Accessio digital 2 - Radiator ATLANTIC - Free user manual and instructions
Find the device manual for free Accessio digital 2 ATLANTIC in PDF.

User questions about Accessio digital 2 ATLANTIC
0 question about this device. Answer the ones you know or ask your own.
Ask a new question about this device
Download the instructions for your Radiator in PDF format for free! Find your manual Accessio digital 2 - ATLANTIC and take your electronic device back in hand. On this page are published all the documents necessary for the use of your device. Accessio digital 2 by ATLANTIC.
USER MANUAL Accessio digital 2 ATLANTIC
Installation and operating manual
Manual must be kept by end user


ACCESSIO
1 - JE METS EN MARCHE ET JE PIOTE MON RADIATEUR
Programmation suspendue
Preparing the installation of the appliance. 26
Securing the mounting bracket on the wall. 27
Electrical connection of the appliance 28
Mounting the appliance 29
Maintenance 30
Using the appliance. 30
Principle of operation. 30
Switching the appliance on for the first time. 30
Description of the modes 31
Basic 31
Prog. 31
The switch 31
Switching the appliance on / off. 31
Locking commands. 32
Window open function 32
Adjusting the temperature. 33
BASIC mode Menu 34
PROG mode Menu 35
Using internal programming. 36
Modifying the programs 36
Copying a program 36
Deleting a comfort temperature range 36
Using external programming 37
EXPERT Menu 38
Restrictions 39
Load-shedding 39
Troubleshooting 40
Characteristic 42
Warranty conditions 43
Safety warnings
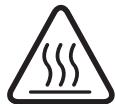
Caution hot surface.
CAUTION: Some parts of this product may become hot and cause burns. Particular attention is required when children and vulnerable people are present.
- Keep children under 3 years old away from the device, unless they are under continuous supervision.
- Children between 3 and 8 years old may only turn on/off the device provided that it has been placed or installed in its intended normal operating position and they are supervised or have received instructions concerning the safe use of the device and understand the potential hazards. Children between 3 and 8 years old must not plug in, regulate and clean the device or perform user maintenance.
- This device may be used by children aged 8 or above and persons with reduced physical, sensory or mental capabilities or lack of experience and knowledge if they have been given supervision or instructions concerning the safe use of the device and understand the potential hazards. Children must not play with the device. Cleaning and maintenance by the user must not be carried out by unattended children.
- This device must be plugged in or connected only by an authorized person and in accordance with applicable rules and standards.
- If the power cable is damaged, it must be replaced by the manufacturer, its customer service or similar qualified persons in order to avoid any risks.
- When first heating up, a slight odor may appear due to the evacuation of traces associated with the manufacture of the device.
-A power management system or a load-shedding system (phase and neutral) is incompatible with our devices. It will damage the thermostat. - The operating instructions for this device are available on the manufacturer's website indicated on the warranty certificate contained in this manual.
-
Never use abrasives or solvents for cleaning.
-
The device is filled with a heat transfer fluid which is hazardous to health if swallowed. In the event of a leak, contact your installer and take any precautionary measures to avoid possible swallowing of the fluid by users, especially young children and vulnerable people.
-Do not install the device directly below a power outlet.
| Warning: For your safety and to avoid overheating, do not cover the device. | |
| Devices with this symbol should not be disposed of with household waste, but should be collected separately and recycled. Collection and recycling of end-of-life products must be carried out in accordance with local laws and regulations. | |
| The installation of a device at high altitude causes an increase in the air output temperature (approximately 10°C per 1000 m of altitude). It is strongly advised not to mount the device above an altitude of 1000 m (risk of malfunction). It is forbidden to mount a vertical device horizontally and vice versa. |
PREPARING THE INSTALLATION OF THE APPLIANCE
Installation Rules
- This appliance has been designed for a residential installation. In any other case, please see your distributor.
- The installation must be carried out in accordance with normal trade practices and applicable standards in the country of installation).
- The appliance must be powered with single phase 230V50Hz
-In humid areas such as bathrooms and kitchens, the power socket must be installed at 25 cm (9.8") minimum above the floor.
Keep the appliance away from any air draught which may disrupt its functioning (e.g. under a mechanical or centralized ventilation, etc.).
Do not install under a fixed power socket.
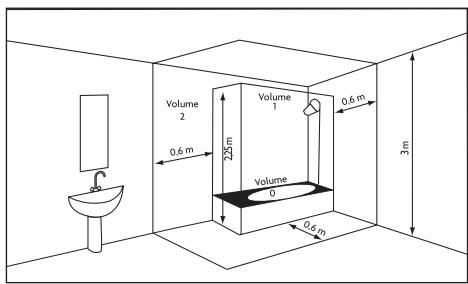
Volume I No electrical appliances
Electrical appliance Volume 2 IPX4
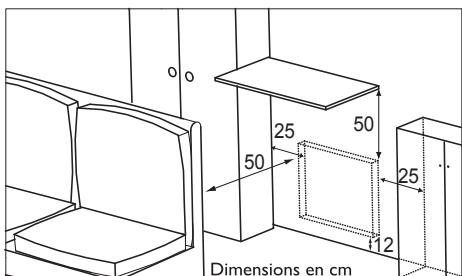
Observe the minimum distances with furniture for the location of the appliance
Despite all the care taken during the various manufacturing steps, some oil traces may appear on the cardboard or the product upon unpacking. These traces come from the manufacture of the appliance and do not interfere in any way with its good functioning. Simply wipe off any traces of oil with absorbent paper
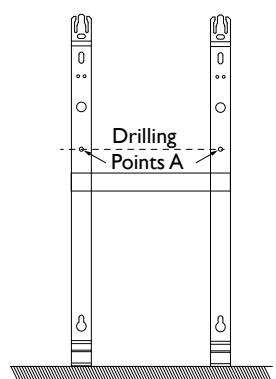
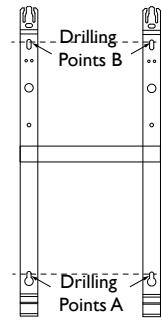
SECURING THE MOUNTING BRAKET ON THE WALL
Put the mounting bracket on the floor and against the wall.
2 Locate the drilling points A. They will indicate the position of the lower brackets.
3 Move the mounting bracket up to the previously identified holes to point to the remaining two drilling points B. These will indicate the position of the upper brackets.
4 Drill the 4 holes and insert the pegs adapted to your wall (e.g.:plasterboard, concrete)..
5 Position the mounting bracket and tighten.

1
2
3
ELECTRICAL CONNECTION OF THE APPLIANCE
Wiring rules
- The appliance must be powered with single phase 230 ~V 50 ~Hz .
- The power supply to the appliance must be directly connected to the household power system after the circuit breaker and without intermediate switch.
- The unit will connect to the household power system through its power cable via a power socket. In humid areas such as bathrooms and kitchens, the power socket must be installed at 25~cm (9.8") minimum above the floor.
- Connection to the earth is prohibited. Do not connect the pilot wire (black wire) to the earth.
- The power supply must be directly connected to the household power system after the double-pole circuit breaker in accordance with installation rules.
- If the power cable is damaged, it must be replaced by the manufacturer, its customer service or similar qualified persons in order to avoid any risks.
- If you use the pilot wire and it is protected by a 30mA residual-current circuit breaker (e.g. bathroom), the pilot wire power must be protected on this residual-current circuit breaker.
- If you want to use a load-shedding device, choose one with a pilot wire outlet rather than one with power outlet, so as not to damage the thermostat.
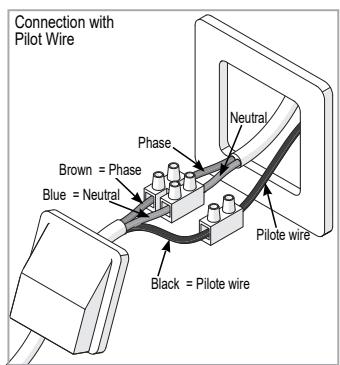
Appliance Wiring Diagram
- Turn off the power and connect the wires according to the following diagram:

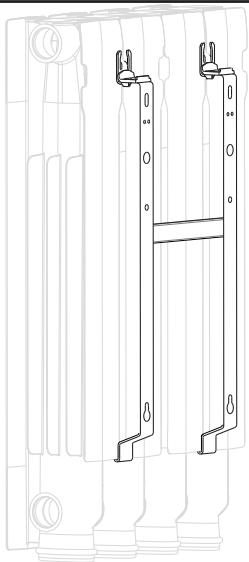
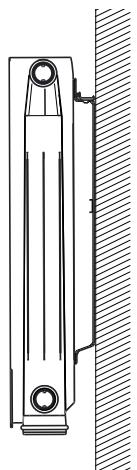
MOUNTING THE APPLIANCE
Location of the mounting bracket of the device.
EN
I Place radiator on the mounting bracket.

2 Bring the radiator towards the mounting bracket and up, then insert the mounting bracket in the 2 wall brackets provided for this purpose.
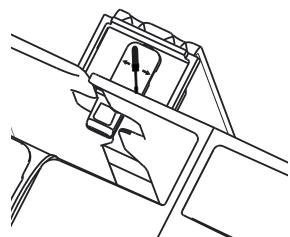
3 Push the 2 locks.
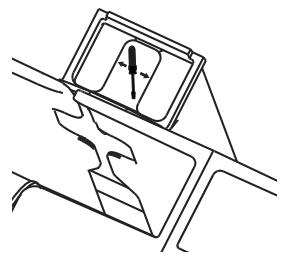
4 Your radiator is mounted and secured.
MAINTENANCE
Before any servicing, turn off the power to the appliance. To maintain the performance of the appliance, dusting is required, approximately twice a year.
Never use any abrasives or solvents.
This appliance is filled with a specific quantity of special heat-transfer fluid. This fluid is unalterable and doesn't require special maintenance. Repairs requiring the opening of the fluid tank must only be carried out by a professional, the manufacturer or its customer service. In the event of a leak, the latter must be contacted. When the radiator is discarded, the fluid must be brought to a waste fluid collector.
Using the appliance
-Increase or lower the temperature without needing to confirm.

- Navigate through menus;
- Confirm;
- Turn off;
- Lock, unlock.
SWITCHING THE APPLIANCE ON FORTHE FIRST TIME
Select the language, then the date and time.
The first time you switch the appliance on,
-PROG mode is selected,
-the setpoint temperature is set at 19^
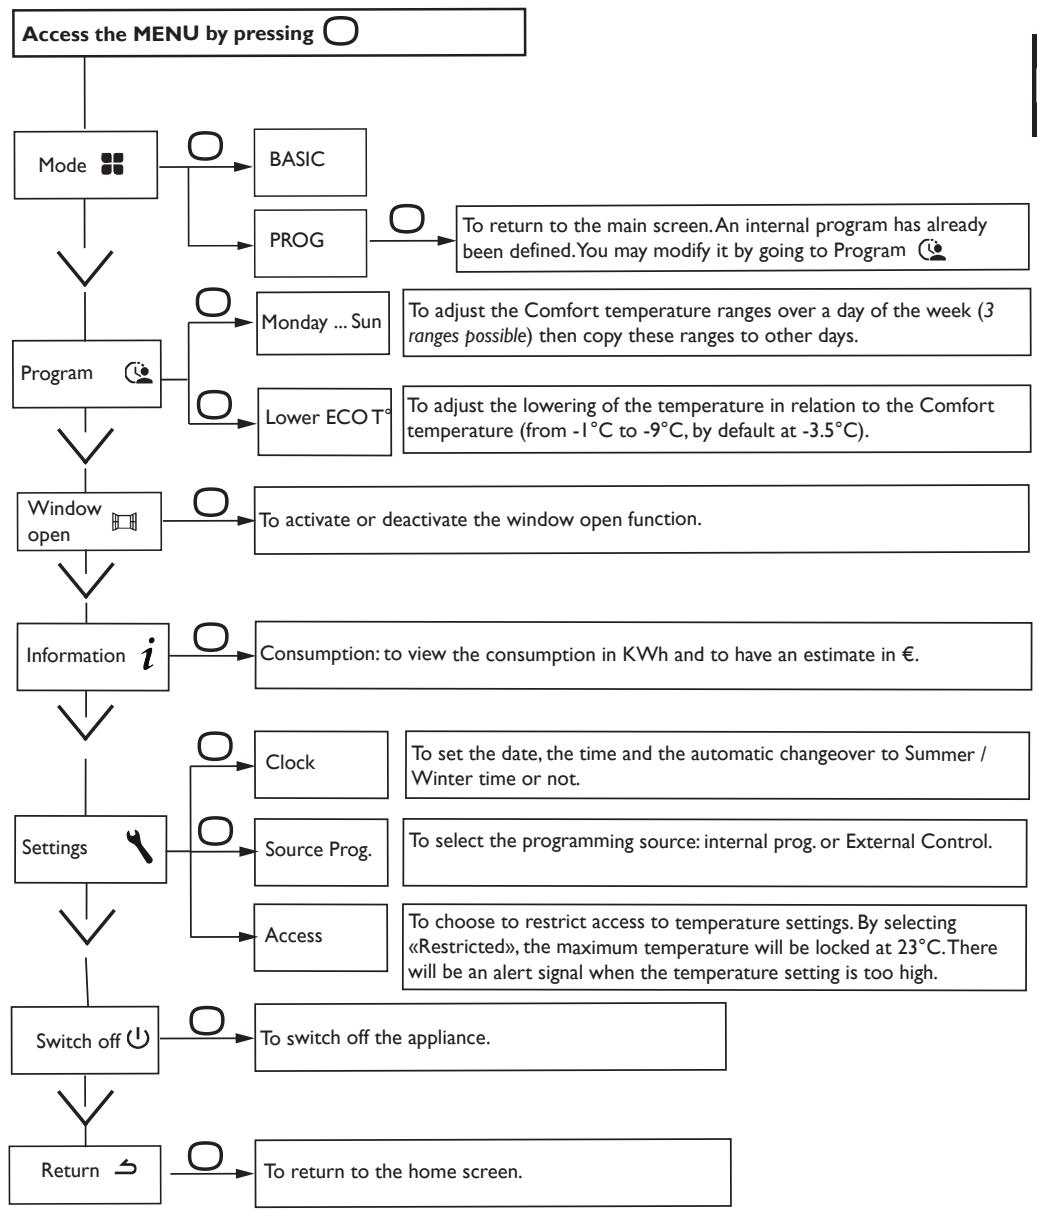
DESCRIPTION OF THE MODES
2 operating modes are proposed:
BASIC
The appliance follows the setpoint temperature adjusted at all times.
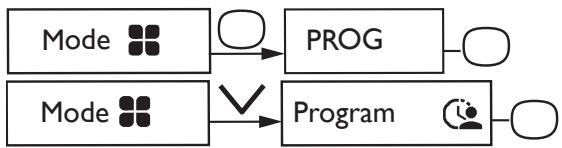
PROG
- The appliance follows the internal program defined for each day of the week. The following ranges are defined when the appliance is switched on:
Monday to Friday, comfort from 5am to 9am and from 5pm to 11pm
Saturday and Sunday, comfort from 5am to 11pm.
You may modify these ranges and define 3 Comfort temperature ranges per day.
During these Comfort ranges, the temperature setpoint is adjusted using or .
Outside the Comfort ranges, lowering the temperature is set in "Lower ECO T" Prog mode (see chapter "The menu in PROG mode").
- The appliance follows your installation's external programming orders (see the manual for your programming unit).
THE SWITCH
An On/Off switch is located at the rear of the device's unit.
Use the switch for extended shutdowns only
(excluding heating periods).
Set the switch (located at the rear of the appliance) to I to switch the appliance on. When the appliance is switched off, you may need to set the day and time again.
SWITCHING THE APPLIANCE ON / OFF
To shut down the appliance, press and hold
Confirm "Switch off" by pressing .
To switch the appliance on, press and hold
LOCKING COMMANDS
To avoid the commands being changed by children, you may lock your appliance's commands by pressing and holding .
Select "Lock" and validate with
Do the same to unlock the commands by selecting "Unlock"

WINDOW OPEN FUNCTION
This function can not be used in BASIC mode
Used to detect variations in temperature related to the opening and closing of your windows. If you forget to switch off your appliance when a window is open for a long time, this function lets you get around this and prevents your appliance from heating up unnecessarily. The appliance automatically switches to Frost Protection mode (7^) when it detects an open window and rises to the setpoint temperature when it detects that the window has been closed (the detection time is variable).
We do not recommend using this function in corridors and rooms located near an entry door which opens to the outside.
ADJUSTING THE TEMPERATURE
Use the consumption indicator to optimize your setting. When the consumption indicator is at the level of the green symbol, the temperature is lower or equal to the recommended temperature.
EN
In BASIC mode:
BASIC
20.0^
-Increase with (max28^)
- Lower with (min 12^ ).
- Reduce again to 7^ C (Frost Protection temperature not modifiable) with .
In PROG mode:
PROG
20.0°
Mon 12:14
If the screen displays PROG, you are in a programming range in Comfort mode.
-Increase with (max 28^ -
- Lower with (min 12^ ).
PROG ECO
16.5^
Mon 17:14
If the screen displays ECO PROG, you are in a programming range in ECO mode.
PROG Waive
18.5^
Mon 17:14
You can change the ECO temperature, so you have to set the default setting between the Comfort temperature and the Eco temperature. "PROG Derog" is displayed until the next Comfort range.
You can set the difference between the Comfort and Eco temperature in the “Abase” menu.T ° ECO“.
PROG
Frost
Protect.
7.0^
Programming
suspended
If you set a Frost Protection temperature (7^) , the programming is suspended.
Modify this temperature when you return to restart the programming.
BASIC mode Menu
USING INTERNAL PROGRAMMING
MODIFYING THE PROGRAMS
You may program up to 3 Comfort temperature ranges for each day of the week. Outside the Comfort ranges, lowering the temperature is set in "Lower ECO T" Prog mode (see chapter "The menu in PROG mode").
Select the day with .Validate
Select. Validate
Select the start time with or . Validate . Select the end time with or . Validate .
COPYING A PROGRAM
You may copy a day's program to one or more days.
Select .Validate
Scroll through the days with or . Validate the day to copy the program with . To validate the copy, select "Copy". Validate .
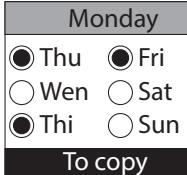
Example: Program copy from Monday to Tuesday,
Thursday, Friday.
DELETING A COMFORT TEMPERATURE RANGE
Select the day with . Confirm .
Select Confirm
On the starting time, select 0:00 with . Confirm . On the ending time, select also 0:00 with and confirm .
USING EXTERNAL PROGRAMMING
The appliance follows the external control of your installation via pilot wire link.
Select Source prog.with .Confirm
Choose Ext. control with and confirm .
Remote control of the operating modes and programs of the device is possible with the Cozytouch application available on App Store® or Google Play®.
The following accessories are required:
A Cozytouch Bridge (to be installed on your Internet box)
One Cozytouch Interface per device.
To access the appliance's advanced functions, press and at the same time for over 3 seconds.
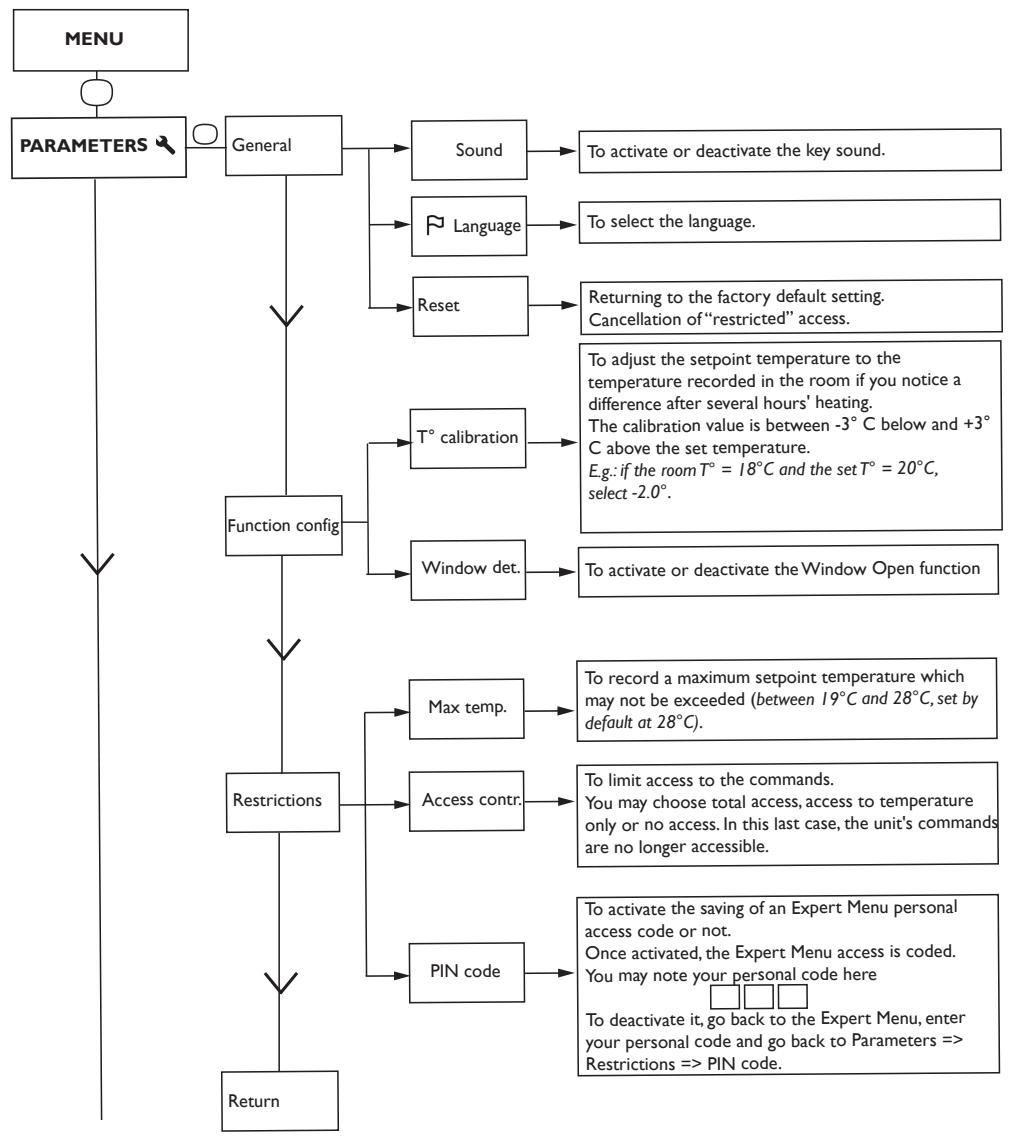

EN
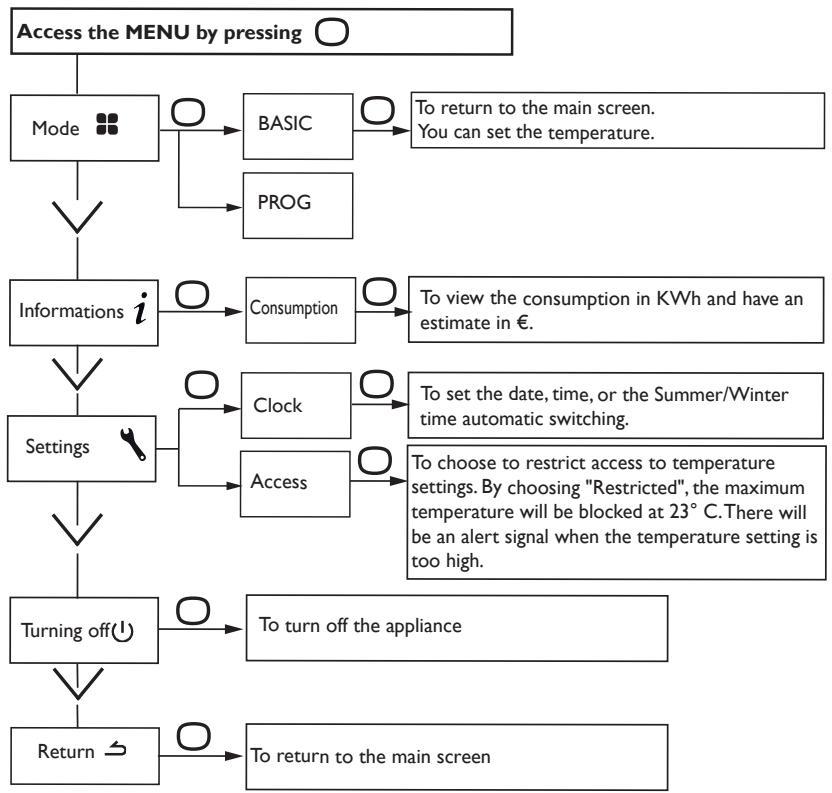
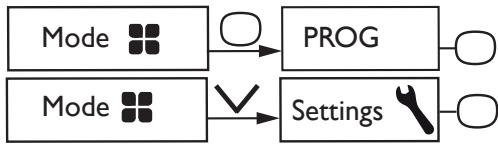
Restrictions
You can restrict access to the temperature settings.
In the Basic or Prog mode menus, go to Settings. Choose «Restricted».
- The temperature will be blocked at 23^ C maximum;
-An alert signal will appear if the temperature is increased with a confirmation request (compulsive anti-heating function);
-Access is secured through a PIN in the Expert Menu.
Disabling is possible by resetting the appliance. (Please refer to the Expert Menu).
Load-shedding
Our appliances are compatible with different load-shedding systems. However, you should not use load-shedding by cutting off the power supply because this is incompatible with our appliances. Total and repeated power supply cut off may cause premature wear and damage to electronic cards that are not covered by the manufacturer's warranty. During load-shedding periods, the screen switches to standby mode.
The unit then returns to its initial operating mode.
Troubleshooting
| Problem | Check |
| The control panel display does not turn on | Check if the switch on the back of the unit is on the I (on) position. Make sure the appliance is electrically powered. |
| The room temperature is different from the one displayed on the appliance. | You have to wait at least 6 hours for the temperature to stabilize. Depending on your installation, the temperature you read may be different from the one displayed on the unit (a variation of 0.5°C is normal). In this case, refer to the «Expert Menu», chapter «Temp. calibration». |
| The appliance does not heat up. | Make sure you are in Comfort mode. If you are programming, check if you are within a Comfort period. Make sure the circuit breakers in the system are turned on or the load-shedding device (if you have one) has not turned off the unit. Check the air temperature of the room: if it is too high, the appliance will not heat up. |
| The unit is heating up all the time | Make sure the appliance is not located in an open air draught (open door nearby, air coming out through the cable cover on the back of the appliance) or the temperature setting has not been changed. There may be a hazard within the household power system. If there is a problem (blocked thermostat ...), cut off the power supply to the appliance (fuse, circuit breaker) for about 10 minutes and then switch it back on again. If the problem recurs frequently, have the power supply controlled by your supplier. |
| The appliance does not heat up enough. | Increase the temperature by pressing ∧. If the temperature setting is at the maximum, check the following: - Check if there is another type of heating in the room. - Make sure your appliance is only heating the room (door closed). - Have the appliance supply voltage checked. - Make sure the power of your appliance is adapted to the size of your room (we recommend an average of 100 W/m2 for a ceiling height of 2.50 m or 40 W/m3). |
| The appliance takes time to heat up | The electrical resistance heats up the fluid which gradually and naturally circulates inside the unit Due to the inertial properties of the fluid the surface temperature of the unit when first starting to heat up reaches an optimal level only after a minimum of 15 minutes, depending on the room temperature. |
| The surface of the appliance is hot. | When functioning, the appliance will be normally warm; the maximum surface temperature being limited in accordance with the NF Electricity Performance standard. However, if you find that your appliance is still too warm, make sure the power is adapted to the size of your room (we recommend 100 W/m2 for a ceiling height of 2.50 m or 40 W/m3) and the unit is not placed in an air draught which would disrupt its functioning. |
| Traces of dirt appear on the wall around the appliance. | In polluted environments, dirt may appear on the air outlets of the appliance or on the wall. This is associated with the poor quality of the ambient air (cigarette smoke, candles, incense, fire place, ...). In this case, the good ventilation of the room should be checked (ventilation, incoming air, etc.). |
| The Expert Menu is not accessible. | You saved a PIN. You must enter your PIN to access the Expert menu (see the Expert Menu chapter).If you forgot your PIN, enter the code 081. |
| The temperature is blocked at 23°C | Access to the temperature setting is restricted. This access is secured through a PIN by activating the Expert Menu. |
| The unit does not follow internal programming commands. | Make sure the date and time are set.Make sure the unit is in PROG mode and internal programming has been selected. |
| The unit does not follow external programming commands. | Make sure the programming unit is correctly used (see Programming unit operating instructions).Make sur the unit is in «Ext. control» programming source. |
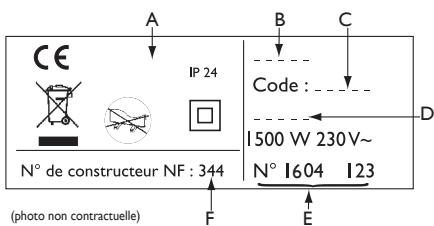
If you have not been able to solve your problem, contact your distributor/installer with the reference numbers of the appliance. They are located on the side of the unit. Measure the room temperature.
The Commercial Code (C) and Serial Number (E) will allow the manufacturer to identify the appliance you purchased.
A Standards, quality marks
B Trademark
C Commercial Code
D Manufacturing reference
E Serial No.
F Manufacturer No.
| Model number | FLEG4 | ||
| Characteristic | Symbol | Value | Unit |
| Thermal power | |||
| Rated thermal power | P nom | 0,3 to 2300 to 2000 | kWW |
| Minimal thermal power | P min | 0,3300 | kWW |
| Maximum Continuous Thermal Power | P max,c | 22000 | kWW |
| Auxiliary Power Consumption | |||
| At rated thermal output | el max | 0,000 | kW |
| At minimum thermal power | el min | 0,000 | kW |
| Sleep mode | el sb | 0,000480,48 | kWW |
| Type of control of the thermal power / temperature of the part | |||
| Characteristic | Unit | Additional information | |
| Electronic room temperature control and weekly programmer. | yes | ||
| Other control options | |||
| Control of room temperature, with presence detector. | no | ||
| Room temperature control, with open window sensor. | yes | ||
| Remote control option. | yes | ||
| Adaptive control of activation. | yes | ||
| Limitation of the duration of activation. | no | ||
| Black goblet sensor. | no | ||
| Contact information | Idem warranty page | ||
Warranty conditions
- The guarantee period is two years from the date of installation or purchase and may not exceed 30 months from the date of manufacture in the absence of a receipt.
- The guarantee covers the replacement and supply of components recognised as being defective, excluding any damages or interest.
- The user is responsible for any labour or transport costs.
- The guarantee does not cover any damage arising from improper installation, abnormal use or nonobservance of the requirements of the said instructions for installation and use.
- The stipulations of the present guarantee conditions do not exclude any of the purchaser's legal rights of guarantee against faults or hidden defects, which are applicable in all cases under the stipulations of Articles 1641 of the Civil Code.
-Present this certificate to your distributor or installer only in the event of a claim, together with your purchase invoice.
The commercial code and the serial number identify for the manufacturer the particular device you have bought.
This information can be found on the information plate situated on the side of the device. To claim under guarantee, contact your installer or dealer. If necessary, contact :
ATLANTIC INTERNATIONAL
2 Allée Suzanne Penillault-Crapez
94110ARCUEIL
FRANCE
France Tel: (33) 146836000 Fax: (33) 146836001