HSWC.2 - Pool vacuum STERWINS - Free user manual and instructions
Find the device manual for free HSWC.2 STERWINS in PDF.
| Product type | Pool vacuum |
| Brand | STERWINS |
| Model | HSWC.2 |
| Dimensions (machine) | 45 x 45 x 34 cm |
| Weight (machine) | 4.5 kg |
| Hose length | 9.60 m (total) |
| Hose diameter | 38 mm |
| Maximum filtration capacity | 10 mm |
| Maximum pool length | 8 m |
| Minimum depth | 1 m |
| Maximum depth | 4 m |
| Maximum surface area | 32 m² |
| Maximum volume | 128 m³ |
| Recommended water pH | 7 - 8 |
| Maximum chlorine | 5 ppm |
| Required pump power | 250 W (min) - 750 W (max) |
| Travel speed | 180 m/h |
| Power supply | Via filtration pump (hydraulic) |
| Usage | Pools with all types of lining |
| Warranty | 3 years |
| Maintenance | Diaphragm cleaning, storage away from sunlight |
| Safety | Read warnings before use |
| Spare parts | Available from the distributor |
Frequently Asked Questions - HSWC.2 STERWINS
User questions about HSWC.2 STERWINS
0 question about this device. Answer the ones you know or ask your own.
Ask a new question about this device
Download the instructions for your Pool vacuum in PDF format for free! Find your manual HSWC.2 - STERWINS and take your electronic device back in hand. On this page are published all the documents necessary for the use of your device. HSWC.2 by STERWINS.
USER MANUAL HSWC.2 STERWINS
8.2 WYKLUCZENIA GWARANCYJNE
7.2 NOUyK HECNPABHOCTEI
Thank you for choosing this product. Upon designing and manufacturing our products, we place all of our efforts into ensuring an excellent quality that meets the needs of the users. Following these instructions allows to optimize the lifetime
IMPORTANT! IN ORDER TO OBTAIN THE UTMOST SATISFACTION FROM THIS PRODUCT UPON SETTING IT UP, USING IT, AND MAINTAINING IT, WE RECOMMEND THAT YOU CAREFULLY READ THIS USER MANUAL BEFORE USING THE PRODUCT. PLEASE PAY ATTENTION TO BASIC WARNINGS RELATING TO SAFETY WITHIN THIS MANUAL, AND KEEP THE MANUAL FOR LATER REFERENCE.

IMPORTANT, KEEP THE MANUAL FOR LATER REFERENCE : READ CAREFULLY
Contents
- Intended use of Hydraulic Pool Cleaner
- Wintering & Storage
- Safety Instructions
- Maintenance
- Technical data
- Warranty
- Assembly
- CE declaration of conformity
- Transportation
1. INTENDED USE OF HYDRAULIC POOL CLEANER
This product is intended for cleaning swimming pools with any type of coating. Do not use it for others purposes. The product is not intended to be used by children or persons with reduced physical, mental or sensory capabilities.
After unpacking, make sure that the product is complete with its accessories (if any). If the product is damaged or has any defects, please do not use it and take back it to your dealer.
If you give this product to other people, please give them also this instruction manual.
Please note that our equipment has not been designed for use in commercial, trade or industrial applications. Our warranty will be voided if the machine is used in commercial, trade or industrial businesses or for similar purposes. This product has been designed to be used over a period of 6 years (Estimated lifetime).
2. SAFETY INSTRUCTIONS

WARNING: Read all safety warnings and all instructions. Failure to follow the warnings and instructions may result in electric shock, fire and/or serious injury.
Save all warnings and instructions for future reference.
2.1 GENERAL SAFETY WARNINGS
- If the product is already assembled, please make sure that all screws are tightly fixed before using it. If the product requires that you assemble it, please make sure upon opening the package that all the elements needed for setting up the product have been
provided. If the product is damaged or has defects, do not use it and take it back to the nearest store.
2.2 SYMBOLS

Type and source of the danger: Failure to observe this warning may result in physical injury or death.

Type and source of the danger: This symbol indicates that damage to the appliance, the environment or other property may occur as a result of non-observation of this warning.

Note: This symbol indicates important information for better understanding of the product.

Read the manual: This symbol indicates that you need to read the user manual carefully.

Please refer to the corresponding illustration at the end of the booklet.

Green point: Packaging recycling.

This product is recyclable. If it cannot be used anymore, please take it to waste recycling center.

Brazilian environmental label: Recycle this product.
DESCARTE SELETIVO
2.3 PERSONAL SAFETY
- Stay alert, watch what you are doing and use common sense when using this product. Do not use this product when you are tired or under the influence of drugs, alcohol or medication. A moment of inattention while using this product may result in serious injury.
- Do not rush. Maintain proper posture and balance at all times. This allows better control of this product in unexpected situations.
2.4 HYDRAULIC POOL CLEANER SAFETY WARNINGS
- Make sure that the suction equipment installed in your pool and to which you connect the hydraulic robot complies with current safety standards.
- Do not obstruct the pool's suction nozzles, the robot suction mouth, or the cleaner hoses with any part of your body.
- Keep your hair, loose clothing, jewelry, etc. away from the suction nozzles.
- Regarding vinyl-lined swimming pools: before installing your new robot cleaner, carefully inspect your pool lining. If the liner crumbles in places, or if you notice gravel, folds, roots or corrosion due to metal on the underside of the liner, or if you notice that the underlying surface (bottom and walls) is damaged, do not install the robot until you have had the necessary repairs or replacement of the liner done by a qualified professional.
2.5 SERVICE
- Have your product serviced by a qualified repair person using only identical replacement parts. This will ensure that the safety of the product is maintained.
- Have the product checked by a qualified professional and repaired, if necessary, before you operate it again.
3. TECHNICAL DATA
| Model | HSWC.2 |
| Hose length | 80cm |
| Total hose length | 9m60 |
| Hose diameter | 38mm |
| Maximum dirt filtering capacity | 10mm |
| Max length of pool | 8m |
| Min depth of pool | 1m |
| Max depth of pool | 4m |
| Max surface of pool | 32m² |
| Max volume of pool | 128m³ |
| Max chlorine quantity | 5ppm |
| Allowed Water pH level | 7-8 |
| Pump power (minimum required) | 250W |
| Pump power (optimum performance) | 375W |
| Maximum pump power | 750W |
| Robot movement speed | 180 m/h |
| Pack dimensions | 83cm X 43.5cm X 16.5cm |
| Machine dimensions | 45cm X 45cm X 34cm |
| Machine weight | 4,5 Kg |
| Full product weight | 5 Kg |
4. ASSEMBLY

WARNING! The product must be fully assembled before operation! Do not use a product that is only partly assembled or assembled with damaged parts!
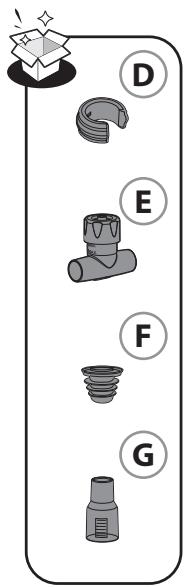
4.1 UNBOXING


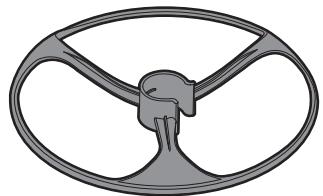
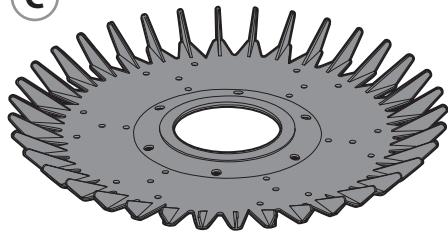
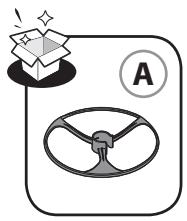
- Big Disc
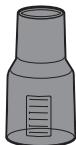
- Hose weight
-
Tee body
-
Soft joint
- Flow test valve body
-
Hose
-
Do not use a cutter, knife, saw or any other similar tool for unboxing.
- Carry the product only by the handle.
- Keep the box for further reuse (transport and storage).
- Keep the instruction manual in a dry area for further reference.
4.2 INSTALLATION
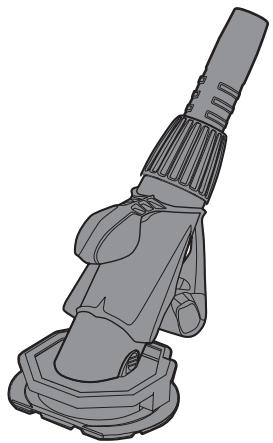
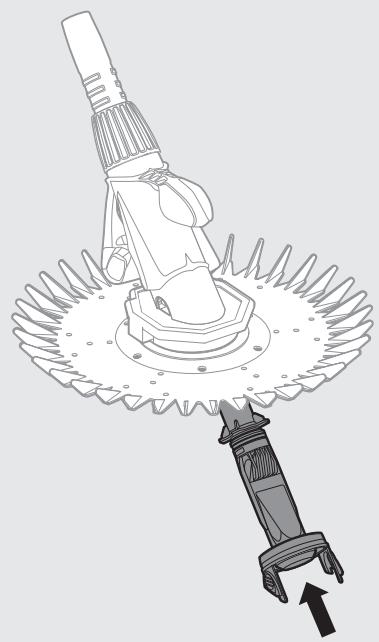
Assemble the head: illustration 2.2
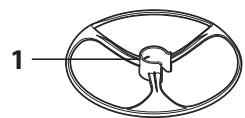
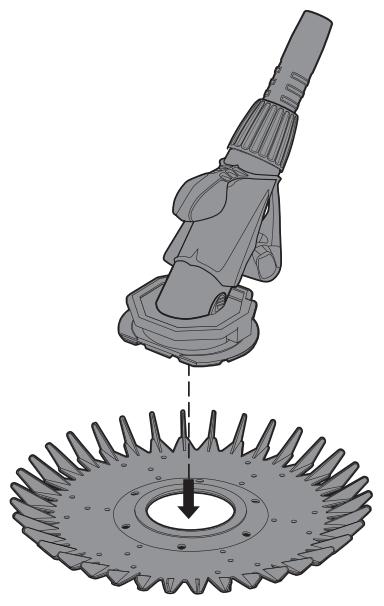
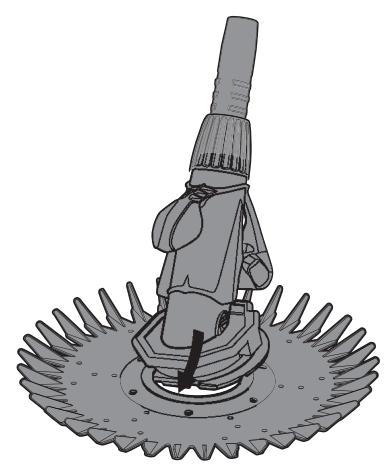
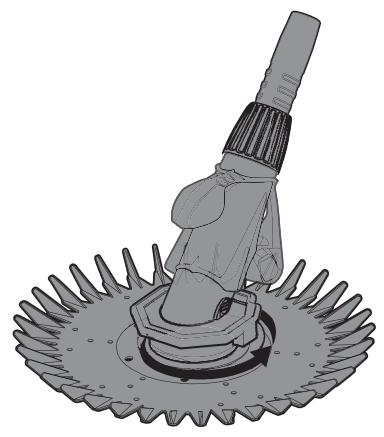
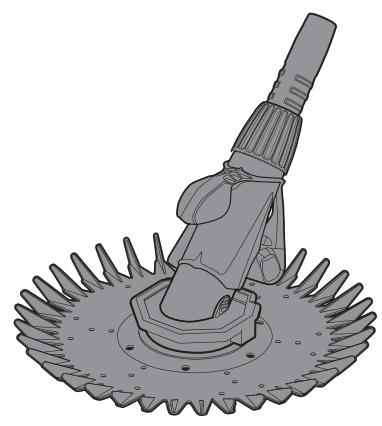
Assemble the disc on the robot: first push the front of the robot head into the neck of the disc, then slowly pass the rest of the disc around it.
4.3 PREPARATION
Pool preparation: illustration 2.1
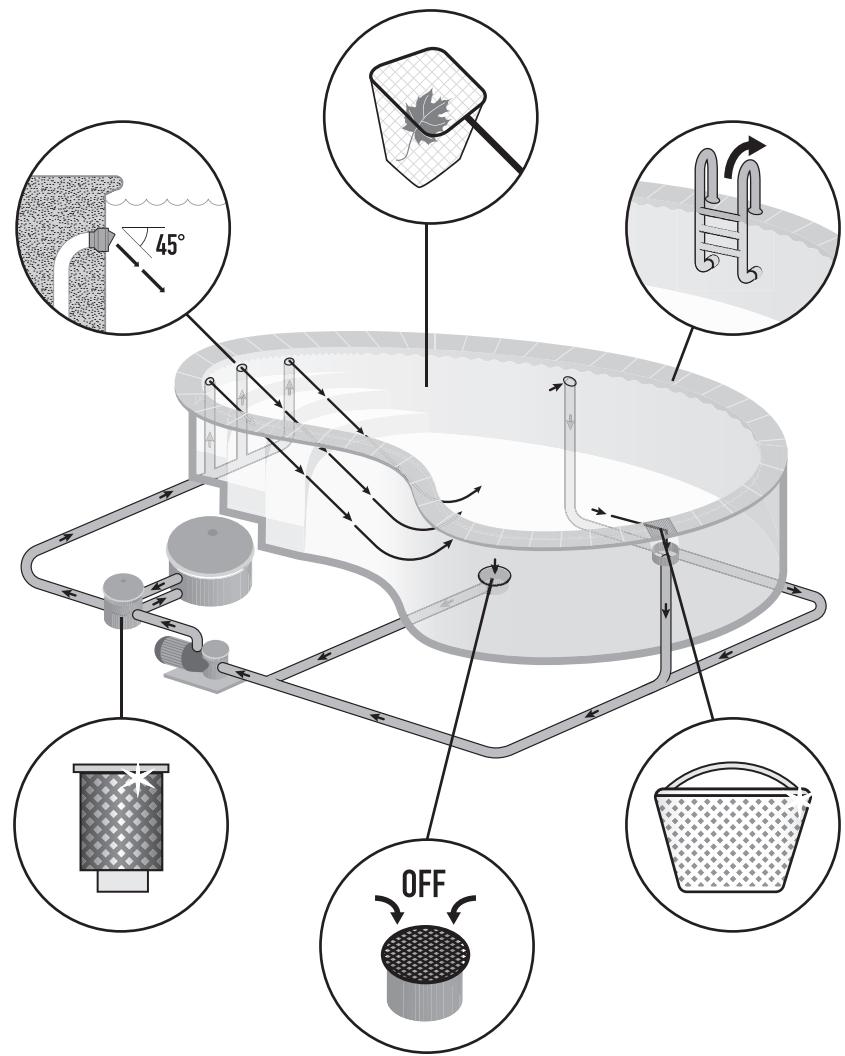
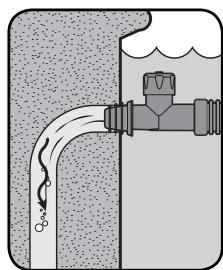
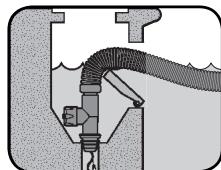
Remove dirt manually and make sure the pool and pump filter is clean. Point the discharge nozzles downward to ensure complete cleaning coverage. Turn off the bottom drain as shown in the illustration.
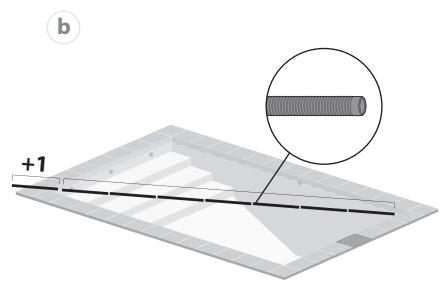
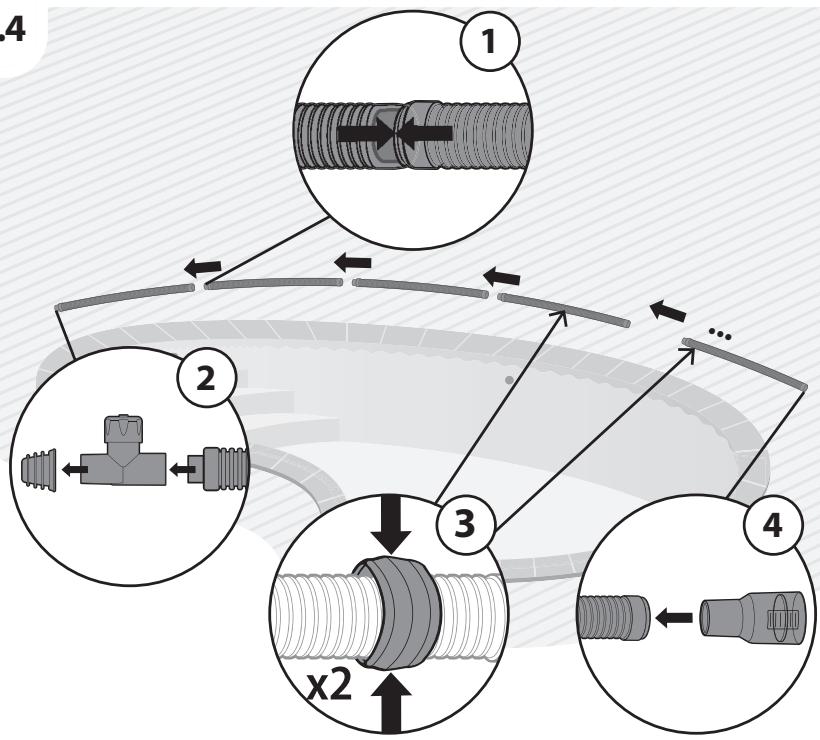
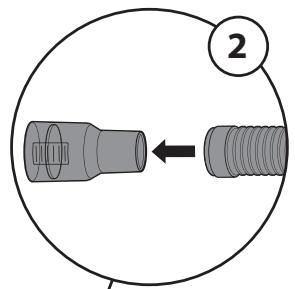
Hose Assembly: illustration 2.3 & 2.4
Fit and turn each section of hose
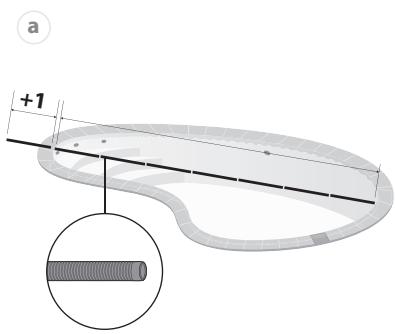
Assemble a sufficient number of hoses to reach the farthest part of the pool, then add another 1 section of hose. Place the hose counterweight at the end of the first section of hose, about 1 meter from the cleaner. Place the second counterweight on top of the first, it will need to be adjusted later.
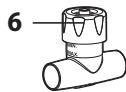
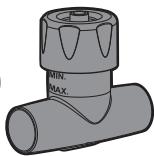
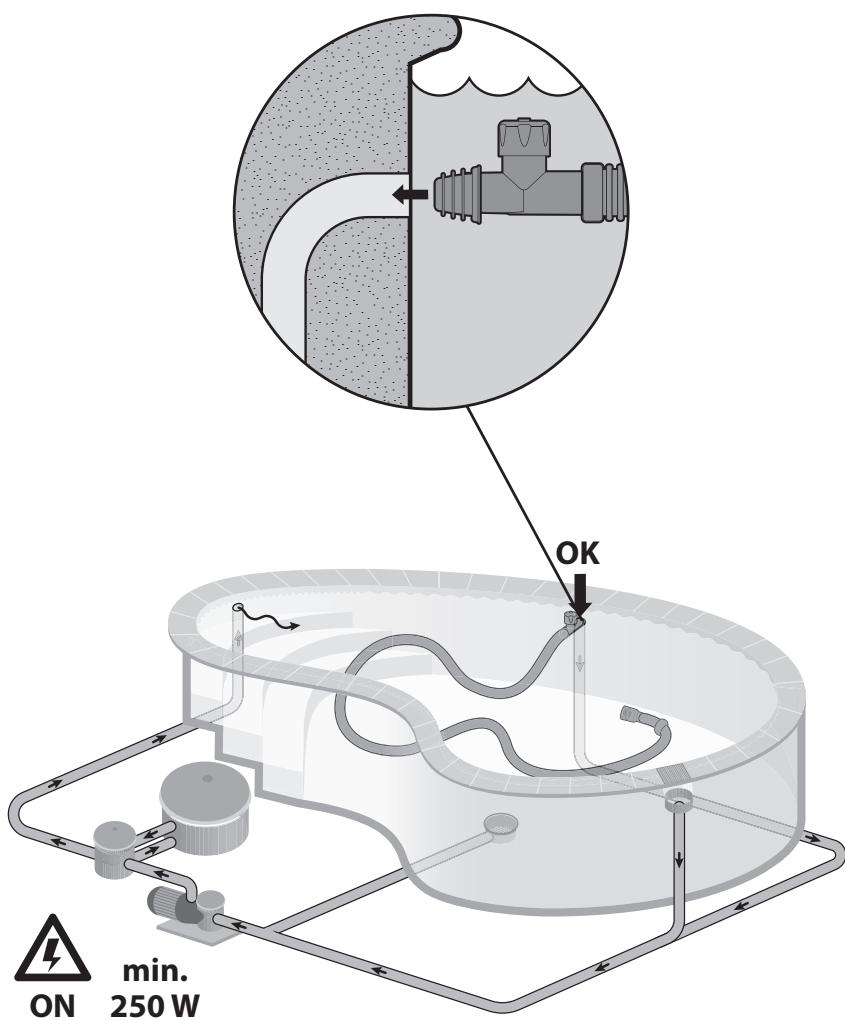
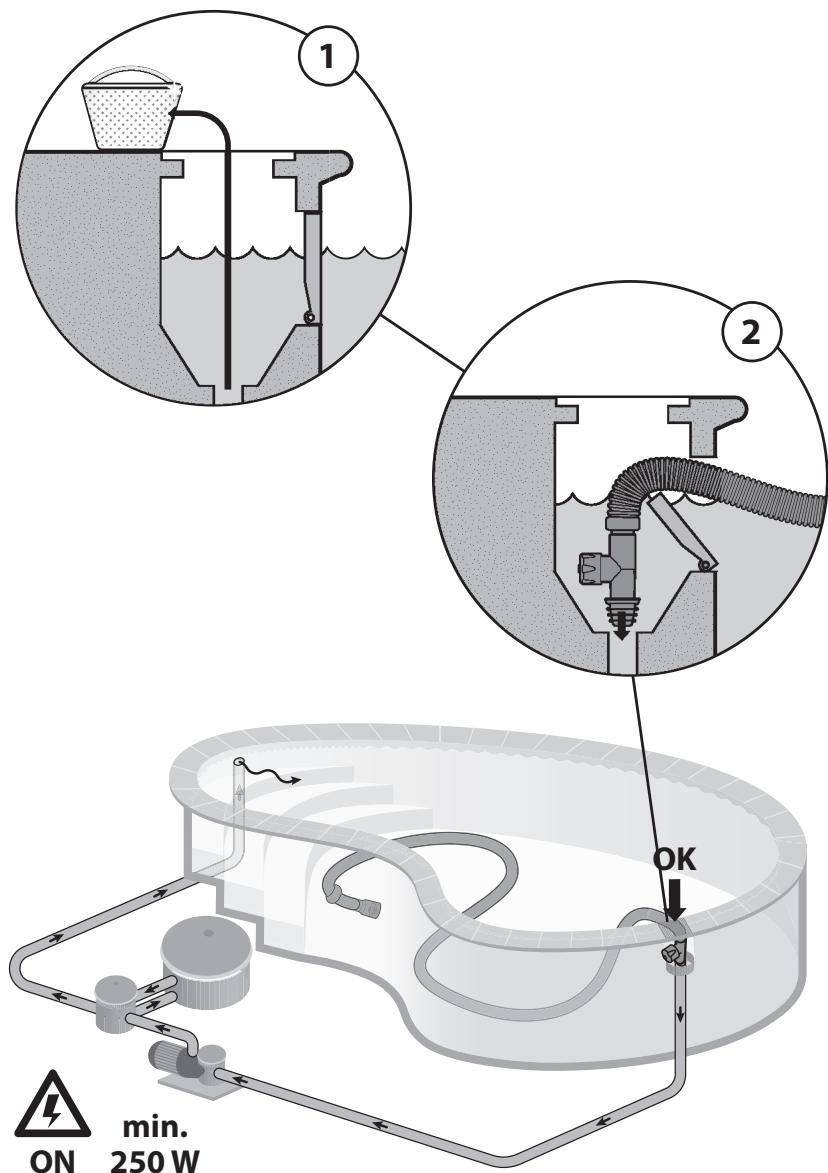
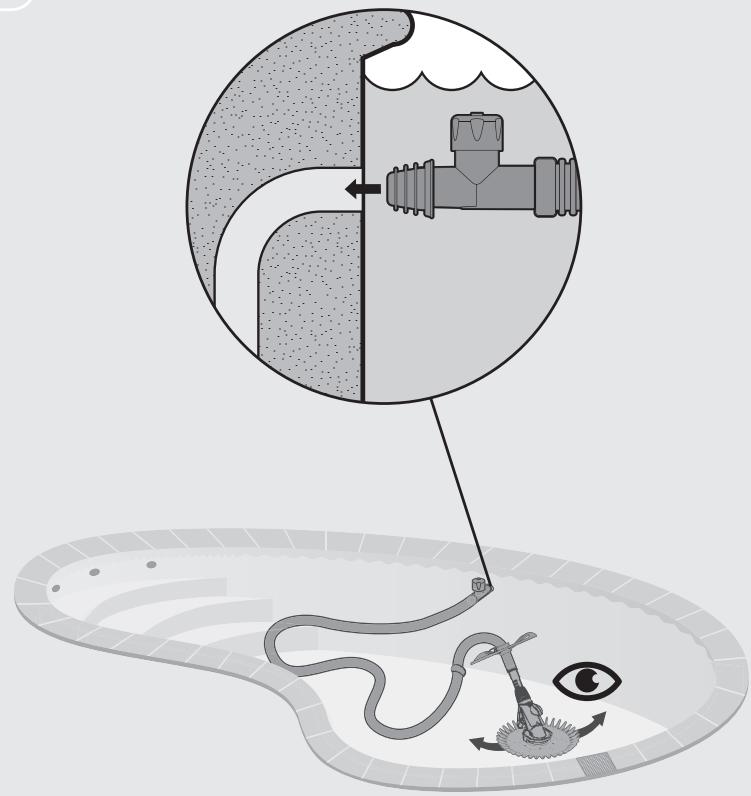
Installation of the flow control valve: illustration 2.4 & 2.5
Connect the hose plug to the flow control valve. Attach the flow control valve to the flexible adapter. The flow control valve is used to adjust the flow rate so that the pump and the robot work properly. Turning the valve towards the "--" reduces the robot suction flow rate, without affecting the pump's suction flow rate.
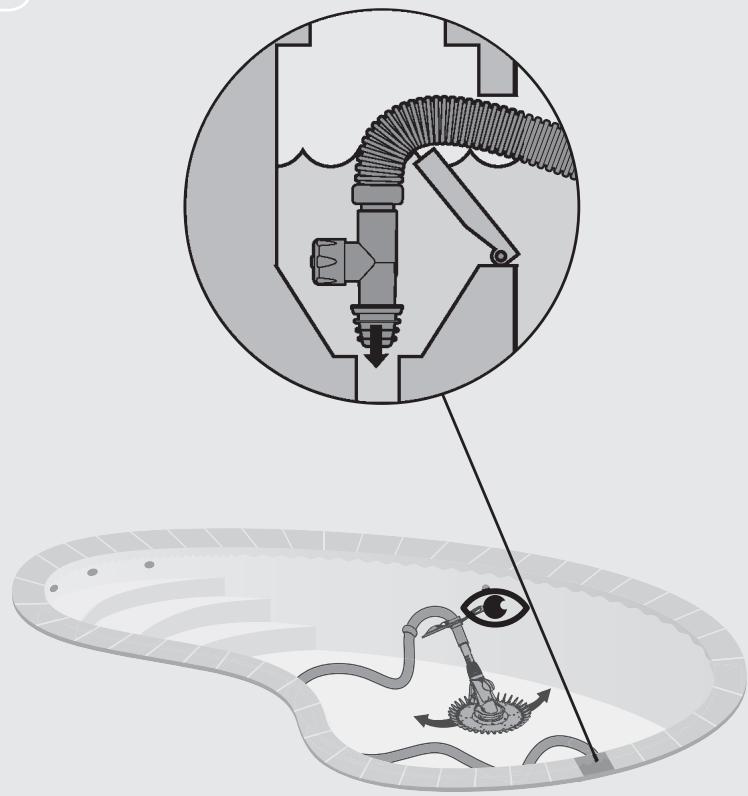
Installation of the flow tester valve: illustration 2.4 & 2.5
Connect the female connector of the hose to the flow tester valve. Switch on the filtering system and fill the hose with water by placing the hose in front of a discharge nozzle until it is completely filled. Stop the pump and make sure the hose is kept submerged. The flow tester valve allows you to check the value of the robot suction flow rate.
4.4 FIRST USE

WARNING! Read the «SAFETY INSTRUCTION» section at the beginning of this manual including all text under subheading therein before using this product.
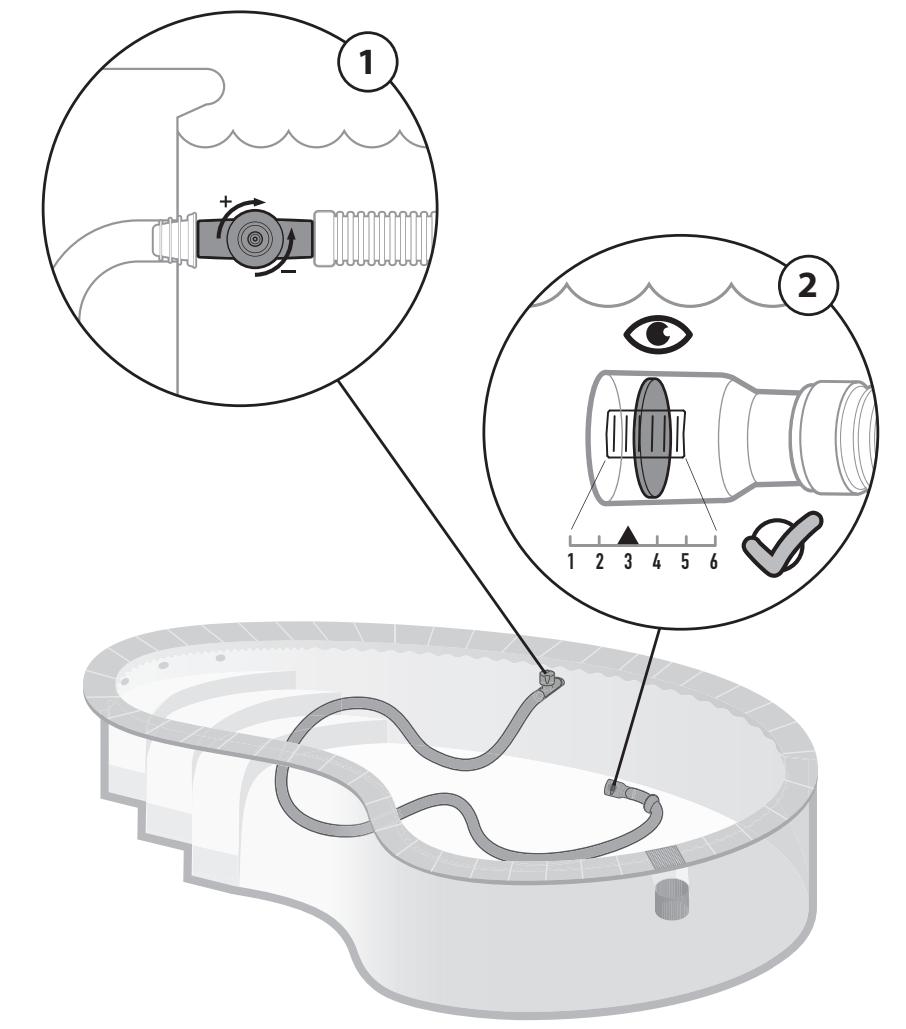
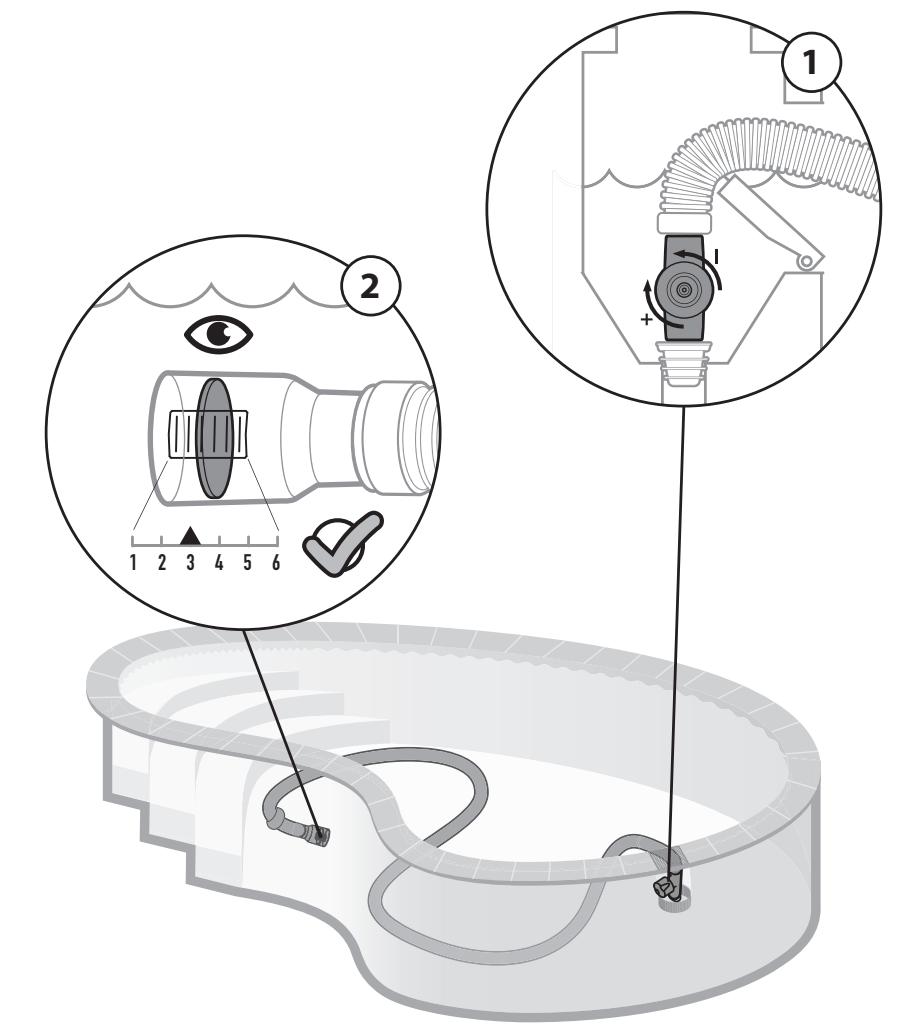
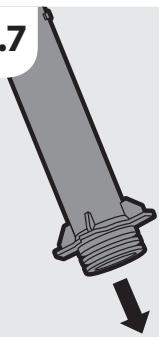
Flow test: illustration 2.6 & 2.7
Before installing the robot head, test and adjust the flow rate for optimal robot operation.
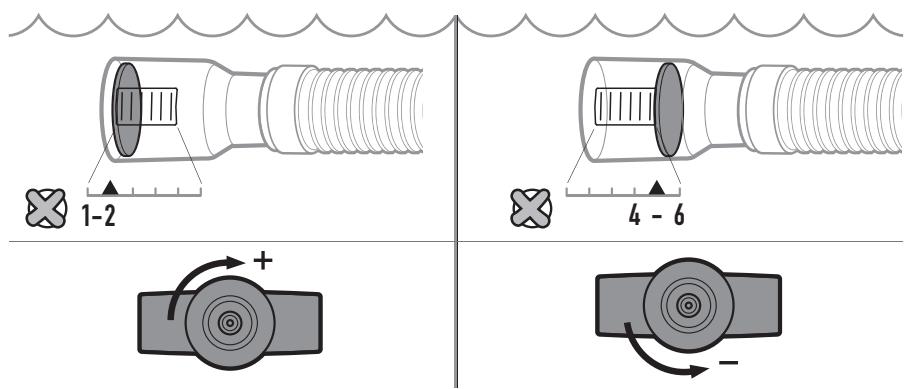
Be sure to keep the hose submerged. Insert the flow control valve with the hose adapter into a pressure nozzle (Fig. 2.6a) or into the suction system of the skimmer (Fig. 2.6b) and switch on the pump. Check that the indicator on the tester is set to setting No. 3. To adjust the setting, turn the valve towards "+" to increase the robot suction flow or towards "-" to decrease the robot suction flow. (Figure 2.7)
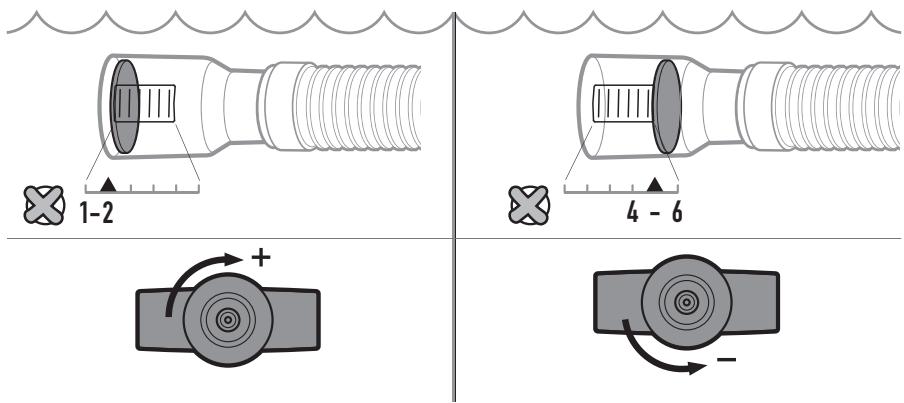
If you encounter difficulties in reaching level 3 on the tester by adjusting the valve, you can try the following solutions, depending on your installation:
- If your installation has only one suction nozzle, check that the pump of your installation has a power between 250 and 750W .
- If the robot is connected to a suction nozzle and a skimmer is running on your pool, reduce the flow of the skimmer in order to increase the robot's suction flow.
- If the robot is connected to the skimmer and one or more suction nozzles are active on your system, reduce the flow rate of the nozzles in order to increase the robot suction flow rate.
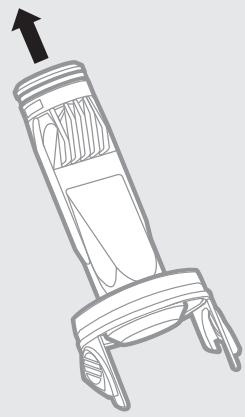
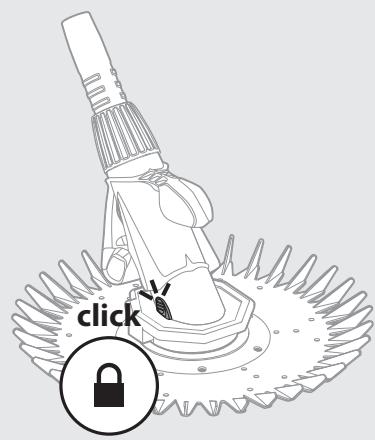
Installation of the pool cleaner: illustration 3.1 to 3.3
Once the flow rate has been adjusted, stop the pump. While keeping the hose submerged, remove the flow tester and replace it with the robot head. Fit the anti-locking wheel on the end of the last section of hose, about 10cm from the robot head. The anti-locking wheel pivots on the hose to help the robot go around steps and other obstacles in the pool.
4.5 OPERATION
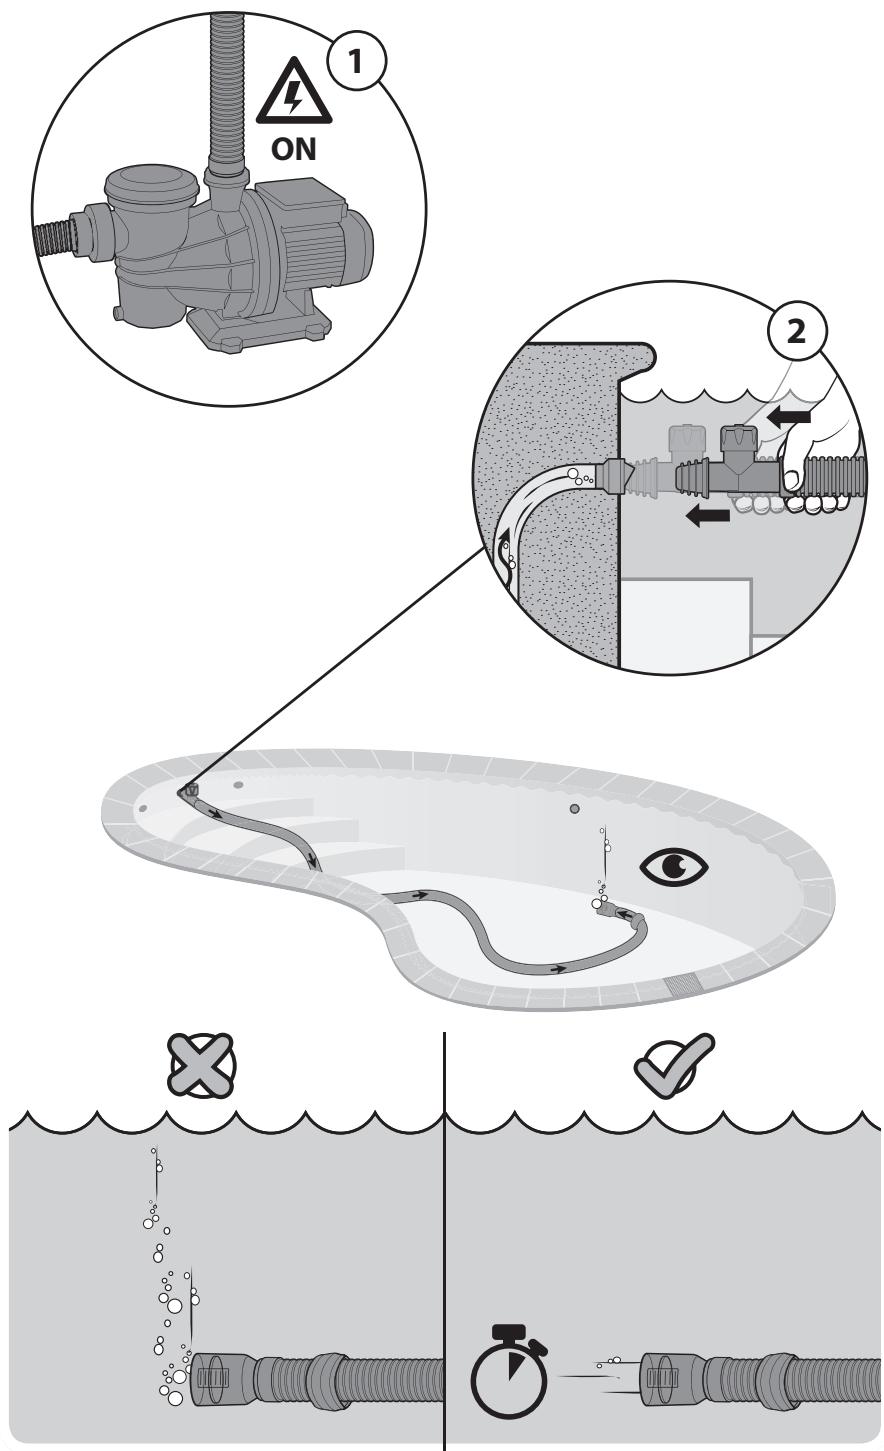
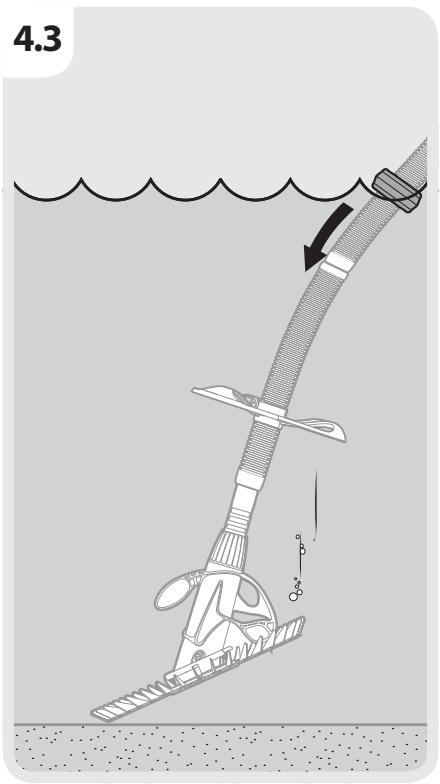
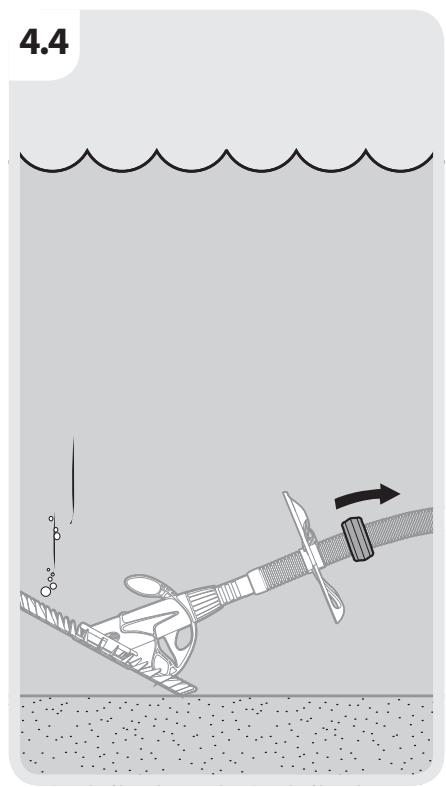
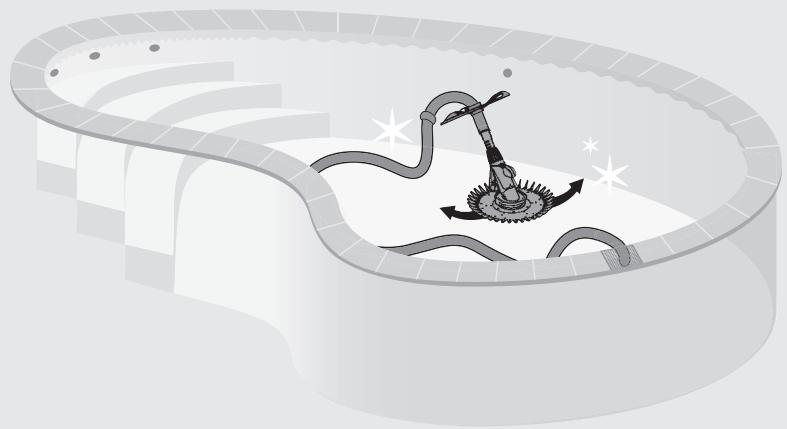
Starting the pool cleaner: illustration 4.1 & 4.2
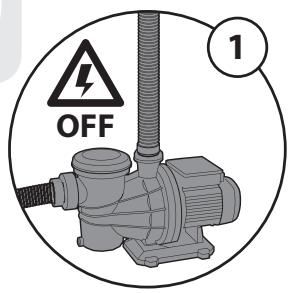
Switch on the filtering system and fill the hose with water by placing the hose in front of a discharge nozzle until it is completely filled. When no more air bubbles escape from the robot, turn off the filtering system and connect the hose to the suction nozzle. Be sure to keep the hose submerged. Place the robot at the bottom of the pool. Turn on the filtration system to start cleaning.
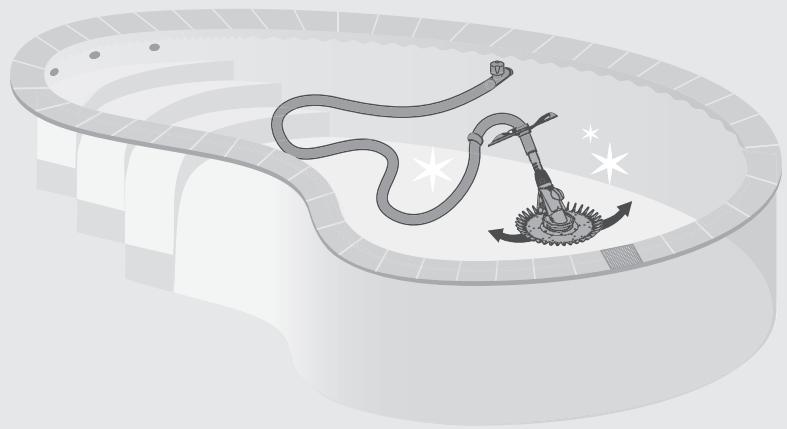
Optimization of performance
The robot follows the activation cycles of the pool filtering pump, sucking and cleaning the entire pool surface in random movements. The robot's coverage rate depends on the shape of the pool, the suction rate and the position of the counterweights to balance the robot. Adjustments may be necessary in some pools to optimize the coverage rate. A minimum cycle of 2 hours is recommended for good pool coverage.
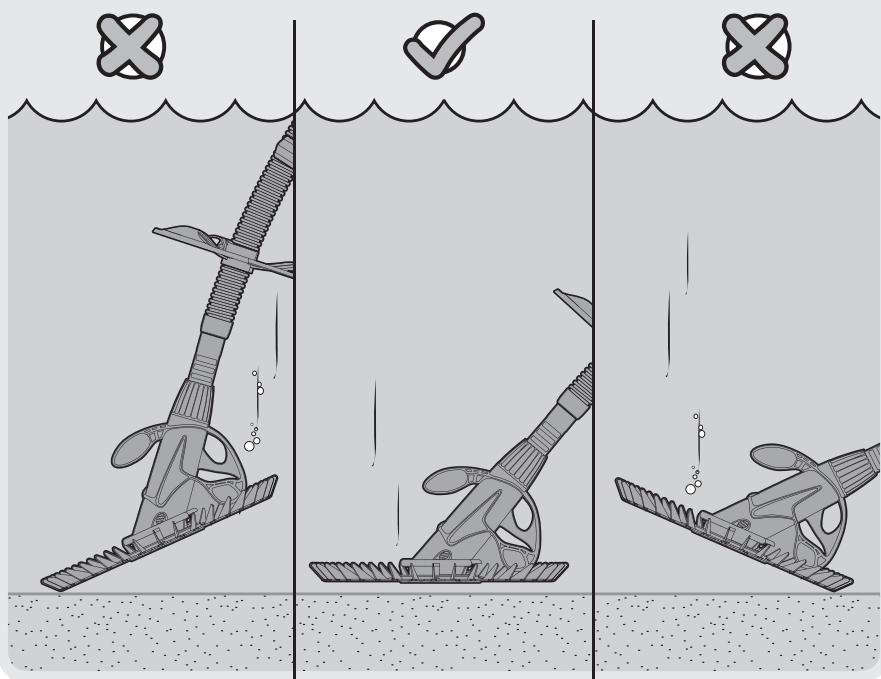
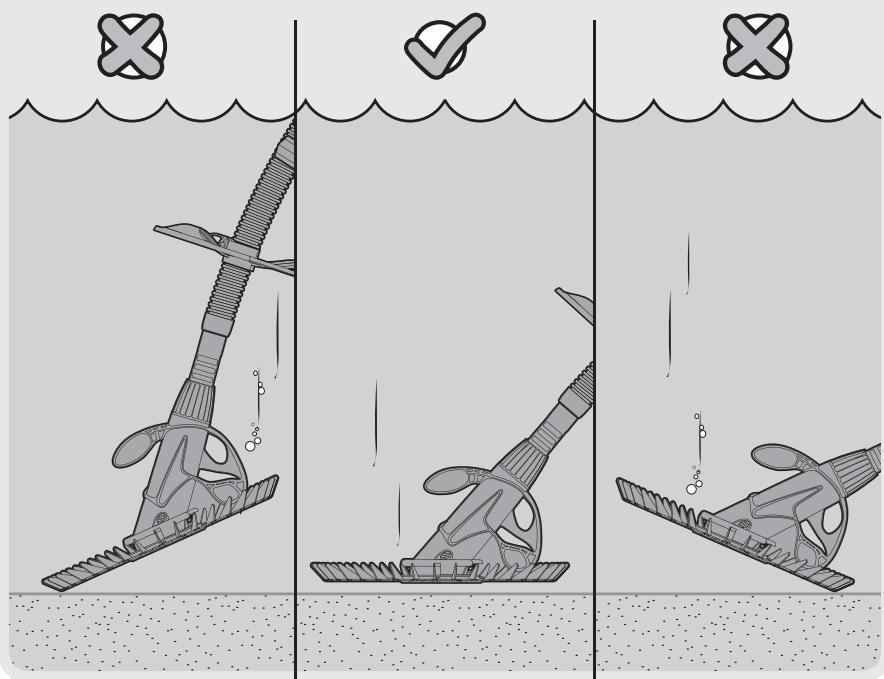
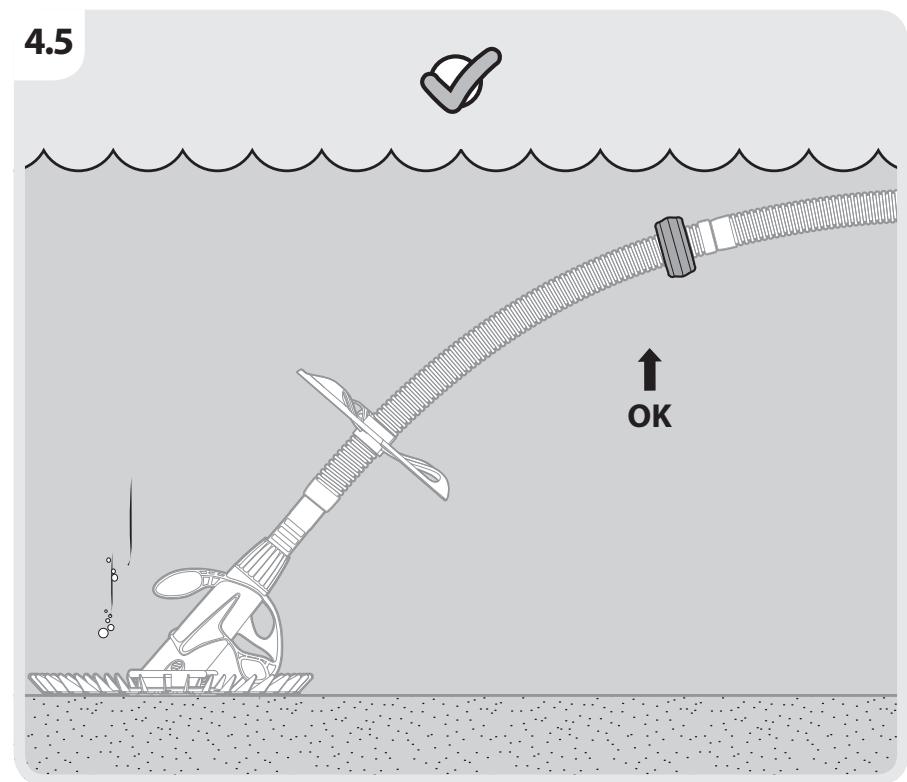
Balance of the hose: illustration 4.2 to 4.5
A properly balanced hose should form a 45^ angle between the robot and the bottom of the pool. Place the first weight about 1m from the robot head (at the end of the first hose) and place the second weight on top, adjust it manually to obtain an optimal result.
Operation safety warnings:
- Check the product for damage before each use.
- The swimming pool must be equipped with a self-priming filter unit with a complete system flow rate of 6.5 ~m^3 / h to 10 ~m^3 / h the power of the filtration pump must be 0.5 HP or 375 watt.
- The robot will ideally operate in water of about 20^ , below this temperature the efficiency of the robot may be reduced.
- Do not wait until your pool is very dirty and full of algae before using the robot: you risk clogging the filtering system very quickly.
- Do not allow too much dirt to be dragged to the bottom of the pool, as this can clog the diaphragm of the appliance.
- Avoid obstacles that could block the appliance.
- In order not to damage the hose, never leave the hose in full sunlight; leave it in water or under a cool shelter
- In order to avoid accidents relating to suction, the nozzles in the suction line must be equipped with a safety valve. Contact your pool professional for more information.
- Clean and empty: the skimmer, pump and pool baskets before installing the robot and at regular intervals afterwards.
- Always disconnect the robot cleaner before cleaning the pool filter or reversing the flow. After cleaning, leave the filtering system running for at least 5 minutes before reconnecting the cleaning robot.
- Remove the robot from the pool before any chemical treatment or shock treatment. Wait at least 4 hours after shock chlorination before reinstalling the cleaner.
4.6 AFTER USE
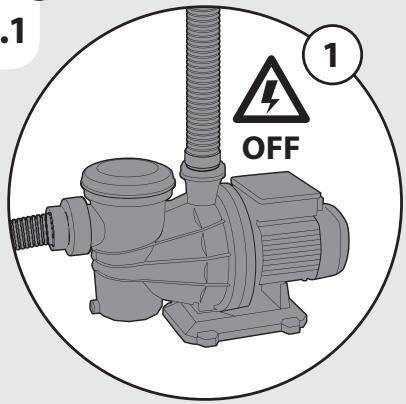
Switch the product off. Check, clean and store the product as described below.
5. TRANSPORTATION
Transporting the machine may require that you meet certain requirements specific to your country. Please make sure you comply with them by contacting the authorities of your country. Always switch the product off. Ensure temperature during transportation is never beyond the range indicated in storage section. Protect the product from any heavy impact or strong vibrations which may occur during transportation in vehicles. Secure the product to prevent it from slipping or falling over.
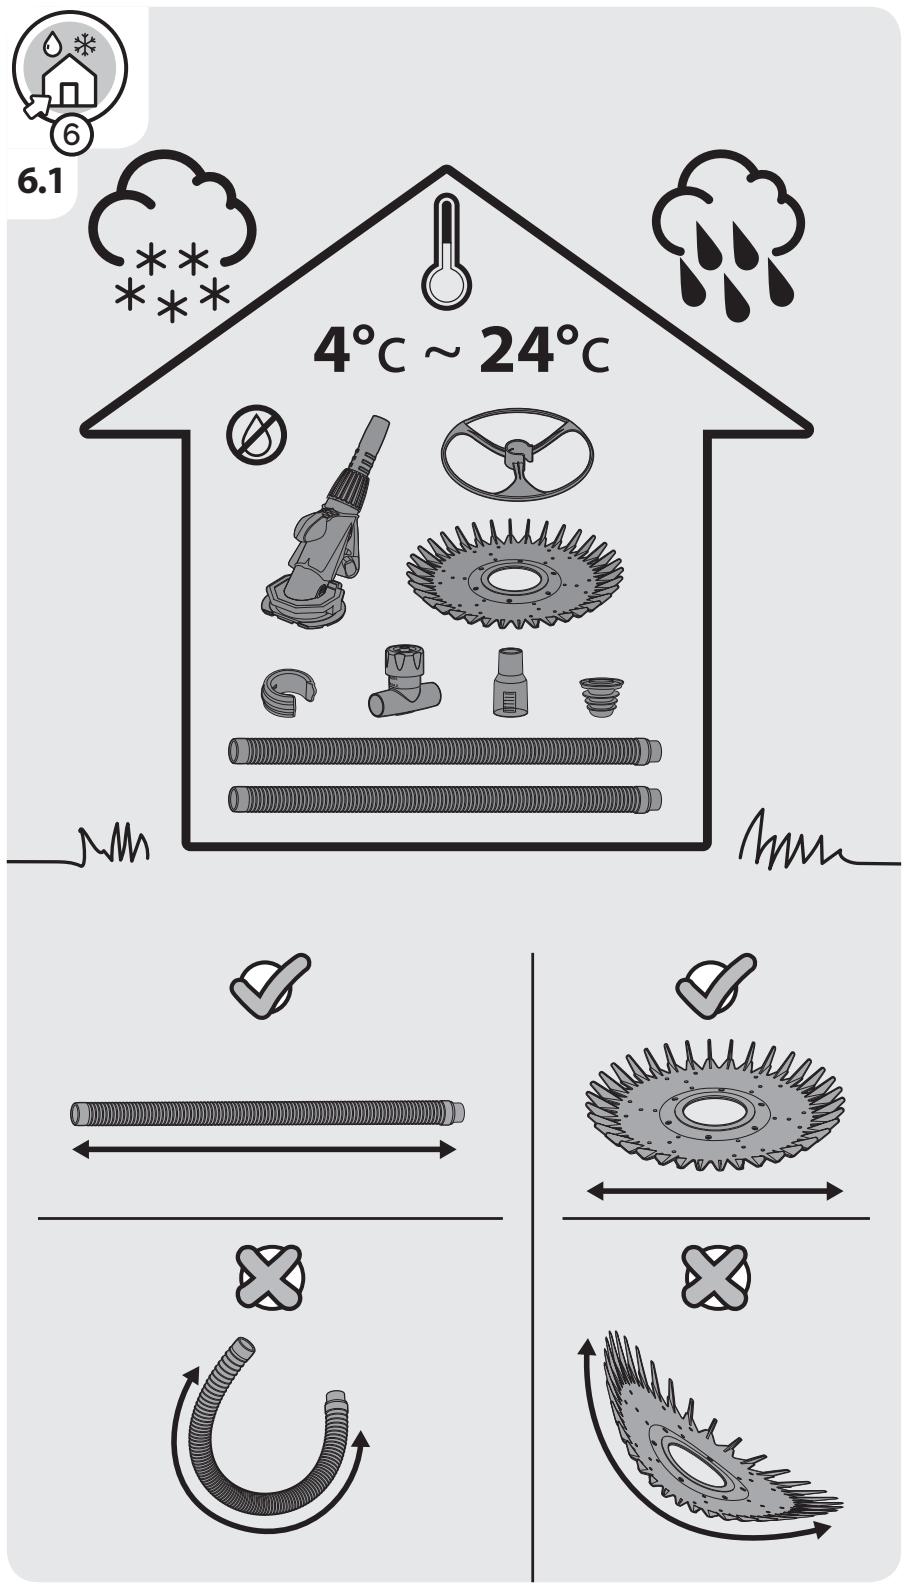
6. WINTERING & STORAGE
Store the machine : Illustration 6.1
Only store the machine in a clean, dry, ventilated place with a temperature range of 4^ to 24^ . Cover it in order to provide added protection. We recommend using the original package for storage or covering the product with a suitable cloth or enclosure to protect it against dust.
Never coil the hose. If the hose is tangled or twisted, uncoil it using hot water and then return it to its original shape. The pool coverage rate will be reduced if the hose is twisted or tangled. Store the disc and place it on a flat surface to prevent it from deforming.

WARNING ! To avoid damaging the hose, never leave it in direct sunlight; leave it in water or under a temperate shelter.
7. MAINTENANCE

WARNING! Always make sure to disconnect the robot cleaner from the suction nozzles of the pool or skimmer before cleaning or purging the pool filter.
Cleaning the product: Illustration 5.1
Clean the skimmer and pump baskets. After cleaning, let the filtering system run without the cleaning robot for at least five minutes before reconnecting the cleaning robot.

WARNING ! To avoid danger of injury, turn off the cleaner suction pump before performing this step
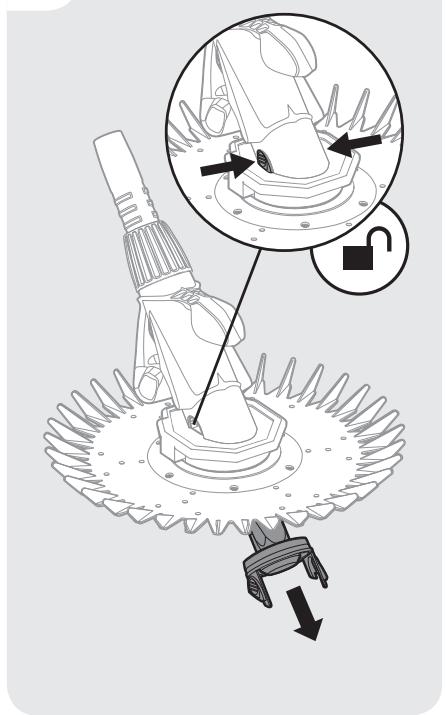
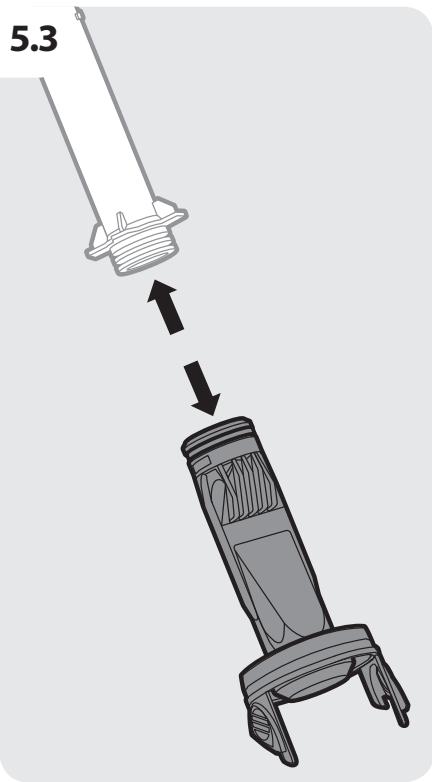
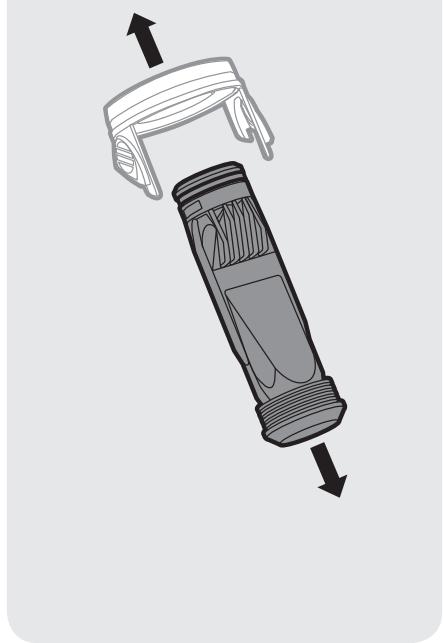
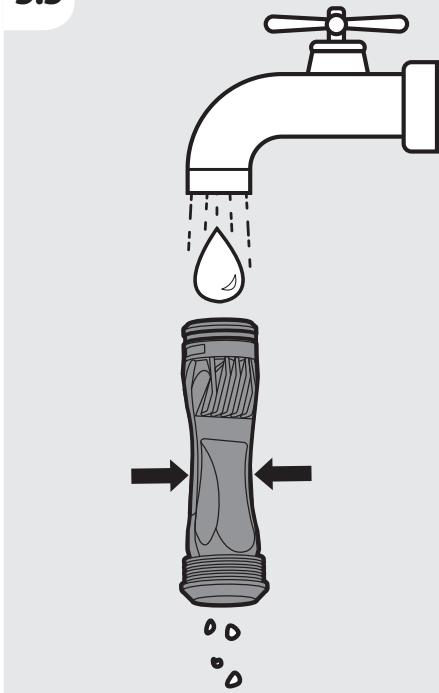
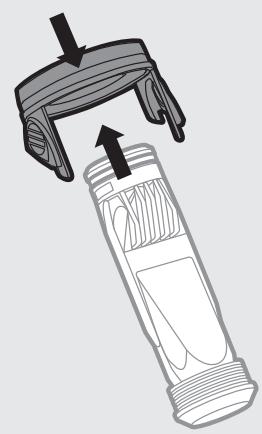
Checking the diaphragm: Illustration 5.1 to 5.9
If the robot stops, stop the suction pump and remove the cleaner from the pool. Check that the diaphragm is not blocked. Check that the diaphragm is not damaged (torn) and that its state of wear is not too advanced if this is the case, clean or replace it.
7.1 EXPLODED VIEW
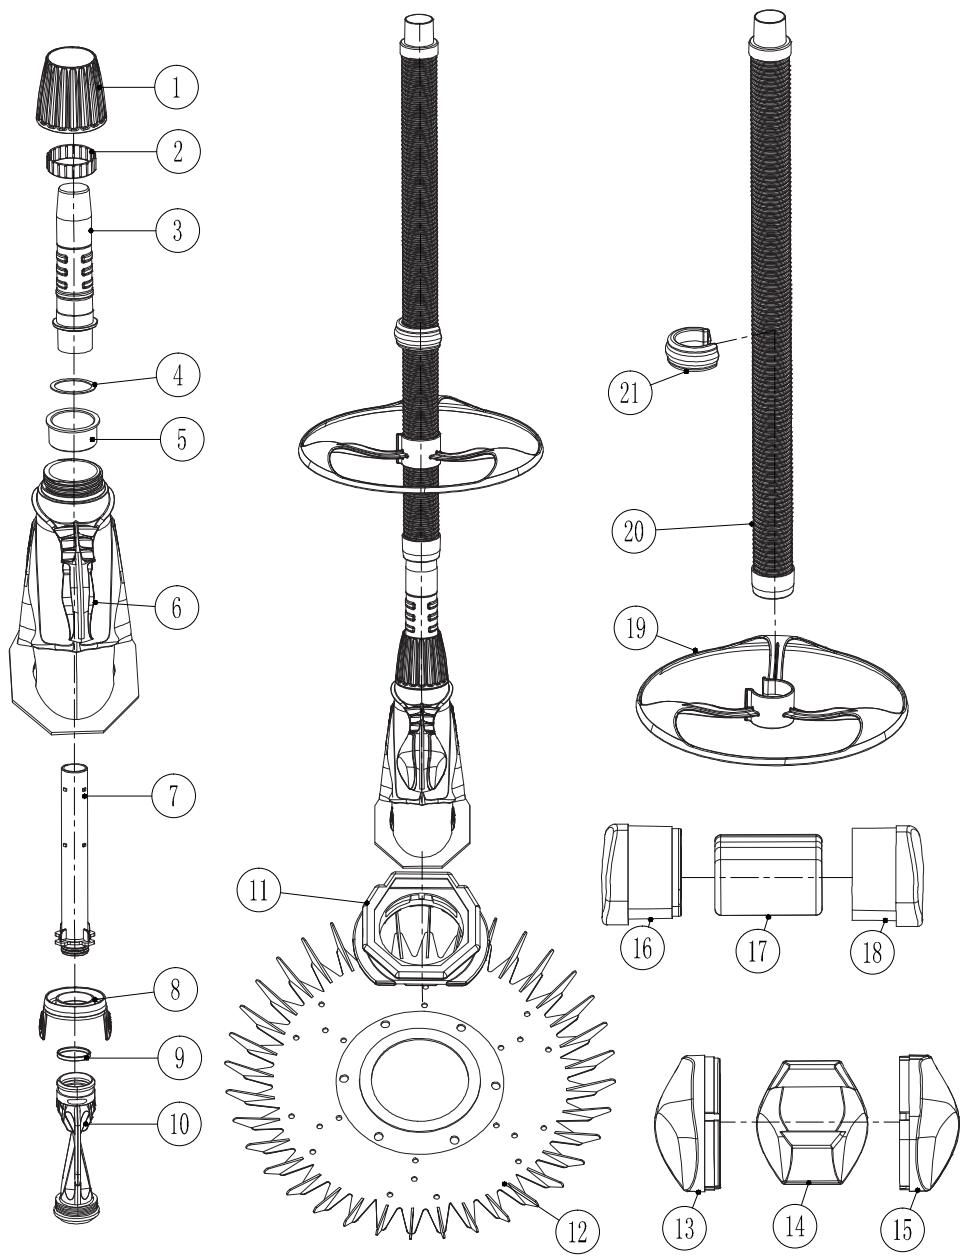
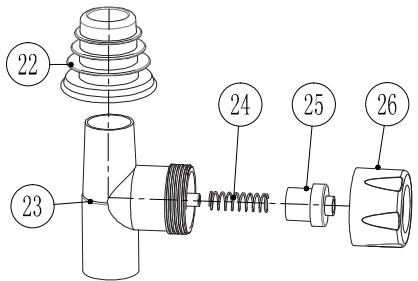
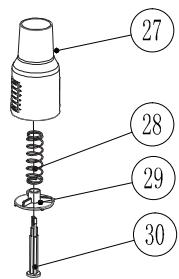
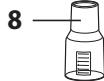
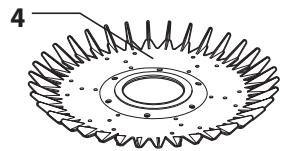
| POS | DESCRIPTION |
| 1 | nut |
| 2 | "C"ring |
| 3 | outer pipe |
| 4 | slip washer |
| 5 | bushing |
| 6 | shell |
| 7 | inner pipe |
| 8 | clamp |
| 9 | ring |
| 10 | diaphragm |
| 11 | foot |
| 12 | skirt |
| 13 | foam left cover |
| 14 | foam |
| 15 | foam right cover |
| 16 | weight left cover |
| 17 | weight |
| 18 | weight right cover |
| 19 | deflector wheel |
| 20 | hose sections |
| 21 | hose weight |
| 22 | universal adapter |
| 23 | flow regulator body |
| 24 | spring |
| 25 | inner cover |
| 26 | screw cup |
| 27 | suction test gauge body |
| 28 | spring |
| 29 | flow rate indication |
| 30 | suction testing bar |
7.2 TROUBLESHOOTING
| Problems | Probable causes | Qualification required |
| Cleaner stops and starts, or won't move at all | Check that the filter is clean and the pump is switched on. | - |
| Ensure that the vacuum plate is properly installed. | - | |
| Check the diaphragm for any damage or blockages | - | |
| Disengage the safety suction, ensure main drain is plugged. | - | |
| Check the cleaner and hose are free of trapped air. | - | |
| Cleaner is missing spots in the pool. | Ensure that the correct amount of hose is installed. | - |
| Ensure that all the returns are directing waterflow towards the floor of the pool, adjusting the eyeballs, or using water diverters available at your local pool shop. | - | |
| Ensure that hose is straight and untangled. | - | |
| Cleaner doesn't climb | Ensure the pool water is properly balanced. For example, high pH and/or lack of chlorine, makes the walls very slippery. | - |
| Check float arm is in the correct position. Note: In pools with a sharp 90 degree wall-to-floor it is unreasonable to expect the cleaner to climb the walls. | ||
| Increase the suction using the speed controller. | ||
| Cleaner spend too much time on the walls and/or climbs out of the water. | Decrease the suction using the speed controller. | - |
| Adjust the hose weight provided towards the cleaner head. | - | |
| Cleaner sticks in corner under ladders, on lights or on pool steps. | Ensure that the correct amount of hose is installed. | - |
| Ensure that all the returns are directing waterflow towards the floor of the pool, adjusting the eyeballs, or using water diverters available at your local pool shop. Excess water movement on the water surface will hold or push the hose. |
8. WARRANTY
8.1 OUR WARRANTY
STERWINS products are designed according to the highest quality standards for products intended for the consumer market. This sale warranty covers a period of 3 years as of the date of purchase of the product. This warranty covers all defects in materials and workmanship: missing parts and elements, and damage occurring under normal use circumstances. Repair and replacement of parts do not lead to an extension of the initial warranty period. You must be able to provide proof of the purchase for this product and the date of purchase. Warranty coverage is limited to the value of this product.
8.2 WARRANTY EXCLUSIONS
This warranty does not cover problems nor incidents resulting from incorrect use of the product. The following items are not covered by warranty:
- The tool have been used incorrectly; or
- Damage occurring upon transporting or setting up this product; or
- Repairs and/or change of parts carried out by a third party; or
- Damage caused by external factors or foreign objects such as sand or stones; or
- Damage resulting from non-compliance with the safety and usage instructions; or
- The tool have been disassembled or opened; or
- The tool has been used for professional purpose; or
- The tool has been exposed to a temperature out of the range specified in "storage" section.
The product must be used under normal usage circumstances, and for non-professional purposes. Therefore, excluded from this warranty are products used by gardening companies, local authorities, as well as companies offering paid rentals or free loaning of equipment.
In the event of a problem or defect, you should first always consult your Sterwins dealer. In most cases, the Sterwins dealer will be able to solve the problem or correct the defect. Keep your invoice or your receipt: these documents will be requested upon processing any claims.

A

D
x2
H
x12
B
E

F
C
G
page
<?>

2.1
Conseils de préparation et précautions d'usage Consejos de preparación y precauiones de'utilisation
PT Conselho de preparacao e precauções de utilização Consiglio per la preparazione e precauzioni per l'uso
ELSigmaouboulénpocetoumaiaic kainpouphiuaéxcipnoct Wskazowki dotyczace przygotowania i srodkow ostrznosci w trakcie uzytkowania IA Nopadni zuo ndrotoBKN ta 3axoib 6e3neK RRecomandari de pregatire si precautii penetr utilizez DR Dicas de preparacao e precauores de uso EER Preparation guidelines and precautions for use.
2.2 a
2.2 b
2.2 C
2.2 d

2.3
PN Connexiondtuyau Conexiondelamanguera Pt Conexaoidotubo 1 Collegamentodeltubo uovdoeonlaoivou
PL Podlaczzenia węza IIA Śląćśdania hażulnagar RO Conexiuneta tubulii BR Conexãoa da mangueira EN Hose connection.
2.4
2.6
a
Installation sur la ligne d'aspiration
5 Instalación en la linea de aspiración
P1 Instalação na红线 de sucoaão
Installazione sulla linea de aspirazione
Elykataoanaon otnyapamun avappoppon
Instalacja na linii sączę
UyTahOBKa HbCMOKTyOuCh Tpy6oPiobvI
Instalarea pe linia de aspiratie
BR Instalação na LINHA DE SUCESSO
EN Installation on the suction line
2.7

PR Test et ajustement du débit ES Test y ajusté de caudal PT Teste re regulação do caudal T Test e regolazioni del flusso
EL EeYyoc kai npooapuyo porc Test i regula cia natezian przeplywu DA Npebipka ta perynobha Bntpar
RO Test si ajustarea debituluri BR Teste e ajuste do fluxo EN Test and adjust for proper flow.
2.6
b
PA Installation sur les skimmer
E5 Instalacion en el skimmer
PI Instalacao no skimmer
Installazione sullo skimmer
EL Eykaradotaon oto skimmer
PL Instalaga na skimerze
YtazHOBkaHaQMMep
12 CkMMMepre ophaty
UA Yctahobka hakimep
91 Yctanejka Hc Qimep
R0 Instalarea skimmer-ului
B8 Instalação no skimmer
EN Installation on the skimmer
2.7

FR Test et ajustement du débit S Test y ajuste del caudal P Teste e regulação do caudal ITest e regulazioni del flusso E Elcysoc kai npocapouoy porc P Test i regulaçia natezienia przyphwu NU Ipobewka n hacrpoika packoda
17 Zhlbh Tckepici Mo Hc Btarnacb Ua Npebpka Ta perynnoBaHnB BVtpat BL Tct i hana da npb nepubm BbKapbIcTahni R0 Test si ajustarea debitului BR Teste a ajuste do fluxo EIT Test and adjust for proper flow.

3.1

3.2

3.3

4.2
a
4.2
b
2h

5.1


5.2
5.4
5.5
5.6
5.7
5.8
5.9
Fc Ce produit est recyclable. S'il ne peut plus etre utilise,veuillez l'apporter dans un centre de recyclage de dechets.
Este producto es recicable. Si ya no se possible usar, llevelo a un centro de recicaje de residuos.
P1 Este produit é reciclavour. SeDEXAR de outilizar,entrege-o num centro de reciclagem de residuos.
Qstto prodto pue essere riciclato. Se deve essere smaltito, portalo presso un centro de reciclaggio.
Auto to npoiov eivai avakukkwio. Eav mopei nEv va xpnoiopointhetai, metapepe tnv oKANO Kevtpo avakukwong anoppmuatow.
Ua Cei npodukT moke nepepo6nTcra. Akso BOHO 6ilbwe He c npuaTHe Iy BnKOpNCTyBaHn, 3daTe Ioro B yTuNi3auiHni UeHTp.
Aceast produs este reciclabil. Daca nu mai poate ti folosit, va rugam sa il aduceci intr-un centru de reciclare a deseurilor.
Eeste produto e reciclavel. Se nao puder mais ser usado, descarte em um centro de reciclagem de residuos.
EN This product is recyclable. If it cannot be used anymore, please take it to waste recycling centre.
PL Ten produkt moza poddać recyklingowy. Jesli nie moza三点 go uzyc ponownie, prosimi zanieść go do centrum recyklingeru.

Made in China
SERIAL NUMBER
**Garantie 3 ans / 3 años de garantía / Garantia de 3 años / Garanzia 3 anni / Eyyüñon 3 ετύν / Gwaranca 3-letnia / Γαραπία 3 pόκιδ / Garantie 3 anni / Garantia 3anos / 3-year warranty
ADEO-business name (Adeo Services)
Adress (135, rue Sadi Carnot- CS 00001 59790- RON- CHIN- France)
Imported by Adeo South Africa (PTY) LTD T/A Leroy
Merlin Leroy Merlin Greenstone Store
Corner Blackrock Street and Stoneridge Drive, Greenstone, Park Ext 2, Edenvale, 1610 Johannesburg, Gauteng, South Africa