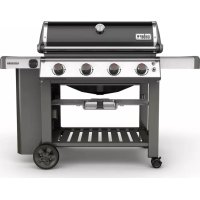
PERFORMER GBS - 51592 - Barbecue WEBER - Free user manual and instructions
Find the device manual for free PERFORMER GBS - 51592 WEBER in PDF.
User questions about PERFORMER GBS - 51592 WEBER
0 question about this device. Answer the ones you know or ask your own.
Ask a new question about this device
Download the instructions for your Barbecue in PDF format for free! Find your manual PERFORMER GBS - 51592 - WEBER and take your electronic device back in hand. On this page are published all the documents necessary for the use of your device. PERFORMER GBS - 51592 by WEBER.
USER MANUAL PERFORMER GBS - 51592 WEBER
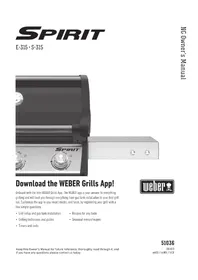
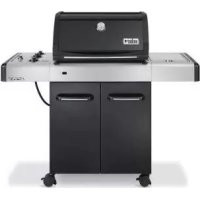
Do not discard. This owner's guide contains important product dangers, warnings, and cautions. For assembly instructions, refer to assembly guide. Do not use grill indoors!
Visit www.weber.com, select your country of origin, and register your grill today.
FR
GUIDE D'UTILISATION DU BARBECUE À CHARBON DE BOIS
Do not discard. This owner's guide contains important product dangers, warnings, and cautions.
For assembly instructions, refer to assembly guide. Do not use barbecue indoors!
ES GUIA DEL PROPIETARIO DE LA PARRILLA DE CARBON 14
Failure to follow the DANGERS, WARNINGS, and CAUTIONS contained in this Owner's Guide may result in serious bodily injury or death, or may result in a fire or an explosion causing damage to property.
Please read all safety information contained in this Owner's Guide before operating this grill.
DANGERS
Do not use indoors! This grill is designed for outdoor use in a well-ventilated area and is not intended for and should never be used as a heater. If used indoors, toxic fumes will accumulate and cause serious bodily injury or death.
Do not use in a garage, building, breezeway, or any other enclosed area.
Do not use petrol, alcohol, or other highly volatile fluids to ignite charcoal. If using charcoal starter fluid (not recommended), remove any fluid that may have drained through the bowl vents before lighting the charcoal.
Do not add charcoal starter fluid or charcoal impregnated with charcoal lighter fluid to hot or warm charcoal. Cap starter fluid after use, and place a safe distance away from the grill.
Keep the cooking area clear of flammable vapour and liquids, such as petrol, alcohol, etc., and combustible material.
WARNING
Do not use this grill unless all parts are in place. This grill must be properly assembled according to the assembly instructions. Improper assembly may be dangerous.
Never use grill without the ash catcher installed.
Do not use this grill under any overhead combustible construction.
The use of alcohol, prescription, or nonprescription drugs may impair the consumer's ability to properly assemble or safely operate the grill.
Exercise caution when operating your grill. It will be hot during cooking or cleaning, and should never be left unattended.
WARNING! This barbecue will become very hot, do not move it during operation.
WARNING! Keep children and pets away.
WARNING! Do not use spirit or petrol for lighting or re-lighting! Use only firelighters complying to EN 1860-3!
This grill is not intended to be installed in or on recreational vehicles and/or boats.
Do not use this grill within five feet (1.5 m) of any combustible material. Combustible materials include, but are not limited to, wood or treated wood decks, patios, and porches.
Keep the grill on a secure, level surface at all times, clear of combustible material.
Do not place grill on glass or a combustible surface.
Do not use grill in high winds.
Do not wear clothing with loose flowing sleeves while lighting or using the grill.
△ Never touch the cooking or charcoal grate, ashes, charcoal, or the grill to see if they are hot.
Extinguish charcoal when finished cooking. To extinguish, close bowl vent and lid damper and place lid on bowl.
Use heat-resistant barbecue mitts or gloves (conforming to EN 407, Contact Heat rating level 2 or greater) while cooking, adjusting air vents (dampers), adding charcoal, and handling thermometer or lid.
Use proper tools, with long, heat-resistant handles.
Always put charcoal on top of the charcoal (lower) grate. Do not put charcoal directly in the bottom of the bowl.
Do not lean on or overload the end of the table.
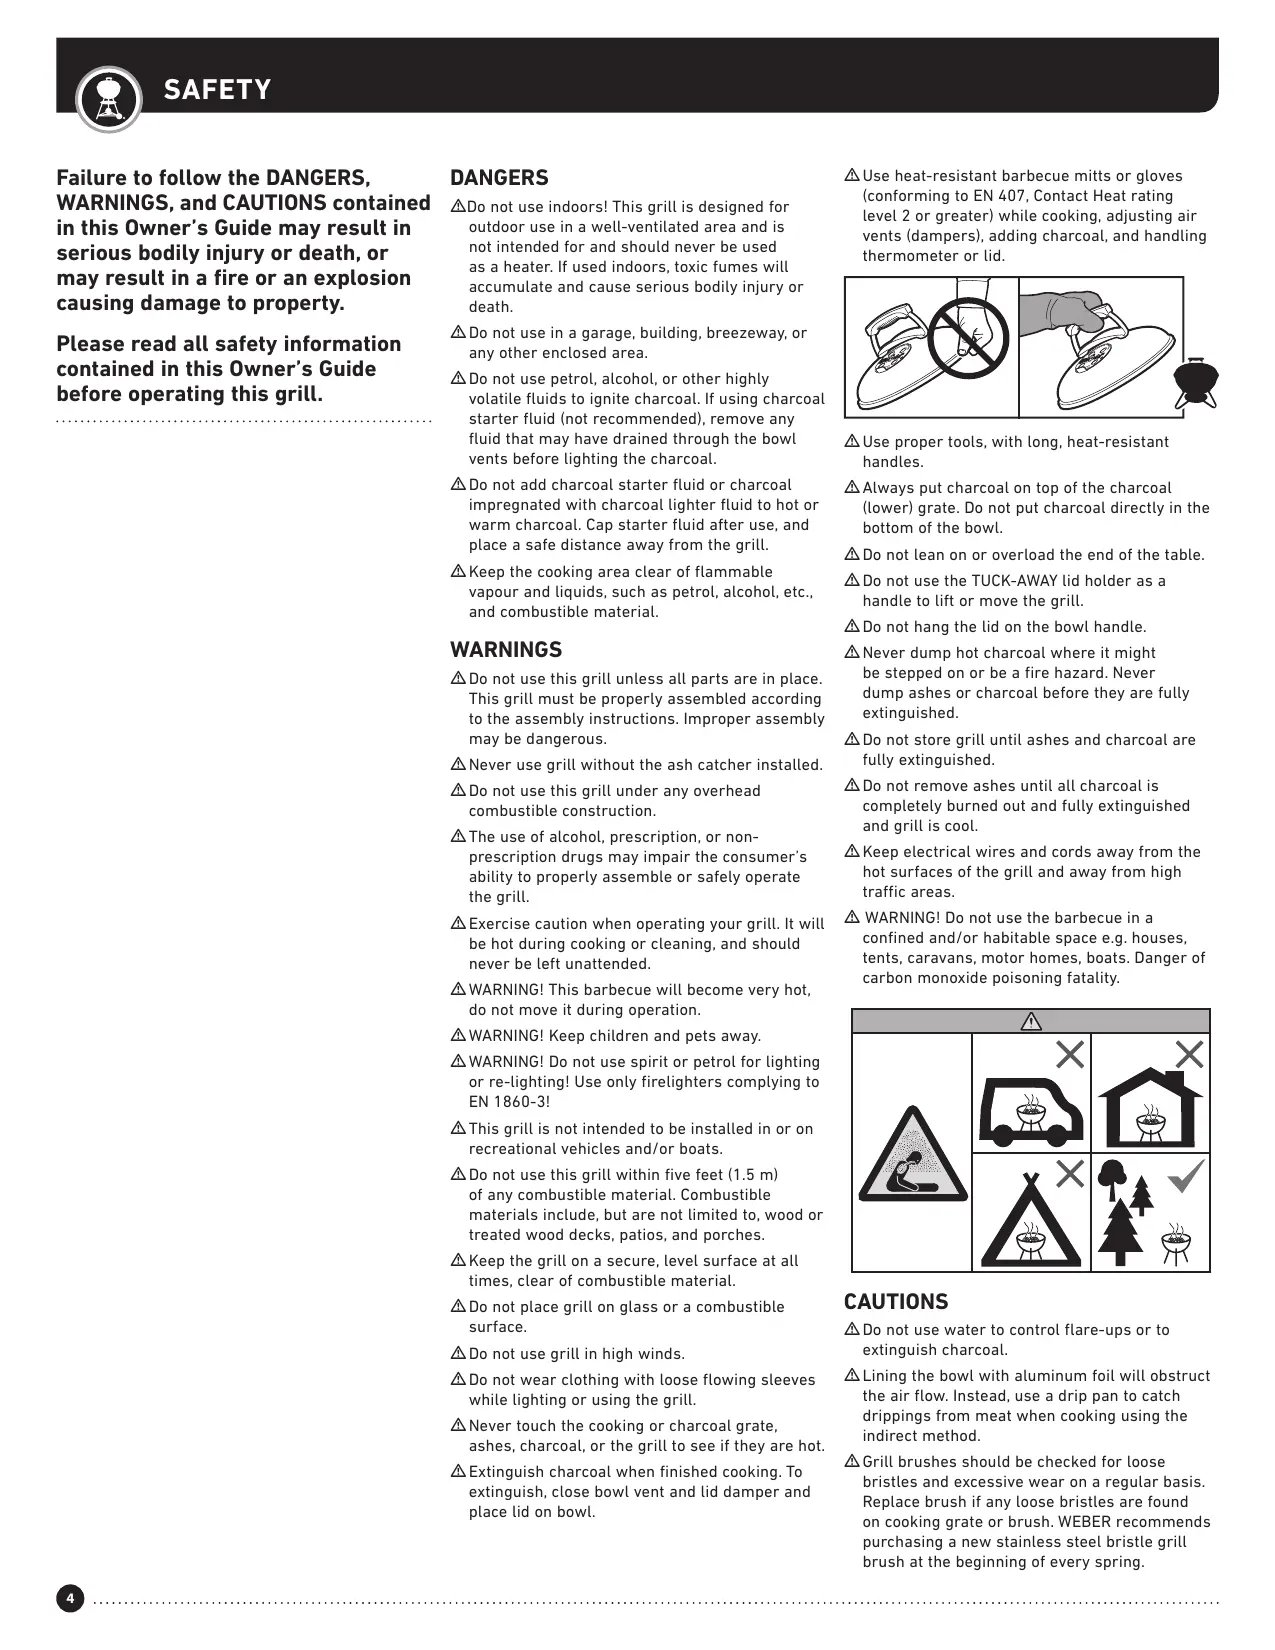
Do not use the TUCK-AWAY lid holder as a handle to lift or move the grill.
Do not hang the lid on the bowl handle.
Never dump hot charcoal where it might be stepped on or be a fire hazard. Never dump ashes or charcoal before they are fully extinguished.
Do not store grill until ashes and charcoal are fully extinguished.
Do not remove ashes until all charcoal is completely burned out and fully extinguished and grill is cool.
Keep electrical wires and cords away from the hot surfaces of the grill and away from high traffic areas.
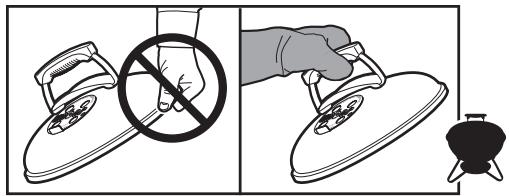
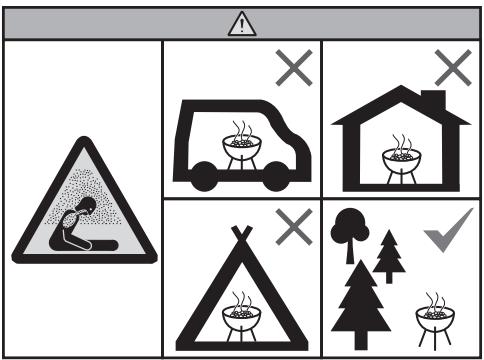
WARNING! Do not use the barbecue in a confined and/or habitable space e.g. houses, tents, caravans, motor homes, boats. Danger of carbon monoxide poisoning fatality.
CAUTIONS
Do not use water to control flare-ups or to extinguish charcoal.
Lining the bowl with aluminum foil will obstruct the air flow. Instead, use a drip pan to catch drippings from meat when cooking using the indirect method.
Grill brushes should be checked for loose bristles and excessive wear on a regular basis. Replace brush if any loose bristles are found on cooking grate or brush. WEBER recommends purchasing a new stainless steel bristle grill brush at the beginning of every spring.
Thank you for purchasing a WEBER product. Weber-Stephen Products LLC, 1415 S. Roselle Road, Palatine, Illinois 60067 ("WEBER") prides itself on delivering a safe, durable, and reliable product.
This is WEBER's Voluntary Warranty provided to you at no extra charge. It contains the information you will need to have your WEBER product repaired in the unlikely event of a failure or defect.
Pursuant to applicable laws, the customer has several rights in case the product is defective. Those rights include supplementary performance or replacement, abatement of the purchasing price, and compensation. In the European Union, for example, this would be a two-year statutory warranty starting on the date of the handover of the product. These and other statutory rights remain unaffected by this warranty provision. In fact, this warranty grants additional rights to the Owner that are independent from statutory warranty provisions.
WEBER'S VOLUNTARY WARRANTY
WEBER warrants, to the purchaser of the WEBER product (or in the case of a gift or promotional situation, the person for whom it was purchased as a gift or promotional item), that the WEBER product is free from defects in material and workmanship for the period(s) of time specified below when assembled and operated in accordance with the accompanying Owner's Manual. (Note: If you lose or misplace your WEBER Owner's Manual, a replacement is available online at www.weber.com, or such country-specific website to which Owner may be redirected.) Under normal, private single family home or apartment use and maintenance, WEBER agrees within the framework of this warranty to repair or replace defective parts within the applicable time periods, limitations, and exclusions listed below. TO THE EXTENT ALLOWABLE BY APPLICABLE LAW, THIS WARRANTY IS EXTENDED ONLY TO THE ORIGINAL PURCHASER AND IS NOT TRANSFERABLE TO SUBSEQUENT OWNERS, EXCEPT IN THE CASE OF GIFTS AND PROMOTIONAL ITEMS AS NOTED ABOVE.
OWNER'S RESPONSIBILITIES UNDER THIS WARRANTY
To ensure trouble-free warranty coverage, it is important (but it is not required) that you register your WEBER product online at www.weber.com, or such country-specific website to which Owner may be redirected. Please also retain your original sales receipt and/or invoice. Registering your WEBER product confirms your warranty coverage and provides a direct link between you and WEBER in case we need to contact you.
The above warranty only applies if the Owner takes reasonable care of the WEBER product by following all assembly instructions, usage instructions, and preventative maintenance as outlined in the accompanying Owner's Manual, unless the Owner can prove that the defect or failure is independent of non-compliance with the above mentioned obligations. If you live in a coastal area, or have your product located near a pool, maintenance includes regular washing and rinsing of the exterior surfaces as outlined in the accompanying Owner's Manual.
WARRANTY HANDLING / EXCLUSION OF WARRANTY
If you believe that you have a part which is covered by this Warranty, please contact WEBER Customer Service using the contact information on our website (www.weber.com, or such country-specific website to which Owner may be redirected). WEBER will, upon investigation, repair or replace (at its option) a defective part that is covered by this Warranty. In the event that repair or replacement are not possible, WEBER may choose (at its option) to replace the grill in question with a new grill of equal or greater value WEBER may ask you to return parts for inspection, shipping charges to be pre-paid.
This WARRANTY lapses if there are damages, deteriorations, discolourations, and/or rust for which WEBER is not responsible caused by:
- Abuse, misuse, alteration, modification, misapplication, vandalism, neglect, improper assembly or installation, and failure to properly perform normal and routine maintenance;
- Insects (such as spiders) and rodents (such as squirrels), including but not limited to damage to burner tubes and/or gas hoses;
- Exposure to salt air and/or chlorine sources such as swimming pools and hot tubs/spas;
- Severe weather conditions such as hail, hurricanes, earthquakes, tsunamis or surges, tornadoes or severe storms.
The use and/or installation of parts on your WEBER product that are not genuine WEBER parts will void this Warranty, and any damages that result hereby are not covered by this Warranty. Any conversion of a gas grill not authorized by WEBER and performed by a WEBER authorized service technician will void this Warranty.
PRODUCT WARRANTY PERIODS
Bowl, lid, and center ring:
10 years, rust through/burn through
ONE-TOUCH cleaning system:
5 years, rust through/burn through
Plastic components:
5 years, excluding fading or discolouration
All remaining parts:
2 years
DISCLAIMERS
APART FROM THE WARRANTY AND DISCLAIMERS AS DESCRIBED IN THIS WARRANTY STATEMENT, THERE ARE EXPLICITLY NO FURTHER WARRANTY OR VOLUNTARY DECLARATIONS OF LIABILITY GIVEN HERE WHICH GO BEYOND THE STATUTORY LIABILITY APPLYING TO WEBER. THE PRESENT WARRANTY STATEMENT ALSO DOES NOT LIMIT OR EXCLUDE SITUATIONS OR CLAIMS WHERE WEBER HAS MANDATORY LIABILITY AS Prescribed BY STATUTE.
NO WARRANTY SHALL APPLY AFTER THE APPLICABLE PERIODS OF THIS WARRANTY. NO OTHER WARRANTYES GIVEN BY ANY PERSON, INCLUDING A DEALER OR RETAILER, WITH RESPECT TO ANY PRODUCT (SUCH AS ANY "EXTENDED WARRANTYES"), SHALL BIND WEBER. THE EXCLUSIVE REMDEY OF THIS WARRANTY IS REPAIR OR REPLACEMENT OF THE PART OR PRODUCT.
IN NO EVENT UNDER THIS VOLUNTARY WARRANTY SHALL RECOVERY OF ANY KIND BE GREATER THAN THE AMOUNT OF THE PURCHASE PRICE OF THE WEBER PRODUCT SOLD.
YOU ASSUME THE RISK AND LIABILITY FOR LOSS, DAMAGE, OR INJURY TO YOU AND YOUR PROPERTY AND/OR TO OTHERS AND THEIR PROPERTY ARISING OUT OF THE MISUSE OR ABUSE OF THE PRODUCT OR FAILURE TO FOLLOW INSTRUCTIONS PROVIDED BY WEBER IN THE ACCOMPANYING OWNER'S MANUAL.
PARTS AND ACCESSORIES REPLACED UNDER THIS WARRANTY ARE WARRANTED ONLY FOR THE BALANCE OF THE ABOVE MENTIONED ORIGINAL WARRANTY PERIOD(S).
THIS WARRANTY APPLIES TO PRIVATE SINGLE FAMILY HOME OR APARTMENT USE ONLY AND DOES NOT APPLY TO WEBER GRILLS USED IN COMMERCIAL, COMMUNAL OR MULTI-UNIT SETTINGS SUCH AS RESTAURANTS, HOTELS, RESORTS, OR RENTAL PROPERTIES.
WEBER MAY FROM TIME TO TIME CHANGE THE DESIGN OF ITS PRODUCTS. NOTHING CONTAINED IN THIS WARRANTY SHALL BE CONSTRUED AS OBLIGATING WEBER TO INCORPORATE SUCH DESIGN CHANGES INTO PREVIOUSLY MANUFACTURED PRODUCTS, NOR SHALL SUCH CHANGES BE CONSTRUED AS AN ADMISSION THAT PREVIOUS DESIGNSWere DEFECTIVE.
Refer to International Business Units list at the end of this Owner's Manual for additional contact information.
Visit www.weber.com, select your country of origin, and register your grill today.
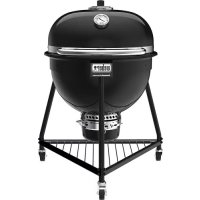
Extensive thought was put into how your charcoal grill was designed. We design our grills to perform so that you never have to worry about flare-ups, hot and cold spots, or burnt food. Expect excellent performance, control, and results every time.
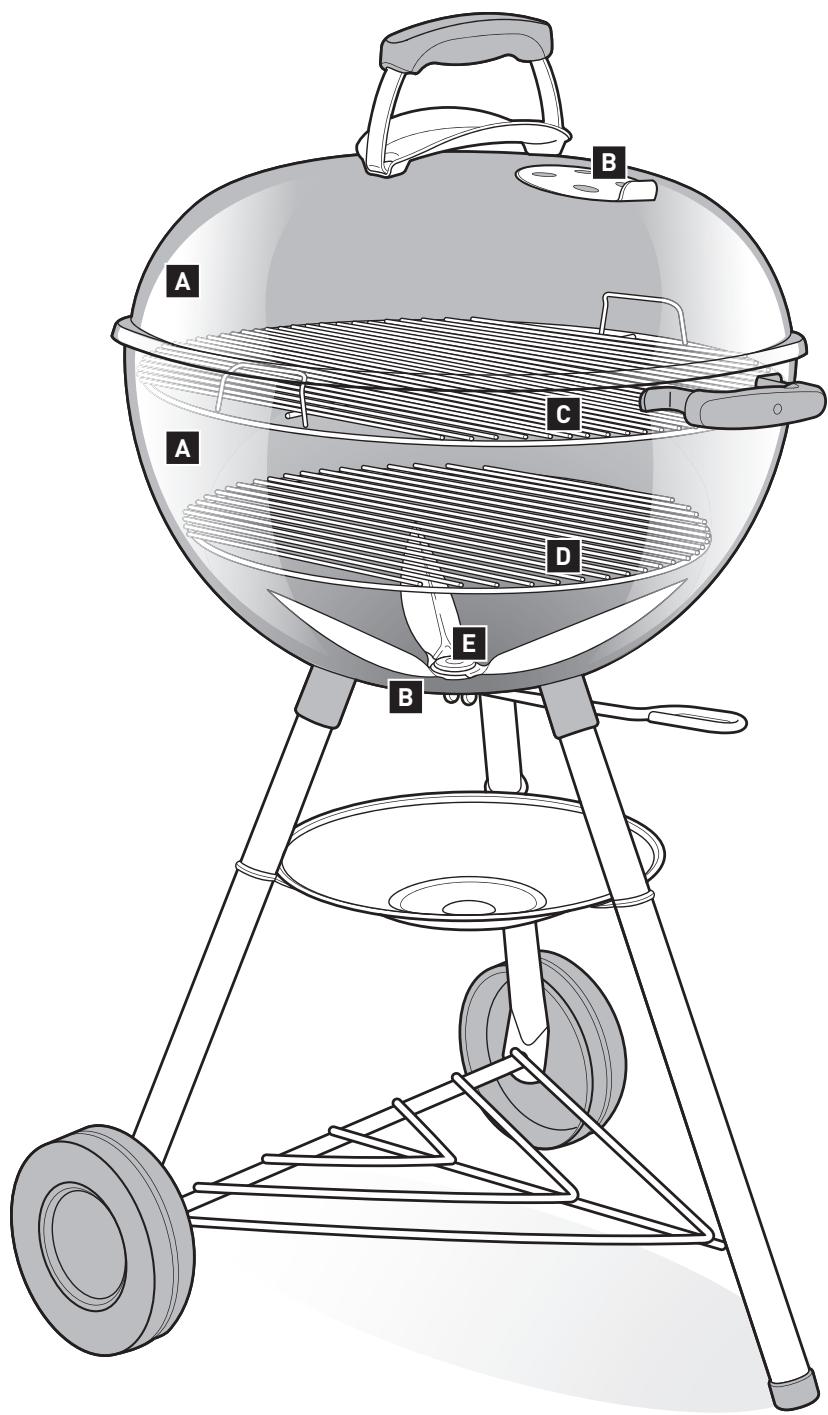
A Bowl and Lid
Every WEBER charcoal grill is made with a baked-on porcelain-enamel coated steel bowl and lid. This is important because it means it will never peel or flake. The reflective surface provides convection cooking, so that the heat radiates around the food much like an indoor oven providing you with even cooking results.
B Dampers and Vents
A big factor in charcoal grilling is air. The more air that you allow into the grill, the hotter the internal temperature will be until the fuel has been maximized. During cooking, you can control the internal grill temperature by easily adjusting the lid and bowl dampers. To ensure a high internal grill temperature for direct method cooking, be sure that the bowl and lid vents are fully open. If your intention is to cook indirectly or smoke foods at lower temperatures, you can close the lid and bowl dampers as much as halfway. Closing the dampers completely will cut off oxygen flow and will eventually extinguish the coals.
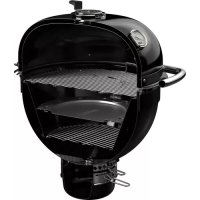
Cooking Grate
Made of heavy-duty plated steel, the cooking grate provides ample area to make all of your favourite meals.
D Charcoal Grade
The charcoal grate has what it takes to withstand the heat of any charcoal fire. Made of heavy-duty steel, this durable grate will not warp or burn through. Additionally, it gives you enough space for direct or indirect cooking, providing you with the flexibility to cook the way you want.
ONE-TOUCH Cleaning System
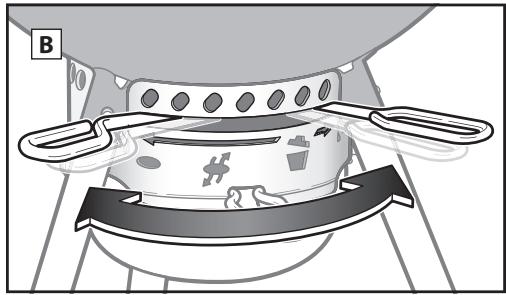
The ONE-TOUCH cleaning system makes cleanup hassle free. As you move the handle back and forth, the three blades in the bowl move ash from the bottom of the grill into the ash catcher. These same vents act as a bowl damper, to help bring oxygen up to the fire or to allow you to easily extinguish the fire.
Depending on the model you purchased, your grill may or may not be equipped with the features described on this page.
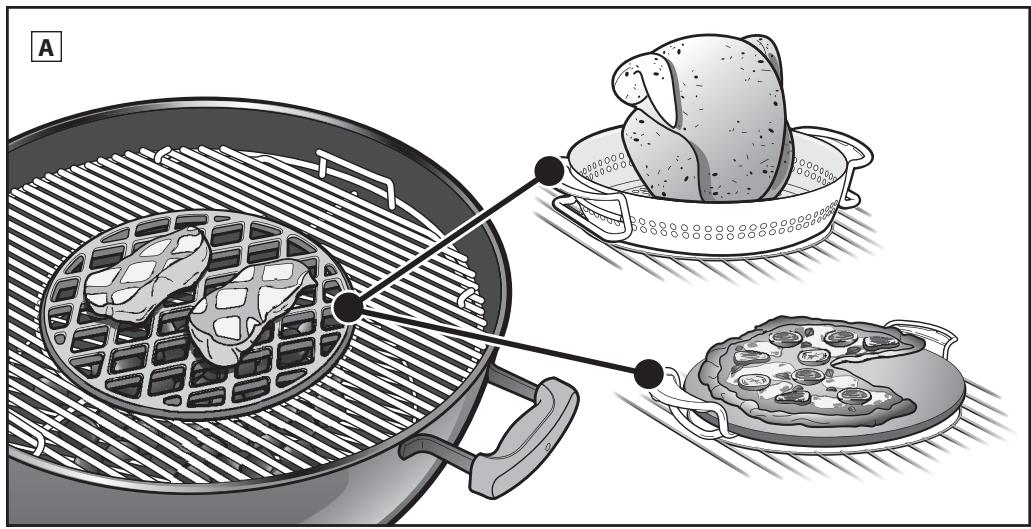
A GOURMET BBQ SYSTEM
Your cooking grate may be equipped with a special centre area that is removable. This feature is designed to allow you to easily add special GOURMET BBQ SYSTEM cooking inserts such as a sear grate, poultry roaster, or pizza stone (sold separately). Each option provides you with limitless opportunities to try new recipes. For a full product line of GOURMET BBQ SYSTEM inserts, visit our website at: www. weber.com.
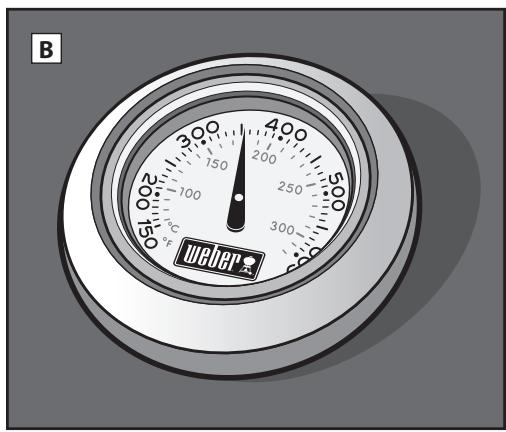
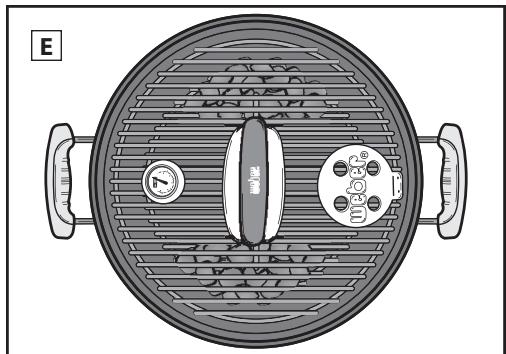
A durable, built-in lid thermometer allows you to easily monitor your grill's temperature.
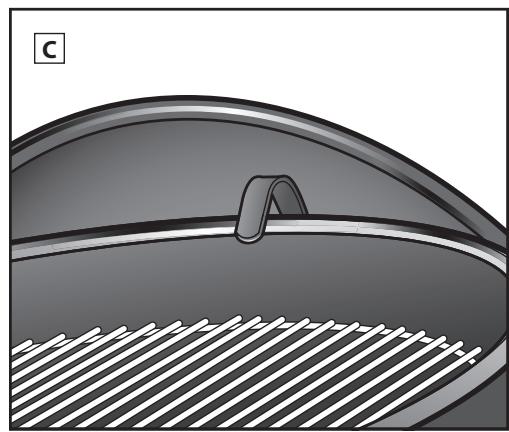
C Lid Hook
Inside the grill lid is an angled lid hook. Simply slide the lid to the side and hang the lid on the bowl.
D TUCK-AWAY Lid Holder
The TUCK-AWAY lid holder allows you to easily move your lid to the side to check your meal or to add charcoal.
E Hinged Cooking Grade
The hinged grate has an area on both sides that lift up to allow you to easily add fuel.
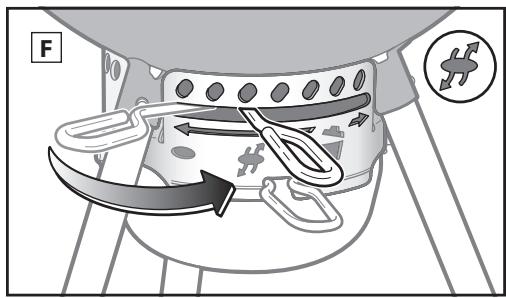
F High Capacity Ash Catcher
The fully enclosed high capacity ash catcher keeps ashes from blowing around and easily detaches for quick and clean ash removal.
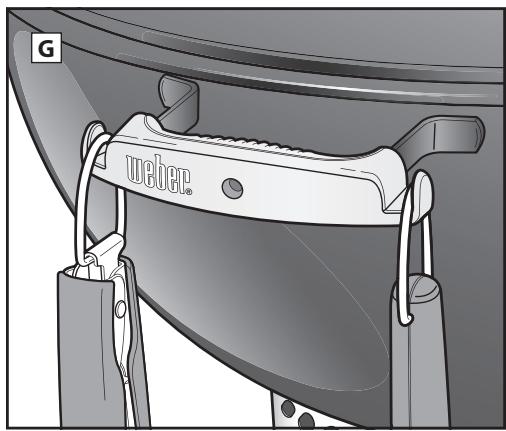
6 Tool Hook Handle
The handle has hooks built right in so you have a convenient place to hang your tools.

Choose a Proper Location to Grill
- Only use this grill outdoors in a well-ventilated area. Do not use in a garage, building, breezeway, or any other enclosed area.
- Keep the grill on a secure, level surface at all times.
- Do not use grill within five feet (1.5 m) of any combustible material. Combustible materials include, but are not limited to, wood or treated wood decks, patios, and porches.
Choose How Much Charcoal to Use
Choosing charcoal quantity depends on what you are grilling and the size of your grill. If you are grilling small, tender pieces of food that take less than 20 minutes, refer to the Measuring & Adding Charcoal for Direct Heat chart. If you are grilling larger joints of meat that require 20 minutes or more of grilling time, or delicate foods, refer to the Measuring & Adding Charcoal for Indirect Heat chart. Use the charcoal cup supplied with your grill to measure the appropriate amount of charcoal. For more details about the difference between direct and indirect cooking, refer to the GRILLING METHODS section.
The Very First Time You Grill
It is recommended that the grill be heated up and the fuel kept red hot, with the lid on, for at least 30 minutes prior to cooking for the first time.
Preparing the Grill for Lighting
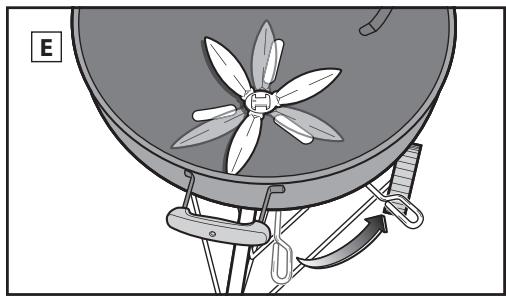
- Remove the lid and position it on the side of your grill using either the lid hook located on the inside of the lid, or the TUCK-AWAY lid holder (depending on your model of grill).
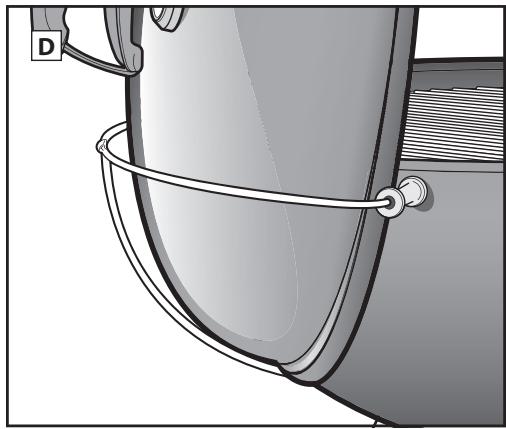
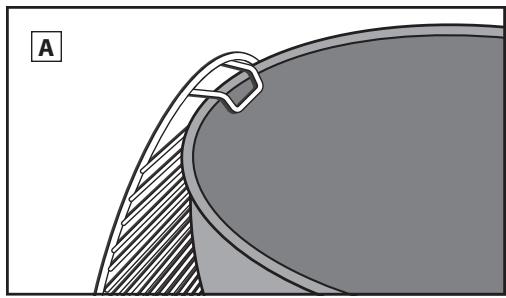
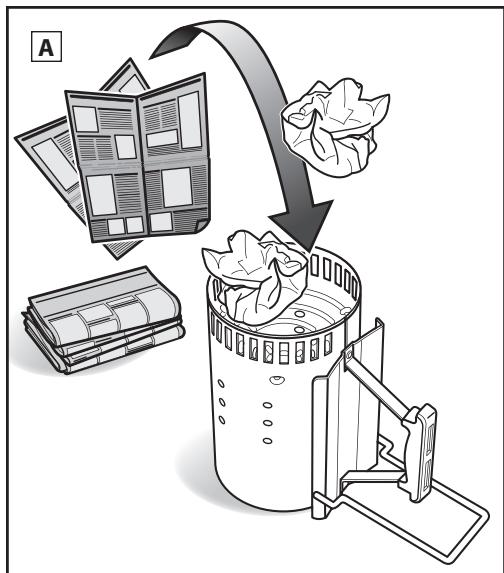
- Remove the cooking (top) grate from your grill. For convenience, hang the cooking grate on the bowl, rear panel or frame of your grill by its curved handle (a feature on some of our grills) (A). If your grill comes with the GOURMET BBQ SYSTEM cooking grate, first remove the detachable centre area, and then the full cooking grate from the grill.
- Remove the charcoal (bottom) grate and clear ashes or chunks of old charcoal from the bottom of the bowl. Charcoal requires oxygen to burn, so be sure that nothing clogs the vents. For grills with a ONE-TOUCH cleaning system, move the handle back and forth to move ash from the bottom of the grill into the ash catcher (B).
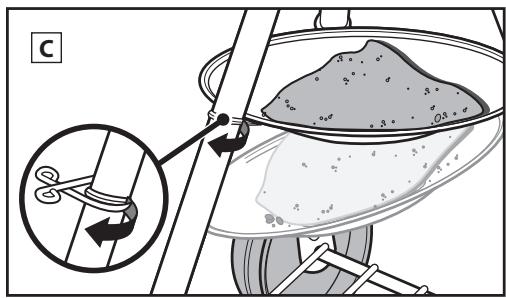
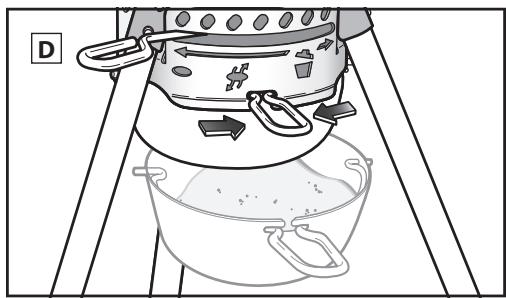
- If your grill has a standard ash catcher, release the leg clip to remove the ash catcher (C) then dispose of the ashes. If your grill has a high capacity ash catcher, squeeze the ash catcher handle to release it from the grill (D).
- Open bowl vent by moving the handle all the way to the right (E) or by moving the handle to the open position (F) (depending on your model of grill).
- Replace charcoal (bottom) grate.
Note: Instructions for using lighter fluid were purposely left out of this owner's guide. Lighter fluid is messy and can transmit a chemical taste to your food, while lighter cubes (sold separately) do not. If you choose to use lighter fluid, follow the manufacturer's instructions and NEVER add lighter fluid to a burning fire.
Measuring & Adding Charcoal for Direct Heat
*When measuring lump charcoal, use the charcoal measuring cup provided with your grill.
| Grill Diameter | WEBER Charcoal Briquettes | Charcoal Briquettes | Beechwood Lump Charcoal* | Mixed Wood Lump Charcoal* |
| 47 cm | 25 briquettes | 30 briquettes | 1 cup (0.56 kg) | ¾ cup |
| 57 cm | 30 briquettes | 40 briquettes | 1¾ cups (0.98 kg) | 1¼ cups |
| 67 cm | 45 briquettes | 60 briquettes | 4 cups (2.24 kg) | 2¾ cups |
Measuring & Adding Charcoal for Indirect Heat
*When measuring lump charcoal, use the charcoal measuring cup provided with your grill.
| Grill Diameter | WEBER Charcoal Briquettes | Charcoal Briquettes | Beechwood Lump Charcoal* | Mixed Wood Lump Charcoal* | ||||
| Briquettes for first hour (per side) | Briquettes to add for each additional hour (per side) | Briquettes for first hour (per side) | Briquettes to add for each additional hour (per side) | Charcoal for first hour (per side) | Charcoal to add for each additional hour (per side) | Charcoal for first hour (per side) | Charcoal to add for each additional hour (per side) | |
| 47 cm | 10 briquettes | 4 briquettes | 15 briquettes | 7 briquettes | ½ cup (0.30 kg) | 1 handful | ½ cup | 1 handful |
| 57 cm | 15 briquettes | 4 briquettes | 20 briquettes | 7 briquettes | ½ cup (0.30 kg) | 1 handful | ½ cup | 1 handful |
| 67 cm | 20 briquettes | 6 briquettes | 30 briquettes | 8 briquettes | ¾ cup (0.42 kg) | 1 handful | ¾ cup | 1 handful |
Lighting the Charcoal Using a Chimney Starter
The simplest, most thorough way to light any kind of charcoal is to use a chimney starter; particularly, the RAPIDFIRE chimney starter (sold separately). Refer to the cautions and warnings included with the RAPIDFIRE chimney starter before lighting.
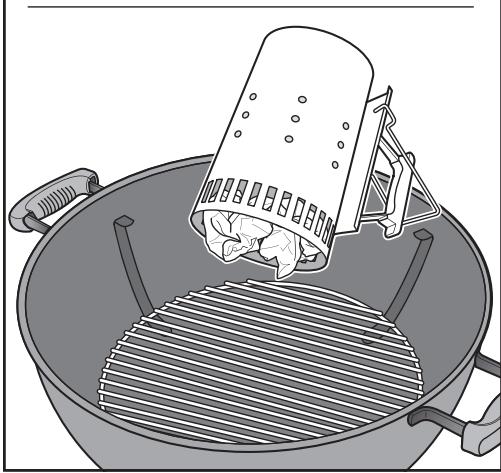
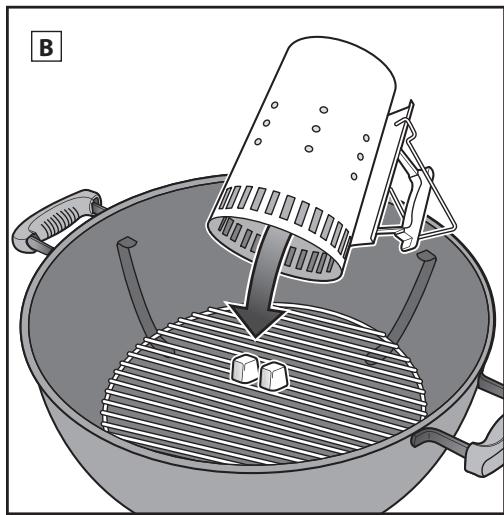
- Put a few sheets of wadded up newspaper in the bottom of the chimney starter and set the chimney starter on the charcoal grate (A); or put a few lighter cubes in the centre of the charcoal grate and place the chimney starter over them (B).
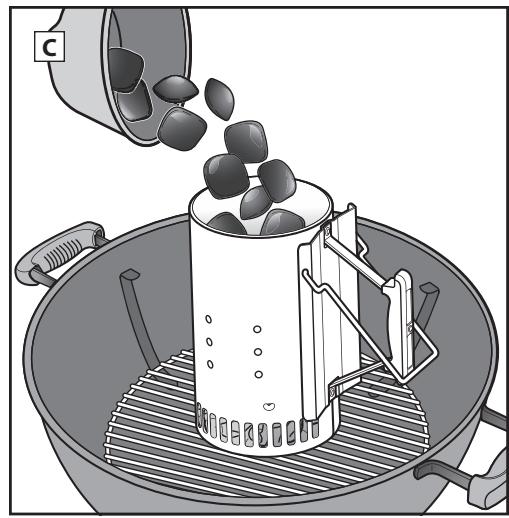
- Fill the chimney starter with charcoal (C).
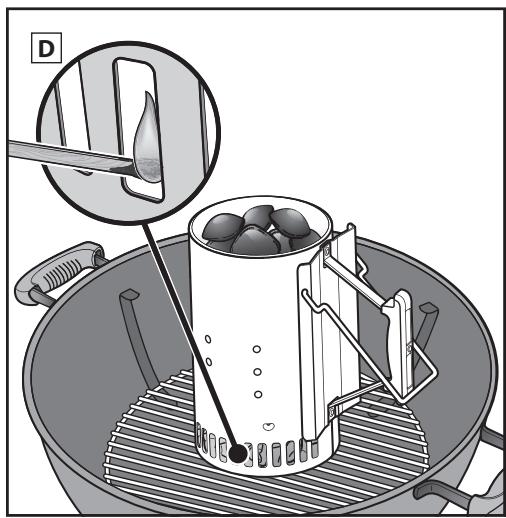
- Light the lighter cubes or newspaper through the holes on the side of the chimney starter (D).
- Keep the chimney starter in place until the charcoal is fully lit. You can tell when the charcoal is fully lit when it is covered with a coating of white ash.
Note: The lighter cubes used must be completely consumed and the charcoal ashed over before placing food on the grate. Do not cook before the fuel has a coating of ash.
5. Once the charcoal is fully lit, continue to the following pages for instructions on how to arrange your charcoal and begin cooking according to your desired cooking method (Direct or Indirect method).
Lighting the Charcoal Using Lighter Cubes
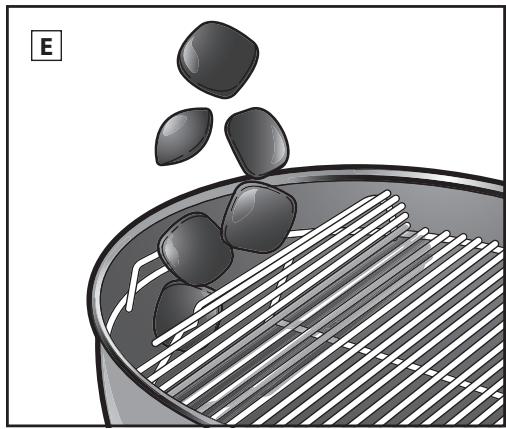
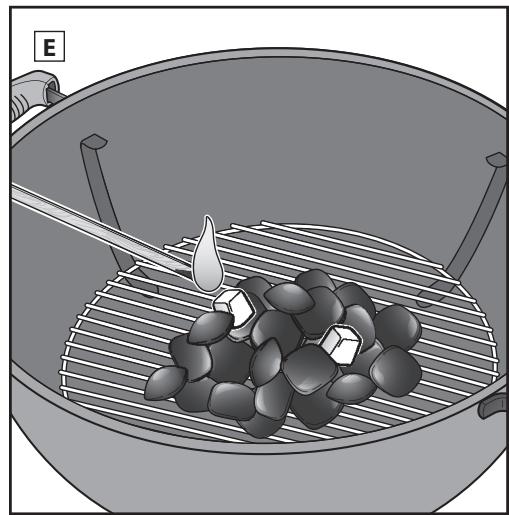
- Build a pyramid of charcoal in the centre of the charcoal (bottom) grate and insert a couple of lighter cubes (sold separately) within the pyramid (E).
- Using a long match or lighter, light the lighter cubes. The lighter cubes will then ignite the charcoal.
- Wait for the charcoal to fully light. You can tell when the charcoal is fully lit when it is covered with a coating of white ash.
Note: The lighter cubes used must be completely consumed and the charcoal ashed over before placing food on the grate. Do not cook before the fuel has a coating of ash.
- Once the charcoal is fully lit, continue to the following pages for instructions on how to arrange your charcoal and begin cooking according to your desired cooking method (Direct or Indirect method).
Grilling With Direct Heat
Use the direct method for small, tender pieces of food that take less than 20 minutes to cook, such as:
Hamburgers
- Steaks
Chops
Kabobs
- Boneless chicken pieces
- Fish fillets
Shellfish
- Sliced vegetables
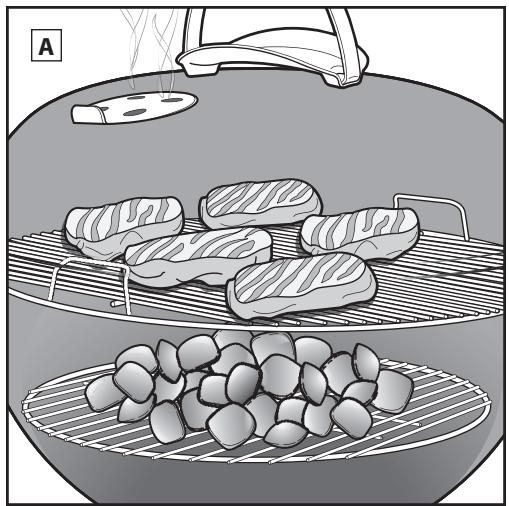
With direct heat, the fire is right below the food (A). It sears or browns the surfaces of the food, developing flavours, texture, and delicious caramelisation while it also cooks the food all the way to the centre.
A direct fire creates both radiant and conductive heat. Radiant heat from the charcoal quickly cooks the surface of the food closest to it. At the same time, the fire heats the cooking grate rods, which conducts heat directly to the surface of the food and creates those unmistakable and lovely grill marks.
Arranging the Charcoal for Direct Heat
- Always wear barbecue mitts or gloves conforming to EN 407, Contact Heat rating level 2 or greater, when using your charcoal barbecue.
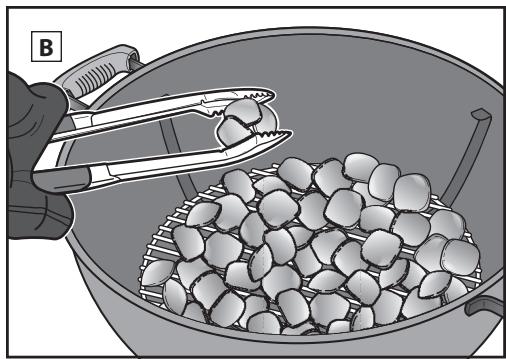
Note: The grill, including the handle and damper/vent handles, will become hot. Make sure that you are wearing barbecue mitts or gloves to avoid burning your hands. - After the charcoal is fully lit, spread them evenly across the charcoal grate with long tongs (B).
- Replace the cooking grate.
- Place the lid on the grill.
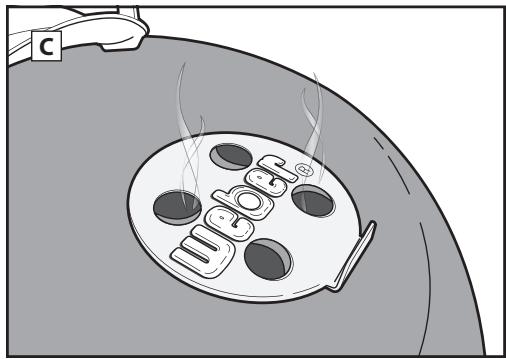
- Open the lid damper (C).
- Preheat the grate for approximately 10 to 15 minutes.
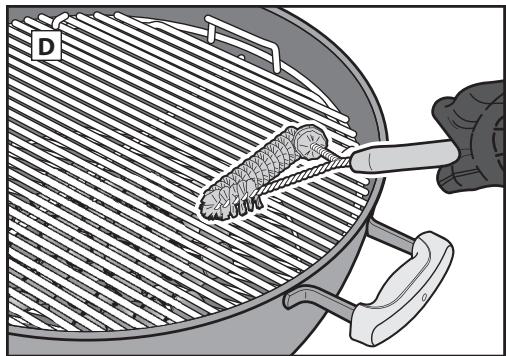
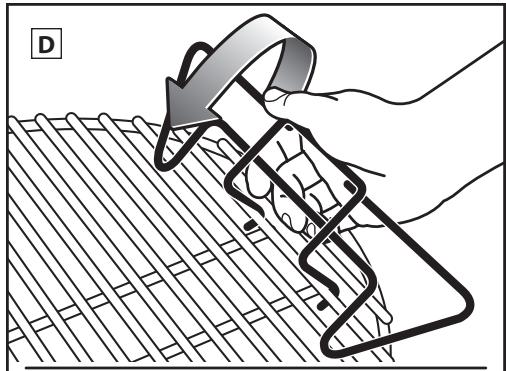
- Once the cooking grate is preheated, using a stainless steel bristle grill brush, clean the cooking grate (D).
Note: Use a stainless steel bristle grill brush. Replace brush if any loose bristles are found on cooking grate or brush.
- Open the lid, and place your food on the grate.
- Place the lid on the grill. Consult recipe for recommended cooking times.
Note: When removing the grill lid during cooking, lift to the side, rather than straight up. Lifting straight up may create suction, drawing ashes up onto your food.
When finished cooking...
Close the lid damper and bowl vents to extinguish the charcoal.
Grilling With Indirect Heat
Use the indirect method for larger cuts of meat that require 20 minutes or more of grilling time, or for foods so delicate that direct exposure to the heat would dry them out or scorch them, such as:
- Joints
- Bone-in poultry pieces
Whole fish
Delicate fish fillets
Whole chickens
Turkeys
Ribs
Indirect heat can also be used for finishing thicker foods or bone-in cuts that have been seared or browned first over direct heat.
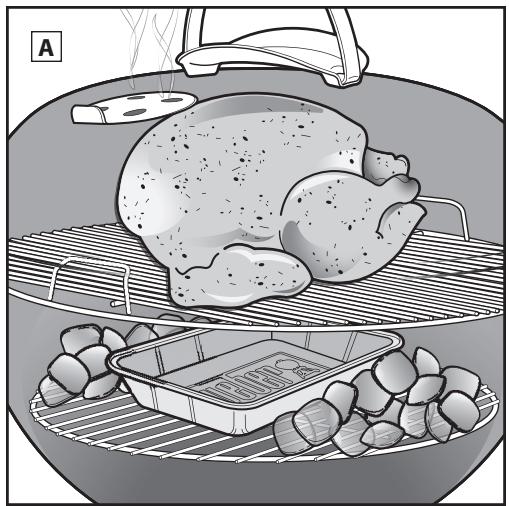
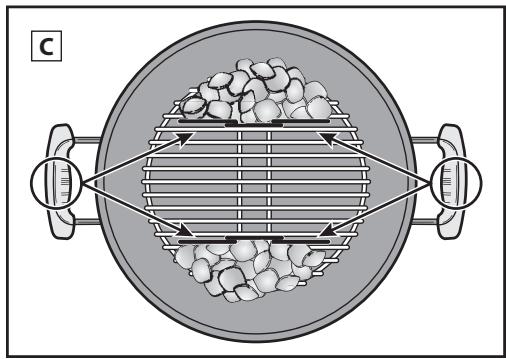
With indirect heat, the heat is on both sides of the grill, or off to one side of the grill. The food sits on the portion of the cooking grate without charcoal directly below it (A).
The radiant and conductive heat are still factors, but they are not as intense while indirect cooking. However, if the lid of the grill is closed, as it should be, there is another kind of heat generated: convection heat. Heat rises, reflects off the lid and inside surfaces of the grill, and circulates to slowly cook the food evenly on all sides.
Convection heat doesn't sear or brown the surface of the food the way radiant and conductive heat do. It cooks it more gently all the way to the centre, like the heat in an oven.
Arranging the Charcoal for Indirect Heat
- Always wear barbecue mitts or gloves conforming to EN 407, Contact Heat rating level 2 or greater, when using your charcoal barbecue.
Note: The grill, including the handles, lid damper and bowl vents, will become hot. Make sure that you are wearing barbecue mitts or gloves to avoid burning your hands.
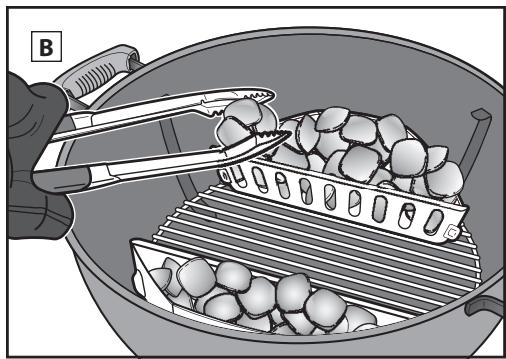
- After the charcoal is fully lit, with long tongs, arrange the charcoal so that they will be set on either side of the food (B). Position the charcoal on the sides of the bowl opposite the handles (C), either directly onto the charcoal grate or in the charcoal rails or Char-Baskets if they are being used. A drip pan may be placed between the charcoal to collect drippings.
USING CHARCOAL RAILS:
Align the charcoal grate so that the steel wires run across the kettle from handle to handle. Then, position the charcoal rails so that they hook over the outside straight wires of the charcoal grate. The front of the charcoal rails should slip over the fourth wire of the charcoal grate and click into place (D).
- Replace the cooking grate.
- Place the lid on the grill. If your grill has a thermometer, always position the lid so that the thermometer is not above the charcoal where it will be exposed to direct heat (E).
- Open the lid damper.
- Preheat the grate for approximately 10 to 15 minutes.
- Once the cooking grate is preheated, using a stainless steel bristle grill brush, clean the cooking grate.
Note: Use a stainless steel bristle grill brush. Replace brush if any loose bristles are found on cooking grate or brush.
- Open the lid, and place your food on the grate.
- Place the lid on the grill. Consult recipe for recommended cooking times.
Note: When removing the grill lid during cooking, lift to the side, rather than straight up. Lifting straight up may create suction, drawing ashes up onto your food.
When finished cooking...
Close the lid damper and bowl vents to extinguish the charcoal.

Wear Gloves
Always wear barbecue mitts or gloves conforming to EN 407, Contact Heat rating level 2 or greater, when using your charcoal barbecue. Vents, dampers, handles, and the bowl will all get hot during the grilling process, so be sure to keep your hands and forearms protected.
Skip the Lighter Fluid
Avoid using lighter fluid, as it can impart a chemical taste to your food. Chimney starters (sold separately) and lighter cubes (sold separately) are much cleaner and much more effective ways of lighting charcoal.
Preheat the Grill
Preheating your grill with the lid closed for 10 to 15 minutes prepares the cooking grate. With all of the charcoal glowing red, the temperature under the lid should reach 500^ . The heat loosens any bits and pieces of food hanging onto the grate, making it easy to brush them off with a stainless steel bristle grill brush. Preheating your grill gets the grate hot enough to sear or brown properly and also helps prevent food from sticking to the grate.
Note: Use a stainless steel bristle grill brush. Replace brush if any loose bristles are found on cooking grate or brush.
Oil the Food, Not the Grate
Oil prevents food from sticking and also adds flavour and moisture. Lightly brushing or spraying the food with oil works better than brushing the grate.
Keep the Air Flowing
A charcoal fire needs air. The lid should be closed as much as possible, but keep the lid damper and bowl vent open. Remove the ashes on the bottom of the grill regularly to prevent them from blocking the vents.
Put a Lid on It
For four important reasons, the lid should be closed as much as possible.
- Keeps the grate hot enough to sear or brown the food.
- Speeds up the cooking time and prevents the food from drying out.
- Traps the smokiness that develops when fat and juices vapourise in the grill.
- Prevents flare-ups by limiting oxygen.
Tame the Flame
Flare-ups happen, which is good because they sear or brown the surface of what you are grilling; however, too many flare-ups can burn your food. Keep the lid on as much as possible. This limits the amount of oxygen inside the grill, which will help extinguish any flare-ups. If the flames are getting out of control, move the food over indirect heat temporarily, until they die down.
Watch the Time and Temperature
If you are grilling in a colder climate or in a higher altitude, the cooking times will be longer. If the wind is blowing hard, it will raise a charcoal grill's temperature, so always keep close to your grill and remember to keep the lid on as much as possible so that the heat does not escape.
Frozen or Fresh
Whether you are grilling frozen or fresh food, follow the safety guidelines on the package and always cook it to the recommended internal temperature. Frozen food will take longer to grill and may need more fuel to be added depending on the type of food.
Keeping it Clean
Follow a few basic maintenance instructions to keep your grill looking and grilling better for years to come!
- For proper air flow and better grilling, remove accumulated ashes and old charcoal from the bottom of the kettle and the ash catcher before use. Make sure that all of the charcoal is fully extinguished and the grill is cool before doing so.
- You may notice "paint-like" flakes on the inside of the lid. During use, grease and smoke vapours slowly oxidize into carbon and deposit on the inside of your lid. Brush the carbonised grease from the inside of the lid with a stainless steel bristle grill brush. To minimise further build-up, the inside of the lid can be wiped with a paper towel after cooking while the grill is still warm (not hot).
- If your grill is subject to a particularly harsh environment, you will want to clean the outside more often. Acid rain, chemicals, and salt water can cause surface rusting to appear. WEBER recommends wiping down the outside of your grill with warm soapy water. Follow up with a rinse and thorough drying.
- Do not use sharp objects or abrasive cleaners to clean the surfaces of your grill.
Cooking times for beef and lamb use the United States Department of Agriculture definition of medium doneness, unless otherwise noted. The cuts, thicknesses, weights and grilling times are meant to be guidelines. Factors such as altitude, wind and outside temperature can affect cooking times.
Visit www.weber.com for recipes and grilling tips.
| Thickness/Weight | Approximate Total Grilling Time | ||
| RED MEAT | Steak:New York strip, porterhouse, rib-eye, T-bone, and fillet mignon (tenderloin) | 2 cm thick | 4 to 6 minutes direct high heat |
| 2.5 cm thick | 6 to 8 minutes direct high heat | ||
| 5 cm thick | 14 to 18 minutes brown 6 to 8 minutes direct high heat, and grill 8 to 10 minutes indirect high heat | ||
| Flank Steak | 0.7 kg to 1 kg, 2 cm thick | 8 to 10 minutes direct medium heat | |
| Minced Beef Patty | 2 cm thick | 8 to 10 minutes direct medium heat | |
| Tenderloin | 1.4 to 1.8 kg | 45 to 60 minutes 15 minutes direct medium heat, and grill 30 to 45 minutes indirect medium heat | |
| PORK | Bratwurst: fresh | 85 g link | 20 to 25 minutes direct low heat |
| Chop: boneless or bone-in | 2 cm thick | 6 to 8 minutes direct high heat | |
| 3 to 4 cm thick | 10 to 12 minutes brown 6 minutes direct high heat, and grill 4 to 6 minutes indirect high heat | ||
| Ribs: baby back, spareribs | 1.4 to 1.8 kg | 1½ to 2 hours indirect medium heat | |
| Ribs: country-style, bone-in | 1.4 to 1.8 kg | 1½ to 2 hours indirect medium heat | |
| Tenderloin | 0.5 kg | 30 minutes brown 5 minutes direct high heat, and grill 25 minutes indirect medium heat | |
| POULTRY | Chicken Breast: boneless, skinless | 170 to 227 g | 8 to 12 minutes direct medium heat |
| Chicken Thigh: boneless, skinless | 113 g | 8 to 10 minutes direct medium heat | |
| Chicken Pieces: bone-in, assorted | 85 to 170 g | 36 to 40 minutes 6 to 10 minutes direct low heat, 30 minutes indirect medium heat | |
| Chicken: whole | 1.8 to 2.25 kg | 1 to 1¼ hours indirect medium heat | |
| Cornish Game Hen | 0.7 to 0.9 kg | 60 to 70 minutes indirect medium heat | |
| Turkey: whole, unstuffed | 4.5 to 5.5 kg | 2 to 2½ hours indirect medium heat | |
| SEAFOOD | Fish, Fillet, or Steak: halibut, red snapper, salmon, sea bass, swordfish, tuna | 0.6 to 1.25 cm thick | 3 to 5 minutes direct medium heat |
| 2.5 to 3 cm thick | 10 to 12 minutes direct medium heat | ||
| Fish: whole | 0.5 kg | 15 to 20 minutes indirect medium heat | |
| 1.4 kg | 30 to 45 minutes indirect medium heat | ||
| Shrimp | 14 g | 2 to 4 minutes direct high heat | |
| VEGETABLES | Asparagus | 1.25 cm diameter | 6 to 8 minutes direct medium heat |
| Maize | in husk | 25 to 30 minutes direct medium heat | |
| husked | 10 to 15 minutes direct medium heat | ||
| Mushroom | shiitake or button | 8 to 10 minutes direct medium heat | |
| portobello | 10 to 15 minutes direct medium heat | ||
| Onion | halved | 35 to 40 minutes indirect medium heat | |
| 1.25 cm slices | 8 to 12 minutes direct medium heat | ||
| Potato | whole | 45 to 60 minutes indirect medium heat | |
| 1.25 cm slices | 9 to 11 minutes parboil 3 minutes, and grill 6 to 8 minutes direct medium heat | ||
Make sure food fits on the grill with the lid down, leaving approximately 2.5cm of clearance between the food and lid.
Cooking Tips
- Grill steaks, fish fillets, boneless chicken pieces, and vegetables using the direct method for the time given on the chart (or to the desired doneness) turning food once, halfway through grilling time.
- Grill roasts, whole poultry, bone-in poultry pieces, whole fish, and thicker cuts using the indirect method for the time given on the chart (or until an instant-read thermometer registers the desired internal temperature).
- Before carving, let roasts, larger joints of meat, and thick chops and steaks rest for 5 to 10 minutes after cooking. The internal temperature of the meat will rise 5 to 10 degrees during this time.
- For additional smoke flavour, consider adding hardwood chips or chunks (soaked in water for at least 30 minutes and drained) or moistened fresh herbs such as rosemary, thyme, or bay leaves. Place the wet wood or herbs directly on the coals just before you begin cooking.
- Thaw food before grilling. Otherwise, allow for a longer cooking time if cooking frozen food.
Food Safety Tips
- Do not defrost meat, fish, or poultry at room temperature. Defrost in the refrigerator.
- Wash your hands thoroughly with hot, soapy water before starting any meal preparation and after handling fresh meat, fish, and poultry.
- Never place cooked food on the same plate raw food was on.
- Wash all plates and cooking utensils that have come into contact with raw meats or fish with hot, soapy water and rinse.
Weber-Stephen Products Belgium Sprl
+3215283090
service-be@weber.com
CHILE
Weber-Stephen Chile SpA.
+01562-3224-3936
CZECH REPUBLIC
Weber-Stephen CZ & SK spel. s r.o.
+42267312973
info-cz@weberstephen.com
DENMARK
Weber-Stephen Nordic ApS
+4599363010
service-dk@weber.com
FRANCE
Weber-Stephen France SAS
+330810193237
service-fr@weber.com
GERMANY
service-de@weber.com
ICELAND
Jarn & Gler Wholesale EHF
+3545858900
INDIA
Weber-Stephen Barbecue Products India Pvt. Ltd.
08042406666
customercare@weberindia.com
ISRAEL
D&S Imports
+97239241119
info@weber.co.il
ITALY
Weber-Stephen Products Italia Srl
+390444367911
service-it@weber.com
NETHERLANDS
Weber-Stephen Holland B.V.
+31202623978
service-nl@weber.com
POLAND
Weber-Stephen Polska Sp. z o.o.
+48223920469
info-pl@weberstephen.com
RUSSIA
Weber-Stephen Vostok LLC
+74959566321
info.ru@weberstephen.com
SOUTH AFRICA
Weber-Stephen Products (South Africa) Pty Ltd.
+27114542369
info@weber.co.za
SPAIN
Weber-Stephen Ibérica SRL
+34935844055
service-es@weber.com
SWITZERLAND
service-uk@weber.com
USA
Weber-Stephen Products LLC
8479345700
support@weberstephen.com
For Republic of Ireland, please contact:
Weber-Stephen Products (U.K.) Limited
For other eastern European countries, such as ROMANIA,
SLOVENIA, CROATIA, or GREECE, please contact:
For Baltic states, please contact:
Weber-Stephen Nordic ApS.
weber.com

WEBER-STEPHEN PRODUCTS LLC
www.weber.com