VENTILATEUR BRUMISATEUR SUR PIED 180 CM - Fan OFRESH - Free user manual and instructions
Find the device manual for free VENTILATEUR BRUMISATEUR SUR PIED 180 CM OFRESH in PDF.
Questions des utilisateurs sur VENTILATEUR BRUMISATEUR SUR PIED 180 CM OFRESH
0 question sur cet appareil. Repondez a celles que vous connaissez ou posez la votre.
Poser une nouvelle question sur cet appareil
Download the instructions for your Fan in PDF format for free! Find your manual VENTILATEUR BRUMISATEUR SUR PIED 180 CM - OFRESH and take your electronic device back in hand. On this page are published all the documents necessary for the use of your device. VENTILATEUR BRUMISATEUR SUR PIED 180 CM by OFRESH.
USER MANUAL VENTILATEUR BRUMISATEUR SUR PIED 180 CM OFRESH
natural_image
Black outdoor air conditioner fan with visible blades and wheels, mounted on a stand (no text or symbols)Thank you for purchasing the high performance 180cm Mist Fan. This product is suitable for outdoor restaurants, florist shops, workshops, swimming pool area, terrace, playground or anywhere you have high temperatures and need a refreshing lift.
These fans are checked carefully during production, and we are confident that they will meet your expectations.
WARNING:
- This appliance is not intended for use by persons (including children) with reduced physical, sensory or mental capabilities, or lack of experience or knowledge, unless they have been given supervision or instruction concerning the use of this appliance by a person responsible for their safety. Children should be supervised to ensure they don’t play with the appliance.
- Please have an electrician install the fan.
- The power supply is 220-240V, 50Hz. The machine must be earthed.
- Do not pour any liquid inside without first installing the waterproof structure, as it will short-circuit the unit.
- Do not insert hands or any object into the fan guards or misting plate when the unit is in operation.
- Turn off the machine and immediately call an electrician if you notice any of the following: smoke, loud noises, appliance simply not working.
- Do not interfere with the fan as you are not qualified to do so.
- Turn off the fan before you attempt to clean the surface.
- Do not install the fan in any area where the temperature exceeds 40^ C.
- For safety – do not open the fan cover.
FEATURES:
-
This high performance 180cm Mist Fan has an Epoxy coating to preserve against corrosion.
-
The misting and blowing is a combination of two different electric motors. High quality bearings keep a stable performance, moderate temperature, low noise and continuous usage.
-
With an advanced misting system, the mist volume can be adjusted. The water pump and float switch will cut out when the water supply has been reduced to the minimum level for operation.
-
Misting time will last up to 10 hours (it depends of the mist volume).
-
The trolley makes this fan easy to move.
USAGE:
See overleaf for a drawing of the assembly instructions.
- Open the water tank cover, fill the tank with clean water and then close the cover.
- Connect the fan and water pump switches and then connect the power supply. You can also adjust the mist level if required.
• The speed switch reads as follows:
'0' OFF
'1' LOW
'2' MEDIUM
'3' HIGH
- In attachment to setting '2' (medium), you will see a pucker handle. When using it, press the button in the handle to open, then repress the handle.
- To adjust the oscillation, please wait for the blade to stop, and then disconnect the power. Please note: the fan will not oscillate if the adjusting screw is set at the centre hole of the oscillating fixture.
MAINTENANCE:
- If outside, keep the fan covered with a tarp or plastic bag to protect from dust or rain.
- To ensure the fan has a long lifespan, remember to replace the gearbox oil, bearing oil and other rotary parts approximately once a year (each 2000 hours)
- Keep the fan clean, remembering to turn the power off first!
- Clear the pump regularly in order to make it running smoothly. Supply clean water for the water tank and clean the water tank timely
- Clean the fan and seal the whole machine with plastic bag and put it in dry, ventilating place, when it is not used for a long time
WARRANTY AND AFTER SALE SERVICE PROCEDURE:
All our misting systems are guaranteed for 1 year parts and labor. If, during this period, product start to malfunction, please follow the return procedure below:
- Before anything else, call customer service at 0951 634 467 (in France)
to determine the cause of the problem and the solution to it or contact your local dealer - After approval of the technician, pack your misting system in its original packaging.
- Attach the original purchase receipt by circling the date (no photocopies will be accepted)
- Send it, at your expense, to: 13 rue des Alpes EFYDIS 07300
Tournon, France or to your local dealer - We will repair or replace your misting system and return it to you at our expense at the address mentioned on the package (address in France).
- We will also return receipt, dated and buffered to revalidate the warranty.
If you have any questions or comments, do not hesitate to contact us at contact@efydis.fr 0033951 634 467.
Manuel d'installation / Manuale di Installazione / Manual de Instalación / Setup Manual
Schéma d'assemblage / Disegno di assieme / Asamblea dibujo / Assembly drawing
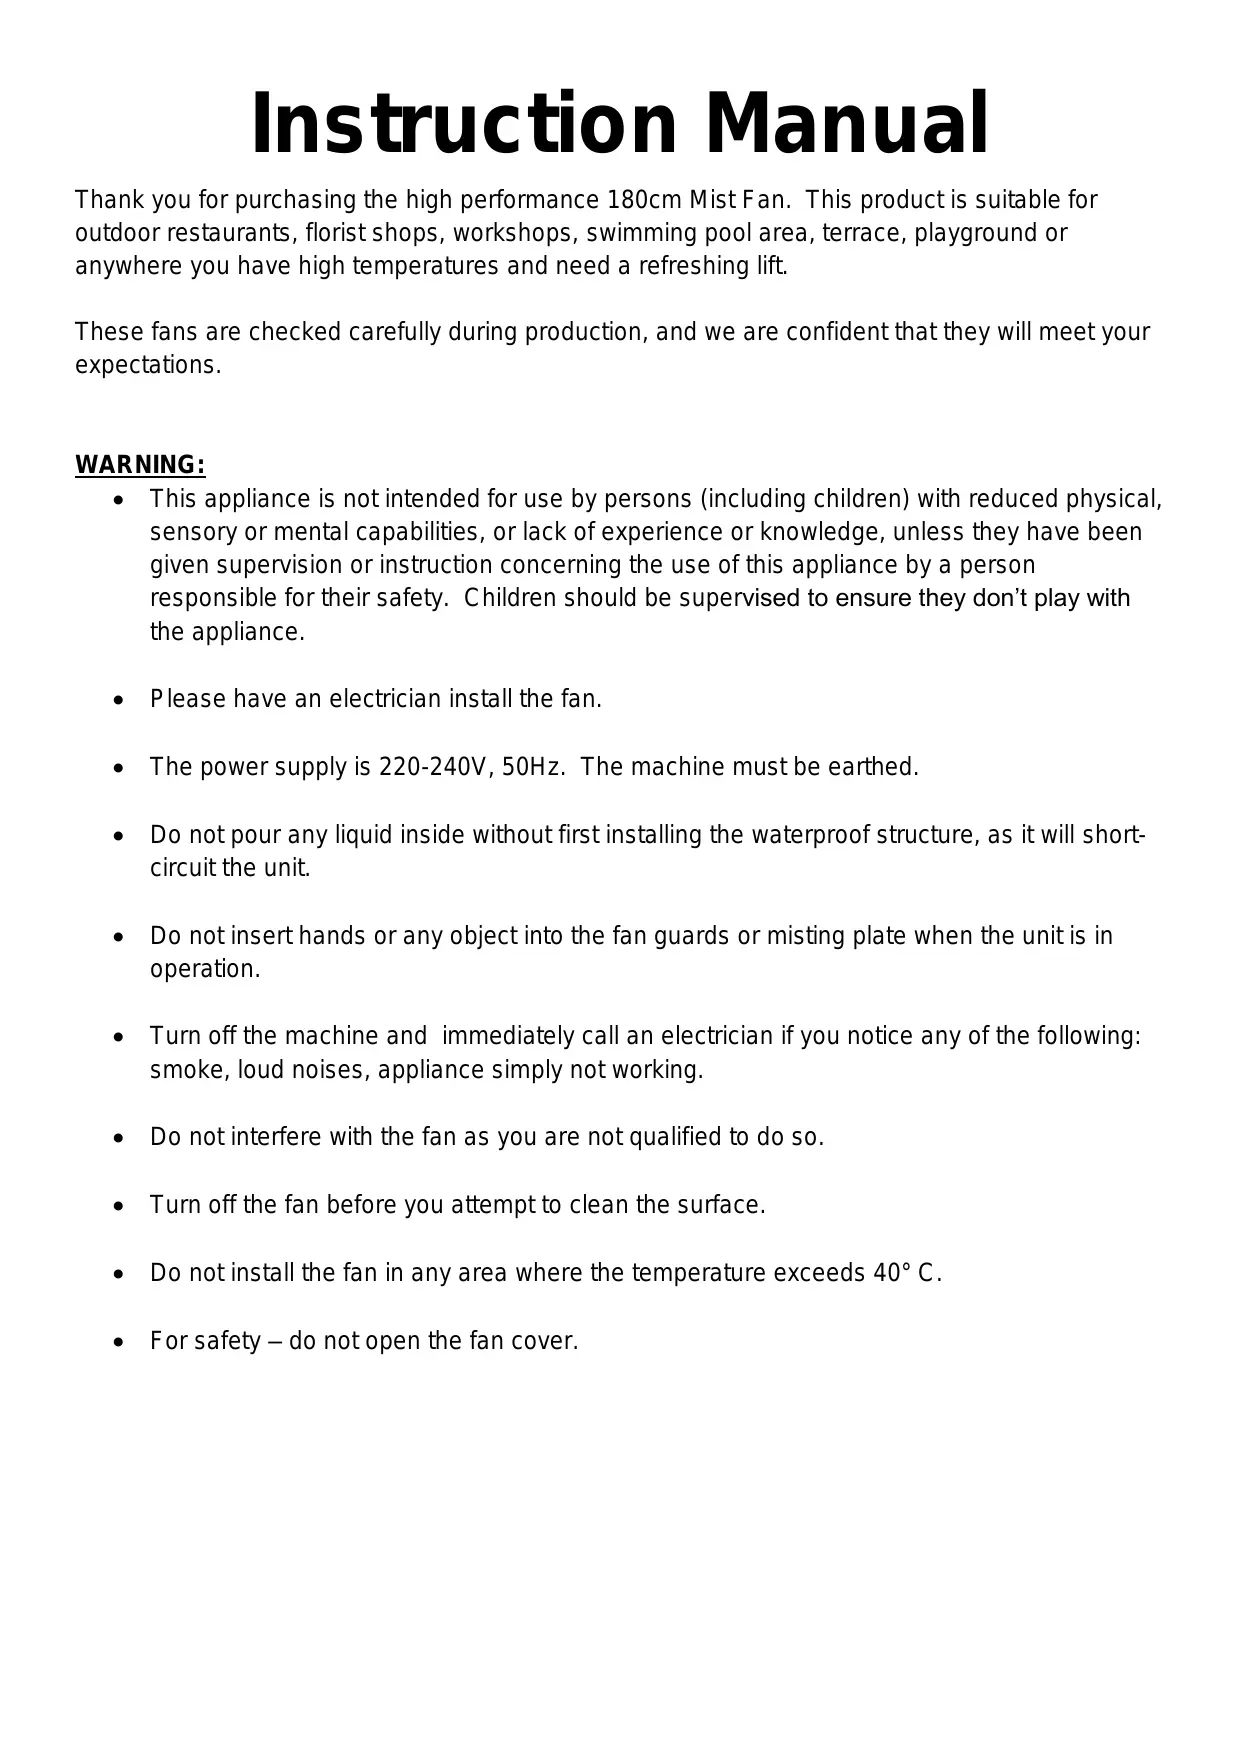
Etape 1:
Screw the pillar on the cart with screws M8x25 and nuts M8
text_image
Pilier / pilastro / pilar / pillar Visses M8x25 / Viti M8x25 / Tornillos M8x25 / Screws M8x25 Chariot / carrello / carro / cart Rondelle 8 / rondella 8 / arandela 8 / washer 8 Rondelle 8 / rondella 8 / arandela 8 / washer 8 Rondelle ressort 8 / rondella primavera 8 / arandela elástica 8 / Spring washer 8 Ecrou M8 / Dadi M8 / Tuercas M8 / Nut M8《Step 1》
Schéma / Diagramma / Diagrama / Sketch map
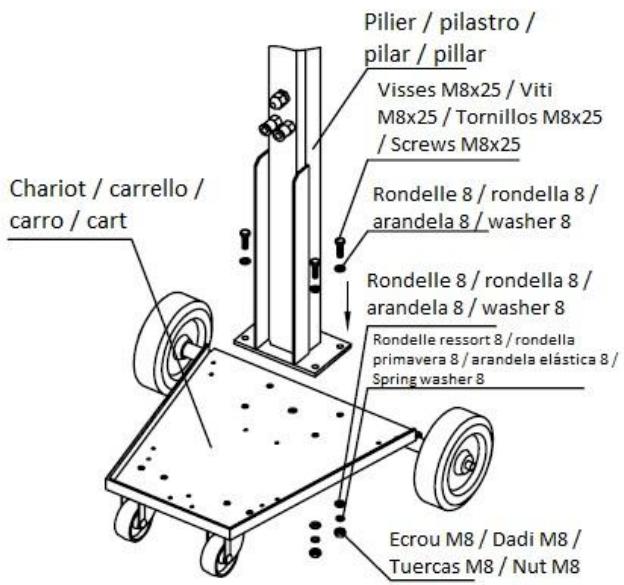
text_image
Raccord eau / collegamento acqua / conexión de agua / Waterconnection Tuyau / Tubo / Tubo / Hose PressPush the hose into the water connection
Disconnections
of the hose: Press the washer and pull the hose out of the fitting
《Attachment 1》
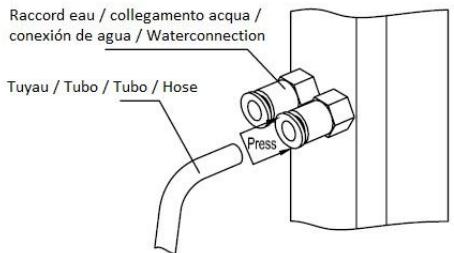
Step 2: Put the head of the fan on the pillar. Lock with screw M6x10. Connect the power cord with M4x10 screws and push the water hose into the fitting
text_image
Tete de ventilateur /testa ventilatore / cabeza del ventilador / Fan head M6x10 M4x10 Tuyau d'eau / tubo dell'acqua / tubo de agua / water hose Pilier / Pilastro / Pilar / Pillar《Step 2》
Step 3: Connect the plug in the sockets and screw the plate with screws M5x12
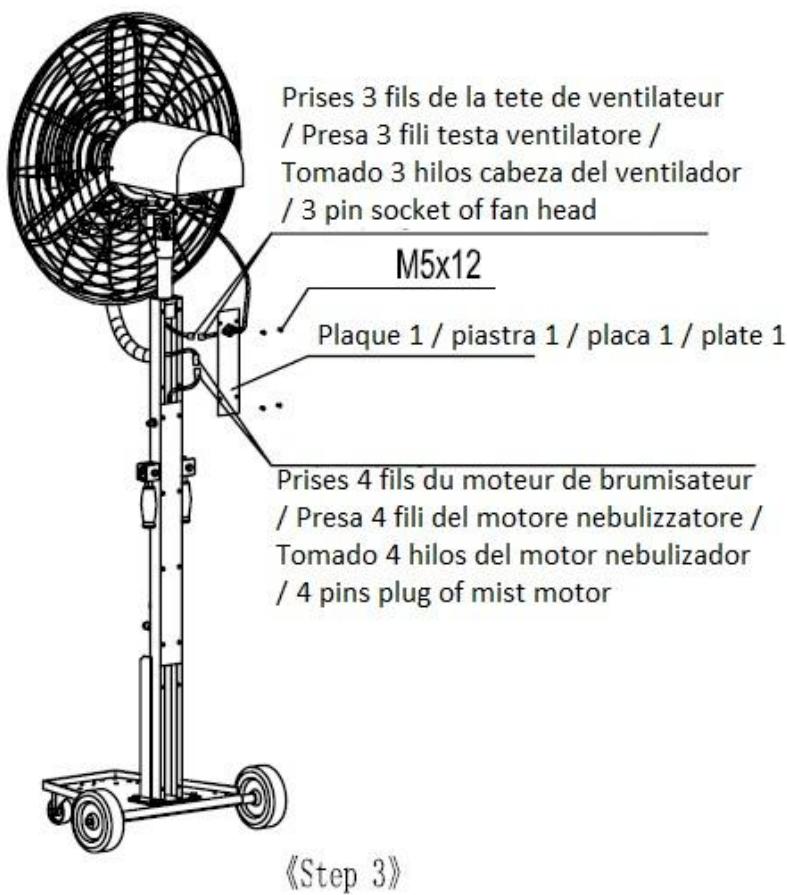
text_image
Prises 3 fils de la tete de ventilateur / Presa 3 fili testa ventilatore / Tomado 3 hilos cabeza del ventilador / 3 pin socket of fan head M5x12 Plaque 1 / piastra 1 / placa 1 / plate 1 Prises 4 fils du moteur de brumisateur / Presa 4 fili del motore nebulizzatore / Tomado 4 hilos del motor nebulizador / 4 pins plug of mist motor 《Step 3》Step 4: Plug the twins pin plug and socket and place the water tank on the cart
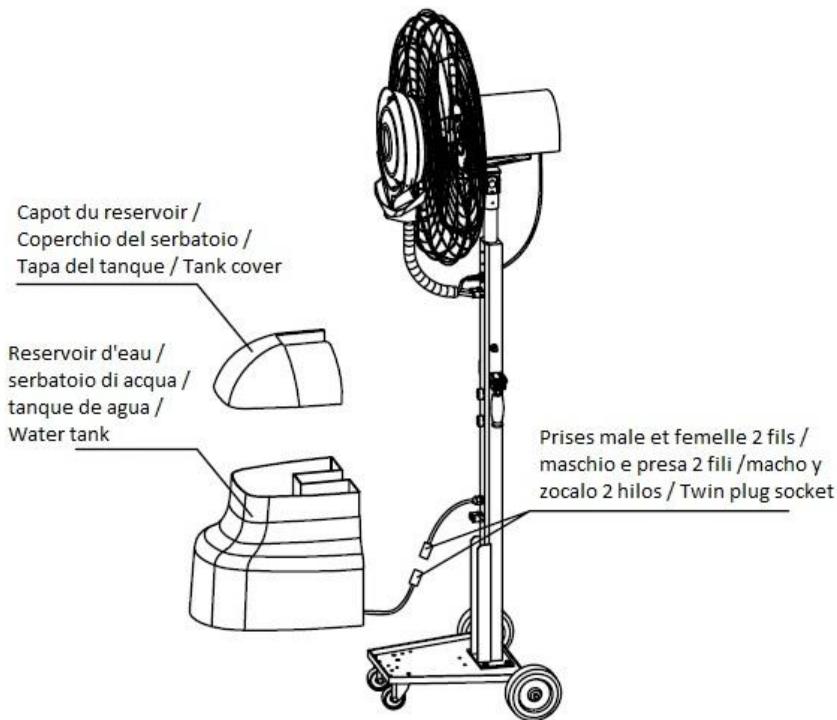
text_image
Capot du reservoir / Coperchio del serbatoio / Tapa del tanque / Tank cover Reservoir d'eau / serbatoio di acqua / tanque de agua / Water tank Prises male et femelle 2 fils / maschio e presa 2 fili /macho y zocalo 2 hilos / Twin plug socket《Step 4》
Step 5: Place the pump in the bottom of the tank, connect the 3 and 4 pin plugs to the sockets and screw the plate 2 with the screws M5x12
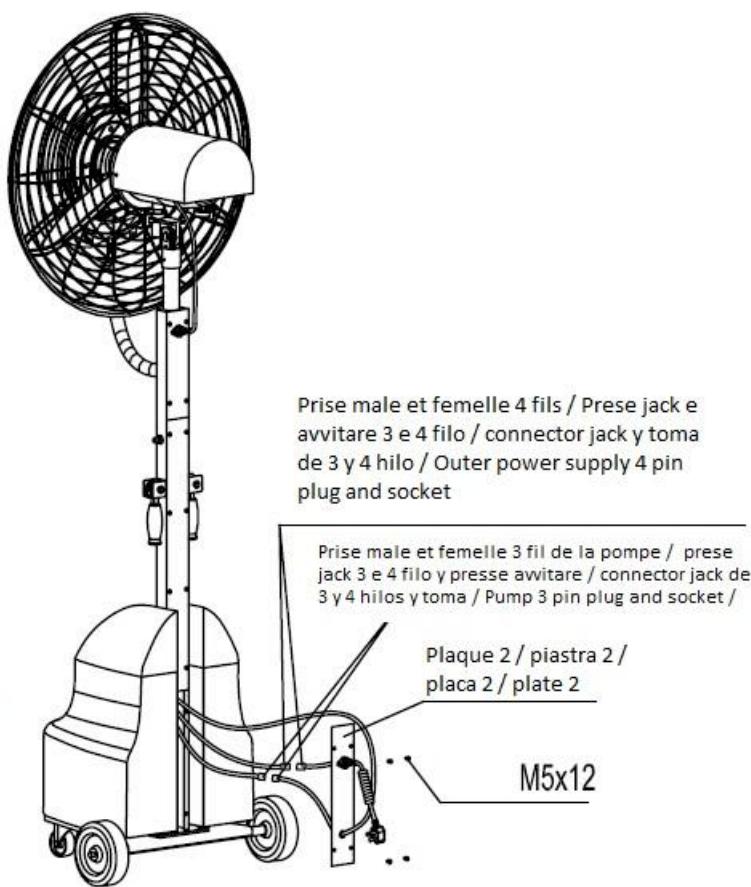
text_image
Prise male et femelle 4 fils / Prese jack e avvitare 3 e 4 filo / connector jack y toma de 3 y 4 hilo / Outer power supply 4 pin plug and socket Prise male et femelle 3 fil de la pompe / prese jack 3 e 4 filo y presse awitare / connector jack de 3 y 4 hilos y toma / Pump 3 pin plug and socket / Plaque 2 / piastra 2 / placa 2 / plate 2 M5x12《Step 5》
Poignée pliable / manico pieghevole / mango plegable / Folding handle
Ressort / primavera / primavera / spring
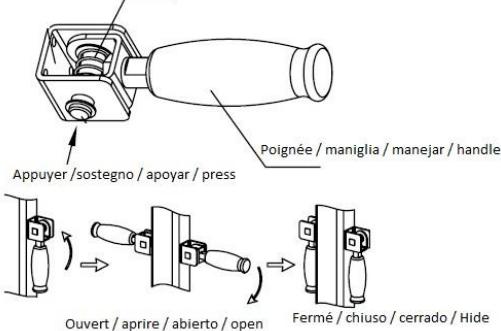
text_image
Appuyer /sostegno / apoyar / press Poignée / maniglia / manejar / handle Ouvert / aprire / abierto / open Fermé / chiuso / cerrado / Hide《Attachment 2》