USER MANUAL 14 m³/h HAYWARD
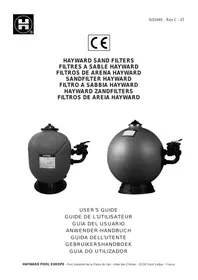
HAYWARD SAND FILTERS FILTRES A SABLE HAYWARD FILTROS DE ARENA HAYWARD SANDFILTER HAYWARD FILTRO A SABBIA HAYWARD HAYWARD ZANDFILTERS FILTROS DE AREIA HAYWARD
USER'S GUIDE
GUIDE DE L'UTILISATEUR
GUIA DEL USUARIO
ANWENDER-HANDBUCH
GUIDA DELL'UTENTE
GEBRUIKERSHANDBOEK
GUIA DO UTILIZADOR
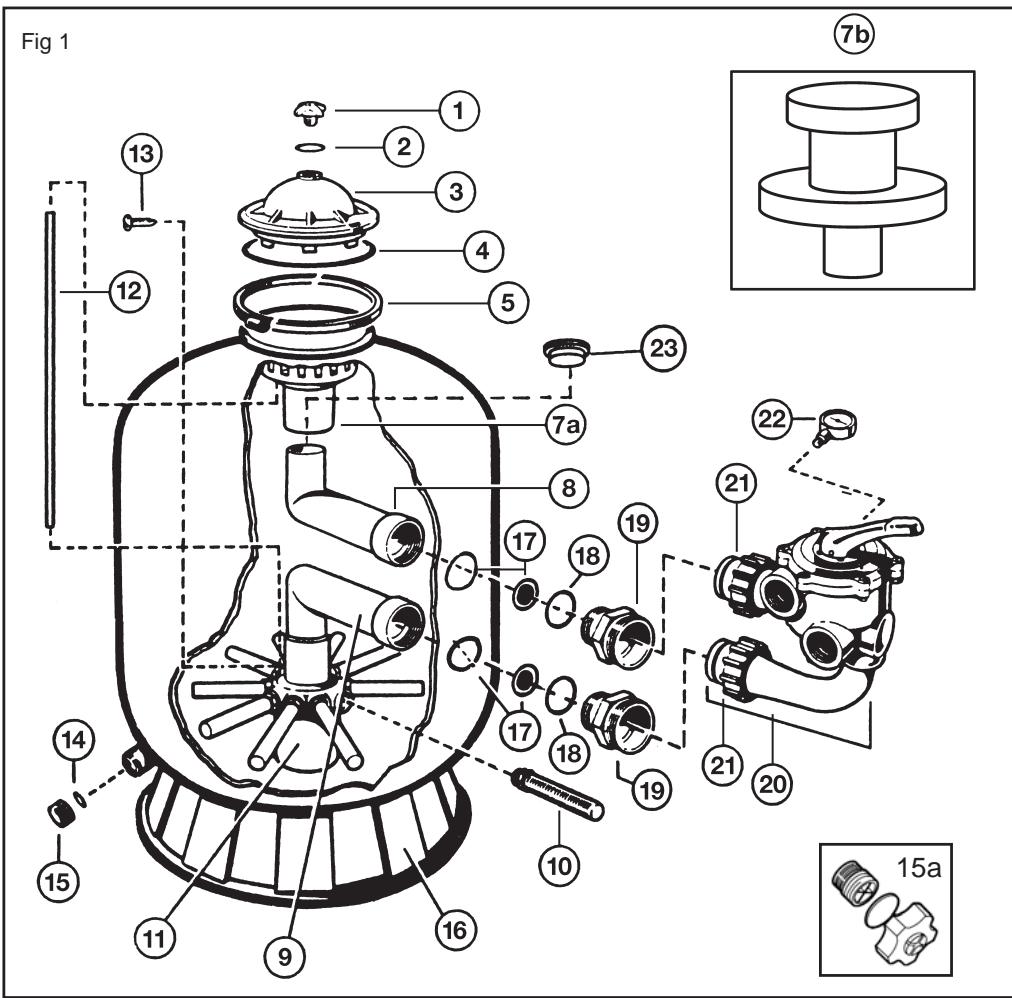
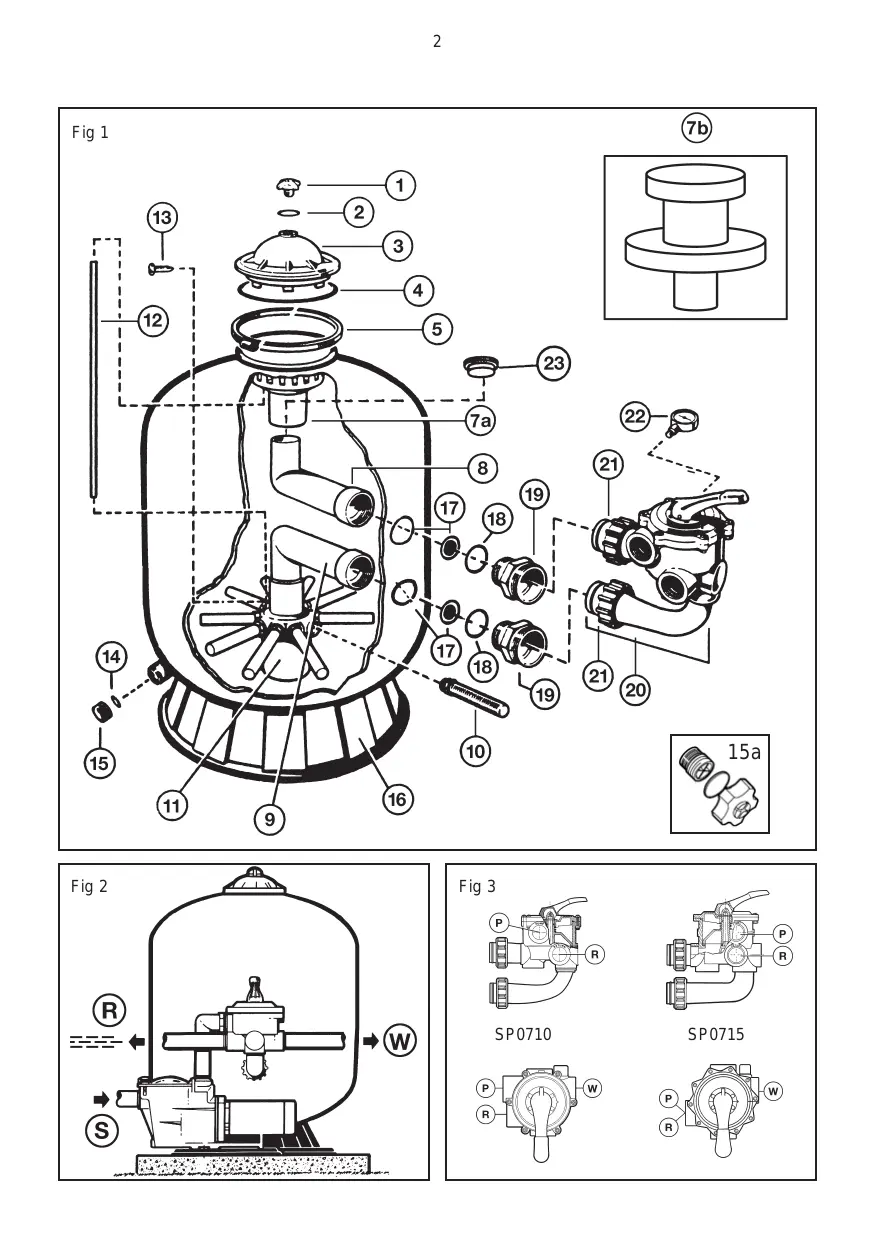
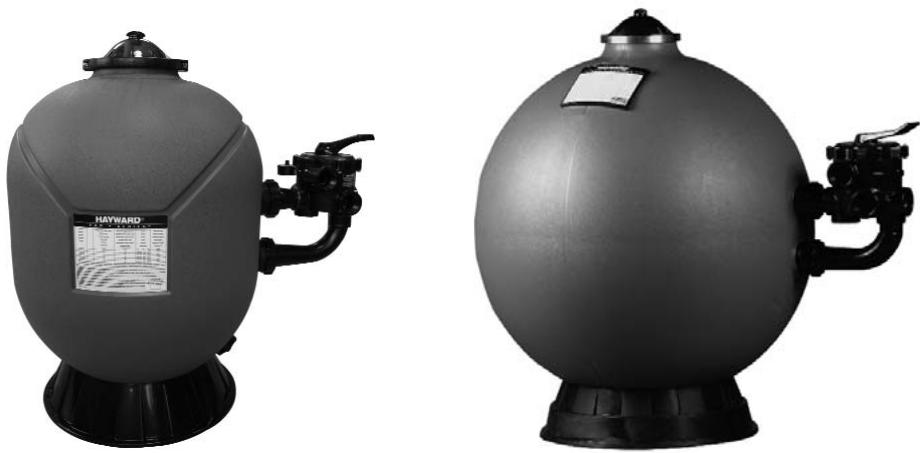
You have just become the owner of a sand filter, his base and his valve (see figure 1).
OPERATION
Your filtration system uses a special sand designed to trap impurities in the pool water. The sand is poured into the tank and acts as a permanent filtration system. The pump draws in the unfiltered pool water, which contains impurities in suspension, and feeds it to the multi-way control valve. When the water flows through the sand, the impurities are trapped there and the water that returns to your pool is filtered.
INSTALLATION
- Locating the filter
Find a clean, level spot. The top of the filter must be at least 1.5m distant from the water level. Place the filter so that the piping, the valve (20), and the drain plug (15) are easy to reach. This will make servicing and winterizing easier.
- Assembling the pump
Assemble the pump and its mount with the filter as indicated by the manufacturer's instructions.
- Filling the filter
The sand is put in through the opening in the top of the filter.
a. Remove diffuser (7) and pull aside air relief tube (12). Cover the opening in the top of the elbow (8) with the cap (23) provided for this purpose, to prevent any sand getting in it during filling. Make sure that the drain plug (15) is in place. All laterals (10) must be in the down position.
b. Half-fill the filter with water, then pour in the required quantity of sand (Cf. table on label).
The surface of the sand should be levelled and reach the middle of the filter.
c. Remove the cap (23).
d. Replace diffuser (7) on top elbow.
e. Replace air relief tube (12). Place O-Ring (4) on dome (3), install manual air relief cap (1) with his O-Ring (2) and place dome, once complete, on top of the filter.
f. Fix dome (3) on valve with the clamp (5). There should be around 5 mm of space left between the two parts of the clamp.
- Assembling the valve
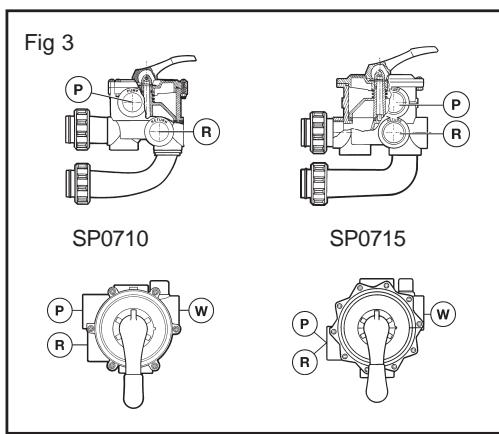
a. Make sure that the «PUMP» outlet of the valve its towards the pump. Align the two valve pipe connections, with O-Rings in place, with the two openings in the side of the filter tank and press in firmly. Secure the assembly to the tank connections with the two bulkhead locknuts (21).
b. Remove the black plastic screw on the side of the valve and replace it with the pressure gauge (22). Screw in by hand without forcing.
c. Connect the «PUMP» outlet (P) of the valve to the top outlet of the pump as indicated by the manufacturer's instructions.
- Connecting the valve
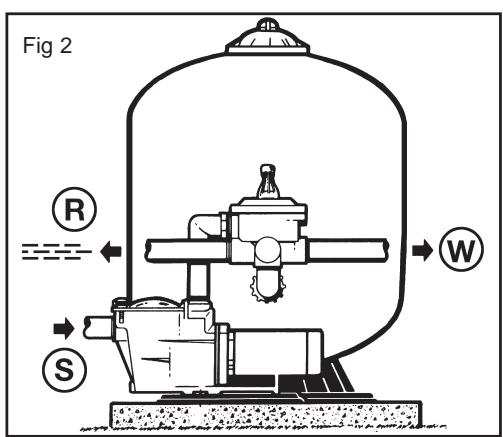
Then simply connect the pipes from the pool (cf. fig. 2) and from the skimmers (S) to the bottom port of the pump, on the prefilter side, the discharge pipes to the valve port
marked «RETURN» (R), and the drain connection to the valve port marked «WASTE» (W).
- Make the electrical connections of the pump as indicated by the manufacturer's instructions.
- To avoid leaks, make sure that the drain plug (15) in in place and that all connections are tight.
Note 1: Do not force when screwing the connection end fittings into the valve unions.
Note 2. Coat the male threads with Teflon.
STARTING UP
IMPORTANT: ALWAYS STOP THE PUMP BEFORE OPERATING THE MULTI-WAY VALVE.
- Check that all connections are tight and that the filter contains just the right amount of sand.
- Set the valve to «BACKWASH». Always lower the handle before turning.
- Start the pump as indicated by the manufacturer's instructions. Check that water flows normally in the circuit.
WARNING: All suction and discharge valves must be open when the pump is started. Otherwise, there is a risk of property damage, grave injury, or death.
Once the water flows smoothly, let the pump run for at least another 2 minutes. This backwash is recommended to eliminate any impurities or fine particles from the filtering sand.
- Stop the pump and set the valve to «RINSE». Restart the pump and let run until the water becomes clear in the valve circulation telltale (about a minute).
- Stop the pump and set the valve to «FILTER». Restart the pump and filtering starts. Adjust the inlet and outlet valves for the desired water flow.
- Carefully note the pressure reading at that time and the position of the needle on the pressure gauge. As the filter operates, impurities are retained and the pressure increases in the tank.
When it exceeds the initial pressure (clean filter) by 10 PSI (0.7 bars or kg/cm^2 ), the filter must be backwashed.
Note 1. When your pool's water is cleaned for the first time, it may be necessary to backwash the filter frequently: the quantity of impurities is likely to be large.
Note 2. Clean the pre-filters of the pump and skimmers regularly to ensure trouble-free operation of your filtration system.
Note 3. Installations including heaters or cleaning systems with nozzles or tentacles protruding from the walls are highly sensitive to hydraulic rams because they operate at high pressure. The installer must do everything necessary to prevent hydraulic rams in the installation.
FUNCTIONS OF VALVE AND FILTER (fig. 3)
FILTER
Set the valve to "Filter" for normal filtration (6 to 8 hours a day).
BACKWASH
For cleaning filter. When filter pressure gauge rises 10 PSI (0.7 bars or kg/cm^2 ) above start-up (clean pressure).
Run the pump until the water in the sight glass is clear. Stop the pump about 2 minutes later and set the valve to "Rinse".
RINSE
With the valve set to "Rinse", run the pump for about one minute. This evacuates the dirty backwash water to a drain, not the pool. Stop the pump, set back to "Filter", and restart.
WASTE
The water is discharged directly to the sewer without going through the filter: to lower the pool water level and directly eliminate very dirty water when using the vacuum.
RECIRCULATE
The water bypasses the filter, for rapid dispersion of chemicals or for massive chlorination.
CLOSED
Cuts off circulation between the filter and the pump. NEVER USE THIS POSITION WITH THE PUMP RUNNING.
WINTERIZING
- Completely drain tank by unscrewing drain cap at base of filter tank. Leave cap off during winter.
- Rotate and leave the valve handle between any position.
- Drain and winterize pump according to pump instructions.
| LIST OF POSSIBLE PROBLEMS |
| THE FLOW FALS OFF AND/OR THE PRESSURE GAUGE READING EXCEEDS THE INITIAL PRESSURE BY 10 PSI (0,7 bars or kg/cm2). | IT BECOMES NECESSARY TO CLEAN MORE AND MORE OFTEN | THE POOL WATER DOES NOT BECOME CLEAR |
| 1. Check and empty the skimmer andpump pre-filter baskets. | 1. Check the pool for algae an if necessary add disinfectant. | 1. Check the disinfectant level, pH, and total alkalinity and adjust if necessary. |
| 2. Check that there is nothing pinching or plugging the water intake and return hoses. | 2. Check that the disinfectant level and pH are correct (adjust if necessary). | 2. Make sure that the filtration flow is correct. |
| 3. Check that there is no leak in the water intake hose (shown up by air bubbles in the water returned to the pool). | 3. Check that the surface of the sand has not solidified or become clogged (if so, remove 2 or 3 cm of sand). | 3. Run the filter longer. |
| 4. Backwash the filter. | | 4. Make sure that the valve is set to "Filter". |
| | 5. Make sure that your installation is properly connected. |
SERVICE AND REPAIRS
Consult your local dealer. No return may be made directly to the factory without the express written authorization of Hayward Pool Europe.
If malfunctioning continues, or for any other operating fault, contact your retailer-installer.
It is expressly stipulated that HAYWARD cannot be held responsible for any damage caused by its equipment if such damage is caused by non-conforming repairs whenever, during the replacement of parts, HAYWARD original parts were not used and if repair was not performed in conformity with HAYWARD instructions or if the information in this guide was not complied with.
This is also valid for any addition of parts and accessories other than those recommended by HAYWARD.
WARRANTY CONDITIONS :
HAYWARD warrants its products free from defects in material and workmanship for a period of one year from the date of purchase. A purchase proof with its date must be enclosed for any request for warranty. We invite you to keep your receipt.
HAYWARD warranty is limited to the replacement or repair, at its option, of defective products that have been used in normal conditions and according to the instructions leaflet, with no change in the product and that have been working only with genuine HAYWARD parts. Frost and chemical reaction damages are excluded of the warranty.
HAYWARD will not be responsible for any other costs (removal, labor...), neither direct or indirect damages caused by malfunction of a product.
To initiate a warranty claim and ask for repair or replacement of a product, please contact your dealer. No shipment to our factory will be accepted without our preliminary written acceptance.
Wear parts are excluded of the warranty.
Product with warranty extension : Polyethylene tank (sand filter) 5 year.

KLEP- EN FILTERFUNCTIES
FILTER (FILTER)
REPARACOES E MANUTENÇAO