USER MANUAL Vintage EDENWOOD
Thank you!
Thank you for choosing this EDENWOOD product. EDENWOOD products are chosen, tested, and recommended by ELECTRO DEPOT, so you can be sure you are getting a top-quality, easy-to-use product that won't let you down.
We're confident your new device will be a pleasure to use every day!
Welcome to ELECTRO DEPOT.
Table of Contents

Product overview
Parts
Product overview
Intended use
Specifications
Declaration of conformity

Product usage
Setup
Connections
Operation

Cleaning and maintenance
Cleaning and maintenance
Troubleshooting
Storage
Parts
| | Description |
| A | | Control panel |
| 1 |  | Power on/off button |
| 2 |  | FM/® (Bluetooth) switch |
| 3 |  | Mode knob for PHONO, CD, AUX, FM/® (Bluetooth) functions |
| 4 | REPEAT[WEZ4] | CD mode only: Repeat a single track or all tracks |
| 5 | [GW9Y] | CD mode only: Stop track or cancel a program setting |
| 6 | [S373] | CD mode only: Program up to 20 tracks |
| 7 | — | FM display with tuning pointer |
| 8 | [SX6Z] | LCD screen |
| 9 | [AHSK] | Standby/Bluetooth indicator light |
| 10 | [FHX12] | Play indicator light |
| 11 | [ASDH] | Program indicator light |
| 12 | REFAT[BDTV] | Repeat indicator light |
| 13 | [GYHZ] | CD/BT mode only: Play/pause track |
| 14 | [ABTB] | CD/BT mode only: Previous track |
| [4BKW][GBH] | CD mode only: Rewind track |
15

CD mode only: Next track
CD/BT mode only: Fast forward
16

Volume knob
17

Socket to connect an AUX input cable (not provided)
with 3.5mm jack
18

Socket to connect earphones with a 3.5mm jack (cable
not provided)
19

Open/close the CD tray
20
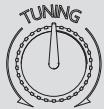
FM radio tuning knob
21
CD tray
B
Speaker
C
Lid arm
D
Lid
E
Turntable
1
45 RPM adapter
2
Turntable platter with protective mat
3
Safety screw
4
Tonearm rest with clip
5
SPEED 33/45/78
Speed switch
6
Tonearm
7
Stylus with cover
⑧
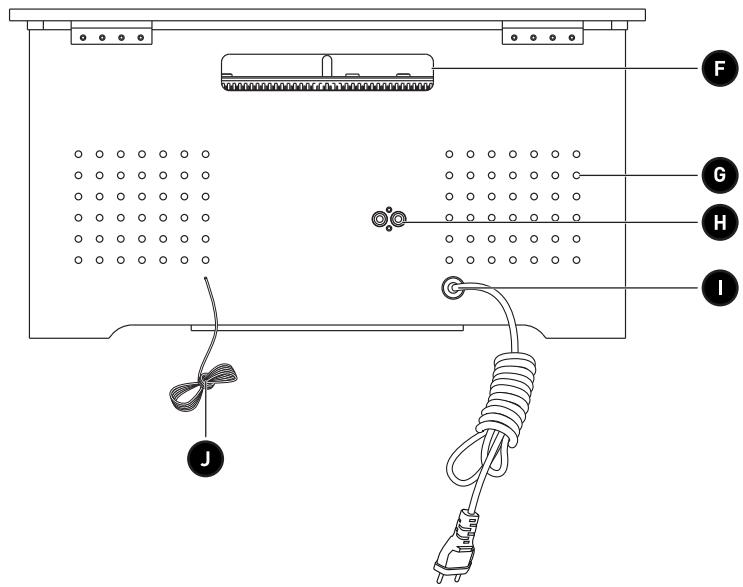
Turntable spindle
F
Handle
G
Air vents
H
R/L LINE OUT
Right and left line out sockets with 8.2mm RCA jacks (cable not provided)
I
Power cable and plug
J
FM aerial
Product overview
- Unpack and remove all labels from the unit except the nameplate. Please check that all parts are included and intact. If the unit is damaged or faulty, do not use it and take it to your retailer or after-sales service centre.
- Keep all packaging out of the reach of children. There is a risk of accidents if children play with packaging materials.
Intended use
• This product is for household use only. It is not designed for industrial or professional use.
• Any other use may damage the product or cause injury.
Specifications
| Model: | 985952 - TURNTABLE VINTAGE |
| Company name or registered trademark,business registration number andmanufacturer's address: | ELECTRO DEPOT /R.C.S. 433 744 5391 route de vendeville, 59155 FachesThumesnil, FRANCE |
| Operating voltage: | Input: 100-240V~, 50/60Hz |
| Maximum power consumption: | 30W |
| Speaker type: | 2-way |
| Speaker impedance: | 8 Ohms |
| Speaker size: | 2 speakers: 7.62cm (diameter) |
| Amplifier output power: | 10W (5W + 5W) |
| Amplifier frequency response: | 60 to 20,000Hz |
| FM radio range: | 88 to 108Mhz |
| CD player frequency response: | 60 to 20,000 Hz =/-4dB |
| Record size compatibility: | 7" (17cm), 10" (25cm), 12" (30cm) |
| Record motor: | DC servo motor |
| Record drive system: | Belt drive |
| Record speeds: | 33-1/3rpm, 45rpm and 78 rpm |
| Bluetooth version: | 5.0 (A2DP, AVRCP) |
| Bluetooth name: | EDENWOOD TURNTABLE VINTAGE |
| BT range: | Up to 10 metres |
| BT frequency: | 2.402GHz to 2.480GHz |
| Bluetooth transmission power: | ≤10dBm |
| AUX input: | 3.5mm jack |
| Line out: | 8.2mm audio RCA cable |
| Size (W x H x D): | 46.0 x 25.5 x 34.0cm |
| Weight: | 7kg |
| Replacement needle: | ITNP-S1 |
| Operating temperature: | 5°C to 40°C |
| Relative humidity range: | 5 to 90% |
| Protection class: | Class II |
Due to constant developments and improvements in the design of our products, changes to the specifications below are likely to occur without notice.
Compatibility disclaimer
Wireless performance is dependent on your device's Bluetooth wireless technology. Please check with the manufacturer. ELECTRO DÉPÔT cannot be held responsible for any data loss or leaks resulting from the use of these devices.

Bluetooth®
In this document, ELECTRO DÉPÔT declares that this unit complies with the essential requirements and other relevant provisions of Directive 2014/53/EU. The declaration of conformity can be viewed on the following website: http://www.electrodepot.fr/sav/notices/

IMPORTANT! Before plugging in and starting the unit, make sure that all controls are turned off or set to a low level.
Setup
Opening/closing the lid

CAUTION: Be careful not to pinch your fingers when opening or closing the lid.
- Open: Lift up the lid as far as it will go. Then, keeping the lid arm straight, lower the lid approximately 1cm until the arm locks into place.
- Close: Lift the lid up as far as it will go to release the arm lock. As you lower the lid, gently assist the arm so that it bends forwards, then you can close the lid.

NOTE: Keep the lid closed when you are not using the unit to prevent dust collecting on the turntable.
Safety screw
- Before and after transporting the turntable, you must check that the safety screw is securely fixed into place.
- Use a screwdriver to turn the screw anticlockwise until it is firmly tightened and the turntable is fixed into place.
Connections
Connect your device to the turntable using the cables and sockets detailed below:
| Device | Connection (cables not provided) | Turntable Socket |
| Phone, iPad or tablet, computer, MP3 player, CD player | Use a jack cable with 3.5mm plug. The other end of the cable must fit your audio device. | AUX |
| Earphones | Plug the 3.5mm earphone jack cable into the socket on the top of the unit. | |
| External speaker | Connect a 8.2mm AUDIO RCA cable to the sockets on the turntable and into theAUDIO IN LandRsockets of the additional speaker.NOTE:Always plug red plug to red socket and white plug to white socket. | R and L LINE OUT |

WARNING!
- Long term exposure to loud music may cause hearing damage. It is best to avoid extreme volume for extended periods of time.
• Always turn the volume to minimum before wearing your earphones.
Pairing a Bluetooth (BT) device
To connect this turntable to a Bluetooth device, you must first pair the turntable with the device.
-
Turn on the Bluetooth device (such as your phone or tablet):
-
Go to settings on your device.
- Select Bluetooth and turn it on.

NOTE: If your Bluetooth device was previously connected to another device, remove that connection before attempting to connect with the turntable.
- Plug the plug into the wall socket.
- Press the POWER button to turn on the unit.
- Turn the mode knob to FM/®.
- Slide the FM/® switch to ® (Bluetooth mode). The unit will automatically start searching for a Bluetooth device. The BT indicator light flashes blue while searching for a device.
- When the Bluetooth device displays the turntable's Bluetooth name, EDENWOOD TURNTABLE VINTAGE, select the name and confirm the connection. The blue BT indicator light becomes steady to confirm that the devices have successfully paired.

NOTE:
- If the turntable's Bluetooth name does not appear on your Bluetooth device, move the devices closer together. If that does not work, turn the devices off and then on again before restarting the pairing process.
- When pairing the units, make sure they are not more than 10 metres apart and there are no physical obstructions between the units.
- Once you have paired a device, the units should remember the connection and you will not need to pair them again.
Disconnecting a Bluetooth connection
When you turn the mode knob to change to another playback mode, the Bluetooth will automatically disconnect.
Operation

WARNING!
- Before plugging in and starting the unit, make sure that all controls are turned off.
- Check that the mains voltage corresponds to that indicated on the unit's rating plate.
Power and standby mode
- Insert the plug into the wall socket.
- Press the POWER button to turn on the unit.
- The unit will enter standby mode after 15 minutes of no operation (except for when you are in radio mode). Press the ▶ button to exit standby mode and start operating the unit again.
- Press the POWER button to turn off the unit. The indicator light will turn off. Unplug the unit from the power supply to fully turn it off.
Adjusting the volume
Turn the VOLUME knob clockwise to increase the volume and anticlockwise to decrease the volume.
WARNING! Listening with the volume set too high can damage your hearing. Avoid listening to very loud music for a long period of time.
Phono mode
- Remove the cover on the stylus by gently sliding it off.

NOTE: Always slide the stylus cover back into place when you have finished using the unit.
- Lift the protective mat off the turntable platter.

NOTE: Always place the protective mat back onto the turntable platter when you have finished using it.
- Connect the turntable to the power source and press the POWER button to turn it on.
- Turn the mode knob to the PHONO position.
- Place a vinyl record onto the turntable platter. If you are playing a 7" vinyl record, put the 45 RPM adapter on the turntable platter before the vinyl record.
- Slide the speed switch to select one of the following settings:
| RPM speed | Use |
| 33 1/3 | Full-length albums (LPs) and 12-inch singles. Most modern vinyl records are meant to be played at this speed. |
| 45 | Singles or Extended Plays (EPs) that have 1-2 songs per side. |
| 78 | Shellac records. Older vintage vinyl. |

NOTE: Check the vinyl record's label or sleeve for the correct speed.
- Unclip the tonearm clip from the tonearm.
- Push the tonearm lever backwards to raise the tonearm.
B
Product usage
- Gently move the tonearm over the vinyl record to the desired position for play. The turntable platter will begin to turn.
- Push the tonearm lever forwards to lower the arm slowly onto the vinyl record.
- To stop playback, or if the vinyl record has finished playing, push the tonearm lever backwards to raise it gently off the record. Put the tonearm on its rest and clip it into place.

NOTE: Always make sure the tonearm is clipped into place before moving the unit.
AUX mode
- Connect an AUX as described in the Connections section.
- Turn the mode knob to AUX.
- Use the external device's controls for playback.
BT mode
- Connect to Bluetooth as described in the Connections section.
- If you have previously connected to Bluetooth, you should automatically reconnect when you turn the mode knob to FM/® and slide the FM/® switch to ® (Bluetooth mode).

NOTE: Make sure the volume is turned up on both the turntable and the external device it is connected to.
- To control playback of the audio, you can either use your external device's controls, or you can use the following buttons on the turntable:
| Button | Action |
| Press to play or pause the track or file. |
| Press to go to the previous track or file. |
| Press to go to the next track or file. |

NOTE: In BT mode, stop, fast forward and rewind are only available on your external device.
FM radio mode
- Fully extend the FM aerial.
- Turn the mode knob to FM/®.
- Slide the FM/® switch to FM.
- Turn the FM radio tuning knob clockwise or anticlockwise to search for a radio station. The ST/BT indicator lights up red when you are tuning in the radio station.
- Adjust the position of the aerial to get the best reception.
CD mode
Compatible discs
| Disc types | Logo | Type |
| CD-R (Recordable) |  | AUDIO |
| CD-RW (Rewritable) |  | AUDIO |
| CD AUDIO / CD-DA (Normal CDs) |  | AUDIO |
- Only use compact discs (CDs) with the compatible digital audio marks.
- Making unauthorised copies of copyrighted works – including computer programs, files, broadcasts and sound recordings – could constitute a copyright violation and a criminal offence under your national law. This unit must not be used for such purposes.
- When playing CD-R/RW discs, the playback quality might be affected by the quality of the burned discs. We recommend using the lowest burn speed to burn CD-R/RW discs containing audio files.

natural_image
Black rounded rectangle with a white circular icon containing an 'i' symbol (no text or numbers present)
NOTE:
This unit uses an invisible laser in the CD compartment. Avoid exposure to the invisible laser beam. Make sure you remove the disc before moving the unit or if you are not using it for a prolonged time, as this could result in damaging the unit and the CD.
• Always close the CD tray to prevent the lens being contaminated with dust.
• Never touch the lens in the CD compartment.
Loading a disc
- Insert the plug into the wall socket.
- Press the POWER button to turn on the unit.
- Turn the mode knob to CD.
- Press the OPEN/CLOSE button to open the CD tray. NO appears on the display when no CD in the CD compartment.

- Place an audio CD disc in the tray, with the front side facing upwards.
- Close the CD tray. The total number of tracks will display, then playback will start from track one.
- To remove the CD, press the ■ button to stop playback. Press the OPEN/CLOSE button to open the CD tray. Grasp the CD by its edges. Carefully remove it.
B Product usage

NOTE:
• Make sure the disc has stopped spinning before opening the CD tray.
- To ensure good quality playback, wait until the unit has finished reading the disc before proceeding.
- If no disc is loaded into the tray or the disc is unreadable, the message NO will appear on the display.
Playing a disc
- Once the disc has been read, playback starts automatically from track 1. The red PLAY indicator light illuminates while the CD mode is in use.
- To pause the playback, press the ▶ button. The current track number will display.
- To resume playback, press the ▶ button again.
- To stop playback, press the ■ button. The total number of tracks is indicated on the display.

NOTE: The CD will play from the first track. The current track will be indicated on the display.
Selecting a track
- Press the ◀ or ▶ button while in stop mode or during playback until the desired track appears on the display.
- If you select a track in stop mode, you will need to press the ▶ button to start playing the selected track. If you select a track in playback mode, the track will start to play automatically.
Searching for a particular section of a track during playback
During playback, press and hold the ◀◀ or ▶▶ button to rewind or fast forward the track until the desired point is reached; then release the button to return to normal playback mode. The playback will resume from this point.
Programming CD tracks
A disc's tracks can be programmed when playback is stopped. Up to 20 CD tracks can be saved in any order in the memory.
- Whilst in stop mode, press the PROGRAM button. The PROGRAM indicator lights up red and 01 flashes on the display.
- Press the ◀◀ or ▶◀ button to select the track to be programmed (e.g. track 4).
- Press the PROGRAM button to confirm. 02 flashes on the display to show the unit is ready to store the second programmed track.
- Repeat the steps 2 to 3 until all the desired tracks have been programmed.
- Press the ▶ button to start playback from the first programmed track.
- Press the ■ button to stop play at any time.
- Press the PROGRAM button and then press the ■ button to stop the programmed playback and delete the programmed tracks.

NOTE: You can only program tracks in stop mode.
B
Product usage
Repeat playback
You can repeatedly play 1 track, or all of the tracks on the disc.
- Press the REPEAT button once during playback to repeatedly play the current track. The REPEAT indicator light flashes.
- Press the REPEAT button again to repeatedly play the entire disc. The REPEAT indicator light illuminates constantly.
Cleaning and maintenance

WARNING!
- Always turn off and unplug the unit from the power supply before cleaning.
- Never immerse the unit in water or any other liquid. Make sure that no liquid comes into contact with the unit.
-
When cleaning the unit, never use abrasive products, metal brushes, scouring or metal foams, or sharp utensils.
-
Regularly clean your unit and keep it dust free to reduce the need for repairs and ensure product longevity.
- Clean the unit with a dry, soft, micro-fibre cloth.
- Make sure the records are clean. Remove dust or grease from the records as necessary before playing them.
- If you do not plan to use the unit for a long time, make sure the protective mat is in place and that the tonearm is clipped in securely. Close the lid. Place the case in its original packaging in a cool, dry place, away from direct sunlight, excessive dirt, and dust.
CD cleaning and care
- A few scratches or a little dust should not usually affect the quality of a disc. That being said, discs must always be handled with care.
- Protect compact discs from dust and scratches.
- Store your compact discs in their sleeves when not in use.
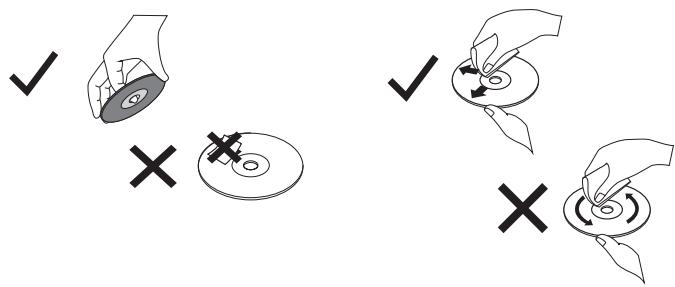
- In order to preserve the original sound quality, occasionally clean your compact discs with a soft cloth. Start from the centre of the disc and work your way outwards towards the edge (without using circular motions). Do not use benzene or other solvents to clean discs.
- Only ever hold a disc by its edges.
C
Cleaning and maintenance
- Do not stick paper on the disc or write anything on it or bend it.
Replacing the turntable stylus

WARNING:
• Always turn off the appliance before removing the stylus.
- Do not remove or bend the stylus needle.
- Do not touch the needle to avoid injury.
- Keep the stylus out of the reach of children and pets.

NOTE: We recommend that you change the stylus as soon as you notice a change in sound quality. Prolonged use of a worn-out stylus may damage the record. 78rpm records wear out the stylus quicker than 45rpm or 33-1/3rpm records.
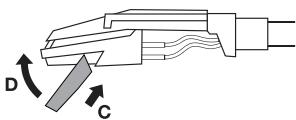
Carefully use a screwdriver to loosen the red part of the stylus (A). Do not use too much force as you may damage or break the stylus. Pull the stylus outwards to remove it (B).
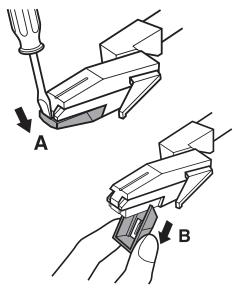
Hold the tip of the stylus and insert the other edge in the direction shown (C). Push the stylus upwards until it locks into place (D).
Troubleshooting
| Problem | Possible Cause | Solution |
| The unit does not work. | The unit is unplugged. | Connect the unit to the power supply.Check the turntable's power is turned on.If the unit still does not work, take it to a qualified service provider. |
| There is no sound. | The volume is too low.The mode knob selection does not match the playback source.The devices are incorrectly connected. | Turn the volume up (on your external device or turntable).Turn the mode knob to the correct playback source.In AUX mode, check the cable is connected and the external device is working properly. |
| The sound is distorted. | Another electrical device such as a TV is interfering with the sound. | Turn off nearby electrical appliances or relocate the turntable. |
| The unit fails to respond. | The unit fails to respond. | Disconnect the unit from the power supply and any connected device. Wait 1 minute, then reconnect the power supply and any device connections. |
| The radio cannot pick up a signal, is distorted or weak. | The radio is incorrectly tuned in.Another electrical device such as a TV is interfering with the radio reception.The aerial is poorly positioned. | Turn the radio tuning knob to get a better signal.Turn off nearby electrical appliances or relocate the turntable.Move the aerial until you get better reception. |
| CD stops immediately after starting, playback is distorted, playback stops or skips. | The CD is scratched or damaged.The disc is dirty or has condensation on it. | Place the CD with the printed side facing upwards.Replace the CD with an undamaged one.Carefully clean the CD. |
| The CD playback buttons are not working. | The unit is processing information.The unit needs to be rebooted. | Wait until the unit finishes processing.Turn the unit off, then on again. |
| The Bluetooth name cannot be found. | Your Bluetooth device may not have Bluetooth turned on.Another Bluetooth connection is preventing you from pairing with the turntable. | Make sure the Bluetooth function is activated on your Bluetooth device.Remove any existing Bluetooth connections and then try again to pair the devices. |
Storage
• Always unplug the unit before storing it.
- Store the unit in a fresh, dry and dust-free place, out of the reach of children and pets.
- Please retain the packaging and use it to store your unit when it is not in use for an extended period of time.
Merci !
natural_image
Black smartphone icon with a white circular 'i' symbol in the center (no text or numbers)
REMARQUE :
natural_image
Black smartphone icon with a white lowercase 'i' symbol in the center (no text or numbers)
REMARQUE :
OPMERKING:
natural_image
Black rounded rectangle with a white circular icon containing a lowercase 'i' in the center (no text or symbols beyond the icon)
OPMERKING:
De naald vervangen

WAARSCHUWING:
natural_image
Black smartphone icon with a white circular 'i' symbol in the center (no text or numbers)
NOTA:
natural_image
Black smartphone icon with a white circular 'i' symbol in the center (no text or numbers)
NOTA:
This product is guaranteed against faults caused by defects in manufacturing or the materials used for a period of two years, starting from the date of purchase.* This warranty does not cover defects or damage caused by failure to install the device correctly, incorrect use of the product, or excessive wear and tear.
*proof of purchase required.
FR
CONDITION DE GARANTIE