USER MANUAL BY-BT BE YOU
Thank you for choosing this BEYOU product. BEYOU products are chosen, tested, and recommended by ELECTRO DEPOT, so you can be sure you are getting a top-quality, easy-to-use product that won't let you down.
We're confident your new device will be a pleasure to use every day!
Welcome to ELECTRO DEPOT.
Table of Contents

Parts Specifications

First use
Use
Description of LED Indicator
Charging the battery
Operation
Using the comb attachment

Cleaning and maintenance Storage
Parts
A Cutting unit
B Size control knob
C On/Off switch
LED indicator
E Small guide comb [0.5-10mm]
Big guide comb (10.5-20mm)
Cleaning brush
USB charging cable
Specifications
| Rated supply: | 5V DC 1.0A |
| Battery: | 3,7V 800mAh Li-ion |
| Charging time: | approx. 2.0 hours |
| Discharge time (When fully charged): | approx. 2.0 hours |
| Operation time (When fully charged): | approx. 1.0 hour |
| Cable length: | 90 cm (USB-C) |
| Products weight: | 148 g |
| RPM: | 6400 RPM MAX |
| Cutting width: | 28 mm |
| Cutting height: | N°1 = 1-10 mm
N°2 = 10-20 mm |
| Noise level: | 58 dB (30 cm) |
| Electric protection class: | Class III |
| Waterproof: | IPX5 |
First use
Before first use, remove the unit and all accessories carefully and paying attention to the sharp accessories.
Clean all accessories with soap and water. Rinse and dry thoroughly. Clean the outside and inside of the machine cabinet with a damp cloth and wipe dry.
Use
Unroll the power cord completely.
- Check that the tension in force in the country where you are corresponds to that indicated on the apparatus.
- Connect the apparatus in a correct socket-outlet, (and connected to the ground if the unit is Class I), to avoid any danger.
- Disconnect the power source cable before any operation of cleaning of maintenance and accessories assembly.
- Never modify the appliance in anyway.
Description of LED Indicator
- Working: LED indicator in blue steady colour.
- Low battery: LED indicator in flashing blue colour.
- When charging: LED indicator in red steady colour.
- Charging finished: LED indicator in blue steady colour.
Charging the battery
- Connect the USB charging cable to the unit.
- Ensure that the appliance is switch off.
- Connect the other end of the charging cable to the power supply.
The pilot light will be red when charging
It will take approximately 2 hours to finish the charging.
Operation
Before using, oil first, put 2 or 3 drops of oil on the cutting unit.
- Use the ON/OFF switch, to switch on or switch off the appliance.
- The appliance can be used for + / - 60 minutes if the battery is fully charged.
B Product usage
The appliance can be used directly with adapter if needed or if no power of battery.
- Please always use the adaptor head (not supplied with main unit) with output of DC 5V 1A.
Using the comb attachment
- When load and unload the comb attachment, please ensure the power switch is on off status.
- Put the comb to the main unit as the reference picture.
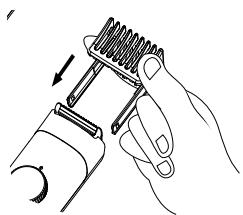
- Turn around the size control knob to adjust the length

NOTE: There are 20 positions to control the cutting length.
Small guide comb: 0.5-10mm
Big guide comb: 10.5-20mm
Cleaning and maintenance

WARNING!
- Before cleaning, always switch off the appliance, disconnect the apparatus and let it cool.
- Clean the outside of the apparatus with a sponge or slightly wet linen.
- Never plunge the apparatus in water or all other liquid!
-
Do not use abrasive cleaners, gritting, or metal brush or another cutting object.
-
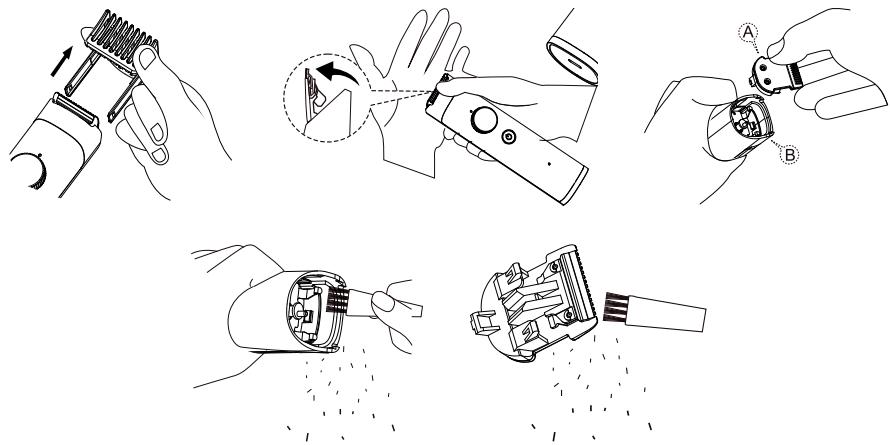
Take off the guide comb, remove the cutting unit to clean the hair between the top-blade and lower blade with cleaning brush.
- Wash the guide comb or the cutting unit with running water if necessary.
- Dry the guide comb or the cutting unit.
- The cutting unit should be oiled frequently in order to maintain its good cutting performance and thus ensure a long service life. Put 2 or 3 drops of oil on the cutting unit.
- To replace the cutting blades position it with the hook in the slot on the housing and press until it clicks into place.
Storage
- Ensure the unit is completely cool and dry.
- Do not wrap the cord around the appliance, as this will cause damage.
- Keep the appliance in a cool, dry place and out of reach from children.

Merci!
This product is guaranteed against faults caused by defects in manufacturing or the materials used for a period of two years, starting from the date of purchase.* This warranty does not cover defects or damage caused by failure to install the device correctly, incorrect use of the product, or excessive wear and tear.
*proof of purchase required.
CONDITION DE GARANTIE
FR