AX5000 - Soundbar HISENSE - Free user manual and instructions
Find the device manual for free AX5000 HISENSE in PDF.

| Product Type | 5.1-channel soundbar with wireless subwoofer and rear surround speakers |
| Brand | Hisense |
| Model | AX5000 / AX5100G |
| Max Audio Power | 340 W |
| Audio Technologies | Dolby Atmos, Roku TV Ready |
| Connectivity | HDMI eARC/ARC, optical, coaxial, USB, AUX, Bluetooth |
| Inputs | 1x HDMI eARC, 1x optical, 1x coaxial, 1x USB, 1x AUX |
| Outputs | Wireless subwoofer, wireless rear surround speakers (via RCA) |
| Supported Audio Formats | Dolby Atmos, Dolby Audio, PCM |
| Channel Configuration | 5.1 (soundbar + subwoofer + rear surround) |
| Power | 100-240 V, 50/60 Hz (power cables included) |
| Power Consumption | Not specified (estimated < 0.5 W in standby) |
| Remote Control Battery Type | 2 AAA batteries (included) |
| Soundbar Dimensions (approx.) | Approximately 100 x 6 x 10 cm (not officially specified) |
| Soundbar Weight (approx.) | Approximately 2.5 kg (estimated) |
| Wall Mounting | Yes, wall brackets and screws included |
| Care and Cleaning | Unplug before cleaning; use a soft, dry cloth |
| Safety | Do not expose to moisture, do not open, use only included accessories |
| Spare Parts and Repairability | Contact Hisense customer service; no consumer spare parts |
| General Information | User manual available for free download |
Frequently Asked Questions - AX5000 HISENSE
User questions about AX5000 HISENSE
0 question about this device. Answer the ones you know or ask your own.
Ask a new question about this device
Download the instructions for your Soundbar in PDF format for free! Find your manual AX5000 - HISENSE and take your electronic device back in hand. On this page are published all the documents necessary for the use of your device. AX5000 by HISENSE.
USER MANUAL AX5000 HISENSE
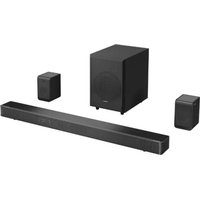
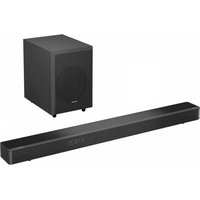
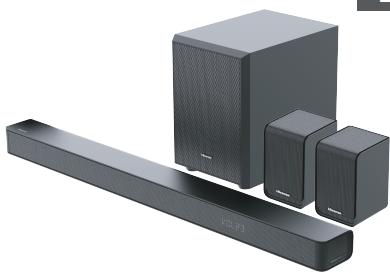
5.1CH Soundbar with Wireless Subwoofer
Model: AX5100G
Roku TV
Ready
√ Simple setup
√One remote.
Quick settings
340W
Max Audio Power
Dolby Atmos


HOMI
HIGH-DEFINITION MULTIMEDIA INTERFACE

Bluetooth

What's in the Box

Main Unit

Wireless Subwoofer

Rear Surround Speakers

AC Power Cord x 2
For Main Unit / Wireless Subwoofer

AC Power Cord x1

For Rear Surround Speakers (SR)
* Plug type varies by region
RCA Cable

Optical Cable

HDMI Cable


Brackets (x4)/Bracket Screw (x4) /Wall Anchors (x4)

Remote Control/
AAA Batteries x 2

User Manual /
Quick Start Guide
- Power cord quantity and plug type vary by regions.
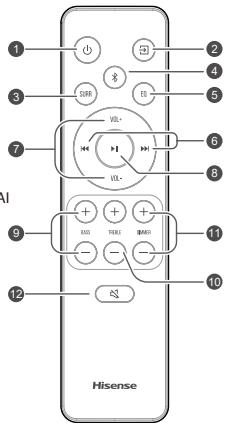
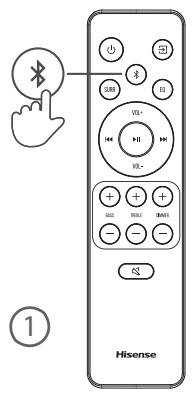
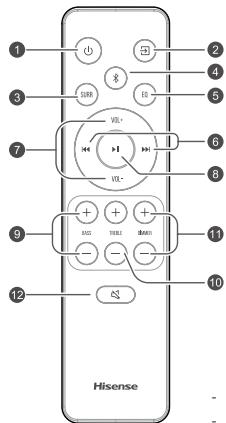
1 Remote Control
① ①
Switch the unit between ON and STANDBY mode.
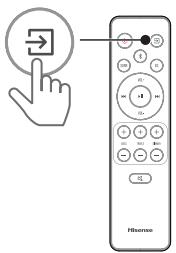
② (SOURCE) Select the play mode.
③ SURR Adjust the surround ON/OFF.
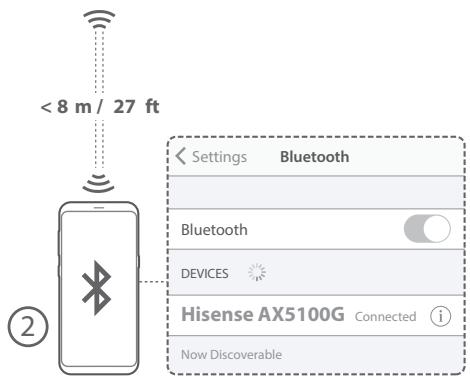
(4) (BT) Select the Bluetooth mode. Press and hold the
(BT) button to activate the pairing function in Bluetooth mode or disconnect the existing paired Bluetooth device.
⑤ EQ
6
Select MUSIC/MOVIE/NEWS/SPORT/NIGHT/GAME/AI
⑦ vo
(8)
Skip to previous/next track in BT / USB mode.
BASS+/- Adjust bass level.
10 TREBLE+/- Adjust treble level.
⑪ DIMMER+/- Adjust display brightness.
12 (MUTE) Mute or resume the sound.
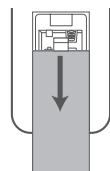
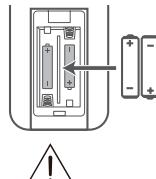
Replace the Remote Control Battery
1 Press and slide the back cover to open the battery compartment of the remote control.
2 Insert two AAA size batteries. Make sure the (+) and (-) ends of the batteries match the (+) and (-) ends indicated in the battery compartment.
3 Close the battery compartment cover.
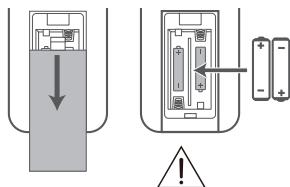
- Do not mix old and new batteries;
- Do not mix alkaline, standard (Carbon-Zinc) or rechargeable (Ni-Cd, Ni-MH, etc.) batteries.
2
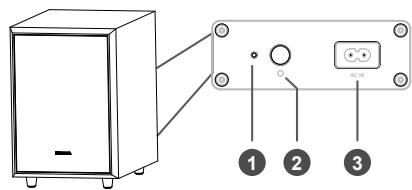
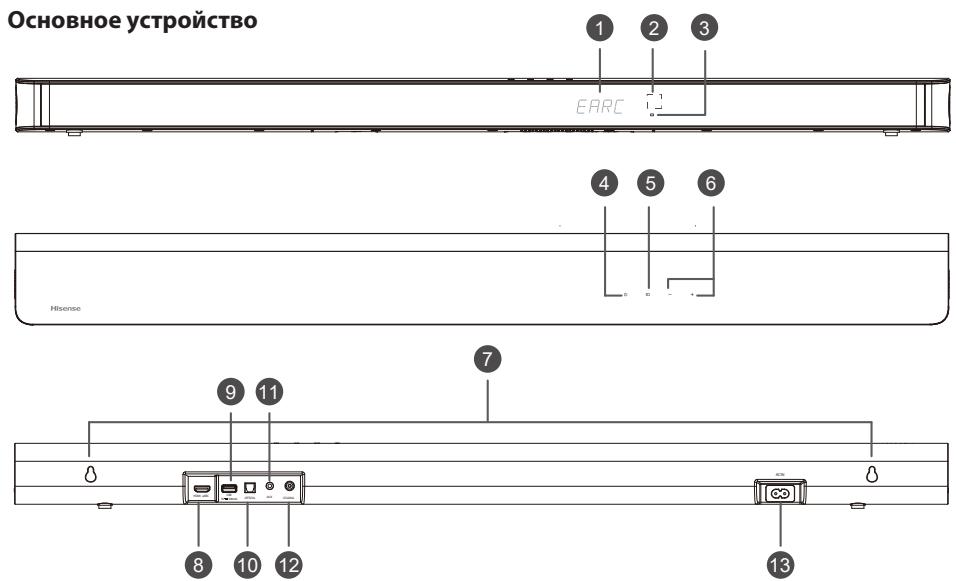
Identifying the Parts
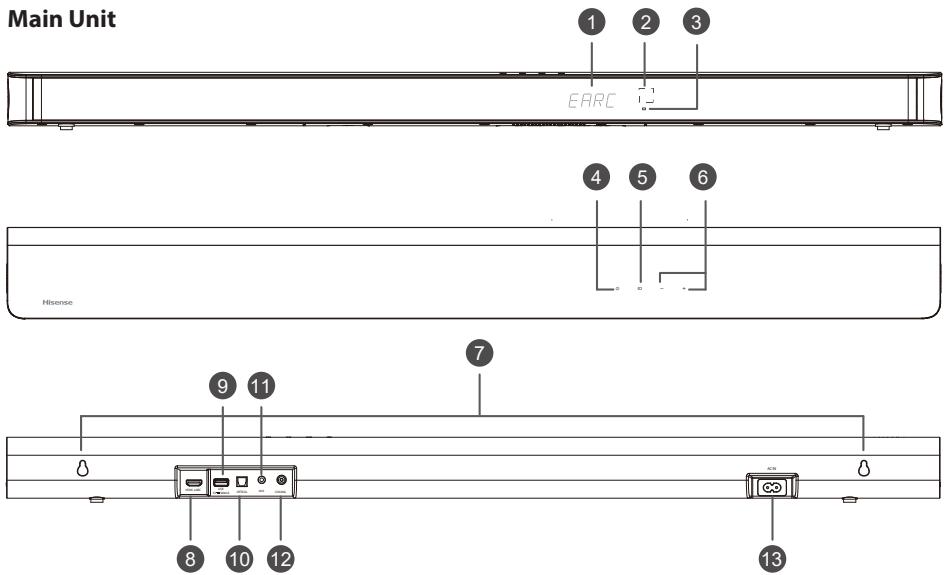
① Display Window
Show the current status.
(2) Remote Control Sensor
Receive signal from the remote control.
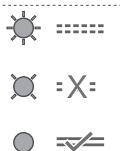
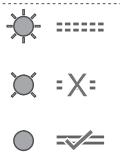
③ Red Standby Indicator
| • Constant on | In Standby mode |
| • Slow blink | In Auto-Wake On mode |
(4) (ON/OFF) Button
Switch the unit between ON and STANDBY mode.
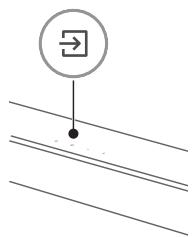
⑤ SOURCE)Button
Select the play mode.
(6) +/-(VOL+/VOL-) Button
Increase/decrease the volume level.
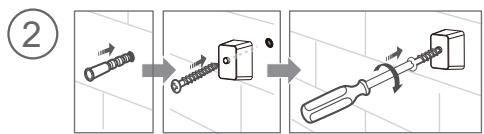
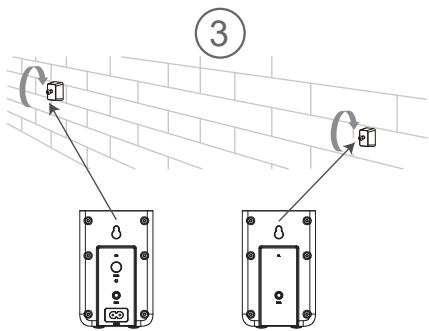
⑦ Wall Mount
Install the wall mounting screws into the wall mount of the unit.
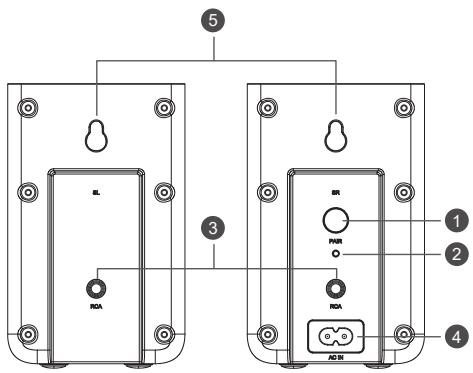
Wireless Subwoofer
① Indicator
| • Fast blink | The subwoofer in pairing mode |
| • Constant on | Connected / Paired successfully |
| • Slow blink | Connection / Pairing failed |
8 HDMI eARC Socket
The port for connecting a TV. The port supports the eARC/ARC HDMI feature, which allows the soundbar to play audio that originates on the connected TV.
⑨ USB Socket
Insert the USB device to play music.
10 OPTICAL Socket
Connect to the OPTICAL OUT socket on an external device.
11 AUX Socket
Connect to an external audio device.
12 COAXIAL Socket
Connect to the COAXIAL OUT socket on an external device.
13 AC IN Socket
Connect to the power supply.

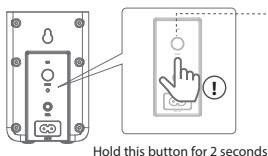
PAIR Button
| 2 seconds | Pairing mode |
| 5 seconds | Clear the pairing record |

AC IN Socket
Connect to power supply.
Wireless Rear Surround Speakers

PAIR Button
| 2 seconds | Pairing mode |
| 5 seconds | Clear the pairing record |

Indicator
| • Fast blink | Rear speakers in pairing mode |
| • Constant on | Connected / Paired successfully |
| • Slow blink | Connection / Pairing failed |

RCA Socket
Connect the left and right rear surround speakers.

AC IN Socket
Connect to power supply.

Wall Mount
Install the wall screws and brackets into the back of the rear surround speakers.

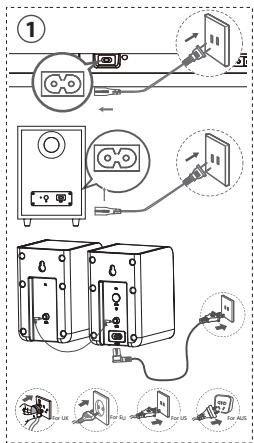
Pair up with the Subwoofer and Rear Surround Speakers
The subwoofer, rear surround speakers and soundbar will be automatically paired when they are powered on.
- If no audio from the wireless subwoofer and the rear surround speakers can be heard, manually pair up them.

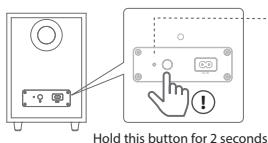

Hold this button for 3 seconds
5
Bluetooth(®) Operation

4

5
Select the play function ( )


| Display | Mode |
| EARC | HDMI eARC |
| ARC | HDMI ARC |
| OPT | OPTICAL |
| COAX | COAXIAL |
| BT_IN | Bluetooth |
| NO_BT | Connected |
| Not Connected | |
| USB | USB |
| NO_USB | No USB connected |
| AUX | AUX |
6
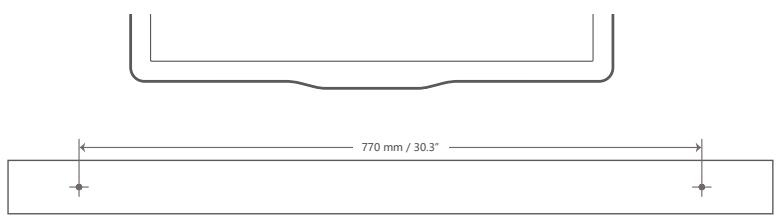
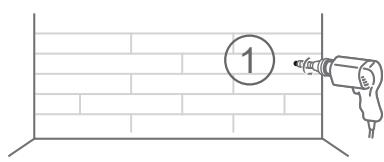
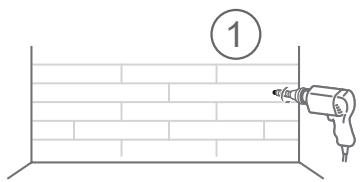
Wall Mounting
Mounting the Soundbar on the Wall
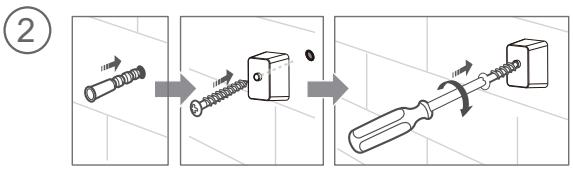
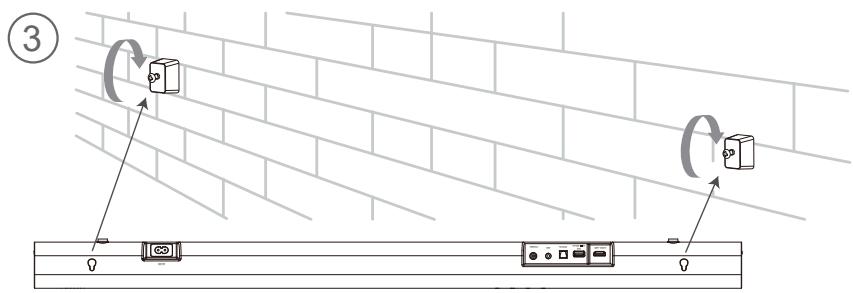
Mounting the Rear Surround Speakers on the Wall
Hisense

Cable of alimentare c.a. × 1 Pentu diflouaree surround (c)
Arka Surround Hoparlor (SR) iin

*Fiş tipi bolgeye,goredecessir
RCA Kablo

Optik Kablo

HDMI Kablosu


Braketler (× 4) /Bekrat Vidais (× 4) /Duvar Dubeliere (× 4)

Uzaktan Kumanda/ AAA Piller × 2

Kullanil kailavuzu / Hizbagiakni kailavuzu
Guc kablosu miktari ve fiis tipi bolgelere gore degisir.
1 Uzaktan Kumanda
① ①
② (SOURCE)
③ SURR
(4) B(BT)
√GnHJH
yipaiwenwei
BbCTpHnAePmK
340W
Max Audio Power
Dolby Atmos


HOMI
HIGH-DEFINITION MULTIMEDIA INTERFACE

Bluetooth
Roku, norotin Roku, Roku TV, Roku TV Ready n norotin Roku TV Ready ABNIAOTc ToBapbIMn 3Hakamn n/nn 3apeiCtprpoBaHHbIMn TOBAPbIMn 3HAKAMN KOMpanAHIN, Inc. Roku TV Ready abtopmOBAH RokuToBkoJdA cornacobaHHbCTpAn. DAnHOe yctpoIcTBO noDepKbBAe Roku TV Ready B CoedInHeHHb XItatax, CoedInHeHHoK OponoeBCTbe, Mekcike N Kahane. CToPAhMyMOT MeHraBc. AKTyalbHb CNICOK cTpaH, B KOTOpby dAnHOe yctpoCTBO noDepKbBAe RokuTVReady, moHIO zanocpoN oJIEkTOPCHNO noTe rokutvready@roku.com

YTO BynakOBKe

OCHOBHoe yCTPOIcTBO

BecnpoBODno ca6Byep

ZADHNI DHAMKHMI OH6bEMHO 38bYaharun

Lhyp nattahny nepemehno toroxa X 29 im ochoeroy cytoptala / 6ecbpnoaobao cabafoy

bHyynTHa nepeMeHHoTOKA x1 dAaHxRbHAnMMKOB 6bMeHHoTOB yrrnSA (SR)
*Tn tvekepa 3aBcNt or perhova
Ka6enb RCA

Onmueckn ka6ebn

Ka6enbHDMI


KoPHTHbIa (N4) / BHTbIa KpOHTbIa HE (N4) / CTeBnAbeKpeK

Ntbytaapanhae/ Bateparekni tna AAA x

PKOyBIOCTIO nMOIbONATEN/ KPOyBIOCTIO nMOIbONATEN
- KolinyectBO shHypOB nHTaHnI n TIN BUNK 3aBnCt OT perNoHa.
1 Пуньт урравлия
① ①
② 3 (NCTOYHNIK)
3 SURR
(4) B (BT)
⑤ EQ
⑥
⑦ VOL+/VOL-
(8)
BASS+/-
10 TREBLE+/-
DIMMER+/-
12 (OTKJIOHEME 3BYKA)
PénékhouJIeNHMe IeMHyI PABOcYIM PeMHOMI pEHMOH OXINDAHIN.
Bb60peKIMBAocpOIN3BeDHeHn.
BKJIOEHEIe/BbKJIIOEHEIe peKHMa o6bEMHOrO 38yauHaer.
Bb6op pekima Bluetooth. Hakmite n undepkivbaite KhoKy (BT), tOb6bl kAnmbiPoBaTb yHnKtmo cOpJKeHHa BpEeMh iOn oTKnOHTb cyueCTyUoeec opCKeHHeO uYcPOnCTBO Bluetooth.
Bu6Peptoyl MY3bIKA/KIHO/HOBOCTA/CNOPT/ HOUb/NTPA/MIH
PereoxdK peneDuoye/cneDyooueD opoKoeB B peKime BT/USB.
YBENHITb/YMEHbWITb rPOMKoCTb.
BocPON3BEBENAYa/BO36ObHOBENeBocPON3BEBENB PekIME BT/USB.HaMKMTIe 1EgZKMBIne KTHOKY I B TceHNe 3cKYNd,TObSOB BOITN M BEMHO HACTPOEK.PIOTDERTMBAVBoFp
PerynupOBKa ypoBHa H3KxqactOT.
Perynpobkya ypOBH BbICOKHXaCTOT.
Perynpobka npKoctn dncnne.
OTKIOUOHeHMeIINBO3O6HOBHeNHe 3Byka.
3aMeha akkymyntopa nynbta dtacnauhoHoro ynpablenu
1 BvduHHTbe 3aHIOU naHEnb npbTa DnactuHIOHOY npabLeHH,OT6bI OTKpbTb BatapeNHyOTcEK.
2 BCTaBbTe DBe 6atapeKIM Tnna AAA. Y6eDInTecb, 4TO NOIoc + ) ( - ) 6atapeEepNpaBnHbO cOBnAodKT C o6o3HaueHnMn (+) ( - ) B 8atapeHOM OTEcK.
3 3akpoTe KpbuKy 6aTapeHoro OTecka.
He nCnOJIb3yIte BmecTe HOBble i CTapBle 6aTapeK;
He nIcIbON3yIte BMeCTe IeNoOHnBe, CTaNdarpTNbE (tylonBHO-CHNKBoBIE)IINpepezapraKaembE(Ni-Cd, Ni-MH n.t.d.)BapateKmE.
2
YkaataJIb deTanei
① Okho OTO6paXeHnA
OTo6paKeHnE TeKyuIero cTaTyca.
②ДатчнлътaynpaBneHn
PpneM cnHaIa nylbTa ynpaBneHna.
③ KpacHbI INHdkaToppeKIMaOxNdaHn
-ПОТОТЯНно ВКЛIOUЧЕN
BpeKmme OxuandaHn
-Меденhoe MuraHne
B pexime aBTOMaTnueckoro np6yJkDeHHa