
10m avec 300x LED Connecté - LED strip EDENWOOD - Free user manual and instructions
Find the device manual for free 10m avec 300x LED Connecté EDENWOOD in PDF.
| Product Type | Smart LED Strip |
| Brand | EDENWOOD |
| Length | 10 meters (2 rolls of 5 meters) |
| Number of LEDs | 300 LED SMD 5050 (30 LED/m) |
| Beam Angle | 120° |
| Power Supply | 12 V = 2.0 A (24.0 W max) |
| Protection Rating | IP44 (strip), IP20 (adapter) |
| Connectivity | WiFi 2.4 GHz and Bluetooth |
| Control | Tuya app (iOS/Android), IR remote, voice assistant (Google Home / Alexa) |
| LED Lifespan | 20,000 hours |
| Operating Temperature | -25 °C ~ 40 °C |
| Storage Temperature | -40 °C ~ 80 °C |
| Ambient Humidity | 65 % ~ 75 % |
| Adhesive | 3M quality, for smooth, clean, and degreased surface |
| Cuttable | Yes, every 3 LEDs (scissors mark) |
| Music Mode | Yes, LED sync to rhythm |
| Timer / Countdown | Yes, via app |
| Device Sharing | Yes, via Tuya app |
| Warranty | 2 years |
| Package Contents | LED strip, WiFi control box, power adapter, remote control, manual |
| Protection Class | III |
| Usage | Indoor only |
Frequently Asked Questions - 10m avec 300x LED Connecté EDENWOOD
User questions about 10m avec 300x LED Connecté EDENWOOD
0 question about this device. Answer the ones you know or ask your own.
Ask a new question about this device
Download the instructions for your LED strip in PDF format for free! Find your manual 10m avec 300x LED Connecté - EDENWOOD and take your electronic device back in hand. On this page are published all the documents necessary for the use of your device. 10m avec 300x LED Connecté by EDENWOOD.
USER MANUAL 10m avec 300x LED Connecté EDENWOOD
Thank you for choosing this EDENWOOD product. EDENWOOD products are chosen, tested, and recommended by ELECTRO DEPOT, so you can be sure you are getting a top-quality, easy-to-use product that won't let you down.
We're confident your new device will be a pleasure to use every day!
Welcome to ELECTRO DEPOT.
Table of Contents

LED strip specifications

Installation procedure
Connection diagram
Remote control features
Wi-Fi connection and configuration
A Product overview
Thank you for your purchase. We hope that you will be fully satisfied with this. Please read this user manual carefully before using the product to make full use of the functions and to become familiar with the system's connection and usage. Please keep this manual in a safe place for future reference.
Box contents
Please make sure that the following items are in the packaging when you open it for the first time:
LED light strip
Wi-Fi controller box
Poweradapter
Remote control
- User manual.
About IP44 waterproof resistance
The light strip is resistant to water splashes and is certified to the IP44 standard. It cannot be submerged in water. The AC power adapter is rated IP20; under no circumstances must it come into contact with water or other liquids. This product is for indoor use only.
LED strip specifications
| 5-meter strip: | 150 SMD 5050 LED (30 LEDs per meter) |
| 10 (2 x 5) meter strip: | 300 SMD 5050 LED (30 LEDs per meter) |
| Beam Angle | 120° |
| Input: | 12.0 V = 1.5 A - consumption: 18.0 W max (5-meter version) 12.0 V = 2.0 A - consumption: 24.0 W max (10-meter version) |
| LED lifetime: | 20,000 hours |
| Not dimmable | |
| Humidity: | 65%-75% |
| Operating Temperature: | -25°C ~ 40°C |
| Storage Temperature: | -40°C ~ 80°C |
| 3M quality adhesive: | Apply to a smooth, clean and degreased surface |
| Resin protective coating: | For safe use, splash protection and easy cleaning |
| Remote control: | To select colors and intensity and different light modes |
| Protection class: | Class III |
A Product overview
Indoor use only
| Mode of operation: | Bluetooth |
| Operating frequency range: | 2402 ~ 2480 MHz |
| Maximum RF output power: | 4.285 dBm (2.68 mW) |
| Mode of operation: | WIFI 2.4GHz |
| Operating frequency range: | 2412 ~ 2472 MHz |
| Maximum RF output power: | 15.823 dBm (38.22 mW) |
Hereby, ELECTRO DEPOT declares that the radio equipment type LED STRIP LIGHT is in compliance with Directive 2014/53 /EU.
The full text of the EU declaration of conformity is available at the following internet address: http://www.electrodepot.fr
Installation procedure
- The light source of this luminaire is not replaceable. When the light source reaches its end of life, the whole luminaire shall be replaced.
- To reduce the risk of strangulation, the flexible wiring connected to this luminaire shall be effectively fixed to the wall if the wiring is within arm's reach.
- Do not connect the light strip to the supply while it is in the packing.
Please follow the below steps to install your light strip properly.
- Select a clean and flat surface for installation. Make sure the surface is completely clean. It must be free of any dirt, dust or grease, otherwise the tape may come off after some time.
- Remove the 3M protection paper band from the strip and stick the strip carefully to the flat surface.
- If necessary, cut the part of the strip you do not need. Note that you should cut the strip only on specific sections marked with the scissors logo on the strip. This logo will appear between each series of 3 LEDs. Never cut the strip at any other location, otherwise the strip will be unusable, and the warranty will be void. See below for the correct location to cut the strip.

- Carefully connect the LED strip to the Wi-Fi controller box, respecting the polarity, and then connect the Wi-Fi controller box to the power adaptor.
- Connect the power adaptor to a domestic power source (wall socket).
- Press the ON button on the remote control to power ON the light strip.
Connection diagram
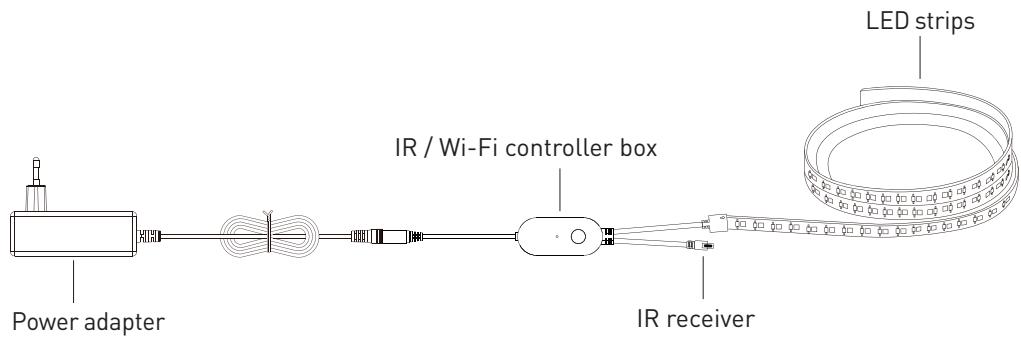
5 meters version
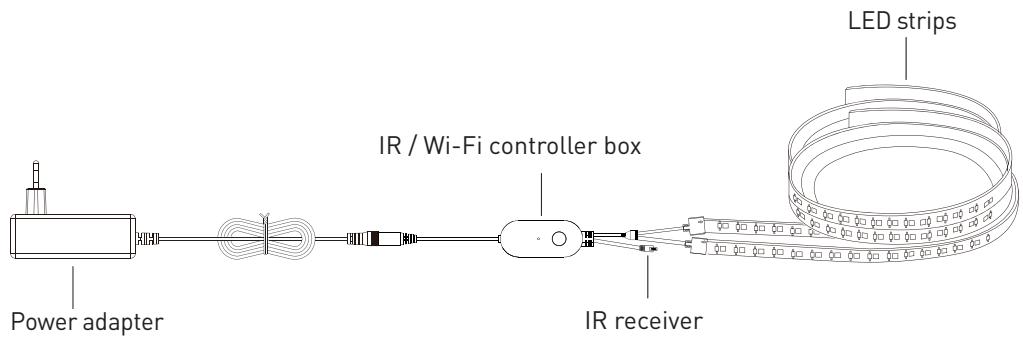
10 meters version
Remote control features
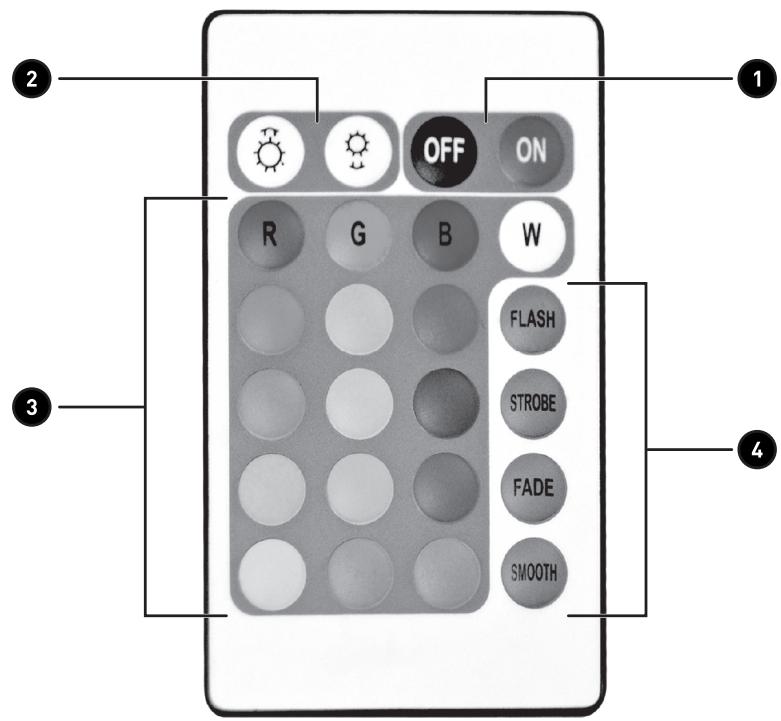
- Press to power ON or to power OFF the LED strip
- In fixed color mode: Press to increase or decrease the brightness (10 levels)
In light show mode: Press to increase or decrease the color change speed (15 levels)
- Press any of these keys to select the desired fixed color (W is for white)
- Light show modes:
FLASH: Flashing colors in this sequence: R>G>B>RG>RB>GB>RGB
STROBE: Flashing colors in this sequence: (RGB)
FADE: Soft fade in this sequence: R>G>B>RG>RB>GB>RGB
SMOOTH: Soft fade in this sequence: R > G > B
Wi-Fi connection and configuration
Follow the steps explained below to use your LED strip in Wi-Fi mode. In this mode you can control the strip from your smartphone from anywhere with an internet connection. You can also control it by voice if you are equipped with a Google Home or Alexa voice system in your house.
PLEASE NOTE THAT YOUR HOME WI-FI NETWORK MUST BE CONFIGURED IN 2.4G TO WORK PROPERLY WITH THE WI-FI LED STRIP. 5G WI-FI NETWORKS ARE NOT SUPPORTED.
Download and install the app on your smartphone

- Search for the "Tuya" app in the Google Play Store or Apple App Store, or scan the QR code to find the app.
- Install the app on your smartphone and launch it.
- Register and login.
Add your LED strip to the Tuya app
Make sure that the LED strip is connected to the Wi-Fi controller but don't connect the controller box to the power adapter yet. Follow the procedure below to connect it.
- Press the + icon on the top right of the app screen to add a new device.
- Select "Light" in the column on the left side of the app screen and search for "LED strip" on the right part of the app screen.
- Select LED strip (BLE+Wi-Fi)
- The default network mode is EZ mode (see the icon on the top right of the app screen). This mode is the easiest and fastest solution to connect your LED strip. In some rare cases, if the EZ mode is not working, you can switch to AP mode by clicking on the EZ mode icon and select AP mode. This procedure is explained in the next section of the manual.
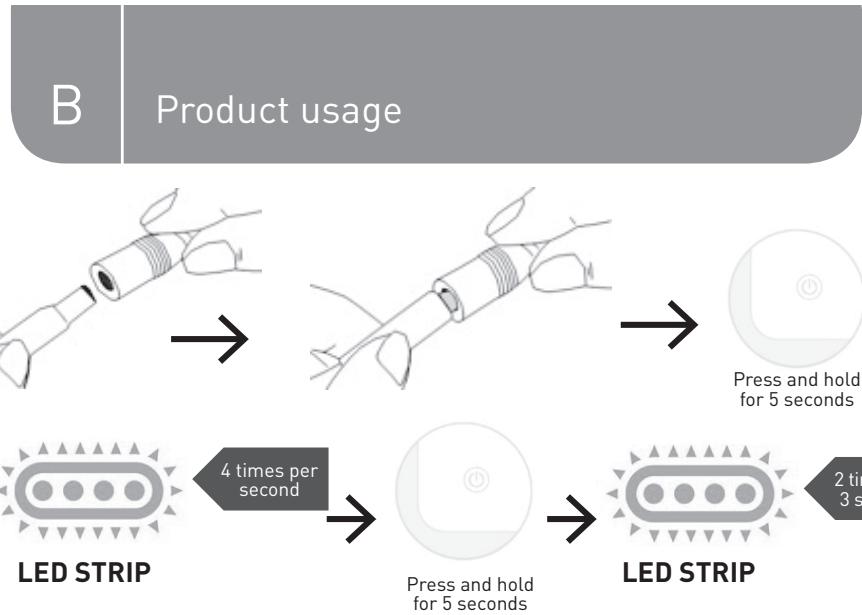
Connection in EZ mode
- You can now connect the Wi-Fi controller box to the power adapter. For a successful connection in EZ mode, the LED strip must be rapidly flashing (4 times per second). If the LED strip is not flashing rapidly, press and hold the power button of the controller box for 5 seconds until the LEDs are flashing rapidly.
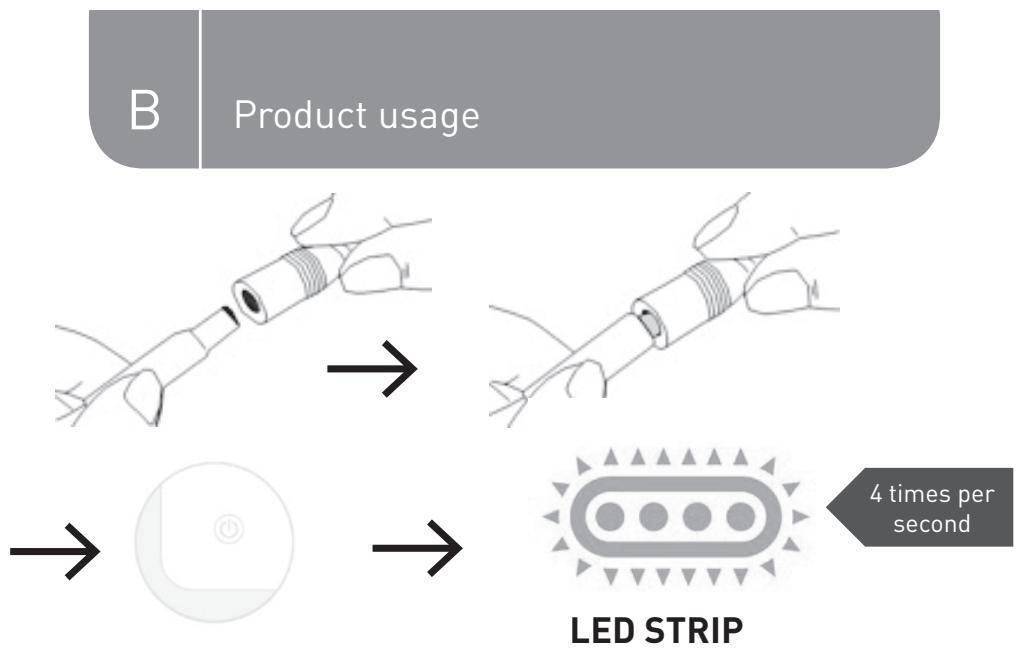
Press and hold for 5 seconds
- When the LEDs are rapidly flashing, press "Next" to access the next screen and then select your home Wi-Fi network name from the list of the available networks. You will be asked to enter your Wi-Fi password.
The app will now scan the Wi-Fi device, find your LED strip and finalize the connection. - When the connection to the Tuya app is successful, the LED strip will appear on the home page.
- You can now select it from the home page to access the control page of the LED strip.
You can switch it ON/OFF, change the colors, select different color shows, select how the LED will move to the rhythm of the music, set a timer, countdown, etc. When you click on the icon on the top right of the app screen, you can access other features, such as share the device with another user, configure the voice assistant, etc.
Connection in AP mode
If the EZ mode network connection explained in the previous section failed, then you can try the AP mode configuration. This is an alternate way of pairing a device where you can isolate and pair directly to it. For this mode, the LED must be flashing slowly, around 2 times per 3 second. To access this mode, repeat the steps explained in the previous section, and when the LEDs are flashing rapidly press again for about 5 seconds on the power button of the controller box until the LEDs are flashing slowly.
- When the LEDs are flashing slowly, press "Next" to access the next screen and then select the Wi-Fi network called "Tuya-XXXX" from the list of available networks.
- The app will now scan the Wi-Fi device, find your LED strip and finalize the connection.
The LED strip will appear on the home page of the app when the connection is successful. - You can now select it on the home page to access the control page of the LED strip.
Merci!
Procedure installation
This product is guaranteed against faults caused by defects in manufacturing or the materials used for a period of two years, starting from the date of purchase.* This warranty does not cover defects or damage caused by failure to install the device correctly, incorrect use of the product, or excessive wear and tear.
*proof of purchase required.
CONDITION DE GARANTIE
FR

- Table of Contents
- A Product overview
- Box contents
- About IP44 waterproof resistance
- LED strip specifications
- Installation procedure
- Connection diagram
- Remote control features
- Wi-Fi connection and configuration
- Add your LED strip to the Tuya app
- Connection in EZ mode
- Connection in AP mode
- Merci!
- Procedure installation
- CONDITION DE GARANTIE
- FR
Brand : EDENWOOD
Model : 10m avec 300x LED Connecté
Category : LED strip