
24DMD22 TS - HD TV DAEWOO - Free user manual and instructions
Find the device manual for free 24DMD22 TS DAEWOO in PDF.
| Product Type | HD LED TV |
| Brand | Daewoo |
| Model | 24DMD22 TS |
| Screen Size | 24 inches (61 cm) |
| Screen Resolution | 1366 x 768 pixels (HD) |
| TV Reception | DVB-T2/C, analog PAL/SECAM |
| Network Connectivity | Ethernet (LAN), Wi-Fi 802.11 a/b/g/n |
| Video Inputs | HDMI (x2), VGA (PC), Composite AV, USB |
| Audio Outputs | Headphone, Optical S/PDIF, HDMI ARC |
| Audio Power | 2 x 2.5 W RMS |
| Power Supply | 220-240 V AC, 50 Hz |
| Power Consumption (max) | 45 W |
| Standby Consumption | Less than 2 W |
| Dimensions with Stand (W x H x D) | 577 x 435 x 149 mm |
| Dimensions without Stand (W x H x D) | 577 x 430 x 69 mm |
| Weight (approx.) | 3.5 kg (estimate) |
| Smart Features | HBBTV, Smart Center, Google Assistant, Netflix, Prime Video, YouTube |
| Supported USB File Formats | Video: MP4, AVI, MKV; Audio: MP3, AAC; Image: JPEG, PNG |
| USB Recording | Yes, with time shift |
| DVB Standards | DVB-T2, DVB-C |
| Operating Temperature | 0 °C to 40 °C |
| Maximum Humidity | 85% RH |
Frequently Asked Questions - 24DMD22 TS DAEWOO
User questions about 24DMD22 TS DAEWOO
0 question about this device. Answer the ones you know or ask your own.
Ask a new question about this device
Download the instructions for your HD TV in PDF format for free! Find your manual 24DMD22 TS - DAEWOO and take your electronic device back in hand. On this page are published all the documents necessary for the use of your device. 24DMD22 TS by DAEWOO.
USER MANUAL 24DMD22 TS DAEWOO
e 100% and the energy required to
e eae ene nee
uS uə||eS
M
bunpuiqay
eae
华
-11111111
-
eae
e e
unz sep
[1]
H
5NNNWA
H
31 + u + 4q = 1 + u + uq dH
eaeaeaeaeae


P
Sos
H
1

P
Sos
H
gsaunag
112
112
gsaunag
112
gsaunag
gsaunag
P
Sos
P
Sos
eepoepepepepepepepepepepepepepepepepepepepepepepepepepepepepepepepepepepepepepepepepepepepepepepepepepepepepepepepepepepepepepepepepepepepepepepepepepepepepepepepepepepepepepepepepepepepepepepepepepepepepe pe
soperbe o
eeppeeppeeppeeppeeppeeppeeppeeppeeppeeppeeppeeppeeppeeppeeppeeppeeppeeppeeppeeppeeppeeppeeppeeppeeppeeppeeppeeppeeppeeppeeppeeppeeppeeppeeppeeppe
mnnnns ooeo eonne
unoguanb an ose
VONEN
oeon
1
10

aepnepnepnepnepnepnepnepnepnepnepnepnepnepnepnepnepnepnepnepnepnepnepnepnepnepnepnepnepnepnepnepnepnepnepnepnepnepnepnepnepnepnepnepnepnepnepnepnep
peeppeeppeeppeeppeeppeeppeeppeeppeeppeeppeeppeeppeeppeeppeeppeeppeeppeeppeeppeeppeeppeeppeeppeeppeeppeeppeeppeeppeeppe

CIOOINLNTNDNOONNNGNNSNNNNNNNNNNNNNNNNNNNNNNNNNNNNNNNNNNNNNNNNNNNNNNNNNNNNNNNNNNNNNNNNNNNNNNNNNNNNNNNNNNNNNNNNNNNNNNNNNNNNNNNNNNNNNNNNNNNNNNNNNNNN
populod sofu (sofedugun) 'sequauiow) soauan
osn (conserion on 2018 and 2019 )
e e e
:so
ep w g soua u e aep uoe aen eae
AAL 1eeppepepepepepepepepepepepepepepepepepepepepepepepepepepepepepepepepepepepepepepepepepepepepepepepepepepepepepepepepepepepepepepepepepepepepepepepepepepepepepepepepepepe
eepnqneepnneepnneepnneepnneepnneepnneepnneepnneepnneepnneepnneepnneepnneepnneepnneepnneepnneepnneep
nneae eae aee aeenee eaeae ee
e
e
eep eep eep eep eep eep eep eep eep eep
e ennnnne nnnnne ennnnne ennnnne ennnnne ennnnne ennnnne ennnnne ennnnne ennnnne ennnnne ennnnne ennnnne ennnnne ennnnne ennnnne ennnnne ennnnne ennnnne ennnnne ennnnne ennnnne ennnnne ennnnne ennnnne ennnnne ennnnne
on egee eeeep 80g 60s o
ON 100000000000000000000000000000000000000000000
a aaeaae aee e ae ennnnne
e aepnns
aenb enoiesan un eaeaneon opnns opep
oeaeepaand

epespeeppeeppeeppeeppeeppeeppeeppeeppeeppeeppeeppeeppeeppeeppeeppeeppe
Prrnne nnnnne eannnne ennnnne ennnnne ennnnne ennnnne ennnnne ennnnne ennnnne ennnnne ennnnne ennnnne ennnnne ennnnne ennnnne ennnnne ennnnne ennnnne ennnnne ennnnne ennnnne ennnnne ennnnne ennnnne ennnnne ennnnne ennnnne enennnne ennnnne ennnnne ennnnne ennnnne ennnnne ennnnne ennnnne ennnnne ennnnne ennnnne ennnnne ennnnne ennnnne ennnnne ennnnne ennnnne ennnnne ennnnne ennnnne ennnnne ennnnne ennnnne ennnnne ennnnne en
Aeae aee eae aeae eeae
Peppepepepepepepepepepepepepepepepepepepepepepepepepepepepepepepepepepepepepepepepepepepepepepepepepepepepepepepepepepepepepepepepepepepepepepepepepepepepepepepepepepepepepepepepepepepe pe
osnns nssnnnne ennnnne eannnne ennnnne ennnnne ennnnne ennnnne ennnnne ennnnne ennnnne ennnnne ennnnne ennnnne ennnnne ennnnne ennnnne ennnnne ennnnne ennnnne ennnnne ennnnne ennnnne ennnnne ennnnne ennnnne ennnnne ennnnne ennnnne enennnne ennnnne ennnnne ennnnne ennnnne ennnnne ennnnne ennnnne ennnnne ennnnne ennnnne ennnnne ennnnne ennnnne ennnnne ennnnne ennnnne ennnnne ennnnne ennnnne ennnnne ennnnne ennnnne ennnnne ennnnne enannnee
e e e e e e e e e e e e e e e e e e e e e e e e e
nneepopoeononee eonenee ene nee
eep
e e e e e e e e e e e e e e e e e e e e e e e e e e e e e e
aepnpeepnepnepnepnepnepnepnepnepnepnepnepnepnepnepnepnepnepnepnepnepnepnepnepnepnepnepnepnepnepnepnepnepnepnepnepnepnepnepnepnepnepnepnepnepnepnep
(essnneee)
sns A AP oepouo ap epuadpepplquodsp
e e e e e e e e e e e e e e e e e e
eeppeepespppeeppeeppeeppeeppeeppeeppeeppeeppeeppeeppeeppeeppeeppeeppeeppeeppeeppeeppeeppeeppeeppeeppeeppeeppeeppeeppeeppeeppeeppeeppeeppeeppeeppeeppeeppeeppe
Especificaciones de LAN inalambrica
Restricciones del pays
| Gama de Frequencias | Potencia max. de salute |
| 2400 - 2483,5 MHz (CH1 - CH13) | < 100 mW |
| 5150 - 5250 MHz (CH36 - CH48) | < 200 mW |
| 5250 - 5350 MHz (CH52 - CH64) | < 200 mW |
| 5470 - 5725 MHz (CH100 - CH140) | < 200 mW |
Peppepepepepepepepepepepepepepepepepepepepepepepepepepepepepepepepepepepepepepepepepepepepepepepepepepepepepepepepepepepepepepepepepepepepepepepepepepepepepepepepepepepepepepepepepepepepepepepepe pe
eeppepepepepepepepepepepepepepepepepepepepepepepepepepepepepepepepepepepepepepepepepepepepepepepepepepepepepepepepepepepepepepepepepepepepepepepepepepepepepepepepepepepepepepepepepepepepepe pe
oeepoepoeepoeepoeepoeepoeepoeepoeepoeepoeepoeepoeepoeepoeepoeepoeepoeepoeepoeepoeepoeepoeepoeepoeepoeepoeepoeepoeepoeepoeepoeepoeepoeepoeepoeepoeepoeepoeepoeepoeepoeepoeepoeepoeepoeepoeepoeepoeepoe
eeppeeppeeppeeppeeppeeppeeppeeppeeppeeppeeppeeppeeppeeppeeppeeppeeppeeppeeppeeppeeppeeppeeppeeppeeppeeppeeppeeppeeppeeppeeppeeppeeppeeppeeppeeppeeppeeppeeppe
eepeeepoeepoeepoeepoeepoeepoeepoeepoeepoeepoeepoeepoeepoeepoeepoeepoeepoeepoeepoeepoeepoeepoeepoeepoeepoeepoeepoeepoeepoeepoeepoeepoeepoeepoeepoeepoeepoeepoeepoeepoeepoeepoeepoeepoeepoeepoeepoe
e e
BAGUUBIRILDANBUOXASIM2HOOBUB
pappappppappappp
e e
(2)


eueepueep 1
marquer les instructions relatives aux restrictions, aux
Veille / Marche (appuyer brievement),
Reinitialisation / Arret (appuyer et maintoprin)
Netflix : Lance I application Netflix .Daxton , a 100 percent shareholder in
months, 15 and 30 seconds.
Remarque installation.
and the sans fi facies.
aee aae eae aeae aee
eess
oeeppeeppeeppeeppeeppeeppeeppeeppeeppeeppeeppeeppeeppeeppeeppeeppeeppeeppeeppeeppeeppeeppeeppeeppeeppeeppeeppeeppeeppeeppeeppeeppeeppeeppeeppeeppeeppeeppeeppeeppeeppeeppeeppeeppeeppeeppeeppeeppeeppeeppeep
eep
eepnnepepepepepepepepepepepepepepepepepepepepepepepepepepepepepepepepepepepepepepepepepepepepepepepepepepepepepepepepepepepepepepepepepepepepepepepepepepepepepepepepepepepepepepepe pe
u sujriy jay u jauoed ojuuoue nu saaqooq sdd Jauiouooia Juaon snoa' apijoe sed jauo u uoiuooi (S
oeepipnpe aepd apow
1
eJnne Jssuueaeudne unone IS jneod Jusdipj ssepeepespsnsospepepepepepepepepepepepepepepepepepepepepepepepepepepepepepepepepepepepepepepepepepepepepepepepepepepepepepepepepepepepepepepepepepepepepepepepepepepepepepepepepepepe pe
nne nnnnne nee nee nee nee nee nee
e 1000000000000000000000000000000000000000000000
nOw:ueoBbUooepaepuubpuuubpuuubpuuauuuuuuuuuuuuuuuuuuuuuuuuuuuuuuuuuuuuuuuuuuuuuuuuuuuuuuuuuuuuuuuuuuuuuuuuuuuuuuuuuuuuuuuuuuuuuuuuuuuuuuuuuuuuuuuuuuuuuuuuuuuuuuuuuuuuuuuuuuuuuuuuuuuuuuuuuuuuuuuuuuuuuUU
eae eae eae eae eae eae eae eae eae eae eae eae eae eae eae eae eae eae eae eae eae eae eae eae eae eae eae eae eae eae eae eae eae eae eae eae eae eae eae eae eae eae eae eae eae
PnOe Pnnepepepepepepepepepepepepepepepepepepepepepepepepepepepepepepepepepepepepepepepepepepepepepepepepepepepepepepepepepepepepepepepepepepepepepepepepepepepepepepepepepepepepepepepepepepe pe
1s ouo 1n 1ssnnp ooiuxooeoo 1s Jnsiaeeepn np epueuoooo 1p eo XO uognoq n s znfzdeoe
ueo 10 aunuundns agus iis nssgedde oagauas uunnns np snaed-npu saiuea e quua
opine oipnepi nne nee nee nee nee nee nee nee nee nee nee nee nee nee nee nee nee nee nee nee nee nee nee nee nee nee nee nee nee nee nee nee nee nee nee nee nee nee nee nee nee nee nee nee nee nee nee nee nee nee nee neee
[ae]dipoeepoeepoeepoeepoeepoeepoeepoeepoeepoeepoeepoeepoeepoeepoeepoeepoeepoeepoeepoeepoeepoeepoeepoeepoeepoeepoeepoeepoeepoeepoeepoeepoeepoeepoeepoeepoeepoeepoeepoeepoeepoeepoeepoeepoeepoeepoeepoeepoeepoeepoe
Ignoe an nnnn aen ennnnne eanennnne ennnne ennnne ennnne ennnne ennnne ennnne ennnne ennnne ennnne ennnne ennnne ennnne ennnne ennnne ennnne ennnne ennnne ennnne ennnne ennnne ennnne ennnne ennnne ennnne ennnne ennnne ennnne ennnne ennnne ennnne ennnne ennnne ennnne ennnnee ennnne ennnne enannn ne
squintis " sucjuti xte o tio y sarniupu sijt jap sana d eBunui sujuyi si smos" auqodud suo
eun un sduq bud'bad'bd' soududde
Theorem 1.1. (See [25, p. 46] for proofs). Assume is an admissible open affinoid subspace of a closed open affinoid set such that .
apbdicis is uugu jnssiieh i hare oipcnppeepne npoepaeepeep euee enrodnoepp
eepnpeepnneepnneepnneepnneepnneepnneepnneepnneepnneepnneepnneepnneepnneepnneepnneepnneepnneepnneepnneepnneepnneepnneepnneepnneepnneepnneepnneepnneepnneepnneepnneep
ep aoeaepeeppeeppeeppeeppeeppeeppeeppeeppeeppeeppeeppeeppeeppeeppeeppeeppeeppeeppeeppeeppeeppeeppeeppeeppeeppeeppeeppeeppeeppeeppeeppeeppeeppeeppeeppeeppeeppeeppeeppeeppeeppeeppeeppeeppeeppeeppeeppeeppeeppeeppe
y sues unipdudpdupe nne np aepu u sowne ne 2-02ed y sues unipdudpdupe
P
suc
A1I sues ouen ene aenea nees nep ae jne anen enan non-zaenssy.
nerees nuaa np jued e quidopisp ius sues nessep aepapaepeepne aneannou aeaes
SNOA ZOU ⅡI IJIAE NENSSI JAIJIJIJI, PZaESESA Uauuueauuuu sed uauuuuuuuu uui Suie nee aai i
- Do not place any heat sources such as electric
heaters, radiators, etc. near the TV set. Do not place the TV on the floor and inclined
surfaces. To avoid danger of suffocation, keep plastic bags out of the reach of the babies, children and domestic
animals. Carefully attach the screws to the TV. If the stand is provided with screws, tighten the screws firmly to prevent the TV from tilting. Do not over-lighten the
- prevent the 100% light energy - Do not use or significantly discrews and mount the stand rubbers properly.
- Do not dispose of the batteries in fire or with hazardous or flammable materials.
WARNING Battery must not be exposed to excessive heat.
- Battered must not be exposed to excessive heat such as sunshine, fire or the like.
- Excessive sound pressure from earphones or headphones can cause hearing loss.
ABOVE ALL - NEVER let anyone, especially children, push or hit the screen, push anything into holes, slots or any other openings in the case.
| Caution | Serious injury or death risk |
| Risk of electric shock | Dangerous voltage risk |
| Maintenance | Important maintenance component |
Markings on the Product
The following symbols are used on the product as a marker for restrictions and precautions and safety instructions. Each explanation shall be considered
where the product bears related marking only. Note such information for security reasons.
Class II Equipment: This appliance is designed in such a way that it does not require a safety connection to electrical earth.
Hazardous Live Terminal: The marked terminal(s) is/are hazardous live under normal operating conditions.
Caution, See Operating Instructions: The marked area(s) contain(s) user replaceable coin or button cell batteries.
CLASS 1 LASER PRODUCT CLASS 1 Laser Product This product contains Class 1 laser source that is safe under
reasonably foreseeable conditions of operation.
Class 1 Laser Product: This product contains Class 1 laser source that is safe under reasonably, foreseeable
reasonably forceless conditions of operation.
Safety Information

CAUTION: TO REDUCE THE RISK OF ELECTRIC SHOCK DO NOT REMOVE COVER (OR BACK). NO USER-SERVICEABLE PARTS INSIDE. REFER SERVICING TO QUALIFIED SERVICE PERSONNEL.
In extreme weather (storms, lightning) and long inactivity (going on holiday) disconnect the TV set from the machine.
The mains plug is used to disconnect TV set from the mains and therefore it must remain readily operable. If the TV set is not disconnected electrically from the mains, the device will still draw power for all situations even if the TV is in standby mode or switched off.
Note: Follow the on screen instructions for operating the related features.
IMPORTANT - Please read these instructions fully before installing or operating
WARNING: This device is intended to be used by persons (including children) who are not eligible for the study.
capable / experienced or operating such a device, unsupervised, unless they have been given supervision or instruction concerning the use of the device by a person responsible for their safety.
- Use this TV set at an altitude of less than 5000 meters above the sea level, in dry locations and in regions
with moderate or tropical climates. The TV set is intended for household and similar
indoor use but may also be used in public places. For ventilation purposes, leave at least 5cm of free space around the TV.
-
The ventilation should not be impeded by covering or blocking the ventilation openings with items, such
-
Sealing the TV, including "sponging" TV frame, such as newspapers, table-cloths, curtains, etc.
- The power cord plug should be easily accessible. Do not place the TV furniture, etc., on the power cord
A damaged power cord/plug can cause fire or give you an electric shock. Handle the power cord by the plug, do not unplug the TV by pulling the power cord.
Never touch the power cord/plug with wet hands as this could cause a short circuit or electric shock.
Never make a knot in the power cord or tie it with other cords. When damaged it must be replaced, this should only be done by qualified personnel.
- Do not expose the TV to dripping or splashing of liquids and do not place objects filled with liquids, such as vases, cups, etc. on or over the TV (e.g.,
such as vases, cups, etc. On or over the TV (e.g., on shelves above the unit). Do not expose the TV to direct sunlight or do not place open flames such as lit candles on the top of
or near the TV.
Wireless Display 33
Connecting Other Wireless Devices 33
Connectivity Troubleshooting 34
Using Audio Video Sharing Network Service 34
Apps 34
BBTV System 35
Smart Center 36
Google Assistant 38
DVB functionality information 38
Connecting Other Wireless Devices 33
Connectivity Troubleshooting 34
Using Audio Video Sharing Network Service 34
Apps 34
Internet Browser 35
HBBTV System 35
Smart Center 36
Google Assistant 38
DVB functionality information 38
Google Assistant 38
DVB functionality information 38
Contents
Safety Information 2
Markings on the Product.. 2
Environmental Information 3
Features 3
Accessories Included. 4
Standby Mode Picture.. 4
Standby Notifications.. 4
TV Control & Operation 5
Using Main TV Menu.. 5
Inserting the Batteries into the Remote.. 7
Power Connection.. 7
Antenna Connection.. 7
Licence Notification.. 7
Disposal Information.. 7
Specification .. 8
Remote Control.. 10
Remote Control- 2.. 11
Connections.. 12
Switching On/Off.. 13
First Time Installation... . 13
Media Playback via USB Input.. 14
USB Recording.. 14
Media Browser.. 15
Quick Al .. 16
E-Manual .. 17
Settings Menu Content.. 18
General TV Operation.. 25
Using the Channel List.. 25
Configuring Parental Settings.. 25
Electronic Programme Guide .. 25
Teletext Services .. 26
Software Upgrade.. 26
Troubleshooting & Tips.. 26
PC Input Typical Display Modes .. 28
AV and HDMI Signal Compatibility .. 28
Supported File Formats for USB Mode .. 29
Video File Formats .. 29
Picture File Formats .. 29
Audio File Formats .. 29
Subtitle File Formats .. 30
Supported DVI Resolutions .. 30
Connectivity .. 31
Wired Connectivity .. 31
Wireless Connectivity .. 31
Networked Standby Mode .. 32
| (HT) | |
| T | |
-ε-yssu
| ENGLISH PRACTICE |
| 'one thousand four hundred and eighty-four hundred and one hundred and one hundred and one hundred and one hundred and one hundred and one hundred and one hundred and one hundred and one hundred and one hundred and one hundred and one hundred and one hundred and one hundred and one hundred and one hundred and one hundred and one hundred and one hundred and one hundred and one hundred and one hundred and one hundred and one hundred and one hundred and one hundred and one hundred and one hundred and one hundred and one hundred and one hundred and one hundred and one hundred and one Hundred |
| 'Some thousand four hundred and one hundred and one hundred and one hundred and one hundred and one hundred and one hundred and one hundred and one hundred and one hundred and one hundred and one hundred and one hundred and one hundred and one hundred and one hundred and one hundred and one hundred and one hundred and one hundred and one hundred and one hundred and one hundred and one hundred and one hundred and one hundred and one hundred and one hundred and one hundred and one hundred and one hundred and one hundred and one hundred and oneundred and one hundred and one hundred and one hundred and one hundred and one hundred and one hundred and one hundred and one hundred and one hundred and one hundred and one hundred and one hundred and one hundred and one hundred and one hundred and one hundred and one hundred and one hundred and one hundred and one hundred and one hundred and one hundred and one hundred and one hundred and one hundred and one hundred and one hundred and one hundred and one hundred and one hundred and one hundred and one hundred and one hundred和 |
| (###) |
| # |
| # |
| # |
| # |
| # |
| # |
| # |
| # |
| # |
| # |
| # |
| # |
| # |
| # |
| # |
| # |
| # |
| # |
| # |
| # |
| # |
| # |
| # |
| # |
| # |
| # # |
| # |
| # |
| # |
| # |
| # |
| # |
| # |
| # |
| # |
| # |
| # |
| # |
| # |
| # |
| # |
| # |
| # |
| # |
| # |
| # |
| # |
| # |
| # |
| # |
eeppeeppeeppeeppeeppeeppeeppeeppeeppeeppeeppeeppeeppeeppeeppeeppeeppeeppeeppeeppeeppeeppeeppeeppeeppeeppeeppeeppeeppeeppeeppeeppeeppeeppeeppeeppeeppeeppeeppeeppeeppeeppeeppeeppeeppeeppeeppeeppeeppeeppeep
Aae) uoddo sddd Aes Rn 8nns nneep o
nuee H euee eae eae ee eae eae ene ne
e e
aen ane ane ane ane ane ane ane ane ane ane ane
sbsbss
Peppepepepepepepepepepepepepepepepepepepepepepepepepepepepepepepepepepepepepepepepepepepepepepepepepepepepepepepepepepepepepepepepepepepepepepepepepepepepepepepepepepepepepepepepe pe
aegaeae aq ou Keuu odo sui uodo suu Buai Apueep nuu sufumoeaeau uoeo neo u
sB
D
A
mnnnne nnnnne nnnnne nnnnne nnnnne nnnnne nnnnne
eessssseosse eonnonpeae dssep qllm sdd
oouuupueepaepoeeppeeppeeppeeppeeppeeppeeppeeppeeppeeppeeppeeppeeppeeppeeppeeppeeppeeppeeppeeppeeppeeppeeppeeppeeppeeppeeppeeppeeppeeppeeppeeppeeppeeppe
peepnepepepepepepepepepepepepepepepepepepepepepepepepepepepepepepepepepepepepepepepepepepepepepepepepepepepepepepepepepepepepepepepepepepepepepepepepepepepepepepepepepepepepepepepepepepepepe pe
A
eess ees
OONN NNNNNNNNNNNNNNNNNNNNNNNNNNNNNNNNNNNNNNNNNNNNNNNNNNNNNNNNNNNNNNNNNNNNNNNNNNNNNNNNNNNNNNNNNNNNNNNNNNN
Paeeppe Paeeppe Paeeppe Paeeppe Paeeppe Paeeppe Paeeppe Paeeppe Paeeppe Paeeppe Paeeppe Paeeppe Paeeppe Paeeppe Paeeppe Paeeppe Paeeppe Paeeppe Paeeppe Paeeppe Paeeppe Paeeppe Paeeppe Paeeppe Paeeppe Paeeppe
no' Joadd oao Aapre 8aBnBnBnBnBnBnBnBnBnBnBnBnBnBnBnBnBnBnBnBnBnBnBnBnBnBnBnBnBnBnBnBnBnBnBnBnBnBnBnBnBnBnBnBnBnBnBnBnBnBnB
Paepeep Paepeep
paoqj qihlll aqippeepd joue ouuusu supege aqpupepuuuoo oui pufduoosai doi anl oia
eessssssssssssssssssssssssssssssssssssssssssssssssssssssssssssssssssssssssssssssss
newwIview6wn
younou youuou no uouue ou ueae du nuau 1. uueu o' passe du ou ngnue uueu
JiQoJn nuu- qns au 0a Jua uue aee 0e oJau ou zu oua neuaouai uau Suui nuu euu
nne nne nee nee nee nee nee nee nee nee nee nee nee nee nee nee nee nee nee nee nee nee nee nee nee nee nee nee nee nee nee nee nee nee nee nee nee nee nee nee nee nee nee nee nee nee nee nee nee nee
A
12:00N
p#
e
mopn oon nn nnnnne aen annnne ane ennnnne
jooos ooeos eo jeoedeed jmm sssaoos a
wopn o n dn
eeppeeppeeppeeppeeppeeppeeppeeppeeppeeppeeppeeppeeppeeppeeppeeppeeppeeppeeppeeppeeppeeppeeppeeppeeppeeppeeppeeppeeppeeppeeppeeppeeppeeppeeppeeppeeppeeppeeppeeppeeppeeppeeppeeppeeppeeppeeppeeppeeppeeppeep
eoh
puue qune quene quene quene quene quene quene quene quene quene quene quene quene quene quene quene quene quene quene quene quene quene quene quene quene quene quene quene quene quene quene quene quene quene quene quene quene quene quene quene quene quene quene quene quene quene quene quene quene quene quene quenesquene quene quene quene quene quene quene quene quene quene quene quene quene quene quene quene quene quene quene quene quene quene quene quene quene quene quene quene quene quene quene quene quene quene quene quene qunequene qunequene qunequene qunequene qunequene qunequene qunequene qunequene qunequene qunequene qunequene qunequene qunequene qunequene qunequene qunequene qunequene qunequene qunequene qunequene qunequene qunequene qunequene qunequene qunequene qune
e e e
nuee nne eee <nnee sss<nsse eae ene nee eae ene ene ene ene ene ene ene ene ene ene ene ene ene ene ene ene ene ene ene ene ene ene ene ene ene ene ene ene ene ene ene ene ene ene ene ene ene ene ene ene ene ene ene ene ene ene ene ene ene ene eneaen eae aene ae aene aene aene aene aene aene aene aene aene aene aene aene aene aene aene aene aene aene aene aene aene aene aene aene aene aene aene aene aene aene aene aene aene aene aene aene aene aene aene aene aene aene aene aene aene aene aene aene aene aene aane aeae aeae aeae aeae aeae aeae aeae aeae aeae aeae aeae aeae aeae aeae aeae aeae aeae aeae aeae aeae aeae aeae aeae aeae aeae aeae aeae aeae aeae aeae aeae aeae aeae aeae aeae aeae aeae aeae aeae aeae aeae aeae aeae aeae aeae aeae aeae aeae aeae aeae aeee aaee aaee aaee aaee aaee aaee aaee aaee aaee aaee aaee aaee aaee aaee aaee aaee aaee aaee aaee aaee aaee aaee aaee aaee aaee aaee aaee aaee aaee aaee aaee aaee aaee aaee aaee aaee aaee aaee aaee aaee aaee aaee aaee aaee aaee aaee aaee aaee aaee aaee
5.1. Source Settings
Specification
| TV Broadcasting | PAL BG/I/DK SECAM BG/DK |
| Receiving Channels | VHF (BAND I/II) - UHF (BAND U) - HYPERBAND |
| Digital Reception | Fully integrated digital terrestrial-cable TV (DVB-T-C) (DVB-T2 compliant) |
| Number of Preset Channels | 1 000 |
| Channel Indicator | On Screen Display |
| RF Aerial Input | 75 Ohm (unbalanced) |
| Operating Voltage | 220-240V AC, 50Hz. |
| Audio | German+Nicam Stereo |
| Audio Output Power (WRMS.) (10% THD) | 2 x 2,5 |
| Power Consumption (W) | 45 |
| Networked Standby Mode Power Consumption (W) | < 2 |
| TV Dimensions DxLxH (with stand) (mm) | 149 x 577 x 435 |
| TV Dimensions DxLxH (without stand) (mm) | 69 x 577 x 430 |
| Display | 24" |
| Operation temperature and operation humidity | 0°C up to 40°C, 85% humidity max |
recycling in accordance with your national legislation and the Directive 2012/19/EU and 2013/56/EU.
By disposing of these products correctly, you will help to conserve natural resources and will help to prevent potential negative effects on the environment and human health which could otherwise be caused by inappropriate waste handling of these products.
For more information about collection points and recycling of these products, please contact your local municipal office, your household waste disposal service or the shop where you purchased the product. Penalties may be applicable for incorrect disposal of this waste, in accordance with national legislation.
[Business users]
If you wish to dispose of this product, please contact your supplier and check the terms and conditions of the purchase contract.
[Other Countries outside the European Union] These symbols are only valid in the European Union. Contact your local authority to learn about disposal and recycling.
The product and packaging should be taken to your local collection point for recycling.
Some collection points accept products free of charge. Note: The sign Pb below the symbol for batteries indicates that this battery contains lead. 1
Notification The terms HDMI, HDMI High-Definition Multimedia Interface, HDMI trade dress and the HDMI Logos are trademarks or registered trademarks of HDMI Licensing Administrator, Inc.

Manufactured under licence from Dolby Laboratories. Dolby, Dolby Audio, and the double-D symbol are trademarks of Dolby Laboratories Licensing Corporation. YouTube and the YouTube logo are trademarks of Google Inc. This product contains technology subject to copyright
This product contains technology subject to certain intellectual property rights of Microsoft. Use or distribution of this technology outside of this product is prohibited without the appropriate licence(s) from Microsoft.
Content owners use Microsoft PlayReady™ content access technology to protect their intellectual property, including copyrighted content. This device uses PlayReady technology to access PlayReady-protected content and/or WMDRM-protected content. If the device fails to properly enforce restrictions on content usage, content owners may require Microsoft to revoke the device's ability to consume PlayReady-protected content. Repurposing should not affect unprotected
content or content protected by other content access technologies. Content owners may require you to upgrade PlayReady to access their content. If you decline an upgrade, you will not be able to access content that requires the upgrade.
Plug one end (the two-hole plug) of the supplied detachable power cord into the power cord inlet on the rear side of the TV as shown above. Then plug the other end of the power cord into the mains socket outlet.
Note: The position of the power cord inlet may differ depending on the model.
Disposal Information [European Union]
These symbols indicate that the electrical and electronic equipment and the battery with this symbol should not be disposed of as general household waste at its end-of-life. Instead, the products should be handed over to the applicable collection points for the recycling of electrical and electronic equipment as well as batteries for proper treatment, recovery and
You can access the source settings menu directly using this option. Edit the names, enable or disable selected source options.
Inserting the Batteries into the Remote
The remote may have a screw that secures the battery compartment cover onto the remote control (or this may be in a separate bag). Remove the screw, if the cover is screwed on previously. Then remove the battery compartment cover to reveal the battery compartment. Insert two 1.5 V - size AAA batteries. Make sure the (+) and (-) signs match (choosing correct polarity). Do not
mix old and new batteries. Replace only with same or equivalent type. Place the cover back on. Secure the cover again with the screw, if any. A message will be displayed on the screen when the batteries are low and must be replaced. Note that when the batteries are low, the performance of the remote control may be impaired. Batteries should not be exposed to excessive heat such as sunshine, fire or the like.
Power Connection IMPORTANT: The TV set is designed to operate on a 220-240V AC, 50 Hz supply. After unpacking, allow the TV set to reach the ambient room temperature before you connect the set to the mains.
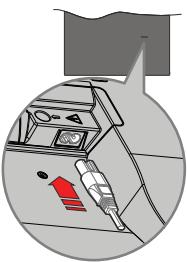
Plug one end (the two-hole plug) of the supplied detachable power cord into the power cord inlet on the rear side of the TV as shown above. Then plug the other end of the power cord into the mains socket outlet. Note: The position of the power cord inlet may differ depending on the model. Antenna Connection Connect the aerial or cable TV plug to the aerial input (ANT) socket located on the rear side of the TV. Rear side of the TV

Wireless LAN Transmitter Specifications
Country Restrictions
| Frequency Ranges | Max Output Power |
| 2400 - 2483.5 MHz (CH11-CH13) | < 100 mW |
| 5150 - 5250 MHz (CH36 - CH48) | < 200 mW |
| 5250 - 5350 MHz (CH52 - CH64) | < 200 mW |
| 5470 - 5725 MHz (CH100 - CH140) | < 200 mW |
This device is intended for home and office use in all EU countries (and other countries following the relevant EU directive). The 5.15 - 5.35 GHz band is restricted to indoor operations only in the EU countries.
| Country | Restriction |
| Bulgaria | General authorization required for outdoor use and public service |
| Italy | If used outside of its own premises, general authorization is required. Public use is subject to general authorisation by the respective service provider |
| Greece | In-door use only for 5470 MHz to 5725 MHz band |
| Luxembourg | General authorization required for network and service supply(not for spectrum) |
| Norway | Radio transmission is prohibited for the geographical area within a radius of 20 km from the centre of Ny-Alesund |
| Russian Federation | In-door use only |
| Israel | 5 GHz band only for 5180 MHz-5320 MHz range |
The requirements for any country may change at any time. It's recommended that user checks with local authorities for the current status of their national regulations for 5 GHz wireless LAN's.
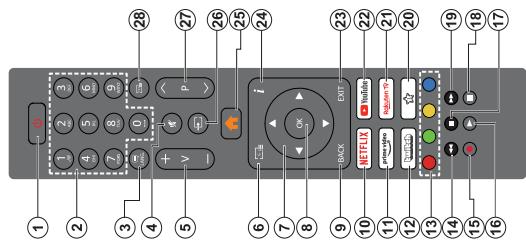
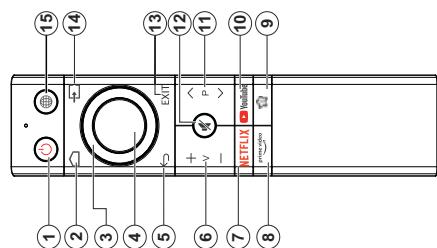
(*) Standby Button
and local authorities for the current status of their national regulations for 5 GHz wireless LANs.
Standby (Normal Standby), and Power On (Forced Standby) options and press OK to perform the selected action. If your TV stops responding to commands and the actions menu can not be displayed, the TV will be forced to restart when the button is kept pressed for about five seconds.
Press briefly and release the button to switch the TV into standby mode or to switch it on when it's in standby mode.
(^**) My Button 1
This button may have default function depending on the model. However you can set a special function to this button by pressing on it for more than three seconds when on a desired source, channel or application. A confirmation message will be displayed on the screen. Now the My Button 1 is associated with the selected
Note that if you perform First Time Installation, My Button 1 will return to its default function.
1. Standby (^*) : Standby / On (press briefly)
Reset/Power Off(press and hold)
2. Menu: Displays TV menu
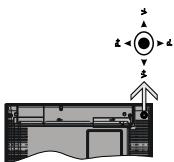
3. Directional buttons: Helps navigate menus,
content, etc. and displays the subpages in TXT mode when pressed Right or Left.
4. OK: Confirm user selections, holds the page (in
TXT channels: user's color, channels, mode, pages (in TXT mode), views Channels menu (DTV mode)
5. Back/Return: Returns to previous screen, previous
menu, opens index page (in TXT mode). Quickly
cycles between previous and current channels of sources
6Volume
7. Netflix: Launches the Netflix application
8. Prime Video: Launches the Amazon Prime Video
application
9. My button 1 (^**)
10. YouTube: Launches the YouTube application
11. Programme +/-
12. Mute: Completely turns off the volume of the TV
13. Exit: Closes and exits from displayed menus or
returns to previous screen
14. Source:
14. Source: shows available broadcast sources
15. Internet: Opens the internet browser
Inserting the Batteries into the Remote
Remove the battery compartment cover to reveal the battery compartment. Insert two size AAA batteries. Make sure the (+) and (-) signs match (observing correct polarity). Do not mix old and new batteries. Replace only with same or equivalent type. Place the cover back on.
To pair remote with the TV
Press and hold the Source button on the remote until the LED on the remote starts to blink, then release the Source button. That means the remote is in pairing mode.
Start device discovery on the TV. Refer to Connecting Other Wireless Devices section for further information. Now you will wait for the TV to find your remote. Select the name of your remote and press OK when it appears on the TV screen.
When the paring process is successful, the LED on the remote will go off. If the paring process fails the remote will enter sleep mode after 30 seconds.
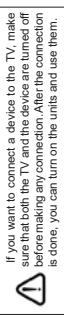
If you want to connect a device to the TV, make sure that both the TV and the device are turned off before making any connection. After the connection is done, you can turn on the units and use them.

Wait a little while before each plugging and unplugging as the player may still be reading files. Failure to do so may cause physical damage to the USB player and the USB device itself. Do not pull out your drive while playing a file.
You can use USB hubs with your TV's USB inputs. External power supplied USB hubs are recommended in such a case.
It is recommended to use the TV's USB input(s) directly, if you are going to connect a USB hard disk. Note: When viewing image files the Media Browser menu can only display 1000 image files stored on the connected USB device.
USB Recording
Recording a Programme
IMPORTANT: When using a new USB hard disk drive, it is recommended that you first format the disk using your TV's Format Disk option in the TV>Recordings>Settings menu.
To record a programme, you should first connect a USB disk to your TV while the TV is switched off. You should then switch on the TV to enable the recording feature. Touse recording your USB drive should have 2 GB free space and be USB 2.0 compatible. If the USB drive is not compatible an error message will be displayed. To record long duration programmes such as movies, it is recommended to use USB Hard disk drives (HDD's). Recorded programmes are saved into the connected USB disk. If desired, you can store/copy recordings onto a computer; however, these files will not be available to be played on a computer. You can play the recordings only via your TV. Lip Sync delay may occur during the timeshifting. Radio record is supported. The TV can record programmes up to ten hours.
Recorded programmes are split into 4GB partitions. If the writing speed of the connected USB disk is not sufficient, the recording may fail and the timeshifting feature may not be available..
It is recommended to use USB hard disk drives for recording HD programmes.
Do not pull out the USB/HDD during a recording. This may harm the connected USB/HDD.
Multiparition support is available. A maximum of two different partitions are supported. The first partition of the USB disk is used for USB Recording ready features. It also must be formatted as the primary partition to be used for the USB Recording ready features. Some stream packets may not be recorded because of signal problems, as a result sometimes videos may freeze during playback.
Record, Play, Pause, Display (for playlist dialogue) keys can not be used when teletext is on. If a recording starts from timer when teletext is on, teletext is automatically
clear the checkbox by pressing OK after moving the focus on the desired broadcast type option.
Digital Aerial: If D. Aerial broadcast search option is turned on, the TV will search for digital terrestrial broadcasts after other initial settings are completed.
Digital Cable: If D. Cable broadcast search option is turned on, the TV will search for digital cable broadcasts after other initial settings are completed. A message will be displayed before starting to search asking if you want to perform cable network search. If you select Yes and press OK you can select Network or set values such as Frequency, Network ID and Search Step on the next screen. If you select No and press OK you can set Start Frequency, Stop Frequency and Search Step on the next screen. When finished, highlight Next and press OK button to continue.
Note: Searching duration will change depending on the selected Search Step.
Analogue: If Analogue broadcast search option is turned on, the TV will search for analogue broadcasts after other initial settings are completed. After the initial settings are completed TV will start to search for available broadcasts of the selected broadcast types. While the search continues current scan results will be displayed at the bottom of the screen. After all the available stations are stored, Channels menu will be displayed. You can edit the channel list according to your preferences using the Edit tab options or press the Menu button to quit and watch TV. While the search continues a message may appear, asking whether you want to sort channels according to the LCN(). Select Yes and press OK to confirm.
(*)LCN is the Logical Channel Number system that organizes available broadcasts in accordance with a recognizable channel number sequence (if available).
Note: Do not turn off the TV while initializing first time installation. Note that, some options may not be available depending on the country selection.
Media Playback via USB Input
You can connect 2.5" and 3.5" inch (HDD with external power supply) external hard disk drives or USB memory stick to your TV by using the USB inputs of the TV.
IMPORTANT! Back up the files on your storage devices before connecting them to the TV. Manufacturer will not be responsible for any file damage or data loss. Certain types of USB devices (e.g. MP3 Players) or USB hard disk drives/memory sticks may not be compatible with this TV. The TV supports FAT32 and NTFS disk formatting but recording will not be available with NTFS formatted disks.
While formatting USB hard drives which have more than 1TB (Tera Byte) storage space you may experience some problems in the formatting process.
Depending on the model of your TV and the country selection Privacy Settings menu may appear at this point. Using this menu you can set your privacy privileges. Highlight a feature and press OK to enable or disable. Read the related explanations displayed on the screen for each highlighted feature before making any changes. You can press the Right directional button to highlight the text and use the Programme +/l, or Up/Down directional buttons to scroll up and down to read the entire text. You will be able to change your preferences at any time later from the Settings>System>Privacy>Privacy Settings menu. If the Internet Connection option is disabled Network/Internet Settings screen will be skipped and not displayed. If you have any questions, complaints or comments regarding this privacy policy or its enforcement, please contact by email at smarthsecurity@voshub.com.
Highlight Next and press OK button on the remote control to continue and the Network/Internet Settings menu will be displayed. Please refer to Connectivity section to configure a network connection. If you want your TV to consume less power in standby mode, you can disable the Networked Standby Mode option by setting it as Off. After the settings are completed highlight Next and press OK button to continue.
Depending on the model of your TV and supplied remote controls, an automatic pairing screen may be displayed at this point. Follow the on-screen instructions to pair your wireless remote control (depends on the model of the remote control) with your TV. Refer to the Remote Control -2 section for more information. If you want to pair your remote control at a later time, highlight Setup Later and press OK.
On the next screen the Devices menu will be displayed. You can connect external wireless audio devices, keyboards and mice to your TV. For audio devices use the Audio Link option, for wireless keyboards and mice use the Input Device option. Refer to the Connectivity section for more information on connecting wireless devices. To continue highlight Next and press OK.
On next screen you can set broadcast types to be searched, set your encrypted channel searching and time zone (depending on the country selection) preferences. Additionally you can set a broadcast type as your favourite one. Priority will be given to the selected broadcast type during the search process and the channels of it will be listed on the top of the channel list. When finished, highlight Next and press OK to continue..
About Selecting Broadcast Type
To turn a search option for a broadcast type highlight it and press OK. The checkbox next to the selected option will be checked. To turn the search option off
Switching On/Off
To Switch the TV On
Connect the power cord to a power source such as a wall socket (220-240V AC, 50Hz -
To switch on the TV from standby mode either: Press the Standby button,Programme +1 or a numeric button on the remote control. Press the centre of the joystick on the TV in or push it up/down.
To Switch the TV Off
Press the Standby button on the remote control or press the centre of the joystick on the TV in and hold it down for a few seconds, the TV will switch into standby mode.
To power down the TV completely, unplug the power cord from the mains socket. Note: When the TV is switched into standby mode, the standby LED can blink to indicate that features such as Standby Mode Search, Over Air Download or Timer is active. The LED can also blink when you switch on the TV from standby mode.
First Time Installation
When turned on for the first time, the language selection screen is displayed. Select the desired language and press OK. In the following steps of the installation guide, set your preferences using the directional buttons and OK button.. After the language selection, you will be asked whether you want to change accessibility settings. Highlight Yes and press OK to change. Refer to System Menu Content section for detailed information on available options.
Set your country preference on the next screen. Depending on the Country selection you may be asked to set and confirm a PIN at this point. The selected PIN cannot be 0000. You have to enter it if you are asked to enter a PIN for any menu operation later.
You can activate Store Mode option in the next step. This option will configure your TV's settings for store environment and depending on the TV model being used, the supported features of it may be displayed on the side of the screen as an info banner or the preinstalled video file may be played back. This option is intended only for store use. It is recommended to select Home Mode for home use. This option will be available in Settings>System>More menu and your preference for this setting can be changed later. Make your selection and press OK to continue.
The picture mode selection screen will then be displayed. In order for your TV to consume less energy and be more environmentally friendly select Natural and press OK to continue. You can change your selection later using the Mode option in the Settings>Picture menu.
| Loop/Shuffle Mode Operation | |
| Start playback and activate | All files in the list will be continuously played in original order |
| Start playback and activate | The same file will be played continuously (repeat) |
| Start playback and activate | All files in the list will be played once in random order |
| Start playback and activate | All files in the list will be continuously played in the same random order |
| Max Timeshift: This setting allows you to set the maximum duration for the timeshift recording. Available options are approximate and the actual recording time may change in practice depending on the broadcast. The reserved and free storage space values will change according to this setting. Make sure that you have enough free space otherwise instant recording may not be possible. Auto discard: You can set the Discard type as None, Oldest, Longest or Shortest. If it is not set to None, you can set the Unplayed option as Included or Excluded. These options determine the preferences for deleting the recordings in order to obtain more storage space for ongoing records. Hard disk information: You can view detailed information about the USB storage device connected to your TV. Highlight and press OK to see and press Back/Return to close. Format Disk: If you want to delete all files on the connected USB storage device and convert the disk format to FAT32, you can use this option. Press OK button while the Format Disk option is highlighted. A menu will appear on the screen, requiring you to enter the PIN(*) After you enter the PIN, a confirmation message will be displayed. Select Yes and press OK to start formatting the USB storage device. Select No and press OK to cancel. (*) Default PIN could have been set to 0000 or 1234. If you have defined the PIN(if requested depending on the country selection) during the First Time Installation use the PIN that you have defined. IMPORTANT: Formatting your USB drive will erase ALL the data on it and its file system will be converted to FAT32. In most cases operation errors will be fixed after a format but you will lose ALL your data. If "USB disk writing speed too slow to record" message is displayed on the screen while starting a recording, try restarting the recording. If you still get the same error, it is possible that your USB disk does not meet the speed requirements. Try connecting another USB disk. Media Browser You can play back music and movie files and display photo files stored on a USB storage device by connecting it to your TV. Connect a USB storage device to one of the USB inputs located on the side of the TV. After connecting a USB storage device to your TV, the Sources bar will be displayed with USBx highlighted. Press OK, Media Browser menu will be displayed on the screen. Select the file of your choice and press OK to display or play it back. You can access the content of the connected USB device any time later from the Sources menu. You can also press the Source button on the remote and then select your USB storage device from the list of sources. |
Settings Menu Content
| Devices Menu Content | |
| Audio Link | Press OK to open the Audio Link menu screen. Using this screen you can discover and connect the sound devices to your TV wirelessly. |
| Input Device | Press OK to open the Input Device menu screen. Using this screen you can discover and connect keyboards and mice to your TV wirelessly. Note: Your TV may not be compatible with all keyboard and mouse models in the market. For more information contact your local dealer or retail outlet where you bought your TV. |
| Virtual Remote | Enable or disable the virtual remote feature. |
| Audio Video Sharing | This feature allows you to share files stored on your smartphone or tablet pc. If you have a compatible smartphone or tablet pc and the appropriate software is installed, you can share/play photos on your TV. See instructions of your sharing software for more information. |
| Timer of No Signal | If your TV does not receive any input signal (e.g. from an aerial or HDMI source) for 3 minutes, it will go into standby mode. You can enable or disable this functionality by setting this option accordingly. |
| CEC | With this setting you can enable and disable CEC functionality completely. Press Left or Right button to enable or disable the feature. |
| CEC Auto Power On | This function allows the connected HDMI-CEC compatible device to turn on the TV and switch to its input source automatically. Press Left or Right button to enable or disable the feature. |
| Picture Menu Content | ||
| Mode | You can change the picture mode to suit your preference or requirements. Picture mode can be set to one of these options: Cinema, Game(optional), Sports, Dynamic and Natural. | |
| Contrast | Adjusts the light and dark values on the screen. | |
| Brightness | Adjusts the brightness values on the screen. | |
| Sharpness | Sets the sharpness value for the objects displayed on the screen. | |
| Colour | Sets the colour value, adjusting the colours. | |
| Energy Saving | For setting the Energy Saving to Custom, Minimum, Medium, Maximum, Auto, Screen Off or Off. Note: Available options may differ depending on the selected Mode. | |
| Backlight | This setting controls the backlight level. The backlight function will be inactive if the Energy Saving is set to an option other than Custom. | |
| Picture Zoom | Sets the desired image size format. | |
| Picture Shift | This option may be available depending on the Picture Zoom setting. Highlight and press OK, then use directional buttons to shift the picture upwards or downwards. | |
| PC Position | Appears only when the input source is set to VGA/PC. | |
| Autoposition | If the image is not centered in VGA mode use this option to automatically adjust the position of the image. Press OK to start the auto adjustment. | |
| H Position | This item shifts the image horizontally to the right hand side or left hand side of the screen. | |
| V Position | This item shifts the image vertically towards the top or bottom of the screen. | |
| Dot Clock | Dot Clock adjustments correct the interference that appear as vertical banding in dot intensive presentations like spreadsheets or paragraphs or text in smaller fonts. | |
| Phase | Depending on the input source(computer etc.) you may see a hazy or noisy picture on the screen. You can use phase to get a clearer picture by trial and error. | |
| Advanced Settings | ||
AI for You: When enabled, TV detects your presence in the room and activates your settings. When activated you will be asked to start a search for mobile phones in the room. Highlight Yes and press OK, available phones will be listed. Select your mobile phone from the list of devices. Follow the on screen instructions to learn more. Then you will be asked to set Picture Mode, Mode (Sound) and Favourites (channel list) options according to your preferences. When TV detects your mobile phone in the room your selections will be applied. A message will be displayed on the screen when the TV detects your phone in order to inform about the setting changes. If all options are activated, AI on Sound and AI on Video options will have higher priority in comparison with AI for You. It means that picture and sound settings will be adjusted automatically according to the programme type instead of the selections you made while setting the AI for You option. Asmall icon and information message will be displayed on the screen when settings are changed via AI on TV feature. E-Manual You can find instructions for your TV's features in the E-Manual. To access the E-Manual, enter Settings menu, select Manuals and press OK. For quick access press Menu button and then Info button. By using the directional buttons select a desired category. Every category includes different topics. Select a topic and press OK to read instructions. To close the E-Manual screen press the Exit or Menu button. Note: Depending on model, your TV may not support this function. The contents of the E-Manual may vary according to the model.
| Sound Menu Content | |
| Dolby Audio | Smart, Movie, Music, News and Off options will be available. Set as Off to disable.Note: Some items in Sound menu will be grayed out and unavailable if set to an option other than Off. |
| Surround Sound | Surround Sound mode can be changed as On or Off. |
| Audio Link | Press OK to open the Audio Link menu screen. Using this screen you can discover and connect the sound devices to your TV wirelessly. |
| Sound Output | Sets the sound output preference TV, S/P/DIF, HDMI ARC, Headphone Only and Lineout options will be available. There will be no sound output except through the selected option and the headphone jack.When you connect an external amplifier to your TV using the headphone jack, you can select this option as Lineout. If you have connected headphones to the TV, set this option as Headphone Only. Please ensure before using headphones that this menu item is set to Headphone Only. If it is set to Lineout, the output from the headphone socket will be set to maximum which could damage your hearing.If HDMI ARC option is selected, CEC feature will be enabled.Note: Depending on the selected option some items in Sound menu will appear as grayed out and will be unavailable. |
| AVL (Automatic Volume Limiting) | Sets the sound to obtain fixed output level between programmes.If the Dolby Audio menu item is set to an option other than Off the AVL setting options will change. Auto, Night, Normal and Off options will be available. In Auto mode the TV will switch to Normal or Night mode automatically according to the current time information. If no time information is available this option will always function as Normal. When the TV switches to Night mode for the first time after setting this option as Auto., an information bar will pop up on the screen.Please note that compared to Normal mode Night mode provides more aggressive dynamic compression control which is suitable for silent environments. |
| Advanced Settings | |
| Equalizer | Selects the equalizer mode. Custom settings can be made only when in User mode. |
| Dynamic Bass | Enables or disables the Dynamic Bass. |
| Sound Mode | You can select a sound mode (If the viewed channel supports). |
| Digital Out | Sets digital out audio type. |
| Headphone | Sets headphone volume. This option will not be available if the Sound Output option is set as Lineout.Please ensure before using headphones that the headphone volume is set to a low level, to prevent damage to your hearing. |
| Reset | Reset some of the sound settings to factory defaults. |
| Dynamic Contrast | You can change the dynamic contrast ratio to desired value. | |
| Colour Temp | Sets the desired colour temperature value. Cool, Normal, Warm and Custom options are available. | |
| White Point | If the Colour Temp option is set as Custom, this setting will be available. Increase the 'warmth' or 'coolness' of the picture by pressing Left or Right buttons. | |
| Blue Stretch | While colour enhancement function that makes white colour more cooler in order to make more bright picture. Set as On to enable. | |
| Micro Dimming | Low, Medium, High and Off options are available. While Micro Dimming is active, it will enhance contrast locally for each defined zone. | |
| Noise Reduction | Low, Medium, High and Off options are available. If the signal is weak and the picture is noisy, use the Noise Reduction setting to reduce the amount of noise. | |
| Film Mode | Films are recorded at a different number of frames per second to normal television programmes. Turn this feature on when you are watching films to see the fast motion scenes clearly. | |
| Skin Tone | Skin tone can be changed between -5 and 5. | |
| Colour Shift | Adjust the desired colour tone. | |
| Colour Tuner | Opens colour tuner settings. Set the Colour Tuner as enabled to adjust the Hue, Colour and Brightness values manually. | |
| Gamut Mapping | You can use this option to set the range of colours displayed on your TV screen. When set as On, colours are set according to the source signal. When set as Off, the TV's maximum colour capacity is used by default (recommended option).Note: This option may not be available depending on the TV model and its features. | |
| HDMI Full Range | While watching from a HDMI source, this feature will be visible. You can use this feature to enhance blackness in the picture. | |
| Reset | Reset the picture settings to factory default settings (except Game mode). | |
| System Menu Content | ||
| Accessibility | Displays accessibility options of the TV. | |
| High Contrast | Increase the contrast of the menu options and texts to make them easier to read. White Text, Yellow Text and Off options will be available. | |
| Hard of Hearing | Enables any special feature sent from the broadcaster. | |
| Audio Description | A narration track will be played for the blind or visually impaired audience. Press OK to see all available Audio Description menu options. This feature is available only if the broadcaster supports it.Note: Audio description sound feature is not available in recording or time shifting mode. | |
| Dialogue Enhancement | This feature provides sound post-processing options for speech-gated dialogue enhancement. Off, Low, Medium and High options will be available. Set according your preference.Note: This feature has an effectonly if input audio format is AC-4 and this effect only applies to TV loudspeaker output. | |
| Spoken Subtitles | Default preference of spoken subtitles is selected with this setting option. To make spoken subtitles priority higher than normal ones, this option should be set to On.This option may not be available depending on the model of your TV and is only visible when the source is set to TV. | |
| Magnification | Enables the use of button combinations to magnify the screen. On and Off options will be available. Set as On to enable.Magnification support will be enabled or disabled with long-press of the numeric button 5. First top-left quadrant of the screen will be zoomed. After the magnification support is enabled, long-press of the numeric buttons 2, 4, 6, 8 will move the zoomed area to up, left, right and down. | |
| Minimap | Minimap is enabled and deactivated by default. It will be activated when Magnification feature is enabled. With this option, you can prevent magnification feature from displaying the minimap. | |
| Click Sound | This option enables the key click sound on TV menu. Set to On to enable. | |
| Highlight programmes with | ||
| [S] Subtitle | If this option is enabled and if any electronic programme guide event has "Subtitle" access service, this events will be highlighted with another colour. | |
| [SL] Sign Language | If this option is enabled and if any electronic programme guide event has "Sign Language" access service, this events will be highlighted with another colour. | |
| [AD] Audio Description | If this option is enabled and if any electronic programme guide event has "Audio Description" access service, this events will be highlighted with another colour. | |
| Language | You may set a different language depending on the broadcaster and the country. | |
| Conditional Access | Controls conditional access modules when available. | |
| Privacy | Manage your privacy privileges for smart TV related applications. Press OK to enter the menu and set according to your preferences. | |
| Privacy Settings | Manage your privacy privileges for smart TV related applications. Press OK to enter the menu and set according to your preferences. | |
| Show All Co- kies | Displays all saved cookies. | |
| Delete All Co- oikes | Deletes all saved cookies. | |
| Do Not Track | You can set your preference regarding the tracking behaviour for HbbTV services using this option. | |
| Network Menu Content | |
| Network Type | Disable the network connection or change the connection type. |
| Scan Wireless Networks | Start a search for wireless networks. This option will be available if the Network Type is set as Wireless Device. |
| Disconnect | To disconnect from a wireless network and delete your saved wireless network profile (if previously saved), highlight this option and press OK. This option will not be available if you did not connect to a wireless network. Refer to Connectivity section for more information. |
| Press WPS on your wifi router | If your modem/rodger device has WPS, you can directly connect to it using this option. Highlight this option and press OK. Go to your modem/rodger device and press the WPS button on it to make the connection. This option will be available if the Network Type is set as Wireless Device. |
| Internet Speed Test | Start a speed test to check your connection bandwidth. The result will be displayed on the screen when finished. |
| Advanced Settings | Change the IP and DNS configurations of your TV. |
| Networked Standby Mode | Enable or disable this feature by setting it as On or Off. |
| Note: For detailed information on the options of this menu refer to the Connectivity section. | |
| Installation Menu Content | |
| Automatic channel scan (Retune) | Displays automatic tuning options. D. Aerial: Searches and stores aerial DVB stations. D. Cable: Searches and stores cable DVB stations. Analogue: Searches and stores analogue stations. |
| Manual channel scan | This feature can be used for direct broadcast entry. |
| Network channel scan | Searches for the linked channels in the broadcast system. D. Aerial: Searches for aerial network channels. D. Cable: Searches for cable network channels. |
| Analogue fine tune | You can use this setting for fine tuning analogue channels. This feature is not available if no analogue channels are stored and if currently watched channel is not an analogue channel. |
| Installation Settings (optional) | Displays installation settings menu. Standby Mode Search(): Your TV will search for new or missing channels while in standby. Any new found broadcasts will be shown. Dynamic Channel Update(): If this option is set as Enabled, the changes on the broadcasts such as frequency, channel name, subtitle language etc., will be applied automatically while watching. () Availability depends on model. |
| Clear Service List | Use this setting to clear channels stored. This setting is visible only when the Country option is set to Denmark, Sweden, Norway or Finland. |
| Select Active Network | This setting allows you to select only the broadcasts within the selected network to be listed in the channel list. This feature is available only for the country option of Norway. |
| Signal Information | You can use this menu item to monitor signal related information such as signal level quality, network name etc for available frequencies. |
| First time installation | Deletes all stored channels and settings, resets TV to factory settings. |
| Subtitle Mode | This option is used to select which subtitle mode will be on the screen (DVB subtitle / Teletext subtitle) if both are available. Default value is DVB subtitle. This feature is available only for the country option of Norway. |
| Store Mode | Select this mode for store display purposes. Whilst Store Mode is enabled, some items in the TV menu may not be available. |
| Audio Video Sharing | This feature allows you to share files stored on your smartphone or tablet pc. If you have a compatible smartphone or tablet pc and the appropriate software is installed, you can share/play photos on your TV. See instructions of your sharing software for more information. |
| Power Up Mode | This setting configures the power up mode preference. Last State and Standby Mode options are available. |
| Virtual Remote | Enable or disable the virtual remote feature. |
| OSS | Displays Open Source Software license information. |
| Application Priority | You can set your preference regarding the priority between the broadcast applications and CICAM AppMMI applications using this option. In case a CICAM is inserted into the TV and a contention occurs between the applications the priority will be given to the selected type of application. |
Note: Some options may not be available depending on the model of your TV and the selected country in the First Time Installation.
| Parental | Enter correct password to change parental settings. You can easily adjust Menu Lock, Maturity Lock, Child Lock or Guidance in this menu. You can also set a new PIN or change the Default CICAM PIN using the related options. Note: Some menu options may not be available depending on the country selection in the First Time Installation. Default PIN could have been set to 0000 or 1234. If you have defined the PIN (is requested depending on the country selection) during the First Time Installation use the PIN that you have defined. | |
| Date/Time | Sets date and time. | |
| Sources | Edit the names, enable or disable selected source options. | |
| Netflix | If this feature is supported by your TV, you can view your ESN(*) number and deactivate Netflix. (*) ESN number is an unique ID number for Netflix, created especially to identify your TV. | |
| Samba ACR | Samba Interactive TV powers recommendations and other apps by gathering data regarding consumption of specific on-screen content to enhance your viewing experience. Using this option you can access Samba Interactive TV settings menu, review Samba TV's Terms of Service, Privacy Policy and manage your advertising preferences, etc. Internet connection will be required in order to access HTML based settings. You can enable or disable Interactive TV at any time from the Settings>System>Privacy>Privacy Settings menu by checking or unchecking the check box next to the related item. This option may not be available depending on the selected country during the First Time Installation process, the model of your TV and its features. | |
| Device Settings | ||
| CEC | With this setting you can enable and disable CEC functionality completely. Press Left or Right button to enable or disable the feature. | |
| CEC Auto Power On | This function allows the connected HDMI-CEC compatible device to turn on the TV and switch to its input source automatically. Press Left or Right button to enable or disable the feature. | |
| Input Device | Press OK to open the Input Device menu screen. Using this screen you can discover and connect keyboards and mice to your TV wirelessly. Note: Your TV may not be compatible with all keyboard and mouse models in the market. For more information contact your local dealer or retail outlet where you bought your TV. | |
| No Signal Timer | If your TV does not receive any input signal (e.g. from an aerial or HDMI source) for 3 minutes, it will go into standby mode. You can enable or disable this functionality by setting this option accordingly. | |
| Voice Assistant | ||
| Google Assistant | Starts the setup process to enable your TV to work with Google Assistant devices. Highlight Start and press OK. If the setup is priority completed Sign Out option will be available. If you sign out Google Assistant feature will be disabled. Refer to Google Assistant section for more information. | |
| More | Displays other setting options of the TV. | |
| Menu Timeout | Changes timeout duration for menu screens. | |
| Standby Mode LED | If set as Off the standby mode LED will not light up when the TV is in standby mode. | |
| Software Upgrade | Ensures that your TV has the latest firmware. Press OK to see the menu options. | |
| Application Version | Displays current software version. | |
| Auto Power Down | Sets the desired time for the TV to automatically go into standby mode when not being operated. This option can be set from 1 to 8 hours in steps of 1 hour. You can also disable this option by setting as Off. | |
-92 - us16b3
| Source | Supported Signals | Available | |
| Back AV | PAL | O | |
| SECAM | O | ||
| NTSC4.43 | O | ||
| NTSC3.58 | O | ||
| YPbPr | 480i, 480p | 60Hz | O |
| 576i, 576p | 50Hz | O | |
| 720p | 50Hz,60Hz | O | |
| 1080i | 50Hz,60Hz | O | |
| HDMI | 480i, 480p | 60Hz | O |
| 576i, 576p | 50Hz | O | |
| 720p | 50Hz,60Hz | O | |
| 1080i | 50Hz,60Hz | O | |
| 1080p | 24Hz, 25Hz, 30Hz, 50Hz, 60Hz | O | |
(X:Not Available,O:Available)
In some cases a signal on the TV may not be displayed properly. The problem may be an inconsistency with standards from the source equipment (DVD, Set-top box, etc.). If you do experience such a problem please contact your dealer and also the manufacturer of the source equipment.
The following table is an illustration of some of the typical video display modes. Your TV may not support all resolutions.
PC Input Typical Display Modes
| Index | Resolution | Frequency |
| 1 | 640x480 | 60Hz |
| 2 | 640x480 | 75Hz |
| 3 | 800x600 | 56Hz |
| 4 | 800x600 | 60Hz |
| 5 | 800x600 | 72Hz |
| 6 | 800x600 | 75Hz |
| 7 | 1024x768 | 60Hz |
| 8 | 1024x768 | 70Hz |
| 9 | 1024x768 | 75Hz |
| 10 | 1152x864 | 75Hz |
| 11 | 1280x768 | 60Hz |
| 12 | 1360x768 | 60Hz |
| 13 | 1280x960 | 60Hz |
| 14 | 1280x1024 | 60Hz |
| 15 | 1280x1024 | 75Hz |
| 16 | 1400x1050 | 60Hz |
| 17 | 1440x900 | 60Hz |
| 18 | 1440x900 | 75Hz |
| 19 | 1920x1080 | 60Hz |
- Are suitable plugs used to connect the antenna?
If you are in doubt, consult your dealer.
No sound
Remote control - no operation
The Image is not centered in VGA source
- Check if the TV sound is muted. Press the Mute button or increase the volume to check.
Sound may be coming from only one spot.
the balance settings from Sound menu. - The batteries may be exhausted. Replace the
batteries.
The batteries may be inserted incorrectly. the section "Inserting the Batteries into the
No signal on an input source - It is possible that no device is connected.
- Check the AV cables and connections from your device.
- Check the device is switched on.
To have your TV automatically center the image, enter
the PC Position menu in Picture menu , highlightAutoposition and press OK . Wait for it to finish . In
order to set the position of the image manually you
can use H Position and V Position options. Select
the desired option and use Left and Right directional buttons on the remote to set.
Recording unavailable
To record a programme, you should first correctly
connect a USB storage device to your TV , while theTV ( with built - off ) can be easily connected to the TV via
TV is switched off . You should then switch on the TV toenable recording feature . If you cannot record , check
the storage device sufficient space.
USB is too slow
If a "USB disk writing speed too slow to record"
message is displayed on the screen while starting asRecording , try restarting the recording . If you still get
recording, a way of recording the recording. If you can getthe same error, it is possible that your USB storage
device does not meet the speed requirements. Try
using a different USB storage device.
Subtitle File Formats
Supported File Formats for USB Mode
| External Subtitles | |
| Extension | Specification |
| .ssa | SubStation Alpha |
| .ass | Advanced SubStation Alpha |
| .srt | Subripper |
| .sub | Micro DVD / SubViewer |
| .sub + .idx | VOBSub |
| .txt | Micro DVD / TMPlayer / MPL2 |
| .mpl | MPL2 |
| .smi | Sami |
| .jss | JACOSUB |
| .tml | TTML |
| .txt / .sub | DVDSUBTITLE |
| .lrc | - |
Supported DVI Resolutions
| Internal Subtitles | |
| Extension | Specification |
| .mkv | VOBSub |
| .mkv | ASS / SSA/ TEXT |
| .dat, .mpg, .mpeg, .vob | DVD Subtitle |
| .mp4 | DVD Subtitle, TEXT |
When connecting devices to your TV's connectors by using DVI converter cable(DVI to HDMI cable - not supplied), you can refer to the following resolution information.
| 56Hz | 60Hz | 66Hz | 70Hz | 72Hz | 75Hz | |
| 640x400 | x | |||||
| 640x480 | x | x | x | x | ||
| 800x600 | x | x | x | x | x | |
| 832x624 | x | |||||
| 1024x768 | x | x | x | x | x | |
| 1152x864 | x | x | x | |||
| 1152x870 | x | |||||
| 1280x768 | x | x | ||||
| 1360x768 | x | |||||
| 1280x960 | x | x | ||||
| 1280x1024 | x | x | ||||
| 1400x1050 | x | x | ||||
| 1440x900 | x | x | ||||
| 1600x1200 | x | |||||
| 1680x1050 | x | |||||
| 1920x1080 | x |
| Video File Formats | ||
| Extension | Video Codec | Max. Resolution & Frame Rate & Bit Rate |
| .mpg, .mpeg, .dat, .vob | MPEG1/2, H.264, VC1 | H.264: 1080Px2@30fps - 50Mbps, 1080P@60fps - 50Mbps Other: 1080P@60fps - 50Mbps |
| .ts, .trp, .m2ts | ||
| .avi | MPEG1/2, MPEG4, H.264, MJPEG | |
| .mp4, .m4a, .m4v, .mov, .qt, .3gp, .3g2, .3gpp | MPEG1/2, H.263, MPEG4, H.264 | |
| .mkv | MPEG 1/2, MPEG4, H.264 | |
| .flv | Sorenson Sp, MPEG4, H.264 | |
| .asf, .wmv | MPEG4, WMV3, VC1 | |
| .webm | VP9, VP8 | |
| .mp4, mov, .gpp, .3gp, .ts, .trp, .tp, .mkv | HEVC/H.265 | |
Picture File Formats
| Extension | Specification | Resolution (width x height) |
| .jpg, .jpeg | Baseline | 8192 x 8192 |
| Progressive | 3000 x 3000 | |
| .bmp | RGB 1/4/8/16/24/32 bit | 8192 x 8192 |
| RLE 4/8 bit | ||
| .png | Grayscale, 24/32 bit per pixel | |
| Interlace format | ||
| Progressive |
| Audio File Formats | |
| Extension | Format |
| .mp3 | .mp3 |
| .ac3 | .ac3 |
| .aac | .AAC |
| .wma | .WMA |
| .amr | .AMR-NB, AMR-WB |
| .wav | .MPEG La, AAC, PCM |
seep
sBnsspepepepepepepepepepepepepepepepepepepepepepepepepepepepepepepepepepepepepepepepepepepepepepepepepepepepepepepepepepepepepepepepepepepepepepepepepepepepepepepepepepepepepepepepepepepepepepepepepepe
Ae eae aee
e e e e e e e e e e e e e e e e e e e e e e e e e e e e e e e e e e e e e e e e e e e e e
NAY MAH MAAH HAN PRAH NARAH
e e e e e e e e e e e e e e e e e e e e e e e e e e e e e e e e e e e e e e e e e e e e e e e e
Ae aee eae ee eae eae eae eae eae eae eae eae eae eae eae eae eae eae eae eae eae eae eae eae eae eae eae eae eae eae eae eae eae eae eae eae eae eae eae eae eae eae eae eae eae eae eae eae eae eae
Aaon no jao
nununununununununununununununununununununununununununununununununununununununununununununununununununununununununununununununununununununununununununununun
Paeeppeeppeeppeeppeeppeeppeeppeeppeeppeeppeeppeeppeeppeeppeeppeeppeeppeeppeeppeeppeeppeeppeeppeeppeeppeeppeeppeeppeeppeeppeeppeeppeeppeeppeeppeeppeeppeeppeeppeeppeeppeeppeeppeeppeeppeeppeeppeeppeeppeeppeep
oeaeaeaeaeaeaeaeaeaeaeaeaeaeaeaeaeaeaeaeaeaeaeaeaeaeaeaeaeaeaeaeaeaeaeaeaeaeaeaeaeaeaeaeaeaeaeaeaeaeaeaeaeaeaeae
eep
Prrnne nnnnne nee eae ene eee nene e ee eee e e e e e e e e e e e e e e e e e e e e e e e e e e e e e e e e e
eae eae eae eae ae aee eae aeae aeae aeae aeae aeae aeae aeae aeae aeae aeae aeae aeae aeae aeae aeae aeae aeae aeae aeae aeae aeae aeae aeae aeae aeae aeae aeae aeae aeae aeae aeae aeae aeae aeae aeae aeae aeae aeae aeae aeae aeae aeae aeae aeae aeae aeae aeae aeae aeae aeae aaee
slll llllllllllllllllllllllllllllllllllllllllllllllllllllllllllllllllllllllllllllllllllllllllllllllllllllllllllllllllllllllllll
e e e e e e e e e e e e e e e e e e e e e e e e e e e e e
e e e e e e e e e e e e e e e e e e e e e e e e e e e e e e e e e e e e e e e e e e e e e e e e e e e e e e ee
0ssspspee
JnnoJnnoJnnoJn noJnO JNOsSd pure uoJnoJnnoJn noJnnoJnSD mdd JnnoJnD HJnnoJnNOuoue aupe be JnnoJnNOuoue JnnoJnNOuoue a n paooo JnnoJnNOuoue Jn noJnNOuoue Jn noJnNOuoue
peepnneepnneepnneepnneepnneepnneepnneepnneepnneepnneepnneepnneepnneepnneepnneepnneepnneepnneepnneepnneepnneepnneepnneepnneepnneepnneepnneepnneepnneepnneepnneepnneepnneepnne
yduBtHbH 10000000000000000000000000000000000000000000000
nne nnnnne nee
| Improve the performance of your wireless device place it at least 1 meter away from any other wireless devices. Connectivity Troubleshooting Wireless Network Not Available · Ensure that any firewalls of your network allow the TV wireless connection. · Try searching for wireless networks again, using the Network menu screen. If the wireless network does not function properly, try using the wired network in your home. Refer to the Wired Connectivity section for more information on the process. If the TV does not function using the wired connection, check the modem (router). If the router does not have a problem, check the internet connection of your modem. Connection is Slow See the instruction book of your wireless modem to get information on the internal service area, connection speed, signal quality and other settings. You need to have a high speed connection for your modem. Disruption during playback or slow reactions You could try the following in such a case: Keep at least three meters distance from microwave ovens, mobile telephones, bluetooth devices or any other WLAN compatible devices. Try changing the active channel on the WLAN router. Internet Connection Not Available / Audio Video Sharing Not Working If the MAC address (a unique identifier number) of your PC or modem has been permanently registered, it is possible that your TV might not connect to the internet. In such a case, the MAC address is authenticated each time when you connect to the internet. This is a precaution against unauthorized access. Since your TV has its own MAC address, your internet service provider cannot validate the MAC address of your TV. For this reason, your TV cannot connect to the internet. Contact your internet service provider and request information on how to connect a different device, such as your TV, to the internet. It is also possible that the connection may not be available due to a firewall problem. If you think this causes your problem, contact your internet service provider. A firewall might be the reason of a connectivity and discovery problem while using the TV in Audio Video Sharing mode or while browsing via Audio Video Sharing feature. Invalid Domain Ensure that you have already logged on to your PC with an authorized username/passport and also ensure that your domain is active, prior to sharing any files in your media server program on your PC. If the domain is invalid, this might cause problems while browsing files in Audio Video Sharing mode. | Using Audio Video Sharing Network Service Audio Video Sharing feature uses a standard that eases the viewing process of digital electronics and makes them more convenient to use on a home network. This standard allows you to view and play photos, music and videos stored in the media server connected to your home network. 1. Server Software Installation The Audio Video Sharing feature cannot be used if the server programme is not installed onto your PC or if the required media server software is not installed onto the companion device. Prepare your PC with a proper server programme. 2. Connect to a Wired or Wireless Network See the Wired/Wireless Connectivity chapters for detailed configuration information. 3. Enable Audio Video Sharing Enter the Settings>Devices menu and enable the Audio Video Sharing option. 4. Play Shared Files via Media Browser Highlight the Audio Video Sharing option in the Sources menu by using the directional buttons and press OK. Available media server devices in the network will be listed. Select one and press OK to continue. The media browser will then be displayed. Refer to the Media Browser menu section for further information on file playback. If a problem occurs with the network, switch your television off at the wall socket and back on again. Trick mode and jump are not supported with the Audio Video Sharing feature. PCHDDI/Media Player or any other devices that are compatible should be used with a wired connection for higher playback quality. Use a LAN connection for quicker file sharing between other devices like computers. Note: There may be some PCs which may not be able to utilize the Audio Video Sharing feature due to administrator and security settings (such as business PCs). Apps You can access the applications installed on your TV from the Home menu. Press the Menu button on the remote, Home menu will be displayed. Highlight an app and press OK to launch. In order to manage the apps installed on your TV, you can use the More Apps option in the TV menu. You can add an installed app to Home menu, launch or remove it. Highlight an app and press OK to see the available options. You can add new apps from the application market. To access the market highlight the Market option in the TV menu and press OK. Available apps will be displayed. |
English -34-
| do not apply, when the TV is switched into the standby mode. The performance of some devices in the market, may vary due to the software architecture. In order to use Networked Standby Mode feature with a better performance, please make sure that your device has latest firmware version. If you want your TV to consume less power in standby mode, you can disable this feature by setting the Networked Standby Mode option as Off. Wireless Display Wireless Display is a standard for streaming video and sound content. This feature provides the ability to use your TV as wireless display device. Using with mobile devices There are different standards which enable sharing of screens including graphical, video and audio content between your mobile device and TV. Then press the Source button on the remote and switch to Wireless Display source. A screen appears stating that the TV is ready for connection. Open the sharing application on your mobile device. These applications are named differently for each brand, refer to the instruction manual of your mobile device for detailed information. Scan for devices. After you select your TV and connect the screen of your device will be displayed on your TV. Note: This feature can be used only if the mobile device supports this feature. If you experience problems with the connection check if the operating system version you use supports this feature. There may be incompatibility problems with the operating system versions which are released after the production of this TV. Scanning and connecting processes differ according to the programme you use. Connecting Other Wireless Devices Your TV supports another short range wireless connection technology too. A pairing is required before using these kind of wireless devices with the TV set. You should do the following to pair your device with the TV: • Set the device to pairing mode • Start device discovery on the TV Note: Refer to the user manual of the wireless device to learn how to set the device to pairing mode. You can connect audio devices, keyboards and mice wirelessly to your TV. Unplug or switch off any other connected audio device in order for wireless connection feature to work correctly. For audio devices you should use the Audio Link option, for keyboards and mice the Input Device option in the Settings>Devices menu. Select the menu option and press the OK button to open the related menu. Using this menu you can discover and connect the devices that use the same radio frequency range and may interfere with one another. To |
| both ways or one of them. If the platform does not have an operational broadband connection, the platform can still launch applications transmitted on broadcast. The autopost red button applications generally provide links to other applications. The user then can switch to other applications by using the links provided. The applications should provide a way to terminate themselves, usually Exit button is used for this. HbbTV applications use keys on the remote control to interact with the user. When an HbbTV application is launched, the control of some keys are owned by the application. For example, numeric channel selection may not work on a teletext application where the numbers indicate teletext pages. HbbTV requires AV streaming capability for the platform. There are numerous applications providing VOD (video on demand) and catch-up TV services. The user can use play, pause, stop, forward, and rewind keys on the remote control to interact with the AV content. Note: You can enable or disable this feature from the Privacy Settings menu in Settings>System menu. Smart Center Smart Center is a mobile application running on iOS and Android platforms. With your mobile device, you can easily stream your favourite live shows and programmes from your smart TV. Also, you can launch your applications, use your mobile device as a remote control for your TV and share media files. Note: Being able to use all functions of this application depends on the features of your TV. Getting Started To be able to use internet based features, your modem/ router must be connected to the internet. IMPORTANT: Make sure the TV and mobile device are connected to the same network. For media sharing feature Audio Video Sharing option should be enabled(if available). Press the Menu button on the remote, select Settings>Devices menu and press OK. Highlight Audio Video Sharing and change as Enabled. Your TV is ready to connect to your mobile device now. Install the Smart Center application onto your mobile device. Start the Smart Center application. If all connections are configured properly, you will see your TV's name on your mobile device. If your TV's name doesn't appear on the list, wait a while and tap on the Refresh widget. Select your TV from the list. Mobile Device screen On the main screen you can find tabs to access various features. The application retrieves actual channel list from TV first when it starts. | MY CHANNELS: The programmes of first four channels from the channel list retrieved from the TV are shown. You can change the listed channels. Press on the channel thumbnail and hold. A list of channels will be displayed and you can choose your desired channel to be replaced. TV: You can watch content through the TV tab. In this mode you can navigate through the channel list retrieved from your TV and click on thumbnails to view the detail pages. RECORDINGS: You can view your active recordings(if available) and reminders through this tab. To delete any item, simply press on the delete icon found on each row. EPG(Electronic programme guide): You can view the broadcast schedules of selected channel lists through this tab. You can also navigate through channels by pressing on the selected channel on the EPG grid. Please note that updating / refreshing the EPG information may take a while depending on your network and web service quality. Note: Internet connection is required for WEB based EPG information. SETTINGS: Configure the application to your liking. You can change; Auto-enable FollowMeTV: FollowMeTV function (if available) will start automatically when this setting is enabled. Default is disabled. Auto-connection to TV: When enabled, your mobile device will automatically connect to last connected TV and skips the TV search screen. Change TV: Shows the currently connected TV. You can press on this setting to go to the "TV search" screen and change to a different TV. Edit custom channel list: You can edit your custom channel list using this setting. Choose channel list source: You can choose the channel list source to be used in the application. The options are "TV List" and "Custom List". Additionally you can activate "Remember my choice" option to set the selected channel list source as a constant choice. In this case if the selected source is available it will be used in the application. Version No: Displays the current version of the application. Detail Page To open detail page tap on a programme. On the detail page screen you can get detailed information of the programmes you select. There are "Details", "Cast&Crew" and "Videos" tabs to find on this page. DETAILS: This tab provides summary and information about the selected programme. |
| You can also access the application market from within the More Apps menu. You can reset your customisations on the Home menu, including app-related ones, to defaults using the Reset Apps option in the Settings menu (availability depends on TV model and its features). Highlight this option and press OK. A confirmation message will be displayed. Highlight Yes and press OK to proceed. Note that you will not be able to perform this operation again within the next few minutes. Notes: Possible application dependent problems may be caused by the content service provider. Third party internet services may change, be discontinued or restricted at any time. Internet Browser To use the internet browser, enter the Home menu first. Then launch the internet browser application which has an orange coloured logo with earth symbol on it. In the initial screen of the browser, the thumbedails of the predefined (if any) links to web sites available will be displayed as Speed Dial options along with the Edit Speed Dial and the Add to Speed Dial options. To navigate the web browser, use the directional buttons on the remote or a connected mouse. To see the browser options bar, move the cursor to the top of the page. History. Tabs and Bookmarks options and the browser bar which contains previous/next buttons, the refresh button, the address/search bar, the Speed Dial and the Vewd buttons are available. To add a desired website to the Speed Dial list for quick access, move the cursor to the top of the page or press. The browser bar will appear. Highlight the Speed Dial button and press the OK button. Then select Add to Speed Dial option and press the OK button. Fill in the blanks for Name and Address, highlight OK and press the OK button to add. Whilst you are on the site you wish to add to the Speed Dial list, highlight the Vewd button and press the OK button. Then highlight Add to Speed Dial option in the submenu and press the OK button again. Name and Address will be filled automatically according to the site you are visiting. Highlight OK and press the OK button to add. You can also use the Vewd menu options to manage the browser. Highlight the Vewd button and press the OK button to see available page specific and general options. There are various ways to search or visit websites using the web browser. Enter the address of a website(URL) into the search/address bar and highlight the Enter button on the virtual keyboard and press the OK button to visit the site. | Enter keyword/s into the search/address bar and highlight the Enter button on the virtual keyboard and press the OK button to start a search for the related websites. Highlight a Speed Dial thumbnail and press the OK button to visit the related website. Your TV is compatible with USB mice. Plug your mouse or wireless mouse adaptor into the USB input of your TV for easier and quicker navigation. Some web pages include flash content. These are not supported by the browser. Your TV does not support any download processes from the internet via the browser. All sites on the internet might not be supported. According to the site; content problems may occur. In some circumstances video contents might not be able to be played. HBBTV System HbbTV (Hybrid Broadcast Broadband TV) is a new industry standard that seamlessly combines TV services delivered via broadcast with services delivered via broadband and also enables access to Internet only services for consumers using connected TVs and set-top boxes. Services delivered through HbbTV include traditional broadcast TV channels, catch-up services, video-on-demand, electronic programme guide, interactive advertising, personalised, voting, games, social networking and other multimedia applications. HbbTV applications are available on channels where they are signalled by the broadcaster. The broadcaster marks one application as "autostart" and this one is started by the platform automatically. The autostart applications are generally launched with a small red button icon to notify the user that there is an HbbTV application on that channel. Press the red button to open the application page. After the page is displayed you can go back to the initial red button icon state by pressing the red button again. You can toggle between the red button icon mode and full UI mode of the application via pressing red button. It should be noted that the red button switching capability is provided by the application and some application may behave differently (other colour buttons such as green, yellow, blue, may be defined for some other functions, e.g. shortcuts). If you switch to another channel while an HbbTV application is active (either in red button icon mode or full UI mode), the following scenarios can occur. • The application can continue running. • The application can be terminated. • The application can be terminated and another autopost red button application can be launched. HbbTV allows the applications to be retrieved both from broadband or broadcast. The broadcaster may enable |
| Command | Function |
| volume up on 'FN' | Increases volume |
| volume down on 'FN' | Decreases volume |
| set mute volume on 'FN' | Mutes sound |
| switch input to "input_name" on 'FN' | The TV switches to the input source with the specified name (e.g., HDMI 1) |
| switch to "input_name" on 'FN' | |
| change channel to "chan-ne_l_number" on 'FN' | The TV switches to the channel with the specified number (e.g., channel 200) |
| change channel to "chan-ne_l_name" on 'FN' | The TV switches to the channel with the specified name |
| channel up on 'FN' | The TV switches to the next higher channel, if any available |
| channel down on 'FN' | The TV switches to the next lower channel, if any available |
FN is the abbreviation for 'Friendly Name'.
Google is a trademark of Google LLC.
DVB functionality information This DVB receiver is only suitable for use in the country which it was designed to be used in.
Although this DVB receiver conforms to the latest DVB specifications at the time of manufacture, we cannot guarantee compatibility with future DVB transmissions due to changes that may be implemented in broadcast signals and technologies.
Some digital television functions may not be available in all countries. We continually strive to improve our products;
For advice on where to purchase accessories, please contact the store where you purchased your equipment.
| Command | Function |
| turn on 'FN' | Powers on the TV |
| turn off 'FN' | Powers off the TV |
| pause on 'FN' | Pauses media playback |
| resume on 'FN' | Resumes media playback |
| stop on 'FN' | Stops media playback |
| CAST&REW: Shows all the people contributed to the current programme. VIDEOS: Provides videos on Youtube related to the selected programme. Note: For some functions an internet connection may be required. FollowMe TV Feature (if available) Tap on the FOLLOW ME TV widget located at the upper right of the screen of your mobile device to change the layout for FollowMe TV feature. Tap the play icon to start streaming of the content from the TV to your mobile device. Available if your device is in your routers operation range. Mirror Mode This mode of FollowMe TV feature is enabled by default and allows streaming the content from any other devices. | 3. Mobile Device based on Android or iOS platform (Android OS 5.1 or higher; iOS 12 or higher version) 4. Smart Center app.(to be found on online application stores based on Android and iOS platforms) 5. Router modem 6. USB storage device in FAT32 format (required for USB Recording feature, if available) Notes: For Android devices, Normal.mdpi), Large(hdpi) and Extra Large(xhdpi) screen sizes are supported. Devices with 3" or smaller screen sizes are not supported. For iOS devices, all screen sizes are supported. User interface of the Smart Center application is subject to change according to version installed on your device. | |
| To access the Media Share widget tap on the Up- arrow on the upper right side of the screen. |
| If the Media Share widget is pressed, a screen is displayed where you can select the media file type to share with your TV. |
| Note: Not all image file formats are supported. This function will not work if Audio Video Sharing feature is not supported. |
| Smart Remote Feature |
| You can use your mobile device as a remote control for your TV once it has connected to the TV. To access smart remote's full features you can use the menu at the bottom middle of the screen. |
| Voice Recognition |
| You can tap on the Microphone( ) widget and manage your application, giving voice commands such as "Volume Up/Down", "Programme Up/Down". |
| Note: This feature is only for android based devices available. |
| Keyboard Page |
| The keyboard page can be opened in two ways; by pressing the Keyboard( ) widget on the application screen or automatically by receiving a command from the TV. |
| Requirements |
| 1. Smart TV |
| 2. Network connection |
Inhoudsopgave
| S-GBD | B | C | D | E | F | G | H | I | J | K | L | M | N | O | P | Q | R | S | T | U | V | W | X | Y | Z |
| S-GBD | B | C | D | E | F | G | H | I | J | K | L | M | N | O | P | Q | R | S | T | U | V | W | X | Y | Z |
| S-GBD | B | C | D | E | F | G | H | I | J | K | L | M | N | O | P | Q | R | S | U | V | W | X | Y | Z | |
| S-GBD | B | C | D | E | F | G | H | I | J | K | L | M | N | O | P | Q | R | S | U | V | W | X | Y | Z | |
| S-GBD | B | C | D | E | F | G | H | I | J | K | L | M | M | N | O | P | Q | R | S | U | V | W | X | Y | |
| S-GBD | B | C | D | E | F | G | H | I | J | K | L | M | M | N | O | P | Q | R | S | U | V | W | X | Y | |
| S-GBD | B | C | D | E | F | G | H | I | J | K | L | M | M | N | O | P | Q | R | 5 | U | V | W | X | Y | |
| S-GBD | B | C | D | E | F | G | H | I | J | K | L | M | M | N | O | P | Q | R | 5 | U | V | W | X | Y | |
| S-GBD | B | C | D | E | F | G | H | I | J | K | L | M | M | M | N | O | P | Q | R | 5 | U | V | W | Y | |
| S-GBD | B | C | D | E | F | G | H | I | J | K | L | M | M | M | N | O | P | Q | R | 5 | U | V | W | Y | |
| S-GBD | B | C | D | E | F | G | H | I | J | K | L | M | M | M | N | O | P | 0 | 0 | 0 | 0 | 0 | 0 | 0 |
e do pene epepepepepepepepepepepepepepepepepepepepepepepepepepepepepepepepepepepepepepepepepepepepepepepepepepepepepepepepepepepepepepepepepepepepepepepepepepepepepepepepepepepepepepepepepe
eeppeeppeeppeeppeeppeeppeeppeeppeeppeeppeeppeeppeeppeeppeeppeeppeeppeeppeeppeeppeeppeeppeeppeeppeeppeeppeeppeeppeeppeeppeeppeeppeeppeeppe
aee aee aee aee aee aee aee aee aee
PC-invoernormaleweergavemodi
Marker Atopic Units and Group CV: Waldt et al. 2020
AANMnBnBnBnBnBnBnBnBnBnBnBnBnBnBnBnBnBnBnBnBnBnBnBnBnBnBnBnBnBnBnBnBnBnBnBnBnBnBnBnBnBnBnBnBnBnBnBnBnBnBn
eeppeeppeeppeeppeeppeeppeeppeeppeeppeeppeeppeeppeeppeeppeeppeeppeeppeeppeeppeeppeeppeeppeeppeeppeeppeeppeeppeeppeeppeeppe
AeepnepneppeepdoBue6ui-NV
(1)
m : x = 1 或 3x + 4y + 1 = 0
eep
eae eeeenee eee n nee eee eee eee
n do nnnn nn n n n n n n n n n n n n n n n n n n n n n n n n n n n n n n n n n n n n n n n n n n n
'uee68
oennnne ennnnne ennnnne ennnnne ennnnne ennnnne ennnnne ennnnne ennnnne ennnnne ennnnne ennnnne ennnnne ennnnne ennnnne ennnnne ennnnne ennnnne ennnnne ennnnne ennnnne ennnnne ennnnne ennnnne ennnnne ennnnne enannnee
AaepuaepzipzapeepdoeBueuNVA
1e9 (1000) N7 2
6uipuiqIeA-dSpupeepaeeg
8
A
( xt^2 - 5x^2) = - 4
1 + u7 = 7 + 1 > ( 1 + u) u7 = 7 + 1 > ( 1 + u) u = 2
( xt^2 - x) a + bt^2 = 7| 8y|
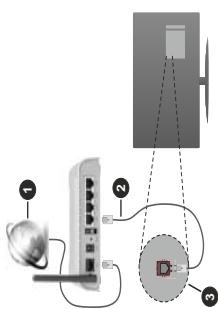
AD = BD = 2 OQ = 2
do eeppeepeeepeeepeeepeeepeeepeeepeeepeeepeeepeeepeeepeeepeeepeeepeeepeeepeeepeeepeeepeeepeeepeeepeeepeeepeeepeeepeeepeeepeeepeeepeeepeeepeeepeeepeeepeeepeeepeeepeeepeeepeeepeeepeeepeeepeeepeeepeeepeeepeeepeeepe