
BFP201BB - Electric oven BRANDT - Free user manual and instructions
Find the device manual for free BFP201BB BRANDT in PDF.
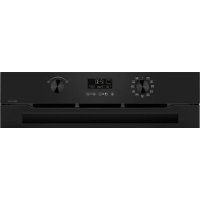
| Product type | Built-in electric oven |
| Brand | BRANDT |
| Model | BFP201BB |
| Power supply | 220-240 V ~ 50/60 Hz, 16 A |
| Nominal power | Approximately 2800 W (estimated) |
| Dimensions (W x H x D) | Standard built-in 60 cm (approximately 595 x 595 x 560 mm) |
| Weight | Approximately 32 kg (estimated) |
| Capacity | Standard (approximately 70 L) |
| Cooking modes | 11 modes: Forced Convection, Conventional, Sole Pulse, Eco, Intense Grill, Pulse Grill, Bread, Poultry, Fish, White Meat, and automatic functions |
| Max/Min temperature | 275 °C / 35 °C |
| Cleaning | Pyrolysis with 3 cycles: Pyrolysis 2h, PyroExpress 59 min, PyroECO 1h30 |
| Safety | Key lock (child safety), automatic door locking in pyrolysis |
| Lighting | Halogen lamp 25 W, 220-240 V, 300 °C, G9 base (energy class G) |
| Included accessories | Anti-tip safety grid, multi-purpose tray 45 mm |
| Levels | 5 positions |
| Door | Removable glass for cleaning |
| Controls | Rotary knob + buttons, digital display with settings menu |
| Smart Assist function | Automatic cooking time recommendation based on mode |
| Installation | Built-in under counter or in column |
| Spare parts | Replaceable lamp and door glass; certified original parts available |
Frequently Asked Questions - BFP201BB BRANDT
User questions about BFP201BB BRANDT
0 question about this device. Answer the ones you know or ask your own.
Ask a new question about this device
Download the instructions for your Electric oven in PDF format for free! Find your manual BFP201BB - BRANDT and take your electronic device back in hand. On this page are published all the documents necessary for the use of your device. BFP201BB by BRANDT.
USER MANUAL BFP201BB BRANDT

INSTRUCTIONS UTILISATEUR FR
FOUR

Chere Cients, Cher Client
RELATIONS CONSOMMATEURS
Information for domestic ovens (UEn° 66/2014)
Thank you for purchasing and placing your trust in a BRANDT product.
We have designed and made this product with you, your lifestyle and your requirements in mind so that it meets your expectations. It comes packed with more than 60 years of expertise, innovative spirit and passion.
In a continuous effort to better satisfy your needs, our customer service department is available to listen and answer all your questions and receive any suggestions you may have.
Visit our website at www.brandt.com where you will find our latest innovations, as well as useful and complementary information.
BRANDT is pleased to be on hand to offer daily support and to help you make the most of your purchase.

BVCert.801825
The "Origine France Garantie" label guarantees consumers the product traceability by providing them with a clear and objective indication of origin. BRANDT is proud to affix this label to the products made in our French plants based in Orléans and Vendôme.
www.brandt.com


IMPORTANT:
Before switching your appliance on, please read this user guide carefully to familiarise yourself quickly with its operation.
TABLE OF CONTENTS
EN
SAFETY INSTRUCTIONS 4
ENVIRONMENT 6
1 - INSTALLATION 7
Choice of location and fitting 7
Electrical connection 8
2 - DESCRIPTION OF YOUR APPLIANCE. 9
Description of the oven 9
Display and control buttons 9
Accessories (depending on the model) 10
3 - USING YOUR APPLIANCE 11
Settings 11
Settings menu 12
Start a cooking programme 14
4 - CARING FOR AND CLEANING YOUR APPLIANCE 16
Cleaning the inner and outer surfaces 16
Cleaning the outer surfaces 17
Removing the over door glass panels 17
5 - ANOMALIES AND SOLUTIONS 19
Anomalies and solutions 19
6- AFTER-SALES SERVICE 20
SERVICE CALLS 20
CUSTOMER RELATIONS 20
Genuine REPLACEMENT PARTS 20
7-COOKING TIPS 21
8 - ENERGY EFFICIENCY 23
9 - FUNCTION PERFORMANCE TESTS 24
IMPORTANT - READ CAREFULLY AND RETAIN FOR FUTURE USE.
This user guide is available for download on the brand's website.
When you receive the appliance, unpack it or have it unpacked immediately. Check its general appearance. Make a note of any reservations on the delivery slip and keep a copy.

IMPORTANT:
This appliance may be used by children aged 8 years and older, and by persons with impaired physical sensorial or mental capacities, or without experience or knowledge, if they are supervised or have received prior instructions on how to use the appliance safely and have understood the risks involved. Children must not be allowed to play with the appliance. Cleaning and maintenance operations must not be carried out by children without supervision.
- Children must be supervised to prevent them from playing with the appliance.

WARNING:
The appliance and its accessible parts become hot during use. Be careful not to touch the heating elements inside the oven. Children under 8 years old must not be allowed near it unless they are supervised at all times.
- This appliance is designed to cook with the door closed.
Before pyrolytic cleaning of your oven, remove all accessories and any thick deposits.
During cleaning, the surfaces may become warmer than under normal conditions of use. It is advisable to keep children away from the appliance.
— Do not use a steam cleaner.
- Do not use abrasive cleaning products or hard metal scrapers for cleaning the oven's glass door, as they could scratch the surface and cause the glass to shatter.

WARNING:
Make sure the appliance is disconnected from the power before replacing the lamp in order to avoid the risk of electric shock. Change the lamp only when the appliance has cooled down. To unscrew the view port and the light, use a rubber glove, which will make disassembly easier.

The electrical plug must re-accessible after installation.
-
It must be possible to disconnect the appliance from the power supply, either using a plug or by fitting a switch on the fixed wiring system in accordance with installation rules.
-
If the power cable is damaged, it should be replaced by the manufacturer, its after-sales service department or by a similarly qualified person in order to avoid danger.
- This appliance may be installed either under a worktop or in a cabinet column, as indicated on the installation diagram.
Centre the oven in the unit so as to ensure a minimum distance of 10mm between the appliance and the surrounding unit. The ma
terial of the unit supporting the appliance must be heat-resistant (or covered with a heat-resistant material). For greater stability, attach the oven to the unit with 2 screws through the holes provided on the side panels.
In order to avoid overheating, the appliance must not be installed behind a decorative door..
- This appliance is designed to be used for domestic and similar applications such as:
Kitchen areas for the staff of shops, offices and other professional premises; Farms; Use by clients of hotels, motels and other residential type establishments; guest house type environments.
The oven must be turned off when cleaning inside the oven.
Do not modify the characteristics of this appliance; doing so could be dangerous.
Do not use your oven as a larder or to store any items after use.
Environment
- This appliance's packing materials are recyclable. Please recycle them and help protect the environment by depositing them in municipal containers provided for this purpose.

- Your appliance also contains many recyclable materials. It is therefore
marked with this logo to indicate that used appliances must not be mixed with other waste.
The appliance recycling organised by your manufacturer will therefore be conducted in optimum conditions, in accordance with European directive on electrical and electronic equipment waste.
Consult your local authority or your retailer to locate your nearest used appliance drop-off points.
- We thank you for your help in protecting the environment.
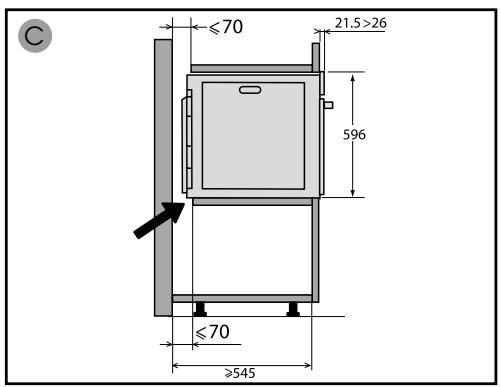
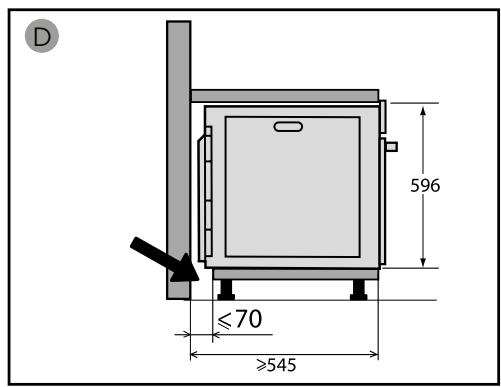
CHOICE OF LOCATION AND FITTING
The diagrams show the dimensions of a cabinet that will be able to hold your oven.
This appliance may be installed either under a worktop (A) or in a column (B). If the cabinet is open, its opening at the back must be 70mm maximum.
Install the oven in the furniture. Secure the oven with 2 wood screws (not supplied - round head, diameter: 3mm and length: 30~mm ). Attach the oven with the two screws. Do not use an electric screwdriver as this could damage the enamel on your oven.
Replace the rubber stops.

Tip:
To be certain that you have properly installed your appliance, do not hesitate to call on a household appliance specialist.

WARNING:
If the electrical installation in your residence requires any changes in order to hook up your appliance, contact a professional electrician. If the oven malfunctions in any way, unplug the appliance or remove the fuse corresponding to the sector where the oven is hooked up.


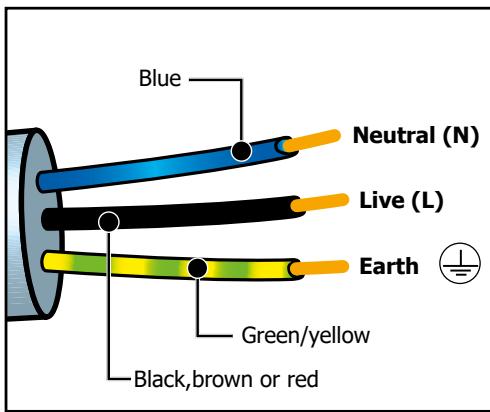
ELECTRICAL CONNECTION
Your oven must be connected with a (standard) power cable with 3 conductors of 1.5mm^2 (1 live + 1 neutral + earth) which must be connected to a 220-240V~ single-phase grid by means of a 1 live + 1 neutral + earth CEI 60083 standard power socket or via an all-poles cut-off device in compliance with the installation rules.
WARNING
The safety wire (green-yellow) is connected to the appliance's terminal and must be connected to the earth terminal of the electrical set-up.
The fuse in your set-up must be 16 amperes.
We cannot be held responsible for any accident resulting from inexistent, defective or incorrect earthing.
Prior to first use
Before using your oven for the first time, heat it with the door closed for about 15 minutes on the highest temperature to break in the appliance. The mineral wool surrounding the oven cavity may initially give off a particular odour due to its composition. You may also notice smoke development. This is normal.
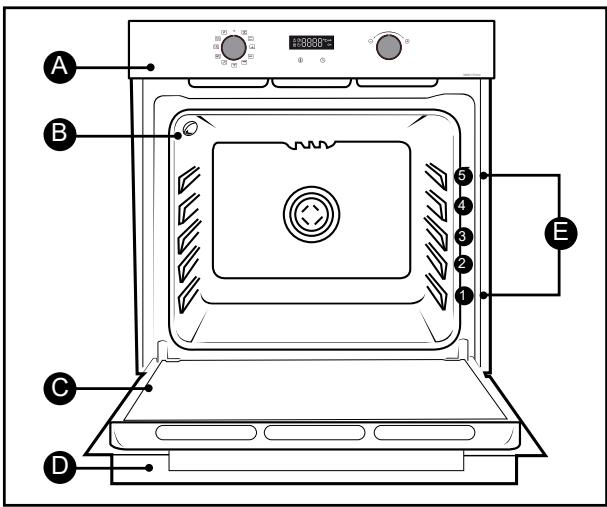
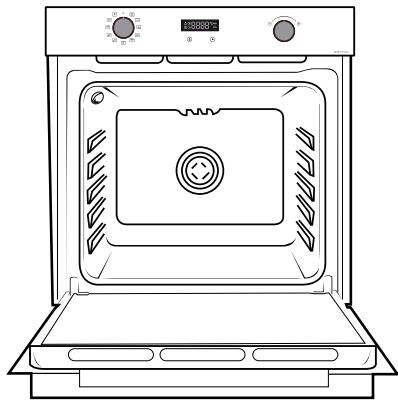
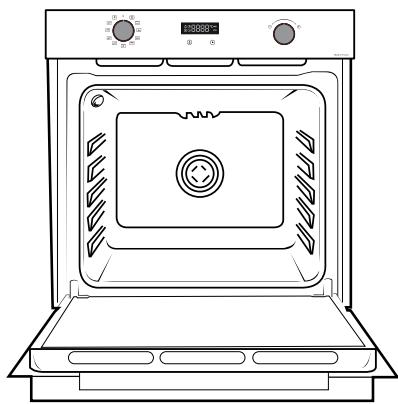
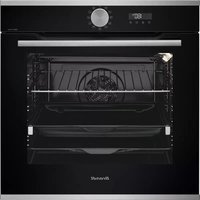
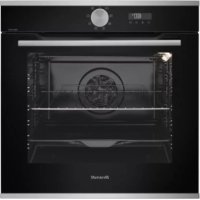
DESCRIPTION OF THE OVEN

Control panel

Light

Door

Handle

Shelf runners (this oven has 5 positions for the accessories: shelf 1 to 5).
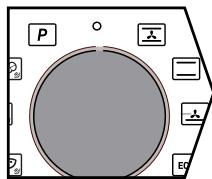
DISPLAY AND CONTROL BUTTONS
- Display
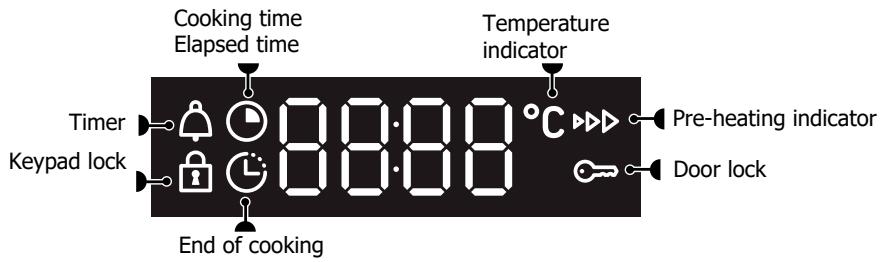
- Keys

ACCESSORIES (depending on the model)
- Anti-tip safety rack
The rack can be used to support all dishes and moulds containing food for cooking or browning. It can be used for barbecues (to be placed directly on the grill).
Insert the anti-tip safety grid towards the back of the oven.
- 45 mm multi-purpose drip tray
To be inserted into the runners below the wire rack. It collects juice and fat from grilling, and can be used half-filled with water as a double-boiler.

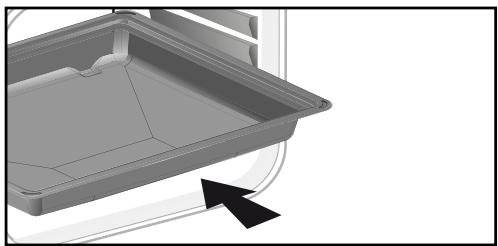

TIP:
To avoid fumes when cooking fatty meats, we recommend you add a small amount of water or oil to the bottom of the 45mm multi-purpose drip tray.

WARNING:
Remove the accessories from the oven before beginning pyrolysis cleaning.
The accessories may warp with the effect of heat, but this will not alter their function. They will return to their original shape once cooled.
SETTINGS
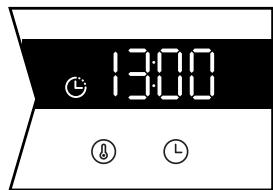
- Setting the clock

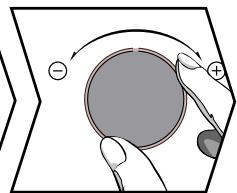
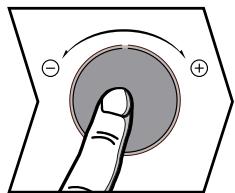
When switching on, the display flashes at 12:00. Set the clock with + and - knob.
Confirm by pressing the knob.
If there is a power cut, the clock flashes. Reset it as above.
- Changing the time
The function selector must be in position 0.
Press the key, the symbol appears. Press again.
Set the clock with the + and - knob. Confirm by pressing the knob.
- Timer
This function can only be used when the oven is off.

The function selector must be in position 0.
Press the key, the symbol appears. The minute minder flashes. Set the timer with the + and - knob. Confirm by pressing the knob, the timer will then start and the current time reappears. Once the time has lapsed, there is a sound signal. To stop it, press any key.
Note: you can modify or cancel the timer at any time. To cancel, return to the timer's menu and set it to 00:00.
- Keypad lock indicator (child safety device).

Press ⑧ and ① at the same time until the symbol appears on the screen. To unlock it, press the ⑧ and ① keys until the symbol disappears from the screen.
SETTINGSMENU
You can change different parameters of your oven, to do so: press the key until "MENU" displays to access the settings mode.
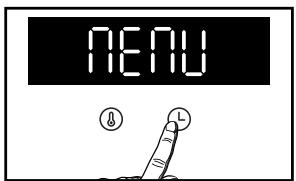
Use the knob to select the different settings. Confirm your choice by pressing the knob, active and deactivate the different parameters with the + and - knob, and confirm with the knob; see table:
| 1-5 | AUTO: In cooking mode, the light inside the oven automatically turns itself off after 90 seconds ON: In cooking mode, the light stays on all the time, except in ECO mode |
| 2-5b | Activate/de-activate the beeping sound of the buttons |
| 3-5c | Activate/de-activate pre-heating mode |
| 4-5d | Activate/de-activate demonstration mode |
| 5-cd | After-sales information |
To exit the "MENU", press 口 again.
COOKING MODES
Manual functions:
CONV. VENTILATED*
Min. temperature 35^ C , max. 275^ C
Recommendation: 200^
Recommended for meat, fish and vegetables, preferably placed in an earthenware dish.
CONVENTIONAL
Min. temperature 35^ C , max. 275^ C
Recommendation: 200^
This cooking method is not compatible with cooking in a bain-marie.
Recommended for slow, gentle cooking: rich game, etc. For retaining the juices in red meat roasts. For simmering in a covered casserole, dishes that were begun on the hob (coq au vin, stew).
PULSED BOTTOM
Min. temperature 75^ , max. 250^
Recommendation: 180^
Recommended for moist dishes (quiches, tarts with juicy fruits, etc.). The pastry will be thoroughly cooked on the bottom. Recommended for recipes which rise (cake, brioche, kügelhopf, etc.) and for souffles which will not be stopped by a crust on the top.
ECO ECO*
Min. temperature 35^ C , max. 275^ C
Recommendation: 200^
This cooking method is not compatible with cooking in a bain-marie.
This setting saves energy while maintaining the quality of the cooking.
All types of cooking are done without preheating.
FULL GRILL
Positions 1 to 4
Recommendation: Position 4
Recommended for toast, gratin dishes, browning crème brûlée, etc.
PULSED GRILL
Min. temperature 100^ C , max. 250^ C Recommendation: 200^ C
Roasts and poultry are juicy and crisp all over.
Insert the 45 mm multi-purpose drip tray onto the bottom shelf runners.
Recommended for all spit-roasted poultry or meat, for sealing and thoroughly cooking a leg or a rib of beef. To keep fish steaks moist.
BREAD
Min. temperature 35^ C , max. 220^ C
Recommendation: 205^ C
Recommended cooking sequence for bread making. Do not forget to place a dish of water in the bottom to obtain a crisp, golden crust.
Automatic functions:
Brandt offers you 3 new automatic cooking functions to preserve the nutritional qualities of food and cook it faster.
POULTRY
Recommended to cook chicken.
FISH
Recommended to cook whole fish (salmon, bass, cod, etc.).
WHITE MEAT
Recommended to preserve the juiciness and tenderness of veal roasts.
To use these 3 functions, simply adjust the weight on your display with the + / - knob and confirm it by pressing this knob.
START A COOKING PROGRAMME
- Start a cooking programme immediately
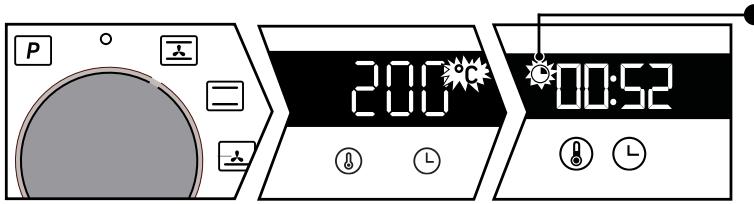
As soon as the oven starts, the operating time is displayed.
The time displayed by the programmer is not flashing.
Turn the function selector to any position.
For manual functions:
The temperature starts to increase at once. Your oven suggests a temperature which can be modified. The oven heats up and the temperature indicator flashes. A series of beeps sounds when the oven has reached the programmed temperature.
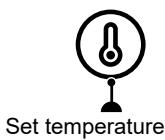
- Changing the temperature

Press ⑧.
Set the temperature with the + and - knob. Confirm by pressing the knob.
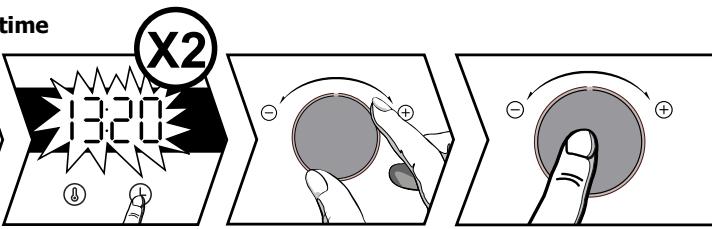
- Changing the cooking time


"Smart Assist" system
Your oven has the "Smart Assist" function which, when programming a cooking time, will suggest a cooking time which can be modified depending on the selected cooking mode (see table).
If you change the time, confirm by pressing the knob. The time starts to count down as soon as the cooking temperature is reached.
| COOKING FUNCTIONS | Cooking time |
| 30 min | |
| 30 min | |
| 30 min | |
| ECO | 30 min |
| 7 min | |
| 15 min |
Press . Your oven suggests a cooking time which can be modified. Set the cooking time with the + and - knob. Confirm by pressing the knob..
- Changing the cooking end time
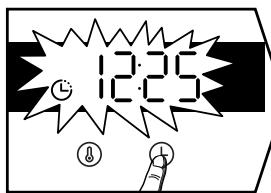
After setting the cooking time, press ⑦ ; the cooking end time flashes. Set the new cooking end time with + and - knob.
Confirm by pressing the knob.
The cooking end time display stops flashing.
You oven will start later on to finish cooking at the selected time.
Note: This function is not available with the Grill setting.
CLEANING THE INNER AND OUTER SURFACES
- Cleaning the oven cavity with pyrolysis
WARNING
Remove the accessories from the oven before beginning pyrolysis cleaning. Before starting pyrolysis cleaning, remove any large overspills, if any. Remove the excess grease on the door using a damp sponge.
As a safety measure, cleaning by pyrolysis only occurs after the door locks automatically, it is then impossible to unlock the door.
- Immediate self-cleaning

The programmer must display the time of day and must not be flashing. Select the self-cleaning cycle with the function selector : select your pyrolysis cycle with the + and - knob depending on the degree of soiling of your oven, and confirm by pressing the knob. Select between:
pyr = 2-hour pyrolysis cycle, confirm by pressing the knob.
P = PyroExpress or ECO Pyrolysis (1H30) confirm by pressing the knob.
At the end of the cleaning cycle, 00:00 will appear on the display and the door will be unlocked. Turn the function selector back to 0.
* PyroExpress in 59 minutes
= PyroExpress*
This specific function uses the heat built up during a previous cooking cycle to quickly and automatically clean the inside of the oven: it cleans a mildly dirty oven interior in less than an hour.
The electronic oven temperature monitor determines whether the residual heat remaining in the oven interior is sufficient to provide a good cleaning result. If this is not the case, a 90-minute ECO pyrolysis cycle will automatically begin.
- Delayed self-cleaning
You can choose to delay the start of the pyrolysis cycle: When the programme duration displays on the screen, press the key and set the new end time with the + and - knob, then confirm by pressing the knob. The self-clean will start later on to end at the new set time. Turn the function selector back to 0 once the cleaning cycle has ended.
CLEANING THE OUTER SURFACES
Use a window washing product applied to a soft cloth. Do not use abrasive creams or scouring sponges.
Removing the over door glass panels

IMPORTANT:
Do not use scouring products, abrasive sponges or metal scrapers to clean the glass oven door as this could scratch the surface and cause the glass to shatter.
Before doing this, remove any excess grease on the inside panel with a soft cloth and washing up liquid. To clean the different inside glass panels, disassemble them as follows:
- Removing the oven door glass panels
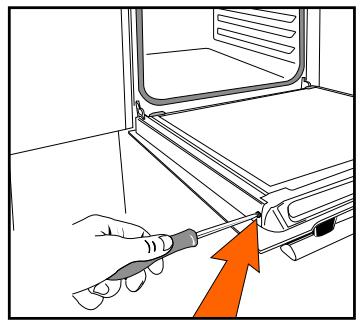
Open the door fully and block it with the plastic wedge provided with your appliance.

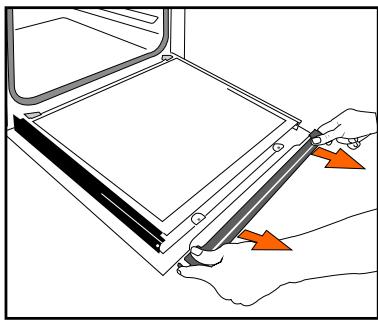
Unscrew the two screws on either side of the door mounts using a Torx screwdriver (T20), then pull the rail out towards you.

IMPORTANT:
Make sure to note the fitting orientation of the first glass panel (shiny surface towards you)
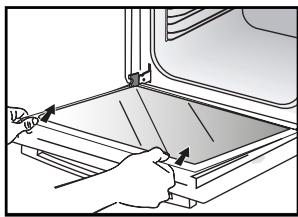
Remove the first glass panel: the door consists of two inside glass panels, with a black rubber spacer at each corner. If necessary, remove the inside panels to clean them.
Do not soak the glass panels in water. Rinse with clean water and dry off with a lint-free cloth.
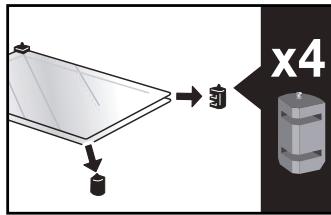
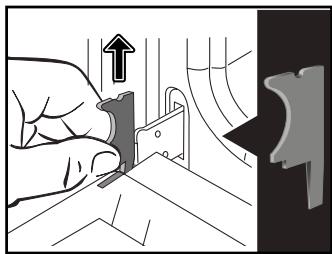
- Reassembling the oven door glass panels
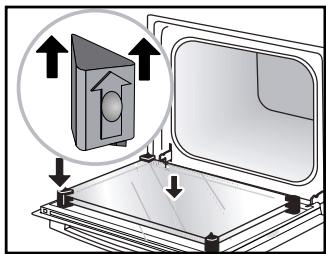
After cleaning, reposition the four rubber stops with the arrow upwards and reposition all of the glass panels.
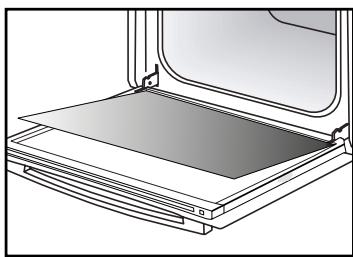
Insert the last glass panel into the stops, reposition the rail and screw it back in. Remove the plastic wedge before closing the door. Your appliance is now ready to use again.
- Replacing the light bulb

IMPORTANT:
Make sure the appliance is disconnected from the power before replacing the bulb in order to avoid the risk of electric shock. Change the lamp only when the appliance has cooled down.

Bulbdetails:
25 W, 220-240 V\~, 300^, G9 cap.
You can replace the bulb yourself. Unscrew the view port and remove the bulb (use a rubber glove, which will make it easier to remove). Insert the new bulb and replace the view port. This product contains a light source with energy rating G.
ANOMALIES AND SOLUTIONS
The oven is not heating.
Check that the oven is correctly connected and that your installation's fuse is not out of service. Increase the selected temperature.
The oven light is not working.
Replace the bulb or the fuse. Check that the oven is correctly connected.
The cooling fan continues to operate after the oven stops.
This is normal; the fan may continue running until a maximum of 1 hour after cooking to lower the temperature inside and outside the oven. If the fan runs for over an hour, contact the After Sales Department.
The pyrolysis cleaning cycle does not begin.
Check that the door is locked. There may be a door locking or temperature sensor fault. If the fault persists, contact the Customer Service Department.
The symbol flashes in the display.
Door locking fault; contact the Customer Services Department.
Cooking in a bain-marie.
Please use ventilated cooking methods when cooking in a bain-marie.
Vibration noise.
Make sure the power cord is not in contact with the rear surface of the oven.
This will not have any impact on your appliance's operation, however it may cause a vibration noise when the fan is running. Remove your appliance and move the cord away. Reposition your oven.
SERVICE CALLS
Any repairs made to your appliance must be carried out by a qualified professional authorised to work on the brand. When calling, please provide the complete references of your appliance (commercial reference, service reference, serial number), so that we can handle your call better. This information appears on the manufacturer's nameplate attached to your equipment.
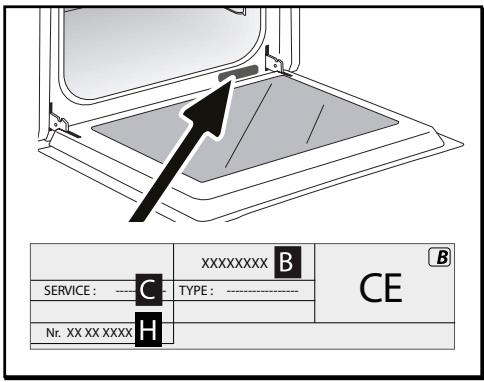
B: Commercial reference
C: Service reference
H: Serial number
CUSTOMER RELATIONS
To learn more about our products, you can visit our website:
www.brandt.com
you can contact us:
Via our website, www.brandt.com
section "SERVICES".
By e-mail to the following address:
relations.consommateurs@groupebrandt.com
write to us at the following postal address:
Service Consommateurs BRANDT
5, avenue des Béthunes
CS69526 SAINT OUEN L'AUMONE
95060 CERGY PONTOISE CEDEX
GENUINE REPLACEMENT PARTS
During maintenance work, request that only certified genuine replacement parts are used.

COOKING TIPS
| TYPE OF FOOD | * | * | * | * | * | * | * | L | |||||||
| LEET | LEET | LEET | LEET | LEET | LEET | LEET | min. | ||||||||
| Meat | |||||||||||||||
| Roast pork (1kg) | 200 | 2 | 180 | 2 | 60 | ||||||||||
| Roast veal (1 kg) | 200 | 2 | 180 | 2 | 60-70 | ||||||||||
| Roast beef rare (1kg) | 240 | 2 | 45-60 | ||||||||||||
| Lamb (leg, shoulder 2.5 kg) | 220 | 1 | 220 | 200 | 2 | 45 | |||||||||
| Poultry (1kg) | 200 | 2 | 220 | 180 | 2 | 210 | 3 | 45 | |||||||
| Large pieces of poultry | 200 | 2 | 60-90 | ||||||||||||
| Chicken thighs | 220 | 3 | 210 | 3 | 30-40 | ||||||||||
| Pork chops | 210 | 3 | 30-40 | ||||||||||||
| Veal ribs | 210 | 3 | 20-30 | ||||||||||||
| Beef ribs rare (1kg) | 210 | 3 | 210 | 3 | 20-30 | ||||||||||
| Mutton ribs | 210 | 3 | 20-30 | ||||||||||||
| Fish | |||||||||||||||
| Small fish | 275 | 4 | 15-20 | ||||||||||||
| Medium fish (1kg to 1.5kg) | 200 | 3 | 180 | 3 | 30-35 | ||||||||||
| Fish fillets | 220 | 3 | 200 | 3 | 15-20 | ||||||||||
| Vegetables | |||||||||||||||
| Gratins (precooked ingredients) | 275 | 2 | 15 | ||||||||||||
| Potato gratins | 200 | 2 | 180 | 2 | 45 | ||||||||||
| Lasagne | 200 | 3 | 180 | 3 | 45 | ||||||||||
| Stuffed tomatoes | 170 | 3 | 160 | 2 | 30 | ||||||||||
| Pastries | |||||||||||||||
| Sponge cake | 150 | 3 | 35 | ||||||||||||
| Swiss roll | 220 | 3 | 15-20 | ||||||||||||
| Brioche | 170 | 1 | 210 | 35-45 | |||||||||||
| Brownies | 180 | 2 | 175 | 3 | 20-25 | ||||||||||
| Cake - Pound cake | 180 | 1 | 180 | 1 | 45-50 | ||||||||||
| Clafoutis | 200 | 2 | 180 | 3 | 30-35 | ||||||||||
| Creams | 165 | 2 | 30-40 | ||||||||||||
COOKING TIPS
EN
| TYPE OF FOOD | * | * | * | * | * | * | * | |||||||
| LENT | LENT | LENT | LENT | LENT | LENT | LENT | LENT | LENT | LENT | LENT | LENT | LENT | min. | |
| Pastries | ||||||||||||||
| Cookies - Shortbread biscuits | 175 | 3 | 15-20 | |||||||||||
| Kugelhopf | 180 | 2 | 40-45 | |||||||||||
| Meringues | 100 | 2 | 60-90 | |||||||||||
| Madeleines | 220 | 3 | 200 | 3 | 5-10 | |||||||||
| Medium choux pastry | 200 | 3 | 180 | 3 | 30-40 | |||||||||
| Puff pastry hors d'oeuvres | 220 | 3 | 200 | 3 | 5-10 | |||||||||
| Savarin cake | 180 | 3 | 30-35 | |||||||||||
| Shortcrust pastry tart | 200 | 1 | 195 | 1 | 30-40 | |||||||||
| Fine puff pastry tart | 215 | 1 | 200 | 1 | 20-25 | |||||||||
| Other | ||||||||||||||
| Skewers | 220 | 3 | 210 | 4 | 15-20 | |||||||||
| Hot water bath terrine pâté | 200 | 2 | 190 | 2 | 80-100 | |||||||||
| Shortcrust pizza | 200 | 2 | 30-40 | |||||||||||
| Bread dough pizza | 15-18 | |||||||||||||
| Quiches | 220 | 2 | 35-40 | |||||||||||
| Soufflé | 50 | |||||||||||||
| Savoury pies | 200 | 2 | 40-45 | |||||||||||
| Bread | 220 | 200 | 220 | 30-40 | ||||||||||
| Toasted bread | 180 | 275 | 4-5 | 2-3 | ||||||||||
| Casseroles (stews) | 180 | 2 | 90-180 | |||||||||||
- Depending on model

All the T°C and cooking times are given for preheated ovens
Note: Before placing it in the oven, meat must be kept at room temperature for at least one hour.
| EQUIVALENT: GAS MARKS T °C | |||||||||
| °C | 30 | 60 | 90 | 120 | 150 | 180 | 210 | 240 | 275 |
| Gas marks | 1 | 2 | 3 | 4 | 5 | 6 | 7 | 8 | 9 and max |
Information for domestic ovens (UE n° 66/2014)
NOTE: When cooking on 2 levels, dishes can be removed at different times.
FR
EN
ES
Brandt
INSTRUCCIONES DE USO
HORNO

- RELATIONS CONSOMMATEURS
- TABLE OF CONTENTS
- EN
- IMPORTANT - READ CAREFULLY AND RETAIN FOR FUTURE USE.
- IMPORTANT:
- WARNING:
- Environment
- CHOICE OF LOCATION AND FITTING
- Tip:
- ELECTRICAL CONNECTION
- WARNING
- Prior to first use
- DISPLAY AND CONTROL BUTTONS
- - Display
- - Keys
- ACCESSORIES (depending on the model)
- - Anti-tip safety rack
- - 45 mm multi-purpose drip tray
- SETTINGS
- - Setting the clock
- - Changing the time
- - Timer
- This function can only be used when the oven is off.
- SETTINGSMENU
- COOKING MODES
- Manual functions:
- CONV. VENTILATED*
- CONVENTIONAL
- PULSED BOTTOM
- ECO ECO*
- FULL GRILL
- PULSED GRILL
- BREAD
- Automatic functions:
- POULTRY
- FISH
- WHITE MEAT
- START A COOKING PROGRAMME
- - Start a cooking programme immediately
- For manual functions:
- - Changing the temperature
- Press ⑧.
- - Changing the cooking time
- "Smart Assist" system
- - Changing the cooking end time
- CLEANING THE INNER AND OUTER SURFACES
- - Immediate self-cleaning
- * PyroExpress in 59 minutes
- - Delayed self-cleaning
- CLEANING THE OUTER SURFACES
- Removing the over door glass panels
- - Removing the oven door glass panels
- - Reassembling the oven door glass panels
- - Replacing the light bulb
- Bulbdetails:
- ANOMALIES AND SOLUTIONS
- The oven is not heating.
- The oven light is not working.
- The cooling fan continues to operate after the oven stops.
- The pyrolysis cleaning cycle does not begin.
- The symbol flashes in the display.
- Cooking in a bain-marie.
- Vibration noise.
- SERVICE CALLS
- CUSTOMER RELATIONS
- GENUINE REPLACEMENT PARTS
- COOKING TIPS
- All the T°C and cooking times are given for preheated ovens
- Brandt
Brand : BRANDT
Model : BFP201BB
Category : Electric oven