USER MANUAL 10000620 - FLOW H9 PURE VALBERG
Fan - Heater - PurifierVentilateur - Chauffage - PurificateurVentilator - Kachel - LuchtreinigerVentilador - Calefactor - Purificador
10000620 - FLOW H9 PURE
INSTRUCTIONS FOR USE 02
CONSIGNES D'UTILISATION 14
Thank you for choosing this VALBERG product. VALBERG products are chosen, tested, and recommended by ELECTRO DEPOT, so you can be sure you are getting a top-quality, easy-to-use product that won't let you down. We're confident your new device will be a pleasure to use every day!
Welcome to ELECTRO DEPOT.
Table of Contents

Parts
Product overview
Intended use
Specifications

Installing the remote control battery
Unit placement
Product usage

Cleaning and maintenance
Installing the new HEPA filters
Storage
Parts
A Control Panel
1 Fan Mode button
② Sleep Wind Mode button
Heating Mode button
Timer button [Auto-off / Auto-on]
5 AI Smart Wind Mode button
⑥ Oscillation button
Decrease button
8 Power button
9 Increase button
B Display
1 Fan Mode indication
② Sleep Wind Mode indication
3 AI Smart Wind Mode indication
Setting indication (wind speed, temperature, timer, degree of oscillation)
5 Connected to the mains supply indication
Heating Mode indication
Replace HEPA filters indication
Air outlets
D Power indicator light (blue: Fan Mode / red: Heating Mode)
E Base
F Power cable
6 Air inlet grille (left, right)
Pre-filter (left, right)
HEPA filter x 2 (left and right)
Remote Control
① Oscillation button
Heating Mode button
Decrease button
Timer button (Auto-off / Auto-on)
5 Power button
Mode switch button
7 Increase button
Product overview
- Unpack and remove all labels from the unit except the nameplate. Please check that all parts are included and intact. If the unit is damaged or faulty, do not use it and take it to your retailer or after-sales service centre.
- Keep all packaging out of the reach of children. There is a risk of accidents if children play with packaging materials.
Intended use
This unit is intended for household use only and not for commercial, industrial, or outdoor use. The unit has been designed for indoor use to circulate air and generate airflow. Use the unit in a room with dry conditions and adequate ventilation.
Any other use may damage the unit or cause injury.
Specifications
| Model: | 10000620 |
| Fan Heater | |
| Operating voltage: | 220-240 V~, 50/60 Hz |
| Rated power: | Heater/max. - 2000 W
Fan - 40 W |
| Dimensions (W x D x H): | 26.5 x 26.5 x 85.1 cm |
| Weight: | 7.8 kg |
| Protection class: | Class II |
| Remote control | |
| Battery type: | 2x 1.5V AAA batteries (not included) |
| Operating range: | 5 metres |
This product complies with the requirements imposed by directives 2014/35 / EC (repealing the Directive 73/23 / EEC as amended by Directive 93/68 / EEC) and 2014/30 / EC (repealing the Directive 89/336 / EEC).
Information requirements for comfort fans according to Regulation (EU) N°206/2012
| Model identification | 10000620 |
| Description | Symbol | Value | Unit |
| Maximum fan flow rate | F | 26.7 | m³/min |
| Fan power input | P | 30.9 | W |
| Service value | SV | 0.9 | (m³/min)/W |
| Standby power consumption | PSB | 0.8 | W |
| Off mode power consumption | Poff | - | W |
| Fan sound power level | LWA | 62 | dB(A) |
| Maximum air velocity | c | 2.5 | meters/sec |
| Seasonal electricity consumption | Q | 10.8 | kWh/a |
| Service value measurement standard: | (EU) No 206/2012 + (EU) No 2016/2282
EN IEC 60879: 2019
EN 50564: 2011
EN 60704-1: 2010 + A11: 2012
EN IEC 60704-2-7: 2020 |
| Contact details for further information: | ELECTRO DEPOT, 1 route de Vendeville
59155 FACHES THUMESNIL – France |
P
Model identifier(s): 10000620
| Item | Symbol | Value | Unit |
| Thermal power |
| Nominal thermal power | Pnom | 2.0 | kW |
| Minimum thermal power (indicative) | Pmin | 0.0 | kW |
| Maximum continuous thermal power | Pmax, c | 2.0 | kW |
| Auxiliary electricity consumption |
| At nominal thermal power | elmax | 0.0 | kW |
| At minimum thermal power | elmin | 0.0 | kW |
| In standby mode | eLSB | 0.00074 | kW |
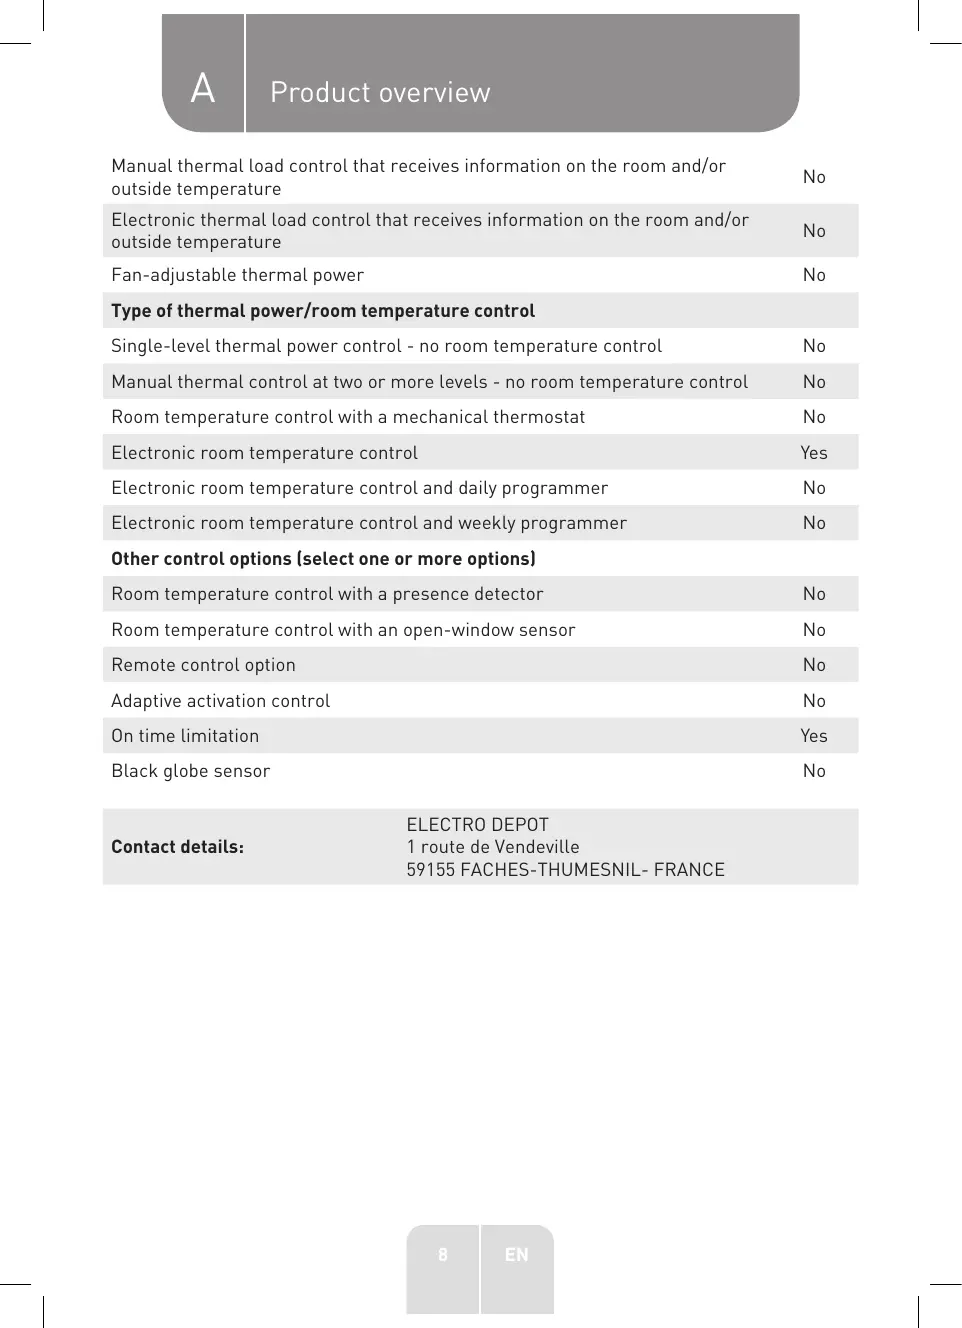
Manual thermal load control with a built-in thermostat No
A Product overview
| Manual thermal load control that receives information on the room and/or outside temperature | No |
| Electronic thermal load control that receives information on the room and/or outside temperature | No |
| Fan-adjustable thermal power | No |
| Type of thermal power/room temperature control |
| Single-level thermal power control - no room temperature control | No |
| Manual thermal control at two or more levels - no room temperature control | No |
| Room temperature control with a mechanical thermostat | No |
| Electronic room temperature control | Yes |
| Electronic room temperature control and daily programmer | No |
| Electronic room temperature control and weekly programmer | No |
| Other control options (select one or more options) |
| Room temperature control with a presence detector | No |
| Room temperature control with an open-window sensor | No |
| Remote control option | No |
| Adaptive activation control | No |
| On time limitation | Yes |
| Black globe sensor | No |
| ELECTRO DEPOT |
| Contact details: | 1 route de Vendeville
59155 FACHES-THUMESNIL- FRANCE |
Installing the remote control battery
- Open the battery compartment cover on the back of the remote control.
- Insert the new batteries (2x 1.5V AAA batteries) following the +/- polarities marked in the compartment. Do not use rechargeable batteries.
- Close the cover firmly.
- Dispose of the used batteries safely.

DANGER! KEEP NEW OR USED BATTERIES OUT OF THE REACH OF BABIES AND CHILDREN.
Unit placement
- Place the unit on a solid, level, stable and heat-resistant surface.
Make sure the room has adequate ventilation.
- Keep a clearance distance of at least 30~cm at the back and 100~cm at the front between the unit and any objects, such as walls, furniture, curtains, etc.

WARNING - Risk of fire or electric shock!
- Do not use the unit in a bathroom.
- Never use the unit near a bathtub, swimming pool or body of water to avoid the danger of electric shock.
- Do not cover the unit during use.
- Do not use the unit in wet or humid conditions.
- Do not expose the unit to rain, splashing or dripping water. If this occurs, stop using the unit immediately. Keep the unit away from windows.
Product usage
Before first use, make sure the HEPA filters are installed in the unit ( "Installing the new HEPA filters").
Fan Mode and basic functions
- Plug the power cable firmly into a suitable power outlet. The display will show "0" and with a beep to indicate that the unit is connected to the mains supply and has entered Standby Mode.
- Touch the button to turn the unit on. The indicator light will light up blue and the unit will start running in Fan Mode by default. The display will show and the current wind speed.
- To set the desired wind speed, touch the 12 = button (1-12 levels).
B Product usage
- When using another mode, touch the ※ button to return to Fan Mode.
- Touch the button to turn the unit off. The indicator light will turn off and the unit will stop. The display will countdown from 30 to 35 and then display "0" (Standby Mode).
- Disconnect the power cable when the unit is not in use.
Sleep Wind Mode
- Touch the button to switch to Sleep Wind Mode. The display will show and the current wind speed.
- Touch the 12 button to set the desired wind speed. Three levels are available (1/2/3).
- You can touch and hold the button for 3 seconds to switch the indicator light off at night. Repeat the procedure to switch the indicator light back on.
Al Smart Wind Mode
Touch the button to switch to Al Smart Wind Mode. The display will show , and the unit will automatically adjust the wind speed according to changes in the ambient temperature.
Heating Mode
- While the unit is on, touch the button to switch to Heating Mode. The indicator light will turn red and the unit will start blowing warm wind. The display will show 和 and the set temperature.
- Touch the 13 button to set the desired temperature (-- [target temperature not set, ≤slant 50^ , 16^ - 35^ ).

NOTE: If no target temperature is set or "--" is selected, the unit will blow warm air and will not stop until the sensor detects that the room temperature has reached 50^ .
- If the room temperature is higher than the set temperature, the unit will stop blowing warm air and the indication will blink for 10-15 seconds and then remain solid on the display.
- When the room temperature drops below the set temperature, the unit will automatically start to blow warm air and will cycle on and off to maintain the set temperature.
Oscillation function
To activate or deactivate the Oscillation function, touch the button. Touch the button twice to set the desired swing angle (30^, 60^, 90^ , or 0^ [stop]).
Auto-off Timer
To set the unit to automatically turn off:
- While the unit is on, touch the button and then touch the button to set the off timer (Oh [null], 1h - 12h).
- Touch the button again to confirm, or wait 3 seconds to confirm automatically.
- When the time elapses, the unit will automatically turn off and resume Standby Mode.
Auto-on Timer
To set the unit to automatically turn on:
- While the unit is off (Standby Mode), touch the button and then touch the / = button to set the on timer (Oh [null], 1h - 12h).
B Product usage
- Touch the button again to confirm, or wait 3 seconds to confirm automatically. The setting will be shown on the display.
- When the time elapses, the unit will automatically turn on and start running in Fan Mode with the last setting used.

NOTE: To cancel a Timer, touch the button.
Other features
- If you want to switch off the indicator light at night, press and hold the button for 3 seconds until the indicator light turns off. Repeat the procedure to switch the indicator light back on.
- The and buttons on the control panel support long pressing to quickly scroll through values.
- Smart Memory - After turning the unit off, it will remember the last fan and heater settings used (except the Timer), as long as the power cable is not unplugged.
- Forced Shutdown - If no operation is detected for 15 hours of continuous use, the fan will automatically shut off.
Cleaning and maintenance

WARNING!
- Before cleaning, always unplug the unit from the power outlet and allow it to cool down completely.
- Never immerse the unit, power cable or plug in water. Do not rinse the unit under the tap.
-
Do not use flammable or abrasive detergents, such as benzene or white spirit, to clean the heater.
-
Clean the exterior of the unit with a soft cloth slightly moistened with water or mild soapy water.
- Do not allow water to enter the motor housing or any openings in the unit.
- Periodically remove the air inlet grilles and pre-filters (left and right) to clean them. These two parts can be rinsed under the tap to remove dust build-up. The parts can also be cleaned with a soft sponge/brush. Dry completely before reattaching them to the unit.
- Do not rinse the HEPA filters with water to avoid damage!
- Allow the unit to air dry completely before using or storing it.
Installing the new HEPA filters
If the indication starts blinking on the display, it indicates that the HEPA filters (left and right) need to be replaced (filter model: FQ150CJ-2). If the filters are not replaced in time, the indication will blink on the display each time the unit is turned on. You can touch and hold the 念 button to turn the indication off.
To install the new HEPA filters:
- Unplug the power cord from the mains outlet.
- Locate the air inlet grille on the left side of the unit.
-
Pull the bottom side of the air inlet grille to remove it from the unit 1.
-
On the top of the pre-filter, press down the 2 clips to unlock and remove it 2 .
- Remove the HEPA filter by pulling the side ribbons
- Unpack and install the new HEPA filter 4 5 6
- Insert the 2 legs of the pre-filter into the slots on the unit, and then push the 2 clips on the top to snap it into place
-
Insert the top side of the air inlet grille into the unit, and then push the bottom and sides to snap into place 8.
-
Repeat the steps above on the right side of the unit.
Storage
- Always unplug the unit from the mains before storing it. Wait until the heater has cooled down before storing it.
- Store the unit in a fresh, dry and dust-free place, out of the reach of children and pets.
- Please retain the packaging and use it to store your unit when it is not in use for an extended period of time.
Merci!
Modelidentificatie(s): 10000620
This product is guaranteed against faults caused by defects in manufacturing or the materials used for a period of two years, starting from the date of purchase.* This warranty does not cover defects or damage caused by failure to install the device correctly, incorrect use of the product, or excessive wear and tear.
*proof of purchase required.
FR
CONDITION DE GARANTIE