USER MANUAL CT-5588-2 - KINOMAP CARE FITNESS
5. INDICE DE MASSE CORPORELLE (IMC)
Connection application
https://cloud.carefitness.com/index.php/s/E2WD22KMNBQzERL
E mail : https://www.carefitness.com/sav
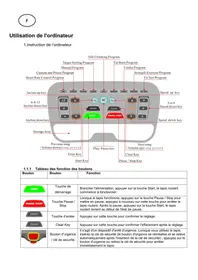
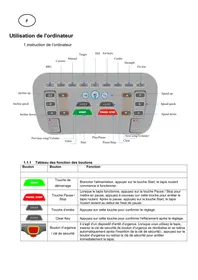
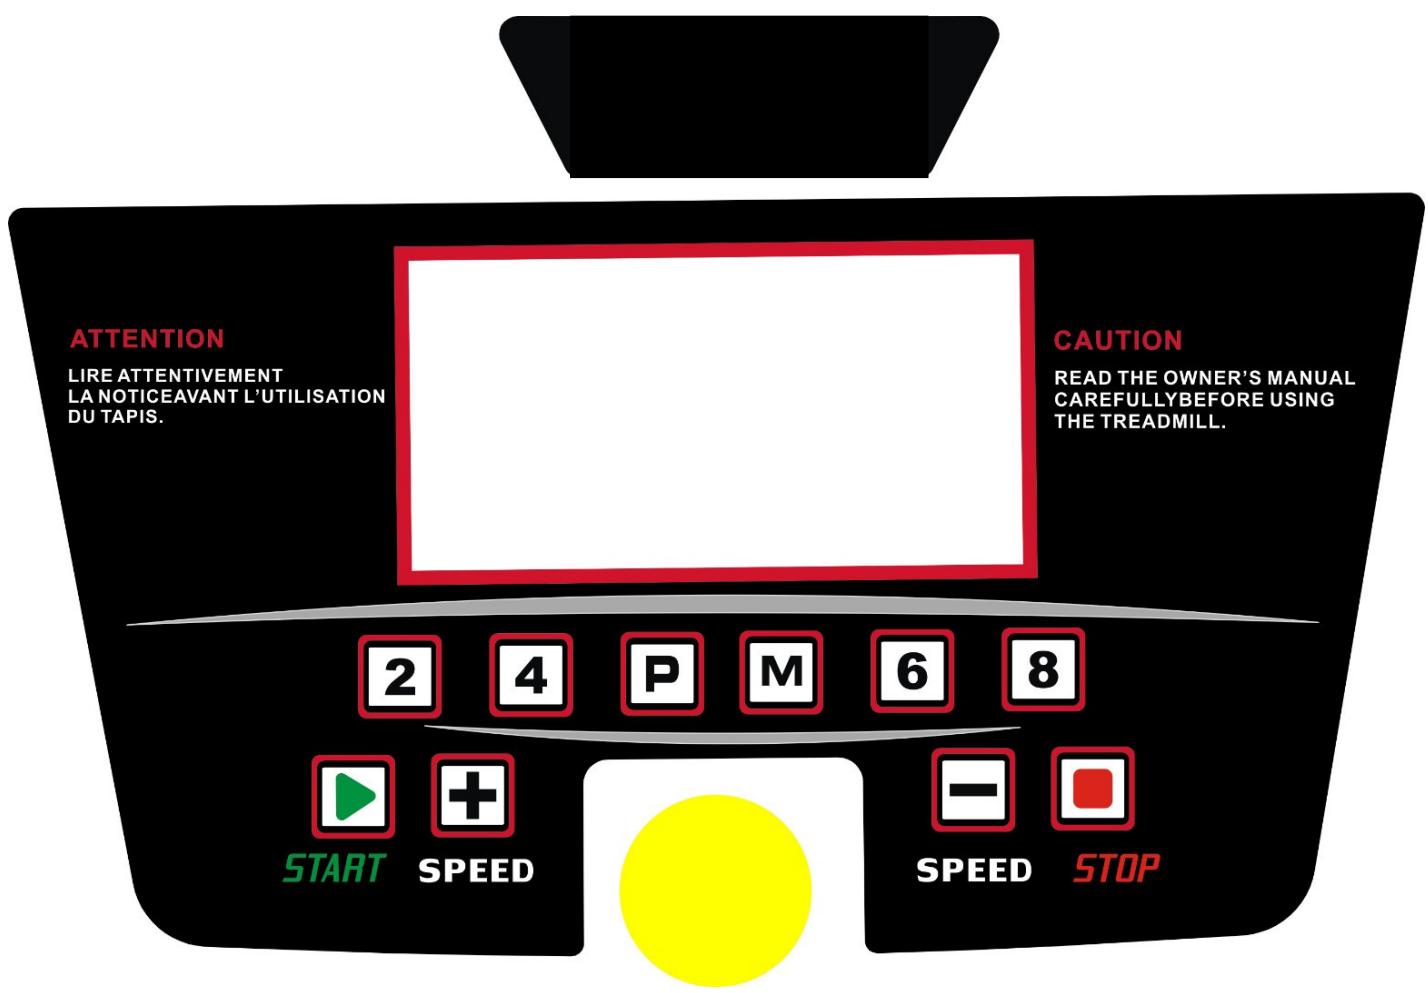
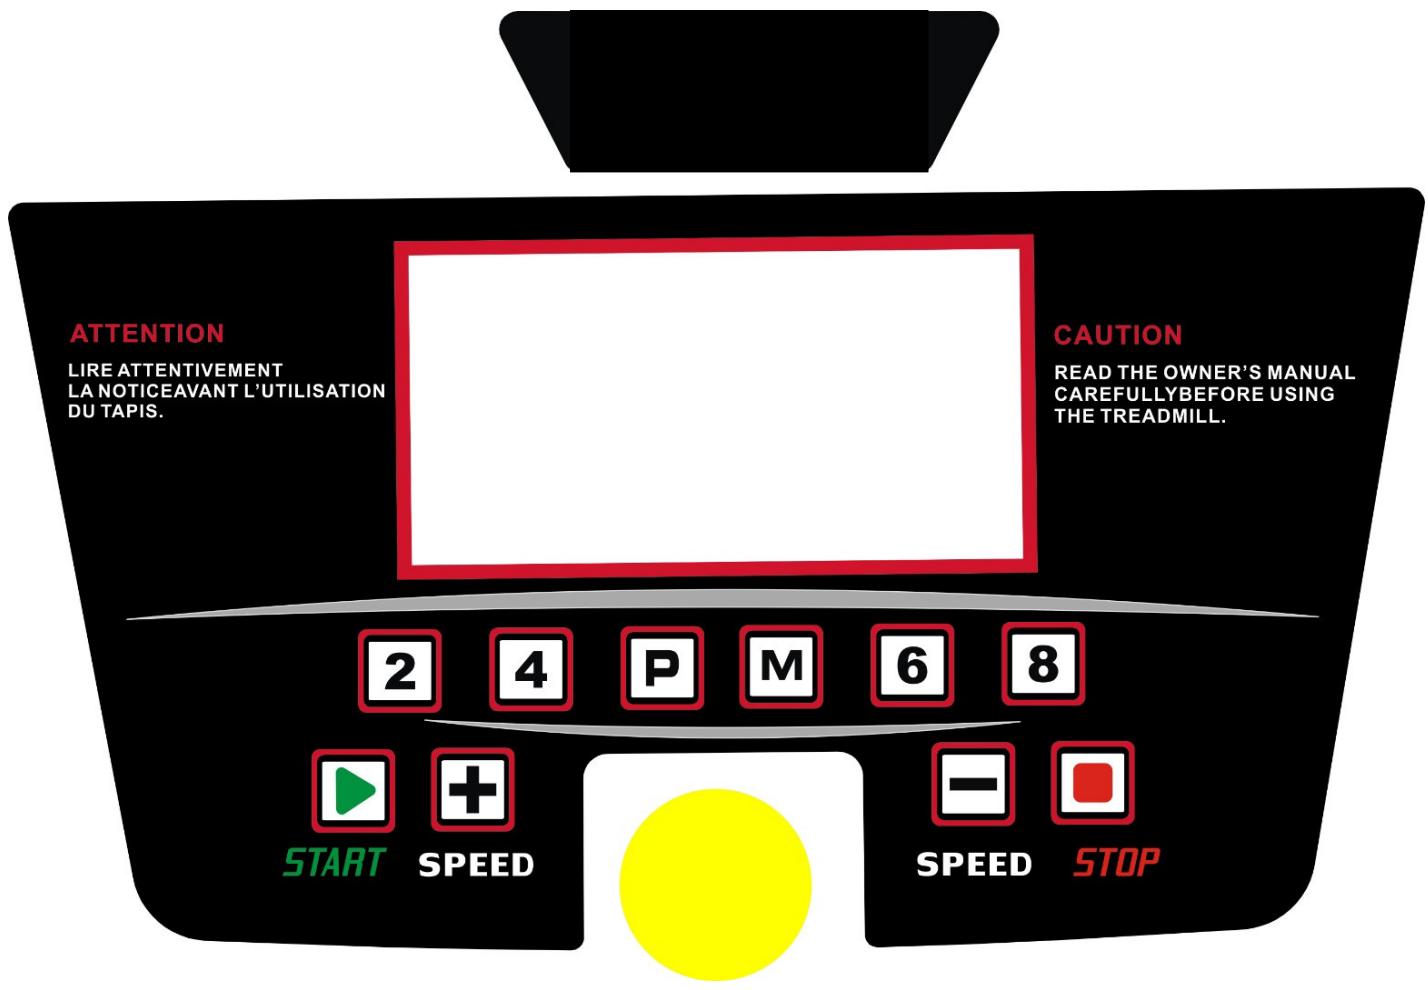
1. CONSOLE PANEL
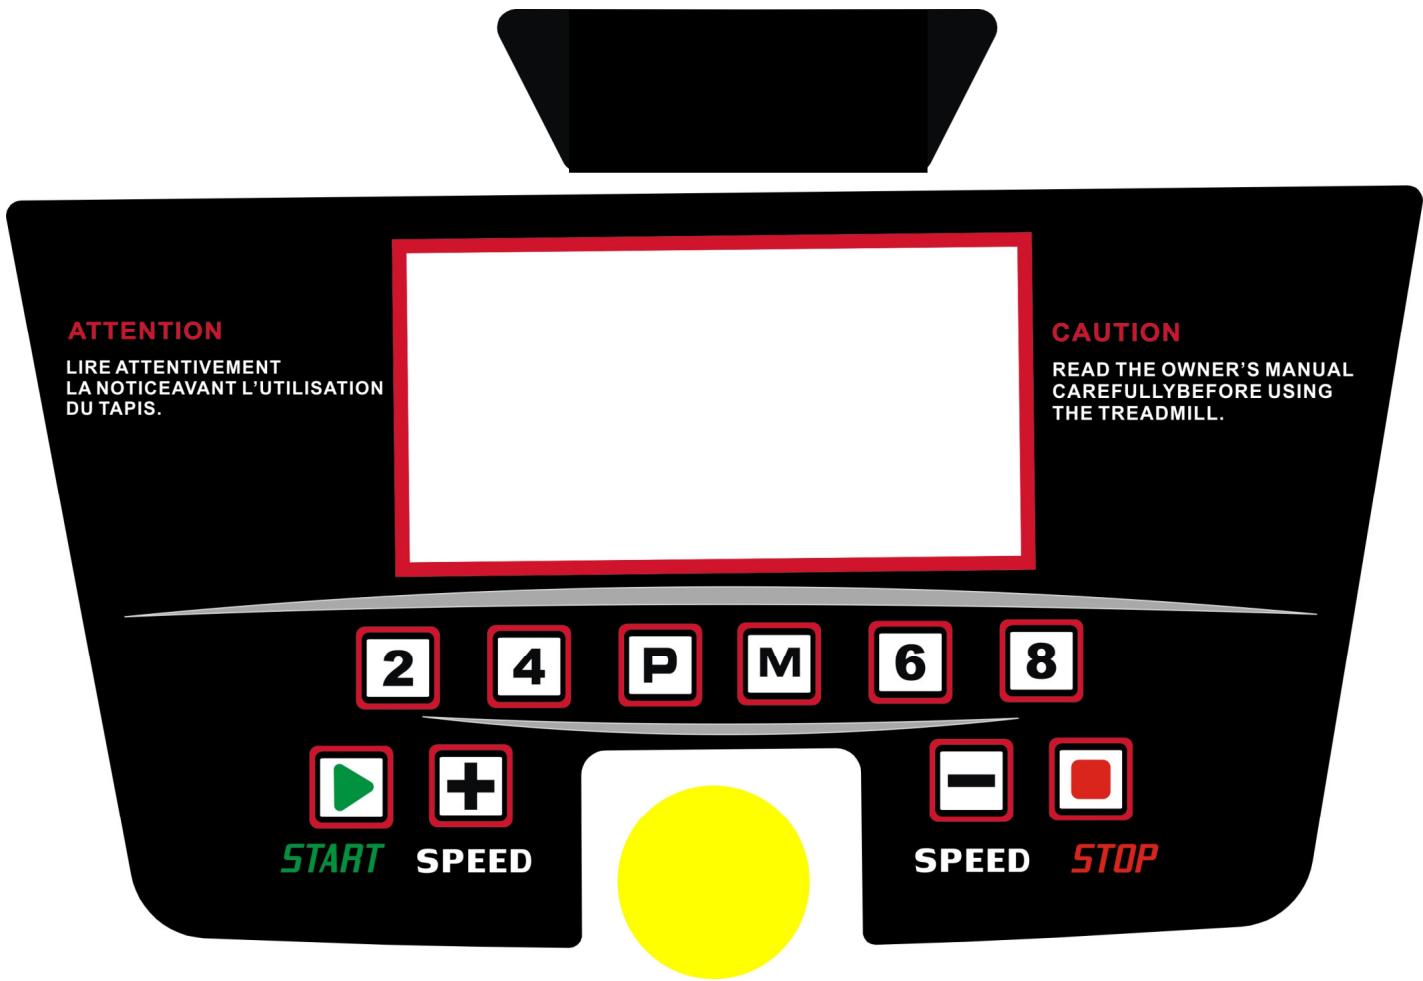
2. KEY FUNCTION:
2.1"START" start running machine, "STOP": stop running machine.
2.2 PROGRAM: Mode choice button, at the stopping state, select loop (P1、P2、P3、P4、... P12) as following:
2.3 MODE: mode button at the stopping state, select the countdown time, countdown distance and countdown calories circularly.
2.4 SPEED" ^+ ": speed ^+ button, at the running state, press it will be add 0.1KM/H every time ,press it for a long time, it will add the speed constantly;
2.5 SPEED"-": speed - button, at the running state, press it will decrease 0.1KM/H every time, press it for a long time, it will decrease the speed constantly.
2.6 "QUICK SPEED": 4 speed short cut buttons, at the running state, choose the corresponding speed 2,4,6,8.
3.PROGRAM
3.1 Countdown time training mode: at the sopping state, press "MODE" button, enter setting state, the time window display flash, default display 30:00, press SPEED+, button amend the setting value. The setting range:5-99
minutes .Press “START” button and start up the treadmill. when the countdown time is 00:00 ,the treadmill stop running automatically .
3.2 Countdown distance training mode: at the stopping state, press "MODE" button, enter setting state, the distance window flash display, default display 5.0KM, press SPEED+, -button and amend setting value, setting range: 0.5-99.0KM. Press "START" button to start up treadmill, as the speed 0.8KM/H to start to run, press SPEED+<- to adjust the speed. When countdown distance is 0.0, treadmill stop running automatically.
3.3 Countdown calories training mode: at the stopping state, press "MODE" button for three times, enter the setting state, the calories window display flash, default display 100CAL, press SPEED+, -button to amend setting value, setting range:20-990CAL. Press "START/STOP" button to startup treadmill, as the speed 0.8KM/H to start to run, press the SPEED+, - to adjust speed. When Countdown calories is 0, treadmill will stop running automatically.
3.4 Now input program mode, the program mode have P1-P6 in all, please press program key separately you can choose you desired and the time window will flash.
enter setting state, the time window display flash, default display 30:00, press The setting range:5-99 minutes SPEED+, - button amend the setting the time. Press "START" button and startup the treadmill. When the countdown time is 00:00, the treadmill stop running automatically. Press speed +,- can change the program data during running.
3.5 Program list
Program list
| program | minutes | Set minutes/ 10 = the time of each level |
| 1 | 2 | 3 | 4 | 5 | 6 | 7 | 8 | 9 | 10 |
| P1 | SPEED | 2 | 4 | 3 | 4 | 3 | 5 | 4 | 2 | 5 | 3 |
| P2 | SPEED | 2 | 5 | 4 | 6 | 4 | 6 | 4 | 2 | 4 | 2 |
| P3 | SPEED | 2 | 5 | 4 | 5 | 4 | 5 | 4 | 2 | 3 | 2 |
| P4 | SPEED | 3 | 6 | 7 | 5 | 8 | 5 | 9 | 6 | 4 | 3 |
| P5 | SPEED | 3 | 6 | 7 | 5 | 8 | 6 | 7 | 6 | 4 | 3 |
| P6 | SPEED | 2 | 8 | 6 | 4 | 5 | 9 | 7 | 5 | 4 | 3 |
| P7 | SPEED | 2 | 6 | 7 | 4 | 4 | 7 | 4 | 2 | 4 | 2 |
| P8 | SPEED | 2 | 4 | 6 | 8 | 7 | 8 | 6 | 2 | 3 | 2 |
| P9 | SPEED | 2 | 4 | 5 | 5 | 6 | 5 | 6 | 3 | 3 | 2 |
| P10 | SPEED | 2 | 3 | 5 | 3 | 3 | 5 | 3 | 6 | 3 | 3 |
| P11 | SPEED | 2 | 6 | 7 | 4 | 4 | 7 | 4 | 2 | 4 | 2 |
| P12 | SPEED | 2 | 5 | 5 | 4 | 4 | 6 | 4 | 2 | 3 | 4 |
4.HEAT BEAT TEST
4.1 After controller check the hand pulse, the Speed/Pulse windows will show correspondence pulse value.
4.2 Check before exercise, feet standing on the both sides of the side rails, and both hands hold the rate-sensor light, wait for 20 seconds you will find a accurate rate value display on the rate window.
4.3 Check after exercise, feet standing on the both sides of the side rails, and both hands hold the rate-sensor light, wait for 20 seconds you will find a accurate rate value display on the rate window.
(Note: In order to the test date more exactly, please don't test in running)
5. BODY FAT TEST
5.1 At the setting state, Continuous press "program" into body fat text (FAT), then press "mode" button, Windows will show "F-1, F-2, F-3, F-4, F-5".
(F-1---Gender, F-2---Age, F-3---Height, F-4---weight, F-5, Fat test)
Press "Speed+" "Speed-" button to setting "F-1 to F-4" (please reference below list),
After finished setting, press "mode" button, windows will show into "F-5", keep both hands on the hand pulse for 2-3 seconds, windows will show your Fat data, please check whether your height and weight correspond. FAT text is just measure the inner relationship between height and weight not for body proportion.
FAT texting is suit for all the female and male, it is same as other health indicator providing help people to adjust weight . The best FAT data is between 20 to 25 range, if FAT data less than 19 means too slim, if FAT data between 25 to 29 means over weight, if the data more than 30 means too fat.(This data just for reference not for medical data.)
| F-1 | Gender | 01male | 02female |
| F-2 | Age | 10-----99 |
| F-3 | Height | 100---200 |
| F-4 | Weight | 20----150 |
| F-5 | FAT | ≤19 | Underweight |
| FAT | =(20---25) | Normal weight |
| FAT | =(26---29) | Overweight |
| FAT | ≥30 | Obesity |
6. ERROR SINGNAL
Please check the error Signal display of the window
Er 1: Display panel doesn't receive signal
Er 3: Over voltage
Er 4: Over current
Er 5: Over weight
Er 6: Motor connection
Er 7: Controller doesn't receive signal
SAFE: Safety protection
Application connection
Copy the link here under to your browser (Edge, Firefox, Chrome, Safari etc) https://cloud.carefitness.com/index.php/s/E2WD22KMNBQzERL
And Followw the detailed instruction
CARE AND MAINTENANCE
Care
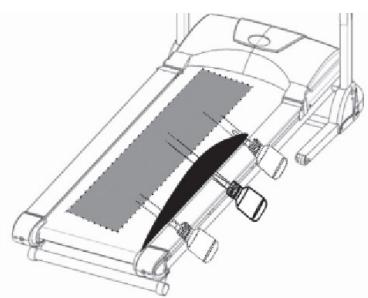
For cleaning the running belt use a vacuum cleaner. If the belt is really dirty, please use a wet cloth. Do not use any cleanser. When cleaning, use only a moist cloth and avoid harsh cleaning agents. Ensure that no moisture comes into the computer. Components that come into contact with perspiration, need cleaning only with a damp cloth
Lubrication
The treadmills have already been spread with "Silicone Oil" in advance before leaving the manufacturing plant. Silicone oil is without volatility and has gradually permeated through the running belt. There will be no need to respread the oil in normal circumstances.
To maintain the running belt, we have included a small bottle of "Silicone Oil". "Silicone Oil" may be re-spread once the resistance has been increased and the running belt starts rubbing against the running deck. To hold open the running belt from two sides, apply the silicone oil with an even motion on the center of the running deck. Allow the silicone oil to 'set' for one minute before using the treadmill.
Attention: Only use "Silicone Oil" lubricants for this equipment. In addition, do not add any other oil ingredient; otherwise the treadmill will be damaged. Do not over-lubricate the walking board. Excess lubricant should be wiped off with a clean towel.
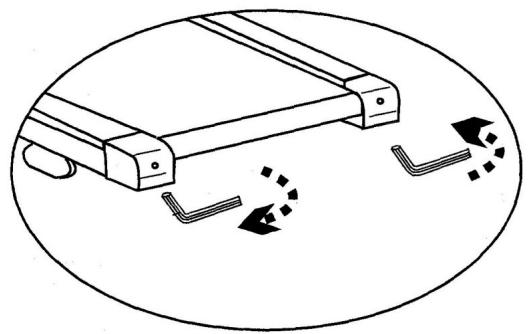
Centering the running belt
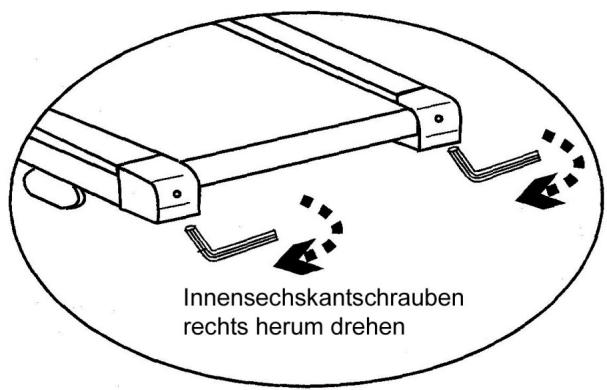
During the exercise, one foot is pushing the running belt stronger than the other. According to that, the belt will be moved out of the centre. Normally the belt will be centered automatically, but during longer exercise, it can be, that the belt is off the centre. In this case, please follow up the following instruction. At the rear end of the running deck, there are 2pcs of Allen screws, which will be used for centering the belt. Don't use any loose clothes during centering.
- Please turn the Allen screw not more than 1/4 turn for each step.
- Stretch one side and release the other side.
- the speed of the belt has to be 6km / h , but make sure, that nobody is running on the belt.
If you finish the centering, walk on the treadmill for about 5 minutes, with the speed of 6km / h . If the running belt is still not in centre, please centre the belt again. Pay attention, that you don't force the belt too much, a shorter life will be caused. If the gap on the left side is too big, please
- turn the left screw a 14 turn clockwise (tighten it)
- turn the right screw a 14 turn anticlockwise (loose it)
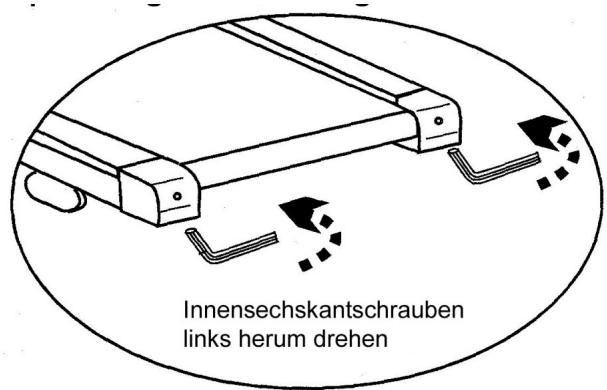
If the gap on the right side is too big, please
- turn the left screw a 1 / 4 turn anticlockwise (loose it)
- turn the right screw a 14 turn clockwise (tighten it)
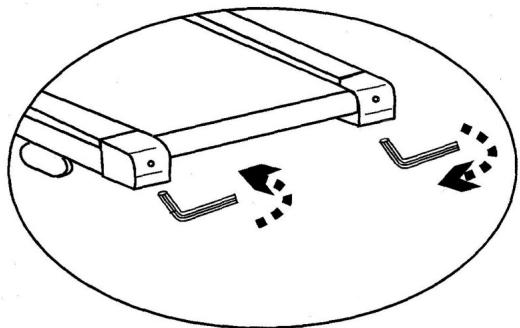
Tighten the belt
after longer exercise, the tension of the belt will decrease. It can be checked if you put one foot on the belt and belt will stop. To solve this problem, please turn both screws clockwise for 14
turns. Please do not turn them more. If the belt is running out of the centre, please adjust it like described under above center the belt.
Turn screw clockwise
Turn screw anticlockwise
To order spare parts
To guarantee an efficient service, make sure you have the following items before you contact our After Sales Service:
The name or reference of the product.
The manufacturing number shown on the main chassis and on the packing box.
After Sales Service
Email: service-uk@carefitness.com
1. BEDIENFELD
https://cloud.carefitness.com/index.php/s/E2WD22KMNBQzERL
E mail : service-de@carefitness.com

1. PANEL DE CONTROL
2. FUNCION CLAVE:
https://cloud.carefitness.com/index.php/s/E2WD22KMNBQzERL
5. INDICE DI MASSA CORPOREA (IMC)
https://cloud.carefitness.com/index.php/s/E2WD22KMNBQzERL
E mail : service-it@carefitness.com
NL
1. BEDIERINGSPANEEL

2. SLEUTELFUNCTIE:
E-mail: service-nl@carefitness.com
CARE
FITNESS