
EZI-DAB - DAB Receiver ALPINE - Free user manual and instructions
Find the device manual for free EZI-DAB ALPINE in PDF.
| Product Type | DAB/DAB+/DMB Receiver |
| Brand | Alpine |
| Model | EZI-DAB |
| Control Box Dimensions | 70 x 53 x 27 mm (W x H x D) |
| Main Unit Dimensions | 150 x 24 x 85 mm (W x H x D) |
| Power Supply | 12 V DC (vehicle) with fuse |
| Connectivity | USB (type A), AUX input 3.5 mm, line output 3.5 mm, DAB antenna input (SMB), FM input (ISO), FM output (ISO), control box connection |
| Display | White on black OLED, high contrast |
| Main Functions | DAB/DAB+/DMB reception, pause and replay (up to 15 min), 30 presets, iPod/iPhone/iPad/USB control, auxiliary input, picnic mode, parking pause, FM injection/broadcasting |
| Safety | Do not install in front of airbags, do not obstruct driver's view, remove the control box when away to prevent theft |
| Maintenance and Cleaning | Clean with a soft, dry cloth. Do not use liquids. Avoid prolonged exposure to sunlight. |
| Spare Parts and Repairability | Software update via USB. Factory reset. Optional antenna: Alpine KAE-220DA. Supplied cables: USB, audio 3.5 mm, FM coaxial. |
| Operating Temperature | Max 75 °C; storage max 85 °C |
| DAB Frequency Ranges | Band III: 174-240 MHz; Band L: 1452-1490 MHz |
| FM Support | Direct injection or FM broadcasting (adjustable frequency 87.5-108 MHz) |
Frequently Asked Questions - EZI-DAB ALPINE
User questions about EZI-DAB ALPINE
0 question about this device. Answer the ones you know or ask your own.
Ask a new question about this device
Download the instructions for your DAB Receiver in PDF format for free! Find your manual EZI-DAB - ALPINE and take your electronic device back in hand. On this page are published all the documents necessary for the use of your device. EZI-DAB by ALPINE.
USER MANUAL EZI-DAB ALPINE
Please read before using this equipment.
MANUEL D'UTILISATION
Fit the unit and the antenna in a position that does not obscure the driver's view.
Fit the unit securely.
Do not fit the unit or the antenna in such a way that may interfere with the safe operation of the vehicle, the deployment of air bags or other safety equipment.
Avoid objects or liquids getting into the unit.
Do not remove screws from or open the unit casing.
Do not operate the unit while driving.
Read this manual fully before operating the unit, including all safety notices.

CAUTION
Do not expose the unit to direct sunlight for long periods, for example, inside a hot car.
To reduce the risk of theft, remove the controller from your vehicle, or position it out of sight, before leaving your vehicle unattended.

WARNING
This WARNING symbol is used throughout this manual to indicate a potentially serious risk to your personal safety. Obey all safety notices that accompany this symbol to avoid possible injury or death.
Contents
Introduction 3
Controls and connectors 4
Getting started 6
Listening to digital radio 8
Connecting an iPod/iPhone/iPad/USB device 10
Using AUX IN 12
Removing/fitting the controller 13
Settings 14
Technical Specifications 22
Introduction
This manual provides instructions for using EZi-DAB. EZi-DAB is designed for professional installation and there are a number of different options for how EZi-DAB can be connected to your existing Head Unit.
Your installer will be able to advise you which method has been used and give you some basic instruction on how to operate EZi-DAB in your car.
There are three main components to EZi-DAB:
Main unit (Interface)
This is typically installed behind your dashboard or in a glovebox with extension cables run to convenient points for connecting your iPod, iPhone, iPad, USB device or other auxiliary music sources.
Controller
The compact, removable controller should be installed within easy reach and has a high-contrast OELD display with back-lit buttons and a simple rotary control for easy station selection or control over other connected devices.
Antenna (optional)
Any active (powered) DAB antenna with 5V phantom feed and SMB (f) connector fits to EZi-DAB. ALPINE recommends ALPINE KAE-220DA.

Please make sure ONLY to connect a dedicated 5V phantom supplied antenna. Failure to do so may result in the device becoming defect.
Controls and connectors
Controller
Power/Home button
Press to switch EZi-DAB on.
Press again to cycle through available sources and settings.
Press and hold to switch off.
Rewind button
Digital radio: Press and repeat to Rewind live radio in steps of 15 seconds.
iPod/USB: Press to skip back. Hold to rewind.
Back button
Press to move back up a level in menus/lists.
Digital radio: Press to return to live radio if using the pause/rewind feature.
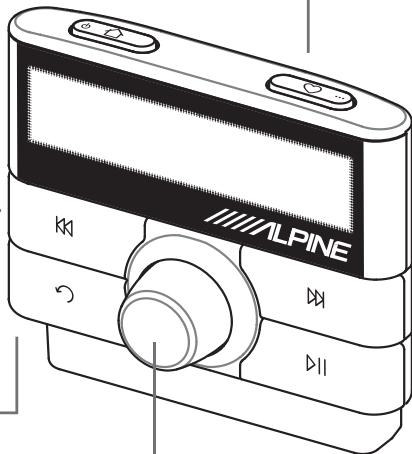
Select knob
Turn to browse stations, tracks and menu items. Push to select.
Presets/More button
Digital Radio: Press to view station presets list.
iPod/USB: Press and repeat to change track shuffle options. Press and hold, then press again to change track repeat options.
Fast forward button
Digital radio: Press and repeat to jump forward in the audio buffer in steps of 15 seconds if you have used the pause/rewind feature.
iPod/USB: Press to skip forward. Hold to fast forward.
Play/pause button
Digital radio: Press to pause digital radio (maximum pause duration 5-15 minutes depending on the station's bitrate). Press again to play from where you paused.
iPod/USB: Press to play/pause track playback.
Main unit (Interface)
The EZi-DAB main unit is usually installed out of sight, so you may only see cable extensions enabling you to connect to the AUX IN and USB sockets.
1 USB
Usually connected to the supplied USB extension cable. Connect your iPod or USB media player to the extension (or directly) for playback and charging. Also used for USB memory stick software updates.
2 Power In
Connected to your car ignition 12V power supply.
3 Controller
Connected to the EZi-DAB controller.
4 Line Out (3.5mm)
Audio out (could be connected to your Head Unit's AUX IN).
ALPINE
中 08
Pepn
3
e e
N 5
FMM
Rrnnnne
()

8 Digital Radio Antenna In
Connected to your EZi-DAB digital radio antenna.
Please make sure ONLY to connect a dedicated 5V phantom supplied antenna. Failure to do so may result in the device becoming defect.
6 Antenna Out
Connects to the FM antenna input on your Head Unit if using FM direct inject.
7 FM Antenna In
Connects to your existing FM car antenna if using FM direct inject.
Getting started
Switching on and off
Press the button on top of the controller to switch EZi-DAB on.
To switch off press and hold the button down until the display switches off.
Forecourt pause
Ideal for quick stops at the petrol station or cashpoint, forecourt pause keeps EZi-DAB on standby for 15 minutes after you remove the keys, making sure it's ready for your return. Restart the ignition or press the button within this period and EZi-DAB immediately resumes playing the station you were listening to or the music you were playing exactly where it left off. If you're listening to digital radio, you can even pause it for around 5-15 minutes, and resume listening without missing a second - see page 8 for more details.
Picnic mode
Continue to enjoy EZi-DAB after you've reached your destination with picnic mode, which enables you to listen with the ignition off and your car keys removed. Simply switch EZi-DAB on again to activate picnic mode. To save power, USB-connected devices are not charged in picnic mode and EZi-DAB will automatically shut down after an hour.
Note: Both forecourt pause and picnic mode are subject to different vehicle specifications. For example, some vehicles will only supply power to the Head Unit for 15 minutes with the ignition off and the keys out.

EZi-DAB Startup screen
Listening to EZi-DAB
Depending on how your unit has been installed, there are three possible methods for hearing EZi-DAB through your Head Unit:
Auxiliary input Select the AUX IN source on your Head Unit if EZi-DAB has been wired in as an auxiliary source.
FM direct inject This method effectively takes over your FM source and replaces it with output from EZi-DAB when you switch EZi-DAB on. Select the FM radio source on your Head Unit and tune to a particular frequency (default 87.6 MHz). Depending on your installation this method may also retain access to your normal FM stations to allow for traffic announcements and data services used by some navigation systems. You can change this frequency in Settings, see page 14.
FM broadcast This method broadcasts the output from EZi-DAB over FM to your car antenna. Select the FM radio source on your Head Unit and tune to a particular frequency (default 87.6 MHz). You can change this frequency in Settings, see page 14.
Selecting your audio source
Ezi-DAB gives you a choice of available audio sources depending on your installation.
Choose from Digital radio, USB (USB connection), iPod (USB connection) or Auxiliary input via (3.5mm connection) as follows:
Press the button and repeat to step through the source options until you see the one you want then wait for a few seconds to select the source shown on the bottom line of the screen.
or
Press the button and turn the Select knob to browse through the source options then press the Select knob to select the source shown on the bottom line of the screen.
Digital radio
iPod
Changing source
(current source on top line)
Listening to digital radio
To listen to digital radio, select the Digital radio source as described on page 7.
Selecting stations
Turn the Select knob to browse the list of available stations and press the Select knob to change station.
Changing the information on the display
Press the button, select Settings > Info display and select one of the following options:
Station name Full height station name (scrolls if necessary)
Name and text Station name and any scrolling text broadcast by the station
Signal strength Signal strength and signal quality

WARNING
Don't get distracted - avoid reading scrolling text information while driving.
Pausing and rewinding digital radio
EZi-DAB enables you to pause and rewind digital radio by saving an audio 'buffer' of the current station. You can rewind for around 5-15 minutes depending on the bitrate of the current station and/or how long you've been tuned to the current station. Use the following controls to pause and control digital radio:
▶Pause and restart playback (display shows a pause icon and a timer counting time behind live)
Skip back through the saved audio in increments of 15 seconds
Skip forward through saved audio in 15 second increments until you get back to live radio
To return to live radio immediately, push the Select knob or change the station.
Amazing Radio
Smooth Radio UK


Changing station
(current station on top line)
Smooth Radi
Station name option - scrolling full height text
Smooth Radio UK
01:05
Digital radio paused
(1 minute and 5 seconds behind live)
Using presets
You can save up to 30 of your favourite digital stations in a presets list for easy access. By default some of our favourite partner stations appear as the first few presets. You can replace these if you want.
Saving presets
- Tune to one of your favourite stations.
- Press the button on top of the controller.
- Turn the Select knob to browse through your presets list and select where you want to save your favourite.
- Press and hold the Select knob or 心 button down to save the current station to that position on the list. Previous presets can be overwritten. You see 'Preset saved' on screen when the preset has been saved.
Selecting presets
- Press the button.
- Press the button again to step through the presets list until you see the one you want then wait for a few seconds to tune to that preset or turn the Select knob to browse through your presets list and push the Select knob to select one.
BFBS Radio
dedications to and from
Tune to your favourite station
Preset 01
一 Smooth Radio UK

Browsing your presets list
Preset saved
Your preset has been saved
Connecting an iPod/iPhone/iPad/USB device
Connect your iPod, iPhone, iPad or USB device (MP3 player, mobile phone or USB memory stick) to EZi-DAB's USB input using its cable. (If your main unit is inaccessible your installer will have fitted a USB extension cable for easy access.) Once connected, you can use EZi-DAB's controller to select tracks and control playback.
To listen to your iPod, iPhone or iPad, select the iPod source or to listen to a USB device, select the USB source as described on page 7.
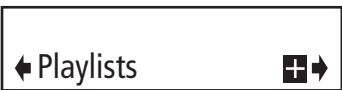
Browsing and selecting tracks
- Press the button to access your device menu and turn the Select knob and press to choose whether to list by Playlists, Artists, Albums, Genres or Tracks. You can also sort by Folders (USB devices only) or by Composers, Audiobooks and Podcasts (Apple devices only), depending on content.
- Turn the Select knob to browse through your tracks and press to select one and start playing it. A + symbol on the display indicates that there are further choices within the selected category.
Controlling playback
Use the following controls to pause and control your device:
▶Pause and restart playback (display shows a pause icon).
Skip to start of current track or press again within three seconds to skip back to previous tracks. Hold to fast rewind.
Skip to start of next track. Hold to fast forward.
Browsing your tracks

Track playing

Track paused
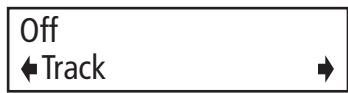
Shuffle and repeat options
Press the button, select Settings and choose one of the following options:
Shuffle
For Apple devices choose Tracks, Albums or Off, for USB devices choose On or Off.
Note: Alternatively you can press the button to cycle through Shuffle states.
Repeat
Choose Track, All or Off.
Note: Alternatively you can press and hold the button, then press again to cycle through Repeat states.
Changing the information on the display
Press the button, select Settings > Info display and select one of the following options:
Track name Full height track name (scrolls if necessary)
Track and artist Information on the selected track
Track time Track name with time into track and time remaining
Note: Apple devices which draw more than 500mA when charging such as iPad will charge more quickly if iPod source is selected on EZi-DAB.

USB track shuffle options
Track repeat options

Full height track name option
Using AUX IN
Connect the line out or headphone socket of any audio device to EZi-DAB using an appropriate 3.5mm to 3.5mm audio cable plugged into the AUX IN on EZi-DAB. Depending on the position in which your main unit has been fitted this cable may have been pre-fitted by your installer.
This connection enables audio to be played through EZi-DAB into your Head Unit. While connected you use the normal controls on your audio device and Head Unit, EZi-DAB cannot control playback as it does when connected using the iPod/USB connection.
To listen to music from your auxiliary device, select the Auxiliary input source as described on page 7.
Changing the auxiliary input gain
You can adjust the gain on the EZi-DAB auxiliary input if you find the volume level from your device seems too quiet or too loud. To adjust auxiliary input gain:
- Select the Auxiliary input source.
- Press the button, select Settings > Aux gain and choose a value between 0 (quieter) and +3 (louder).
AUX IN
AUX IN source selected
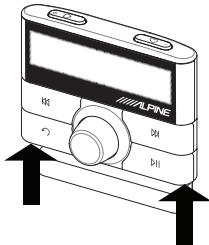
Removing/fitting the controller
The controller can be fitted and removed easily for security purposes. Your installation may also use a swivel bracket or some sort of universal or model-specific mounting bracket onto which the controller bracket shown is mounted - if so, take extra care when removing or fitting the controller.
Removing the controller
Hold the bracket and pull the controller firmly up by the sides to remove it.
If EZi-DAB is switched on when you remove the controller it will continue radio or track playback until you replace and stop playback, turn off EZi-DAB or turn off your ignition.
Note: We recommend that you remove the controller from your car (or store out of direct sunlight) on hot/sunny days if your vehicle is to be left unattended, as temperatures inside a closed vehicle can get very high.
Fitting the controller
Slide the controller onto the mounting bracket as shown and click in to place.
Removing the controller
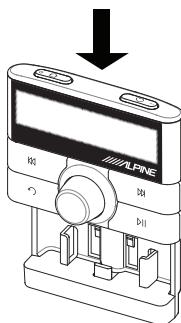
Fitting the controller
Settings
You can view and adjust the following settings from any source:
Backlight
- Press the button, select Settings > Backlight.
- Choose from the following backlight options for the display and backlit buttons:
Timed dim Dims the backlight after around 7 seconds and brightens when any button is pressed
Timed off Switches the backlight off after around 7 seconds and switches on again when any button is pressed
Dim Dim backlight option
Bright Bright backlight option
Button colour
Press the button, select Settings > Button colour and select one of the following options for the button colour: Blue, Green, Red, Amber, White
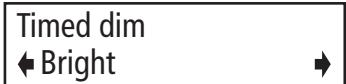
Setting backlight options
Software update
Software updates for your EZi-DAB may be made available in the future which you can load on to EZi-DAB using a USB stick connected to the USB input. Available software updates are made available for download from http://www.alpine-europe.com.
To update:
- Press the button, Select Settings > Software update.
- Insert the USB stick containing the update into EZi-DAB's USB socket/lead and press the Select knob. Note: The update process may take around five minutes. Ensure that you don't switch off EZi-DAB or start your car during the update process or the update may fail.
V1.0 4.85.1.26.007 Insert USB stick then pres
Software update screen showing the current software version number (left) and build number (right)
Language
You can change the language EZi-DAB uses for displaying menus and options.
- Press the button, select Settings > Language.
- Turn the Select knob and press to choose from English, French, German or Italian.
Restore defaults
Restore defaults removes all saved presets, clears the station list and resets all options to their defaults.
- Press the button, select Settings > Restore defaults.
- Press the Select knob to confirm you want to restore EZi-DAB defaults.
Ezi-DAB will reset, switch off and on again, you will then be asked to choose your preferred language, an autotune will be performed to refresh the digital station list and Ezi-DAB will tune to a digital station.
FM transmit frequency
If your unit has been installed to use FM transmit or FM direct inject, you can change the frequency on which EZi-DAB transmits if you find it is interfering with a broadcast station.
- Press the button, Select Settings > FM transmit frequency.
- Turn the Select knob to choose a new transmit frequency and push the Select knob to confirm.
- Retune your Head Unit to the new FM frequency you have chosen.
English
Deutsch

Changing the display language
Press SELECT to confirm
Confirm restore defaults
Package Contents
- Controller
- Main Unit (Interface)
- Controller bracket with captive cable
- Controller mount with adjustable angle
- Wiring loom with ISO connectors
- USB extension lead
- 3.5mm to 3.5mm jack audio cable
Coaxial FM antenna loop through cable
Self adhesive controller bracket mounting pad - Owner's manual
Considerations before starting
Minimum vehicle requirements
Fitted audio system including AUX-IN or FM antenna connection.
- Standard 12V power system - not suitable for 24V systems.
Recommended for best results
- Check that the latest version of software is installed. To find out which version your unit has installed: Press the button , Select Settings > Software update.
- Visit http://www.alpine-europe.com to see if there is a later software version available. Download the file and copy it to a USB stick. For instructions on how to install a software update see page 15.
Main unit (Interface) positioning
Consider length of controller cable and USB/AUX audio extension and possible routing, whether access required to unit after fitting and distance from antenna and suitable power connection (avoid using safety critical power circuits such as airbag/ABS system etc).
Controller positioning
- Consider usability and visibility from driving seat, possible mounting points/brackets, cable length and routing to main unit.
- Decide on connection to Head Unit - AUX IN or FM and whether FM pass-through is required.
Connections and System Wiring Diagram
| EZI-DAB power connector pins | ||
| Pin | Function | Colour |
| 1 | Nav_Tel_Audio+ | Purple |
| 2 | Nav_Phone_Mute | Grey |
| 3 | Cabin illumination | Brown |
| 4 | 12V Permanent battery supply (with series fuse holder) | Yellow |
| 5 | Nav_Tel_Audio_GND | Pink |
| 6 | 12V Switched ignition (with series fuse holder) | Red |
| 7 | Car mute (with crimp) | Orange |
| 8 | Ground | Black |
| ISO connector pins | ||
| Pin | Function | Colour |
| 1 | Mute 1 (with crimp) | White |
| 2 | Mute 2 (with crimp) | Orange |
| 3 | Mute 3 (with crimp) | Blue |
| 4 | 12V Switched ignition (with series fuse holder)* | Red |
| 5 | Not used | Green |
| 6 | Cabin illumination | Brown |
| 7 | 12V Permanted battery supply (with series fuse holder)* | Yellow |
| 8 | Ground | Black |
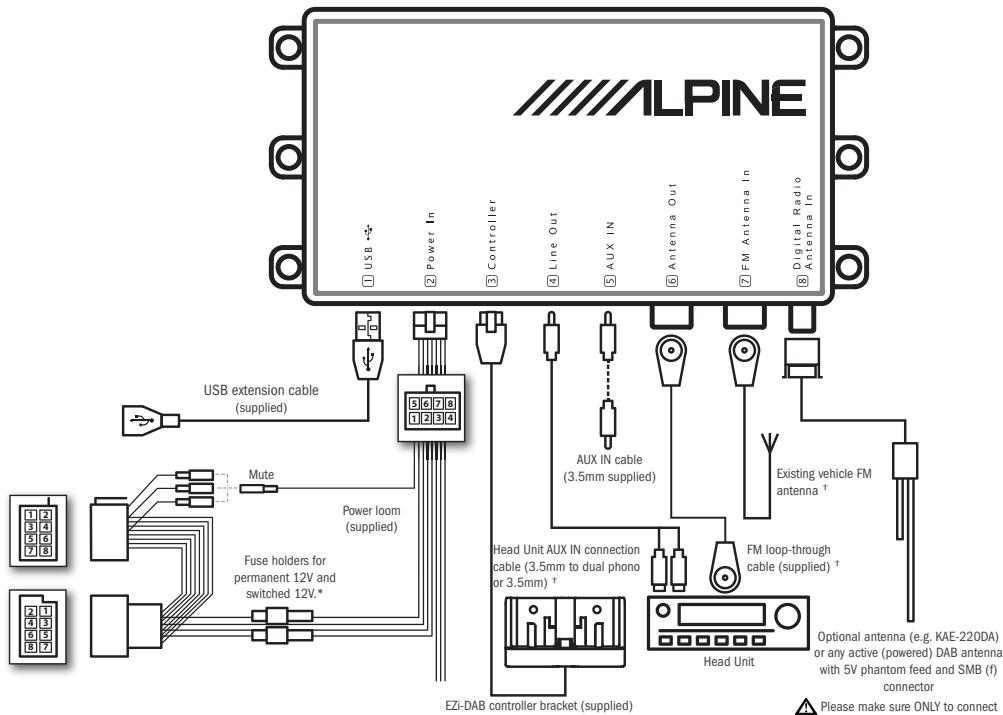
- On some vehicles switched and permanent live connections may be reversed. Open the fuse holders and swap the connections round if required.
- If connected to Head Unit AUX IN then FM antenna connections to EZi-DAB are not required.
Please make sure ONLY to connect a dedicated 5V phantom supplied antenna. Failure to do so may result in the device becoming defect.
Fit cables and connections
Fit USB extension and AUX IN cables
Route the USB extension (used for MP3/iPod connection) and AUX IN cable from e.g. the glove box, to where you will fit the main unit, as required. Note that even if this cable is not required for use with music devices, it is recommended that it is installed to enable easy access to the USB socket for software updates.
Fit connections to the Head Unit
Slide out the Head Unit and connect AUX IN cable from EZi-DAB or connect the FM pass-through cable and reroute the existing FM antenna cable and the pass through cable to where you will fit the main unit. Antenna adapters (Fakra/ISO/DIN) or extensions may be required.
Note: If the Line out connection on EZi-DAB is used the FM transmit/pass through is disabled.
Connect the power loom
Connect the supplied loom to the vehicle's system ensuring the EZi-DAB power connector is positioned where you will fit the main unit.
Note: The supplied loom provides a permanent live and ignition controlled live feed to EZi-DAB but also offers other connections that may not be required. Ensure any unused wires are safely taped up and securely tied.
Mount the controller
- Run the cable for the controller from where you will fit the main unit to the desired mounting position e.g. on the dashboard and mount the bracket as required - either using the supplied sticky pad, swivel bracket or third party mounting bracket.
- Once secure - click the controller onto the controller bracket making sure it is securely mounted.
Connect all cables to the main unit
- Connect all cables to the main unit and trial fit it in place.
- Slide the Head Unit back into place.
Check operation/setup
- As soon as the power is connected, EZi-DAB will switch on automatically, once it has started up it will ask you to select a language.
- Turn the Select knob to browse and press the knob to choose your preferred language.
- An autotune will be performed to scan for digital stations and EZi-DAB will tune to a digital station when complete.
- Switch on the Head Unit and select the AUX IN source or FM radio depending on fitting method.
- Check all sources/connections work.
Installer settings
Installer settings are provided to enable the initial setup, to prevent unintentional changing these appear in a hidden menu. To access the installer settings:
- Press , in quick succession.
- Turn the Select knob to browse through the following options and press the Select knob to choose one.
Antenna input source
Choose the required source depending on the type of antenna you are using:
Connector 8 (powered) Choose this if using an active antenna. (Default)
Connector 8 (unpowered) Choose this if using an alternative unpowered digital antenna like a film windscreen antenna or mag-mount type.
Connector 7 Choose this if using the existing car FM antenna.
Autotune
Performs a scan for digital stations as per initial start-up.
FM pass-through
Choose from two FM pass-through connection options:
Disabled EZi-DAB output effectively replaces all FM stations when EZi-DAB is switched on. (Default)
Enabled EZi-DAB output is blended in to the FM waveband, alongside normal broadcast FM stations.
Software upgrade
Use this option to update EZi-DAB's software if you have an update available and loaded on a USB stick.
Factory reset
Use this option to reset all settings including the installer settings above to defaults.
Technical Specifications
Radio DAB/DAB+/DMB-Radio depending on region. Dual digital radio tuners.
Frequency ranges Band III 174-240 MHz, L-Band 1452-1490 MHz and FM transmit 87.5-108 MHz.
Input connectors Digital radio antenna in: FAKRA SMBA connector
FM antenna in: ISO connector
Analogue AUX IN: 3.5mm auxiliary input
Power supply: 8 way latched Molex connection - 12V from vehicle supply
USB: (type A) USB connection for iPod, iPad, iPhone, MP3 players and USB sticks for audio playback, also used for software updates
Output connectors FM antenna out: ISO connector for pass-through of FM connection
Line out: 3.5mm audio out to Head Unit
Controller connection: 6 way latched Molex connection to micro USB
Controls Backlit rewind and fast forward controls, play/pause and back buttons. Home and presets. Rotary knob with push to select
Display High contrast white-on-black graphical OELD display
Dimensions Controller: 70mm wide x 53mm high x 27mm deep. Main unit (Interface): 150mm wide x 24mm high x 85mm deep
Temperature range Maximum recommended operating temperature 75^ maximum recommended storage temperature 85^
Suitable for use in the following countries: A, B, BG, CY, CZ, DK, EE, FIN, F, D, EL, HU, IRL, I, LV, LT, L, MT, NL, PL, P, RO, SK, SL, E, S, GB, ISL, LIE, NOR, CHE
Copyright
Copyright 2012 by Alpine Electronics (Europe) GmbH. All rights reserved. No part of this publication may be copied or distributed, transmitted, transcribed, stored in a retrieval system, or translated into any human or computer language, in any form or by any means, electronic, mechanical, magnetic, manual or otherwise, or disclosed to third parties without the express written permission of Alpine Electronics (Europe) GmbH.
Trademarks
iPad, iPod and iPhone are trademarks of Apple Inc., registered in the U.S. and other countries.
"Made for iPod," "Made for iPhone," and "Made for iPad" mean that an electronic accessory has been designed to connect specifically to iPod, iPhone, or iPad, respectively, and has been certified by the developer to meet Apple performance standards. Apple is not responsible for the operation of this device or its compliance with safety and regulatory standards. Please note that the use of this accessory with iPod, iPhone, or iPad may affect wireless performance. All other product names are trademarks of their respective companies. Version 1 February 2012.
Made for

iPod

iPhone

iPad
Bouton Lecture/Pause
dedications to and from
Press SELECT to confirm
FM pass-through (passerelle FM)
dedications to and from
Sintonice su emisora favorita
Preset 01
Smooth Radio UK

Press SELECT to confirm
dedications to and from
Press SELECT to confirm
dedications to and from
Press SELECT to confirm
dedications to and from
Stem op uw favorite radiozender af
Preset 01
Smooth Radio UK

Selecteer Track (liedje), All (alles) of Off.
Press SELECT to confirm
dedications to and from
Sok after din favoritstation
Preset 01
Smooth Radio UK

Track and artist Information om valid lat
Press SELECT to confirm
Minimikrav for fordonet
- Anpassat ljudsystem inklusive AUX-IN aller anslutning for FM-antenn.
- Standardmässigt 12 V-system - ej lampligt für 24 V-system.
Rekommenderas for basta resultat
DAB-radio: Tryk for at se listen over faste stationer.
dedications to and from
Stil ind på din favoritstation
Preset 01
Smooth Radio UK

Bladring I listen over faste stationer
Preset saved
Dine faste stationer er gemt
Press SELECT to confirm
Connector 8 (powered)
Vaelg dette, hvis du anvender en aktiv antenne. (Standard)
Connector 8 (unpowered)
Torrance, California 90501 U.S.A.
Phone 1-800-ALPINE-1 (1-800-257-4631)
ALPINE ELECTRONICS OF CANADA, INC.
7300 Warden Ave., Suite 203
Markham, Ontario L3R 9Z6 Canada
Phone 1-800-ALPINE-1 (1-800-257-4631)
ALPINE ELECTRONICS OF AUSTRALIA PTY. LTD.
161-165 Princess Highway, Hallam
Victoria 3803, Australia
Phone 03-8787-1200
ALPINE ELECTRONICS GmbH
ALPINE House, Fletchamstead Highway,
Coventry CCV4 9TW, United Kingdom
Phone 0870-3333763
ALPINE ELECTRONICS (BENELUX) GmbH
Leuvensesteenweg 510-B6
1930 Zaventem, Belgium
Tel.: 02-7251315
ALPINE ELECTRONICS FRANCE S.A.R.L.
(RCS PONTOISE B 338 101 280)
98, Rue de la Belle Etoile, Z.I. paris Nord II, B.P. 50016,
95945 Roissy Charles de Gaulle Cedex, France
Phone 01-48638989
- MANUEL D'UTILISATION
- CAUTION
- WARNING
- Contents
- Introduction
- Main unit (Interface)
- Controller
- Antenna (optional)
- Controls and connectors
- Power/Home button
- Rewind button
- Back button
- Select knob
- Presets/More button
- Fast forward button
- Play/pause button
- USB
- Power In
- Controller
- Line Out (3.5mm)
- Digital Radio Antenna In
- Antenna Out
- FM Antenna In
- Getting started
- Switching on and off
- Forecourt pause
- Picnic mode
- Listening to EZi-DAB
- Selecting your audio source
- Listening to digital radio
- Selecting stations
- Changing the information on the display
- Pausing and rewinding digital radio
- Using presets
- Saving presets
- Selecting presets
- Connecting an iPod/iPhone/iPad/USB device
- Browsing and selecting tracks
- Controlling playback
- Shuffle and repeat options
- Shuffle
- Repeat
- Using AUX IN
- Changing the auxiliary input gain
- AUX IN
- Removing/fitting the controller
- Removing the controller
- Fitting the controller
- Settings
- Backlight
- Button colour
- Software update
- Language
- Restore defaults
- FM transmit frequency
- Package Contents
- Considerations before starting
- Minimum vehicle requirements
- Recommended for best results
- Main unit (Interface) positioning
- Controller positioning
- Connections and System Wiring Diagram
- Fit cables and connections
- Fit USB extension and AUX IN cables
- Fit connections to the Head Unit
- Connect the power loom
- Mount the controller
- Connect all cables to the main unit
- Check operation/setup
- Installer settings
- Antenna input source
- Autotune
- FM pass-through
- Software upgrade
- Factory reset
- Technical Specifications
- Copyright
- Trademarks
- Bouton Lecture/Pause
- dedications to and from
- Press SELECT to confirm
- FM pass-through (passerelle FM)
- Preset 01
- Smooth Radio UK
- Minimikrav for fordonet
- Rekommenderas for basta resultat
Brand : ALPINE
Model : EZI-DAB
Category : DAB Receiver