
NC - Grinder MELITTA - Free user manual and instructions
Find the device manual for free NC MELITTA in PDF.
| Product type | Automatic coffee machine with grinder |
| Brand | MELITTA |
| Model | NC |
| Power supply | 220-240 V, 50-60 Hz |
| Power consumption | 1450 W |
| Pump pressure | 15 bar (max) |
| Dimensions (W x H x D) | 200 x 352 x 459 mm |
| Weight (empty) | 7.7 kg |
| Water tank capacity | 1.5 L |
| Bean hopper capacity | 250 g |
| Main functions | Coffee, cappuccino, latte macchiato, milk froth, hot water |
| Grind size adjustment | Yes, adjustable slider during grinding |
| Automatic shut-off | Yes, adjustable (30 min to 8 h) |
| Automatic rinsing | Yes, can be enabled/disabled |
| Descaling program | Yes, automatic (approx. 25 min) |
| Cleaning program | Yes, automatic (approx. 15 min) |
| Milk system cleaning | Manual and specific cleaning program |
| Filter cartridge | Compatible with Melitta Pro Aqua (optional) |
| Spout | Height-adjustable |
| Included accessories | Milk hose, cartridge wrench, water hardness test strip |
| Safety | Automatic shut-off, brew chamber lock, overheating protection |
| Warranty | Check with retailer |
Frequently Asked Questions - NC MELITTA
User questions about NC MELITTA
0 question about this device. Answer the ones you know or ask your own.
Ask a new question about this device
Download the instructions for your Grinder in PDF format for free! Find your manual NC - MELITTA and take your electronic device back in hand. On this page are published all the documents necessary for the use of your device. NC by MELITTA.
USER MANUAL NC MELITTA
trical and Electronic Equipment).
1 For your safety. 20
1.1 Proper use 20
1.2 Danger from electric current 20
1.3 Risk of burns and scalds.. 20
1.4 General safety 20
1.5 Children 20
2 Appliance at a glance 21
2.1 "On/Off" button 22
2.2 Service modes 22
3 First steps. 22
3.1 Unpacking the appliance 22
3.2 Setting up the appliance 22
3.3 Connecting the appliance 22
3.4 Switching on the appliance for the first time 22
4 Preparing to make beverages 23
4.1 Filling with tap water 23
4.2 Filling with coffee beans.. 23
4.3 Using milk 23
4.4 Emptying the drip tray and coffee grounds container 23
5 Preparing beverages 24
5.1 Preparing two beverages simultaneously 24
5.2 Changing settings 24
5.3 Setting the grinding fineness 24
6 Basic settings. 25
6.1 Setting switch-off time 25
6.2 Setting the water hardness 25
6.3 Setting switch-off rinsing 26
6.4 Setting the brewing temperature.... 26
7 Care and maintenance. 26
7.1 Cleaning surfaces 26
7.2 Cleaning the brewing unit.. 26
7.3 Cleaning milk system 27
7.4 Cleaning the milk unit 27
7.5 Cleaning program 28
7.6 Dcsaling program 29
7.7 Water filter 29
7.8 Factory settings 30
7.9 Drying out 31
8 Transport 31
9 Disposal. 31
10 Technical data. 31
11 Troubleshooting 31
1 For your safety
1.1 Proper use
The appliance is intended for use in private households to prepare coffee beverages and to heat milk and water.
Any other use is regarded as improper and may lead to personal injury and material damage.
1.2 Danger from electric current Only use the appliance if it is in a technically flawless condition.
If the appliance or the power cable is damaged, there is a risk of fatal electric shock. You may not use the appliance in this case, but instead you need to have it repaired by the manufacturer, the customer services or a service partner.
You must not immerse the appliance in water or let the power cable come into contact with water.
Disconnect the appliance from the power supply when left unsupervised for a long time.
1.3 Risk of burns and scalds
Escaping fluids and steam may be very hot. The nozzles on the outlet can also become very hot.
1.4 General safety
Do not operate the appliance in a cabinet or at altitudes above 2000m
Do not reach into the interior of the appliance during operation.
You may not open the housing or manipulate the appliance or the accessories in any other way.
1.5 Children
Children must not play with the appliance.
You must keep children who are younger than 8 years away from the appliance.
This appliance may be used by children over 8 years of age and by persons with reduced physical, sensory or mental capabilities or a lack of experience and knowledge, but only if they are supervised or have been instructed in using the appliance safely and understand the resulting risks.
Cleaning and maintenance must not be undertaken by children younger than 8 years of age.
Children older than 8 years of age must be supervised during cleaning and maintenance.
2 Appliance at a glance
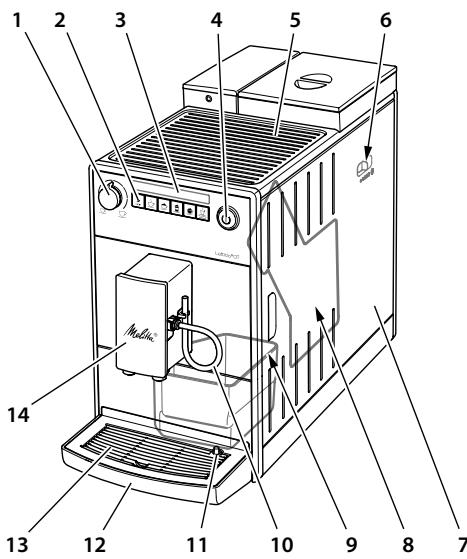
1 "Coffee Quantity" regulator
2 Buttons
3 Displays
4 "On/Off" button
5 Cuprest
6 "Grinding Fineness Adjustment" lever (inner)
7 Cover
8 Brewing unit (inner)
9 Coffee grounds container (inner)
10 Milk hose
11 Float
12 Drip tray
13 Cup plate
14 Height-adjustable outlet for coffee beverages with milk
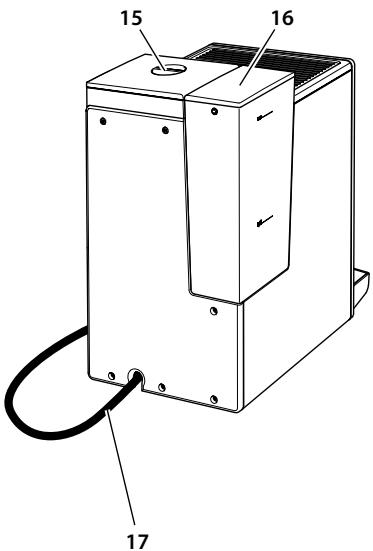
15 Bean container
16 Water tank
17 Power cable
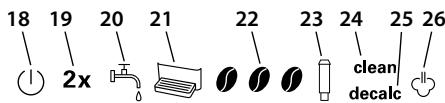
| Display | Function in service mode 1/2 | |
| 18 | Ready display | |
| 19 | 2× | Automatic switch-off/factory settings |
| 20 | Water | Water hardness/− |
| 21 | Drip tray | Switch-off rinsing/− |
| 22 | Coffee beans | Status display/− |
| 23 | Filters | Filter program/− |
| 24 | Cleaning | Cleaning program/− |
| 25 | Descaling | Descaling program/− |
| 26 | Steam dispensing | Brewing temperature/drying out |
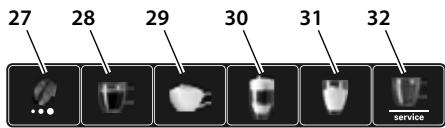
| Buttons | |
| 27 | "Brewing Strength" button |
| 28 | "Coffee" direct key |
| 29 | "Cappuccino" direct key |
| 30 | "Latte Macchiato" direct key |
| 31 | "Milk Froth" direct key |
| 32 | "Water/Service" button |
2.1 "On/Off" button
Switch on the appliance by briefly pressing the "On/Off" button. The appliance performs automatic rinsing while it heats up. Place a vessel under the outlet if possible.
You can switch off the appliance by pressing the "On/Off" button for approximately 2 seconds. If you do not switch off the appliance, it will switch off automatically after a defined off time.
2.2 Service modes
The appliance has two service modes. The service modes allow you to configure your appliance and use care and maintenance functions.
Calling up service mode
Press the "Water/Service" button for longer than 2 seconds to access Service mode 1.
Simultaneously press the "Water/Service" and "Brewing Strength" buttons for longer than 2 seconds to access Service mode 2.
» The Ready display flashes rapidly when the service mode is active.
Press the "Water/Service" button once or several times to select a function.
» The display for the active function is lit up.
If no further input is made within 1 minute, the appliance returns to Ready mode.
Ending service mode
Press the "Water/Service" button for more than 2 seconds to save the setting and exit service mode.
- Press any direct key to exit service mode without saving the setting.
3 First steps
3.1 Unpacking the appliance
Remove the packaging material, the adhesive strips and the protective films from
the appliance. Please keep the original packaging.
The appliance has been tested in the factory to ensure that it functions perfectly. Therefore, the appliance may still contain traces of coffee and water.
Included in delivery
Milk hose
- Screwing aid for the water filter
- Test strip for determining the water hardness
3.2 Setting up the appliance
- Set up the appliance in a dry room.
- Set up the appliance on a stable, flat and dry surface. The surface may not be hot. The appliance may not be placed in the vicinity of sinks or the like.
- Set up the appliance at a sufficient distance (approx. 10cm ) from the wall and other objects. The space above the appliance should be at least 20cm .
- Route the power cable so it does not lie over edges or cannot be damaged by hot surfaces.
3.3 Connecting the appliance
Only connect the appliance to a properly installed earthing contact socket. The earthing contact socket must be protected by a fuse with a rating of at least 10 A.
3.4 Switching on the appliance for the first time
- Place a vessel under the height-adjustable outlet. The distance between the outlet and the vessel should be as small as possible.
- Switch on the appliance with the "On/Off" button.
The Ready display lights up briefly.
The Water display lights up. - Remove the water tank. Rinse out the water tank with clean tap water.
- Fill the water tank with fresh, cold tap water and insert it. Observe the instructions in section 4.1, page 23.
The Steam dispensing display flashes rapidly.
- Press any button.
Water flows from the milk outlet and the Ready display flashes.
» The appliance heats up and hot water flows out of the outlet.
» Once no more water flows out of the outlet, the appliance has been vented.
» The Ready display and the Coffee beans display light up.
- Fill the bean container with coffee beans. Observe the instructions in section 4.2, page 23.
- Prepare the first two beverages and pour them away. Observe the instructions in section 5, page 24.
4 Preparing to make beverages
4.1 Filling with tap water
The Water display lights up.
The quality of the tap water largely determines the flavour of the coffee. Fill the water tank only with fresh, cold tap water that has not been carbonated. Change the tap water on a daily basis. Please observe the maximum filling level.
4.2 Filling with coffee beans
The Coffee beans display flashes.
Important! Do not use freeze-dried or caramelised coffee beans as they can clog the grinder. Coffee powder and instant products can also damage the grinder.
Roasted coffee beans lose their aroma after a few days. Therefore, do not fill too many coffee beans into the bean container.
Caution! When you switch bean variety, a small amount of the other coffee beans will remain in the grinder. The next two coffee beverages will be prepared still with remains of the previous variety. Persons with caffeine intolerance should only consume the third coffee beverage.
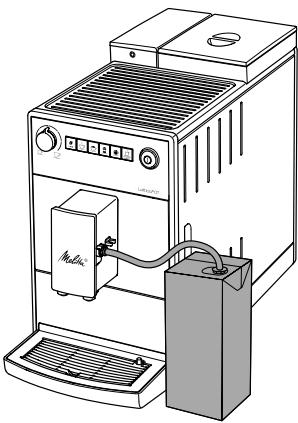
4.3 Using milk
To prepare milk froth or hot milk, insert the milk hose into a conventional milk pack. In addition, you can use a milk lance or a milk container. The milk lance and milk container are not included in the delivery. Always use cold milk.
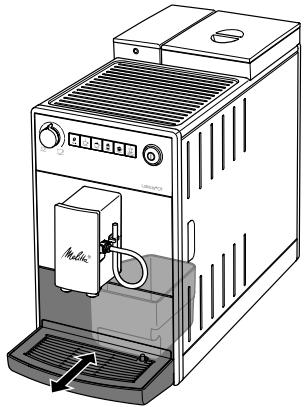
4.4 Emptying the drip tray and coffee grounds container
The Drip tray display lights up.
After a set number of dispensing operations, the appliance will ask you to drain the drip tray and the coffee grounds container. The protruding float also shows you when it is time to empty the drip tray.
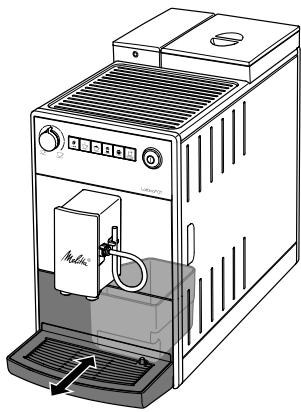
The drip tray can be pulled forwards out of the appliance. Always empty both the drip tray and also the coffee grounds container. Then, make sure you push the drip tray into the appliance up to the stop.
Information If you empty the drip tray while the appliance is switched off, the appliance does not register this process. Therefore, it is possible that you are asked to empty the containers even though the drip tray and the coffee grounds container are not yet full.
5 Preparing beverages
Observe the following instructions during preparation:
- The water tank should be sufficiently full. If the filling level is too low, the appliance will ask you to refill it.
- There should be sufficient coffee beans in the bean container. The appliance asks you to refill only if there are no more coffee beans in the bean container and the grinder has ground itself empty.
- When you prepare a beverage with milk, you need to connect a vessel filled with milk. The appliance does not indicate a lack of milk.
- The vessels for the beverages should be sufficiently large. The beverage quantity varies according to the beverage.
- (1) The Ready display should be lit up.
- Start the preparation by pressing the corresponding direct key. Observe the displays during preparation.
- Set the required beverage quantity with the "Coffee Quantity" regulator.
Press the direct key again to end preparation. - The preparation ends automatically. You should clean the milk system after preparing milk beverages. This prevents the formation of bacteria that are harmful to health.
clean The illuminated Clean and Steam dispensing displays indicate that you need to clean the milk system. You can, however, prepare more milk beverages and then clean the milk system.
- Immerse the hose in a vessel filled with clear tap water (approx. 150 ml).
- Press the "Milk froth" direct key for longer than 2 seconds.
Also observe the instructions in section 7.3, page 27 and section 7.4, page 27.
5.1 Preparing two beverages simultaneously
You can prepare two cups at the same time with all of the beverages. To do so, you simply need to press the respective direct key briefly twice in succession. The 2 × display lights up during preparation. The Steam dispensing display flashes in addition for milk beverages.
5.2 Changing settings
You can still change the brewing strength and the beverage quantity before and during preparation.
You can set the brewing strength by pressing the "Brewing Strength" button. After the grinding process, you can no longer change the brewing strength.
The changed brewing strength will also be used for subsequent coffee preparation processes.
You can change the beverage quantity by turning the "Coffee Quantity" regulator.
5.3 Setting the grinding fineness
The grinding fineness of the coffee beans influences the flavour of the coffee. The finer you set the grinding fineness, the stronger the coffee.
The grinding fineness has been optimally set at the factory. Change the grinding fineness setting at the earliest after about 100 coffee dispensing processes (after approx. 1 month, depending on coffee consumption).
You can set the grinding fineness optimally with the "Grinding Fineness Adjustment" lever. Adjust the grinding fineness only during the grinding process.
Information Do not set the grinding fineness too fine. The optimum grinding fineness is set when the coffee flows evenly out of the outlet producing a fine, dense crema.
6 Basic settings
You will find the basic settings in Service mode 1. The number of illuminated coffee beans indicates the set value.
6.1 Setting switch-off time
If you do not operate the appliance for a long time, it initially switches to energy save mode. The appliance switches off completely later on.
If the appliance is in energy save mode, you can wake it up by pressing any button briefly.
- Press the "Water/Service" button for longer than 2 seconds.
- 2x Press the "Water/Service" button repeatedly until the 2x display lights up.
-
Press the "Brewing Strength" button repeatedly until the desired time is set.
-
Press the "Water/Service" button for more than 2 seconds to save the setting and exit service mode. Press any direct key to exit service mode without saving the setting.
| Display | Energy save mode after: | Switch off after: |
| 1 | 3 minutes | 30 minutes |
| 1 1 | 10 minutes | 1 hour |
| 1 1 1 | 20 minutes | 4 hours |
| 1 1 1 flashing | 30 minutes | 8 hours |
6.2 Setting the water hardness
The hardness of the tap water influences how often you have to descale the appliance. The harder the tap water, the more frequently you have to descale the appliance.
Determine the water hardness with the enclosed test strip. Observe the instructions on the test strip and the information in the following table.
| Water hardness | °d | °e | °f |
| Soft | 0 to 10 | 0 to 13 | 0 to 18 |
| Medium | 10 to 15 | 13 to 19 | 18 to 27 |
| Hard | 15 to 20 | 19 to 25 | 27 to 36 |
| Very hard | >20 | >25 | >36 |
- Press the "Water/Service" button for longer than 2 seconds.
- Press the "Water/Service" button repeatedly until the Water display lights up.
- Press the "Brewing Strength" button repeatedly until the required water hardness is set.
- Press the "Water/Service" button for more than 2 seconds to save the setting and exit service mode. Press any direct key to exit service mode without saving the setting.
| Display | Water hardness |
| ➁ | soft, descale after 150 litres |
| ➂➂ | medium, descale after 100 litres |
| ➂➂➂ | hard, descale after 70 litres |
| ➂➂➂ flashing | very hard, descale after 30 litres |
| no coffee beans | A water filter is used. Adjustment is not possible. |
6.3 Setting switch-off rinsing
The appliance performs rinsing when switched on and off.
We recommend that you do not permanently deactivate the switch-off rinsing function.
- Press the "Water/Service" button for longer than 2 seconds.
- Press the "Water/Service" button repeatedly until the Drip tray display lights up.
- Press the "Brewing Strength" button to activate or deactivate the switch-off rinsing.
- Press the "Water/Service" button for more than 2 seconds to save the setting and exit service mode. Press any direct key to exit service mode without saving the setting.
| Display | Switch-off rinsing |
| 0 | activated |
| no coffee beans | deactivated |
6.4 Setting the brewing temperature
The brewing temperature influences the flavour of the coffee beverage.
- Press the "Water/Service" button for longer than 2 seconds.
-
Press the "Water/Service" button repeatedly until the Steam Dispensing display lights up.
-
Press the "Brewing Strength" button repeatedly until the desired brewing temperature is set.
- Press the "Water/Service" button for more than 2 seconds to save the setting and exit service mode. Press any direct key to exit service mode without saving the setting.
| Display | Brewing temperature |
| 10 | Low |
| 100 | Medium |
| 1000 | High |
7 Care and maintenance
Regular cleaning and maintenance of the appliance ensures the consistent high quality of your beverages.
Important! Unsuitable cleaning agents can damage the appliance. Only use the recommended cleaning agents.
7.1 Cleaning surfaces
Use a soft, damp cloth and a little washing up liquid to clean the surfaces. Remove external soiling immediately.
After you have emptied the drip tray and the coffee grounds container, rinse them and, if necessary, also clean them with a soft, damp cloth and a little washing-up liquid.
You can remove residue from the coffee beans in the bean container with a soft cloth. The cloth needs to be dry.
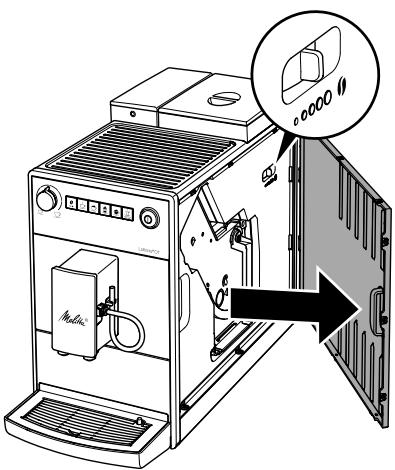
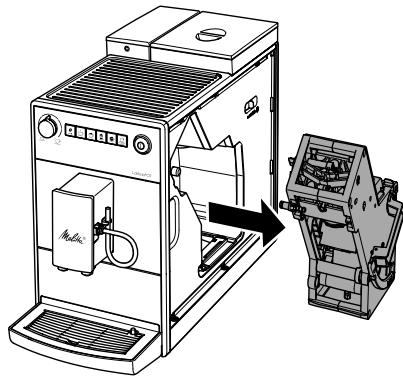
7.2 Cleaning the brewing unit
You should clean the brewing unit every week.
- Remove the cover by reaching into the handle recess and pulling the cover to the side.
- Press and hold the red lever on the brewing unit handle and turn the handle clockwise until it engages at the stop.
- Pull the brewing unit out by the handle.
clean Alternating flashing of the Ready display and the Clean display indicates that the brewing unit is missing.
- Rinse the entire brewing unit thoroughly from all sides under running water. In particular, make sure that coffee residues are removed from the sieve.
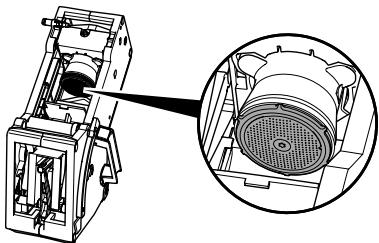
- Allow the brewing unit to drip dry.
- Use a soft, dry cloth to remove coffee residues from the surfaces inside the appliance.
- Insert the brewing unit into the appliance. Press and hold the red lever on the handle of the brewing unit and turn the handle anticlockwise until it engages at the stop.
- To do this, insert the cover again until it engages.
7.3 Cleaning milk system
You should clean the milk system after approximately 100 milk beverages. This appliance does not prompt you to clean the milk system.
Only use Melitta® Perfect Clean milk system cleaning agent for automatic coffeemakers.
Use a vessel with a capacity of at least 500 ml as a collecting container.
- Fill a second vessel with cleaning solution. Observe the instructions on the packaging of the milk system cleaning agent.
- Immerse the hose in the cleaning solution.
- Turn the "Coffee Quantity" regulator to the maximum position.
- Press the "Milk Froth" direct key. The appliance rinses itself.
- Press the "Milk Froth" direct key repeatedly until the vessel is emptied.
- Fill the second vessel with 500ml of clear tap water.
- Press the "Milk Froth" direct key again repeatedly until the vessel is emptied.
7.4 Cleaning the milk unit
Bacteria that are harmful to health can form in milk residue within a few days. Therefore, we recommend cleaning the milk unit and the milk hose on a regular basis.
- Pull the milk hose off the outlet.
- Dismantle the milk unit.

-
Clean all individual parts with warm water. Use a soft, damp cloth and washing up liquid for this.
-
Reassemble the milk unit properly. Make sure that you push the milk unit upwards to the end stop when assembling it.
7.5 Cleaning program
This cleaning program is used to remove residues and coffee oil residues. You should run the program every two months or when the appliance asks you to do so.
Only use Melitta® Perfect Clean cleaning tabs for automatic coffeemakers. Observe the instructions on the packaging of the cleaning tabs.
Caution! Cleaning agent causes eye irritation. If it accidentally comes into contact with your eyes, you should rinse them with clear water for several minutes. Consult a doctor if symptoms persist.
The program takes approximately 15 minutes and should not be interrupted. The program runs in several stages. Progress is indicated by the number of coffee beans displayed.
clean The Clean display light tells you to clean the appliance.
- Fill the water tank with tap water up to the maximum filling level. Insert the water tank.
- Press the "Water/Service" button for longer than 2 seconds to access Service mode 1.
- clean Press the "Water/Service" button repeatedly until the Cleaning display lights up.
- Press the "Water/Service" button for longer than 2 seconds.
» clean The cleaning program starts.
The Cleaning display flashes for the duration of the program.
» The Drip tray display lights up.
- Empty the drip tray and the coffee grounds container.
- Insert the drip tray without the coffee grounds container and place the coffee grounds container under the outlet.
The first stage starts.
» The appliance rinses twice.
» clean The Cleaning display flashes rapidly.
- Remove the brewing unit. Do not switch off the appliance.
- Rinse the brewing unit under running water (see section 7.2, page 26).
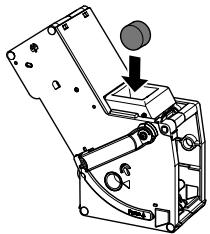
- Place a cleaning tab in the brewing unit. Insert the brewing unit into the appliance.
The second stage starts.
» The appliance performs several rinsing operations.
» The Drip tray display lights up.
The third stage starts.
- Empty the drip tray and the coffee grounds container.
- Insert the drip tray without the coffee grounds container and place the coffee grounds container under the outlet.
The fourth stage starts. The three coffee beans flash.
» The appliance performs several rinsing operations.
» The Drip tray display lights up.
- Empty the drip tray and the coffee grounds container.
- Insert the drip tray with the coffee grounds container.
» The appliance is ready for operation. If the cleaning program has been interrupted, e.g. because you unintentionally switched off the appliance, you must switch the appliance on again and follow the instructions from step 10. The appliance is then ready for operation, even if it has not been completely cleaned. For complete cleaning, you must start the cleaning program again.
7.6 Descaling program
The descending program is used to remove limescale deposits. You should run the program every three months or when the appliance asks you to do so.
There must not be a water filter in the water tank during descending. If you use a water filter, you need to remove it before descending (see section 7.7, page 29).
Only use Melitta® Anti Calc liquid descaling agent for automatic coffeemakers.
Caution! Descaling agent causes eye irritation. If it accidentally comes into contact with your eyes, you should rinse them with clear water for several minutes. Consult a doctor if symptoms persist.
The program takes approximately 15 minutes and should not be interrupted. The program runs in several stages. Progress is indicated by the number of coffee beans displayed.
decalc The Descaling display light tells you to descale the appliance.
- Press the "Water/Service" button for longer than 2 seconds to access Service mode 1.
- 13 decalc Press the "Water/Service" button repeatedly until the Descale display lights up.
- Press the "Water/Service" button for longer than 2 seconds.
decalc The descending program starts. The Descale display flashes for the duration of the program.
The first stage starts.
» The Drip tray display lights up. - Empty the drip tray and the coffee grounds container.
- Insert the drip tray without the coffee grounds container and place the coffee grounds container under the outlet. The Water display lights up.
- Fill 0.5 litres of descending fluid into the water tank. Observe the instructions on the packaging of the descending agent.
- Insert the water tank.
The second stage starts.
» The appliance performs several rinsing operations.
» The Drip tray display lights up.
- Empty the drip tray and the coffee grounds container.
-
Insert the drip tray without the coffee grounds container and place the coffee grounds container under the outlet.
The Water display lights up. -
Thoroughly rinse out the water tank and fill it with fresh tap water.
- Insert the water tank.
» The appliance rinses itself.
The third stage starts.
» The appliance rinses itself.
» The Drip tray display lights up.
- Empty the drip tray and the coffee grounds container.
- Insert the drip tray with the coffee grounds container.
The appliance is ready for operation. If the descending program has been interrupted, e.g. by unintentionally switching the appliance off, you must switch the appliance on again and follow the instructions from step 8. The appliance is then ready for operation, even if it has not been completely descaled. For complete descending, you need to start the descending program again.
7.7 Water filter
The use of a water filter extends the service life of your appliance. The water filter filters calcium and pollutants out of the tap water.
If you use a water filter and change it on a regular basis, you will need to descale the appliance only once per year. This information is based on an average of six 120 ml coffee beverages per day and six filter changes per year.
Only use Melitta® Pro Aqua filter cartridges for automatic coffeemakers. Observe the instructions on the packaging of the filter cartridge.
Use the screwing aid to screw the water filter into and out of the water tank.
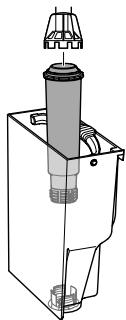
Inserting/changing water filter
Place a new water filter in a vessel filled with fresh tap water for a few minutes.
The Filter display light asks you to change the water filter.
- Press the "Water/Service" button for longer than 2 seconds to access Service mode 1.
- Press the "Water/Service" button repeatedly until the Filter display lights up.
- Press the "Brewing Strength" button repeatedly until one coffee bean is lit.
- Press the "Water/Service" button for longer than 2 seconds.
The filter program starts. The Filter display flashes for the duration of the program. The Drip tray display lights up.
- Empty the drip tray and the coffee grounds container.
- Insert the drip tray without the coffee grounds container and place the coffee grounds container under the outlet. The Water display lights up.
- Empty the water tank.
- Insert a new filter in the water tank.
- Fill the water tank with fresh tap water.
- Insert the water tank.
» The filter is rinsed.
-
Empty the coffee grounds container.
-
Insert the drip tray with the coffee grounds container.
» The appliance is ready for operation.
Removing the water filter
- Remove the water filter from the water tank.
- Fill the water tank with fresh tap water.
-
Insert the water tank.
-
Press the "Water/Service" button for longer than 2 seconds to access Service mode 1.
-
Press the "Water/Service" button repeatedly until the Filter display lights up.
- Press the "Brewing Strength" button repeatedly until no coffee beans are lit.
- Press the "Water/Service" button for more than 2 seconds to save the setting and exit service mode. The water filter is de-registered.
- Set the water hardness (see section 6.2, page 25).
7.8 Factory settings
The appliance can be reset to the factory settings. In this case, all personal settings are lost.
- Simultaneously press the "Water/Service" and "Brewing Strength" buttons for longer than 2 seconds to access Service mode 2.
- 2x Press the "Water/Service" button repeatedly until the 2x display flashes.
- Press the "Brewing Strength" button repeatedly until one coffee bean is lit.
- Press the "Water/Service" button for more than 2 seconds to reset the appliance to the factory settings and exit service mode.
Press any direct key to exit service mode without resetting the factory settings.
7.9 Drying out
During drying out, residual water is removed from the appliance. You should dry out the appliance whenever you do not use it for longer periods, if you want to transport it or if there is a risk that it could freeze.
If the water filter is inserted, you will need to remove it from the water tank beforehand.
- Simultaneously press the "Water/Service" and "Brewing Strength" buttons for longer than 2 seconds to access Service mode 2.
Press the "Water/Service" button repeatedly until the Steam Dispensing display flashes. - Press the "Water/Service" button for longer than 2 seconds.
The Water display lights up.
- Remove the water tank.
The drying out process begins.
» The appliance switches off.
- Insert the empty water tank.
Keep the water filter in a vessel containing tap water in the refrigerator so that it does not stand dry over a longer period.
8 Transport
Transport the appliance in the original packaging if possible.
You may not fasten loose parts with adhesive tape or parcel tape because the adhesive residue is difficult to remove.
When you send the appliance to Melitta's service centres, you do not need to send in the cup plate. This prevents scratches during transport.
Before transporting the appliance, you must carry out the following activities:
- Dry out the appliance (see section 7.9, page 31).
Empty the drip tray and the coffee grounds container.
Empty the water tank.
Empty the bean container.
Clean the appliance (see section 7, page 26).
Package the appliance.
9 Disposal

Appliances marked with this symbol are subject to the European Directive 2012/19/EC for WEEE (Waste Electrical and Electronic
Equipment).
Electrical appliances do not belong in domestic waste. Dispose of the appliance in an environmentally friendly way via suitable collection systems.
10 Technical data
| Technical data | |
| Operating voltage | 220 V to 240 V, 50 Hz to 60 Hz |
| Power consumption | Maximum 1450 W |
| Pump pressure | Static, max. 15 bar |
| Dimensions | |
| Width | 200 mm |
| Height | 352 mm |
| Depth | 459 mm |
| Holding capacity | |
| Bean container | 250 g |
| Water tank | 1.5 l |
| Weight (empty) | 7.7 kg |
| Ambient conditions | |
| Temperature | 10°C to 32°C |
| Relative humidity | 30% to 80%(non-condensing) |
11 Troubleshooting
Contact our hotline if the actions listed in the table fail to rectify the problems or if other problems not listed here occur.
You will find the telephone numbers (local rates) in the lid of the water tank or in the Service section on our website.
| Problem | Cause | Action |
| Coffee only emerges from the outlet in drips. | Grinding fineness is too fine. | Set a coarser grinding fineness (see section 5.3, page 24). |
| Appliance is soiled. | Clean the brewing unit (see section 7.2, page 26).Run the cleaning program (see section 7.5, page 28). | |
| Appliance is covered inside with limescale. | Run the descaling program (see section 7.6, page 29). | |
| Coffee does not flow. | Water tank is not filled or is not correctly inserted. | Fill the water tank and ensure it is positioned correctly (see section 4.1, page 23). |
| Brewing unit is clogged. | Clean the brewing unit (see section 7.2, page 26). | |
| Although the bean container is full, the appliance indicates that coffee beans must be filled. | Coffee beans do not drop into the grinder. | Press a direct key.Tap lightly on the bean container.Clean the bean container.Coffee beans are too oily. Use different coffee beans. |
| Loud grinder noise. | Foreign objects in the grinder. | Contact the hotline. |
| Brewing unit cannot be inserted after removing. | Handle for the locking mechanism of the brewing unit is not in the correct position. | Check that the handle for the locking mechanism is correctly engaged (see section 7.2, page 26). |
| Drive is not in the correct position. | Press the "Coffee" and the "Cappuccino" direct keys simultaneously for more than 2 seconds. The appliance initialises. | |
| Rapid alternate flashing of the displays: | The appliance does not heat up. | Switch the appliance off and on again.Contact the hotline if the problem persists. |
| Rapid alternate flashing of the displays: | Problem with temperature sensor | The appliance switches off automatically after 10 seconds. Switch the appliance on again.Contact the hotline if the problem persists. |
| Rapid alternate flashing of the displays: | Problem with brewing unit drive | The appliance switches off automatically after 10 seconds. Switch the appliance on again.Contact the hotline if the problem persists. |
| Rapid alternate flashing of the displays: | Brewing unit is not inserted. | Insert and lock the brewing unit. |
| The display flashes rapidly without having been activated: | Appliance is not fully vented. | Vent the appliance, press any button to do this.Clean the brewing unit (see section 7.2, page 26). |
Sommaire
and Electronic Equipment).
Electronic Equipment).
6.3 Stille inn spying
Apparatet gjennomforer en skylling nár du slár apparatet pá og av.
7.5 Program Rengjoring
Med rengjoringsprogrammet fjernes genvaerde bunnfall og kaffeoljerester. Programmet bo r utfores annihilver maned ellr nar apparatet ber om det.
Electronic Equipment).
4.4 OuNTka PoiDoHa JIa c6opa KaIeIb N EMcKoCTN JIA KOΦeHOrO XMbIXa
Fopnt uHnKaTOp IoDDOn dJra c6opa Kanenb.
Iocne 3aadHOrO KOInuecTb npiroToBHeHn aannapat nonpocnt Bac onOpOxHNt bIOdoH dIy c6opa Kaenb IEMKoCTb dIy KoFeHoro JkMbIXa. Kpome TOrO, BbICTyaUoN IOJIbaOK NOKaXket Bam, KOrDa ppiuNIO BpeM OOnopXHNb IOdoH dIy c6opa Kaenb.
I3meHnHa KpeNoctb Kofo6yJeT IcnoB3OBAtBcTaKaJKe IJIa CNeDyUOnX npOceCCOB pnproTOBHeHn.
BbMOKeTe N3MeHnTb KOJIyEcTBo HAnITKa, NOBepHyB peYJrTOp «KoJIyEcTBO KoΦe».
5.3 Hac tropona TohKoCTn NOMOJa
ToHKoCTb NOMOJa KOfoeHbIX 3epeh BnIureT Ha BKyc Kofoe. Yem MeIbye yCTaHOBneHa CTeIeHb NOMOJa, TEM Kpenue Kofoe.
Annapat nocTaBJIaTc s npdeUcTaHOBLeHHO ONTmAbIbHOH NaCTPOKO ToHKoCTN NOMOJa. IV3MeHeHne HaCTPOKn TOHKoCTN NOMOJa peKOMeHdyETc BbINOJHrTb CaMOe paHee npImepHO nocle npriroTOBHeHn 100 yawek KoFe (npimepHo uepe3 1 Mecau, B 3aBNCIMoCTn OT nOTpe6JeHn KaFe).
C nomoubpo bpyara «PerynipoBka CTepeH NOMOla» MOXHO ONTImaJIbHO HAcTPOINb TOHKOCTb NOMOJa. TOHKOCTb NOMOJa CJeDyEt HaCTpaINBaTb TOnbKO BO Bpemr Ipocecca pa3MOJa.

PpeynpexkdenHe! He yctaHaBnBaIte CInuKOM 6oJIbSyU TOHKOCTb NOMOJa. Ppi3NaK ONtMaJbHOJ HAcTPOiKN ToHKOCTN NOMOJa — paBHomepHoe NOCTyIeHne KOFe I3 BbIpyCKHOrO OTBepCTNu I NOnyuHHeJe IeRKOTo RcTOrO Kpema.
6 OchOBhble HaCTpOJKN
OchOBhIe HAcTpoKm MoXHO HaHTn B CepBuchOM pexkume 1. INdnKauna KOnuYeCTBa KoFeHbIX 3epeH CmMBoln3npyeT o6 yCTaHOBJIeHHOM 3NaueHnn.
6.1 HacrtpoBKn BpeMeHn OTKJIUOyeHn
Ecnn annapat He nCnoIb3yeTcB TeueHne dInTeIbHoro BpeMeHn, ChauJa OH nepeXoJNT B pexm 3HePrc6epeKehn. 3aTe m annapat NIOHOCTbO BVIKIouaETcR.
Korda annapaT haoonTCB pexnme 3heproc6epekeHna, Bbl MoKeTe pa36yDntb erO, KOPOTKO Haxkab Ha IIO6yIO KHONKy.
- HaxmTe u ydepKuBaIte KHOpKy «Boa/cepBnC» HaxaToB TceHne 6oJee 2 cekynd.
- 2x HeckoJIbKO pa3 HaJIMTe KHOJKy «Boa/cepBnC», NOKa He 3aROpNTcY INdNkAToP 2x.
- Heckolbko pa3 haxmite KhoNky «KpenocTb KoΦe», noka He 6yndeT HacTpOeHO Tpe6yeMoE Bpemr.
- YTo6bI coXpaHnTb HaCTpoKn I BbIITN 3c cepBnCHOrO peKIma, HAnKMnTe N ydepXnBaIte KHOIpKy «BoJa/cepBnC» B TeueHne 6oJee 2 cekyHd.
HaKMMte IIO6yIO KHOKNKy pnpiroTOB- neHnry, yTO6bI BbIITN n3 cepBcHORO pexima 6e3 coXpaHeHHaCTpoEK.
He KpeHnTe He3aKpeHnEHHbIe DeTaII NKeIkoN UIn yNaKOBoUHOJ LeHToI, NocKoIbKy OCTaTKN KJIe TpydHO ydaIITb.
Waste Electrical and Electronic Equipment, WEEE).
Elektros jrenginiai negali buti salinami su buitinemis atliekomis. Irengio atliekas tvarky kite tausodami aplinkar perduokite jas tinkamatlieku surinkimo punkta.
Division Household Products
Ringstr. 99
D-32427 Minden
Germany
www.melitta.de
Editorial department:
ZINDEL AG
www.zindel.de
- For your safety
- Proper use
- Children
- Appliance at a glance
- "On/Off" button
- Service modes
- Calling up service mode
- Ending service mode
- First steps
- Unpacking the appliance
- Included in delivery
- Setting up the appliance
- Connecting the appliance
- Switching on the appliance for the first time
- Preparing to make beverages
- Filling with tap water
- Filling with coffee beans
- Using milk
- Emptying the drip tray and coffee grounds container
- Preparing beverages
- Preparing two beverages simultaneously
- Changing settings
- Setting the grinding fineness
- Basic settings
- Setting switch-off time
- Setting the water hardness
- Setting switch-off rinsing
- Setting the brewing temperature
- Care and maintenance
- Cleaning surfaces
- Cleaning the brewing unit
- Cleaning milk system
- Cleaning the milk unit
- Cleaning program
- Descaling program
- Water filter
- Removing the water filter
- Factory settings
- Drying out
- Transport
- Disposal
- Technical data
- Troubleshooting
- Sommaire
- Stille inn spying
- Program Rengjoring
- OuNTka PoiDoHa JIa c6opa KaIeIb N EMcKoCTN JIA KOΦeHOrO XMbIXa
- Hac tropona TohKoCTn NOMOJa
- OchOBhble HaCTpOJKN
- HacrtpoBKn BpeMeHn OTKJIUOyeHn
Brand : MELITTA
Model : NC
Category : Grinder