HF201H - Aspirateur HOOVER - Free user manual and instructions
Find the device manual for free HF201H HOOVER in PDF.
Download the instructions for your Aspirateur in PDF format for free! Find your manual HF201H - HOOVER and take your electronic device back in hand. On this page are published all the documents necessary for the use of your device. HF201H by HOOVER.
USER MANUAL HF201H HOOVER
D E F G H J K L I M N S * Dependant on your model.
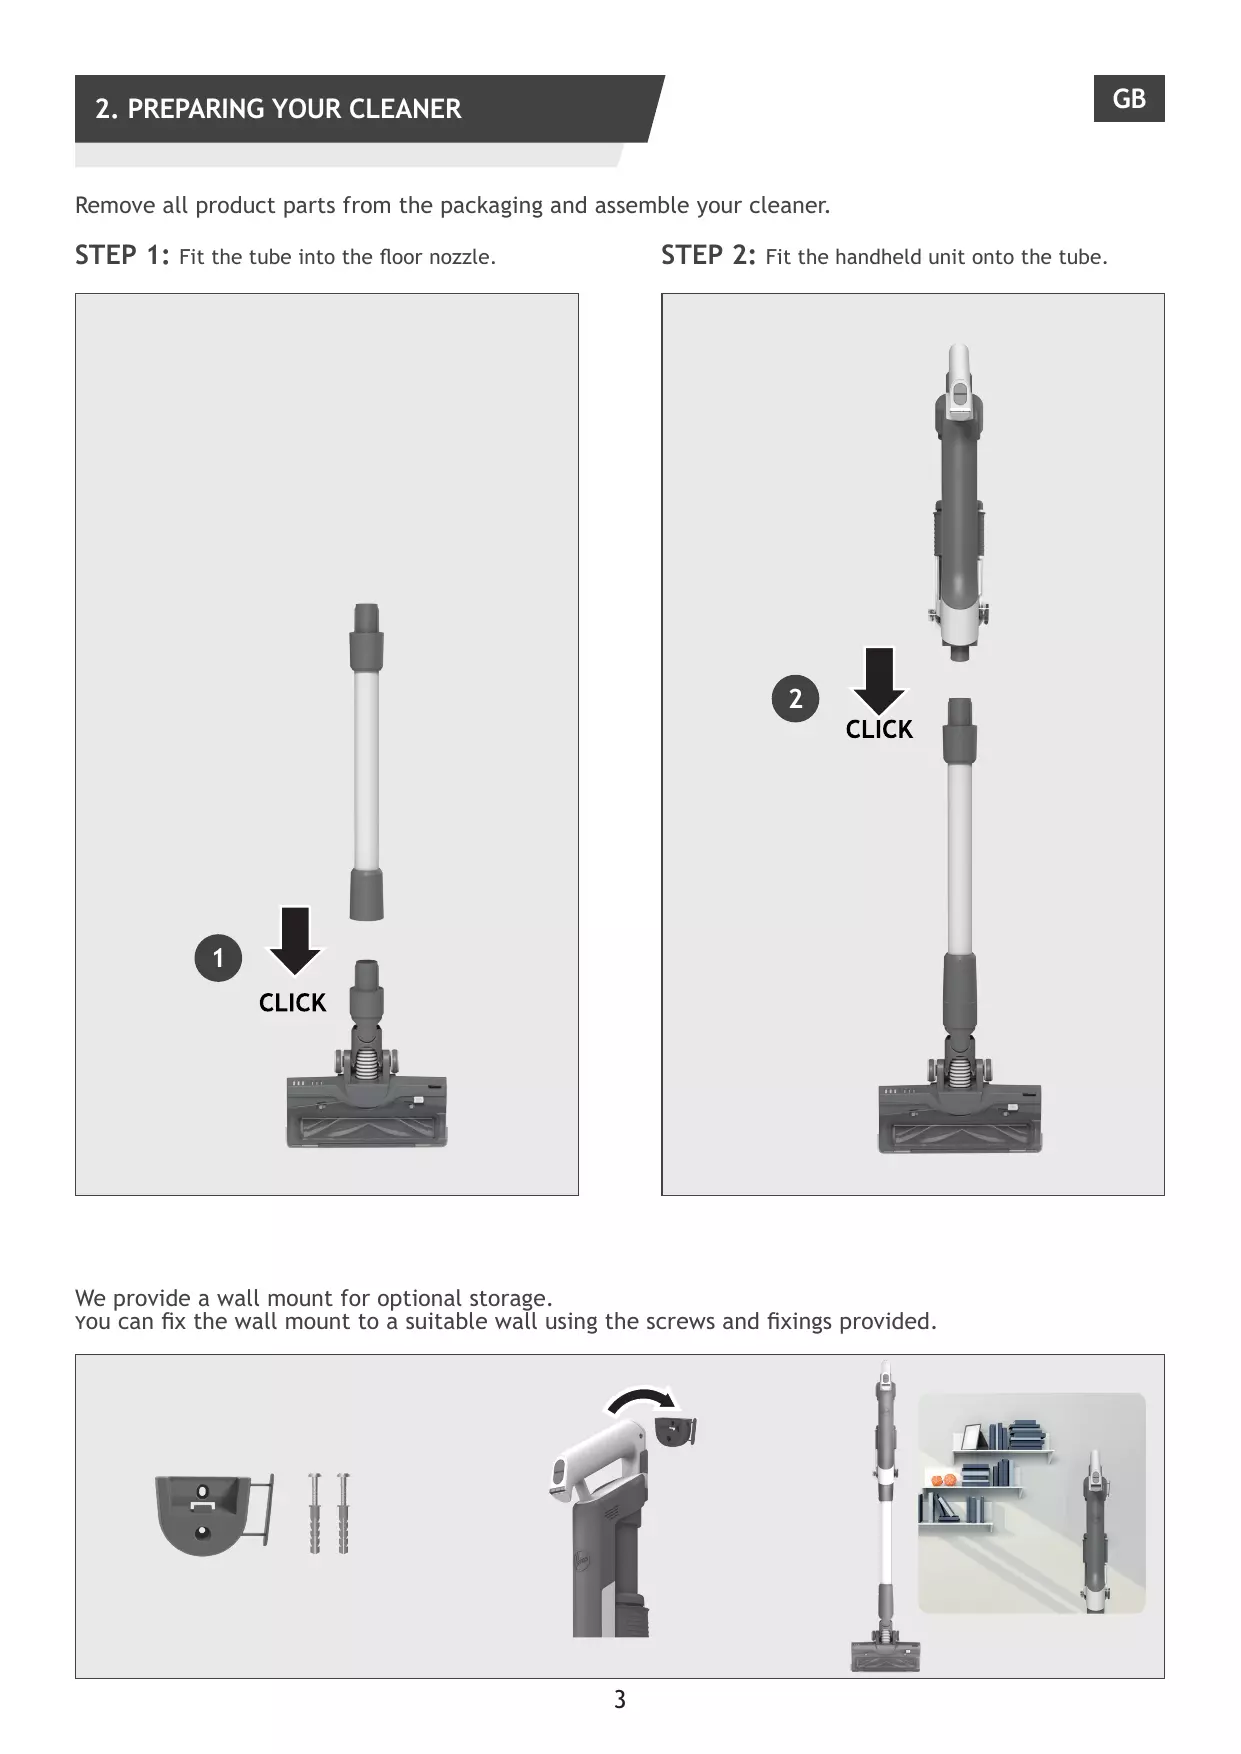
2. PREPARING YOUR CLEANER Remove all product parts from the packaging and assemble your cleaner.
Fit the tube into the floor nozzle.
Fit the handheld unit onto the tube.
We provide a wall mount for optional storage. you can fix the wall mount to a suitable wall using the screws and fixings provided.
3. CHARGING THE BATTERY The battery of your product does not come fully charged. Before first use, please charge your product completely. lt takes around 4 hours.
You can charge your product in three different conditions, and the Battery status will be indicated on the LED DISPLAY. 1. With the product fully assembled in stick mode or located in the wall mount. 2. With the product In the handheld mode. 3. With the battery removed from the product.
When using your product, the real time charge level of your battery is indicated on the Battery Status LED located on the handheld.
TURBO ECO When the remaining run time is finishing, the LED display icons will begin to blink white. It is recommend you switch off your product and recharge the battery.
4. USING YOUR CLEANER There are 3 different working modes for your cleaner: 1. Stick mode. 2. Above Floor mode. 3. Handheld mode.
4.1 STICK MODE To use your product in Stick Mode: Press the ON/OFF button to begin cleaning,the default mode is STANDARD. Press the Power Mode Button to shift the working mode between Turbo/ECO/Standard. NOTE: The nozzle LED lights are always on and the brushbar is always rotating. X 1
TURBO ECO TURBO ECO TURBO ECO TURBO ECO TURBO ECO TURBO ECO STD MODE TURBO ECO TURBO ECO TURBO MODE X 1
TURBO ECO TURBO TURBO ECO ECO ECO MODE TURBO ECO TURBO ECO TURBO ECO STD MODE If you require a deeper clean when using your product in Stick Mode, press the Power Mode Button once to enter TURBO mode. The Power Mode icon will illuminate white on the LED display to confirm your selection. Please note this will reduce your battery runtime. If you require a lighter clean when using your product in Stick Mode, press the Power Mode Button two times to enter ECO Mode. The Power Mode icon will illuminate green to confirm your selection. Press again the Power Mode Button to go back to Standard Mode. The Power Mode icon will turn off to confirm your selection.
4.2 ABOVE FLOOR / HANDHELD MODE To use your product in Above Floor mode: 1. Detach the Nozzle from the tube by pressing the Nozzle Release Button. 2. Fit your desired accessory to the end of the Tube, all of your available accessories will fit onto the end of the Tube. 3. Press the ON/OFF Button to start cleaning.
To use your product in Handheld mode: 1. Detach the Tube from the handheld unit by pressing the Tube Release Button. 2. Fit your desired accessory to the end of the handheld unit, all of your available accessories will fit onto the end of the handheld unit. You also can use the Integrated Crevice tool. 3. Press the ON/OFF button to start cleaning.
4.2 ABOVE FLOOR / HANDHELD MODE Control settings:
Press the ON/OFF button to begin cleaning, the default mode is STANDARD. Press the Power Mode Button to shift the working mode between Turbo/ECO/Standard. If you require a deeper clean, press the Power Mode Button once to enter TURBO Mode. The Power Mode icon will illuminate white on the LED display to confirm your selection. Please note this will reduce your battery runtime. If you require a lighter clean, press the Power Mode Button two times to enter ECO Mode. The Power Mode icon will illuminate green to confirm your selection. Press again the Power Mode Button to go back to Standard Mode. The Power Mode icon will turn off to confirm your selection. X 1
TURBO ECO TURBO ECO TURBO ECO TURBO ECO TURBO ECO TURBO ECO TURBO ECO TURBO ECO X 1
TURBO ECO TURBO TURBO ECO ECO TURBO ECO TURBO ECO
5. CLEANER MAINTENANCE 5.1 ULTRA COMPACT X3: DUST COMPACTION FUNCTION You can compress the debris in the DUST BIN to increase the debris capacity of the DUST BIN. Move the slider upwards then downwards to perform dust compaction function.
5. CLEANER MAINTENANCE 5.2 EMPTYING THE DUST BIN When the debris in your dust bin reaches the max fill line, empty your bin. 1. Switch off your product. 2. Press the Tube Release Button and to detach the Tube from handheld. 3. Hold the handheld over a Dust Bin and press the Dust Bin Empty Release Button to open the flap and release the debris into the trash. 4. Hold the Dust Bin ULTRA COMPACT X3 Slider and move it upwards and downwards to remove any residual dirt. 5. Close the Bin Flap. 6. Check that the Dust Bin ULTRA COMPACT X3 Slider is back into its original position.
5. CLEANER MAINTENANCE 5.3 CLEANING THE FILTER AND THE BIN IMPORTANT: for optimum performance, we recommend to wash the filters after every 5 bin empties. 1. Ensure your product is switched off. 2. Hold the Dust Bin ULTRA COMPACT X3 Slider and pull it upwards. 3. Press the Dust Bin Empty Release Button to open the Bin Flap. 4. Rotate the Filter anti-clockwise. 5. Remove the Filter from the handheld unit. Note: Remove any excess debris from the Filter. 6. Press the Dust Bin Removal Lever to release the bin moving it downwards. 7. Remove the bin from the main unit sliding it downwards. 8. Check for any residual dust or debris on the main unit. 9. Wash the filter and the bin using lukewarm water. 10. Leave them to dry for 24hrs before refitting to your product. 11. Refit the bin onto the main unit. 12. Attach the bin sliding it upwards on the main unit until you hear a “click” sound. 13. Insert the filter back into position and rotate it clockwise until you hear a “click” sound. 14. Close the bin flap. 15. Hold the Dust Bin Ultra Compact x3 Slider and move it downwards into its original position.
5.4 CLEAN FLOOR NOZZLE GB Thanks to ANTI-TWIST, your Hoover vacuum features an integrated comb which radically reduces hair wrapping around the brushbar. However, if your cleaner is not picking up efficiently your brushbar may need to be cleaned. 1. Ensure your product is switched off. 2. Slide the nozzle brushbar release slider and open the nozzle window. 3. Using the brushbar release latch, remove the brushbar from the nozzle. 4. Check for and remove any large debris from inside the nozzle. Carefully check for and remove any tangled debris from the comb. 5. Remove any excess debris from the brushbar. 6. Refit the brushbar to the nozzle ensuring the latch is fully in place. The brush bar can only fit in one direction. Press the end slightly to make sure the brush bar is in place. 7. Close the window by pressing gently on the middle area until you hear it “click” into place. Check the window is completely locked by pressing on both sides. IMPORTANT: Ensure the window is fully closed. If the nozzle window is not correctly reassembled,the nozzle LED lights will flash and the brushbar status light will turn red.
5. CLEANER MAINTENANCE 5.5 CLEAN MINI POWER NOZZLE 1. Ensure your product is switched off. 2. Detach the mini-power nozzle from your product. 3. To remove the brushbar, unlock the release latch with a coin. 4. Using scissors, remove any tangled fibres or debris from the Brushbar. 5. Look inside the nozzle and remove any debris. 6. Re-fit the brushbar, push and lock the release latch with a coin.
* Dependant on your model.
5. CLEANER MAINTENANCE
5.6 BLOCKAGES GB If your product is still working but has low or no suction, your product may have a blockage. A red steady light may appear on the battery status led bar. Carry out all maintenance instructions included in sections, 5.1,5.2,5.3,5.4,5.5. The following additional areas of your product should also be checked for any debris or blockages: 1. 2. 3. 4. 5. 6. 7.
Ensure your product is switched off. Detach the nozzle, tube and handheld unit as per previous instructions. Visually check the handheld inlets for any debris or obstructions and clean it. Visually inspect the nozzle joints area for any debris or obstructions and clean it. Remove the Brushbar and check the nozzle inlet area for any debris or obstructions and clean it. Visually check both ends of the tube and remove any debris or obstructions. Re-Assemble your product.
6. TROUBLE SHOOTING The following is a list of commonly encountered problems and solutions. A. Cleaner does not switch on. Check if the cleaner is charged. Check if the battery pack is assembled in place. Check if the filter is assembled in place. Check if the dust bin is assembled in place. B. If a red flashing light appears on the battery status LED bar. Check if the battery is assembled correctly. Check if the Dust Bin ULTRA COMPACT X3 slider is the correct position. Check if the filter is assembled correctly.
C. Cleaner stop working. Check if there is an obstruction in air inlet or in the tube, clear it and ensure the product is OFF. Once this is done simply press the on/off button, the product will start working again. D. The All Floor Nozzle status LED light goes off and the warning symbol on Hand-Held LED is RED. There is a blockage in the nozzle or an obstruction to the brushbar or the nozzle window is not properly located. Ensure your product is switched OFF and remove any debris or obstruction and following cleaner maintenance 5.4. E. Batteries cannot be charged. This may be a result of very long storage periods (over half year). Contact Hoover customer service to arrange battery replacement. If the problem persists, contact the Hoover customer service center. If there is any doubt call the Hoover Service Office for advice. They may be able to assist you over the telephone. A service charge will be made if the cleaner is examined and found to be in working order, has not been assembled in accordance with these instructions or has been used incorrectly.
7. IMPORTANT INFORMATION Hoover Spares and Consumables Always replace parts with genuine Hoover spares. These are available from your local Hoover dealer or direct from Hoover. When ordering parts always quote your model number. Quality Hoover’s factories have been independently assessed for quality. Our products are made using a quality system which meets the requirements of ISO 9001. Your Guarantee The guarantee conditions for this appliance are as defined by our representative in the country in which it is sold. Details regarding these conditions can be obtained from the dealer from whom the appliance was purchased. The bill of sale or receipt must be produced when making any claim under the terms of this guarantee. Subject to change without notice.
D E F G H J K L I M N T 11
D E F G H J K L I M N T 20
D E F G H J K L I M N T 29
D E F G H J K L I M N T 38
D E F G H J K L I M N T 56
D E F G H J K L I M N T 65
D E F G H J K L I M N T 74
D E F G H J K L I M N T 83
D E F G H J K L I M N T 101
D E F G H J K L I M N T 110
D E F G H J K L I M N T 119
D E F G H J K L I M N T 128
D E F G H J K L I M N T 137
D G H J K L I M N O R P Q X W V U T 163
S * يعتمد على طراز المنتج.
EC 2019/1782 Manufacturer Name Manufacturer Address Model
Dongguan Guanjin Electronics Technology Co., Ltd. Block 16 Qiantou New industrial Park, Niushan, DongchengDistrict,Dongguan City,Guangdong Province, China
K12B176070B/K12B176070G Input Voltage
17.6V DC Output Current Output Power Average Active Efficiency Efficiency at load 10% No-Load Power Consumption
0.7 A 12.3 W 83.1% 79.0%