
DBB4651M - Built-in oven AEG - Free user manual and instructions
Find the device manual for free DBB4651M AEG in PDF.

| Product type | Built-in hood |
| Brand | AEG |
| Model | DBB4651M |
| Lighting | Integrated LED, separate control |
| Fan speeds | 3 speeds (1, 2, 3) |
| Control | Mechanical push buttons |
| Filter type | Dishwasher-safe metal grease filter, non-washable charcoal filter |
| Grease filter cleaning frequency | Monthly |
| Charcoal filter replacement frequency | Every 4 to 6 months depending on usage |
| Bulb replacement | By a technician (LED bulb not user-replaceable) |
| Material | Stainless steel (estimated) |
| Installation | Built-in, see installation manual |
| Power supply | 220-240 V ~ 50 Hz (estimated) |
| Energy consumption | Not specified |
| Noise level | Not specified |
| Warranty | 2 years (estimated) |
Frequently Asked Questions - DBB4651M AEG
User questions about DBB4651M AEG
0 question about this device. Answer the ones you know or ask your own.
Ask a new question about this device
Download the instructions for your Built-in oven in PDF format for free! Find your manual DBB4651M - AEG and take your electronic device back in hand. On this page are published all the documents necessary for the use of your device. DBB4651M by AEG.
USER MANUAL DBB4651M AEG
OBCLNYKBAHE HA KJINEHTN
BnHa n3no3BaIte opunHAnHn pe3epBn qactn.
Korato ce cBbP3BaTe c Hauin OToPn3IpaH OTJeI,ObcnykBaHe",Tpr6Ba da Imate npD pKa cIeHaTa HOpMaun: MoJeI, PNC, cepneH Homep.
HΦopMaunra MoKe Da 6bJe OTKpuTa Ha Ta6JIkata C OCHOBn DaHHN
I IpeDynpexdEHNe/BHmHaHne-INHΦopMaζηa 3a6e3oNaCHOCT
① O67a INHΦopMaζηι ΜcBbETn
IHHΦopMaçnla 3a OKOJHaTa cpeJa
3ana3bame cn npabOTo Ha n3MeHeHn.
1. ИнфОРМАЦЯ 3A БЕЗПACHОТИ MOHTAZK

BHIMAHNE!
BnKTe OTeJIHaTa 6poWya
CNHCTpyKcMn3a
INCTaJIpaHe 3a
HOpmaa3a
6e30nachOCT N MOHTaK.
PpoheTeBHHMaTeHNo
TJIaBInTe 3a 6e3OnaCHOCT
PpeDn BcKa ynoTpe6a nn
IoIaJbXkaHa ypea.
2.ОПИСАНЕHAУРEDA
2.1 Перлед на Контropolnia наец
3. BCEKNДHEBHA YNOTPEBA
3.1ИЗнолзВан e a6cop6aTopa
PpOBepTe npenOpbUHTeHnHaTcCKoPoCT B cBoTBETCBnC TaBnucTaNo-DoNy.
Kulfilteret kan/DDKE VASKES!
i i 15 5eTTa eT a to yaeipepa.
- Av xpeiaaTei, aAaTe Tnu Taxutnta TiEgovTcTo Etnuunto koupiTi.
Tia va xeiipioTeite ToV atoppoqntipa:
Thank you for choosing this AEG product. We have created it to give you impeccable performance for many years, with innovative technologies that help make life simpler – features you might not find on ordinary appliances. Please spend a few minutes reading to get the very best from it.
Visit our website to:

Get usage advice, brochures, trouble shooter, service and repair information: www.aeg.com/support

Register your product for better service: www.registeraeg.com

Buy Accessories, Consumables and Original spare parts for your appliance: www.aeg.com/shop
CUSTOMER CARE AND SERVICE
Always use original spare parts.
When contacting our Authorised Service Centre, ensure that you have the following data available: Model, PNC, Serial Number.
The information can be found on the rating plate.
Warning / Caution-Safety information
① General information and tips
Environmental information
Subject to change without notice.
1. SAFETY INFORMATION AND INSTALLATION

WARNING!
Refer to the separate Installation Instructions booklet for Safety Information and Installation. Read carefully the Safety chapters before any use or maintenance of the appliance.
2. PRODUCT DESCRIPTION
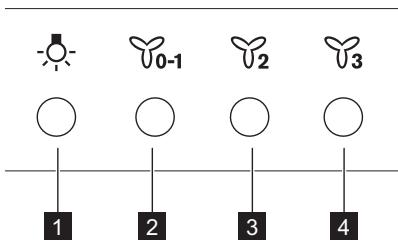
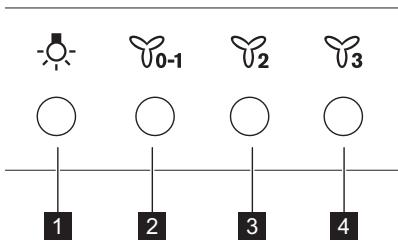
2.1 Control panel overview

| Function | Description | |
| 1 | Lamp | Turns the lights on and off. |
| 2 | First speed / Off | The motor switches to first speed level. Second press turns off the appliance. |
| 3 | Second speed | The motor switches to second speed level. |
| 4 | Third speed | The motor switches to third speed level. |
3. DAILY USE
3.1 Using the hood
Check the recommended speed according to the table below.
| ♀0-1 | While heating up food, cooking with covered pots. |
| ♀2 | While cooking with covered pots on multiple cooking zones or burners, gentle frying. |
| ♀3 | While boiling and frying big quantities of food without a lid, cooking on multi-ple cooking zones or burners. |
It is recommended to leave the hood operating for approximately 15 minutes after cooking.
To operate the hood:
- Press the first speed button to switch on the appliance.
- If needed, change the speed by pressing the desired button.
The hoods light works independently to other hood functions. To illuminate the cooking surface press the light button.
To turn off the appliance press the first speed button 0 - 1 again.
4. CARE AND CLEANING
4.1 Notes on cleaning
| Cleaning Agents | Do not use abrasive detergents and brushes. Clean the surface of the appliance with a soft cloth with warm water and a mild detergent. |
| After cooking some parts of appliance can get hot. To avoid stains appliance must be cooled down and dried with clean cloth or paper towels. | |
| Clean stains with a mild detergent. | |
| Keep the hood clean | Clean the appliance and grease filters each month. Clean the interior and grease filters carefully from fat. Fat accumulation or other residue may cause fire. |
| Grease filters can be washed in a dishwasher. The dishwasher must be set to a low temperature and a short cycle. The grease filter may discolour, it has no influence on the performance of the appliance. | |
| Charcoal filter | The time of saturation of the charcoal filter varies depending on the type of cooking and the regularity of cleaning the grease filter. The activated charcoal filter is not washable, cannot be regenerated and must be replaced approximately every 4/6 months of operation, or more frequently for particularly heavy usage. |
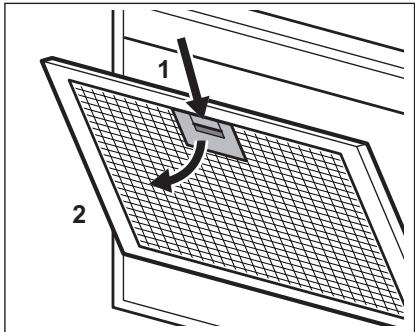
4.2 Cleaning the grease filter
Filters are mounted with the use of clips and pins on the opposite side.
To clean the filter:
- Press the handle of the mounting clip on the filter panel underneath the hood.
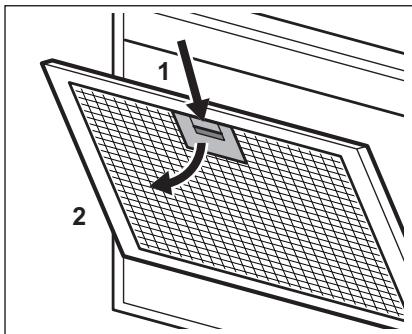
- Slightly tilt the front of the filter downwards, then pull.
Repeat the first two steps for all filters.
- Clean the filters using a sponge with non abrasive detergents or in a dishwasher.

The dishwasher must be set to a low temperature and a short cycle. The grease filter may discolour, it has no influence on the performance of the appliance.
- To mount the filters back follow the first two steps in reverse order.
Repeat the steps for all filters if applicable.
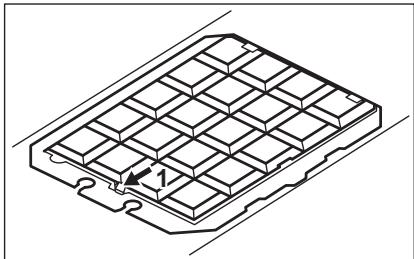
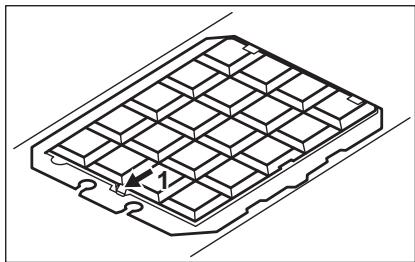
4.3 Replacing the charcoal filter

WARNING!
The charcoal filter is non-washable!
To replace the filter:
- Remove the grease filters from the appliance.
Refer to "Cleaning the grease filter" in this chapter. - press the tab (1) and slightly tilt the front of the filter.
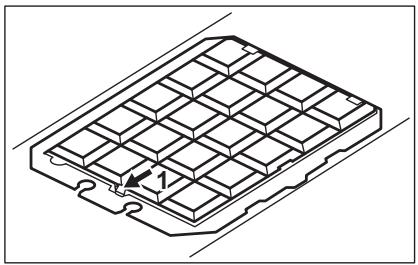
- To install a new filter, perform the same steps in reverse order. In any case, it is necessary to replace the filters at least every four months.
4.4 Replacing the lamp
This appliance is supplied with a LED lamp. This part can be replaced by a technician only. In case of any malfunction refer to "Service" in the "Safety Instructions" chapter.
5. ENVIRONMENTAL CONCERNS
Recycle materials with the symbol . Put the packaging in relevant containers to recycle it. Help protect the environment and human health by recycling waste of electrical and electronic appliances. Do not dispose of
appliances marked with the symbol with the household waste. Return the product to your local recycling facility or contact your municipal office.
CONTENIDO
- INDICACIONES DE SEGURIDAD E INSTALLACION 28
2.DESCRIPTION DEL PRODUCTO 29
3.USO DIARIO 29 - MANTENIMIENTO Y LIMPIEZA 30
- ASPECTOS MEDIOAMBIENTALES 31
4.3 Söeffltr vahetamine

HOIATUS!
Söefilter ei ole pestav!
3. SVAKODNEVNA UPORABA
3.1 Uporaba nape
Provjerite preparučenu brzinu prema tablici u nastavku.
| ♀0-1 | Prilikom zagrijavanja hrane, kuhanja sPokrivenim posudama. |
| ♀2 | Prilikom kuhanja sPokrivenim posudama na više zona kuhanja ili plamenika, lagano prženje. |
| ♀3 | Prilikom ključanja i prženja velikih količina hrane bezPoklopca, kuhanja na više zona kuhanja ili plamenika. |

Preporuca se ostaviti napu da radioko 15 minuta nakon kuhanja.
Za upravljanje napom:
TYTbIHUbIAPFA KOJIaY JXHE KbI3MET KOPCETY
Opkaaan TynHcyckaJIbK Kocakbl 6eJIweKTepei naJaIaIbIbI3.
ÖkiNETI Kbl3MET Kepcety opTaNbIFbIMbl3fa xa6apnackaHa, MbHa depeKTePiH 6OlybIH kAMTaMaCb13 etiH3: Ynri, PNC, cepraJIbIK hemip.
ByaiknapatbI TexHnKaIbIK depeKTeP TaKtaiWacBHaH Ta6yfa 6oJabl.
EckepTy/caKtbik-Kayinci3dk Typanbl aknapaT
①Жань aknapaT пон Кесстep
Kopwaah opTa typaIbI aknapaT
Ehnpuyi eceptyci3 e3repic hri3y KykbfbHaHe.
1. KAYINCI3IJKKE JXHE OPHATYFA APHAJFAH AKIAPAT

ECKEPTY!
Kayinci3ikke XeHe opHaTyFa
KaTbICTblaknapaTk
aphanfah KITanwadaH
Kayinci3 opHaTy TypaJIbI
HYCKayIbIKTbI KapaHbI3.
KypbIINfbIhbnaiDanaHny
Hemece OFaH KbI3MeT
KepceTy aIdbIHda
Kayinci3ik TypaJIbI
TapayapdbIMyKmTOKbI
UbIFbHb3.
2.БУньIM CINПATTAMACbl
2.1 Baçapy nahanelihe sojy
4.2 Ma'c y3ricin Ta3aJay
Cy3rIePepi opHaTy yuH KApama-Kapcbi KaTapbIHda KbICbIUtap MeH KaDaybIUtap naJaIaNbIJFaH.
Cy3rhi ra3aJay yuiH:
- Aya tapTkbl KypaIbIH actbIaFbI cy3ri naHeniIderi 6eKity KbICblBbIbIHbIH YCTaFbIWBH 6acblbI3.
- Cy3rHih aIbHfbl XaFbIH TEmeH Kapaa a3dan eKneTih3, cOaH KeiH TapTbHb3.
BapnbC cy3rinep ysiH anFaikbEki KaamdbkKaTanaHb3.
- Cy3rinepiKemipriuEmecXyfbi3aTtapdbI KOJdaHbIN XeKemeHHeMece bIDIC XyfbiIM MaUNHaTa3aJalaHbI3.

blblicyfblmMaunHada
TMeH TeMnepaTypaHbI
KHe KbICKa zkKnDi opHaTy
Kepe.KMa cy3ricinH tyci
e3repyi MyMKIn,6yI
KpyblFbIHbHxMyBIC
icteyihe acep etnei.
- Cy3rihi KaIta opHbHa KOIO yUiH anFaWKbI eKI KaDAmDbI KepicIHwe opbIHdaHbI3.
KaKet 6oJca, 6apIbIK cy3rInep yUiH Kaamdapbl KaItanaHbI3.
4.3 Kemip cy3ricih aybictbipy

ECKEPTY!
Kemip cy3ricin Jyyf a60maiDbI!
Cy3rhi aybictbyyih:
- Mai cy3rinepiH KypblfbldaH WbIfapbln aIbHbI3.
OcbI tapaydaIbI «MaI cy3rinepiH Ta3anay» 6eNIMiH kappaHbI3. - ictiKweHicabIn(1), cy3riHH aIdbIHfblXaFbH a3dan eHKeTiiH3.
- KaHa cy3rHi opHAty yuHn ocbl KaamdapdbI kepiHne opbHnDaHb13. Ke3-KeIReH JkaFdaJaCy3rIePdi KEm DeReHNe TepT aHcBIn aHyICTbipy KepeK.
4.4 WamdbiaayblicTbipy
Kypblfbl LED wambimeh xa6dbkTaNfaH.
Byn 6eNikTi texHKn fAna aybICTbpaDbI.
AkaynbIK opbIH aNFAH kafdaJa
"Kayinci3ik Hcckaynapbi" TapaybIHdFaBl
"KbImet Kepcety" 6eNIMiH kappaHbI3.
5. KOPSHAFAH OPTAFA KATbICTbl JAFDAJILAP
Benri caNbHfah MaTePnAldapbl KaTAteHDeydeH eTKi3yRe TaCbIpbHb3. Opam MaTePnAldapbH KaTAteHDeydeH eTKi3y YuWIn TNICTI KOHTeHepNepre caNbHb3. 3NeKTPnIK XHe 3JIeKTPoHnKaBk KypbIbnApDbH KaNbDfBbH KaTAteHDeydeH eTKi3y apKbIbI, KopShaFaH opTaFz KHe aAdAMhIH DeHCayNbIfbHa 3NbIH
KeTipeTIn JkaFdaaInapFa KON 6epMeyre
e3 yneciHizdi KocbIbI3.Benri
caJIbIHFaH KpyblIbIapDb TyPbIcTBIK
KaIbIbIKTapMeH 6ipre TactamaHbI3.
EHiMdi XepriniKTI KaIta eHdey
opTaIbIFbHa eTKi3iH3 Hemece XepriniKTI
MeKemere xa6apnacbIHbI3.
TURINYS
- SAUGOS INFORMACIJA IR IRENGIMAS 60
- GAMINIO APRAŠYMAS 61
- KASDIENIS NAUDOJIMAS 61
- VALYMAS IR PrieziURA 62
5.APLINKOS APSAUGA 63
PUIKIEMs REZULTATAMS
3.1 IcnoJb3ObaHne BbITaXkN
PekomEnDoBaHHbe 3NaueHnA cKOpOCTn npBVeHebI B Ta6JIuCe HnKe.
KOPINCHNUCHA NOIDPSKA IN CEPBNC
YBeK KopnCTnte opnHaJIne pe3epBHe JeIOBe.
Kaanda konthaktnape OBnaawehn cepBucn ceHTap,BoDnte paUHa da kOd ce6e Imate cneedehe noaTke:Moden,6poj npOn3bOda,cepnjckn 6poj.
IopauMoryda cape npohayHa nlouyncaTexnukimKapaktepcntkama.
Uno3opehe/Oppe3- nHΦopMaunje o 6e36dNHOCTn
① OnuTe INHΦopMaζηje n cabetn
HΦopMaunje O XJNBOHTHOJ cpeINH
3aDpkaHO npabo NImeha.
1. INHΦOPMAUJIJE O BE3BEdHOCTN INHCTAJAUJN

YNO3OPEHbE!
PonjeaTe 3ace6Hy
4. HERA N YN WHTHeB E
4.1 Hanomehe y Be3n ca uhihHeBem
reparationsinformation:
www.aeg.com/support
registrar din produit for bättre service:
www.registeraeg.com


3.1 KopncTyBaHHB BNTXKoH
IpebeipTe pekomeHdoBaHy WbNdkicTb BiINOiHO do TaBnCi HxKYe.
4.2 OuHcENHa XnpoBOro fInbTa
4.3 3aMiHa ByrɪJIbHOrO φɪNbTpa

PONEPEDEXEHH!
ByrilbHnI pIlbTp He moKHa mItn!
Lio6 3amHnT pInbTp:
- 3HIMITb JxipOBI fiNbTpN 3 npnpaNy. INB. nyHKT «OuHsEHHJ JxipOBOI OfJIbTpA» B cIbOMy po3dini.
- HATINCHITb Ha 3nUOK (1) i 3nerka HaxNIITb nepeDnH Yo actHy fInbTpa.
5. OXOPOHA IOBkIJIJIa
3daBaIte Ha nobToPhy nepepo6ky MaTepiAIn, no3HaueHi BiDnOBiDnHM CmBBOJOM BnKndaIte ynaKOBky B iDnOBiDiH KOnTeHepn IJaB BTOpHHoI CnpOBHN. DOnOMOxItb 3axNCTnTn HABKOLINHc cepeDobuIe Ta 3dOpOB'ay iHNX IIOdei 3a6e3neHTn BTOpHHy nepeo6ky eNEkTpnuHnx i eNEkTPOHHx
- Lio6 BCTaHOBUNHOBuΦiNbTp, NOBTOPIb Ti cami KPOKN B 3BOPOTOMy Noprky.
Y6yDb-RAKOMByBnnaIky Heo6xidno 3aMIHOBaTNIbTpNIHIMYM KoxHi cHTnpN MiCraJI.
4.4 3amɪha Jʌmɒn
Ppnaad noctaayetcbci 3cblnoioHOIamnoIO.LIO detanb moke 3amHOBATNIiue KBaIIipikOBAHn CneuaiaICT.YBnnaKky 6yNb-RAoi HecnpabHocTi3BepHITbc DO pOzdiNy CepBic rIaNBI《InCTpykuii 0oDo 6e3neKn
npnilaib. He BkndaTe npnila, n03haeHb iDnOBiHm CmBbONOM pa3OM 3 iHsIM DomaunHim CMITTjam. IobephiB npOyKT do 3abOy i3 BtOpHHoI nepepo6Kn y Bauii MicueBOcTi a6o 3BepHItbcrdo MiCebuX MyHicnapbHnx opraHIB Blaani.
jlll JldwI gJgJgJgJgJgJgJgJgJgJgJgJgJgJgJgJgJgJgJgJgJgJgJgJgJgJgJgJgJgJgJgJgJgJgJgJgJgJgJgJgJgJgJgJgJgJgJgJg
Jll 4.4
S y. LED 1 aJyI I i g q J
Jy J
Jy J
Jy J
Jy J
Jy J
Jy J
Jy J
Jy J
Jy J

glaal gai jj 3
aJll Jglal.5
p9 p9 20 g.8 s Jd jaiall aiaa all no 12c oJg c algiall agjll jaiall oJclg 11111111111111111
j00 j00 j00 j00 j00 j00 j00 j00 j00 j00 j00 j00 j00 j00 j00 j00 j00 j00 j00 j00 j00 j00 j00 j00 j00 j00 j00 j00 j00 j00 j00 j00 j00 j00 j
| . . . . . . . . . . . . . . . . . . . . . . . . . . . . . . . . . . . . . . . . . . . . . . . . . . . . . . . . . . . . . . . . . . . . . . . . . . . . . . . . . . . . . . . . . . . . . . . . . . . . .. . . . . . . . . . . . . . . . . . . . . . . . . . . . . . . . . . . . . . . . . . . . . . . . . . . . . . . . . . . . . . . . . . . . . . . . . . . . . . . . . . . . . . . . . . . . . . . . . . . . ? . . . . . . . . . . . . . . . . . . . . . . . . . . . . . . . . . . . . . . . . . . . . . . . . . . . . . . . . . . . . . . . . . . . . . . . . . . . . . . . . . . . . . . . . . . . . . . . . . . . - . . . . . . . . . . . . . . . . . . . . . . . . . . . . . . . . . . . . . . . . . . . . . . . . . . . . . . . . . . . . . . . . . . . . . . . . . . . . . . . . . . . . . . . . . . . . . . . . . . . - - - - - - - - - - - - - - - - - - - - - - - - - - - - - - - - - - - - - - - - - - - - - - - - - - - - - - - - - - - - - - - - - - - - - - - - - - - - - - - - - - - - - - - - - - - - - - - - - - - - - - . . . . . . . . . . . . . . . . . . . . . . . . . . . . . . . . . . . . . . . . . . . . . . . . . . . . . . . . . . . . . . . . . . . . . . . . . . . . . . . . . . . . . . . . . . . . . . . . . . . 2 3 4 5 6 7 8 9 10 11 12 13 14 15 16 17 18 19 20 21 22 23 24 25 26 27 28 29 30 31 32 33 34 35 36 37 38 39 40 41 42 43 44 45 46 47 48 49 50 51 52 53 54 55 56 57 58 59 60 61 62 63 64 65 66 67 68 69 70 71 72 73 74 75 76 77 78 79 80 81 82 83 84 85 86 87 88 89 90 91 92 93 94 95 96 97 98 99 100 101 102 103 104 105 106 107 108 109 110 111 112 113 114 115 116 117 118 119 120 121 122 123 124 125 126 127 128 129 130 131 132 133 134 135 136 137 138 139 140 141 142 143 144 145 146 147 148 149 150 151 152 153 154 155 156 157 158 159 160 161 162 163 164 165 166 167 168 169 170 171 172 173 174 175 176 177 178 179 180 181 182 183 184 185 186 187 188 189 190 191 192 193 194 195 196 197 198 199 200 201 202 203 204 205 206 207 208 209 210 211 212 213 214 215 216 217 218 219 220 221 222 223 224 225 226 227 228 229 230 231 232 233 234 235 236 237 238 239 240 241 242 243 244 245 246 247 248 249 250 251 252 253 254 255 256 257 258 259 260 261 262 263 264 265 266 267 268 269 270 271 272 273 274 275 276 277 278 279 280 281 282 283 284 285 286 287 288 289 290 291 292 293 294 295 296 297 298 299 300 301 302 303 304 305 306 307 308 309 310 311 312 313 314 315 316 317 318 319 320 321 322 323 324 325 326 327 328 329 330 331 332 333 334 335 336 337 338 339 340 341 342 343 344 345 346 347 348 349 350 351 352 353 354 355 356 357 358 359 360 361 362 363 364 365 366 367 368 369 370 371 372 373 374 375 376 377 378 379 380 381 382 383 384 385 386 387 388 389 390 391 392 393 394 395 396 397 398 399 400 401 402 403 404 405 406 407 408 409 410 411 412 413 414 415 416 417 418 419 420 421 422 423 424 425 426 427 428 429 430 431 432 433 434 435 436 437 438 439 440 441 442 443 444 445 446 447 448 449 450 451 452 453 454 455 456 457 458 459 460 461 462 463 464 465 466 467 468 469 470 471 472 473 474 475 476 477 478 479 480 481 482 483 484 485 486 487 488 489 490 491 492 493 494 495 496 497 498 499 500 501 502 503 504 505 506 507 508 509 510 511 512 513 514 515 516 517 518 519 520 521 522 523 524 525 526 527 528 529 530 531 532 533 534 535 536 537 538 539 540 541 542 543 544 545 546 547 548 549 550 551 552 553 554 555 556 557 558 559 560 561 562 563 564 565 566 567 568 569 570 571 572 573 574 575 576 577 578 579 580 581 582 583 584 585 586 587 588 589 590 591 592 593 594 595 596 597 598 599 600 601 602 603 604 605 606 607 608 609 610 611 612 613 614 615 616 617 618 619 620 621 622 623 624 625 626 627 628 629 630 631 632 633 634 635 636 637 638 639 640 641 642 643 644 645 646 647 648 649 650 651 652 653 654 655 656 657 658 659 660 661 662 663 664 665 666 667 668 669 670 671 672 673 674 675 676 677 678 679 680 681 682 683 684 685 686 687 688 689 690 691 692 693 694 695 696 697 698 699 690 691 692 693 694 695 696 697 698 699 690 691 692 693 694 695 696 697 698 699 690 691 692 693 600 601 602 603 604 605 606 607 608 609 610 611 612 613 614 615 616 617 618 619 620 621 622 623 625 626 627 628 629 630 631 632 633 634 635 636 637 638 639 640 641 642 643 644 645 646 647 648 645 646 647 648 649 650 651 652 653 654 655 656 657 658 659 660 661 662 663 664 665 666 667 668 667 668 669 670 671 672 673 674 675 676 677 678 679 680 681 682 683 684 685 686 687 688 689 690 692 693 694 695 696 697 698 699 700 701 702 703 704 705 706 707 708 709 710 711 712 713 714 715 716 717 718 719 720 721 722 723 724 725 726 727 728 729 730 731 732 733 734 735 736 737 738 739 740 741 742 743 744 745 746 747 748 749 750 751 752 753 754 755 756 757 758 759 760 761 762 763 764 765 766 767 768 769 770 771 772 773 774 775 776 777 778 779 780 781 782 783 784 785 786 787 788 789 790 791 792 793 794 795 796 797 798 799 800 801 802 803 804 805 806 807 808 809 810 811 812 813 814 815 816 817 818 819 820 821 822 823 824 825 826 827 828 829 830 831 832 833 834 835 836 837 838 839 840 841 842 843 844 845 846 847 848 849 850 851 852 853 854 855 856 857 858 859 860 861 862 863 864 865 866 867 868 869 870 871 872 873 874 875 876 877 878 879 880 881 882 883 884 885 886 887 888 889 890 891 892 893 894 895 896 897 898 899 890 891 892 893 894 895 896 897 898 899 890 891 892 893 894 895 896 897 898 899 890 891 892 893 800 801 802 803 804 805 806 807 808 809 810 811 812 813 814 815 816 817 818 819 820 821 822 823 825 826 827 828 829 830 831 832 833 834 835 836 837 838 839 840 841 842 843 844 845 846 847 848 845 846 847 848 849 850 851 852 853 854 855 856 857 858 859 860 861 862 863 864 865 866 867 868 865 866 867 868 869 870 871 872 873 874 875 876 877 878 879 880 881 882 883 884 885 886 887 888 885 886 887 888 889 890 891 892 893 894 895 896 897 898 899 800 801 802 803 804 805 806 807 808 809 810 811 812 813 814 815 816 817 818 819 820 821 822 823 B |
I
1
J
J
J
J
J
J
J
J
o 1d l d j 1i a o .AEG 1d J
-1JgWgWgWgWgWgWgWgWgWgWgWgWgWgWgWgWgWgWgWgWgWgWgWgWgWgWgWgWgWgWgWgWgWgWgWgWgWgWgWgWgWgWgWgWgWgWgWgWgWgWg
g 100000000000000000000000000000000000000000
aio olaawl jg> S aclj
j>1 j0 gJyI liqg o JyI glaa
aagaaag aalwaaagaaag. gjjll aaiyglg jia jie jao
:2x, ylg aIaI I log12og
www.aeg.com/support
jie jiaoi aovc ie Jgaoall jw
www.registeraeg.com
jglal aolll jglg bgsaIgwall gallg caxlall
www.aeg.com/shop


aIg sLaell
aIJIJIJIJIJIJIJIJIJIJIJIJIJIJIJIJIJIJIJIJIJIJIJIJIJIJIJIJIJIJIJIJIJIJIJIJIJIJIJIJIJIJIJIJIJIJIJIJIJIJIJIJIJIJIJIJIJIJIJIJIJIJIJIJIJIJIJIJIJIJIJIJIJIJIJIJIJIJIJIJIJIJIJIJIJIJIJIJIJIJIJIJIJIJIJIJIJIJIJIJIJ
Jullll PNC
a>gl 1c logleall oia j
a0dwl1og120-a/
aolo zilag og loglo ①
a 1oglo
jow jy aio
JgJlJnJLJLJLJLJL.1

J 1 J
JgJgJgJgJgJgJgJgJgJgJgJgJgJgJgJgJgJgJgJgJgJgJgJgJgJgJgJgJgJgJgJgJgJgJgJgJgJgJgJgJgJgJgJgJgJgJgJgJgJgJ g J g J g J g J g J g J g J g J g J g J g J g J g J g J g J g J g J g J g J g J g J g J g J g J g J g J g J g J g J g J g J g J g J g J g J g J g J g J g J g J g J g J g J g J g J g J g J g J g J g J g

C E