
MMB6176B - Blender BOSCH - Free user manual and instructions
Find the device manual for free MMB6176B BOSCH in PDF.

| Product type | Blender |
| Brand | BOSCH |
| Model | MMB6176B |
| Power | 700 W |
| Power supply | 220-240 V, 50-60 Hz |
| Blender bowl capacity | 1.5 L |
| Maximum capacity for hot liquids | 1000 ml |
| Capacity of the bottle (to-go) | 600 ml (estimated) |
| Main functions | Blend, chop, grind, emulsify, puree, make smoothies, sauces, sorbets, ice cream, crush ice |
| Included accessories | Blender bowl with EasyKlick blade assembly, lid with measuring cup, tamper, bottle with blade assembly, chopper/grinder attachment |
| Speeds | Variable (min, max) and Pulse function |
| Adjustable cord length | Yes, thanks to the storage compartment |
| Safety | Anti-tangle safety, overload protection, spill-proof protection for accessories |
| Cleaning | Blender bowl, lid, bottle, chopper/grinder attachment are dishwasher safe (max 60°C). Base unit wipe with a damp cloth. |
| Spare parts and repairability | Spare parts available via after-sales service for at least 7 years after market launch |
| Warranty | Contact after-sales service for conditions depending on the country |
Frequently Asked Questions - MMB6176B BOSCH
User questions about MMB6176B BOSCH
0 question about this device. Answer the ones you know or ask your own.
Ask a new question about this device
Download the instructions for your Blender in PDF format for free! Find your manual MMB6176B - BOSCH and take your electronic device back in hand. On this page are published all the documents necessary for the use of your device. MMB6176B by BOSCH.
USER MANUAL MMB6176B BOSCH
Register your new device on MyBosch now and get free benefits: bosch-home.com/ welcome

VitaPower Serie | 4
MMB617...
[de] Gebrauchsanleitung Standmixer 10
[en] Information for Use Blender 27
[fr] Manuel d'utilisation Blender 44
[It] Manuale utente Frullatore 62
[n] Gebruikershandleiding Mixer 79
[da] Betjeningsvejledning Blender 96
[no] Bruksanvising Blender 112
[sv] Bruksanvisning Blender 128
[fi] Käyttoohje Tehosekoitin 144
[es] Manual de usuario Batidora 161
[pt] Manual do utiliser Triturador 179
[el] Evyεipio xρηση Mπλεντερ 196
[tr] Kullanim kilavuzu Mikser 216
[pl] Instrukcja obslugi Mikser 234
[uk] KepiBnTBo 3 ekPnyataui CtaioHapn6neHdep 254
[ru] PynoBIOCTBOIpoNb3OBaTeH NkOep 272
[ar] 290

A

B

C

D

E

F

G

H
1

6

7
8

9
10


2
3
5

7
9
4
6
8
10
11

12

13
14

15
16
17

18
19
20
21


23

24
25

26
27

28
29
30

31
32
33
34
35
| MIN-MAX | 9 max | min 0 pulse | MIN-MAX | 1 | |||||
| 60% + 40% | 300-1300 200-500 | max | 45-90 s 45-90 s | ||||||
| 70% + 30% | 300-1300 200-500 | max | 45-90 s 45-90 s | ||||||
| 40% + 60% | 300-1000 200-600 | max | 45-120 s 45-90 s | * | |||||
| 60% + 40% | 300-1300 200-600 | max | 45-90 s 60-90 s | * | |||||
| 40% + 60% | 300-1500 200-600 | min | 20-30 s 20-30 s | ||||||
| <70 °C | X | X | 300-1000 | min | 30-60 s | ||||
| 60% + <50 °C | 300-1000 200-600 | max | 45-90 s 45-60 s | * | |||||
| + | 300-1300 | max | 45-90 s | ||||||
| * | X | X | 5-10 x10g | pulse | 2-3x1 s | ||||
| 180 °C 10 min < 30 °C | X | √ | X | 400 | max | 120 s | * |
| MAX | 0 pulse max | S/MAX | |
| 1cm | 50 | max | 3-6 |
| 10 x | pulse (1 s) | 1-2 x | |
| 1cm | 50 | min (1 s) | 1-3 x |
| 5 | pulse (1 s) | 1 x | |
| 70 | max | 30 | |
| X | X | X | |
| X | X | X | |
| 70 | max | 5 | |
| 50 | pulse (1 s) | 8 x | |
| X | X | X | |
| 50 | max | 30 |
Further information and explanations are available online:

Table of contents
1 Safety 28
1.1 General information 28
1.2 Intended use 28
1.3 Restriction on user group..... 29
1.4 Safety instructions 29
2 Avoiding material damage. 32
3 Environmental protection and saving energy 32
3.1 Disposing of packaging 32
4 Unpacking and checking 32
4.1 Unpacking the appliance and parts 32
4.2 Scope of delivery 32
4.3 Setting up the appliance 32
5 Familiarising yourself with your appliance. 33
5.1 Appliance 33
5.2 Symbols 33
5.3 Rotary switch 33
5.4 Safety systems 33
6 Before using for the first time... 34
6.1 Cleaning the appliance and parts 34
7 Basic operation 34
7.1 Cable length 34
7.2 Recommended speeds 34
7.3 Using the blender to process food 34
7.4 Using instantaneous switching 35
7.5 Pushing down food for processing 35
7.6 Adding more ingredients 35
7.7 Emptying the blender jug..... 35
7.8 Processing food using the To-Go blender jug 35
7.9 Closing the To-Go blender jug 36
7.10 Using the chopper-grinder accessory to process food .... 36
7.11 Emptying the chopper-grinder accessory 37
8 Cleaning and servicing 37
8.1 Dishwasher-safe components 37
8.2 Cleaning products 37
8.3 Cleaning the main unit 38
8.4 Cleaning the blender 38
8.5 Cleaning the To-Go blender jug and To-Go blade insert .... 38
8.6 Cleaning the choppergrinder accessory.. 38
9 Recipes 39
9.1 Overview of recipes 39
10 Troubleshooting 41
11 Transportation, storage and disposal 43
11.1 Disposing of old appliance .... 43
12 Customer Service 43
12.1 Product number (E-Nr.) and production number (FD) 43

1 Safety
Observe the following safety instructions.
1.1 General information
- Read this instruction manual carefully.
- Keep the instruction manual and the product information safe for future reference or for the next owner.
- Do not connect the appliance if it has been damaged in transit.
1.2 Intended use
Only use this appliance:
- With genuine parts.
- For cutting up, chopping, mixing, grinding and beating food.
for blending and puréeing. - for making pancake batter, sorbets, spreads, sauces and ice cream.
For crushing ice cubes.
Under supervision. - In private households and in enclosed spaces in a domestic environment at room temperature.
- for normal processing quantities and for normal processing times for domestic use.
Up to an altitude of max. 2000 m above sea level.
for blending fruit and vegetables to make smoothies.
Disconnect the appliance from the power supply when:
are not using the appliance.
the appliance is unattended.
assembling the appliance.
taking the appliance apart.
- cleaning the appliance.
approaching rotating parts.
- confronted with a fault.
1.3 Restriction on user group
This appliance can be used by persons with reduced physical, sensory or mental capabilities or a lack of experience and/or knowledge if they have been given supervision or instruction concerning use of the appliance in a safe way and if they understand the hazards involved.
Do not let children play with the appliance.
Cleaning and user maintenance must not be performed by children.
The appliance must not be used by children. Keep children away from the appliance and power cable.
1.4 Safety instructions
Observe the safety instructions.
WARNING - Risk of electric shock!
If the appliance or the power cord is damaged, this is dangerous.
- Never operate a damaged appliance.
- Never operate an appliance with a cracked or fractured surface.
- Never pull on the power cord to unplug the appliance. Always unplug the appliance at the mains.
- If the appliance or the power cord is damaged, immediately unplug the power cord or switch off the fuse in the fuse box.
- Call customer services. Page 43
Incorrect installation is dangerous.
- Connect and operate the appliance only in accordance with the specifications on the rating plate.
Incorrect repairs are dangerous.
- Repairs to the appliance should only be carried out by trained specialist staff.
- Only use genuine spare parts when repairing the appliance.
- If the power cord of this appliance is damaged, it must be replaced by the manufacturer, the manufacturer's Customer Service or a similarly qualified person in order to prevent any risk.
en Safety
An ingress of moisture can cause an electric shock.
- Never immerse the appliance or the power cord in water or clean in the dishwasher.
- Only use the appliance in enclosed spaces.
- Never expose the appliance to intense heat or humidity.
- Do not use steam- or high-pressure cleaners to clean the appliance.
If the insulation of the power cord is damaged, this is dangerous.
- Never let the power cord come into contact with hot appliance parts or heat sources.
- Never let the power cord come into contact with sharp points or edges.
- Never kink, crush or modify the power cord.
WARNING - Risk of fire!
Intense heat may cause the appliance and other parts to catch fire.
- Never place the appliance on or near hot surfaces.
WARNING - Risk of scalding!
Hot food may splash out during processing and steam can escape from the lid.
- Add a maximum of 1000 ml of hot or frothing food.
Process hot food carefully.
Do not lean over the appliance. - Do not process food that is hotter than 50^ C in the To-Go blender jug.
WARNING - Risk of injury!
Operating the appliance with damaged parts may result in injury.
- Parts which show cracks or other damage or do not fit correctly must be replaced with genuine spare parts.
Improper use may cause injuries.
- Only use the appliance once it is fully assembled.
- Never operate the appliance without fitting the lid.
- Never place fingers in the attached blender jug.
WARNING - Risk of cutting!
The blender knife has sharp blades.
- When cleaning and emptying the blender jug, watch out for the sharp blades.
- Never touch the edges of the blades with bare hands.
WARNING - Risk of suffocation!
Children may put packaging material over their heads or wrap themselves up in it and suffocate.
- Keep packaging material away from children.
- Do not let children play with packaging material.
Children may breathe in or swallow small parts, causing them to suffocate.
- Keep small parts away from children.
- Do not let children play with small parts.
WARNING - Risk of harm to health!
Soiling on surfaces may be harmful to health.
Follow the cleaning instructions.
- Clean surfaces which come in contact with food before each use.
2 Avoiding material damage
ATTENTION!
Improper use may cause material damage.
- Do not operate the appliance at no-load.
Observe the maximum processing quantities. - Never use the blender jug in the microwave or oven.
- Do not use the blender jug to store objects which do not belong to it.
- Do not process food that is hotter than 50^ C in the To-Go blender jug.
3 Environmental protection and saving energy
3.1 Disposing of packaging
The packaging materials are environmentally compatible and can be recycled.
- Sort the individual components by type and dispose of them separately.
4 Unpacking and checking
Find out here what you need to note when unpacking the appliance.
4.1 Unpacking the appliance and parts
-
Take the appliance out of the packaging.
-
Take all other parts and the accompanying documents out of the packaging and place them to hand.
- Remove any packaging material.
- Remove any stickers or film.
4.2 Scope of delivery
After unpacking all parts, check for any damage in transit and completeness of the delivery.
Fig. 1
| A | Main unit |
| B | Blender jug with EasyClick blade insert |
| C | Lid and measuring cup |
| D | Pusher |
| E | To-Go blender jug with blade insert1 |
| F | Lid with seal and closable mouthpiece1 |
| G | Chopper-grinder attachment with blade insert |
| H | User manual |
1 Depending on the appliance specifications
4.3 Setting up the appliance
- Place the appliance on a stable, level, clean and flat work surface.
- Pull the power cable out to the required length.
"Cable length", Page 34
Do not insert the mains plug.
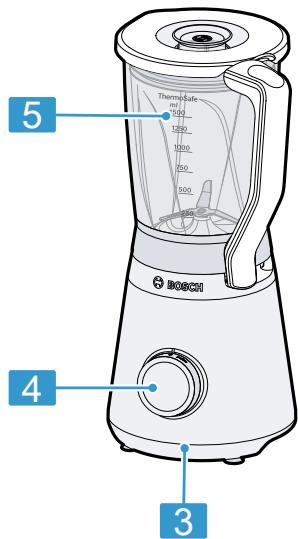
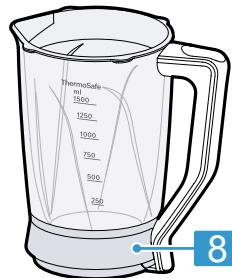
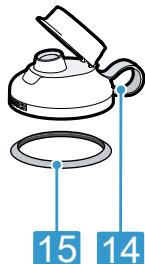
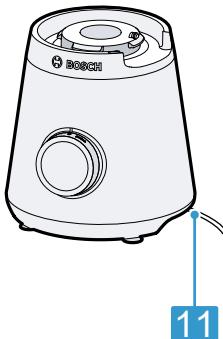
5 Familiarising yourself with your appliance
5.1 Appliance
You can find an overview of the parts of your appliance here.
Fig. 2
| 1 | Chopper-grinder blade insert |
| 2 | Chopper-grinder attachment |
| 3 | Main unit |
| 4 | Rotary switch |
| 5 | Scale |
| 6 | Measuring cup |
| 7 | Lid with filling opening |
| 8 | Blender jug |
| 9 | EasyClick blade insert |
| 10 | Retaining bracket |
| 11 | Power cord storage compa- ment |
| 12 | To-Go blade insert¹ |
| 13 | To-Go blender jug¹ |
| 14 | Lid with seal and closable mouthpiece¹ |
| 15 | Seal |
| 16 | Pusher |
1 Depending on the appliance specifications
5.2 Symbols
You can find an overview of the symbols used on your appliance here.
| Symbol | Explanation |
| ▲▼ | Position markings |
| choppergrinder | Blade holder with grinding blade and cutting blade. The grinding blade is blunt and the cutting blade is sharp. |
5.3 Rotary switch
The rotary switch is used to start and stop processing and select the speed.
| Symbol | Function |
| 0 | Stop processing. |
| min | Process ingredients at low speed. |
| max | Process ingredients at maximum speed. |
| pulse | Process ingredients briefly at maximum speed. |
5.4 Safety systems
You can find an overview of your appliance's safety systems here.
Start lock-out
Start lock-out prevents your appliance from being switched on accidentally.
You can switch on and operate the appliance once the blender jug has been correctly positioned.
Overload protection
The overload protection system prevents the motor and other components from being damaged through being overloaded.
6 Before using for the first time
Configure the basic settings. Clean the appliance and accessories.
6.1 Cleaning the appliance and parts
- Clean all parts that come into contact with food before using for the first time. "Cleaning and servicing", Page 37
- Put the cleaned and dried parts out ready for use.
7 Basic operation
7.1 Cable length
Adjust the length of the power cable to your needs.
Adjusting cable length via cable storage compartment
- Pull the power cable out to the required length.
- To shorten the cable, push it into the cable storage compartment.
7.2 Recommended speeds
You can find out here which speeds you can use to achieve optimal results.
| Setting | Use |
| pulse | Briefly blending food with instantaneous switching at maximum speed. |
| max | Blending, puréeing, emulsifying, frothing and cutting up food. |
| Setting | Use |
| min | Blending food that should not be cut up too small. |
Tip: Please use our recipe suggestions to gain experience with your new appliance.
"Overview of recipes", Page 39
7.3 Using the blender to process food
WARNING Risk of injury!
Improper use may cause injuries.
- Only use the appliance once it is fully assembled.
- Never operate the appliance without fitting the lid.
-
Never place fingers in the attached blender jug.
-
Prepare the food.
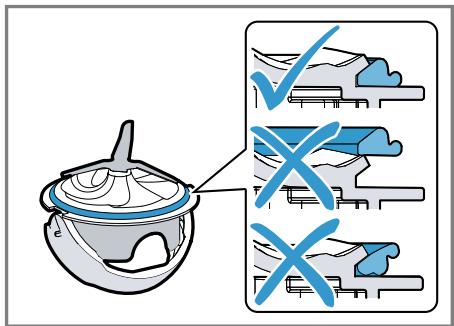
For example, cut large items of food into pieces. - Check the seal on the EasyClick blade insert. If a seal has been removed, reinsert it correctly.
Fig. 3
Note: The seal remains on the EasyClick blade insert for cleaning. If the seal is damaged or not correctly positioned, liquid may run out.
The seal is seated in the groove.
- The sealing lips point in the direction of the blender jug.
- The smooth sealing surface lies against the EasyClick blade insert.
- Turn the blender jug upside down.
- Open the retaining bracket.
Fig. 4
-
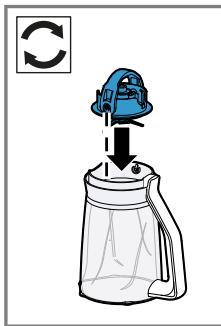
Align the EasyClick blade insert with the tap in the blender jug.
-
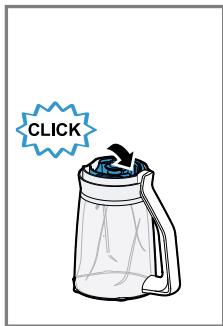
Push the EasyClick blade insert into the blender jug and close the retaining bracket until it clicks into place. Fig. 4
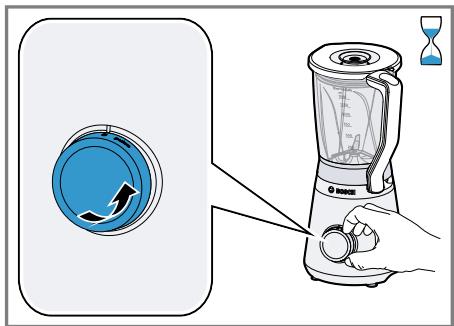
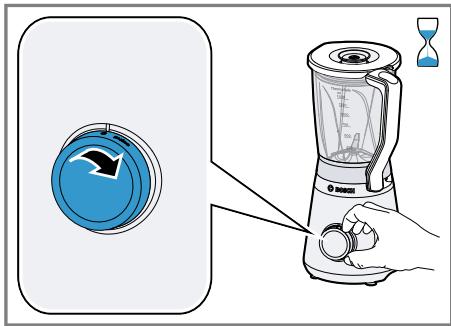
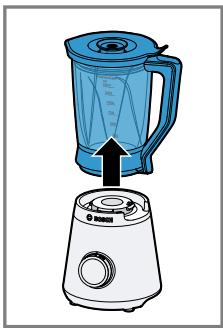
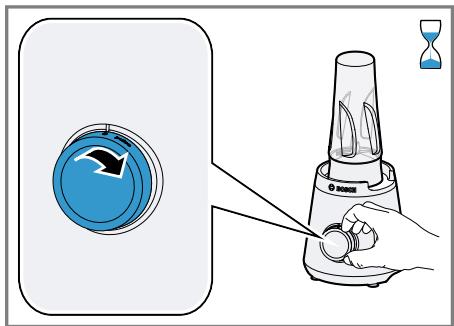
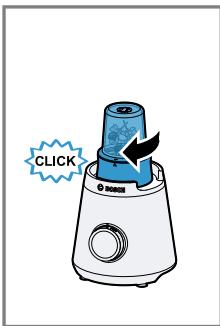
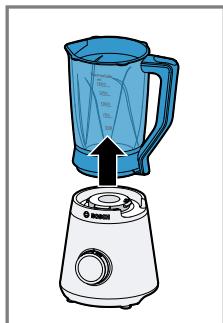
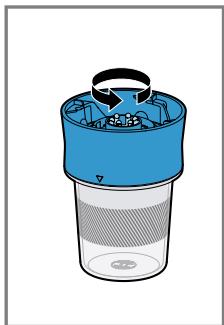
- Place the blender jug onto the main unit and rotate in a clockwise direction until it locks into place. Fig. 5
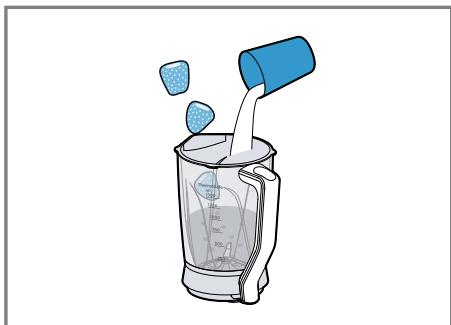
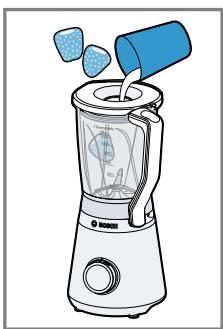
- Add the food to the blender jug. Fig. 6
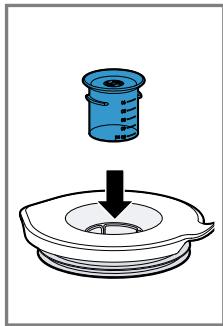
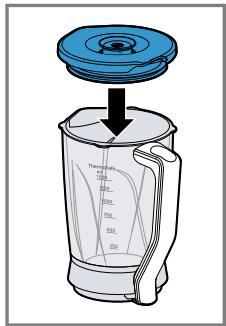
Observe the minimum and maximum processing quantities. "Overview of recipes", Page 39 - Insert the measuring jug in the lid and place the lid on the blender jug. Fig. 7 The lid must be completely closed.
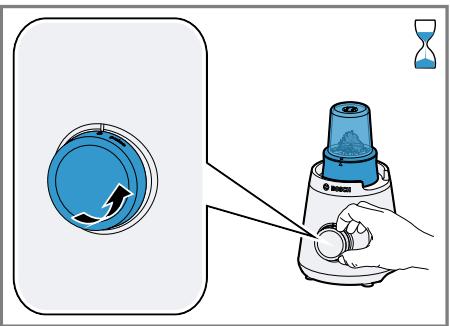
11.Insert mains plug. - Set the rotary switch to the recommended speed. Fig. 3
- Process the ingredients until you achieve the required result.
- To end the operation, set the rotary switch to 0.
7.4 Using instantaneous switching
- Set the rotary switch to pulse and hold it there. Fig. 9
- The ingredients are processed at maximum speed.
- Release the rotary switch.
The rotary switch jumps to 0.
Processing stops.
7.5 Pushing down food for processing
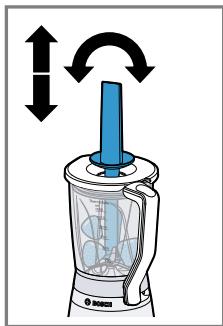
- Remove the measuring jug and insert the pusher into the filling opening. Fig. 10
- Push down the food from the sides of the blender jug. Fig. 10
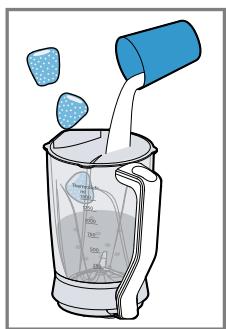
7.6 Adding more ingredients
- During processing, remove the measuring jug and add the ingredients through the opening in the lid. Fig. 11
- To add larger quantities, set the rotary switch to 0.
- Wait until the appliance stops.
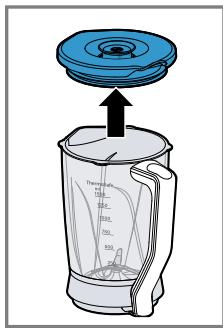
- Remove the lid. Fig. 12
- Add the ingredients. Fig. 12
- Place the lid on the blender jug again and continue to process the ingredients.
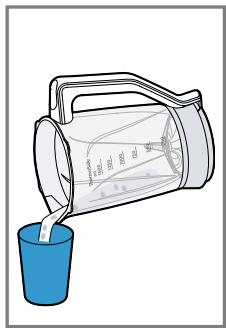
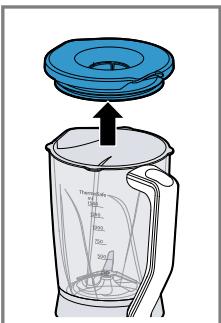
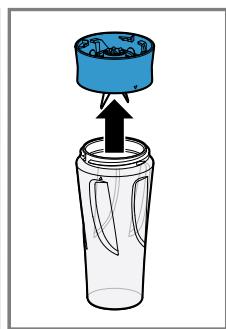
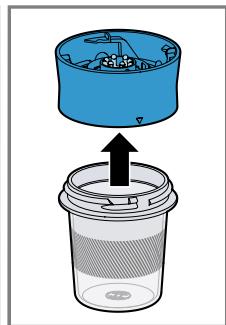
7.7 Emptying the blender jug
Requirement: The appliance has stopped.
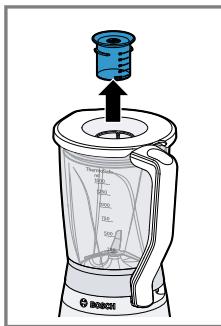
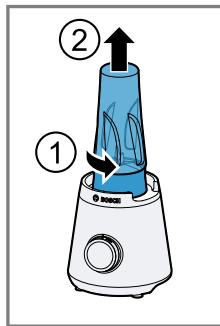
- Turn the blender jug anti-clockwise and remove it from the main unit. Fig. 13
- To pour out all of the processed food, remove the lid. Fig. 14
7.8 Processing food using the To-Go blender jug
1.Prepare the food. For example, cut large items of food into pieces.
- Add the food to the To-Go blender jug.
$$ \rightarrow F i g. 1 5 $$
Observe the minimum and maximum processing quantities.
"Overview of recipes", Page 39
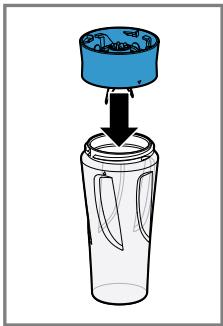
- Place the To-Go blade insert on the To-Go blender jug.
$$ \rightarrow F i g. 1 5 $$
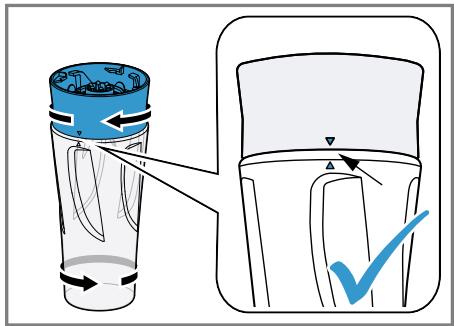
- Screw the To-Go blade insert and the To-Go blender jug in tightly.
$$ \rightarrow F i g. \quad 1 6 $$
- The and markings must match up.
-
You can only connect the To-Go blade insert to the main unit when the To-Go blender jug is screwed on fully.
-
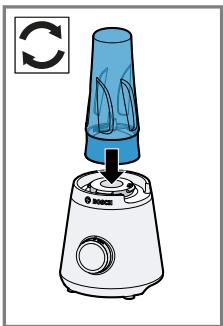
Turn the To-Go blender jug upside down.
$$ \rightarrow \text {F i g .} 1 7 $$
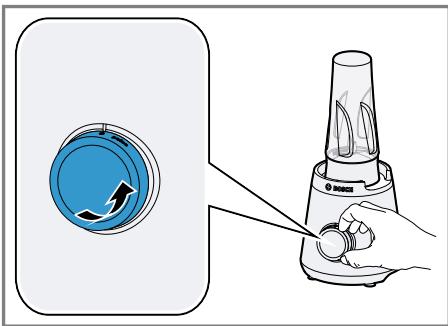
- Place the To-Go blade insert on the main unit and rotate it in a clockwise direction until it locks into place.
$$ \rightarrow \text {F i g .} 1 7 $$
- Set the rotary switch to the recommended speed.
$$ \rightarrow \text {F i g .} 1 8 $$
Tip: We recommend pausing operation several times when preparing smaller quantities of baby food in the To-Go blender jug.
Processing can also take place with instantaneous switching.
"Using instantaneous switching", Page 35
-
Process the ingredients until you achieve the required result.
-
To end the operation, set the rotary switch to 0.
$$ \rightarrow \text {F i g .} 1 9 $$
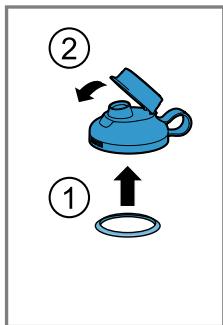
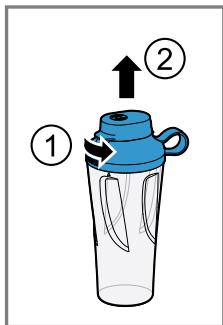
7.9 Closing the To-Go blender jug
Requirement: The appliance has stopped.
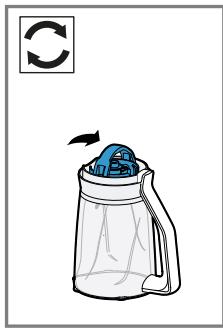
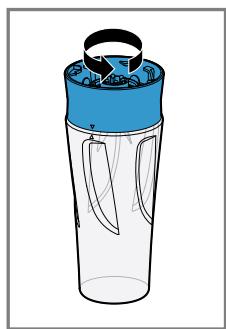
- Turn the To-Go blender jug anticlockwise and remove it from the main unit.
$$ \rightarrow \text {F i g .} 2 0 $$
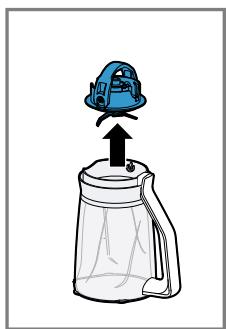
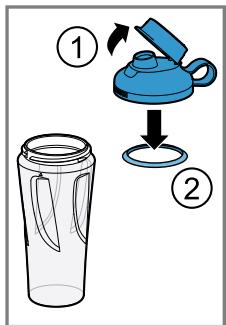
- Turn the To-Go blender jug and unscrew the To-Go blade insert.
$$ \rightarrow \text {F i g .} 2 0 $$
- Insert the seal for the lid.
$$ \rightarrow \text {F i g .} 2 1 $$
- Close the mouthpiece on the lid.
$$ \rightarrow \text {F i g .} 2 1 $$
- Screw the lid and the To-Go blender jug in tightly.
$$ \rightarrow \text {F i g .} 2 1 $$
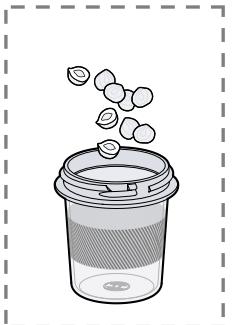
7.10 Using the chopper-grinder accessory to process food
- Prepare the food.
For example, cut large items of food into pieces.
- Add the ingredients to the chopper-grinder attachment.
$$ \rightarrow \text {F i g .} 2 2 $$
Observe the maximum processing quantities.
"Overview of recipes", Page 39
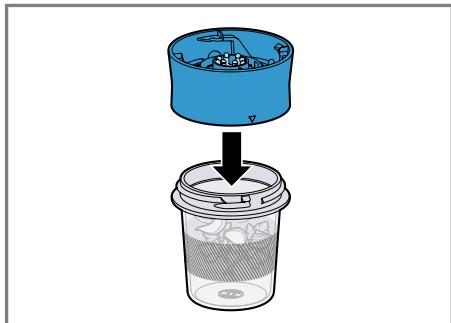
- Place the chopper-grinder blade insert on the chopper-grinder attachment.
$$ \rightarrow \text {F i g .} 2 3 $$
- Screw the chopper-grinder blade insert and the chopper-grinder attachment in tightly.
Fig. 24
- The and markings must match up.
- You can only connect the chopper-grinder blade insert to the main unit when the chopper-grinder attachment is fully screwed on.
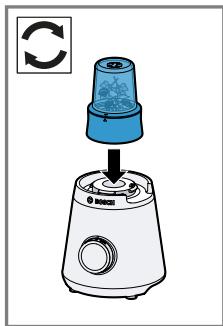
- Turn the chopper-grinder accessory upside down.
Fig. 25 - Place the chopper-grinder accessory onto the main unit and rotate in a clockwise direction until it locks into place.
Fig. 25 - Set the rotary switch to the recommended speed.
Fig. 26
Tip: Processing can also take place with instantaneous switching.
"Using instantaneous switching", Page 35
- Process the ingredients until you achieve the required result.
- To end the operation, set the rotary switch to 0.
Fig. 27
7.11 Emptying the choppergrinder accessory
Requirement: The appliance has stopped.
- Turn the chopper-grinder accessory anti-clockwise and remove it from the main unit.
Fig. 28 -
Turn the chopper-grinder accessory over and unscrew the chopper-grinder blade insert.
Fig. 28 -
Empty the chopper-grinder attachment with the processed food.
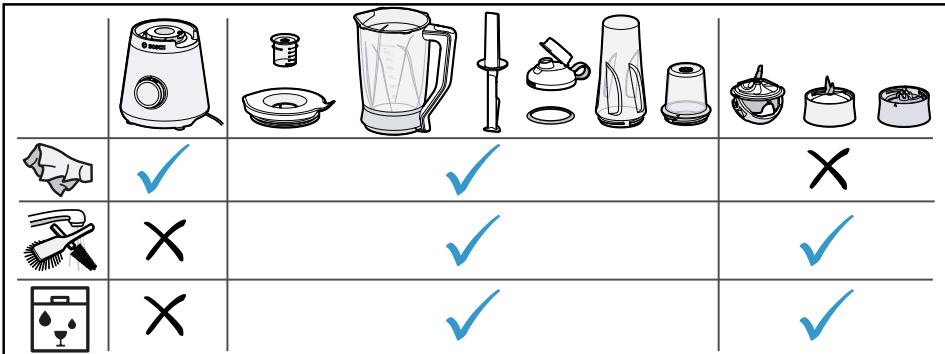
8 Cleaning and servicing
To keep your appliance working efficiently for a long time, it is important to clean and maintain it carefully.
8.1 Dishwasher-safe components
Find out here which components can be put in the dishwasher.
ATTENTION!
Some parts may be damaged if they are put in a dishwasher.
- Only put dishwasher-safe parts in the dishwasher.
- Only use programmes that do not heat the water above 60^ .
- Do not wedge plastic parts in the dishwasher.
This overview describes the cleaning process for the components.
Fig. 29
8.2 Cleaning products
Find out here which cleaning products are suitable for your appliance.
ATTENTION!
Using unsuitable cleaning agents or incorrect cleaning may damage the appliance.
- Do not use cleaning agents containing alcohol or spirits.
- Do not use sharp, pointed or metal objects.
- Do not use abrasive cloths or cleaning agents.
8.3 Cleaning the main unit
WARNING
Risk of electric shock!
An ingress of moisture can cause an electric shock.
- Never immerse the appliance or the power cord in water or clean in the dishwasher.
- Do not use steam- or high-pressure cleaners to clean the appliance.
- Wipe down the main unit with a soft, damp cloth.
8.4 Cleaning the blender
WARNING
Risk of cutting!
The blender knife has sharp blades.
- When cleaning and emptying the blender jug, watch out for the sharp blades.
- Never touch the edges of the blades with bare hands.
ATTENTION!
The blender knife has sharp blades. Improper handling may damage the blades or the surface.
-
Never set the blade insert down with the blade facing downwards.
-
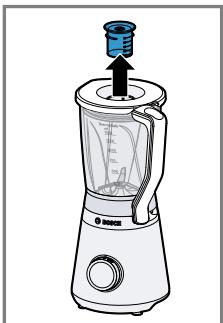
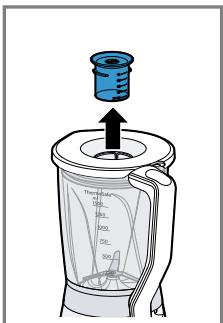
Remove the measuring jug.
$$ \rightarrow \text {F i g .} 3 0 $$
2 Remove the lid.
$$ \rightarrow \text {F i g .} 3 0 $$
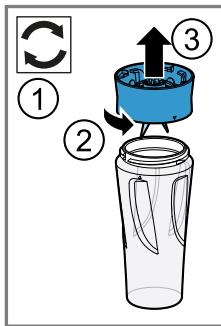
- Turn the blender jug anti-clockwise and remove it from the main unit.
$$ \rightarrow \text {F i g .} 3 1 $$
-
Turn the blender jug upside down.
-
Open the retaining bracket.
$$ \rightarrow \text {F i g .} 3 2 $$
- Remove the EasyClick blade insert from the blender jug. Fig. 32
- Clean the components.
8.5 Cleaning the To-Go blender jug and To-Go blade insert
ATTENTION!
The blender knife has sharp blades. Improper handling may damage the blades or the surface.
-
Never set the blade insert down with the blade facing downwards.
-
Turn the To-Go blade insert anticlockwise and remove it from the To-Go blender jug.
$$ \rightarrow \text {F i g .} \tag {33} $$
- Turn the lid anti-clockwise and remove it from the To-Go blender jug.
$$ \rightarrow \text {F i g .} \quad 3 4 $$
- Open the mouthpiece on the lid.
$$ \rightarrow \text {F i g .} \quad 3 4 $$
- Remove the seal.
$$ \rightarrow \text {F i g .} 3 4 $$
- Clean the components.
8.6 Cleaning the choppergrinder accessory
ATTENTION!
The blender knife has sharp blades. Improper handling may damage the blades or the surface.
-
Never set the blade insert down with the blade facing downwards.
-
Rotate the chopper-grinder blade insert anticlockwise and remove it from the chopper-grinder attachment.
$$ \rightarrow \text {F i g .} 3 5 $$
- Clean the components.
9 Recipes
You can find a selection of recipes specially developed for your appliance here.
9.1 Overview of recipes
This overview lists the ingredients and processing steps for various recipes.
Fig. 36
Fig. 37
For the recipes labelled with (^*) in the recipe table, leave the appliance to cool to room temperature after three operating cycles.
| Recipe | Ingredients | Processing |
| Sports drink | 250 g Honey (cold, 7-9°C)5 g Cinnamon200 g Milk (warm, 65 °C) | Add the honey and cinna-mon to the blender.Blend the ingredients for 5 seconds at level max.Add the milk.Blend the ingredients for 5 seconds at level max. |
ATTENTION!
Using unsuitable food may damage the appliance.
- Do not process food that is hotter than 50^ C in the To-Go blender jug.
- Do not process food that is hotter than 70^ C in the blender jug.
Notes
-
Restrictions on processing in the blender:
-
Do not use it to chop ingredients like almonds, onions, parsley and meat.
- It is only possible to mix spreads, such as peanut butter, coconut butter or nut spreads, with a suitable Bosch pusher.
- The blender cannot be used to make mayonnaise.
- Use enough liquid when mixing solid food.
- Mix powdered food with sufficient liquid before blending, or dissolve it entirely in liquid. Examples of powdered food include icing sugar, cocoa powder, roasted soybeans, flour, protein powder.
en Recipes
-
Restrictions on processing in the chopper/grinder accessory:
-
Use instantaneous switching for coarse and fine chopping.
- Do not grind very dry or solid food larger than coffee beans. Unsuitable food includes e.g. nutmeg and dry ginger.
- Do not grind any sugar.
- Do not chop ice cubes.
- The chopper-grinder attachment cannot be used to produce nut spreads.
- Chop a maximum of 50 ~g of solid food at maximum speed for a maximum of one second or 1 - 5 pulses unless otherwise indicated in the recipe table.
- The chopper/grinder attachment is not suitable for fine chopping meat, e.g. for Bolognese.
10 Troubleshooting
You can rectify minor faults on your appliance yourself. Read the troubleshooting information before contacting after-sales service. This will avoid unnecessary costs.

WARNING
Risk of electric shock!
Incorrect repairs are dangerous.
- Repairs to the appliance should only be carried out by trained specialist staff.
- Only use genuine spare parts when repairing the appliance.
- If the power cord of this appliance is damaged, it must be replaced by the manufacturer, the manufacturer's Customer Service or a similarly qualified person in order to prevent any risk.
| Fault | Cause and troubleshooting |
| The appliance is not working. | The mains plug of the power cord is not plugged in. • Connect the appliance to the power supply. |
| The circuit breaker in the fuse box has tripped. • Check the circuit breaker in the fuse box. | |
| There has been a power cut. • Check whether the lighting in your kitchen or other appliances are working. | |
| Blender jug is not locked. • Set the rotary switch to 0. 1. Place the blender jug onto the main unit and rotate in a clockwise direction until it locks into place. 2. If required, select this option: - Place the To-Go blender jug with the To-Go blade insert onto the main unit and rotate in a clockwise direction until it locks into place. | |
| Appliance has a humming sound. | The blade is blocked or stiff. • Set the rotary switch to 0. • Remove the blockage. |
| Appliance switches off during use. | Processing quantity is too great or processing time was too long. • Set the rotary switch to 0. • Reduce the processing quantity. • Allow the appliance to cool down to room temperature. |
| The To-Go blade insert cannot be connected to the main unit. | Outlet protection is active. • Screw the To-Go blade insert and the To-Go blender jug in by turning them in a clockwise direction. • The To-Go blender jug and To-Go blade insert are fully and tightly screwed in. • The ▼ and ▲ markings match up. |
| The chopper-grinder accessory cannot be connected to the main unit. | Outlet protection is active. • Screw the chopper-grinder blade insert and the chopper-grinder attachment in place with one rotation in a clockwise direction. • The chopper-grinder blade insert and the chopper-grinder attachment are fully and securely screwed in. • The ▼ and ▲ markings match up. |
| To-Go blender jug is leaking. | Seal is missing from the lid. • Insert the seal. |
| Liquid is leaking from the blade insert. | Seal between the blender jug and the blade insert is missing. • Insert the seal on the EasyClick blade insert. • The seal is seated in the groove. • The sealing lips point in the direction of the blender jug. • The smooth sealing surface lies against the EasyC-lick blade insert. |
11 Transportation, storage and disposal
11.1 Disposing of old appliance
Valuable raw materials can be reused by recycling.
- Unplug the appliance from the mains.
- Cut through the power cord.
- Dispose of the appliance in an environmentally friendly manner.
Information about current disposal methods are available from your specialist dealer or local authority.

This appliance is labelled in accordance with European Directive 2012/19/EU concerning used electrical and electronic appliances (waste electrical and electronic equipment - WEEE). The guideline determines the framework for the return and recycling of used appliances as applicable throughout the EU.
12 Customer Service
Function-relevant genuine spare parts according to the corresponding Ecodesign Order can be obtained from Customer Service for a period of at least 7 years from the date on which your appliance was placed on the market within the European Economic Area.
Note: Under the terms of the manufacturer's warranty the use of Customer Service is free of charge.
Detailed information on the warranty period and terms of warranty in your country is available from our after-sales service, your retailer or on our website.
If you contact Customer Service, you will require the product number (E-Nr.) and the production number (FD) of your appliance.
The contact details for Customer Service can be found in the enclosed Customer Service directory or on our website.
12.1 Product number (E-Nr.) and production number (FD)
You can find the product number (E-Nr.) and the production number (FD) on the appliance's rating plate.
Make a note of your appliance's details and the Customer Service telephone number to find them again quickly.
Sécurité anti-surcharge
WAARSCHUWING - Kans op letsel!
WAARSCHUWING - Kans op verstikking!
WAARSCHUWING Kans op letsel!
7 General betjening. 103
ADVARSEL - Brandfare!
1 Knivholder for kutting/ kverning
1 Allt after apparatens utrusting
1 Allt after apparatens utrusting
1 Allt after apparatens utrusting
5.2 Symboler
1.1 Advertencias de character general
1.4 Yπoδεiξεις ασφαλειας
PooexTe TIC UIOBeliEic aOaAeiaC.
IPOEIIOIOIHSH - Kivduoc nAektpoannxiac!
Mia ouokεuñ ð εva kaλδio ouvδεοης πou éxouv unoTei ημia εivai Eπikivóuva.
Mn 1eitoupyeite note _i ouokeu nou exu unoeti zniia.
Mn i ou p y i TOTe i OUOKeun payioevn n OIIaOeuN ETIiΦavεIα.
MnV TpaβaTe TOTe TO kaλδio ouvδεoç, yia va aTIOouvδεoεTE Tn OuaKεuñ anToi δiktuo Tou pεμatoç. TpaβaTe nAVTOE To φic Tou kaλωdiou ouvδεoç.
OTav n ouokeuñ n TO kαλδio ouvδεοç exi ζημia, TpaβnξTe αεωc TO φic Tou kαλδiou ouvδεoç n KATEβaOTE Tnv aφαλεia OTO KβwTIO TWV aσφαλεiωv.
Kαλεοτε Νγνιπηρεοία εξυπηρετησός πελατών. → Σελιδα 214
Oi un eovdeiyuevEc ykaataotaoeic ivai tnikivuvc.
SuvoTe kai xpooiopoite Tn ouoku n ovo ouoawva tao Toiexia Tou avaepovtai otnv nivakiδa tuou.
Oi kataaannae c eTIIOKEUEc eivai ETIIKIVDUVEC.
81739 Munchen, Germany
www.bosch-home.com
Tyt Bn Di3HaTeC, JkNx NpaBnI CJIiDOTpIMyBaTnC, PO3NaKOByOuN PrnlaI.
4.1 Po3naKOBvBaHnI npHJaNy IeTaJIeI
- BnMItb npua3 ynaKOBkn.
- BnmiTb 3 ynpaKOBkn NiIroTuYnte BcI DoJaTkoBi DeTaI N cynpoBIDHy DOKyMeHTaCiIO.
- 3Himitb HaBnI NaKyBaIbHn MaTepiAn.
- 3HIMITb HaBHi HAcJIeIKn Ta NIIbKN.
4.2 O6caI nocTaayHn
IicIpaO3naKaYBaHHnepeBipTe, uKOMnJIeKT NOBHN i uH He NIOsKOdNIOyKiCb YactuHn Ni d uac TpaHCnOpTyBaHHa.
→ Man. 1
3axnct BiD yBIMKHeHHA
3axnCT BiD yBIMKHeHHa 3aNo6irae HebaxKaHOMy BBIMKHeHHIO npuJaIy. Jaio yaasa 6JeHepa npabInbHO BcTaHOBLeHa, npuJaM OMOHa yBIMKHyTN Ta BNKOpNCTOByBaTu.
3axnct Bi nepeBaHTaKeHHA
3axnCT BiD nepeBaHTaKeHHa 3anObi-rae NoWKoJxKeHHIO DnBnHyHa iHnIXuactINH uepe3 3aBnCOke HabaHTaKeHHa.
7.11 CnpoJHHeHH npJIaIdJa IJI NaDiPi6HeHH
Bmora: Pnpiaad 3yynHnBCa.
1.ПовернiTb пиладя дя поДрібHeHHЯ пOTи ГДИНКОВОICTpіЛКТа BИМITb 3 OCHOBHOrO6LoKa пиладу.→MaJ.28
2.ПepeBepHitb npnlaIaIЯ IJIЯ NO- pioHeHHЯ DoIopn IHom i BiJ- kpyiTb TpIMauch HOka IOppiHOBa- ya. Man. 28
3. BnmiTb o6pO6JIeHI npOdyKTu i3 4aushi nOpiHIOBaHa.
8 YnueHHa Ta DOrJaD
IIO6 npnilad npaioBab IOBRO, cII peTeJIbHO uNCTNTu IoTO J DoTJAdATU 3a HIM.
- BnMItb MiHy cKJIaHKy.
$$ \rightarrow M a \pi . \quad 3 0 $$
- 3HIMITb KpNIuKy.
$$ \rightarrow M a n. \quad 3 0 $$
Tempepatypicn3zuknlbpo60tn!
10 YcyHeHHa HeCnpaBHOCTeH
He3NaHHi HeCnpaBHOCTI npuHaNy MOxHa yCyBaTn BlnachOpyu. IepH HiK 3BeptaTnca Do cepBicHOi CnyXb6, CKOpNCtaTecr BiIOMOCTAmN IpO yCyHeHHr HeCnpaBHOCTe. TaK MoxHa yHNKHyTN 3aIBNX BVtpaT.
YBARA!
Hebe3neKa ypaXeHH eJEnKtpnHm cTpyMOM!
PemOHTHi pO6OTn, BnKoHaHl HeHaJIeXHm YInHOM, MoKyTb CTaHOBHTn He6e3IeKy IIN KOpNCTyBaUa.
- PemOHtYBaTn npuJa dO3BOLHeo TiIbKn faxiBzM.
-Для ремоHTу пиладу ДОЗВОЛЯЕТСВИКОРИСТОВУВАТИ ЛИше opигIHальни занчacTNH.
yHnKHyTN He6e3neK, y pa3i nOuKoJKeHHKa6eJIIO KINBHeHHa bOTo npIaNy Ioro 3amHy MaE BnKOHyBaTn BnPo6HnK, cepBicHn CHTp a6o ocOba 3 BiIDNoBIDHOU KBaJIΦikaueio.
I P E D U N P E X J D E H N E - O n a c h o c t b B 0 3 r o p a n h y!
При сишkom ВьICOKОI TempeType BO3MOJHO BO3ROPaHne Пибopa n HacaDOK.
HnkOrda He cTaBbTe npnbOp Ha ropnne NOBepxHOCTN INIIN PAnOM C HmN.
I P E D U N P E X J D E H N E - O n a c h o c t b o w n a p n B a H N I!
Topnye npodykTBi MOyT pa36pbI3rNBaTbcR npn nepepa60Te, a H3-IOd KpbIshKMOJcET BbIXOAnTb Nap.
KolnueCTBO ropauHx nIi peHnCTbIX npOdyKTOB He doJHKHO ppeBbl- 1000 mI.
Co6JIHOaIte oCtOpOxHocTb npn nepepa6OTke ropuNX npoDyKTOB.
He haKloHnTeCb HaI npH6opom.
He nepepa6aTbIbaiTe npOdyKtbl, TempepaTypa KOToPbIX Bbl- 50 ^ C B cTaKaHe To-Go.
I P E D U N P E X J D E H N E - O n a c h o c t b T p a B M n p o B a H N I!
He noDnyscakaiTe DeTei K ypaKOBOCHOMy MaTePnAly.
He no3B0JIe Te DeTm IrgaTb C ypaKOBouHbIM MaTePnaJIoM.
ДeТи MOrут ВДохнУть ИПИ ПроглOTиТь МeЛКиЕ DeТаПи,В pe3yЛьТаTe ueRo 3aДохнУтбя.
He noDnyckaIte DeTeK MeKLIM DeTaJIaM.
He no3BolnaTe DeTm nIgpaTb C MeIKNIM DeTaJIaMn.
PPEyIeHNE-PnckHaHeceHnBpea3OpOBbIo!
3aŋp3HeHnHa nOBepxHOCTaX MoγT ppeIcTaBJIaTb ONaCHOCTb IJIa 3dOpOBb.
Co6nHoaJte yKa3aHHn oOuNCTke.
NObepxHocTHn, KOHTaKTHpyUoUne C npOdyKTamN pNTaHnY, cNeDyET OUnuTaB nepei KaJdbIM NCpOJIb3OBAHHeM.
He BCTaBnIe BNkCy ceTeBOrO shHypa Bpo3eTKy.
5 3HaKOMCTBO C npH6Opom
5.1 Пибор
3decb npuBeDeH 063Op coCTaBbIX qacteynpnp6opa.
→Pnc. 2
IbOpoTHbIM nepeKJIIOUaTeJeM 3anyKaeTcN IOCTaHaBnBaEaTcN pepepa6oTKa, a TaKKe BbIbnpaEcckOpocTb.
Ecnn 6IeHnep yCTaHOBnEH npaBnIbHo, ycTpoIcTBo MOxHOb BkJIIOHTb I NcNoJIb3OBaTb.
YcTpoIcTBO 3aUHTbI OT neperpy3KN
3aunTa oT nepeRpy3Kn npenrTCTByeT NOBpeKdEHHO 3NeKTPoMoTOpa NdpyHX KOMNoHHeTOB BcIeDCTBnE CInuKOM BbICOKo Harpy3Kn.
2 TTo6bI BbJIINb BCIO nepepa6oTaHHyOMaccy, CHIMNTe KpbIuKy.
$$ \begin{array}{l} \rightarrow P u c. 1 3 \ \rightarrow P u c. 1 4 \ \end{array} $$
- YctaHOBInTe NOBOpOTbI nepeKJIIOUaTeIb Ha peKOMeHdyeMMyO cKOPOCTb.
$$ \rightarrow P u c. \quad 1 8 $$
PekomeHdaun: PekomeHnyetcJeIaTb nepepbIbbl npn nprirotoblenn He6oJbUoro KOJInuEcTBa DetCKOrO nHTaHnB v CtaKaHe To-Go.
IpepepaOtky npOdykTOB MOxHOTaKKe OcyuEcTBJIaTb C NOMOuBoΦyHKUIM MOMeHTaJIbHO BKJIIOue-HNIA.
"IcnoIb3ObaHne MomeHTaJIbHOro BKNIOUeHn", CtpaHnua 281
- NpepeabaBaiTe INHrpEIneHTbI Do noNoIyueHnJKeJaEMOro pe3yNbTaTata.
9.Дязавершени ржима певебиповоротьпегклочаель в поожене 0.
$$ \rightarrow P u c. \quad 1 9 $$
7.9 3aKpbiBaHne cTaKaHa To-Go
Tpe6oBaHne: Pnp6op 3aBepwn pa6oTy.
- ПовернITE стakaн To-Go пpoTNb yacoBOI CTpeKNu ChIMnTe erO c 6JIOka DBNraTeJIa.
$$ \rightarrow P u c. \boxed {2 0} $$
2.Перевернite CTaKaHTo-Goи OTKpyTHe HOKeByIO BCTaBky To-Go.
$$ \rightarrow P u c. \boxed {2 0} $$
- YcTaHOBInTe yIJIOTHTeNb KpbIiIKN.
$$ \rightarrow P u c. \quad 2 1 $$
- 3aKpoIte OTBepCTne IJIa NITbHa KpbIuKe.
$$ \rightarrow P u c. \boxed {2 1} $$
- Плотно 3акрутinte Крblшky Ha CTakaHe To-Go.
$$ \rightarrow P u c. \mathbf {2 1} $$
7.10 N3MeJIbUeHHe npOdyKToB
- NpOToTOBtE npOdyKtbl.
Ha npimep, npoeKbTe npOdykTb 6oJbIoro pa3Mepa Ha KycouKn.
- BbIIOxHte INHpeJeHNTb I BaUy dIaI N3MeIbYeHnI.
$$ \rightarrow P u c. \boxed {2 2} $$
He npebbIaIe MaKcImaIbHoe KOnIueCTBO npOdyKTOB.
"Ob3op peueeTToB", CtpaHnua 285
- BctabbTe depKaTeIb HOKa I3MeIbCuI-TeJI B yauy.
$$ \rightarrow P u c. \quad 2 8 $$
- HadejHo npikpyTne depkaTeIb HOKa n3MeIbYHTeI B YaIe.
$$ \rightarrow P u c. \boxed {2 4} $$
- MeTkN n △DOnKHbI yKa3bIbTaB dpyrHa npyra.
8.3 OuHCTka 6JOKa DBrHaTeJIa
PPEyPExKDEHNE
Onachoctb nopaxeHHaJNeKtpnueckHM TOKOM!
He nepepaabaBaiTe npOdykTbI, TemepaTypa KOTopbix Bblue 50^ bctaKahe To-Go.
He nepepa6aTbIBaIte npOdyKtbl, TeM- nepaTypa KOToPbIX Bblwe 70^ BcaIe 6JeHepa.
PpIMeuaHn
-
Пюдукъ, He похдаиne ДЯпегеработknВблendepe:
-
He n3MeIbUaIe TaKne IpoDyKTbI, KaK MInHdAJIb, LyK, neTpUShKa N Ma-CO.
- PnirtoBJIeHne cnpeIOB, TaKnx KaK apaxncBOe MacNo, KOKOCBOe MacNo HIN opexOBIe NaCTbI, HeBO3MOKHo 6e3 ToNkATEJIA.
-Бленьдер He npedHa3HauenДЯ npi-roTOBneHnMaHOHe3a.
ДобавытКТВердимпpoДуКТамdoCTaTOUHoe KONHueCTBOM JNДKoCTH.
CmeuHnpooKoo6pa3HbIe npOyKTBcDIOCTaTOHyBIM KOJIueCTBOM KJIKoCTN ININ NOHOCbIO paCTbOpHTe B JKnIOcTn.K NopoUkoo6- pa3HbIM PPOyKTAM OTHOCHTc, HApPImep, caxapHaY nuJa, KaKaONopOwOK, XapeHbIe coEBbIe 606bl, MyKa, PPOTeHOBbI NopoWOk.
IpoDyKbI,HeNoOxOJaUeDNnOBpa6oTKnBuaaE H3MeJbYnteJIa:
IcnoB3yTe yHKUHO MOMeTaIb-Horo BkHouEnn IJr rpy6oRo n MeI-Koro N3MeJIbYeHn.
- He n3MeIbUaIte 3acyuIe HbIe IIN TBePbIe npOdyKtIpa3MepOM 6oJIbIe KoIeHbIX 3epeH. IIN n3 MeIbUeHnHe IIOxOJrT, HApPIMep, MycKaTHbI opex n cyUeHbI IM- 6npb.
- He nepeMaIbIbAitc caxap B nydpy.
- Pnp6op He nOxOHT IaI dpo6JIeHnKy6IKOB IbDa.
- YaSHA dIy I3MeIbYeHNe He npeDy-CMOTpeHa dIy IpnIroTOBHeHn OpeXOBOI nactbl.
I3MeIbUaIte He 60Jee 50 r TBepIbIX IPOyKTOB Ha MaKcIMMaJIb-Ho CKOpOCTn He DoJIbIe OJHO CE-KyHbI INI 3aNyCTHe NpeMaJIbIBaHne OJHOkPaTHbIM HaxKaTHeM 1-5 pa3,ecIN B Ta6JIuCe C peCenTaMn He yKa3aHO IHoe.
- YaIa I3MeIbYIeJI He IIOxOJIT IJI pepepa6OTK Mca B φapU, HApPIMep, IJI BIoONbe3e.
10 YcTpaHeHne HenCnpaBHOcTei
Bb MoXe TaMoCTOaTeNbHo YcTpaHnTb He3NaHTeNbHbIe HncnPabHocTN BaUero np6o- pa. BocnoJIb3yIteCb IHΦOpMauné N3 rnaBbl «YcTpaHne HncnPabHocTeN» nepeo oBaPaueHem B cepBnCHyO cnlyK6y. 3To n03BoNt N36ExKaTb DOnoJIHnTbeNbHbIX pacxOdoB.

PNEyPPEKdHNE
Onachoctb nopaxeHn 3JIeKtpnuecknM TOKOM!
Pn HeKbAInHnCnPOBaHHOM pEmoHTe Pnp6Op MOxET CTaTb NCTOuyHKOM ONaCHOCTN.
PemontnoBaTb np6op pa3peWaaetc TOnbKO KBaIINHnpoBaHHbIM CneuaJIInCTaM.
ДлгpeMOHTa npH6opa MoXHo HcNoJb3OBaTb TOnbKO opnHaJIbHbIe 3aNuaCTH.
Bo n36eKaHHe onaChOtey 3aMeHa NOBpeJckDeHHoro cTeBOrKa6eJaHHoro np6o-pa MoKet 6bTb BblONHeHa TOnbKO pOn3BOdnteJeM NIn aBtOpN3OBaHHo IM cepBc-Ho CnyK6oJIb6o IINOM, MEmIoUIM aHaIOrnHyIO KBaJIINΦkaUIO.
$$ \left. \right.\left. \right.\left. \right.\left. \right.\left. \right.\left. \right.\left. \right.\left. \right.\left. \right.\left. \right.\left. \right.\left.\left.\left.\left.\left.\left.\left.\left.\left.\left.\left.\left.\left.\left.\left.\left.\left.\left.\left.\left.\left.\left.\left. \text {的} \right]\right]\right]\right]\right]\right]\right]\right]\right]\right]\right]\right]\right]\right]\right]\right]\right]\right]\right]\right]\right]\right]\right] $$
$$ j l q \cdot j l \cdot l a b i j g s $$
$$ . l j b \cdot \bigcup \dot {S} \dot {w} \cdot \dot {g} w \cdot \bigcup \dot {j} \cdot \dot {S} \bigcup \bigcup \dot {S} \cdot \bigcup \dot {j} \cdot \dot {o} \cdot \bigcup \dot {j} c \cdot \bigcup $$
$$ d i a l w \cdot | j _ {j} | g o u m e n t g \cdot g \cdot g \cdot d s i m m e r l a w g g o g l o l b o p o o f X ^ {\prime} $$
$$ . \ddot {a} j l \Delta j s l a o g l j l q l l j o $$
$$ \dot {J} \left[ \omega \right] = \omega \left[ \omega \right] \left[ \omega \right] \left[ \omega \right] \left[ \omega \right] \left[ \omega \right] \left[ \omega \right] $$
$$ . \ddot {o} \dot {s} \dot {a} \dot {c} \dot {g} \dot {g} \dot {f} \dot {a} \dot {b} \dot {c} $$
$$ . \ddot {a} ^ {\prime} \dot {u} _ {j} \dot {r} \leqslant \left[ \begin{array}{l l l l l l l l l l l l l} \ddot {a} ^ {\prime} & \dot {u} _ {j} & \dot {u} _ {j} & \dot {u} _ {j} & \dot {u} _ {j} & \dot {u} _ {j} & \dot {u} _ {j} & \dot {u} _ {j} & \dot {u} _ {j} & \dot {u} _ {j} & \dot {u} _ {j} & \dot {u} _ {i} & \dot {u} _ {i} & \dot {u} _ {i} & \dot {u} _ {i} \ \ddot {a} ^ {\prime} & \dot {u} _ {j} & \dot {u} _ {j} & \dot {u} _ {j} & \dot {u} _ {j} & \dot {u} _ {j} & \dot {u} _ {j} & \dot {u} _ {j} & \dot {u} _ {j} & \dot {u} _ {j}, \end{array} \right] $$
$$ ! \ddot {g} _ {\epsilon} \omega g \dot {w} j b \dot {z} - \mu \dot {z} \Delta $$
$$ . \left|\left|\right|\right| j _ {j} \left|\right| g j _ {j} \left|\right|\left|\right|\left|\right|\left|\right|\left|\right|\left|\right|\left|\right|\left|\right|\left|\right|\left|\right|\left|\right|\left|\right|\left|\right|\left|\right|\left|\right|\left|\right|\left|\right|\left| \right. 1 0 0 0 0 0 0 0 0 0 0 0 0 0 0 0 0 0 0 0 0 0 0 0 0 0 0 0 0 0 0 0 0 0 0 0 0 0 0 0 0 0 0 0 0 0 0 0 0 0 0 1 2 5 5 5 5 5 5 5 5 5 5 5 5 5 5 5 5 5 5 5 5 5 5 5 5 5 5 5 5 5 5 5 5 5 5 5 5 5 5 5 5 5 5 5 5 5 5 5 5 5 5 8 $$
$$ . d i o \cup j _ {j} \cup g \left\lceil \dot {n} \dot {a} l w \quad a b w \quad \cup c \mid \dot {v} \right\rceil j _ {j} \cup j _ {j} \cup j _ {j} \cup j _ {j} \cup j _ {j} $$
$$ ! \ddot {U} | g i S L \ddot {a} _ {i} l o x _ {c} ^ {k} j b \dot {s} - \mu_ {c} \dot {s} $$
$$ \Delta g \Delta a l l \Delta s i c \mid \mid \mid j d i a l l \Delta a l l \Delta f d i a l l \Delta g a l l \Delta p l q \Delta k n \Delta j $$
$$ . \text {L} \left[ \begin{array}{l l l l l l} \end{array} \right] $$
$$ . \circ g \dot {c} \text {J U} \ddot {a} \dot {g} \text {S o l l} \text {g} \dot {l} \ddot {a} \text {L W L} \ddot {a} \dot {y} \text {I S L} \text {I g a l l} \text {J o} \text {J o} 1 0 0 0 \text {C i c} < $$
$$ . j \dot {s} \ddot {a} i \dot {s} \omega \Vert \ddot {a} \dot {s} \Vert \dot {s} \Vert \dot {s} g a l \Vert_ {\hat {c}} \triangleleft $$
$$ . j l q \cdot j l \quad l c \quad j a \cdot j 8 \cdot $$
$$ \rho^ {\circ} 5 0 \text {L e} \text {L a j l a d a j s u j i a i l w a i l s c s l g o j u a a} _ {p o j} \lambda $$
$$ . T o - G o \text {b} \text {L a J I} \text {L c g} \text {G} $$
$$ ! \ddot {a} _ {i} \left[ \omega_ {\varepsilon} ^ {k} \right] \left[ \begin{array}{l l} \dot {p} _ {i} & - \mu_ {i} \end{array} \right] $$
$$ \begin{array}{l} \dots \text {U} _ {i} \text {L} _ {j} \text {O} g \text {D} \text {S} \text {U} _ {i} \text {S} \text {S} \text {S} \text {S} \text {S} \text {S} \text {S} \text {S} \text {S} \text {S} \text {S} \text {S} \text {S} \text {S} \text {S} \text {S} \text {S} \text {S} \text {S} \text {S} \text {T} _ {i j k l} \text {O} g _ {j k l} ^ {\prime} \ \text J e c l a s s i n g l e f o r m a l y t h e r e i s a l o w d i v a t i o n o f t h e r e i s a l o w d i v a t i o n o f t h e r e i s a l o w d i v a t i o n o f t h e r e i s a l o w d i v a t i o n o f t h e r e i s a l o w d i v a t i o n o f t h e r e i s a l o w d i v a T I S L A R D O F T H E S T O F T H E S T O F T H E S T O F T H E S T O F T H E S T O F T H E S T O F T H E S T O F T H E S T O F T H E S T O F T H E S T O F T H E S T O F T H E S T O F T H E S T O F T H E S T O F T H E S T O f t h e r e i s a l o w d i v a t i o n o f t h e r e i s a l o w d i v a t i o n o f t h e r e i s a l o w d i v a t i o n o f t h e r e i s a l o w d i v a t i o n o f t h e r e i s a l o w d i v A L P. \end{array} $$
$$ . \ddot {a} l \omega \vert j \dot {l} \dot {c} \dot {b} \dot {b} \dot {o} \vert l \dot {j} \dot {d} \dot {u} \omega \vert , \dot {c} \dot {s} \dot {w} \dot {u} \ddot {a} s \dot {j} o $$
$$ . \dot {u} \left\lvert \omega \right\rvert \left\lvert \omega \right\rvert \left\lvert \zeta \right\rvert \left\lvert \delta \right\rvert \left\lvert \dot {\omega} \right\rvert \left\lvert \dot {\omega} \right\rvert \left\lvert \omega \right\rvert \left\lvert \omega \right\rvert \left\lvert \omega \right\rvert \left\lvert \omega \right\rvert \left\lvert \omega \right\rvert \left\lvert \omega \right\rvert $$
$$ . \cup l s k l b d i j a l y s i c x l j l q n l p s a i w x $$
$$ \cdot \text {l b} \leq j \quad \text {j g} \quad \text {j l} \quad \text {j l} \quad \text {j l} \quad \text {j l} \quad \text {j l} \quad \text {j l} \quad \text {j l} $$
$$ . d _ {i} \leqslant j \leqslant l \text {l i} \mid b \text {d} \text {d} \mid l c g \mid j \mid s \mid s \mid s \mid s \mid s \mid s \mid s \mid s $$
$$ ! g b o l l j b \dot {a} - \mu \dot {j} \omega \Delta $$
$$ . \ddot {o} \Delta L \dot {u} | j \dot {a} \dot {w} l \mu b \dot {l} \dot {l} | j \mu \leq w $$
$$ . d \dot {a} \dot {b} \dot {c} \dot {d} g b) \dot {a} \dot {b} \dot {c} \dot {l} \dot {g} c \dot {a} \dot {b} \dot {c} \dot {u} \ddot {u} \ddot {c} \dot {d} \dot {a} \dot {b} \dot {c} \dot {l} \dot {a} \dot {b} \dot {c} \dot {u} \ddot {u} \ddot {c} \dot {d} \dot {a} \ddot {b} \ddot {c} \ddot {u} $$
$$ . \left| \right| ^ {2} \left| \right| ^ {2} \left| \right| ^ {2} \left| \right| ^ {2} \left| \right| ^ {2} \left| \right| ^ {2} \left| \right| ^ {2} \left| \right| ^ {2} \left| \right| ^ {2} \left| \right| ^ {2} \left| \right| ^ {2}. $$
!gIgIgIgIgIgIgIgIgIgIgIgIgIgIgIgIgIgIgIgIgIgIgIgIgIgIgIgIgIgIgIgIgIgIgIgIgIgIgIgIgIgIgIgIgIgIgIgIgIgIg
JgI Jllo 1j4 .JqJI
e iJguc Ugoo 4.2
LgolcJoo gboJI aGlc JpO c9 UaiI Jyol Joo gla Joo Sli .Lgio 1Uauo
jaiwui aclull jloc as
dilso
25 U
aL a o logg 1c Jn j g w
12 ab g g 1Joaal 0j g
12 gl li aolal 1sJ
12 1c g 12o 1Jol 1Jl 1Jl
. g j k l i z go
g w, 12aI 12o 12o 12o 12o
(E-Nr.) aii I I p J I d J I d J I d J
. jlg j b n Jn Jn Jn Jn Jn Jn Jn Jn Jn Jn Jn Jn Jn Jn Jn Jn Jn Jn Jn Jn Jn Jn Jn Jn Jn Jn Jn Jn Jn Jn Jn Jn Jn Jn Jn Jn Jn Jn Jn Jn Jn Jn Jn Jn Jn Jn Jn Jn Jn Jn J n J n J n J n
Thank you for buying a Bosch Home Appliance!
Register your new device on MyBosch now and profit directly from:
- Expert tips & tricks for your appliance
- Warranty extension options
- Discounts for accessories & spare-parts
- Digital manual and all appliance data at hand
- Easy access to Bosch Home Appliances Service
Free and easy registration – also on mobile phones:
www.bosch-home.com/welcome

Looking for help? You'll find it here.
Expert advice for your Bosch home appliances, help with problems or a repair from Bosch experts.
Find out everything about the many ways Bosch can support you: www.bosch-home.com/service
Contact data of all countries are listed in the attached service directory.
BSH Hausgeräte GmbH
Carl-Wery-Straße 34
81739 München, GERMANY
www.bosch-home.com
A Bosch Company

8001258711 (020520)
de, en, fr, it, nl, da, no, sv, fi, es, pt, el, tr, pl, uk, ru, ar
Valid within Great Britain:
Imported to Great Britain by
BSH Home Appliances Ltd.
Grand Union House
Old Wolverton Road
Wolverton, Milton Keynes
MK12 5PT
United Kingdom