USER MANUAL TE655319RW SIEMENS
Register your product online
| en | English | 2 |
| fr | François | 25 |
| nl | Nederland | 50 |
| pl | Polski | 74 |
| cs | Čeština | 99 |
| ru | Russkii | 122 |
Included in delivery (see page 5)
Dear Coffee Connoisseur,
Congratulations on purchasing this fully automatic coffee machine from Siemens.
This instruction manual describes a number of versions of the appliance with minor differences.
Please also take note of the enclosed Quick reference guide, which you can then keep in the specially provided compartment 16 until you need it again.
How to use these instructions:
You can open up the front cover of this instruction manual to see illustrations of the appliance with each part numbered. These numbers will be referred to throughout the text.
Example: brewing unit 14
These instructions also show display texts and symbols in a special way so that you can clearly see where we refer to texts displayed by the appliance or symbols that are marked on it.
Example of display texts: Espresso Example of control elements:[start/stop]
Contents
Intended use 3
Important safety information. 3
Included in delivery. 5
Overview. 5
Overview of control elements 6
Display 7
Initial use. 8
Childproof lock. 9
Preparing drinks. 9
Preparing coffee drinks. 11
Preparation using milk 11
Preparation using ground coffee 12
Dispensing hot water 12
Adjusting the grind setting 12
Menu 13
Care and daily cleaning 15
Cleaning the milk system. 16
Cleaning the brewing unit (Figure G)......17
Service programmes. 18
Cleaning the milk system. 18
Dscaling. 19
Cleaning 19
calc'nClean 20
Tips on energy saving. 21
Frost protection. 21
Storing accessories 21
Accessories 21
Disposal. 21
Guarantee 21
Simple troubleshooting 22
Technical specifications 24
Intended use
This appliance is designed for processing normal household quantities in the home or similar quantities in non-industrial applications. Non-industrial applications include e.g. use in canteens in shops, offices, agricultural and other commercial businesses, as well as use by guests in boarding houses, small hotels and similar dwellings.
Only use the appliance indoors at room temperature and up to 2000 m above sea level.
Please read and follow the operating instructions carefully and keep them for later reference! Enclose these instructions when you give this appliance to someone else.
This appliance may be used by children aged 8 years and older and by persons with reduced physical, sensory or mental capabilities or who lack experience and / or knowledge if they are supervised or have been given instruction in the safe use of the appliance and have understood the dangers involved.
Keep children under 8 years of age away from the appliance and the power cord and do not allow them to use the appliance. Children must not play with the appliance. Cleaning and user maintenance may not be carried out by children, unless they are aged 8 years or older and are supervised.
Warning
Risk of electric shock!
The appliance may only be connected to a power supply with alternating current via a correctly installed socket with earthing. Ensure that the protective conductor system of the domestic supply has been correctly installed.
- Connect and operate the appliance only in accordance with the specifications on the rating plate.
- Do not use the appliance if the power cord and/or appliance are damaged.
Only our customer service may repair the appliance, e.g. by replacing a damaged power cord, in order to avoid hazards.
- Never immerse the appliance or mains cord in water.
If there is a fault, pull out the mains plug immediately or switch off the power supply.
Warning
Hazard due to magnetism!
The appliance contains permanent magnets which can affect electronic implants such as pacemakers or insulin pumps. Persons wearing electronic implants must maintain a minimum distance of 10 cm from the appliance and from the following parts upon removal: milk container, milk system, water tank and brewing unit.
Warning
Risk of suffocation!
- Do not allow children to play with packaging material.
Store small parts safely as they can be easily swallowed.
Warning
Risk of injury!
- Do not reach into the grinding unit!
- Improper use of this appliance may result in injury.
Warning
Risk of burns!
The milk system becomes extremely hot. After use, always let it cool down before you touch it.
After use the surfaces of the heating element or hotplate can remain hot for some time.
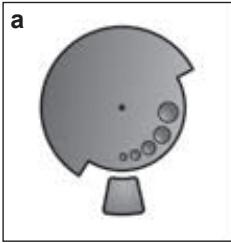
Included in delivery
(Figure A on the fold-out pages)
Fully automatic coffee machine
品 User Manual
Quick reference guide
Milk tube and suction pipe
Water hardness testing strip
Measuring spoon
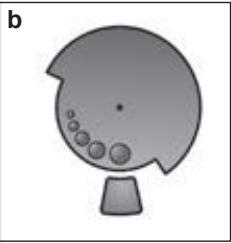
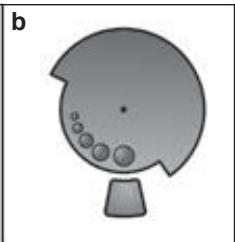
Overview
(Figures B, C, D, E, F and G on the fold-out pages)
1 Mains switch ①
2 Control panel (see next page)
3 Display
4 Drinks outlet (coffee, milk, hot water), height-adjustable
a) Cover
b) Milk system/coffee outlet (two-part)
c) Milk tube
d) Suction pipe
5 Removable water tank
6 Lid for water tank
7 Storage compartment for measuring spoon
8 Measuring spoon (insertion aid for water filter)
9 Bean container
10 Aroma cover
11 Dial selector for grinding level
12.739 (for ground coffee/cleaning tablet)
13 Door to brewing unit
14 Brewing unit a) Locking mechanism b) Cover
15 Eject lever
16 Storage compartment for quick reference guide
17 Drip tray
a) Drip tray panel
b) Drip plate
c) Coffee grounds container
d) Floater *
18 Compartment for power cord
19 Rating plate (E number, FD)
- These user instructions describe a number of appliance versions. Items marked * are not present in all models.
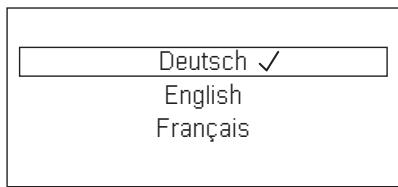
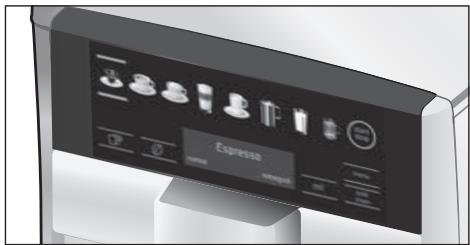
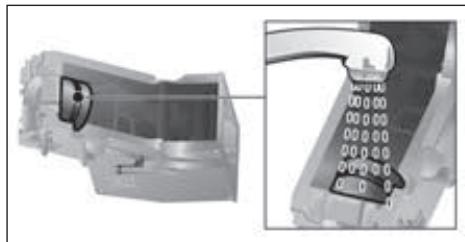
Overview of control elements
(Figure B on the fold-out pages)

The following symbols are visible or backlit depending on the appliance's current operating mode:
| Espresso | Caffe Latte |
| Coffee | Milk froth |
| Cappuccino | Warm milk |
| Latte Macchiato | Hot water |
| [ start/stop] - Start/stop button | [√] - Selection down |
| [ ]- Back | menu | [menu] - Open menu |
| [ ]- Dispense two cups simultaneously | ok√ | [ok√] - Confirm/Store |
| [ ∅] - Set coffee strength | ml | [ml] - Select cup size |
| milk clean | [ milk clean] - Service program for milk system (touch briefly) and childproof lock (touch for at least 3 seconds). | | |
Mains switch ①
The mains switch ① is used to switch the appliance on or off. The appliance rinses itself automatically when it is switched on and off.
The appliance does not rinse if:
- it is still warm when switched on, or
- no coffee was dispensed before it was switched off.
The appliance is ready for use when the symbols and the display on the control panel are lit.
Control panel (touch field)
In the control panel you can easily navigate the controls just by touching the symbols and characters.
You will hear an audible signal.
These audible signals can be switched on or off (see the section "Menu - Key tones").
Drink selection
Touching the corresponding symbol selects the desired drink (see the section "Preparing drinks").
Touching [start/stop] either begins preparing a drink or launches a service programme. If you touch [start/stop] again while the drink is being prepared, dispensing will be prematurely halted.
Touching [menu] calls up the menu, the navigation symbols will be activated and light up. Touch [√], [ok√] and [∫] to navigate through the menu and call up information or change settings (see the section "Menu").
Drink options
Touching [O] or [ml] adjusts the strength or size of the drink, touching [P] prepares two cups simultaneously as soon as you touch [start/stop] to begin dispensing (see the section "Preparing drinks").
milk clean and childproof lock
Briefly touching [ milk clean ] calls up the cleaning programme for the milk system (see the section "Daily maintenance and cleaning - Cleaning the milk system").
Touching [ milk clean ] for 3 seconds or more activates or deactivates the childproof lock (see the section "Childproof lock").
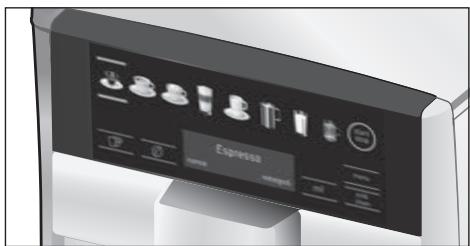
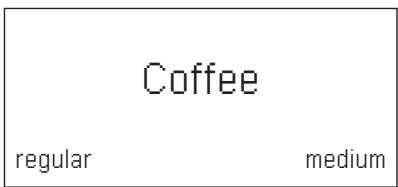
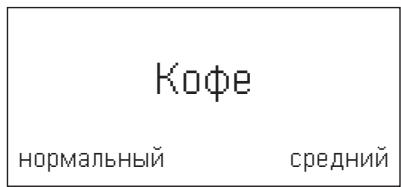
Display
The display shows the selected drinks and settings plus messages reporting the appliance's operating status.
Espresso
regular
medium
Please refill water tank
These messages are cleared as soon as the action has been carried out.
Initial use
General
Fill the appropriate container using only pure, cold, uncarbonated water and solely roasted beans. Do not use coffee beans that have been glazed, caramelised or treated with other additives containing sugar, since they will block the brewing unit. The water hardness setting on the appliance can be adjusted. The factory setting for the water hardness is 4. Use the enclosed test strip to determine the hardness of your water supply. If this shows a value other than 4, you will need to programme the appliance appropriately after it has been taken into service (see section "Menu - Water hardness").
Setting up the appliance
- Remove any protective plastic film.
- Place the fully automatic coffee machine on a level, waterproof surface that is able to support its weight.
- The appliance's ventilation slits must not be covered or obscured.

Important: Only use the appliance in a frost-free room. If it has been transported or stored at temperatures below 0^ , wait at least 3 hours before taking it into operation.
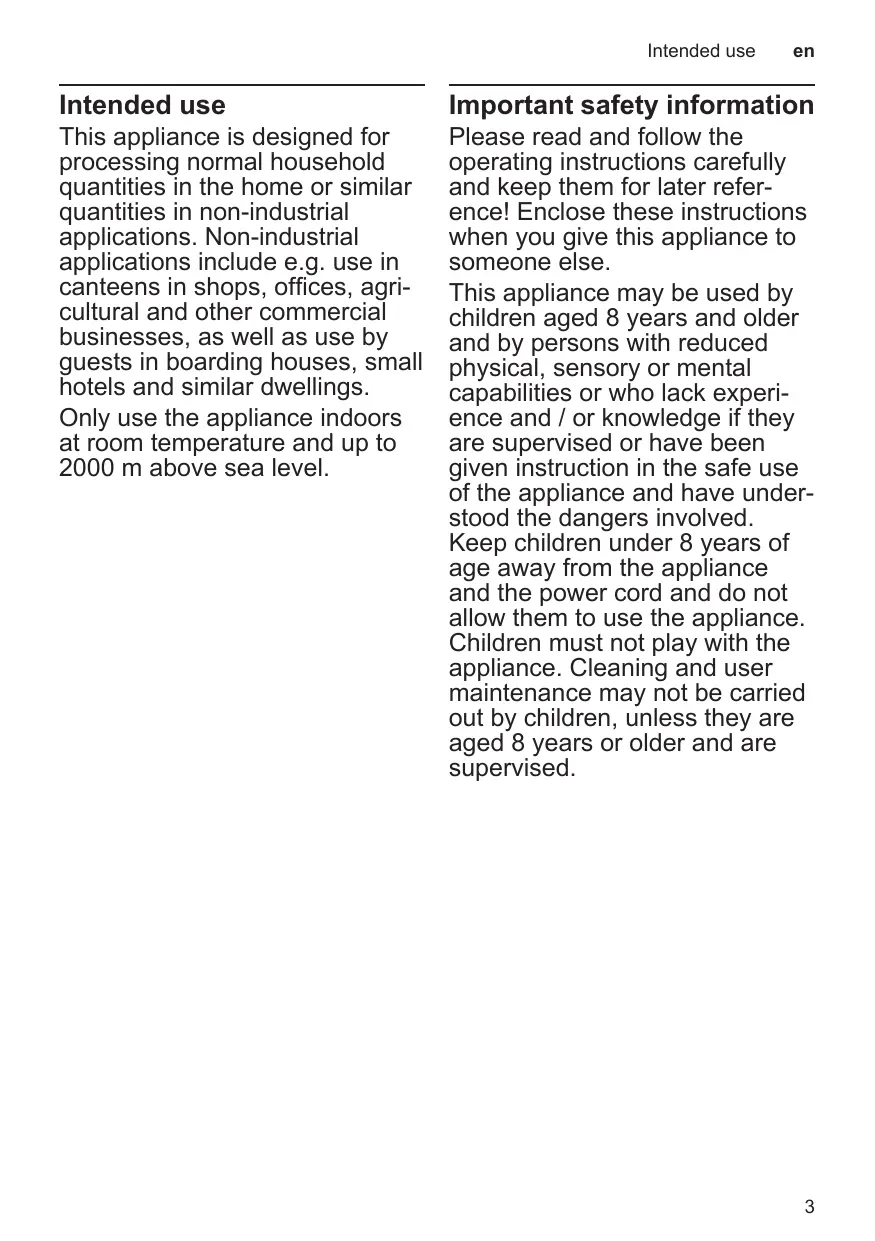
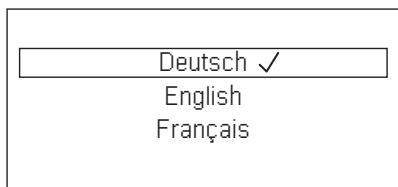
The control panel and the display will be activated. The display will show the previously specified language, which will also be used for all subsequent display texts. A number of different languages are available.
- Touch [√] repeatedly until the display indicates the desired language.
- Touch [start/stop] to confirm your selection.
The chosen language is now stored. The brand logo will light up on the display 3. The appliance will heat up and rinse itself, a small amount of water will run out of the drink outlet 4.
The appliance is ready for use when the symbols and the display on the control panel are lit.
The factory settings of the fully automatic coffee machine are programmed for optimal performance. The appliances switches off automatically after a configured time (see the section "Menu - Automatic shut-down").
i When the appliance is used for the first time, after a service program has been run and when it has not been operated for a long period, the first beverage will not have the full aroma and should not be consumed.
i When the fully automatic coffee machine is first used, you will achieve a suitably thick and stable "crema" only after the first few cups have been dispensed.
If the appliance is in use for a long period of time, water droplets will form on the ventilation slits. This is normal.
Childproof lock
The appliance can be locked to protect children against scalding and burns.
- Touch [milk clean] for at least 3 seconds.
A key symbol appears on the display 3.
The childproof lock is now active.
It is no longer possible to operate the appliance.
- Touch [milk clean] for at least 3 seconds. The key symbol disappears from the display 3. The childproof lock is now deactivated. The appliance can be used in the usual way.
Preparing drinks
This fully automatic coffee machine grinds fresh beans for every brewing. For optimum quality, store the beans in a cool place in sealed containers.
i Important: Fill the water tank 5 with fresh clean water every day. The tank 5 should always contain sufficient water for operating the appliance.
Cups should be prewarmed, e.g. with hot water. This applies particularly to small thick-walled espresso cups.
i For a number of settings, coffee is prepared in two stages (see "aromaDouble Shot"). Please wait until the process is completely finished.
Different beverages can be prepared just by touching a key.
Drink selection
Touching the appropriate symbol selects the desired drink. Your selection is indicated by lines above and below the symbol. The name of the drink and the currently active values for strength and cup size are shown in display 3.
You can choose from the following drinks:
Espresso Caffe Latte
Coffee Milk froth
Cappuccino Warm milk
Adjusting the strength, selecting ground coffee
Touch [0] to set the strength of your coffee individually or to specify that ground coffee is to be used.
The following settings are possible:
very mild
very strong
mild
doubleshot strong
regular
doubleshot strong+
strong
Ground coffee
- Touching the appropriate symbol selects the desired drink.
- Touch [Ø] repeatedly until the desired setting e.g. strong or Ground coffee (see the section "Preparation using ground coffee") appears on the display.
aromaDouble Shot
The longer the coffee is brewed, the more bitter substances and undesired aromas are released. This has a negative effect on the taste and makes the coffee less easily digestible. So for extra strong coffee, the appliance has a special aromaDouble Shot function. When half the quantity has been prepared, it grinds and brews fresh coffee beans so that only the pleasant, aromatic scents are released.

The aromaDouble Shot function can be selected for any drink containing a proportion of at least 35ml coffee volume. It is not available for small drinks such as a small espresso or when the [] setting is enabled.
Select cup size
Touching [ml] selects the volume of coffee desired.
The following settings are possible:
small
medium
large
- Touching the appropriate symbol selects the desired drink.
- Touch [ml] repeatedly until the display indicates the desired setting.

An arrow or multiple arrows next to the setting, e.g. large 串 , indicate that the preset capacity (see the section "Menu - Set cup size") has been changed.
Two cups at once
Once you have selected a black coffee or milky coffee drink (for some appliances, this applies only to black coffee), touching [P] prepares two cups simultaneously as soon as you touch [start/stop] to begin dispensing. The setting is shown on the display.
- Touching the appropriate symbol selects the desired drink.
- Touch [P].
- Place two prewarmed cups at left and right underneath the beverage outlet 4.
- Touch [start/stop] to begin dispensing the beverage.
The selected drink will be brewed and will then be dispensed into the two cups.

The drink is prepared in two stages (two grinding operations). Please wait until the process is completely finished.

Depending on the type of appliance:
The function "Two cups at once" may be available only for black coffee, not for milky coffee drinks.
Preparing coffee drinks
The appliance must be ready for use.
- Place a prewarmed cup underneath the beverage outlet 4.
- Touch the appropriate symbol to select the desired drink, Espresso or Coffee. The name of the drink and the currently active values for strength and cup size are shown in display.
i You can change the cup size and coffee strength by touching [ml] and [ ] .If you select Ground coffee, follow the procedure described under "Preparation using ground coffee".
For example:
- Touch [ml] repeatedly until the display shows large.
- Touch [ ] repeatedly until the display shows mild.
- Touch [start/stop] to begin dispensing the beverage.
The coffee is brewed and then dispensed into the cup.

You can touch [start/stop] again to prematurely halt dispensing.
Preparation using milk
This fully automatic coffee machine possesses an integrated milk system that enables you to prepare coffee with milk or milk froth or warm milk alone.

Risk of burns!
The upper and lower sections of the milk system 4b become extremely hot. After use, always let them cool down before you touch them.

Caution!
Dried milk residues are difficult to remove, so you should always clean the appliance after each use (see the section "Cleaning the milk system").

While milk is being prepared you may hear a whistling sound. This is due to the technical nature of the milk system 4b.

Touch [start/stop] again to prematurely halt dispensing.
The appliance must be ready for use. The milk tube and suction pipe must be connected.
- Insert the suction pipe 4d into the milk container.
- Place a prewarmed cup or glass underneath the beverage outlet.
Coffee-based drinks with milk
- Touch the appropriate symbol to select Caffe Latte, Latte Macchiato or Cappuccino. The name of the drink and the previously specified values for strength and cup size are shown in display.

You can change the cup size and coffee strength by touching [ml] and [0]. If you select Ground coffee, follow the procedure described under "Preparation using ground coffee".
- Touch [start/stop] to begin dispensing the beverage.
The milk or milk froth is dispensed into the cup or glass first. Then the coffee is brewed and runs into the cup or glass.
You can touch [start/stop] again to prematurely halt dispensing of the milk or coffee, touching [start/stop] twice stops the entire dispensing process.
Milk froth or warm milk
- Touch the appropriate symbol to select Milk froth or Warm milk.
- Touch [start/stop] to begin dispensing the beverage.
Milk froth or warm milk is dispensed from the beverage outlet.
Preparation using ground coffee
This fully automatic coffee machine can also be operated using ground coffee (but not instant coffee).

When using ground coffee, the setting for the strength of the coffee, dispensing two cups at once and aromaDouble Shot is not available.
The appliance must be ready for use.
- Place a prewarmed cup underneath the beverage outlet 4.
- Touch the appropriate symbol to select a black or milky coffee drink.
- Touch [ ] repeatedly until the display shows Ground coffee.
- Open the ground coffee drawer 12.
- Place no more than two level measuring spoons of ground coffee in the drawer.

Caution!
Do not place coffee beans or instant coffee in this drawer.
- Close the ground coffee drawer 12.
- Touch [start/stop] to begin dispensing the beverage.
The coffee is brewed and then dispensed into the cup.

Touch [start/stop] again to prematurely halt dispensing.
Dispensing hot water
Before hot water is dispensed the milk system should be cleaned and the milk tube removed (see the section "Cleaning the milk system"). If the milk system is not cleaned small amounts of milk may be dispensed together with the hot water.

Risk of burns!
The milk system 4b becomes extremely hot. After use, always let them cool down before you touch them.
The appliance must be ready for use.
- Place a prewarmed cup underneath the beverage outlet 4.
- Touch the symbol for Hot water.
- Touch [start/stop] to begin dispensing the beverage.

If you see the message Please remove suction hose, proceed as follows:
Take off the milk tube 4c and then touch [start/stop] again.
Hot water will flow out of the outlet 4.

Touch [start/stop] again to prematurely halt dispensing.
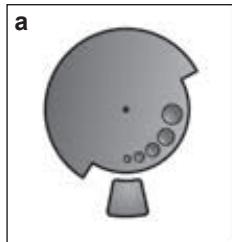
Adjusting the grind setting
You can use the rotary selector 11 to adjust the grind setting from coarse to fine.

Caution!
Adjust the grind setting only while the grinding unit is running, otherwise you may damage the appliance.

Risk of injury!
Do not reach into the grinding unit.
- With the grinding unit running, adjust the selector 11 from fine (a: turn anticlockwise) to coarse (b: turn clockwise).
The new setting will not become apparent until after the second cup of coffee.
i For dark roast coffee beans, choose a finer grind, for lighter beans a coarser grind.
The menu is used for changing individual settings, accessing information and launching processes.
- Touch [menu] to open the menu. In the display you will see the various setting options, the navigation symbols light up. The current setting is marked on the display.
[ \bigtriangledown \big] = \text{move down} ]
[ [ok\checkmark] = \text{confirm / store} ]
[ [☑] = \text{go back} ]
[ [menu] = \text{open the menu} ]
[ exit from the menu ]
i Touching [ ] displays each setting or selection option in order. After you reach the lowest menu item the topmost one is shown again.
For example:
Setting the coffee temperature to max..
- Touch [menu]. The menu is opened.
- Touch [√] repeatedly until the display shows Coffee temperature.
- Touch [ok√], the display shows e.g. high
- Touch [√] repeatedly until the display shows max.
- Touch [ok√] to store the setting. The display shows the confirmation.
- The menu item Coffee temperature appears.
- Touch [☑] to exit from the menu.
You can specify the following settings:
Set cup size
Set up the volume dispensed for each drink and each size of cup. The volumes set up in the factory can be adjusted stepwise.
- Use [√] to choose a drink and touch [ok√] to confirm your choice.
- Use [√] to choose the desired volume and touch [ok√] to confirm your choice. The setting is then saved.
Languages
Setting up the language to be used for display texts.
- Use [√] to choose the desired language and touch [ok√] to confirm your choice.
Water hardness
Set this to the hardness of the local water supply.
Level 1, 2, 3, 4 or Softening system can be selected. The preset level of water hardness is level 4.
- Use [√] to choose the desired water hardness and touch [ok√] to confirm your choice.
It is important to set the water hardness correctly, so that the appliance indicates accurately when the descaling programme should be run.
You can check the water hardness using the enclosed test strip or by asking your local water supplier. If a water softening system is installed in the house, please select the Softening system setting.
- Briefly dip the test strip in the water and check the result after one minute.
| Level | Water hardness |
| German (°dH) | French (°fH) |
| 1 | 1-7 | 1-13 |
| 2 | 8-14 | 14-25 |
| 3 | 15-21 | 26-38 |
| 4 | 22-30 | 39-54 |
Automatic shut-down
Setting how long the appliance should wait after the last drink was prepared before it automatically switches itself off.
You can specify values from 15 minutes to 8 hours. The factory setting is 30 minutes.
- Use [√] to choose the desired interval and touch [ok√] to confirm your choice.
Coffee temperature
Specifying the temperature for coffee drinks and hot water.
You can choose normal, high, or max.
The setting applies to all types of drink preparation.
- Use [√] to choose the desired temperature level and touch [ok√] to confirm your choice.
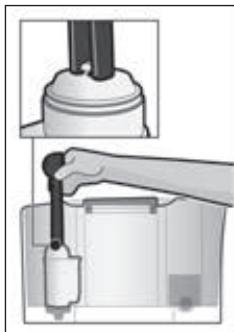
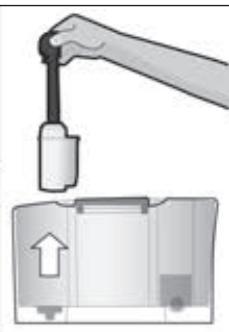
Water filter
- Specifying whether a water filter should be activated or whether no filter is used.
You can choose Activate new filter or No filter.

Using a water filter can prevent the build-up of limescale.
Water filters are available from retail outlets or from customer services (see the section "Accessories").
i Important: Before you can use a new water filter it will need to be rinsed.
- Use the measuring spoon 8 to press the water filter firmly into the water tank 5.
- Fill the water tank with water up to the "max" mark.
- Connect the milk tube 4c to the milk system 4b and the suction pipe 4d.
- Insert the end of the suction pipe 4d into the drip plate 17b.
- Touch [menu] and use [√] to select Water filter.
- Touch [ok√] and use [√] to select Activate new filter.
- Empty the drip tray and re-insert.
- Touch [ok√] to confirm.
Water will now flow through the filter to rinse it.
- Then empty the drip tray and re-insert.
The appliance is ready for use again.


Rinsing the filter simultaneously activates the setting for displaying the message "Please change water filter". When this message appears, or at the latest after two months, the filter will no longer be effective. It needs to be replaced for reasons of hygiene and to prevent a build-up of limescale (which could damage the appliance).
If you do not intend to insert a new filter, select the setting No filter and touch [ok√] to confirm.
If the appliance has not been used for a prolonged period (for example, while you are on holiday), the existing filter should be rinsed before the appliance is used again. To do this, simply dispense a cup of hot water.
Cleaning and care
Starting the special service programmes.
You can select Rinse the milk system,
Descale, Clean or calc'nClean.
- Use [√] to choose the desired programme and touch [ok√] to confirm your choice.
- Touch [start/stop] to begin running the programme.
i Important: Be sure to take note of the section on "Service programmes".
Info Service programmes
Depending on the type of appliance)
Display how many beverages can still be prepared before it will be necessary to run one of the service programmes.
- Use [ ] to display Clean after --- or Descale after --- .
- Touch [S] to exit from the display.
i For technical reasons the counter does not represent a precise number of cups.
Frost protection
Service programme to prevent frost damage during transportation and storage.
This programme completely empties the appliance.
The appliance must be ready for use and the water tank 5 must be filled.
- Touch [start/stop] to begin running the programme.
- Remove the water tank; the appliance automatically empties all its pipes and then switches itself off.
- Empty the water tank 5 and the drip tray 17.
Key tones
Switches on or off the tones that you hear when you touch the control panel.
- Touch [ok√] to confirm your choice.
- Use [▼] to choose Key tones ON or Key tones OFF and touch [ok√] to confirm your choice.
Beverage statistics
Depending on the type of appliance) Shows the volume of drinks dispensed since the appliance was taken into service.
- Touch [ú] to exit from the display.
Factory settings
Resets your own settings to the condition when delivered.
- Touch [start/stop] to clear all your own settings.
Care and daily cleaning

Risk of electric shock!
Before cleaning the appliance, unplug it from the mains. Never immerse the appliance in water. Do not use a steam cleaner.
- Wipe the outside of the appliance with a soft, damp cloth.
- Clean the control panel with a microfibre cloth.
- Do not use any cleaning agents containing alcohol or spirits.
- Do not use abrasive cloths or cleaning agents.
- Always immediately remove any limescale, or residues of coffee, milk, cleaning or descaling solution. It is possible for corrosion to form underneath such deposits.
- New sponge cloths may contain salts that can cause rust films to form on stainless steel, so such cloths should always be thoroughly rinsed before use.
- Pull the drip tray 17 and coffee grounds container 17c towards the front and remove them. Take off the panel 17a and drip plate 17b. Empty and clean the drip tray and coffee grounds container.
- Wipe out the inside of the appliance (holder, trays) and the drawer for ground coffee (this cannot be removed).
- Remove the float 17d and clean it with a moist cloth (depends on the type of appliance).

Do not put the following parts in the dishwasher:
Panel of drip tray 17a, cover 4a, brewing unit 14, water tank 5 and aroma cover 10.

The following parts may be cleaned in the dishwasher:
Drip tray 17, drip plate 17b, coffee grounds container 17c, measuring spoon 8 and the upper and lower parts of the milk system 4b.

Important: The drip tray 17 and coffee grounds container 17c should be emptied and cleaned every day in order to prevent deposits.

If the appliance is cold when switched on, or if it is switched off after dispensing coffee, it rinses automatically. The system is therefore self-cleaning.

Important: If at any time the appliance is not used for a lengthy period (e.g. holiday), clean the entire appliance thoroughly, including the milk system 4b and brewing unit 14.
Cleaning the milk system

Be sure to clean the milk system 4b every time you make a drink involving milk!
You can clean the milk system 4b automatically using programme [milk clean] or by hand.
Automatic cleaning:
- Touch [ milk clean ] and then [ stop].
- Place an empty glass under the beverage outlet 4 and stand the end of the suction pipe 4d in it.
- Touch [start/stop] to begin running the programme.
The milk system 4b will now clean itself automatically.
- Then empty the glass and clean the suction pipe 4d.
Cleaning by hand:

Risk of burns! The milk system 4b becomes extremely hot. After use, always let them cool down before you touch them.
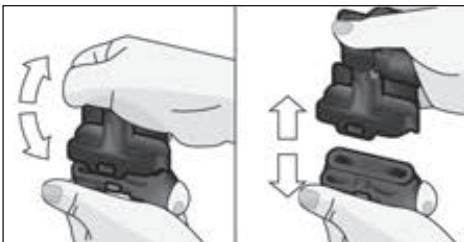
Take the milk system 4b apart to clean it:
- Push the beverage outlet 4 right down.
Take off the cover 4a towards the front and pull off the milk tube.

- Remove the milk system 4b by pulling it straight forward.
Take apart the upper and lower parts of the milk system 4b.
- Separate the milk tube from the suction pipe.
- Clean the individual parts with washing-up liquid and a soft cloth.
- Rinse all parts with clean water and dry them.

The upper and lower parts of the milk system 4b, the milk tube 4c and the suction pipe 4d can also be cleaned in a dishwasher.
- Reassemble the individual parts.
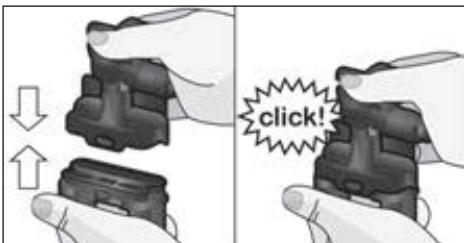
- Place the milk system 4b back in the appliance from the front, making sure it is straight.
- Replace the cover 4a.

See also the Quick reference guide in the storage compartment 16.
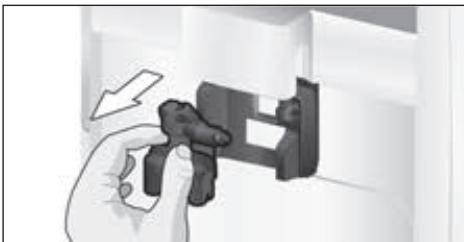
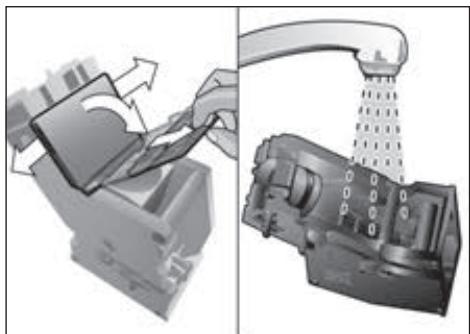
In addition to the automatic cleaning programme, the brewing unit 14 should be removed regularly for cleaning.
- Use the main switch ① 1 to switch the appliance completely off.
- Open the door 13 to the brewing unit.
- Slide the red latch 14a on the brewing unit 14 all the way to the left.
- Press the eject lever 15 right down. The brewing unit will be released.
Take hold of the brewing unit 14 by the recessed grips and carefully remove it.

Important: Clean it without using washing-up liquid and do not put it in the dishwasher.
- Remove the cover 14b and thoroughly clean the brewing unit 14 under running water.
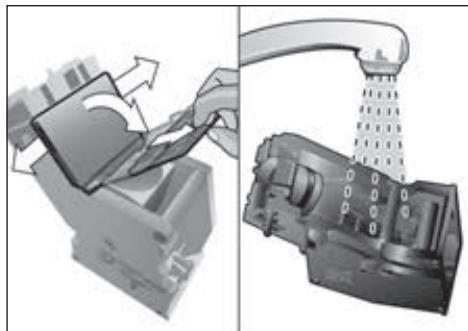
- Thoroughly clean the strainer of the brewing unit under the water jet.
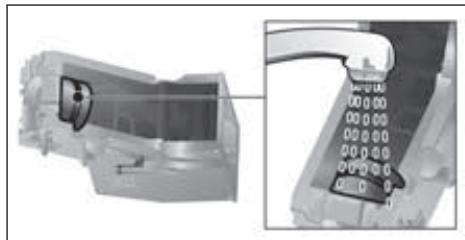
- Thoroughly clean the inside of the appliance with a moist cloth, removing any coffee residues.
- Allow the brewing unit 14 and the inside of the appliance to dry.
- Replace the cover 14b on the brewing unit and then push the brewing unit 14 back into the appliance until it latches into place.
- Press the eject lever 15 right up.
- Slide the red latch 14a all the way to the right and close the door 13.
Service programmes

See also the Quick reference guide in the storage compartment 16.
Following prior notification, either
Descalng necessary or
Cleaning necessary or
calc'nClean necessary.
appears in display 3 at certain intervals.
The unit should immediately be cleaned or descaled using the appropriate programme.
The two processes Descale and Clean can
optionally be carried out together using
the calc'nClean function (see the section
"calc'nClean"). Failure to carry out the
service programme according to the instructions may damage the appliance.

Important: if descending is not performed on the appliance in good time, then the following appears:
Descaling overdue. Appliance will soon be locked press menu for 3 sec. Immediately perform the descending process in accordance with the instructions. If the appliance is locked, it can only be operated again once the descending process has been carried out.

Caution!
For each of the service programmes, use descaling and cleaning agents as described in the instructions.
Never interrupt a service programme. Do not swallow any cleaning fluids! Never use vinegar, citric acid or any vinegar-based or citric acid-based agents. Never place descending tablets or other descending materials in the coffee drawer 12!
Before starting the service program (Descale, Clean or calc'nClean) remove the brewing unit, clean it as instructed and replace it.
Specially developed suitable descending and cleaning tablets are available from retail outlets or from customer services (see the section "Accessories").
Cleaning the milk system
Takes about 1 minute.
- Touch [menu] to open the menu.
- Use [√] to choose Cleaning and care and touch [ok√] to confirm your choice.
- Use [√] to choose Rinse the milk system and touch [ok√] to confirm your choice.
- Touch [start/stop] to begin running the programme.

The milk system can also be cleaned by pressing [milk clean].
The display 3 will indicate the progress of the programme:
- Place an empty glass under the beverage outlet 4 and stand the end of the suction pipe 4d in it.
- Touch [start/stop]. The milk system will now clean itself automatically.
- Then empty the glass and clean the suction pipe 4d.
You should also regularly clean the milk system manually (dishwasher or by hand).
Dscaling
Takes about 30 minutes.
The line at the bottom of the display indicates the progress of the descending process.

If there is a water filter in the water tank 5, be sure to remove it before starting the service programme.
- Touch [menu] to open the menu.
- Use [√] to choose Cleaning and care and touch [ok√] to confirm your choice.
- Use [√] to choose Descale and touch [ok√] to confirm your choice.
- Touch [start/stop] to begin running the programme.
The display 3 will indicate the progress of the programme:
- Empty and re-insert the drip tray 17.

The following request appears: Remove water filter if inserted start.
- Remove the filter and then touch [start/stop] again.
- Pour lukewarm water into the empty water tank 5 up to the "0.51" mark and then dissolve one Siemens descending tablet TZ80002 in it.
- Touch [start/stop].
- Place a container with a capacity of 0.5 litre under the beverage outlet 4.
- Place the end of the suction pipe 4d in the container.
- Touch [start/stop].
The descending programme will now run for about 20 minutes.

If there is not enough descending solution in the water tank 5, you will see the prompt Refill descaler start.

Important: Wipe over the appliance with a soft damp cloth to ensure that you immediately remove any traces of descending solution. It is possible for corrosion to form underneath such deposits. New sponge cloths may contain salts that can cause rust films to form on stainless steel, so such cloths should always be thoroughly rinsed before use. Clean the suction pipe 4d of the drinks outlet particularly carefully.
The appliance has finished descaling and is ready for use again.
Cleaning
Takes about 9 minutes.
The line at the bottom of the display indicates the progress of the descending process.
- Touch [menu] to open the menu.
- Use [√] to choose Cleaning and care and touch [ok√] to confirm your choice.
- Use [√] to choose Clean and touch [ok√] to confirm your choice.
- Touch [start/stop] to begin running the programme.
The display 3 will indicate the progress of the programme:
The appliance has finished cleaning and is ready for use again.
calc'nClean
Takes about 43 minutes.
calc'nClean combines the functions Descale and Clean.
If both programmes are due to be carried out close together the fully automatic coffee machine will automatically suggest this service programme.
The line at the bottom of the display indicates the progress of the descending process.

If there is a water filter in the water tank 5, be sure to remove it before starting the service programme.
- Touch [menu] to open the menu.
- Use [√] to choose Cleaning and care and touch [ok√] to confirm your choice.
- Use [√] to choose calc'nClean and touch [ok√] to confirm your choice.
- Touch [start/stop] to begin running the programme.
The display 3 will indicate the progress of the programme:
- Empty and re-insert the drip tray 17.
- Open the ground coffee drawer 12.
- Drop one Siemens cleaning tablet in the drawer 12 and close it.
- Touch [start/stop].

The following request appears: Remove water filter if inserted start.
The descending programme will now run for about 28 minutes.

If there is not enough descending solution in the water tank 5, you will see the prompt Refill descaler start.
- Add more descending solution and then touch [start/stop] again.
- Rinse the water tank 5 and refill it with fresh water up to the "max" mark.
- If you use a filter, replace it now.
- Touch [start/stop].
The descending programme will now run for about one more minute, and then the cleaning programme will run for about 7 minutes and rinse the appliance.
- Empty and re-insert the drip tray 17.

Important: Wipe over the appliance with a soft damp cloth to ensure that you immediately remove any traces of descending solution. It is possible for corrosion to form underneath such deposits. New sponge cloths may contain salts that can cause rust films to form on stainless steel, so such cloths should always be thoroughly rinsed before use. Clean the suction pipe 4d of the drinks outlet particularly carefully.
The appliance has finished descaling and is ready for use again.

Important: If any of the service programmes is ever interrupted, for instance by a power failure, please proceed as follows:
- Rinse the water tank 5 and refill it with fresh water up to the "max" mark.
- Touch [start/stop].
The appliance will be rinsed for approx.
2 minutes for safety reasons.
- Empty and re-insert the drip tray 17.
The aborted service programme must be restarted.
Tips on energy saving
- When the fully automatic coffee machine is not in use, use the mains switch ① 1 on the front of the appliance to switch it off.
- In the menu, set the Automatic shut-down period to 15 minutes.
- If possible, do not interrupt the dispensing of coffee or milk froth. Stopping a process prematurely results in higher energy consumption and the drip tray fills up more quickly.
- Descale the appliance regularly to avoid a build-up of limescale. Limescale residues cause higher energy consumption.
Frost protection

Caution!
To prevent frost damage during transportation and storage, completely empty the appliance beforehand.
See the section "Menu - Frost protection".
Storing accessories
The fully automatic coffee machine has special compartments to hold the measuring spoon and the Quick reference guide.
- To store the measuring spoon 8, lift off the water tank 5 and place the spoon in the preformed recess 7.
- To store the Quick reference guide, open the door to the brewing unit 13 and insert the guide into the space provided 16.
Accessories
The following accessories are available from retailers or from customer service:
| Accessories | Order number
Retail / Customer service |
| Cleaning tablets | TZ80001/00311807 |
| Descaling tablets | TZ80002 / 00576693 |
| Water filter | TZ70003 / 00575491 |
| Care set | TZ80004 / 00576330 |
| Milk container with “freshLock” lid | TZ80009N / 00576166 |
Disposal

Dispose of packaging in an environmentally-friendly manner. This appliance is labelled in accordance with European Directive 2012/19/EU concerning used electrical and electronic appliances (waste electrical and electronic equipment - WEEE). The guideline determines the framework for the return and recycling of used appliances as applicable throughout the EU. Please ask your specialist retailer about current disposal facilities.
Guarantee
The guarantee conditions for this appliance are as defined by our representative in the country in which it is sold. Details regarding these conditions can be obtained from the dealer from whom the appliance was purchased. The bill of sale or receipt must be produced when making any claim under the terms of this guarantee.
Changes reserved.
Simple troubleshooting
| Problem | Cause | Solution |
| Coffee or milk froth quality varies considerably. | Build-up of limescale in the appliance. | Descale the appliance as described in the instructions. |
| No hot water dispensed. | The milk system or its holder is not clean. | Clean the milk system or its holder (see the section “Cleaning the milk system”). |
| Too little milk froth, or none at all, or the milk system is not taking in any milk. | The milk system or its holder is not clean. | Clean the milk system or its holder (see the section “Cleaning the milk system”). |
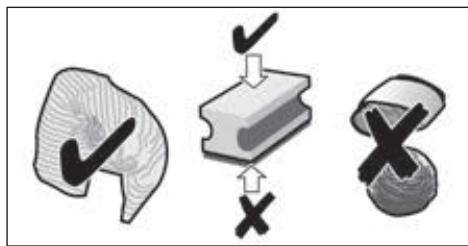
| Milk not suitable for foaming. | Do not use milk that has already been boiled. Use cold milk with a fat content of at least 1.5%. |
| The milk system is incorrectly assembled. | Moisten the upper and lower sections and fit them together. |
| Build-up of limescale in the appliance. | Descale the appliance as described in the instructions. |
| The selected per-cup quantity is not reached. Coffee dispensing slows to a trickle or stops completely. | Coffee is being ground too finely, or the pre-ground coffee is too fine. | Adjust the grinding unit to a coarser setting. Use a coarser ground coffee. |
| Heavy build-up of limescale in the appliance. | Descale the appliance as described in the instructions. |
| Coffee has no “crema”. | Unsuitable type of coffee. | Use a type of coffee with a higher proportion of robusta beans. |
| The beans are no longer fresh. | Use fresh beans. |
| The grinding setting is not suitable for the beans. | Adjust the grinding unit to a finer setting. |
| Coffee is too “acidic”. | The grinding setting is too coarse or the pre-ground coffee is too coarse. | Adjust the grinding unit to a finer setting or use finer pre-ground coffee. |
| Unsuitable type of coffee. | Use a darker roast. |
| Coffee is too “bitter”. | The grinding setting is too fine or the pre-ground coffee is too fine. | Adjust the grinding unit to a coarser setting or use coarser pre-ground coffee. |
| Unsuitable type of coffee. | Change the type of coffee. |
| If you are unable to solve the problem, always call the hotline!
You will find the telephone numbers at the back of these instructions. |
| The coffee tastes "burnt". | The brewing temperature is too high | Reduce the temperature, see the section "Menu-Coffee temperature". |
| The grinding setting is too fine or the pre-ground coffee is too fine. | Adjust the grinding unit to a coarser setting or use coarser pre-ground coffee. |
| Unsuitable type of coffee. | Change the type of coffee. |
| The water filter does not stay in position in the water tank. | The water filter is not mounted correctly. | Firmly press the water filter straight down into the tank connection. |
| The coffee grounds are not compact and are too wet. | The grinding setting is too fine or too coarse, or not enough ground coffee has been used. | Adjust the grinding unit to a coarser or finer setting, or use 2 level measuring spoons of ground coffee. |
| Water dripped onto the inner floor of the appliance when the drip tray was removed. | Drip tray was removed too soon. | Wait a few seconds after the last drink was dispensed before removing the drip tray. |
| Display shows Please refill bean container although the container is already full, or the grinder is not grinding any beans. | Beans are not falling into the grinding unit (beans too oily). | Gently tap the bean container. Possibly change the type of coffee used. When the bean container is empty, wipe it with a dry cloth. |
| Display shows Please empty drip tray despite the drip tray being empty. | Emptying is not detected when the appliance is switched off. | When the appliance is switched on, remove and re-insert the drip tray. |
| The drip tray is soiled. | Clean the drip tray thoroughly. |
| Display shows Refill with still water or change filter | Water tank wrongly inserted. | Insert water tank correctly. |
| Carbonated water in the water tank. | Fill the water tank with fresh tap water. |
| Float is stuck in the water tank. | Remove the tank and clean thoroughly. |
| New water filter did not rinse according to the instructions. | Rinse the water filter according to instructions and then switch on. |
| Air in the water filter. | Dip the water filter into water until no more air bubbles escape, replace the filter. |
| Water filter is old. | Insert a new water filter. |
If you are unable to solve the problem, always call the hotline!
You will find the telephone numbers at the back of these instructions.
| Problem | Cause | Solution |
| Display shows
Please clean brewing unit,
then replace | Brewing unit is soiled. | Clean the brewing unit. |
| Too much pre-ground coffee in the brewing unit. | Clean the brewing unit. Place no more than two level measuring spoons of ground coffee in the drawer. |
| The mechanism of the brewing unit is stiff. | Clean the brewing unit (see the section “Daily maintenance and cleaning”). |
| Display shows
Please restart appliance | Appliance is too warm. | Leave the appliance to cool down. |
| Brewing unit is soiled. | Clean the brewing unit. |
| Display shows
Descaling insufficient.
Repeat process | Incorrect or insufficient descaler or excessive scale existing on appliance. | Perform descaling programme again. |
| Display shows
Please let appliance cool down | Appliance is too hot. | Switch off appliance for 30 minutes. |
| Display shows
Error
Please contact hotline | The appliance has a fault. | Please contact the hotline. |
| If you are unable to solve the problem, always call the hotline!
You will find the telephone numbers at the back of these instructions. |
Technical specifications
| Power connection (voltage – frequency) | 220–240 V – 50/60 Hz |
| Heater wattage | 1500 W |
| Maximum static pump pressure | 15 bar (TE603)
19 bar (TE605/TE607) |
| Maximum water tank capacity (without filter) | 1.7 l |
| Maximum capacity of the coffee bean container | ~300 g |
| Length of power cable | 100 cm |
| Dimensions (H x B x D) | 385 x 301 x 458 mm |
| Weight, empty | 10–12 kg |
| Type of grinding unit | Ceramic |
Informations relatives aux programmes de maintenance
PpuroToBneHne HAnNTKOB. 129
PpIroTOBnEHNe KOpeHbIX HAnNTKOB ....131
PpIroTOBnEHNHe HAnNTKOB C MoJIOKOM....131
PpnoROToBJIeHne HAnNTKOB
N3MOJOTOROKoPe 132
PpiroToBJIeHne ropaye BObl. 133
HactpoKa CTeneHn NOMa 133
MeHIO 134
Yxod n exeDHeBna Ounchka 137
OuNTka MOnoUHOcNCTeMbI 138
OuicTka 3aBapouHoro 6noka (pnc. G) ...139
CepBnchbIe nporpaMMbl 139
OuNTKa MOnOuHoi CnCTeMbI 140
(PnC.B,C,D,E,FnGHa paacklaIbIbIaIOuIXxCsCTpaHnuaX)
1 CeTeBov BvIKnHouaTeIb ①
2 PanaJIb ynpaBneHnA (cM. cIeI. cTpaHnIu)
3 Dusnnei
4 UcTpoIcTBo pa3JIbBa HAnITKOB (KoPe, MoIOKO, TOpJyAa BOJa), peryIINpYEmoe NO BbICote
a) Kpbioka
b) MoNoUHaNc NcTeMa/ycTpoNCTBO dJa pa3JIiBa KoΦe (n3 DByx YacTei)
c) Μιηαήν ἀπη Μολοκα
d) BcabsbAiooJra Tpy6ka
5 Cbemhbl KOHTeHep DJIY BOdbl
6 KpbIuKa KOHTeHepa DnA BObl
7 OtceK dIy xpaHeHn MepHOJ IOxKn dIy MONOTOro KoOe
8 Mepna lojka dny MONOTOro KoFe (npncnocobJeHne dny yctahOBKn cnIbTp a dny BObl)
9 EMKoCTbIa KOpEiHbIX 3epeH
10 Kpbliuka, coxpanhaouza apomat
11 Поворотный рergyлгосте
CTepeHи РOMOЛа
12 BbIbNkHOn OTcEK dIЯ MONOTOro KoΦe (MOJtbi KcΦe/TabneTka dIЯ OChCTkn)
13ДеверcaЗаварочногблoka
14 3aBapOuHbI a)ΦKcaTOp b) KpbIka
15 PbyarДЯ BbIbpaBbAHn
16 OtceKДЯхpaHeHЯ KpaTko INHCTpyKcinn
17 POnDoH
a) 3acJIOHaKa
b) PeWTeTka
c) Emkoctb dnn KofoeHOn ryu
d)Поглавok*
18 Otcek dans xpahehna Kaebna
19 TnnoBa TaBnUka (MoJeIb, FD-Homep)
*B INHCTpyKuI NIO kCnJyatauN
ONICbIbAOTcpa3NmHbIeBapnAHTbl.
0603haeHHbIe * P03nCIN IMEIOCTa TOnbKO
BOnpeJeHnHbIX MoDeJx npnbopa.
KacaiTeCb [V]do Tex nop, noka Ha DInCnIee He 6yJeT BbIeIeH HyxHbI Ia3blk.
- ПикocHTecb K CmBony [start/stop],УTO6bl IOДТВердь ВИбор.ВыбpaHHbЯ3bIK COxpaHЯETcB вamTn.Ha ДиспLee 3 NOYBЯETcN IOROTINTopROBoМарК.Пибop пOnI3BOДNTHarpeB И рОмьIBky,ИЗ уСТpoIyCTBapa3JIbHaHINTKOB 4 BbITEKaET He6OJbShoeKONUYeCTBO BOДbl.
Pnp60rTOB KpaOte,ecnHa naHEnynpaBHeHcBETcCmBOnblI nDcnJIeN.
Ha 3aBoJe-Im3rOToBnTeNe 3anpOrpaMMnpOBaHbCTaHdapThbIe HAcTpoKIn, o6ecne-uauoune ONTmAmlbHbI pexIM paobTbI nonHOCTbIO aTO-maTuuecko KoFemaunHbI. Ype3 HaCTpoEHoe npEdBaupTeNbHO Bpem np6Op aBTOMaTuueckn BbIKlOuyaeTcR (CM.pa3dEIN《MeHIO-ABTOM.OTKlHOUeHNE)
i Pn npBOM nCNoJIb3OBAHn np6opa, nocIe BblIOJIHeHn cepBnCHOn npOrpaMMbl NnPiNocJe dInTeJbHO npepbBa B pa6oTe apomat KoFe B nepBoYaUke H peackpbIbAEtCBA NpHNOH Mepe, 3TOT KoFe He peKOMEnyETc NITb.
Ecnn abTomatuecka KoepemaunHa He nCnojB3OBAlanc paHee, BbI NaHHeTe nOnyataB cTaNJbHyo NeHy Heo6XODIMoTToJIuINHbI TOnbKO Nocne npNroTOBJeHnHECKOJBKnx YaWeK.
i IpnIaNTeHbOMNcNoJIb3OBAHnI YBIIaTcHOpMaJIbHbIM,HTOHa BEHTINLAuONHHbIX OTBepCTnX 6pa- 3yOTcKaIeJIbKIN BObl.
- PπuKacauTecb K CnMbOly [milk clean] He MeHee 3 cekyHd. Ha nCnPee 3 nOBaTeCra KInou. BnokpobBa dna 6e30anachocTn DeTeB BKnUoHeHa Tepe np6opom noJb30aBtbcr HeIb3a.
- PpukacaiTecb K CmboJy [milk clean] He MeHee 3 cekyHd.
Kliou Ha dncnlee 3 ChOba Ncye3aet.
BloKOpOBka dny 3aunTbI DeTei DeakTNBpuBaHa. Tepeb np6op MOxHO NcNoJIb30BaTb, KaK obuHOr.
PnroTOBJIeHne HAnITKOB
3Ta NOnHOCtBIO ABToMaTUnYeCKa KOpemA
ShnHa DnI KaKDoRo 3aBaApNbAHnCmAlbI
BaET CBExKn KoPe. IJr ONTImaNbHorO
CoXpaHeHn KaYeCTBa 3epeH INx HHyKHO
XpaHHTB INpOxJaADHom MeCTe IN B PJIOTHO
3aKpbITOn yNaKOBKe.
BaxHo: Heo6xOdmo exeJHeBHO haJIiBaTb B KOHTeHep dIy BObl 5 CBexkyU XOIOHyU BOy. B KOHTeHepe 5 NOCTOARHNO DOJXHO 6bITb HEKOTOpoe KOINueCTBO BObl,DOCTaTOHoe dIpaB0tBu KoFemaunHbl.
i Yaushky/chaushki, oco6eHNO MaJIeHbKHe, TOnCTOcTeHHbIe YaShKn IJRA 3cnpcecco Heo6xOdIMo IpeBa-pntelbHo nOIOgPeTb, npOONoCKaB ropueh BOdoi.
i HekoToPbIe HaCTpOriKn PpeIOna- rAOT npiroToBVeHne KoFe B Dba 3Tana (CM. «aromaDouble Shot»). IpoJoxdnte, noka npoceC noJIHOcTbU He 3aKOHHTcR.
Pa3JIuHbIe HAnITKn rToOBrTcR OueHb npocTo HaxKaTnEM KHOKN.
BbI6Op HauNTka
KeIaembI HAnITOK BbIbpaetc
HEnOcpeDCTBeHHO npKacAHMe K COOTBETCTByUoUeMy CmBOny. BbIbpaHbI
HaNtOK BblJeTcra NInHnMn HaI N IOc
CmBOnom. Ha3BaHne HAnITka n HactpoEHHbIe B DaHHoe BpEma3NaueHnKpeNoCTN KoPe I pa3Mepa YauKn OTo6paKaIoTcra Ha
dIscPiee 3.
Ha Bb6op npedeIparaIOTc cJeIyUoIe HAnITKn:
3cnpecco KoFe c Monok. KoPe MoOnuHa neHa KanyuHn Ho TEnNoe MOnOko Iatte MaNaTo TOpuaa Boda
HactpoKa KpenocTu KoPe, BbI6Op MOJIoTOrO KoPe
Kacahnem [ ] ININBIVaIbHO HAcTpaIBaETcKpeIOCTb KoPeHOrO HanITKa IINBbIbPaTeC npiroTOBHeHne HAnITKa I3MOJOTOro KoPe.
Bo3MOxHbI CJIeDyUOuNHe NaCTpoKn:
OueH cna6bI OU.KpeKNI
cna6bou doubleshot kpenkni
HopMaJIbHbI doubleshot kpenKn+
KpenKn Monot. KoΦe
MaJIeHbKnI CpeDnI 6oNbwoI
- BbIepeHte XeJeaembl HAnITOK, npNKoc-HyBUnCb K COOTBeTCTByIOUeMy CmMBOJy.
- KacaiTebc CmBOna [ml]doTex npop, nokaHaDnCnJIee He NpOBuTcHyXhAha HAcTpoiKa.

CTpeJIka nIIN CTpeJIKN prJdOM c
HacTpoNkoI, HApNIMep, «60JIbWIOI»
NOKa3bIBaIOT, YTO yCTaHOBNeHHOE
n3rOToBNTeIeM KOJInuCeTBO HAnITka
(cm. rIaNaby «MeHIO - HAcTpoNka pa3M.
yaI.)》6blIO n3MeHeHo.
Дычашк CPA3y
Kacahnem [P] nocne BbIbopa KofoeHoro HauNTka NIN KoofoeHNO-MONOHORo HauNTka (Дя OnpedeJIeHORO Tnna npi6opa - ToJIbKO KofoeHoro HauNTka) roTOBArTcBa DBe YaShKn OndHOBpeMeHHO, KaT OJbKO npriToBJIeHne 6yJeT 3anyuEHO npNKACAHNEM K CmMbony [start/stop].HaCtpoNk oTo6paxa-etcNa Ha DCnJIee.
PnroTOBJeHne KOcpeHbIX HAnNTKOB
Pp6opdoJxKeHbItb roTOB K pa6oTe.
- NocTaBbTe nporpeTuO uAuKU NOy UcTpoiCTBO pa3nBa HAnNTKOB 4.
- BbI6epnte XeJaaembl KoFeHbI HAnNTOK 3cnpecco nn N KoFe, npNKoCHyB- uNcB K COOTBETCTBYUOeMy CmMBOny. Ha3BaHne HAnNTka n HAcTpoEHhBiE B daHHoe BpEmr 3HaueHnra KpeNoCTn KoFe n pa3Mepa YauKn OToobpaKaIoTCra Ha dncJIee.

Pa3Mep qaWeK n KpeNoctb KoPe MoXHO 13MeHnTb, KOChyBUnCb [ml] n[O].PpN Bbl6ope Monot. KoPe BblONHInTe DeiCTBnA, ONuCaHNbIe B pa3dJe «PpuroToBHeHne KoPeHbIX HAnNTKOB IN3 MOnOToro KoPe>.
Hapnimep:
KacaiTecb[ml]doTexnop,poKaHaDinCnnee He NoBITc80JIbwoi.
KacaiTeCb[0]doTexnop,okaHaDInCnnee He NOBITcNla6bI.
- ПикocнTecb K [start/stop],ЧтобИ
НачыпriroTOBJIeHne HAnITKOB.
Кофе 3abapnBaETcR И 3aTeM HaJINBaETcR
В чшky.

Monouhna nha nn TeNoe monoko
BbI6epTe MoOnuHa nHa nn TEnnoe MoNOKo, npNKOCHyBUncK COOTBeTCTByIOUeMy CmBOJy.
- ПикочиТсь K [start/stop], чобla
начаТь пи�OTOBлЕне НаNTКOB.
MOnOuHaI neHa nIIn TcIIOe MoIOKo pa3JIbAHTcN 13 yCTpoIcTbPa3JIbBa HAnITKOB.
ПригOTOBлЕнHe HAnITKOB иЗ мОЛТORO Кофe
B 3TOI NOHOCbIO ABTOMaTHueCKoI KOeMaUINHe MOXHO NcNoJIb3OBaTB TaKKe MOnOTbIKoPe (He pAcTBOpIMbl).

Pn npiroTOBNeHn HAnNTKOB n3 MoNToT O KoFe HaCTpoIka KpeIOCTN KoFe, npiroTOBNeHne DByx ChaWeK n aromaDouble Shot oJHObpeMeHHo He DeiCTByIOT.
PπpδopdoJoxhen6bItbTOTOBkpaδoTe.
- NocTaBbTe npOrpeTuO yauKy nOJ yCTpoiCTBO pa3nBa HAnNTKOB 4.
BbIbepnTe JKeJaembl KoPeHbI nII N KoPeHbO-MoLOHbI HAnITOK, pNkOC-HyBUncB K COOTBeTCTByUOeMy CmMBOJy.
KacaiTeCb [O]doTexnop, nokaHa dncnnee He noaBntcMonoT.KoFe.
- OTKpoITe BbIDBnKHOIOTcEK dIa MoIOTOrO KoPe 12.
3acbInbTe B Hero He 60Jee 2 MepHbIX JIOKEK MONOTORO KoPe.
BHMaHne!
He 3acbinaIte HEMOJIOTBe 3epHa IINI pactBOPIMbIKoPe.
3aKpOTe BbIbBnKHOOTCEKДПЯ MOJTOrO KoPe 12.
-ПикocнTeCbK[start/stop],чTo6bl
HauatbпиroTOBJIeHne HAnNTKOB.
КофеЗавариBaetcIиЗaTemHaJIiBaETcR
ВЧашky.
I IOBTOpHbIM KacaHnEM CmMBOJa [start/stop]MOxHNo IpeJKeBpeMeHHO OCTaHOBtB pa3JIb HAnITKa.
PnroTOBJIeHne ropeyB BObl
Ipeep npirotoBHeHnem ropye BODbIMOOnHna CnCTema DoJnxHa 6blb OunueHaN WJNaHr DnA MOnOKa ChrT (CM. pa3deJ《OuNCTKa MoOnOHn CnCTeMbI》).EcnnMOOnHna CnCTema He OUnSeHa,TO He6oJbShne KOJIynchCTBa MOlOKa MOryT 6blb pa3nITb BmecTe C BoDoi.

Onachoctb oxora!
MOnOuHaNcSnCTema 4b CnIbHo pa3oRpeBaetc. Pocne nCNoB3oBaHnA cnayana DoXdntEc b ee OxJaXeHnA, npexJe cem pInKacatbc K Hei.
Pπpδop dɔŋkɛn 6bɪt b rʊtob k paδoTe.
Ecnn noBnTc coocheHne
CHIMMTE WnAHr DnA MOJOKa BbINONHIne CJeDyUOJIne DeIcTBnR:
- CHINMITE shiHaHr IJMa MONoka 4c N KocHnTecb CmBOJa [start/stop] eue pa3.
Togrya BOda nOdaetc n3 yCTpoiCTBa pa3JIuBa 4.

Повторньим касанем сиMuBoJa [start/stop] moxHo npexKdEbpemHeOCTaHOBnTb pa3JIb HAnITka.
Hactpoja cTepeHn nOmoJa
ПоворOTьМ perулгОТОМ 11 мохно установпь HeобхODИМУTOHКОCTь ПOMОЛа кофe.

BhimaHne!
CTeIeHb NOMOla peRyInpoBaTb TOnbKO npu pa6oTaIOUeKoΦeMOnKe!B npOTnBHom cnyuae BO3MOxHNOOBpeKdEHeYcTpOInCTBa.

Onachoctb TpaBMnpoBaHnia!
He npikacaiTecb K BHyTpehHm Yactram KoΦemONKI.
- Pn pa6oTaUoSei KoΦeMoJke yctaHOBtIb NOBOPHTbI pyuIaTOp 11 MeKdMyMeIKIM NOMOLOm (a: BpaUeHne IPOTuB YacOBoi CTpeKN) n 60JeE rpy6bIM NOMOLOm (b:BpaUeHne No YacOBoi CTpeJIke).

ДeиctBnE HOBOn HacTpoiKu 6yDeT 3aMeTHO JINb HaunHaJ Co BToPoI YaUKN KoPe.

Дя зерен Temнов оьжаркн HeobxOДИМО yCTaHOBuTb 60JIe ToHkyUcTepeH b NOMJla, a 3epeh 60JIeCBETIOn oBxapKn - 60JIe rpy6yI.
MeHIO
MeHIO cIyXnT IJIa INDINBnDyaJIbHOrO n3MeHeHnHaCTpoEK, Bbl3Oba INHOpMaunn 3aNycka npoceccOB.
- MeHIO OTKpbIbAeTcR npKacAHnEM K CIMBOJy [menu].
HaDnCnIe OTo6paKaIoTcpa3NnUHbIe BO3MOxHOctn HAcTpoEk, 3aRopaIoTc CmBOJbI DJIra HaBnRaun. TeKu7aar HAcTPOJa BbIDJePaTeHa DnCnIee.
Habiruaqna no MeHIO:
[ \bigtriangledown \big] = \text{пексяд Виим} ]
[ \text{ok√} ] = ποιΤΒερπιΤb/ coxρaπιΤb
[ ] =BepHyTbC
[menu] = OTKpbITb MEHIO/BblTN N3 MeHIO

Ecnn npNKoCHyTbcr K[ ]TO BO3MOxHOctn HAcTPOeK nIIN BbIbopa 6dyT OTo6paKaTbcr B NOBTopHO- ueCn PocNeIOBaTeNbHOCtN. Korda DOCTnHyT Cambl HxKnHn NyHKT MeHIO, Nocne Hero CHOba NoABJIaETcA Cambl BepxHNIpyHKT MeHIO.
HapnMap:
HacTPOIka MaKc. TempepaTybI KoFe:
KochnTeCb CnmbOJa [menu].OTkpblBa-etcra MeHIO.
KacaiTeCb [V] DoTexnop, noka Ha dinCnlee He noBntcTc Temnepatypa KoPe.
- PπuKoCHntecb K [ok√], NOBnIeTc, HapnIeMep, BbICOKa.
KacaiTeCb[ ]doTexnop,pokaHa DInCnlee He NoBNTcMaKc.
KoCHnTeCb CnMbOJa [ok√], YTObI coxpaHnTb HacTpOriKy. Ha DiuCnIe nOraB- IaIeTcnoTBePckDeHne.
IIOBJIaETcnyHKT MeHIO Tempepatya KoFe.
- Пикочпесь K [ ], чобblы Виити ИЗ MEHIO.
MOxHOBbINOHNITb CNeDyUOuNe HaCTpoKn:
Hactpoika pa3M.uaa.
HacpoKa oBema Ia KaJIO Ro HAnITka I dIaJIIObero pa3Mepa YaUKN.HacptoeHHbI Ha 3aBODe-I3rTOBNTeJe Obem MoXHO N0wArOBO N3MeHЯTb.
CIMBBOJOM [√] BbIbepNTe HaNITOK INoTBePdnte, KcOHyBwUncb [ok].
CIMBBOJOM[VBIbEpuTe HeoOxOДИМы OБьEm IN IOdTBepDInTe, KOCHyB-UIINCb [ok√].
Hacpoika coxpanaetcB namrtn.
3bIKN
HactpoiKa y3bIka,Ha KOTOpOM 6yDyT BbIBOAnTBcA TEKCTbI Ha DnCnPlee.
CIMBBOJOM[√]BbIbepnTE HUxHbIy3bIK NIOaTBePdntE, KOCHyBUnCb [ok√].
XeCTKoCTb BoDbl
HacpoKa CTeneHN JecTKOCTN BObl Dnla DaHHoM MeCTHOCTN.
Moxho Bb6paTb CTyneH JecKoCTn 1,2, 3,4 nnn HactpoKy BoDoyMaRHTeBHaY yCTaHOBka.
IpeBapnteHbHO JecTKoCTb BObl yCTaHOBJeHa Ha 4.
CIMBONOM[√]BbIbepNTe Heo6xoDmyO CTeneHb JKeCTKoCTN BObl NIOdTBePdntE,KoCHyBwUncb [ok√].

Правиьная Настpoяka JжecTKOCTN BOДы Вадна Дпя обессоченя CBОЕВРЕМENHOrO HanOMINHAнЯ O Heo6xOДИМOCtN ydaJIeHЯнHaKInI.
KecTKoCTb BObl MOxHO ONpeJeNTb npn NOMOu npnlaeraMoN HndkaTOpHOn NOLOCKN INy y3HaTb ee B MeCTHO BDOchabXaUoSe OprAn3auu. EcInB Dome IMeETc YCTaHOBKa dny yMaRYeHn BObl, TO Tpe6yeTc HAcTpoiKa BoDoyMraTn- TebhA yCTaHOBKa.
Onyctnte HndnkaTopHyIO NOLOCKy HeHaDOnrBO BODy I NOCMOTpITeYepe3 1 MNHyTy pe3yJbTaT TeCTa.
| Стениь | ЖecTKоCTь ВODы |
| Hem. (°dH) | Фрази. (°fH) |
| 1 | 1-7 | 1-13 |
| 2 | 8-14 | 14-25 |
| 3 | 15-21 | 26-38 |
| 4 | 22-30 | 39-54 |
ABTOM.OTKIOUeyHIE
Hacpoika npomexkyka BpemeHH, no nCTeueHHKOTOPORo pnp6op aBTOMaTHueCKN OTKNIOyaeTcR nocJIe npnroTOBHeHHn nocJeHrero HAnNTKa.
Ha BbIbOp IpeIpaIaIOTc3HaueHnIaO15 MNHT Do 8 YacOB.IpeBapITeIbHO hAcTPOeHHoe Bpem - 30 MNHT.
CIMBOJOM [ ] BbIepeHte HUKhBII npomexkyTOK BpeMeHn IIOITBePdnte, KOCHyBwncb [ok√].
Temnepatypa kOe
HacpoiKa TeMnepaTpybl KoPeiHbIX HAnITKOB I ropayeB OBObl.
Ha Bb6op npednaIaOTc: HopMaJIbHa, BBICOKa, INM MaKc. HAcTpoKa DeIcTBnTeJbHa DnA BCex CnOco6oB npiroTOBJeHnA.
CIMBOJOM [√] BbI6epNTe HUxHbIy yPOBeHb TeMnepaTpybl NIOdTBepdITe, KOCHyBUnCb [ok√].
ΦnIbTp DnA BODbl
3Decb MOXHO HaCTpOINTb, DOnJKeH JIn aKTHBnPoBaTbCRA NJIbTp IIN BODbl INN JKe OH He NCNoJIb3yETcR.
Moxho BbipAaKTHBnHOB.ΦnIbTpnn He yctahOBnEHnIbTp.

BaxHo: Ipeed nCnoIb3OBAHnEm HOBOr OfInbTpA DnA BODbl erO HxKHO pOMblTb.
ДлгэTOROФильтдявОьbl Heo6-XODIMKpeNKOBdABNTbC NOMOIbMOpeHoiLoKKINДЯМоJOTOrO KoFe8B KOHTeHepДлгВОьbl5.
- HanoJIHnTe KOHTeHep BOIoN Do OTMeTkn «max».
- CoeINHInTe ⅢnAhnI DnI MOJOKa 4c C MoIOuHOH CNCTeMOI 4b I BCaCbIBaIOUeI Tpy6KOi 4d.
BCTaBbTe KOHeu BCaCbIbAIOUe Tpy6Kn 4d B NOdoH 17b.
- PpNkoCHNTecb K [menu] n CmBONOM [ ] BbIbepnte FnIbTp DnRA BoDbI.
-ПикocHTeCьК[ok√]N CmBbONOM [ ] Bbl6epnte AKTINBnP.HOB.ФИNbTp
- Onopokhnte noDOnH n BCTaBbTe ero o6paTHO.
- ПОДТВЕРДИТь Выбор, КОСЧУВШИСь [ok√].
Tepeb Boda TeueT uee3 pfNbTp npomblaet erO.
- 3aTeM onopoxhHnte loTOK dIy c6opa KaIeIb N BCTaBbTe erO o6paTHO.
Ppibop cHOba roToB K pa6oTe.

Ppi npombIbKe pfNtbpTa oJHObpeMeHNO aKTHBnpyetcna HAcTPOKa DnA COO6eHnRA 3aMeHnTe PnIbTp DnA BoDbl. Iocne nOaBHeHn 3TOrO COo6uHn nnMaKc. Chepe32 MeCa qnIbTp DnA BOnbl TepReT CBOU 3pFekTnBHOCTb. 3aMeHa Heo6xOdima n3 COo6paXeHn rInHehbl n C ceJIbIO pEDoTbPaSeHn O6pa3OBaHn N3BeCTKOBbIX OTNo- XeHn (BO3MOXhbl NOBpeXeHn np6opa).
EcnHOBbIΦnIbTp He yctaHaBnBaetcra, Bbl6epnte HAcTpoKy He yctaHOBneH ΦnIbTp nIOdTBePdTe, KOCHyBUnCb [ok].

Ecπn npnbopДnlTeNbHoe BpeM He nCNoIb3yETc8 (HaNP., BO BpeM Otnycka), BCTaBJIeHHbI ΦnIbTp Heo6xOdIMo npOMbITb nepei NcNoIb3OBaHNem np6opa.ДЯ 3TOrO npocTo nprirotOBbTe yauKу ropaye BObl.
OncTkauyXoD
3aynctte cneuaJIbHbIe cepBnchbIe nporpaMMbl.
Ha Bb6op npednaraotc OuCTKa MONOCHN CNTembl, YdaJIeHne HAKIN, OuCTKa nn calc'nClean.
- Upe3 [ ] BbIbepuTe Huxkyu npOprpAMMy I NOITBepDInTe, KOCHyBUnCb [ok].
KochnTeCb Cmmbola [start/stop], YTo6bl 3aNyCTnTb npOrpaMMy.

BaxHo: O6raTeIbHo yuHTbIaIte HΦopMaζHIO n3 pa3dela «CepBnchIbe npOrpaMMbl».
HOpMaIgOceBnChbIXnporpaMMax (B3aBncmocnOTtna npnbopa) HnKaIg,CKoJIbKOHaNTKOBeE MoXHO nprirotOBnT,IpexJeHemHyxHObyet BbINOHNtBceBnCHyIO nporpaMMy.
Kacahnem[ ]NOKa3aTb COO6eHna OuNCtKa:--- P NJIY Udan.Hakun:---P.
-ПикocHyBUNcьK[],ВыДNTeИЗ INHДИКaцИN.

BaxHo: BbIOpJIHnIe OunchKy 6e3 IcIb3OBoAHnI MOUxN CpeICTB N He KJaIITe 6nK B IocydomoehHyo MaunHy.
CINMITE KpbIuKy 14b c 3aBapOuHoro 6noka n TuaTeNbHO npOMoIte 3aBapOuHbN 6nOK 14 npOTouHOBdoi.
TtataTeNbHO npOMoIte CnTO 3aBapOuHOrO 6noka nD cTpye BObl.
TtataTeNbHO NOuNCTnTe BHyTpEnHHee npocTpaHCTBO npi6Opa BnaXHoI TKaHbIO uYdaJIte BO3MOxHOb IMeHOUneC8 OCTaTKI KoPe.
- Плождпг, пoka заварочьблok 14и BHyтpenHee npoctpaHCTBO He BbICoxHyT.
- CHOBA yCTAHOBHTe KpbIiKUy 14b Ha 3aBaP OOHbI 6bOK I BCTaBbTe 3aBaOpHbI 6bOK 14do ynpoBaBnpi6op.
- Haxmnte pbuqar dIy BbI6paCbIBaHn 15 Do ynpa BBepx.
Cdbnhte KpaChbI qnkCaTOp 14a Do ynpora Bnpaba N3akpoTe DBepy 13.
CepBnchIe nporpaMMbl

Cm. TaKke KpaTkyU INHCTpyKcNIO B CpeNaJbHom OTCeKe 16.
C onpeJeHNo nepnoDnUHocTbIO nocne 13BeueHna dncJIee 3 noBJIeTcR
Tpe6yetc ydaNTb Haknbl nnn Tpe6yetc ouNCTka nn PpOBeCTn calc'nClean.
PnbopeoHcOxOIMo HeMeJeHHO OuchTb Pn NOMOUs COOTBeTCTByIOUeI pOporpAmMbI INy ydaJIITb HakInb.
Ppoeccby YdaJIeHne HaknIu N OUcTka MoXHo 06beDInHTb yHKcnei calc'nClean (cm. pa3dien «calc'nClean»). Ppi HapyuEHH yKa3aHn IO BbIOJHeHIO cepBUCHO pOrpamMbI BO3MOxHO nOBpeKDeHne np6opa.

Baxho: EcIn CBOeBpeMeHNo He OuchnttbpnpbOpOT hakn,Ha DnCnIee NOBNTc HyxHo ydaI. HAKnIb.Annapat cKopo 6ydet 6nokpoBaH --> HaxmAtb 3 cek. menu. Iocne coo6uEHHemEJenHb BblONHte npouecc ydaJeHHa HAKnI. Ecn np6op 6nOKupOBaH, IM MOxHO 6ydet CHOBA nOlb30BaTbCra TOnbKO nOcNE BblONHeHHoro npoucecca ydaJIeHHa HAKnI.

BhimaHne!
Для каддо сервсног пограмьИncpoьзуITE cpeidCTBA ДлЯУдаеленя Накпи И OчNTКИВCOOTBETCTBиСИНСТРУКиЕ.НВ Кем Спунай He OCTa-HaВПВaBayte сервсную пограмMy! Heпeite пименье ХИДКОSTN!He ДорускаетсЯ ИспolyЗованeуKCyca, cpeidCTB, coDEржuaux Yukcuc,ЛIMOHHoi KICNOTbI IIN CpeIDCTB,CODEржuauxлIMOHHyO KICNOTy?3anpeaetcKaactb TabletknДля Ydaelenя Haknpi ИлИньeCpeIDCTBaДлЯ Ydaelenя HaknpiВВbIbWxHOn OTCEK ДлЯ MONOTOROKofoe 12!
Ipeed 3aynckom COOTBEcTByUocei cepBnCHOH npOrpamMbI (ydaJIeHne HaKIN, ouNCTka nn calc'nClean) Heo6xoJMo CnTb 3aBapOuHbI 6JOK, OOnCTnTb eO B COOTBEcTBeHn C nHCTpyKUnei n CHOBA BCTaBtB.
CneuHaIbHo pa3pa6oTaHHbIe Ta6JIeTKn IaYdaJIeHnHaKINu N OcNCTKn MoxHO npNo6peCTn B Mara3INhax INn Upe3 cepBnCHyO cLyX6y (CM. pa3JeI «PpHaIaJIeXHocTn').
OuNCTKa MOJOnHON CnCTeMbI
Tenepb nporpamma ydaenHaKnPi nnITcnp6JI.28 MInyT.

EcnB KOHTHepe DnB ODbI 5 cnHKOM MaNo CpeCTBa DnY ydaJIeHnHaKINN, NOBJIaETcra TpeBOAHne Doabte CpeCTBO dny ydaI. HAKINN start.
-Добавыстсдоствдя удалени
нakини и сюва кочинецсимьona
[ start/stop ].
-ПюмоуTe KOHTeHepДЯВОБы5и HANOЛHInTe erO CBexeY BDOJdo OTMeTkn «max»(MaKc.).
- Ecni nCnoJIb3yeTcAΦnIbTp, CHOBa BCTaBbTe erO.
- Kocnntecb cmbola [start/stop]. Tenepb nporpamma ydaJIeHnaKuPi dIITc8 eue np6I. 1 MInHyTu, 3aTeM BkIIOUaETc npOrpamma OUnCTKn, KOtOpaJ dIITc8 np6I. 7 MInHyT n IpombIbaet np6Op.
CJIeTe JxNdkoCTb N3 POnDoHa 17 n CHOBa BCTaBBte erO.

BaxHo: IpoTnpaIte np6Op mRkoB BnaXHO TkaHbU, YTObI cpa3y Je ydaJIInTB ocTaTKn pactBopa dJa ydaJIeHnra HAKIN. IoN TaKIMN OCTaTKAMM MOryt O6pa3OBbIBaTbc8 ouarN KoppO3nn. B HOBbIX rYbuaTbIX caJIpeTkax MOryt COpEpxaTbc8 coJN. CoJN MOryt npNBecTN K o6pa3OBaHN Ho HaTe pKabuHbHa CTaNbHbIX DeTaJnx, N03TOMy nepeD INcONb3OBAHNem rYbuaTbIX caJIpeToK INCneJyET TsaTeJIbHO npOnIoCKaTb. TsaTeJIbHO OunchTe BCacBaIbUOyIO Tpy6Ky 4d ycTroINCTBa pa3JIbBa HAnITKOB.
HaKunB B npi6ope ydaJIeHa, n OH cHOba roTOB K pa6Ote.

BaxHo: Ecnn, Hanpimep, BcneIdCTBnpe npe6oeb B 3Heprochab-KeHN 6blIa OCTaHOblHa OHa N3 cepBnCHbIX pOprpaMM, DeiCTByTe CJIeDyUOuMm Obpa3OM:
- Помойт e kHTeHep dЯ BODbl 5
и haboJIHITe erO CBexeB BOdДо
OTMETKn «max».
- KocHTecb CnMBOJa [start/stop].
ДЯбEZOJaCHOCTN B TeUeHNe pIIMepHO
2 MInHyT BbINOJIHReTcPnpMbIBKa pIbOpa.
CJIeTe JxNkOcTb N3 POnDoHa 17 n CHOBa BCTaBBte erO.
AE United Arab Emirates,
BSH Home Appliances FZE
Round About 13,
Plot Nr MO-0532A
Jebel Ali Free Zone - Dubai
Tel.:048814401
mailto:service-uae@bshg.com
www.siemens-home.com/ae
AL Republika e Shqiperise, Albania
ELEKTKO-SERVIS sh.p.k
Rr. Shkelqim Fusha, Selite,
Pallati "Matrix Konstruktion",
Kati 0 dhe +1
1023 Tirane
Tel.: 42278130, -131
Fax: 4 2278 130
mailto:info@elektro-servis.com
EXPERT SERVIS
Rruga e Kavajes,
Kulla B Nr 223/1 Kati I
1023 Tirane
Tel.: 44806061
Tel.: 42274941
Fax: 4 227 0448
Cel: +355 069 60 45555
mailto:info@expert-servis.al
HEATHERTON, Victoria 3202
Tel.: 1300 368 339
mailto:bshau-as@bshg.com
www.siemens-home.com.au
BA Bosnia-Herzegovina, Bosna i Hercegovina
"HIGH" d.o.o.
Gradačačka 29b
71000 Sarajevo
Tel.: 061 10 09 05
Fax:033213513
mailto:bosch_siemens_sarajevo@
yahoo.com
BE Belgique, Belgie, Belgium
BSH Home Appliances S.A.
European Trade Center Building,
5th floor
1784 Sofia
Tel.: 0700 208 18
Fax: 02 878 79 72
mailto:informacia.servis-bg@
bshg.com
www siemens-home.bg
BH Bahrain,
Khalafat Est.
P.O.Box 5111
Manama
Tel.:017400553
mailto:service@khalaifat.com
CH Schweiz, Suisse, Svizzera, Switzerla
BSH Hausgeräte AG
Werkskundendienst
fur Hausgeräte
Fahrweidstrasse 80
8954 Geroldswil
To arrange an engineer visit,
to order spare parts or
accessories or for product
advice please visit
www.siemens-home.co.uk
or call
Tel.: 0344 892 8999*
*Calls are charged at the basic rate,
please check with your telephone service
provider for exact charges
GR Greece, Eλλας
BSH Ikiakes Siskeves A.B.E.
Central Branch Service
17 km E.O. Athinon-Lamias &
Potamou 20
14564 Kifisia
Unit 1 & 2, 3rd Floor
North Block, Skyway House
3 Sham Mong Road
Tai Kok Tsui, Kowloon
Hong Kong
Tel.: 2565 6151
Fax: 2565 6681
mailto:siemens.hk.service@
bshg.com
www.siemens-home.com.hk
HR Hrvatska, Croatia
BSH kučni uredaji d.o.o.
Kneza Branimira 22
10000 Zagreb
Tel.: 01 552 09 99
Fax: 01 640 36 03
mailto:informacije.servis-hr@
bshg.com
www.siemens-home.com/hr
www.siemens-home.com/hu
IE Republic of Ireland
BSH Home Appliances Ltd.
Unit F4, Ballymount Drive
Ballymount Industrial Estate
Walkinstown
Dublin 12
Service Requests, Spares and
Accessories
Tel.: 01450 2655*
Fax:014502520
www.siemens-home.com/ie
*0.03 € per minute at peak.
Off peak 0.0088 € per minute.
IL Israel,
C/S/B/ Home Appliance Ltd.
1, Hamasger St.
North Industrial Park
Lod, 7129801
Tel.:089777222
Fax:089777245
mailto:csb-serv@csb-ltd.co.il
www.siemens-home.co.il
IN India, Bharat, यानल
BSH Household Appliances
Mfg. Pvt. Ltd.
Arena House, 2nd Floor, Main Bldg,
Plot No. 103, Road No. 12
MIDC, Andheri East
Mumbai 400 093
Tel.: 022 6751 8080
www.siemens-home.com/in
IS Iceland
Smith & Norland hf.
Noatuni 4
105 Reykjavik
Tel.: 0520 3000
Fax:05203011
www.sminor.is
IT Italia, Italy
www.siemens-home.com/it
KZ Kazakhstan, Ka3akctah
IP Turebekov Yerzhan
Nurmanovich
Jangeldina str. 15
Shimkent 160018
Tel.: 0252 31 00 06
mailto:evrika_kz@mail.ru
LB Lebanon, jli/
Tehaco s.a.r.l
Boulevard Dora 4043 Beyrouth
P.O.Box 90449
Jdeideh 1202 2040
Tel.:01255211
mailto:Info@Teheni-Hana.com
LT Lietuva, Lithuania
Baltic Continent Ltd.
Lukšio g. 23
09132 Vilnius
Tel.: 05 274 1788
Fax:052741765
mailto:info@balticcontinent.It
www.balticcontinent.It
LU Luxembourg
www.siemens-home.com/lu
LV Latvija, Latvia
General Serviss Limited
Bullu street 70c
1067 Riga
Tel.:07424137
mailto:bt@olimpeks.lv
MD Moldova
S.R.L. "Rialto-Studio"
yn. LycceBa 98
2012 KuniHneB
TeJ./ΦaKc:022 23 81 80
MK Macedonia, MaKeDoHnJa
GORENEC
Jane Sandanski 69 lok.3
1000 Skopje
Tel.: 02 2454 600
Mobil: 070 697 463
mailto:gorenec@yahoo.com
MT Malta
Aplan Limited
The Atrium
Mriehel by Pass
BKR3000 Birkirkara
Tel.: 025 495 122
Fax: 021 480 598
mailto:lapap@aplan.com.mt
NL Nederlande, Netherlands
Unit F 2, 4 Orbit Drive
Mairangi Bay
Auckland 0632
Tel.:094770492
Fax:094772647
mailto:bshnz-cs@bshg.com
PL Polska, Poland
www.siemens-home.com/pt
RO Romania, Romania
BSH Electrocasnice srl.
Sos. Bucuresti-Ploiesti,
nr. 19-21, sect.1
13682 Bucuresti
Tel.: 021 203 9748
Fax:021 203 9733
mailto:service.romania@
bshg.com
www.siemens-home.com/ro
RU Russia, Poccn
www.siemens-home.com/sk
TR Türkiye, Turkey
BSH Ev Aletleri Sanayi
ve Ticaret A.S.
Fatih Sultan Mehmet Mahallesi
Balkan Caddesi No: 51
34771 Ümraniye, Istanbul
Tel.:02164446688*
Fax:02165289188
mailto:careline.turkey@bshg.com
www.siemens-home.com/tr
gama-electronics.com
XS Srbija, Serbia
BSH Kucni aparati d.o.o.
15th Road Randjespark
Private Bag X36, Randjespark
1685 Midrand-Johannesburg
Tel.:086 002 6724
Fax:0866171780
mailto:applianceserviceza@
bshg.com
www siemens-home.com
Service-Hotlines
www.siemens-home.com
AE 048030501
AL 0662064794
AT 0810550522
AU 1300368339
BA 033213513
BE 070222142
BG 029315062
CH 0434554095
CN 4008899999
Call rates depend on the network used
CZ 0251095546
DE 091170440044
DK 44898985
EE 06278730
ES 902118821
FI 0207510700
Calls charged at local or mobile rate
GR 18 182 (Aotri xpeo)
HR 013028226
HU 003614895461
IE 014502655
IL 089777222
IS 05203000
IT 800 018 346 (Line Verde)
LI 052741788
LU 26349300
LV 067425232
ME 050432575
MK 022454600
NL 0884244020
NO 22660600
PL 801 191 534
PT 214250720
RO 021 203 9748
RU 88002002962
SE 0771 11 22 77 (local rate)
SK 0244452041
SL 012007017
TR 4446688
Cagri merkezini sabit hatlardan aramanin bedeli gehir ici
ücretlendirme, Cep Telefonlarndan ise kullanilan tarifeye gore
degiskenlik gostermedtekdir
US 8664474363(toll free)
XK 044172309
XS 0112139552
Manufactured by BSH Hausgeräte GmbH under Trademark License of Siemens AG