
DBB6960HM - Built-in oven AEG - Free user manual and instructions
Find the device manual for free DBB6960HM AEG in PDF.
 FR
FR
 BG
BG
 CS
CS
 DA
DA
 DE
DE
 EL
EL
 EN
EN
 ES
ES
 ET
ET
 FI
FI
 HU
HU
 IT
IT
 KK
KK
 LT
LT
 LV
LV
 MK
MK
 NL
NL
 NO
NO
 PL
PL
 PT
PT
 RO
RO
 RU
RU
 SK
SK
 SL
SL
 SQ
SQ
 SR
SR
 SV
SV
 TR
TR
 UK
UK
| Product Type | Built-in Hood |
| Brand | AEG |
| Model | DBB6960HM |
| Dimensions (W x D x H) | 600 x 500 x 120 mm (estimated) |
| Weight | Approximately 15 kg |
| Power Supply | 230 V, 50 Hz |
| Motor Power | 300 W (estimated) |
| Lighting | Integrated LED, 2 x 3 W (estimated) |
| Suction Speeds | 4 speeds + Breeze function (ambient ventilation) |
| Grease Filter | Dishwasher-safe, monthly cleaning |
| Activated Carbon Filter | LONG LIFE type washable or non-washable depending on model, replacement every 3-4 months |
| Suction Capacity | Up to 800 m³/h (estimated) |
| Noise Level | 65 dB (estimated at max speed) |
| Material | Stainless Steel |
| Controls | Touch panel with LED indicators |
| Hob²Hood Function | Yes, wireless connection with compatible hob |
| Filter Saturation Indicator | Yes, with manual reset |
| Installation | Minimum distance 50 cm for electric cookers, 65 cm for gas |
| Safety | Automatic shutdown in case of overheating, motor stop if filter saturated |
| Maintenance | External cleaning with damp cloth and neutral detergent, do not use alcohol |
| Spare Parts | Filters, LED bulbs, remote control (if applicable) available via AEG |
| Repairability | Estimated repairability score: 7.5/10 (parts available and easy disassembly) |
Frequently Asked Questions - DBB6960HM AEG
User questions about DBB6960HM AEG
0 question about this device. Answer the ones you know or ask your own.
Ask a new question about this device
Download the instructions for your Built-in oven in PDF format for free! Find your manual DBB6960HM - AEG and take your electronic device back in hand. On this page are published all the documents necessary for the use of your device. DBB6960HM by AEG.
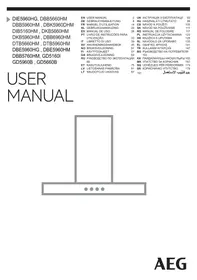
USER MANUAL DBB6960HM AEG
DIE5960HG, DBB5660HM DBB5960HM, DBK5960DHM DIB5160HM, DKB5660HM DKB5960HM, DBB6960HM DTB5660HM, DTB5960HM DBE5960HG, DBE5960HM DBB5760HM, GD5160I GD5960B, GD5660B
EN USER MANUAL 2 UK INSTRUCTIONS FOR USE 3 RU OPERATING MANUAL 93 DE GEBRAUCHSANLEITUNG 8 HU HASZNÁLATI ÚTMUTATÓ 99 FR MANUEL D'UTILISATION 14 CS NÁVOD K POUŽITÍ 105 NL GEBRUIKSAANWIJZING 20 SK NÁVOD NA POUŽITIE 111 ES MANUAL DE USO 26 RO MANUAL DE FOLOSIRE 117 PT LIVRO DE INSTRUÇÕES PARA UTILIZAÇÃO 32 HR KNJIZICA S UPUTAMA 129 IT LIBRETTO DI USO 39 SL NAVODILA ZA UPORABO 135 SV ANVÄNDNINGSHANDBOK 45 EL ΟΔΗΓΙΕΣ ΧΡΗΣΗΣ 140 NO BRUKSVEILEDNING 51 TR KULLANIM KİTAPÇIĞI 147 FI KÄYTTÖOHJEET 57 BG РЪКОВОДСТВО ЗА ПОТРЕБИТЕЛЯ 153 DA BRUGSVEJLEDNING 63 RU РУКОВОДСТВО ПО ЭКСПЛУАТАЦИИ 160 UK ПОСІБНИК КОРИСТУВАЧА 69 MK УПАТСТВО ЗА КОРИСНИК 167 ET KASUTUSJUHEND 75 SQ UDHËZUES PËR PËRDORIMIN 173 LV LIETOŠANAS PAMĀCĪBA 81 SR КОРИСНИЧКО УПУТСТВО 179 LT NAUDOTOJO VADOVAS 87 191
USER MANUAL
FOR PERFECT RESULTS
Thank you for choosing this AEG product. We have created it to give you impeccable performance for many years, with innovative technologies that help make life simpler – features you might not find on ordinary appliances. Please spend a few minutes reading to get the very best from it.
Visit our website to:

Get usage advice, brochures, trouble shooter, service information:
www.aeg.com

Register your product for better service:
www.aeg.com/productregistration

Buy Accessories, Consumables and Original spare parts for your appliance:
www.aeg.com/shop
ENVIRONMENT CONCERNS
Recycle the materials with the symbol . Put the packaging in applicable containers to recycle it. Help protect the environment and human health and to recycle waste of electrical and electronic appliances. Do not dispose appliances marked with the symbol with the household waste. Return the product to your local recycling facility or contact your municipal office department for household waste or the shop where you purchased this product.
CUSTOMER CARE AND SERVICE
We recommend the use of original spare parts.
When contacting Service, ensure that you have the following data available.
The information can be found on the rating plate. Model, PNC, Serial Number.
Warning / Caution-Safety information.
Subject to change without notice.
SAFETY INFORMATION
Before any cleaning or maintenance operation, disconnect hood from the mains by removing the plug or disconnecting the mains electrical supply. Always wear work gloves for all installation and maintenance operations. This appliance can be used by children aged from 8 years and above and persons with reduced physical, sensory or mental capabilities or lack of experience and knowledge if they have been given supervision or instruction concerning use of the appliance in a safe way and understand the hazards involved. Children shall not be allowed to tamper with the controls or play with the appliance. Cleaning and user maintenance shall not be made by children without supervision. The premises where the appliance is installed must be sufficiently ventilated, when the kitchen hood is used together with other gas
combustion devices or other fuels. The hood must be regularly cleaned on both the inside and outside (AT LEAST ONCE A MONTH). This must be completed in accordance with the maintenance instructions provided in this manual. Failure to follow the instructions provided in this user guide regarding the cleaning of the hood and filters will lead to the risk of fires. The flaming of foods beneath the hood itself is severely prohibited.
1.SAFETY INSTRUCTIONS
The use of exposed flames is detrimental to the filters and may cause a fire risk, and must therefore be avoided in all circumstances.
Any frying must be done with care in order to make sure that the oil does not overheat and ignite.

CAUTION: Accessible parts of the
hood may become hot when used with cooking appliances.
For lamp replacement use only lamp type indicated in the Maintenance/Replacing lamps section of this manual.

WARNING! Do not connect the
appliance to the mains until the installation is fully complete.
With regards to the technical and safety measures to be adopted for fume discharging it is important to closely follow the regulations provided by the local authorities.
The ducting system for this appliance must not be connected to any existing ventilation system which is being used for any other purpose such as discharging exhaust fumes from appliances burning gas or other fuels. Do not use or leave the hood without the lamp correctly mounted due to the possible risk of electric shocks.
Never use the hood without effectively mounted grids.
The hood must NEVER be used as a support surface unless specifically indicated.
Use only the fixing screws supplied with the product for installation or, if not supplied, purchase the correct screws type.
Use the correct length for the screws which are identified in the Installation Guide.
In case of doubt, consult an authorised service assistance centre or similar qualified person.

WARNING! Failure to install the screws or fixing device in accordance with these instructions may result in electrical hazards.
2. USE
The hood serves to aspirate the fumes and vapors resulting from cooking.
The attached installation manual indicates the version to be used depending on the model you have, the suction version with
external evacuation or filtering with internal recirculation
3. INSTALLATION
The mains power supply must correspond to the rating indicated on the plate situated inside the hood. If provided with a plug connect the hood to a socket in compliance with current regulations and positioned in an accessible area, after installation. If it not fitted with a plug (direct mains connection) or if the plug is not located in an accessible area, after installation, apply a double pole switch in accordance with standards which assures the complete disconnection of the mains under conditions relating to over-current category III in accordance with installation instructions.
Warning! Before re-connecting the hood circuit to the mains supply and checking the efficient function, always check that the mains cable is correctly assembled.
The minimum distance between the supporting surface for the cooking equipment on the hob and the lowest part of the range hood must be not less than 50cm from electric cookers and 65cm from gas or mixed cookers. If the instructions for installation for the gas hob specify a greater distance, this must be adhered to.
4. MAINTENANCE
ATTENTION! Before performing any maintenance operation, isolate the hood from the electrical supply by switching off at the connector and removing the connector fuse.
Or if the appliance has been connected through a plug and socket, then the plug must be removed from the socket.
The cooker hood should be cleaned regularly (at least with the same frequency with which you carry out maintenance of the fat filters) internally and externally. Clean using the cloth dampened with neutral liquid detergent. Do not use abrasive products.
DO NOT USE ALCOHOL!
Warning! Failure to carry out the basic cleaning recommendations of the cooker hood and replacement of the filters may cause fire risks. Therefore, we recommend observing these instructions.
The manufacturer declines all responsibility for any damage to the motor or any fire damage linked to inappropriate maintenance or failure to observe the above safety recommendations.
4.1 Grease filter - The grease filter must be cleaned once a month using non aggressive detergents, either by hand or in the dishwasher, which must be set to a low temperature and a short cycle. When washed in a dishwasher, the grease filter may discolour slightly, but this does not affect its filtering capacity.

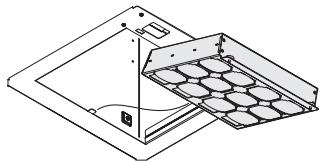
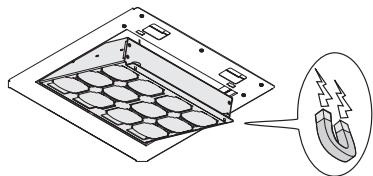
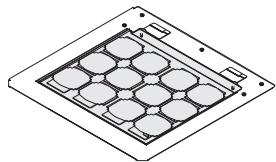
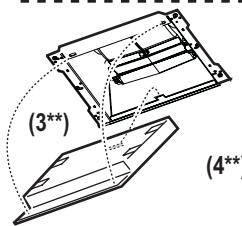
4.2 Charcoal filter
Type 20 LONG LIFE - Washable activated charcoal filter
The charcoal filter can be washed once every two months using hot water and a suitable detergent, or in a dishwasher at 65°C (if the dishwasher is used, select the full cycle function and leave dishes out).
Eliminate excess water without damaging the filter, then remove the mattress located inside the plastic frame and put it in the oven for 10 minutes at 100°C to dry completely. Replace the mattress every 3 years and when the cloth is damaged.
4.3 Type 15 - NON-washable activated charcoal filter
The saturation of the charcoal filter occurs after more or less prolonged use, depending on the type of cooking and the regularity of cleaning of the grease filter. In any case it is necessary to replace the cartridge at least every four months.
The charcoal filter may NOT be washed or regenerated.
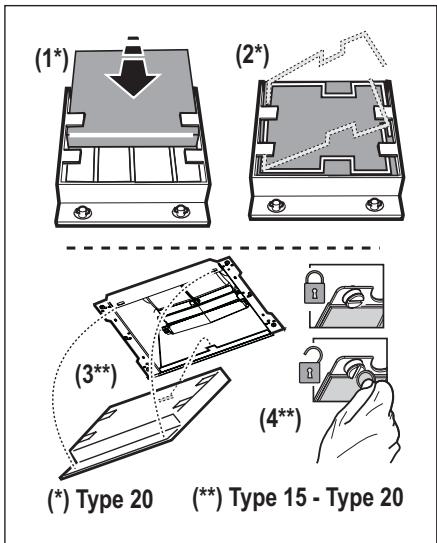
4.4 Regenerable carbon filter
The carbon filter must be regenerated every two months (or when the filter saturation indicator - if present - indicates the need for it) and in accordance with the procedure as shown here below:
- Disconnect the electrical appliance from the mains.
- Clean the filter's surface with a damp cloth to remove grease deposits.
- Put the filter in an oven at 200 degrees for 45 minutes.
- Turn off the oven and wait for an hour before taking out the filter.
Attention! Make sure the filter has cooled down before touching it.
Type SUPCHARC-E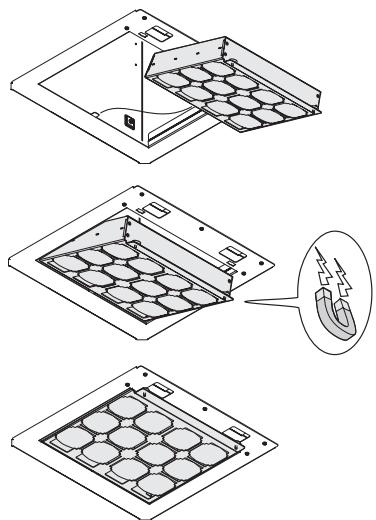
5. CONTROLS
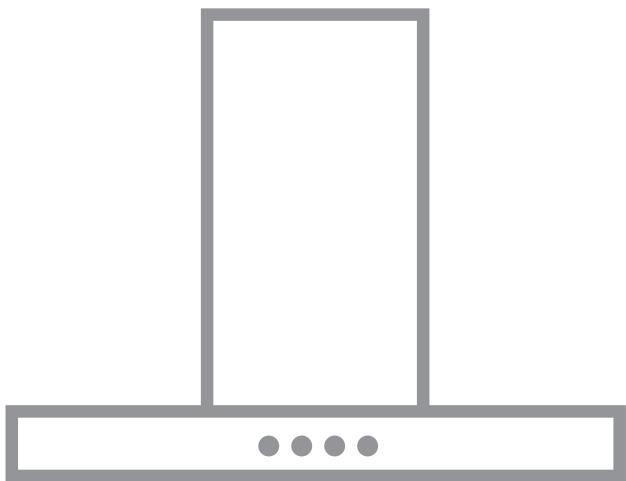
The hood is fitted with a control panel with aspiration speed selection control and a light switch to control cooking area lights. Use the high suction speed in cases of concentrated kitchen vapours. It is recommended that the cooker hood suction
is switched on for 5 minutes prior to cooking and to leave in operation during cooking and for another 15 minutes approximately after terminating cooking.
The control switches are located on the unit's front panel:


1 Speed ON/OFF button Control panel on/off key 2 Suction speed (power) key 1: 3 Suction speed (power) key 2: 4 Suction speed (power) key 3: Suction speed (power) key 4: Note: suction speed (power) key 4 has a limited duration of 5 minutes, after which the previous suction speed is reactivated. 6 "Breeze" function key (Room ventilation) The hood switches on at low suction speed (power) for 60 minutes, after which it switches off. 7 Filter saturation control and activation/deactivation key 8 Hob2Hood function indicator 9 Lights ON/OFF key
Control panel on/off function
With the hood in standby, press key 1, all LED lights will switch off: the control panel is off.
Press key 1 again, all LED lights will turn on: the control panel is active.
Carbon filter saturation control activation/deactivation function
With the hood in standby, press key 5 for longer than 3 seconds. Key 7 will flash to indicate that the carbon saturation filter has been activated. Key 7 will remain lit to indicate that the carbon saturation filter has been deactivated.
Filter saturation control and reset function
At regular intervals and depending on the hood temperature, key lights up to indicate that the filters need to be maintained in accordance with the instructions in the relative paragraphs. Key 7 on with a fixed light: maintenance is required on the grease filters. Key 7 on and flashing: maintenance is required on the carbon filter.
Filter saturation indicator reset
With the hood in standby, press key 7 for longer than 3 seconds. Repeat the operation if necessary.
5.1 Hob²Hood
The hood is equipped with a function for wireless connection with the cooktop for automatic adjustment of the most suitable speed. Refer to the instruction manual of the cooktop to verify the presence and compatibility of this function.
In the case of first connection to the mains or abrupt disconnection from power supply (blackout), wait 1 minute to allow the hood to restore the connection with the cooktop.
When the hood is working in Hob²Hood mode, key 8 is lit.
6. LIGHTING
The hood is equipped with a lighting system based on LED technology.
The LEDs guarantee an optimum lighting, a duration up to 10 times as long as the traditional lamps and allow to save 90% electrical energy.

Caution! Do not look directly into the LED light.
To replace lights, contact authorised spare part center.
www.aeg.com/productregistration

www.aeg.com/productregistration

www.aeg.com/productregistration

Install the drawer in cooling mode, press button 7 and hold for more than 3 seconds.
Repeat the operation if necessary.
5.1 Hob²Hood
The extractor is equipped with a wireless function with the hob for automatic adjustment of the appropriate speed. Familiarize yourself with the instructions for the hob to check the presence and compatibility of this function. At the first connection to the electrical network or after a sudden power failure, it is necessary to wait 1 minute to allow the extractor to re-establish the connection with the hob.
During operation of the extractor in Hob²Hood mode, button 8 lights up.
6. LIGHTING
The extractor is equipped with LED lighting.
LED lamps provide optimal illumination, and their service life is 10 times longer than that of traditional lamps, allowing for 90% energy savings.

Warning! Be careful and do not look directly at the switched-on halogen lamp.
For replacing the lamp, contact an authorized service center for spare parts.
FOR BEST RESULTS
www.aeg.com/productregistration

Use original spare parts, materials, and accessories for your appliance:
www.aeg.com/shop
ENVIRONMENTAL PROTECTION
Recycle materials with the symbol. Place packaging materials in appropriate containers for recycling.
Help protect the environment and human health by recycling electrical and electronic appliance waste. Do not dispose of appliances marked with this symbol with household waste. Return the product to your local recycling facility or contact your local municipal office.
CUSTOMER SERVICE AND SERVICE
We recommend using original spare parts.
When contacting the service department, make sure you have the following data.
This information can be found on the rating plate. Model, product number, serial number.
Register your product to receive better service: www.aeg.com/productregistration

Use the correct length for the screws which are identified in the Installation Guide.
If in doubt, consult an authorized service center or a suitably qualified person.
www.aeg.com/productregistration

FOR PERFECT RESULTS
www.aeg.com/productregistration

For accessories, consult the original and spare parts for your appliance:
www.aeg.com/shop
ENVIRONMENT PROTECTION
Recycle materials with the symbol. Put the packaging in the relevant containers for recycling.
Help protect the environment and human health, as well as the recycling of electrical and electronic appliances. Do not dispose of
appliances marked with the symbol with household waste. Return the product to your local recycling facility or contact your municipal office.
SAFETY INFORMATION
Do not use or leave the vacuum cleaner without the correctly mounted filters, due to the risk of electric shock.
Never use the vacuum cleaner without the correctly mounted grille!
The vacuum cleaner must never be used as a support or step, unless this is specifically indicated.
When installing, use only the fixing bolts supplied with the device. If they are missing, purchase suitable bolts. Use bolts with a suitable length, as indicated in the installation instructions. If in doubt, contact your dealer.
This appliance must be serviced by qualified personnel only.

WARNING! Failure to install the appliance in accordance with these instructions may lead to risks of electric shock.
2. USE
The extractor hood is designed for suction and filtration of vapors during cooking.
In the accompanying booklet with instructions, you will find various options depending on the purchased model, including the choice between an extractor hood with ventilation or a recirculating version.
filtering version with recirculation
3. INSTALLATION
The voltage in the mains must correspond to the voltage indicated on the rating plate of the hood, located on its inner side. If the hood is equipped with a plug, connect it to a socket that complies with the applicable standards and is placed in an accessible location after installation. If it is not equipped with a plug (direct connection to the mains), or if the socket is not in an accessible location after installation, use a double-pole switch that complies with the standards, ensuring complete disconnection from the mains under overvoltage category III, in accordance with installation rules.

Warning! Before connecting the hood to the mains and checking its proper functioning, verify that the cable is installed as required.
The minimum distance between the surface on which the cooking vessels are placed and the lower part of the hood must be no less than 50 cm in the case of electric cookers and no less than 65 cm in the case of gas or combined cookers. If the instructions for the gas cooker specify a greater distance, this must be respected.
4. MAINTENANCE
Warning! Before performing any cleaning or maintenance operation, disconnect the hood from the mains, either by unplugging it or by switching off the main switch.
The hood must be cleaned frequently (at least as often as the filters are cleaned), both inside and outside. Use a damp cloth and neutral liquid detergents. Avoid products containing abrasive substances. Warning! Never use a steam cleaner!
Warning! Failure to follow the standards for installing the hood and for replacing the filters may lead to fire risks.
Follow the instructions strictly! No responsibility is accepted for any damage to the motor or fire caused by improper maintenance or failure to follow these instructions.
The filter for oil must be cleaned at regular intervals. The cleaning is done by washing the filter in a suitable detergent. When cleaning the filter for oil in the washing machine, it is possible to deform it, but this in no way affects the filtering capacity.
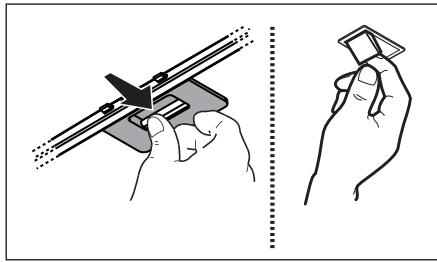
4.2 Type 20 LONG LIFE - This is a filter with activated carbon
The filter with activated carbon must be replaced every 6 months with warm water and suitable detergent in the washing machine at 65°C (remove the grease filters before washing; the washing machine must not have other dishes).
Remove the filter carefully, take out the charcoal insert
Place the plastic frame in the oven for 10 minutes at 100°C to dry it completely.
The charcoal insert must be replaced every 3 years or when you notice it is saturated.
4.3 Type 15 - This is a filter with activated carbon
The filter with activated carbon is replaced approximately every 4 months depending on the type of cooking and how often you use the filter.
In any case, it is necessary to replace the filter with activated carbon every 4 months or when the filter saturation indicator shows that it is necessary.
It cannot be reused.

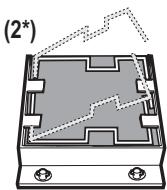
( ) Type 20 ( *) Type 15 - Type 20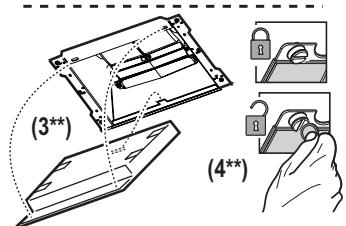
4.4 Regeneration of the carbon filter
The carbon filter must be regenerated every two months (or when the filter saturation indicator - if such is provided in your model - shows this need) and the procedure is as follows:
- 1. Disconnect the hood from the electrical supply. 2. Clean the surface of the filter with a damp cloth, remove the grease deposits from its surface. 3. Place the filter in an oven at 200 degrees for 45 minutes. 4. Turn off the oven and wait one hour before removing the filter.
Attention! Before using the filter, check it and clean it.
Type SUPCHARC-E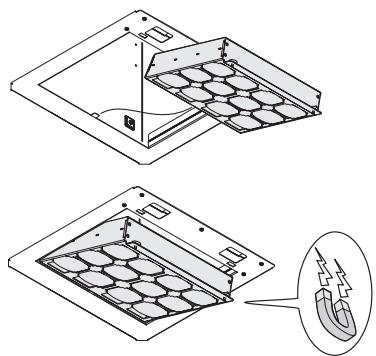
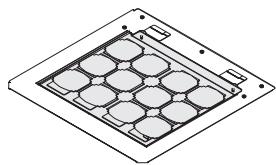
5. Controls
The extractor hood is equipped with a control panel with the possibility to adjust the extraction speed and switch on the lighting and the appliance. If a lot of steam is released during cooking, switch to maximum mode.
It is recommended to turn on the extractor hood 5 minutes before you start cooking and to leave it running for 15 minutes after you finish. The controls are located on the front panel of the device:


1 Button ON/OFF speed Button activation/deactivation of the control panel 2 Button Speed (Power) for extraction 1 3 Button Speed (Power) for extraction 2 4 Button Speed (Power) for extraction 3 5 Button Speed (Power) for extraction 4 Note: The extraction speed (power) is designed to function for 5 minutes, after which it returns to the previous setting. 6 Button Function "Breeze" (room ventilation) The extractor hood turns on at the lowest speed (power) of extraction for 60 minutes, after which it turns off. 7 Button for control and activation/deactivation of the filter saturation 8 Filter saturation indicator 9 Button ON/OFF lighting
Function Activation/Deactivation of the Control Panel
When the extractor hood is in standby mode, press button 1, all LED lights turn off: the control panel is deactivated.
Press button 1 again, all LED lights turn on: the control panel is activated.
Function Activation/Deactivation of the Filter Saturation Control with Activated Filter
When the extractor hood is in standby mode, press button 5 for more than 3 seconds.
Button 7 turns on with a flashing light to show that the filter saturation control is activated.
Button 7 turns on with a fixed light to show that the filter saturation control is deactivated.
Function Filter Saturation Reset
At regular intervals, based on the usage time of the extractor hood, button 7 lights up to indicate that it is necessary to clean the filters, according to the instructions presented in the corresponding paragraphs.
The device is switched on with a flashing light: it is necessary to perform maintenance on the air filter.
The device is switched on with a steady light: it is necessary to perform maintenance on the activated carbon filter.
Reset the filter replacement indicator.
The aspirator is in standby mode. Press the button for more than 3 seconds.
Repeat if necessary.
5.1 Wireless
The aspirator is equipped with a wireless function for connection to a smart device for automatic regulation of the suction speed. Refer to the instructions for use of the smart device to check the availability and compatibility of this function.
After the first connection, if the device is disconnected due to a power outage (blackout), wait 1 minute to allow the aspirator to re-establish the connection with the smart device.
At the moment when the aspirator is operating in wireless mode, the button is on.
6. LIGHTING DEVICE
The aspirator is equipped with a lighting system with LEDs.
The LEDs guarantee optimal lighting, up to 10 times more powerful than traditional lamps, and allow a 90% saving on electricity.

Warning! Do not look directly at the light of the LEDs!
For replacement of the lamps, please contact the authorized service center.
Thank you for choosing this product. We are confident that the new appliance, manufactured using the latest technology, will provide you with many years of trouble-free operation. To ensure the best performance, please read the instructions carefully before using the appliance.
Please visit our website to:

Get usage advice, brochures, trouble shooter, service information:
www.aeg.com

Register your product for better service:
www.aeg.com/productregistration

Buy Accessories, Consumables and Original spare parts for your appliance:
www.aeg.com/shop
ENVIRONMENT CONCERNS
Recycle materials with the symbol. Put the packaging in applicable containers to recycle it.
Help protect the environment and human health by recycling waste of electrical and electronic appliances. Do not dispose
appliances marked with the symbol with the household waste. Return the product to your local recycling facility or contact your municipal office.
CUSTOMER CARE AND SERVICE
We do not accept responsibility for any damage caused by incorrect installation.
Contact the service centre for any issues that may arise.
IepeKTeepi TeXnKanbIK aknapaTakTaunacbHaH TaByfA 6oJaBly. Ylrici, HIm Hemipi, CepnJIbIK
Eckepty /A6aIaNbI3 - Kayinci3ik TypaIbMaHb3Ib MaFTyMaT.
AnbH ana eckepTyci3 3e reptinei.
! KAYIINCI3IK TYPALbIMAFJYMATTAP
Ke3 KeJrReH Ta3aIay HeMece TexHNKaJIbIK Kbl3MeT KePcTeY KymbICTapbIH OpbIHdaMaC 6ypbIH aUaHbI UbIFapy HeMece KeJIiIK Kyat Ke3iH axbipAty apkbIbICOPfbltBl 3JIeKTP KeJIiICHe H axbipAtbIH3. OPhATy JxHE TexHNKaJIbIK KbI3MeT KePcTeY KymbICTapbIH Kypri3reH Ke3de aRpaIbIM KymbIC KoIFa6bIH KniH3. Byn KypblfbiHbI 8 XactaftbIX KHe OdaH YIkeH bIaIap, DeHe, ce3y HeMece akbl-Oh KaibineTepi WeKTEyJI TynFaIap HeMece Taxipnbeci MeH biImi JOK TyIFaIap OHbI Kayinci3 XoJlmEn NaJaIaNHyfA KaTbICTbl Hyckay aIbIn, bIKTImaI Kayintepdi YfblHaH JaFdaJaXeHe BaKblayda BoNfaHda naDaIaHa anaDbI.
BaIaIapDbIn backapy 3neMeHTTepiH e3repTyiHe JxHe KpybIINfBIMeH O'HaYbIHa KOJ 6epMey KepeK.
Ta3anay xhe 36etihwe TexHnkaIbIK KbI3MeT KepcTeY xMbICTapbIH banaIapdbIH 6aKbIaycbI3 Kypri3yIHe 6oImaIdbI. Acy copfblbIb6acka ra3 Kafty KpbIbnIapbIMeH HeMece 6acka OTbIHapMeH NaIdaIaNbIFan Ke3de, KpbIbnIbOpHaTbIJFaH 6eJIme XeTKiIKTI Tpyde JeJdEtInyi KaKeT.
CopfbltbiH iwi-cbipblH TypaKbl Typde Ta3aIan Tpy KaKeT (AIBiHA KEMIHDE BIP PET). Ohbl OcbI HxckayIbIKTa 6epiIreH texHnKaJIbIK KbI3MeT KepeTy HxCKayIapblHa cAnkec Jy3ere acbipy Kepek. OcbI naJaIaNHybl HxCKayIbIFblHda copfblI nn CHy3riJepdi Ta3aIayFa KaTbICTbl 6epiIreH xCKayIapdbI opbIHdAmay ept Kaynihe eken CoFadbl.
TamaKtbl TikeJeN copfblw actbHda XaHdbipyfa KaTaH, TblbIM CaIbHaDbI.
1. KAYIINCI3IK HYCKAYAPbI
Ausbik kanaibnbip naandaany cy3rinep yuhi 3nHxhe npT KayniH TybHaTaYbIMyMkiH COHBkTah Ofah ekaaah kon bepmey kepek.
MaIdbH IwamadaH TBIC KbI3bIn HEmece KaHbIN KeTneyIH KaMTaMaCbI3 eTy YUH, TaMaKTBI abaIIan KybpyKaKeT.
CAK BOJIbIHbI3: CopfblHTbH KOJIkeTImi 6eJIkTepi TaMaK daBbIHday KpyblFNbApbi naaDanaHbIFaH Ke3De KbIbIN KeTyIMMkiH.
UamdblyaybcIbpyyuih TEKocbl NcKaynbIKbIH《TexHnKaNbKbI3MeT KepceTy/llamapdblyaybcIbpy》6eImiHde KepcetinreHwamTypiin naJaIaNbHbI3.
ECKEPTY! Ophaty TOnbik aayTaNmaBihua KpyblfblHbI 3NeKtp JeicHe KocnaHbI3.
The device must be operated in accordance with the technical and safety requirements established by the relevant authorized bodies, and the requirements for the intended use must be met.
The device is intended for cutting metal, wood, and other materials using cutting discs. It can also be used for other purposes with appropriate accessories. Do not use the device for purposes other than those specified in this manual.
Do not use the device for purposes other than those specified in this manual. Use only as intended and in accordance with the instructions.
For your own safety, do not use the device without the protective guard installed. If the guard is missing, install it before use.
Install the guard as shown in the instructions.
If you notice any damage, contact a qualified service center or the manufacturer for repair.
WARNING! Do not use the device without the guard or with a damaged guard. This could lead to electric shock or injury.
2. INTENDED USE
The device is intended for cutting various materials. The type of cutting tool to be used depends on the material to be cut, as indicated in the specifications.
for cutting or grinding
3. INSTALLATION
Before starting work, ensure that the device is installed on a stable surface and that all safety precautions are followed. If the device is not working properly, do not attempt to repair it yourself. Contact a qualified service center for assistance. If the device is not working properly (e.g., it stops suddenly), or if you notice any damage, do not use it and contact a qualified service center for repair.
WARNING! When connecting the device to the power supply, ensure that the power cord is properly connected and not damaged.
The device is designed for use with cutting discs of 50 cm diameter for metal and 65 cm for wood or other materials. Do not use discs larger than specified.
If the device is not suitable for use with a particular disc, do not use it.
4. TECHNICAL MAINTENANCE OF THE CORSET
Before cleaning or performing technical maintenance, remove the batteries or disconnect the power supply.
Clean the outer and inner surfaces with a soft, slightly damp cloth (do not use aggressive cleaning agents). For cleaning, use a vacuum cleaner with a soft brush attachment. Do not use abrasive materials. DO NOT IMMERSE IN WATER!
Warning! The filter must be cleaned or replaced regularly. Contact your dealer for advice on maintenance.
If you notice any damage or defects, or if the product does not function properly, contact the seller.
4.1 Main filter - The filter should be cleaned with a soft, non-abrasive cloth, by hand or with a vacuum cleaner, at room temperature, as needed. It is possible to wash the filter in a washing machine, but then it must be rinsed thoroughly.
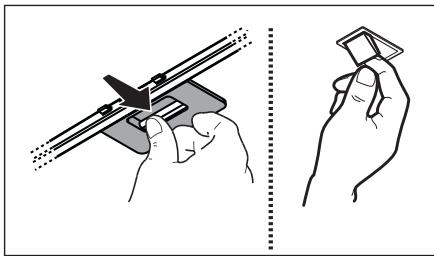
1. Press and hold the button for 7 seconds to reset the filter counter.
Replacing the filter and resetting the counter
When the corset is in use, press and hold button 5 for 3 seconds to reset the filter counter. Button 7 is used to reset the filter counter after replacement. Button 7 is used to reset the filter counter after replacement.
Filter replacement and reset function
Depending on the operating temperature of the product, the filter should be replaced every 7 days or as needed. The filter replacement interval: for technical maintenance, replace the filter every 7 days. For technical maintenance, replace the filter every 7 days.
Filter replacement indicator
When the corset is in use, press and hold button 7 for 3 seconds.
If necessary, repeat this action.
5.1 New
This appliance is intended for household and similar applications such as: staff kitchen areas in shops, offices and other working environments; farm houses; by clients in hotels, motels and other residential type environments; bed and breakfast type environments.
If the supply cord is damaged, it must be replaced by the manufacturer, its service agent or similarly qualified persons in order to avoid a hazard. If the appliance is used in a way that is not in accordance with the instructions, the warranty may be void.
6. TROUBLESHOOTING
The appliance is designed for household use and is not intended for commercial use.
The appliance is equipped with a high-efficiency LED lamp that consumes up to 10 times less energy and provides 90% energy savings.
Do not use the appliance if the LED lamp is damaged.
To replace the lamp, contact the service center.
3. WARRANTY AND SERVICE
Thank you for choosing an AEG product. We are confident that you will enjoy the performance and reliability of your new appliance. Please take a few minutes to register your product for better service.
Visit our website to:

Get usage advice, brochures, trouble shooter, service information:
www.aeg.com

Register your product for better service:
www.aeg.com/productregistration

Buy Accessories, Consumables and Original spare parts for your appliance:
www.aeg.com/shop
Recycle the materials marked with the symbol. Dispose of the packaging in the appropriate recycling containers to recycle it.
Help protect the environment and human health by recycling waste from electrical and electronic appliances. Do not dispose of appliances marked with the
symbol with household waste. Return the product to your local recycling facility or contact your municipal office.
ENVIRONMENT AND SERVICE INFORMATION
We recommend using original spare parts.
When contacting the Service, ensure you have the following data available.
The information can be found on the rating plate. Model, Product Number, Serial Number.
! WARNING/CAUTION - Safety information.
Possibility of modification is reserved.
INFORMATION AND SAFETY
Before any cleaning or maintenance operation, disconnect the appliance from the electrical supply by unplugging it or switching off the household mains switch. For all installation and maintenance operations, use protective gloves. This appliance can be used by children aged 8 years and above and persons with reduced physical, sensory or mental capabilities, or lack of experience and knowledge, if they have been given supervision or instruction concerning use of the appliance in a safe way and understand the hazards involved. Children must not play with the appliance. Cleaning and maintenance must not be performed by children without supervision. The room must be sufficiently ventilated when the cooker hood is used simultaneously with appliances that use gas or other
fuels. The hood must be cleaned regularly, both internally and externally (at least once a month), and in any case, maintenance must be carried out in accordance with the maintenance instructions given in this manual. Failure to follow the instructions regarding the hood and filter cleaning will lead to a risk of fire. Strictly forbid flambéing food under the hood.
1. SAFETY INSTRUCTIONS
The appliance must be installed in accordance with the regulations and can only be used in well-ventilated areas. Every installation must be carried out in such a way as to prevent the oil from overheating and igniting.
WARNING: When the appliance is in operation, the accessible parts of the aspirator may become hot.
For replacing the lamp, use only the type of lamp specified in the section on maintenance/replacement of the lamp in this manual.
Warning! Do not connect the appliance to the electrical power supply until the installation is completely finished.
When disposing of the appliance, follow the technical and safety regulations applicable for its disposal. It is important to follow the rules given by the local authorities. The exhaust air must not be discharged into an active flue used for fumes created by appliances that burn gas or other fuels. Do not use the aspirator without a correctly installed filter to avoid the risk of electric shock.
Never use the aspirator without a correctly installed grille! The aspirator must never be used as a support surface unless explicitly stated. Use only the fixing screws provided with the product for mounting, and ensure they are the correct type. Use the correct length for the screws as specified in the mounting section. In case of doubt, consult
the authorized technical support center or a qualified professional.
WARNING! Incorrectly installed screws for fixing may lead to the risk of electric shock.
2. USE
The aspirator is used for extracting vapors from cooking. The accompanying mounting instructions indicate which version can be used for the model you have, including the version with external exhaust.
The exhaust air is expelled through a pipe with a circular cross-section.

3. INSTALLATION
The main electrical connection must correspond to the voltage shown on the rating plate inside the aspirator. If the aspirator is not equipped with a plug, connect it to the mains in accordance with the wiring diagrams, placing it in an accessible position even after installation. If it is not equipped with a plug (direct connection to the electrical supply), the connection must still be made in an accessible position, even after installation. Use a bipolar switch in accordance with the standards that ensure complete disconnection from the electrical supply under conditions of overvoltage category III, in accordance with the installation instructions.
!Warning! Before (re)connecting the aspirator to the electrical supply, always check that the power cord is correctly installed.
The minimum installation height of the hood above the cooking surface for electric hobs should not be less than 50 cm, and for combined or gas hobs 65 cm. If the installation instructions for the gas hob specify a greater distance, this must be taken into account.
4. MAINTENANCE
Warning! Before any cleaning or maintenance operation, disconnect the hood from the electrical mains by removing the plug or by switching off the main household circuit breaker. The hood must be cleaned regularly (at least with the same frequency as the maintenance of the grease filters) both on the inside and on the outside. For cleaning, use a cloth dampened with neutral liquid detergent. Do not use abrasive sponges. Do not use alcohol!
Warning! Failure to follow the instructions for cleaning the hood and replacing the filters may lead to a risk of fire. It is recommended to follow the suggested instructions. No liability will be accepted for any damage or motor failure or fire caused by improper maintenance or failure to follow the above instructions.
4.1 Grease filter - The grease filter should be cleaned monthly with neutral detergents, either by hand or in a dishwasher at low temperature and with a short cycle. By washing in a dishwasher, the grease filter may lose its shine, but its filtering characteristics remain unchanged.
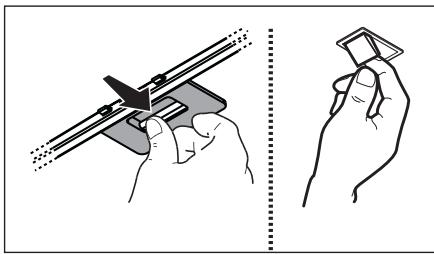
4.2 Type 20 LONG LIFE - Filter with active charcoal that can be washed
The charcoal filter can be washed every two months in hot water with neutral detergent and in a dishwasher at 65°C (to avoid overload in the dishwasher, the washing cycle should be done without dishes inside).
Rinse it in running water without damaging the filter, then remove the excess water from the inside of the plastic part and place it in the oven for 10 minutes at 100°C for complete drying.
Replace it every 3 years and whenever the fabric is damaged.
4.3 Type 15 - Active charcoal filter THIS IS NOT WASHABLE
The saturation of the charcoal filter occurs after more or less prolonged use depending on the type of cooking and the regularity of cleaning of the grease filter. In any case, it is necessary to replace it at least every 4 months.
It cannot be washed or regenerated.
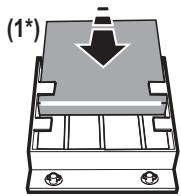
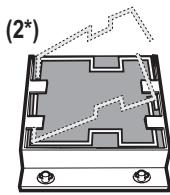
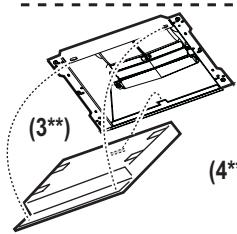
( ) Type 20 ( *) Type 15 - Type 20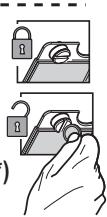
www.aeg.com/productregistration

Buy accessories, consumables and original spare parts for your appliance:
www.aeg.com/shop
ENVIRONMENT CONCERNS
Recycle materials with the symbol. Put the packaging in relevant containers to recycle it.
www.aeg.com/productregistration

Buy accessories, consumables and original spare parts for your appliance:
www.aeg.com/shop
ENVIRONMENT CONCERNS
Recycle materials with the symbol. Put the packaging in relevant containers to recycle it.
Help protect the environment and human health and to recycle waste of electrical and electronic appliances. Do not dispose appliances marked with the symbol
with the household waste. Return the product to your local recycling facility or contact your municipal office.
GUIDE TO THE APPLIANCE AND SERVICING
We recommend that you use original spare parts.
Type SUPCHARC-E
20 cai 4.2
10 10d
-15cogai4.3
(1*)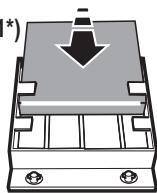
(2*)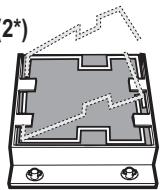
( ) Type 20 ( *) Type 15 - Type 20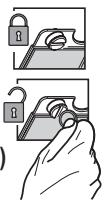
1.5
www.aeg.com/productregistration

www.aeg.com/shop

∴ S ΔOBC = S ΔCOD + SΔBOC
PNC.

1
- USER MANUAL
- FOR PERFECT RESULTS
- VISIT OUR WEBSITE TO
- ENVIRONMENT CONCERNS
- CUSTOMER CARE AND SERVICE
- SAFETY INFORMATION
- SAFETY INSTRUCTIONS
- USE
- INSTALLATION
- MAINTENANCE
- CHARCOAL FILTER
- TYPE 20 LONG LIFE - WASHABLE ACTIVATED CHARCOAL FILTER
- TYPE 15 - NON-WASHABLE ACTIVATED CHARCOAL FILTER
- REGENERABLE CARBON FILTER
- CONTROLS
- CONTROL PANEL ON/OFF FUNCTION
- CARBON FILTER SATURATION CONTROL ACTIVATION/DEACTIVATION FUNCTION
- FILTER SATURATION CONTROL AND RESET FUNCTION
- FILTER SATURATION INDICATOR RESET
- HOB²HOOD
- LIGHTING
- FOR BEST RESULTS
- ENVIRONMENTAL PROTECTION
- CUSTOMER SERVICE AND SERVICE
- ENVIRONMENT PROTECTION
- TYPE 20 LONG LIFE - THIS IS A FILTER WITH ACTIVATED CARBON
- TYPE 15 - THIS IS A FILTER WITH ACTIVATED CARBON
- REGENERATION OF THE CARBON FILTER
- FUNCTION ACTIVATION/DEACTIVATION OF THE CONTROL PANEL
- FUNCTION ACTIVATION/DEACTIVATION OF THE FILTER SATURATION CONTROL WITH ACTIVATED FILTER
- FUNCTION FILTER SATURATION RESET
- RESET THE FILTER REPLACEMENT INDICATOR
- WIRELESS
- LIGHTING DEVICE
- PLEASE VISIT OUR WEBSITE TO
- ! KAYIINCI3IK TYPALBIMAFJYMATTAP
- KAYIINCI3IK HYCKAYAPBI
- INTENDED USE
- TECHNICAL MAINTENANCE OF THE CORSET
- REPLACING THE FILTER AND RESETTING THE COUNTER
- FILTER REPLACEMENT AND RESET FUNCTION
- FILTER REPLACEMENT INDICATOR
- NEW
- TROUBLESHOOTING
- WARRANTY AND SERVICE
- ENVIRONMENT AND SERVICE INFORMATION
- INFORMATION AND SAFETY
- TYPE 20 LONG LIFE - FILTER WITH ACTIVE CHARCOAL THAT CAN BE WASHED
- TYPE 15 - ACTIVE CHARCOAL FILTER THIS IS NOT WASHABLE
- GUIDE TO THE APPLIANCE AND SERVICING
- TYPE SUPCHARC-E
Brand : AEG
Model : DBB6960HM
Category : Built-in oven