LFP226S - Basket ELECTROLUX - Free user manual and instructions
Find the device manual for free LFP226S ELECTROLUX in PDF.
| Product type | Range hood |
| Brand | Electrolux |
| Model | LFP226S |
| Number of speeds | 3 speeds (1st, 2nd, 3rd) |
| Lighting | LED, independent control |
| Control type | Push buttons on control panel (pull out the drawer to expose) |
| Grease filter type | Dishwasher-safe metal filters |
| Charcoal filter | Non-washable activated charcoal filter, replace every 4 to 6 months |
| Bulb type | Integrated LED, replacement by technician |
| Maintenance | Monthly cleaning of grease filters; do not use abrasive detergents |
| Spare parts | Grease filters, charcoal filters, LED bulb |
| Repairability | User replaceable filters; LED bulb only by technician |
| Safety | Automatic shutdown when closing the drawer; do not use without filter |
| General information | Refer to separate installation instructions; manual available in multiple languages |
Frequently Asked Questions - LFP226S ELECTROLUX
User questions about LFP226S ELECTROLUX
0 question about this device. Answer the ones you know or ask your own.
Ask a new question about this device
Download the instructions for your Basket in PDF format for free! Find your manual LFP226S - ELECTROLUX and take your electronic device back in hand. On this page are published all the documents necessary for the use of your device. LFP226S by ELECTROLUX.
USER MANUAL LFP226S ELECTROLUX
3. BCEKNДHEBHA YNOTPEBA
3.1ИЗпОЛЗВанеHa a6cop6aTopa
PpOBepeTe npenOpbYHTeHnHaTcCKopoCT B cBoTBETCBnC TaBnucataNo-dony.
| 01 | При заюлие на*xрана;rotveheс постaven караз. |
| 2 | При rotvebeNeСКАпAKВьрXYнякOLKO3ОниЗАrotvebeNEиlnrOpeЛКИ,Пьр-жеNeHaСлавбOrьн. |
| 3 | При ВареNEипьхеNeHa roJel'mKoJIчecТвахрана6e3Караз,rotve- HeВьрXYнякOLKOrotВарCSN3ОнииlnrOpeЛКИ. |
I IpenopbUHTeHNO e da octabInTe a6cop6aTopa da pa60Tu np6bIm3uTEnHO 15 MHyTu cNei rOTBeHe.
3a da pa6oTne c a6cop6aTopbT;
CbdomnHaTa Tp6Ba Da e HactpoeHa Ha HnCKa TeMnepatya N KpaTbK Ukbl.ФnlTbpT 3a Ma3HnH MoKe Da 3aRy6u CBeta CN, HO TOBA He BnIe Bbpxy pa6Ota Ta Ha ypea.
- 3a MOHTIpaHHe HaФИTpIte O6paTHO,ИЗПБЛHETe ПБРВTeДBE CTbIKN B O6paTeH peI.
IobtopeTe cTbKnTe 3a BCnKn qnnTpni, aKe e npInoXmIO.
4.3 CmHa Ha qnTbpa c aKTHBEH BbIeH

BHIMAHHE!
ФИNTbPbT CAKTNBEH BByIeH He TpI6Ba Da ce Mne!
ФИNTbPbT He MoKe Da 6bIe peReHepePnA!
3a cmraHa Ha qnIITbpa C aKTINBeH BvJIeH:
1.ИЗваде Te Филт pine 3a Ma3HnHn OToypeда.
BnKTe ,IOnuHCTBaHe Ha cHnTbpa 3a Ma3HNH" B Ta3n TnaBa.
2. 3aBbPTe Te fHITbpa ObaTHo Ha YacOBHNKOBaTa CTeJIka (1) n ro DpbHHeTe (2).
3a MOHTIpaHe Ha qnITpIte n3IbJIHeTe CTbIKnTE B O6paTeH peI.
PnB CnUKN cnuyan e Heo6xOJMo da CmEnrTe fNITpNTe NOHe Ha BCEKn Yetnpn Meceua.
4.4 CmHa Ha Jlamnata
To3n ypeI ce doCTabc c LED lamma n OTdJIHa KOHTpOHa KUTna (3aDnKBaM mExAH3bMa Ha CBeTOJNOda).Te3n Yactn MORaT Da ce NODMeHrT cMo O TTexHk. B CnyaH Na Heu3npaBHOCT BVXKe "ObcnyBaHe" B rIba ,INCTpyKun 3a 6e3oNaCHOCT".
5.ОПАЗBAHE HA OKОЛHATA CPEДA
PeuzklnpaTe MaTePnaJIte cbc
CIMBONA .IocTABYTe ONAKOBKNTe BCbOTBeTHNTE KOHTeHepn 3a peuKNIPAHeTO IM. NOMoHte 3a ONa3BaHTo HA OKONHaTa CpeDa N OBOeWKOTO 3dpaBe, KaKTo n 3a peuKNIPAHeTO Ha OTNaDbUc NT
eJektpnueckn n eJektpoHn ypeiN. He n3XBpIaTe ypeInte, 03HaYeHn cbc
CIMBOJAL 3aEDHO C6HTOBATA CMET.
BbPheTe ypeDa B MeCTHnI pyHKT 3a peuKnIpaHe nIi Ce oBbPheTe KbM BaWata OoHnHcA cnYk6a.
OBSAH
- BEZPEČNOSTNI INFORMACE A INSTALACE 6
- POPIS SPOTREBICE 7
- DENNI POUZIVANI 7
4.CISTENIA UDRZBA 8 - POZNÁMKY K OCHRANE ZIVOTNIHO PROSTREDI
MYSLÍME NA VÁS
KataxwpioTeToTPOIOvOa,waTeVaexTeKaLATEPOePbic:
www.registerelectrolux.com

AyopaoTe aegouap, avawoiqa kai yviia avtalaktiKa yia t oukeun ca:
www.electrolux.com/shop
EYHPETHH IANATQN KAI ZEPBIZ
XpəiμoTioEite TáVtα μóvo yvniδa avTaλλakTiKa.
WE'RE THINKING OF YOU
Thank you for purchasing an Electrolux appliance. You've chosen a product that brings with it decades of professional experience and innovation. Ingenious and stylish, it has been designed with you in mind. So whenever you use it, you can be safe in the knowledge that you'll get great results every time.
Welcome to Electrolux.
Visit our website to:

Get usage advice, brochures, trouble shooter, service and repair information: www.electrolux.com/support

Register your product for better service: www.registerelectrolux.com

Buy Accessories, Consumables and Original spare parts for your appliance: www.electrolux.com/shop
CUSTOMER CARE AND SERVICE
Always use original spare parts.
When contacting our Authorised Service Centre, ensure that you have the following data available: Model, PNC, Serial Number.
The information can be found on the rating plate.
Warning / Caution-Safety information
① General information and tips
Environmental information
Subject to change without notice.
1. SAFETY INFORMATION AND INSTALLATION

WARNING!
Refer to the separate
Installation Instructions
booklet for Safety
Information and Installation.
Read carefully the Safetychapters before any use of
maintenance of the
appliance.
2.PRODUCT DESCRIPTION
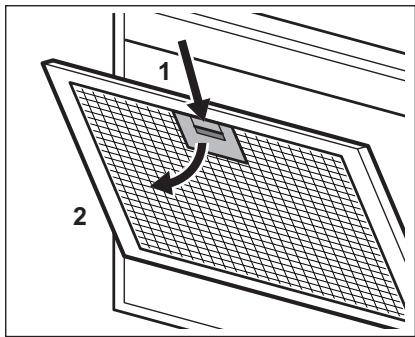
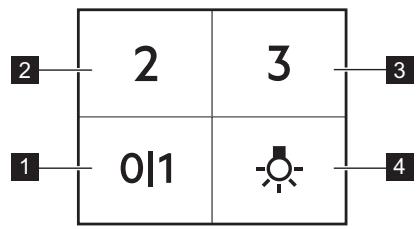
2.1 Control panel overview

| Function | Description | |
| 1 | First Speed | The fan switches to first speed level. |
| 2 | Second Speed | The fan switches to second speed level. |
| 3 | Third Speed | The fan switches to third speed level. |
| 4 | Lamp | Turns the lights on and off. |
3. DAILY USE
3.1 Using the hood
Check the recommended speed according to the table below.
| 01 | While heating up food, cooking with covered pots. |
| 2 | While cooking with covered pots on multiple cooking zones or burners, gentle frying. |
| 3 | While boiling and frying big quantities of food without a lid, cooking on multiple cooking zones or burners. |
It is recommended to leave the hood operating for approximately 15 minutes after cooking.
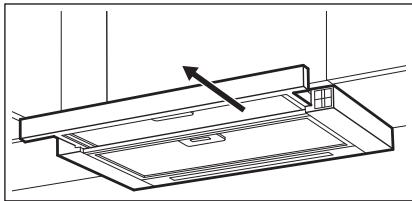
To operate the hood:
- Pull out the drawer of the hood more than 5 cm.

The control panel is exposed.
- To activate the function press the 01 button.
- If needed, change the speed by pressing the desired button.

The hoods light works independently to other hood functions. To illuminate the cooking surface press the light button. Closing the drawer has no effect on the hood light.

The hood remembers last setting of fan speed on closing the drawer. The hood will operate on this fan speed level when drawer is pulled out again.
To turn off the fan press 01 or close the hood drawer.
4. CARE AND CLEANING
4.1 Notes on cleaning
| Cleaning Agents | Do not use abrasive detergents and brushes. Clean the surface of the appliance with a soft cloth with warm water and a mild detergent. |
| After cooking some parts of appliance can get hot. To avoid stains appliance must be cooled down and dried with clean cloth or paper towels. | |
| Clean stains with a mild detergent. | |
| Keep the hood clean | Clean the appliance and grease filters each month. Clean the interior and grease filters carefully from fat. Fat accumulation or other residue may cause fire. |
| Grease filters can be washed in a dishwasher. The dishwasher must be set to a low temperature and a short cycle. The grease filter may discolour, it has no influence on the performance of the appliance. | |
| Charcoal filter | The time of saturation of the charcoal filter varies depending on the type of cooking and the regularity of cleaning the grease filter. The activated charcoal filter is not washable, cannot be regenerated and must be replaced approximately every 4/6 months of operation, or more frequently for particularly heavy usage. |
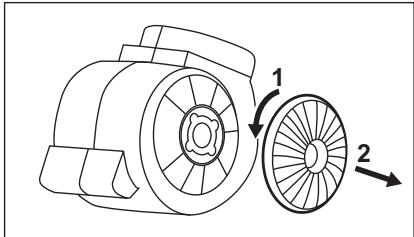
4.2 Cleaning the grease filter
Filters are mounted with the use of clips and pins on the opposite side.
To clean the filter:
- Press the handle of the mounting clip on the filter panel underneath the hood (1).
- Slightly tilt the front of the filter downwards (2), then pull.
Repeat the first two steps for all filters. - Clean the filters using a sponge with non abrasive detergents or in a dishwasher.

The dishwasher must be set to a low temperature and a short cycle. The grease filter may discolour, it has no influence on the performance of the appliance.
- To mount the filters back follow the first two steps in reverse order.
Repeat the steps for all filters if applicable.
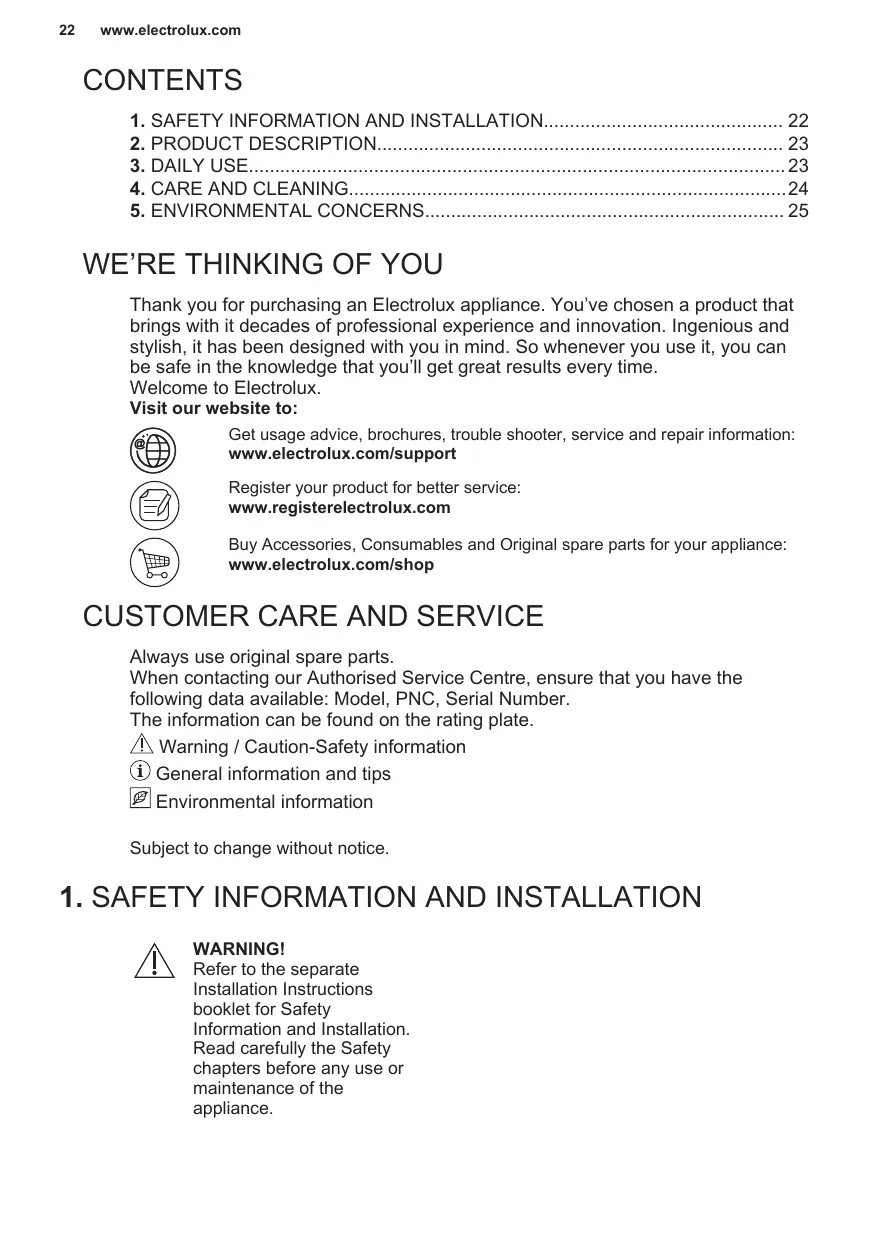
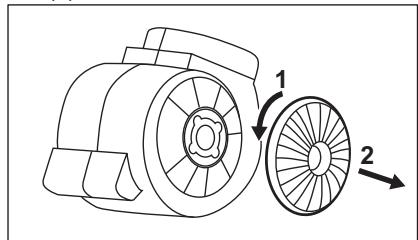
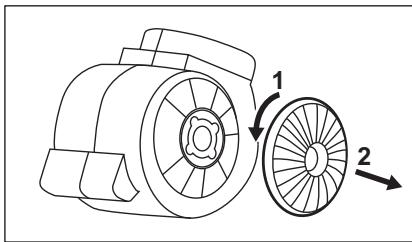
4.3 Replacing the charcoal filter

WARNING!
The charcoal filter is NON-washable! The filter cannot be regenerated!
To replace the charcoal filter:
- Remove the grease filters from the appliance.
Refer to "Cleaning the grease filter" in this chapter.
2. Turn the filter counterclockwise (1) and then pull (2).

To mount the filters back follow the steps in reverse order.
In any case, it is necessary to replace the filters at least every four months.
4.4 Replacing the lamp
This appliance is supplied with a LED lamp and separate control gear (LED driver). These parts can be replaced by a technician only. In case of any malfunction refer to "Service" in the "Safety Instructions" chapter.
5. ENVIRONMENTAL CONCERNS
Recycle materials with the symbol
Put the packaging in relevant containers to recycle it. Help protect the environment and human health by recycling waste of electrical and electronic appliances. Do not dispose of
appliances marked with the symbol with the household waste. Return the product to your local recycling facility or contact your municipal office.
CONTENIDO
- INDICACIONES DE SEGURIDAD E INSTALLACION 26
2.DESCRIPTION DEL PRODUCTO 27
3.USO DIARIO. 27 - MANTENIMIENTO Y LIMPIEZA 28
- ASPECTOS MEDIOAMBIENTALES 29
PENSAMOS EN USTED
4.3 Söeffltr vahetamine

HOIATUS!
Söefilter EI OLE pestav! Filtrit ei saa regenereerida!
Söefftri asendamiseks:
- Eemaldage seadmelt rasvafiltrid. Vt selles peatuki joatist „Rasvafiltri puhastamine".
5. JÄATMEKÄITLUS
3. SVAKODNEVNA UPORABA
3.1 Uporaba nape
Provjerite preparučenu brzinu prema tablici u nastavku.
| 0|1 | Prilikom zagrijavanja hrane, kuhanja sPokrivenim posudama. |
| 2 | Prilikom kuhanja sPokrivenim posudama na više zona kuhanja ili plame-nika, lagano prženje. |
| 3 | Prilikom ključanja i prženja velikih količina hrane bezPoklopca, kuhanja na više zona kuhanja ili plamenika. |

Preporuca se ostaviti napu da radioko 15 minuta nakon kuhanja.
Za upravljanje napom:
- Izvucite ladicu nape vise od 5 cm.

Upravljacka ploca je izložena.
- Za aktiviranje funkcjije pritisnite gumb 01
- Ako je potrebno, promijenite brzinu pritiskom na zenljenu tipku.

MbyHay ysiH Be6-caTbIMb13Fa KipiHi3:

PainanaHyTypaIbIaknapaTbI,KitanuapardbI,aKaynbIKtbJIOKypaIbI, Kbl3MeTKepcTeyXaHeXeHdeyTypaIbIaknapaTbIMbHaXepdeHanBbI3:
www.electrolux.com/support

Kakcbipak Kb3met any ywiin eHimih3di tipkehi3:
www.registerelectrolux.com

KpybIyBHy3 yuih akceccyapnapdbI, uIbIFbH MaTePnAnDapbH XHe KocaNkBi 6eJWeKTepei catbIn anHy3:
www.electrolux.com/shop
TYTbIHyUbIAPFA KOJIaY JXHe Kbl3MET KOPCETY
Opkaaan TynHcyckaJIbK KocalKbI 6eJIweKTepei naJaIaNbIbI3.
ΘKiJIeTTI Kbl3MeT KepCety optaIbIbIMbl3Fa xa6apnackKaHda, MblHa DepeKTePdiH 6OJyBIn KaMTaMaCbI3 etiH3: YJrI, PNC, cepraJIbIK Hemip.
BynaknapaattbTexhikalbIKdepeKTep TaKaTaaCbHaH Ta6yfa 6oIaIbI.
EckepTy/caKtbik-Kayinci3dk Typanbla aknapaT
①Жань aknapaT peH KeheCTep
KopwaFaH opTa TypaIbI aknapaT
Ehnpuyi eceptyci3 e3repic hri3y KykbfbHa ne.
1. KAYINCI3ДIКKE JXHE OPHATYFA APHAJFAH AKПAPAT

ECKEPTY!
Kayinci3dkke Jxhe ophatyka TaBtcbaKnapaTka apHanfah KITanwadaH Kayinci3 ophaty TypaNbI HcKaynbIKbI KaPAHbI3. KyblfHbI NaJaIaNHy Hemece OFaH KbI3MET Kepcety aIdbIHda Kayinci3dkTypaNbI TapaynapDbMyKnRT OKbIN LbIFbHbI3.
2.БУИБIM CINATTAMACbI
2.1 Baçkapy nahanıne shony
4.2 Ma'iyaricin Ta3aay
Cy3rIeIepi opHaTy yIiH Kapama-KapcbI KaTapbIHda KbICbIUtap MeH KaadaybIUtap naJaIaNbIJFaH.
Cy3rhi ra3anay yuih:
- Aya tapTkblk KypaIbIH actbHdafbI cy3ri nahenihderi 6ekity KbickblbIHbIH yCTaFbIbIH 6acblb3 (1).

- Cy3rHih andbihfj kafbIH TeMeH Kapai a3dan eHKeiTiH3 (2), cOaH KeiH TapTbIHbI3.
BapnbC cy3rinep yuiH anfauKbEki KaamdbKaTanaHbI3.
- Cy3rinepdi Jxemipriu Emec xyfbl 3aTtapdbi KOJaDaHbI IN XeKEmEHemece bIDbc XYfbl MaunHaTa3aJnHaB13.

blblicyfblmMaunHada
TEmeH TempeatypaHbl
KHe KbICKa zkNdiOpHaTy
Kepe.KMa cy3ricinH Tyci
e3repyi MymkiH,6yI
KpyblfblHbHxMblC
icteyihe acep etneidi.
- Cy3rihi KaT aOpHbHa KOIO yUiH anFaAikbI eKl KaDAMdbI KepicIHwe opbIHdaHbI3.
KaKet 6oJca, 6apIbIK cy3rInep yuH Kaamdapdbi KaItanaHbI3.
4.3 Kemip cy3ricih aybictbipy

ECKEPTY!
Kemip cy3ricin JyyfA BOJIMAIdbI! Cy3riHi KaIIbHa KeTIpy MymKiH emec!
Kemip cy3rici aybictbyuhi:
- Mai cy3rinepiK KypblfbldaH 1bIfrapbln aIbHbI3.
OcbI tapaydaIbI «MaI cy3rinepiH ta3aIay» 6eJIMIn kapaHbI3. - Cy3rihi caFat tiJIHe Kapcbl 6aFbITTa 6ypaHbI3 (1), codah KeiH TapTbIHbI3 (2).
Cy3rhi KaIta opHbHa KOHO yuHIN Kaamdapdbi KepiciHwe opbHdaHb13.
Ke3-KeJIreH KaFdaNda cy3rInepdi KEM DeReHDe TepT aN caBbH aybICTbpy KepeK.
4.4 甲amdbaybictbipy
Byn KpybJfbl KUd WambIme HKeHe
6eIek icke Kocy KypaIbIme (KUd
dpaIbepi) Ka6dbkTaNfH. Byn
6eIweKterpi TexnIK KaHa aybCTbipa
anaIb. AkaynbIk opbIH anFaH JaFdaJa
"Kayinc3ik HcckaynapbI" TapaybHdaFl
"Kb3met Kepcety" 6enimH kapaHbI3.
5. KОПШАFAH OPTAFA KATbICTbl JAFДАЛAP
BenlrcanbHfAH MaTePnAldapbl KaTaNHeDeyEnOTK3yRe TaNCbIpbHbI3. Opam MaTePnAldapbIH KaTaNHeDeyEn ETK3yUwIH TNICTIKoHTeHepnepe caBbH3. 3JeKTpNikXHe 3JIeKTPOHNKaBk KpyBnFbIaNPdbIH KaNbBIfbIH KaTaNHeDeyEnOTK3yApKbIbI, KopShaFaH optaFA XHe aDAMbIH DeHCaybIFbHa 3NbIH
KeTiptinKaFdaInapfKaon6epMeyre e3 yneciH3di KocbIbI3.Benri CaIbIHFaH KpyblIbIapDb TYPMbICTbIK KaIbIKTapMeH 6ipre TactaMaHbI3. ΘHiMdi JxeprIniKTi KaIta eHdey opTaIbIbHa eTKi3iH3 Hemece JxeprIniKTi MekeMe re xa6apnaCbIbI3.
Ocb eHimHi eHdpinre H Kyi cepnIbIK Hemipde KepceTilreH, OHbIH HemipHih bipHsi caHbI eHdpinre XblDbIH COHfbI caHbHa, ekHsi kHe yWihci cHap anTaHbIH peTTik HemipHe caikec KeleDi. MbcJIbI, 14512345 cepnIbIK Hempi eHIM 2021 XblDbIH KbIPbIK bcicHIa anTaCbIHda eHdpipInreH biNipei.
Фндірuyш: Electrolux Appliances AB, St. Goransgatan 143, 105 45 Stockholm, Шваши.
NmnpTaybI kHe eHdipyuHIn yKeinTeTTi NbIMbl:
OOO «Злестоюк Рс», Кожевинецкиnpoe3d 1, 115114, МockeysMocKbA, тeI.: 8-800-444-444-8.
Польшаджасалfax.
TURINYS
- SAUGOS INFORMACIJA IR IRENGIMAS 61
- GAMINIO APRAŠYMAS 62
- KASDIENIS NAUDOJIMAS 62
- VALYMAS IR PrieziURA 63
5.APLINKOS APSAUGA 64
MES GALVOJAME APIE JUS
- BbIDBnHbTe RaIcK BbITaXKn 6OJIe yEM Ha 5 CM.
Pahenb ynpabneHn OTkpbTa.
- Дяв BKЛЮЧЕня Функции Нахмпту кНОПКУ 01.
- Пи Нeo6хОДМОСТи ИЗМЕнITEckopoOCtь, Нжав Тpe6уemyHо KhoNkY.
OcBeUeHne BbITJXKN pa6oTaet He3aBVCIMO OT npyHX FyHKnBbITJXKN. TObbl BKIOHTb BapOHyI NaHeJIb, KHOPIKY OCBSeHnA 3AkpyTne Jzka He BNIAET Ha OCbUeHne BbITJXKN.
HTO6bI BbIKIOHHTB BEHTINJATOP, HAKMNTe 01NIN 3aKpOInTe BblDINKHOJ RzIK.
BbIyKa 3aONMHaET
PocJeHIOU HAcTPOJky
CKOpOCTN BeHTnJIaTOPa pni
3aKpbIBAHNI JaNka.
BbITyKa 6yDeT pa6oTaTB
Ha 3Tom yPoBHe cKOpOCTN
BeHTnJIaTOPa, KOrDa
BbIDBMKnHЯuNK CHOBA
BbIDBInHeTCra.
4. yXoI OuNCTKA
4.1 Пгимechаши no ouchstke
| Чinctашие cpeč央а | He IncnoJIb3уITE abpa3nVBныe моюшиce cpeIcTBAи сеТКИ. ПоверхноCTь пriбopa прOTираite МягКоI ТkaНБЮ, СmoчEHоВВ Тeпло ВODEС MOюшIM cpeIcTВOM. |
| Посné пprINOToBVeHЯн HeKOTOpbIeЧаSTи пriбopa сильно harpe- валотсь. Визбеканue obpa3OВаHЯпЯтEN HeoБxOДМО дТь пriбору OCTыть И ВblteРeТь ergo hacyxo ChIcToI TprЯПКоI ИЛIN By- MaxныIMN ПОЛOTeHцAMN. | |
| Очицайte пЯТHA мЯrkIM моюшIM cpeIcTВOM. |

ДерхиTe BblTЯЖуВЧ-CTOTE.
Pa3B MecaI npOn3BOJnTe OOncTky pnp60paN JxipoyaBnBaHO x PhJBTOB. TuaTeNbHO OChuAte BHyTpEHHne NOBepXHOCTn IN KxipoyaBnBAoUcne PhJBTOBpIOTKnpa.HakOpJIeHne Knpa Nn DpyNX OTIOXeHm MOKeT pnpBeCTN K BO3rOpaHnIO.
KinpoynaBnBaIOuIe fNJIbTpbl MOxHO MblB NocydomoeyHOMaunHe.
Iocydomoeha MaunHa DoJxHa 6bItb HactpoeHa Ha Hn3KOTempeatpyHou MOkyu KopoTkn uKnL. XkpoynaBnBaIOuNfOJIbTp MoKET N3MeHHTb CBet; 3To He NOBnIeR Ha npOn3BOIDntelbHOCTb Pn60pa.

YrOJIbHbIy cnJIbTp
BpemHaCbIeHnYrOJbHOroΦnIbTpRaBapbpyetcRBa3aBncmocTnOT BnDa pnproTOBHeHnIpeyIpaHIOCTOn OChtKn KInpoynabLNaBoUeOΦnIbTpA.ΦnIbTpN3AKTNbIPOBaHHORyIgNHe RaJIaTeC MoUoUIMcR, He NpDnEKeNT peReHepaunN Tpe6yET 3amehIpnpMepHO kaxdIbe 4/6 MecaueB pa6ToB IINu YauE B Cnyae Oco60 INTHcNBHO 3KcnIpyataun.
4.2 OuchTka
KInpoUyIaBnBaIouIeOΦnIbTpA
JnpooyIaBJIbIbIoUeΦJIbTpbl.
Cm. pa3dJIe «UncTka
KInpoUyIaBnBaIOuIeOΦnIbTpα» B 3ToI rIaBe.
- ПовернITE ФильтnpOTив са corrobor CTpeJIKN (1), a 3aTeM NotянITE (2).
I3roTOBneHO B PJIbwe.
OBSAH
- BEZPEČNOSTné POKNYA INSTALÁCIA 100
- POPIS VYROBKU 101
- KAZDODENNE POUZIVANIE 101
- Osetrovanie A CISTENIE 102
- OCHRANA ZIVOTNÉHO PROSTREDA 103
NAVRHNUTE PRE VÁS
KOPINCHNCHKA NOIDPSSHKA IN CEPBNC
YBeK KOpnCTnTe OpunHaHne pe3epBHe JeNoBe.
Kaanda KONTAKTnpate OBnawheHn cepBnCHn ceHTap, BODNTe paUHa da KOd ce6e ImaTe cneDeHe noDaTke: Moen, 6poj npOn3BoDa, cepNJcKn 6poj.
IopauMry da ce npohy Ha IIOuHcN ca TexnKIM KapaKTePnCTkKaMa.
Uno3opehe/Oppe3- nHΦopMaunje o 6e36eHnOCTn
① OnuTe INHΦopMaζηje n cabetn
IInΦopMaζηeOxNtHOJcpeiHn
3aDpkaHO npabo N3MeHa.
1. INHΦOPMALUJNE O B6E3BEdHOCTN INHCTAJIALUJN

YI03OPEHbE!
Porjedajte 3ace6Hy
6pouypy C ynyTCTBnma 3a
HnctaJauJy 3a
HOpmaJne o
6e36eDnOCTn
CBeTIO acnnpaToppaIi He3aBnCHO OJ HeROBNX ocTAnx FyHKuJa.3a OCBeTbAbaHe IOBpUHHe 3a KyBaHe npITcHNe DyRMe 3a CBeTIO.3aTbapaHe fNOke He yTuHe Ha CBeTIO acnnpaTopa.
reparationsinformation:
www.electrolux.com/support
registrar din produit for bättre service:
www.registerelectrolux.com

3i BCTaHOBHeHH. IpeeI
BVKOPNCTAHNM YN
O6cIyROByBaHHm npHnaDy
yBaJHNO npOuHTaIe po3dIIN
IooI6e3neKn.
2.ОПИСВИРОБУ
2.1 Ornay naneji KepyBaHHa
4.2 OuHnEHHJxHpoBOrO fInbTp a
I Jnra nocydomnHO MaunHn notpi6Ho BCTaHOBHTN Hn3bky Tempepatpy KOPOTkn uNKJ MNTTJ. KnOpOBn fInbTp MoKe 3ne6apBHTncA, UO He BnINBaE Ha eFeKTNBHicTB po60t npnilady.
- Uo6 yctahOBHTn fInbTpnu Ha Micce, NOBTOPIb nepsi Dba KpOKn y 3BOPOTHOMy NOPrky. IOBTOPIb KpOKn dIra BCix fInbTpib (RAUO 3aCTOCOBHO).
4.3 3aHa ByrɪnbHOrO φɪnbTpa

NONEPEJXEHH!
ByrilbHnI iInbTp HE MoXHa MNT! iInbTp He NiDJaRa e perehepaui!
5. OXOPOHA IOBKIIJIJIa
3daBaIte Ha nobTOpHy nepepo6ky MaTepiAIn, nO3HaueHi BiDnOBiDnHM CmBBOJOM BnKndaIte ynaKOBky uBiIDNOBidiKOHTeHepn IJaB TbOPHHoIC CuPOBHN. DOnOMOXITb 3axNCTNTu HABKOLNIHc cepEOBUNe Ta 3dOpOB'ay iHNX JIODei i 3a6e3neHTn BTOPNHny nepepo6ky eNEKTpUHnx i eNEKTPOHNx
Lio6 3amHnT ByrInbHn FInbTp:
:2Lxylgaiualllogd2og
www.electrolux.com/support
jie jiaoi aoe jie Jgaoall jw
www.registerelectrolux.com
jglal aolll jglg bgsaIgwall gallg caxlall
www.electrolux.com/shop


aIg cIg I
aaiy jia jia jia jia jia jia jia jia jia jia jia jia jia jia jia jia jia jia jia jia jia jia jia jia jia jia jia jia jia jia jia jia jia jia jia jia jia
jlll: jlll lllllllllllllllllllllllllll
Julll PNC
a>gl 1c loglaall o i j k a
a0dwl10og120-a/
aole jilagloglgo ①
a uloglo
jolw jgduy aio
jlllJalalaloglo .1

Jr J 100000000000000000000000000000000000000000000000000

EAC C E