TASSIMO TAS1104 - Coffee maker BOSCH - Free user manual and instructions
Find the device manual for free TASSIMO TAS1104 BOSCH in PDF.
User questions about TASSIMO TAS1104 BOSCH
0 question about this device. Answer the ones you know or ask your own.
Ask a new question about this device
Download the instructions for your Coffee maker in PDF format for free! Find your manual TASSIMO TAS1104 - BOSCH and take your electronic device back in hand. On this page are published all the documents necessary for the use of your device. TASSIMO TAS1104 by BOSCH.
USER MANUAL TASSIMO TAS1104 BOSCH
natural_image
Colorful six-petal flower pattern with no text or symbolsTASSIMO
style

natural_image
Black Bosch BOSCH brand coffee maker with TASSIMO branding, displayed against a solid orange background (no visible text or symbols on device body)TAS110x
natural_image
Illustration of a hand using a handheld device to interact with a blue cushion, showing a black arrow and play button (no text or symbols)2
text_image
Diagram showing car safety warning and calibration device with 'calco' label3
natural_image
Illustration of a hand pouring liquid into a container with a magnified inset showing a water level (no text or symbols)4
text_image
max5
text_image
Diagram illustrating car wheel steering and calco valve mechanism with labeled components6
natural_image
Illustration of a hand pressing down on a blue-handled industrial machine component (no text or symbols)7
text_image
Diagram illustrating a hand using a blender to adjust or remove a blue lid, with checkmarks indicating cancellation or adjustment.8
text_image
CLICK9
text_image
min. 250 ml 9 fl.oz.10
flowchart
graph TD
    A["1: calco"] --> B["2: heat warning symbol"]
    B --> C["3x"]
    C --> A
    style A fill:#f9f,stroke:#333
    style B fill:#ccf,stroke:#333
    style C fill:#cfc,stroke:#333
11
text_image
calco12
text_image
Diagram illustrating a person's air intake with warning symbols and a warning sign, showing airflow direction and hazard.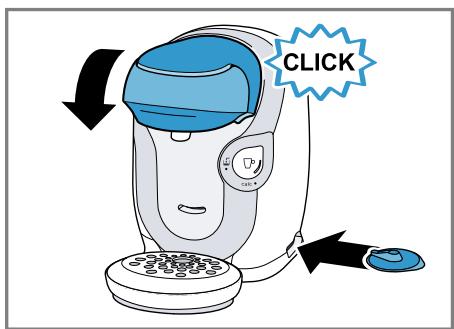
text_image
CLICK13
natural_image
Line drawing of a modern blender with control panel and buttons, plus a blue checkmark (no text or symbols on device)14
text_image
max15
text_image
Diagram showing a hairdryer with warning symbol and electrical plug, indicating safety hazard.16
text_image
Diagram illustrating a washing machine operation with three variants of a blender cup, showing step-by-step assembly.17
natural_image
Illustration of a blue coffee maker using a cup, with a hand adjusting the cup (no text or symbols present)18
text_image
Diagram illustrating a coffee maker's step-by-step cleaning and inspection process, with labeled steps and checkmarks indicating removal or confirmation.19
natural_image
Illustration of a coffee machine with a mug and a downward arrow, labeled 'CLICK' (no text or symbols on the device itself)20
text_image
calco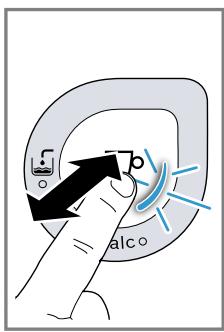
text_image
b alco21

text_image
calc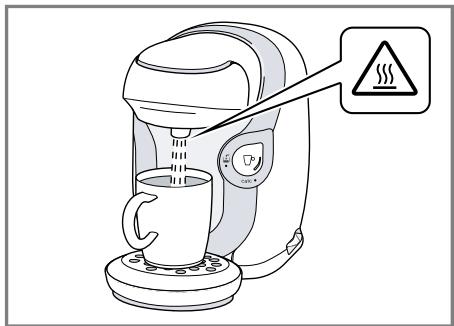
natural_image
Line drawing of a coffee maker with a steaming cup and warning symbol (no text or labels)22

text_image
Diagram showing a hand using a calco machine to clean food, with an inset image of a meal tray labeled 'calco' and a blue X symbol.23
text_image
Diagram illustrating the step-by-step cooking process of a coffee maker, showing hand pressing to switch and stopping with STOP.24
text_image
Diagram illustrating a hand interacting with a device, showing pie chart and meter icons for different charge states.25
text_image
calco26

text_image
Diagram showing a coffee maker with warning sign indicating heat and smoke, featuring a rising arrow and warning symbol.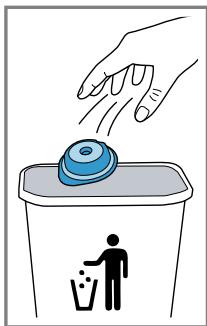
natural_image
Illustration of a hand placing a trash bin into a trash can with a person silhouette (no text or symbols)27
natural_image
Line drawing of a kitchen appliance with a steaming cup and a checkmark (no text or symbols)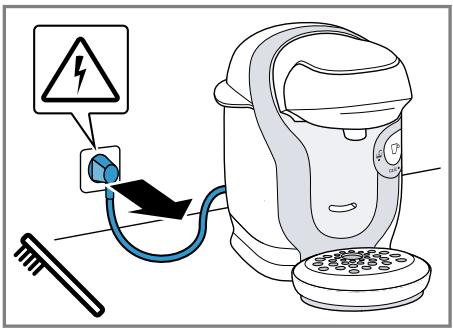
text_image
Diagram showing an electric shock absorber connected to a power outlet, with warning symbol and tool nearby28
text_image
Diagram illustrating a device with labeled parts and directional arrows, including a checkmark for cleaning or repair.29
text_image
Diagram illustrating a mechanical device with labeled parts and a safety check symbol30
text_image
CLICK calc31
text_image
CLICK CLICK32
natural_image
Illustration showing two steps of cleaning a car hood, one with a cloth and the other with a blue cloth (no text or symbols)33
text_image
CLICK CLICK34
text_image
Diagram showing car seat assembly with labeled parts and directional arrows indicating movement or force35
text_image
Diagram illustrating a hairdryer with labeled steps to remove or check, showing a hand holding a brush and a checkmark.36
text_image
max37
text_image
Diagram illustrating car seatbelt usage and electrical hazard warning, showing hand placement and cable installation steps38
text_image
Diagram illustrating a washing machine operation with checkmarks and X/XX labels indicating different states or conditions.39
text_image
CLICK min. 250 ml 9 fl.oz.40
text_image
b calco b calco41
text_image
calco ###42
text_image
Diagram showing two steps of a coffee maker's usage, with warning sign and checkmark indicating action.43
text_image
calc calc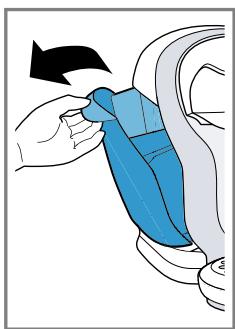
natural_image
Illustration of a hand adjusting a blue shipping container on a car seat (no text or symbols)44
text_image
calc
text_image
TASSIMO calc www.tassimo.com www.bosch-home.com No TCZ600445
natural_image
Illustration of a hand using a handheld device to lift a circular component (no text or symbols present)46

text_image
Diagram illustrating a hand using a washing machine to adjust or install a blue component, with checkmarks and X/XX labels indicating selection or status.47
text_image
CLICK min. 500 ml 17 fl.oz.48
text_image
5 s b alco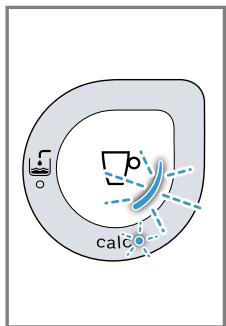
text_image
calc49
text_image
30 min50
text_image
calco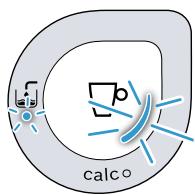
text_image
calc°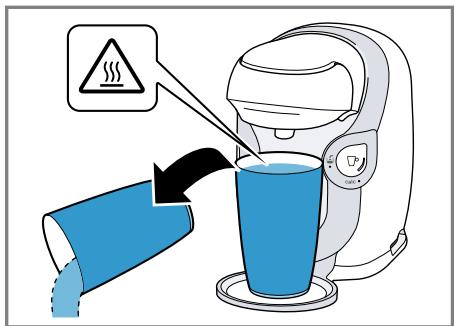
text_image
Illustration showing a steaming machine with warning symbol and liquid being poured into a blue cup, indicating environmental hazard.51
natural_image
Illustration of a hand cleaning a bag with a blue liquid, showing a spray bottle and a container (no text or symbols)52
text_image
max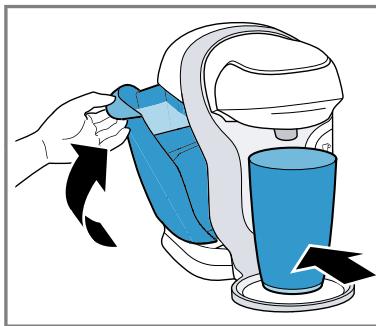
natural_image
Illustration of a hand using a blue safety belt to lift a blue cup, with arrows indicating motion (no text or symbols)53
flowchart
graph TD
    A["Step 1: Heating"] --> B["Step 2: Reaction"]
    B --> C["Warning Symbol"]
    C --> D["Reaction Step"]
    D --> E["3x Multiplier"]
    style A fill:#f9f,stroke:#333
    style B fill:#ccf,stroke:#333
    style C fill:#cfc,stroke:#333
    style D fill:#fcc,stroke:#333
54
text_image
calco55
text_image
Diagram illustrating a person using a toilet with warning symbols and a warning sign, indicating environmental hazard.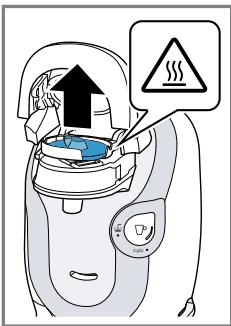
text_image
Diagram illustrating a person's air intake process with warning sign and smoke symbol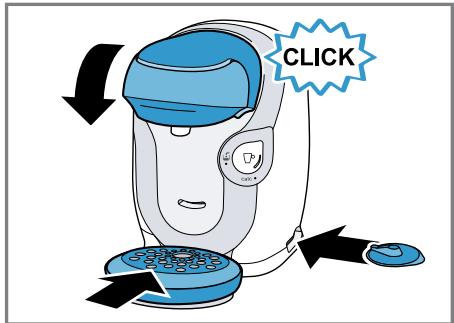
text_image
CLICK56
text_image
max57
natural_image
Illustration of a hand holding a blue object with an arrow indicating direction (no text or symbols)
natural_image
Line drawing of a modern blender with a checkmark indicating selection (no text or symbols present)58
de
Inhaltsverzeichnis
Restriction on user group...... 26
Safety information....27
Familiarising yourself with your appliance.... 30
Appliance 30
Controls 30
Before using for the first time ..... 30
Performing initial start-up 30
General information.... 30
Accessories.... 30
Basic operation 31
To prepare a drink.... 31
Cleaning and servicing.... 31
Dishwasher-safe components ..... 31
Cleaning the appliance .... 31
Descale the appliance.... 31
Troubleshooting...... 32
Malfunctions 32
Information on display panel...... 34
Problem with results.... 35
Disposal 36
Disposing of old appliance .... 36
Customer Service.... 36
Product number (E-Nr.) and production number (FD) 36
Warranty conditions.... 36
Technical specifications...... 36

Safety
Please read the safety information to ensure that you use the appliance safely.
General information
You can find general information for this instruction manual here.
- Read this instruction manual carefully. Only this will ensure you use the appliance safely and efficiently.
■ This manual is intended for the user of the appliance.
■ Follow the safety instructions and warnings. - Keep the instruction manual and the product information safe for future reference or for the next owner.
- Check the appliance after unpacking it. Do not connect the appliance if it has been damaged in transit.
Intended use
Please read the information on intended use to ensure that you use the appliance correctly and safely.
Only use this appliance:
■ As specified in this instruction manual.
■ for preparing hot drinks.
■ In private households and in enclosed spaces in a domestic environment.
■ Up to an altitude of max. 2000 m above sea level.
Restriction on user group
Avoid risks to children and vulnerable persons.
This appliance may be used by children aged 8 or over and by people who have reduced physical, sensory or mental abilities or inadequate experience and/or knowledge, provided that they are supervised or have been instructed on how to use the appliance safely and have understood the resulting dangers.
Children must not play with the appliance.
Children must not perform cleaning or user maintenance unless they are at least 8 years old and are being supervised.
Keep children under the age of 8 years away from the appliance and power cable.
Safety information
Follow these safety instructions when using the appliance.
⚠ WARNING – Risk of suffocation!
■ Children may put packaging material over their heads or wrap themselves up in it and suffocate.
- Keep packaging material away from children.
▶ Do not let children play with packaging material.
■ Children may breathe in or swallow small parts, causing them to suffocate.
▶ Keep small parts away from children.
▶ Do not let children play with small parts.
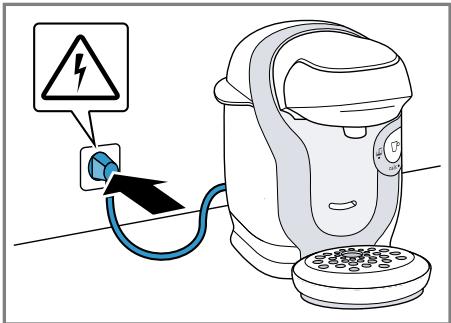
⚠ WARNING – Risk of electric shock!
■ Improper installation is dangerous.
- Connect and operate the appliance only in accordance with the specifications on the rating plate.
- Connect the appliance to a power supply with alternating current only via a properly installed socket with earthing.
▶ The protective conductor system of the domestic electrical installation must be properly installed.
■ If the appliance or the power cord is damaged, this is dangerous.
▶ Never operate a damaged appliance.
▶ Never operate an appliance with a cracked or fractured surface.
▶ Never pull on the power cord to unplug the appliance. Always unplug the appliance at the mains.
▶ If the appliance or the power cord is damaged, immediately unplug the power cord or switch off the fuse in the fuse box.
▶ "Call Customer Service." → Page 36
▶ Repairs to the appliance should only be carried out by trained specialist staff.
en Safety
■ Improper repairs are dangerous.
▶ Repairs to the appliance should only be carried out by trained specialist staff.
▶ Only use genuine spare parts when repairing the appliance.
▶ If the power cord of this appliance is damaged, it must be replaced by the manufacturer, the manufacturer's Customer Service or a similarly qualified person in order to prevent any risk.
■ An ingress of moisture can cause an electric shock.
▶ Never immerse the appliance or the power cord in water.
- Liquids must not be spilled on the appliance plug connection.
▶ Only use the appliance in enclosed spaces.
▶ Never expose the appliance to intense heat or humidity.
- Do not use steam- or high-pressure cleaners to clean the appliance.
⚠ WARNING – Risk of fire!
■ The appliance will become hot.
▶ Ventilate the appliance adequately.
▶ Never operate the appliance in a cupboard.
▶ Never leave the appliance unattended while it is switched on.
■ It is dangerous to use an extended power cord and non-approved adapters.
▶ Do not use extension cables or multiple socket strips.
▶ If the power cord is too short, contact Customer Service.
▶ Only use adapters approved by the manufacturer.
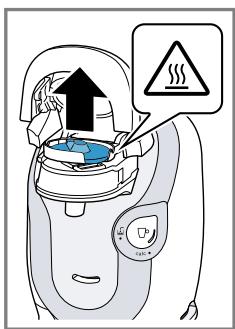
⚠ WARNING – Risk of burns!
Some parts of the appliance become very hot.
▶ Never open the brewing system during operation.
▶ Never use a damaged T DISC.
▶ Never use a drinks T DISC more than once.
▶ Never touch hot appliance parts.
- Allow hot appliance parts to cool down before touching them.
⚠ WARNING – Risk of scalding!
Freshly prepared drinks are very hot.
▶ Leave drinks to cool down if necessary.
- Do not let escaping liquids or steam come into contact with your skin.
⚠ WARNING – Risk of injury!
Improper use of the appliance may endanger the user.
▶ Use the appliance only for its intended purpose.
⚠ WARNING – Danger: Magnetism!
The appliance contains permanent magnets. These may affect electronic implants, e.g. pacemakers or insulin pumps.
▶ People with electronic implants must stand at least 10 cm away from the appliance.
- This minimum distance of 10 cm must also be observed for the water tank when removed.
⚠ WARNING – Risk of harm to health!
Dirt on the appliance may be dangerous to health.
▶ Follow the cleaning instructions for the appliance.
Familiarising yourself with your appliance
Familiarise yourself with the parts of your appliance.
Appliance
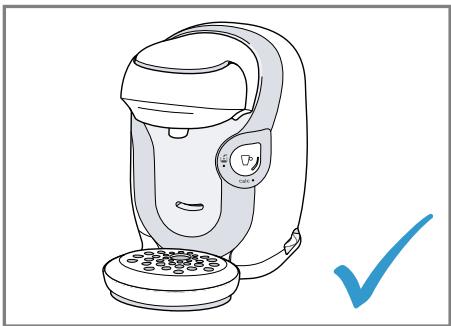
You can find an overview of the parts of your appliance here.
Note: Individual details and colours may differ, depending on the appliance model.
→ Fig. 1
| 1 | Float |
| 2 | Calc mark |
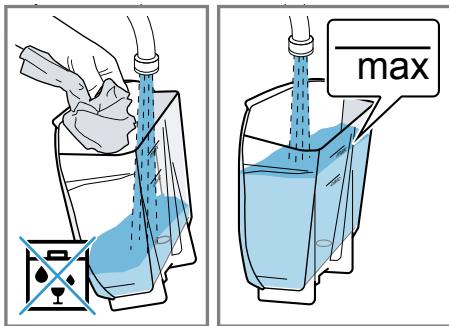
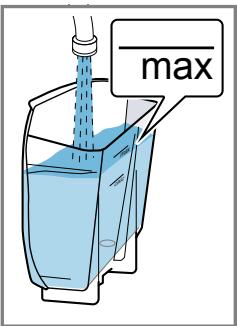
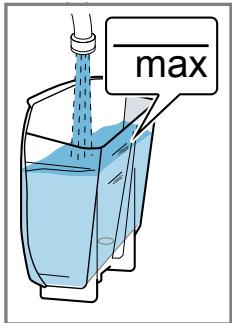
| 3 | Max mark |
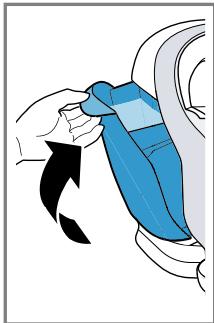
| 4 | Water tank |
| 5 | T DISC reading window |
| 6 | T DISC piercing unit |
| 7 | T DISC holder |
| 8 | Lock |
| 9 | Brewing unit |
| 10 | Control panel |
| 11 | Storage compartment |
| 12 | Brief cleaning / descaling instructions |
| 13 | Service T DISC |
| 14 | Bowl |
| 15 | Cup stand |
| 16 | Drip grate |
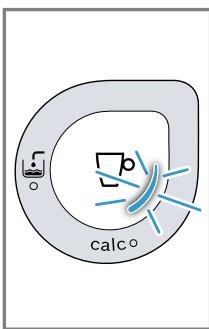
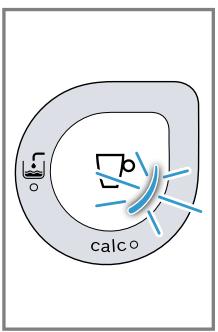
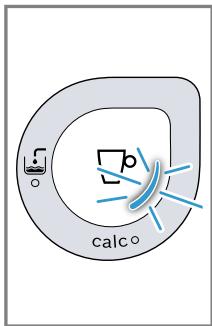
Controls
You can find an overview of the symbols on your appliance here.
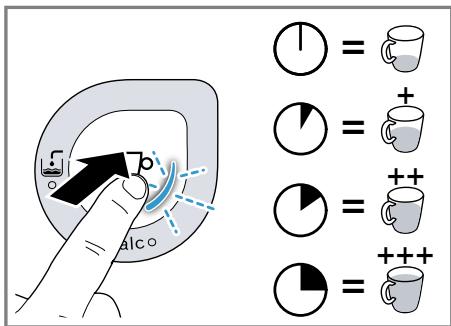
| ■ Activate the appliance.■ Start, stop and prolong dispensing of drinks.■ Start service programme. | |
| Fill water tank. | |
| Display status. | |
| calc | Descale the appliance. |
Before using for the first time
Clean the appliance and individual parts.
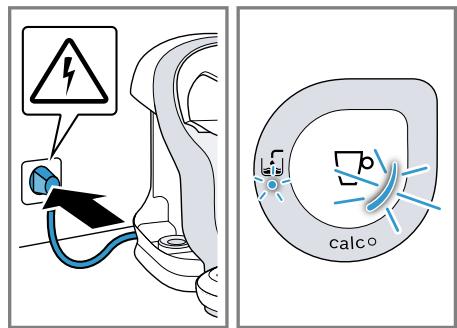
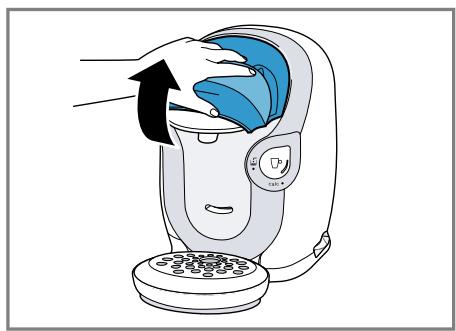
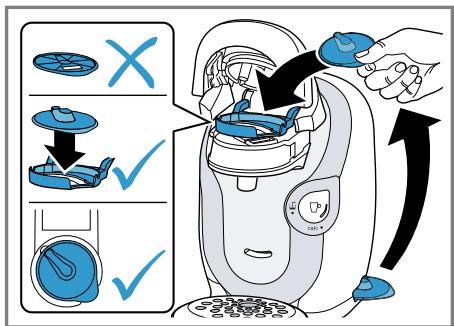
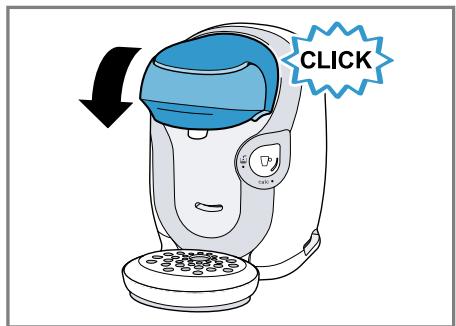
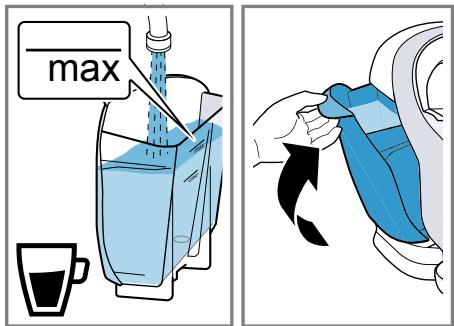
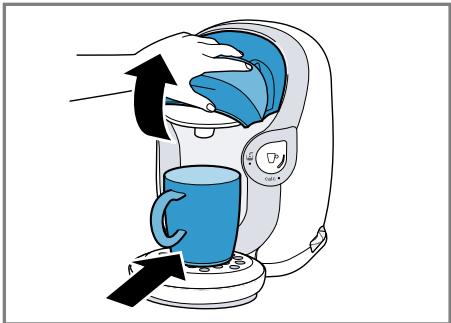
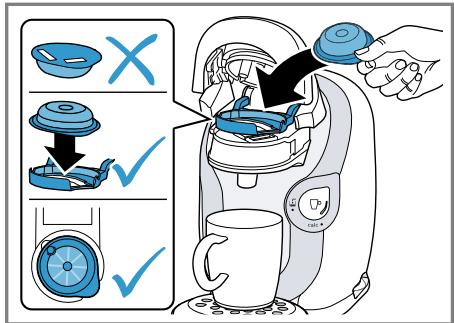
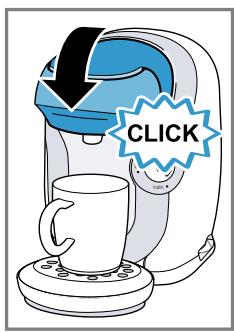
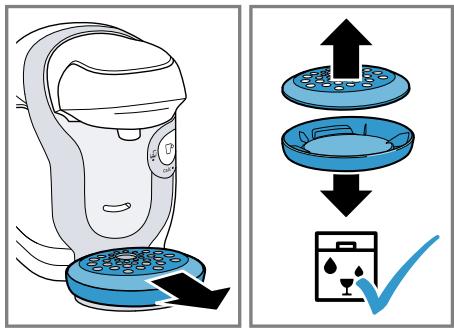
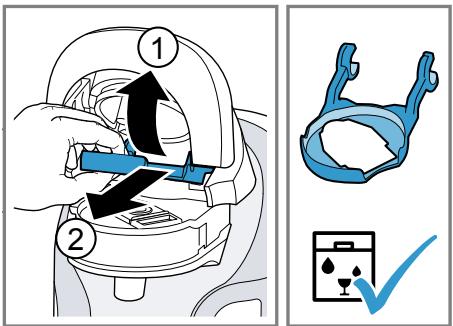
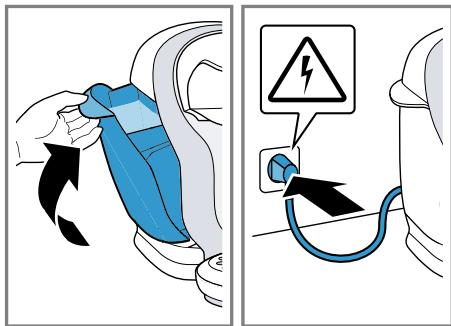
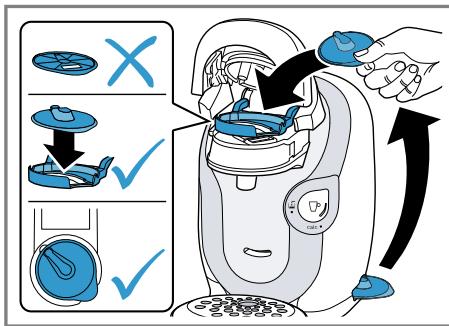
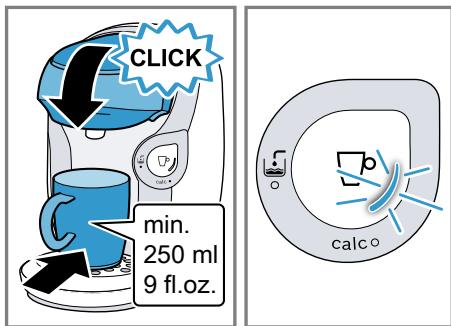
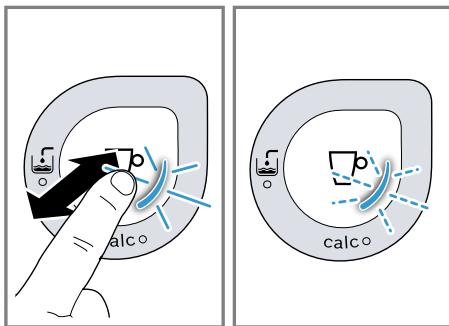
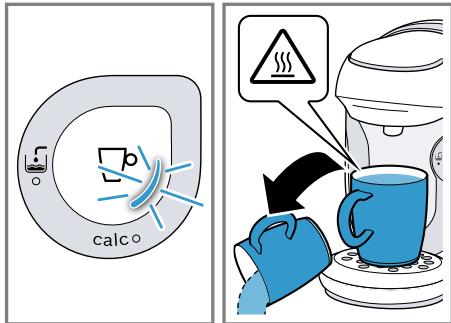
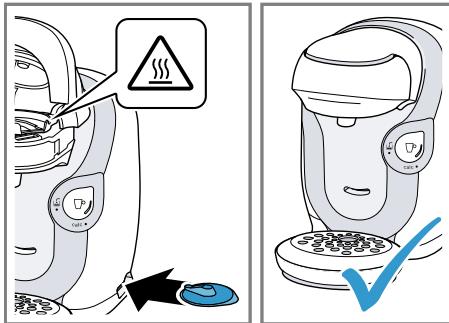
Performing initial start-up
Follow the pictorial instructions at the start of these instructions.
→ Fig. 2 - 14
General information
Please bear this information in mind so that you can get the best out of your appliance.
Note: The appliance has been programmed at the factory with standard settings for optimum operation.
Accessories
Only use original accessories. These have been made especially for your appliance. Here, you can find an overview of your appliance's accessories.
Note: Bosch is the manufacturer of the TASSIMO appliance. Therefore Bosch cannot provide any delivery guarantee for the TASSIMO TDISCs.
| accessories | Order number / Web shop |
| Descaling tablets | TCZ6004 / 00311909www.tassimo.comwww.bosch-home.com |
| Service T DISC | 17001491www.bosch-home.com |
Basic operation
You can find out everything you need to know about operating your appli-ance here.
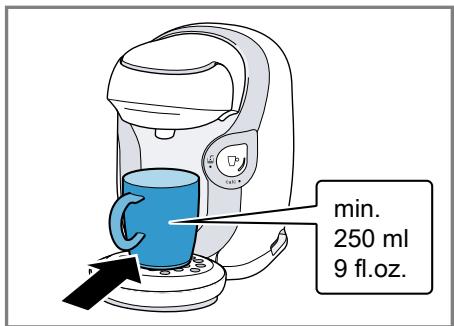
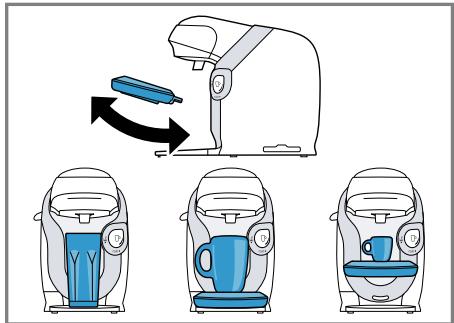
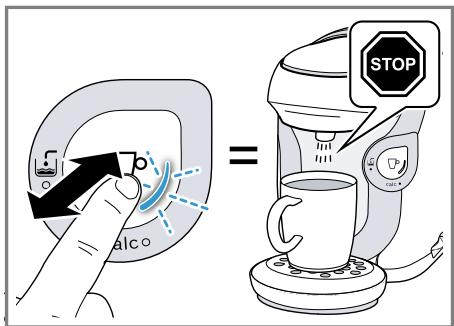
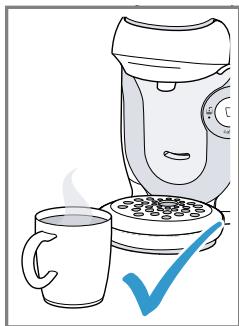
To prepare a drink
Find out how to prepare a drink of your choice. Follow the pictorial instructions at the start of these instructions.
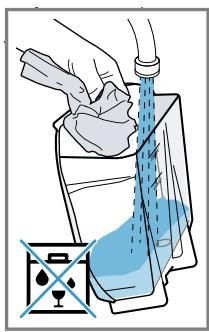
Tips
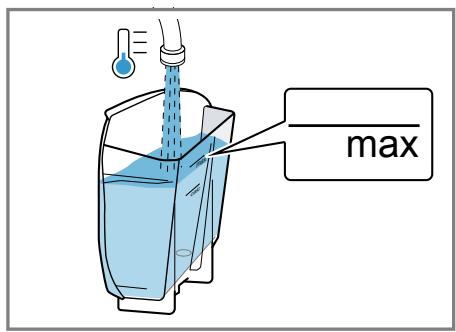
■ Fill the water tank each day with fresh, cold, non-carbonated water.
■ Do not use chemically decalcified water.
■ To interrupt the dispensing process, briefly press □°.
→ Fig. 15 - 27
Cleaning and servicing
To keep your appliance working efficiently for a long time, it is important to clean and maintain it carefully.
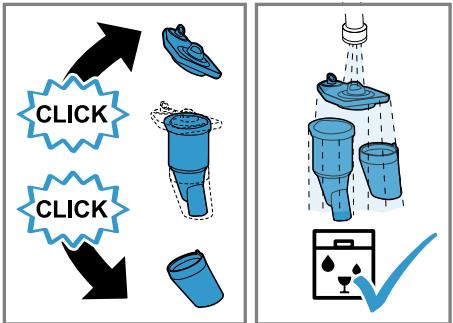
Dishwasher-safe components
Find out which components can be cleaned in the dishwasher.
ATTENTION!
Some components are sensitive to heat and may be damaged if they are cleaned in a dishwasher.
▶ Follow the operating instructions of the dishwasher.
▶ Only put dishwasher-safe components in the dishwasher.
▶ Only use programmes that do not heat the water above 60 °C.
Dishwasher-safe components:
■ T DISC holder
■ T DISC piercing unit
■ Drip grate
■ Bowl

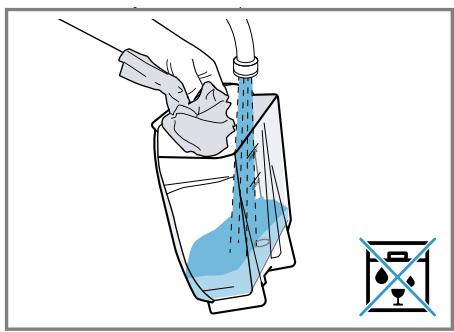
Components that are not dish-washer-safe:
■ Water tank
■ Service T DISC

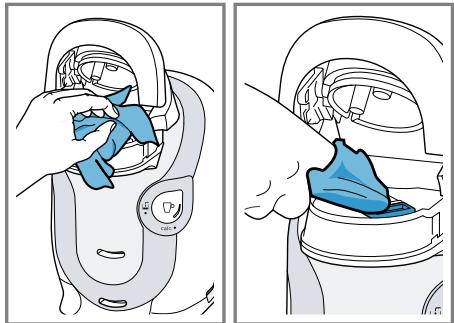
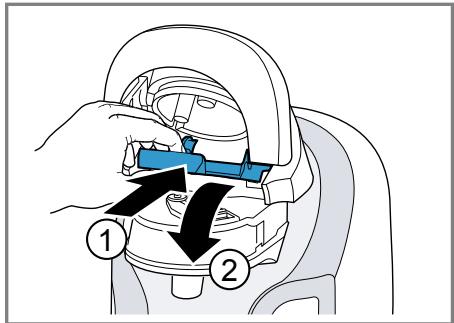
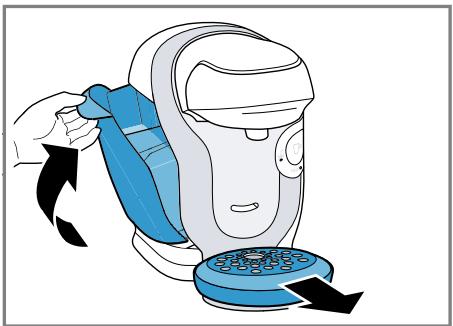
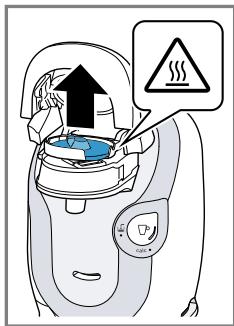
Cleaning the appliance
Follow the pictorial instructions at the start of these instructions.
→ Fig. 28 - 43
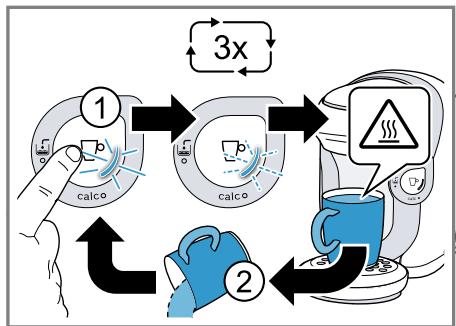
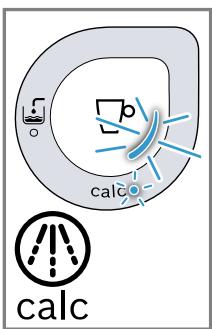
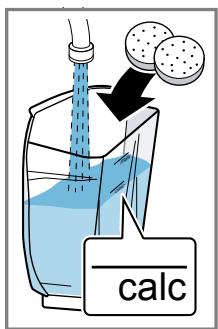
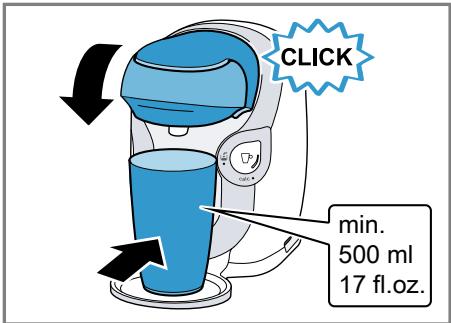
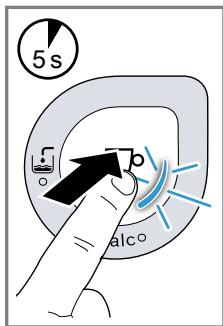
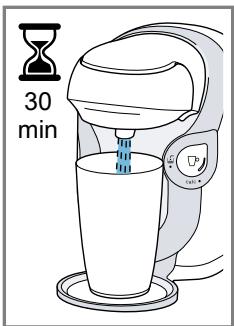
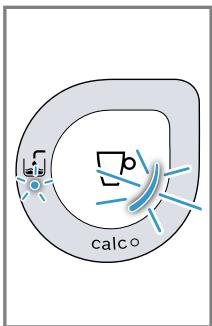
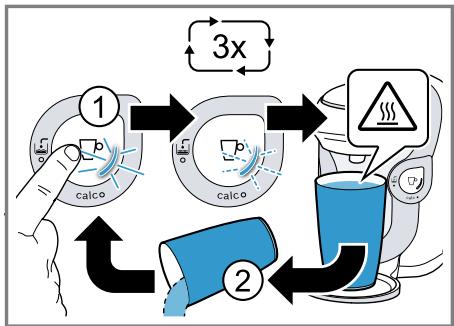
Descale the appliance
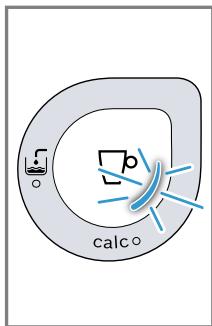
If calc lights up, run the descaling programme. Follow the pictorial instructions at the start of these instructions.
ATTENTION!
Improper cleaning and descaling or a delay in doing so may damage the appliance.
- Immediately perform the descaling process in accordance with the instructions.
▶ Do not use descaling agent with phosphoric acid.
→ Fig. 44 - 58
Troubleshooting
You can rectify minor faults on your appliance yourself. Read the troubleshooting information before contacting after-sales service. This will avoid unnecessary costs.

WARNING
Risk of electric shock!
Incorrect repairs are dangerous.
▶ Repairs to the appliance should only be carried out by trained specialist staff.
▶ Only use genuine spare parts when repairing the appliance.
▶ If the power cord of this appliance is damaged, it must be replaced by the manufacturer, the manufacturer's Customer Service or a similarly qualified person in order to prevent any risk.
Malfunctions
| Fault | Cause | troubleshooting |
| The appliance is not working.LEDs do not light up. | The appliance has no power supply. | ▸ Check to see whether the appliance is connected to the mains. |
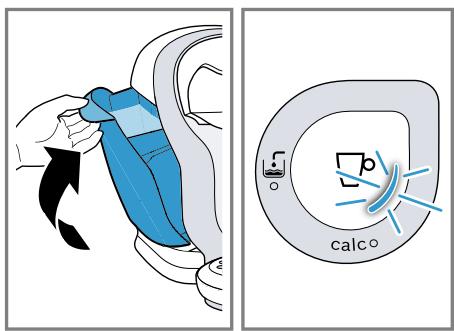
| Brewing process starts, drink is not dispensed. | Water tank is wrongly inserted. | 1. Insert the water tank correctly.2. Push the water tank into the appliance until it clicks into place. |
| The water tank was removed during the brewing stage or there is air in the system. | ▸ Start the cleaning process with the T DISC.→ "Performing initial start-up", Page 30 | |
| Float is stuck in the water tank. | 1. Remove the water tank.2. Descale the appliance.→ "Descale the appliance", Page 313. Reach into the water tank and move the float up and down. | |
| Brewing process does not start.Status display lights up red. | T DISC has not been inserted. | ▸ Check whether the T DISC is inserted. |
| The T DISC bar code is not recognised. | ▸ Clean the T DISC reading window with a soft, damp cloth.▸ Smooth out the film of the T DISC.▸ Use a new T DISC.► Contact the TASSIMO careline if the problem persists. | |
| Brewing process does not start. | ||
| Status display lights up red. | Brewing unit is not closed properly. | 1. Clean the brewing unit with a soft, damp cloth, particularly in the area of the lock.2. Close the brewing unit. |
| The appliance not connected to the power supply when the T DISC was inserted. | ► Connect the appliance to the power supply before inserting the T DISC. | |
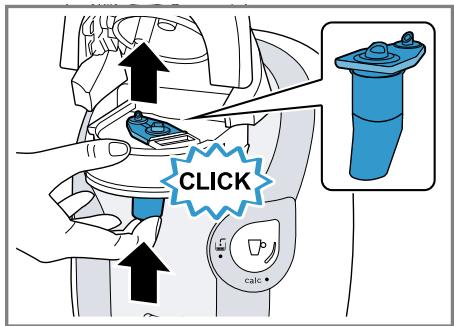
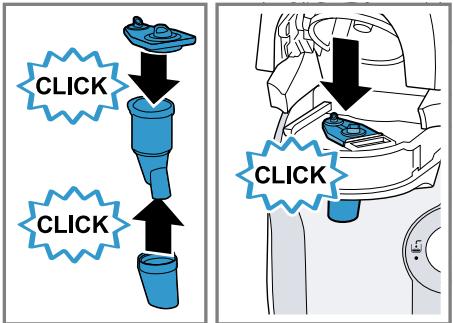
| Brewing unit cannot be closed. | T DISC holder or piercing unit has not been correctly inserted. | 1. Press the piercing unit into the holder using both thumbs until it clicks audibly into place.2. Check the position of the T DISC holder. |
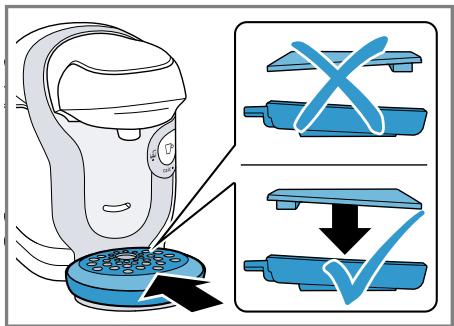
| T DISC has not been correctly inserted. | 1. Insert the T DISC with the printed side facing downwards.2. Check whether the tab of the T DISC is in the recess. | |
| T DISC is damaged. | ► Use a new T DISC. | |
| Brewing unit is soiled. | 1. Clean the brewing unit with a soft, damp cloth, particularly in the area of the lock.2. Close the brewing unit. | |
| Lock does not engage. | ► Press the lock down until it audibly clicks into place. | |
| Brewing unit cannot be opened. | Brewing unit is locked. | ► Only open the brewing unit when the status display remains lit continuously.1. Unplug the mains plug.2. Contact the TASSIMO careline if the brewing unit remains locked. |
en Troubleshooting
| Fault | Cause | troubleshooting |
| Water is dripping from the brewing unit. | T DISC is damaged, leaking or not correctly pierced. | ► Use a new T DISC.► Only use T DISCs once.1. Wait until the brewing process has come to an end and the appliance has cooled down.2. Remove the T DISC.3. Clean the brewing unit.→ "Cleaning the appliance", Page 31 |
| The piercing unit is not inserted correctly. | ► Press the piercing unit into the holder using both thumbs until it clicks audibly into place. | |
| There is water under the cup stand. | Condensation has formed due to technical reasons. | ► Remove excess water with a soft cloth. |
Information on display panel
| Fault | Cause | troubleshooting |
| No LED is lit. | Appliance is in idle mode. | ▸ Press ☐ . |
| All LEDs flashing. | Voltage in the house system is incorrect. | 1.Pull out the mains plug and re-insert it.2.If the problem persists for a longer period, have the voltage of your property checked by an electrician. |
| LED lights up. | Water tank has not been sufficiently filled. | 1.Fill the water tank with fresh, cold water up to the mark max .2.Insert the water tank. |
| LED lights up even though there is enough water in the water tank. | Float is stuck in the water tank. | 1.Descale the appliance. "Descale the appliance",Page 312.Reach into the water tank and move the float up and down. |
| Water tank is wrongly inserted. | 1.Insert the water tank correctly.2.Push the water tank into the appliance until it clicks into place. | |
| LED calc lights up. | Build-up of limescale in the appliance. | ▸ Descale the appliance. "Descale the appliance",Page 31 |
| calc LED flashes. | Heavy build-up of limescale in the appliance. | ▸ Descale the appliance.→ "Descale the appliance", Page 31 |
| calc LED lights up even though decalcified water has been used. | Decalcified water still contains small amounts of lime. | ▸ Descale the appliance.→ "Descale the appliance", Page 31 |
| calc LED and LED are simultaneously lit and the brewing process is not possible. | Appliance has a fault. | 1. Unplug the mains plug.2. Contact the TASSIMO careline. |
| calc LED and LED flash simultaneously. | Descaling process is running. | ▸ Wait until the descaling process is complete. |
Problem with results
| Fault | Cause | troubleshooting |
| Crema has deteriorated. | Beverage outlet is soiled. | ▸ Clean the beverage outlet.→ "Cleaning and servicing",Page 31▸ Clean the brewing unit with the T DISC.→ "Cleaning and servicing",Page 31 |
| Build-up of limescale in the appliance. | ▸ Descale the appliance.→ "Descale the appliance",Page 31 | |
| Drink volume has changed. | Build-up of limescale in the appliance. | ▸ Descale the appliance.→ "Descale the appliance",Page 31 |
| Drink volume has reduced.Drink dispensing halts. | Water tank has not been sufficiently filled. | 1. Fill the water tank with fresh, cold water up to the mark max.2. Keep □ pressed until the desired fill volume is reached. |
Disposal
Find out here how to dispose of old appliances correctly.
Disposing of old appliance
Valuable raw materials can be re-used by recycling.
- Unplug the appliance from the mains.
- Cut through the power cord.
- Dispose of the appliance in an environmentally friendly manner.
This appliance is labelled in accordance with European Directive 2012/19/EU concerning used electrical and electronic appliances (waste electrical and electronic equipment - WEEE). The guideline determines the framework for the return and recycling of used appliances as applicable throughout the EU.
Customer Service
If you have any queries, are unable to rectify faults on the appliance yourself or if your appliance needs to be repaired, contact Customer Service. You can solve many problems yourself by consulting the information on troubleshooting in these instructions or on our website. If this is not the case, contact our after-sales service. We always find an appropriate solution.
With any warranty claims, we will make sure that your appliance is repaired by trained after-sales technicians using genuine spare parts, including after the manufacturer's warranty has expired.
Detailed information on the warranty period and terms of warranty in your country is available from our after-sales service, your retailer or on our website.
If you contact Customer Service, you will require the product number (E-Nr.) and the production number (FD) of your appliance.
The contact details for Customer Service can be found in the Customer Service directory at the end of the manual or on our website.
Product number (E-Nr.) and production number (FD)
You can find the product number (E-Nr.) and the production number (FD) on the appliance's rating plate.
Make a note of your appliance's details and the Customer Service telephone number to find them again quickly.
Warranty conditions
You can make warranty claims for your appliance under the following conditions.
The guarantee conditions for this appliance are as defined by our representative in the country in which it is sold. Details regarding these conditions can be obtained from the dealer from whom the appliance was purchased. The bill of sale or receipt must be produced when making any claim under the terms of this guarantee.
Technical specifications
Facts and figures for your appliance can be found here.
| Voltage | 220-240 V ~ |
| Frequency | 50 Hz |
| Power rating | 1400 W |
fr
Table des matières
Sécurité.... 39
▶ "Ring service!" → Sida 77
⚠️ ADVARSEL – Brandfare!
⚠️ ADVARSEL – Fare for skoldning!
⚠️ ADVARSEL – Fare for kvelning!
⚠️ ADVARSEL – Fare for forbrenning!
⚠️ ADVARSEL – Fare for skolding!
Central Service Contacts
GB Great Britain BSH Home Appliances Ltd. Grand Union House, Old Wolverton Road, Wolverton Milton Keynes MK12 5PT To arrange an engineer visit, to order spare parts and accessories or for product advice please visit www.bosch- home.co.uk Or call Tel.: 0344 892 8979* *Calls are charged at the basic rate, please check with your telephone service provider for exact charges.
GR Greece, Ελλάς BSH Ikiakes Siskeves A.B.E. Central Branch Service 17 km E.O. Athinon-Lamias & Potamou 20 14564 Kifisia Τηλέφωνο: 210 4277 500 Τηλέφωνο: 210 4277 701 mailto:nkf-CustomerService@bshg.com www.bosch-home.gr
IE Republic of Ireland
BSH Home Appliances Ltd.
M50 Business Park, Ballymount Road Upper, Walkinstown
Dublin 12
To arrange an engineer visit, to order spare parts and accessories or for product advice please call Tel.: 01450 2655*
www.bosch-home.ie
*Calls are charged at the basic rate, please check with your telephone service provider for exact charges
KR Republic Korea, Daehan Minguk, 대한민 국 Dongsuh Foods Corporation Dongsuh Bldg., 324, Dongmak-ro, Mapo- gu Seoul Tel.: 080 023 9114 mailto:khjo@dongsuh.co.kr
NO Norge, Norway BSH Husholdningsapparater A/S Grensesvingen 9 0661 Oslo Tel.: 22 66 05 54, -06 00 mailto:Bosch-Service-NO@bshg.com www.bosch-home.no
NZ New Zealand
BSH Home Appliances Ltd.
Level 3, Air NZ Building, Smales Farm, 74
Taharoto Road, Takapuna
Auckland 0622
Tel.: 0800 245 700*
mailto:aftersales.nz@bshg.com
www.bosch-home.co.nz
*Mon-Fri: 8.30am to 5.00 pm (exclude public holidays)
GB TASSIMO careline For information, questions or locations of authorised Bosch service centres nearest you, please contact TASSIMO: Phone: 0800 0328833 www.tassimo.co.uk
IE TASSIMO careline For information, questions or locations of authorised Bosch service centres nearest you, please contact TASSIMO: Careline: 1800 454501 www.Tassimo.ie
Looking for help? You'll find it here.
Expert advice for your Bosch home appliances, help with problems or a repair from Bosch experts.
Find out everything about the many ways Bosch can support you:
www.bosch-home.com/service
Contact data of all countries are listed in the attached service directory.
Visit tassimo.com for registration, accessories and more.