
Robomix Metal - 1779 - Hand blender ARIETE - Free user manual and instructions
Find the device manual for free Robomix Metal - 1779 ARIETE in PDF.
User questions about Robomix Metal - 1779 ARIETE
0 question about this device. Answer the ones you know or ask your own.
Ask a new question about this device
Download the instructions for your Hand blender in PDF format for free! Find your manual Robomix Metal - 1779 - ARIETE and take your electronic device back in hand. On this page are published all the documents necessary for the use of your device. Robomix Metal - 1779 by ARIETE.
USER MANUAL Robomix Metal - 1779 ARIETE
natural_image
Line drawing of a blender with side and front views, showing internal components (no text or symbols)199 202 250
NUMERO UNICO
-Ariete
De' Longhi Appliances Srl
text_image
F E D C B A G H I J K L M N O P Q RFig. 1
natural_image
Illustration of a hand cleaning a kitchen appliance with a downward arrow indicating the process (no text or symbols present)Fig. 6
text_image
Diagram showing a hand pouring liquid from a glass into a blender with two directional arrows labeled 1 and 2 indicating flow or process.Fig. 7
natural_image
Illustration of a hand pouring liquid into a kitchen appliance (no text or symbols)Fig. 8
natural_image
Illustration of hands using a pliers to cut a circular object (no text or symbols visible)Fig. 9
natural_image
Illustration of a hand using a tool to adjust a mechanical component (no text or symbols present)Fig. 2
text_image
Diagram illustrating a mechanical process with labeled steps 1 and 2, showing a hand pouring liquid into a container and adding a tool to a base.Fig. 3
natural_image
Illustration of a hand holding a kitchen blender with a lid and a downward arrow indicating action (no text or symbols)Fig. 10
natural_image
Illustration of a blender with a side panel and downward arrows indicating process (no text or symbols)Fig. 11
natural_image
Illustration of a hand pouring liquid into a blender with a downward arrow indicating action (no text or symbols)Fig. 4
natural_image
Illustration of a hand pressing down on a kitchen appliance with a downward arrow indicating action (no text or symbols)Fig. 5
natural_image
Line drawing of a coffee maker with lid and side arm, showing volume measurement (no text or symbols)Fig. 12
natural_image
Illustration of a kitchen appliance with a lid and base, showing internal components (no text or symbols)Fig. 13
AVVERTENZE IMPORTANTI
LEGGERE QUESTE ISTRUZIONI PRIMA DELL'USO
The necessary precautions must be taken when using electrical appliances, and these include the following:
- Make sure that the voltage on the appliance rating plate corresponds to that of the mains electricity.
- Never leave the appliance unattended when connected to the power supply; unplug it after every use.
- Never place the appliance on or close to sources of heat.
- Always place the appliance on a flat, level surface during use.
- Never leave the appliance exposed to the elements (rain, sun, etc...).
- Make sure that the power cord does not come into contact with hot surfaces.
- This appliance is not intended for use by persons (including children) with reduced physical, sensory or mental capabilities, or lack of experience and knowledge, unless they have been given supervision or instruction concerning use of the appliance by a person responsible for their safety.
- Children should be supervised to ensure that they do not play with the appliance.
- NEVER PLACE THE APPLIANCE BODY, PLUG OR POWER CORD IN WATER OR OTHER LIQUIDS; ALWAYS WIPE CLEAN WITH A DAMP CLOTH.
10.ALWAYS UNPLUG THE POWER CORD FROM THE ELECTRICITY MAINS BEFORE FITTING OR REMOVING SINGLE ATTACHMENTS OR BEFORE CLEANING THE APPLIANCE. - Always make sure that your hands are thoroughly dry before using or adjusting the switches on the appliance, or before touching the power plug or power connections.
- NEVER TOUCH MOVING PARTS.
- WARNING: ALWAYS FIT THE BLADE BEFORE INSERTING THE FOOD. Before removing the lid, unplug the appliance and make sure that the blade has stopped moving.
- Never operate the appliance when empty.
- Never use the appliance if the blade is damaged.
- NEVER PLACE INGREDIENTS, INCLUDING LIQUIDS, ABOVE THE MAXIMUM LIMIT SHOWN ON THE BOWL.
- Never use the appliance to chop excessively hard foods (e.g., ice cubes or meat on the bone).
- Never use the fitted bowl to move the appliance; i.e., the handle on the bowl is
not a carry handle for the appliance as a whole.
- To prevent accidents or damage to the appliance, always keep hands and cooking utensils well away from moving blades or cutting discs.
- The blades are sharp. Handle them with care. Always hold them by the plastic parts.
- Never introduce foods by hand. Always use the pusher.
- Never remove foods from the sides of the bowl while the appliance is operating. Switch off the appliance, unplug the power cord from the mains and use the special spatula.
- THIS APPLIANCE HAS BEEN DESIGNED TO OPERATE ONLY IF THE BOWL AND RELEVANT LID HAVE BEEN FITTED CORRECTLY. IF THIS IS NOT THE CASE, TAKE IT TO YOUR NEAREST AUTHORISED ASSISTANCE CENTRE.
24.ALWAYS UNPLUG THE APPLIANCE BEFORE CARRYING OUT ANY OPERATION INSIDE THE BOWL. - PREPARE THE BLENDER GOBLET WITH THE FOODS TO BE BLENDED AND FIT IT TO THE POWER BASE BEFORE PLUGGING IN THE APPLIANCE.
- Never pick up or carry the appliance by the bowl when fitted. In other words, the bowl handle must never be used to carry the appliance.
- To unplug the appliance, grip the plug and remove it directly from the power socket. Never pull the power cord to unplug the appliance.
- Never use the appliance if the power cord or plug are damaged or if the appliance itself is faulty; in this case, take it to your nearest Authorised Assistance Centre.
- To prevent any risks, if the power cord is damaged, it must be replaced by the manufacturer, its Technical Assistance Service or a similarly qualified person.
- This appliance is designed for HOME USE ONLY and may not be used for commercial or industrial purposes.
- This appliance conforms to the directives 2006/95/EC and EMC 2004/108/EC, and to the regulations (EC) No. 1935/2004 of 27/10/2004 regarding material in contact with foods.
32.Any changes to this product that have not been expressly authorised by the manufacturer may lead to the user's guarantee being rendered null and void. -
In the event that you decide to dispose of the appliance, we advise you to make it inoperative by cutting off the power cord. We also recommend that any parts that could be dangerous be rendered harmless, especially for children, who may play with the appliance or its parts.
-
Packaging must never be left within the reach of children since it is potentially dangerous.

- To dispose of product correctly according to European Directive 2009/96/CE, please refer to and read the provided leaflet enclosed with the product.
DO NOT THROW AWAY THESE INSTRUCTIONS
DESCRIPTION OF THE APPLIANCE (Fig. 1)
| A | Operating dial | J | Chopping blade |
| B | Power base | K | Mixing blade |
| C | Motor shaft | L | Blade support |
| D | Bowl | M | Spatula |
| E | Lid | N | Whisking disc |
| F | Pusher | O | Julienne blade |
| G | Blender lid cap | P | Slicing blade |
| H | Blender cover | Q | Chip cutting blade |
| I | Blender | R | Blade disc |
WARNING
The appliance is fitted with a device to prevent it from operating if the lid (E) is not securely locked in place and the bowl (D) is not correctly inserted.
INSTRUCTIONS FOR USE
WARNING
Make sure that the appliance is unplugged and that the control dial (A) is set to "0" before cleaning it or fitting or removing attachments.
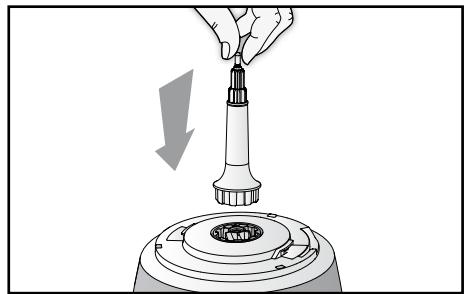
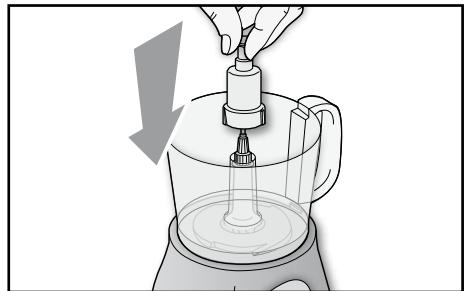
- Insert the motor shaft (C) into the special seating on the power base (B) (Fig. 2).
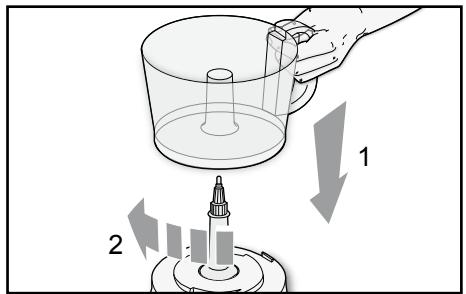
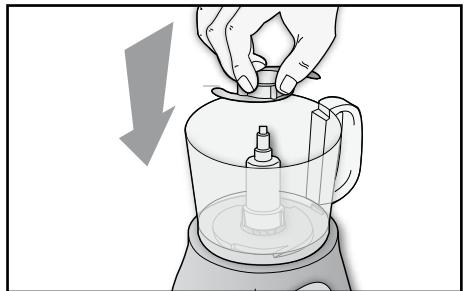
- Fit the bowl (D) onto the power base (B) and lock it into place turning it clockwise so that the tab in the bottom section of the handle clicks perfectly into the slit in the power base (Fig. 3).
- Fit the blade support (L) onto the motor shaft (C) inside the bowl (D) (Fig. 4).
Chopping, mixing or whisking
- To use the appliance as a chopper, fit the metal blade (J) onto the blade support (L), while for mixing, fit the plastic blade (K) by making sure that the slots inside the base of the blade are in line with the notches in the support and pressing the blade downwards (Fig. 5).
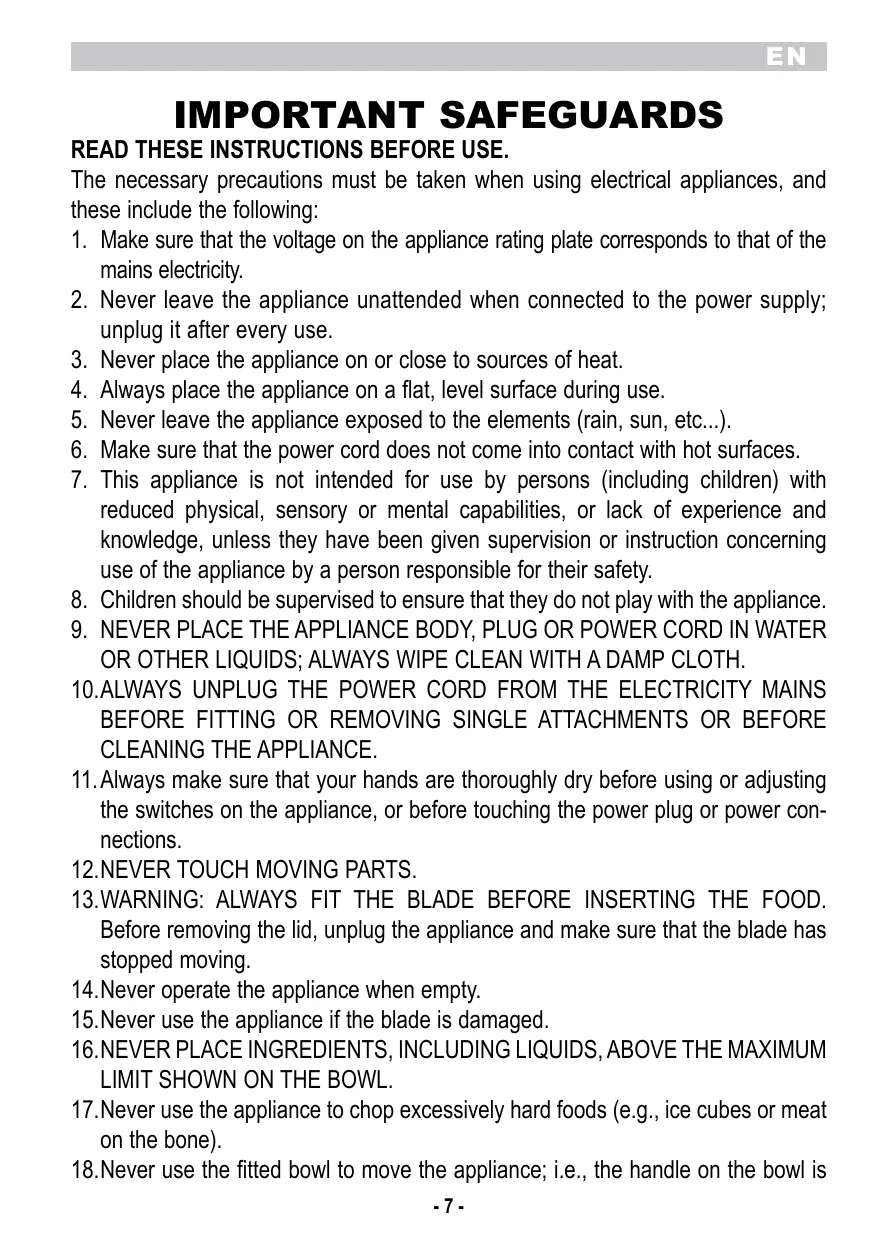
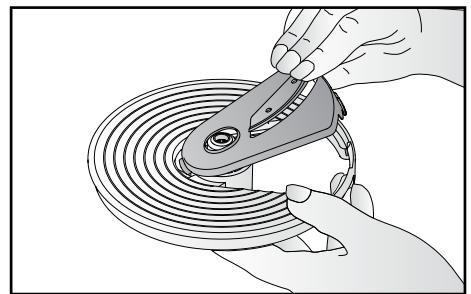
- To use the appliance to whisk egg whites or whip cream, fit the special attachment (N) onto the blade support (L), as illustrated in Fig. 6.
WARNING
Before starting the appliance, make sure that the bowl (D) and the disc (N) are perfectly clean and without any traces of butter or egg yolk.
- Cut the foods into small pieces and place them inside the bowl (D) or for mixing, insert the ingredients.
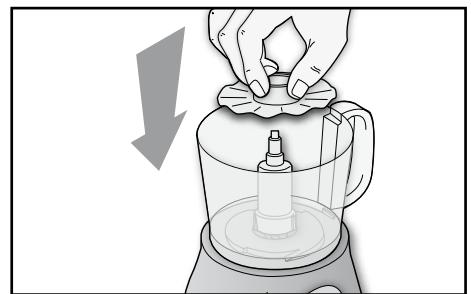
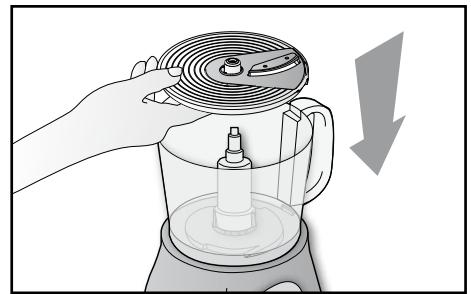
- Fit the lid (E) over the bowl (D) moving the mark inside the bowl (D) so that it is in line with the symbol (☐). Block the lid (E) so it clicks into place by moving it clockwise (☐) (Fig. 7).
- Plug the appliance into the mains power.
- Start the appliance, selecting the rotation speed of the blade using the operating dial (A).
The appliance is equipped with a control knob for adjusting the speed from a minimum to a maximum.
WARNING
When the appliance is used to for mixing or whipping-up, it is recommended to start with the lowest speed and then increase the speed. When used to chop, it is advisable to use the pulse function, turning the dial (A) anticlockwise to the "P" setting. For optimum use, press the button in short bursts (2/3 sec.).
- For smoother, finer chopped foods, remove the food, if necessary, from the sides of the bowl with a spatula, pushing it towards the centre.
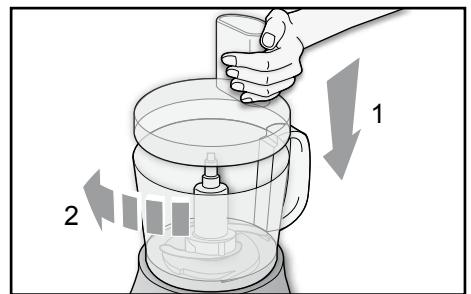
- If it is necessary to add foods during appliance operation, use the opening in the lid (E). Push the foods down with the pusher (F) on its own (Fig. 8).
- To stop the appliance, turn the dial (A) to "0".
Slicing
WARNING
The blades are sharp; handle with care.
- Fit the required blade, the slicing blade (P), julienne blade (O) or chip blade (Q) into the blade disc (R) so that the hole in the blade is in the centre of the disc (Fig. 9).
- Fit the assembled blade support disc (r) on the motor shaft (C), gripping it by the relevant slots and keeping the blade so it is facing upwards (Fig. 10).
- Fit the lid (E) over the bowl (D) and proceed as described in the section “Chopping, mixing or whisking”.
INSTRUCTIONS FOR BLENDER USE
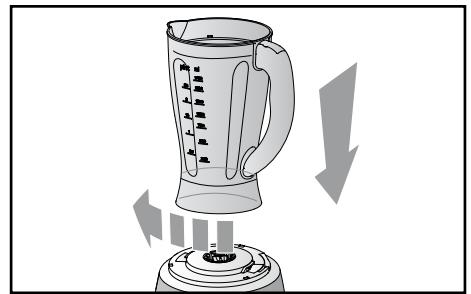
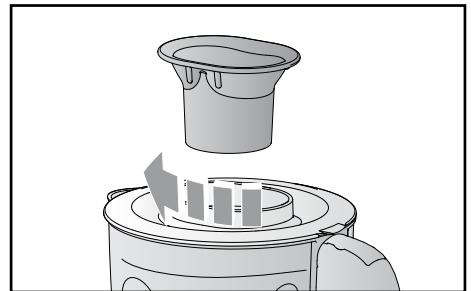
- Fit the blender (I) onto the power base (B) and turn it clockwise until it clicks into place and so that the tabs on the blender fit perfectly into the slots in the power base (Fig. 11).
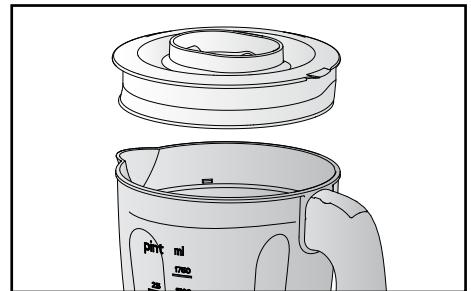
- Fit the lid (H) onto the blender (I) and press it gently down until fully inserted (Fig. 12).
- Insert the foods (prepared previously) through the opening in the lid, without exceeding the maximum level, which is marked on the blender (I) and then insert the plug (G) into the lid (H) pressing it gently downwards and turning it clockwise to lock it into place (Fig. 13).
Note: The plug (G) also has a measure.
- Switch on the appliance, selecting the blade rotation speed with the operating dial (A).
The appliance is equipped with a control knob for adjusting the speed from a minimum to a maximum.
It is also possible to select pulse operation by turning the dial (A) anticlockwise to "P". For the best use of this function, only turn the dial for a very short time (2-3 sec.).
Note: For softer fruit and vegetables (e.g., bananas), start at slow speed and then increase the speed
as required. For firmer fruit or vegetables (e.g., carrots), use the maximum speed.
- For a smoother result, switch the appliance off, unplug it, remove the lid (H) and, using a suitable cooking spatula, bring food stuck on the sides of the blender towards the center (I).
- Repeat the above steps for processing other foods.
Note: Never place more than 500g of firm fruit or vegetables into the blender at any one time.
Note: To prevent liquid spills, never place more than 1000 ml of soups, purées or other liquids into blender.
WARNING
The blades are sharp; handle them with care.
Remove the protections from the metal blade before use.
Never add foods over the maximum level marked on the bowl.
Make sure that the lid is firmly locked into place before starting the appliance.
Never operate the appliance for more than 10 minutes at a time. Wait at least 30 minutes before operating it again.
Never remove foods from the sides of the bowl or the blender while the appliance is operating. Always switch off the appliance and unplug it from the mains power.
To prevent accidents or damage to the appliance, always keep hands and cooking utensils well away from moving blades or discs.
Do not use your fingers to remove food from the sides of the bowl while the appliance is functioning. Always use a suitable cooking spatula.
Never add liquids to mix together chopped foods when using the bowl.
Never press foods into the opening in the lid using your hands. Always use the food presser.
Always fit the lid before starting the blender.
Before blending warm liquids, always remove the blender filler cap. Never place hot liquids inside the blender.
CLEANING
WARNING
NEVER PLACE THE APPLIANCE BODY, PLUG OR POWER CORD IN WATER OR OTHER LIQUIDS; ALWAYS WIPE CLEAN WITH A DAMP CLOTH.
WARNING
ALWAYS UNPLUG THE POWER CORD FROM THE ELECTRICITY MAINS BEFORE FITTING OR REMOVING SINGLE ATTACHMENTS OR BEFORE CLEANING THE APPLIANCE.
WARNING
The blades are extremely sharp. Always handle them with care.
- Remove all of the attachments used, working in the opposite order to the way they were fitted.
EN
- All attachments can be washed in the top rack of the dishwasher, at a maximum temperature of 50^ C/122°F.
- Wipe the power base (B) clean with a slightly damp cloth.
INSTRUCTIONS IMPORTANTES
LIRE CES INSTRUCTIONS AVANT L'EMPLOI.
BESCHRIJVING VAN HET APPARAAT (Fig. 1)