
1384 - Coffee maker ARIETE - Free user manual and instructions
Find the device manual for free 1384 ARIETE in PDF.


| Product Type | Coffee Maker (Drip) |
| Brand | Ariete |
| Model | 1384 |
| Dimensions (approx.) | 25 x 20 x 30 cm |
| Weight (approx.) | 1.5 kg |
| Power Consumption | 900 W |
| Voltage | 220-240 V ~ 50/60 Hz |
| Water Tank Capacity | 1.25 L |
| Coffee Capacity | Up to 10-12 cups |
| Filter Type | Permanent mesh filter (included) / compatible with #4 paper filters |
| Carafe Material | Glass with drip-free spout |
| Key Functions | Auto shut-off, anti-drip system, keep-warm plate |
| Control Type | Push-button with indicator light |
| Cleaning | Removable filter basket; descale regularly with vinegar or descaling solution |
| Safety Features | Overheat protection, automatic shut-off when carafe is removed |
| Spare Parts Available | Carafe, filter basket, replacement filters |
| Repairability | User-replaceable parts: carafe, filter; professional service for electrical issues |
| Warranty | 2 years (may vary by region) |
Frequently Asked Questions - 1384 ARIETE
User questions about 1384 ARIETE
0 question about this device. Answer the ones you know or ask your own.
Ask a new question about this device
Download the instructions for your Coffee maker in PDF format for free! Find your manual 1384 - ARIETE and take your electronic device back in hand. On this page are published all the documents necessary for the use of your device. 1384 by ARIETE.
USER MANUAL 1384 ARIETE
natural_image
Illustration of a modern coffee maker with control panel and side arm (no text or symbols visible)Macchina da caffè
Coffee maker
Machine a café
Kaffeemaschine
Cafetera
Máquina de café
Espressomachine
Кафетиера
Кофеварка
Кавоварка
Kaffelrakter
-Ariete

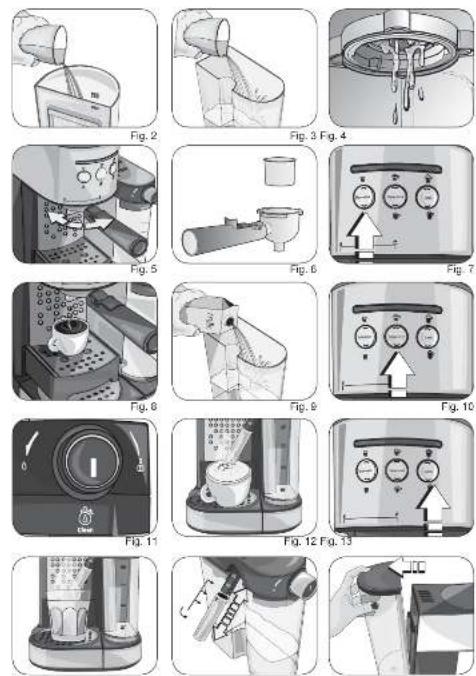


Fig. 14 Fig. 15 Fig. 16
Fig. 17


Fig. 20 Fig. 21 Fig. 22
WITH REGARD TO THIS MANUAL
This appliance is made in conformity with appropriate European Regulations in force, to protect the user wherever possible from potential hazards. Even if you are familiar with this type of appliance, carefully read this manual before use. Only use this appliance for the purpose it is designed for in order to prevent accidents and damage. Keep this manual close by for future consultation. If you should decide to give this appliance to other people, remember to also include these instructions.
The information provided in this manual is marked with the following symbols indicating:

Danger for children

Danger due to electricity

Danger of damage originating from other causes

Warning of burns

Warning – material damage
INTENDED USE
You can use the appliance to prepare coffee, cappuccino and milk. This appliance is designed only and solely for private use, and is therefore to be considered unsuitable for industrial or professional purposes. No other use of the appliance is contemplated by the manufacturer, which is exempt from any liability for all types of damages caused by improper use of the appliance. Improper use also results in any form of warranty being forfeited.
RESIDUAL RISKS
The construction characteristics of the appliance, covered by this publication, do not allow to protect the user against the contact with hot parts of the appliance.

Warning!
Danger of burns. The external metallic parts of the appliance and the filter holder must not be touched with the equipment in operation, as it could cause burns.

Use only containers made of material "for foods".
IMPORTANT SAFEGUARDS
READ THESE INSTRUCTIONS CAREFULLY.
- This appliance is designed solely for household and similar uses such as:
- in cooking areas used by personnel of shops, offices and other professional environments;
- on farms;
- guests of hotels, motels and other residential environments;
- bed and breakfast type of environments.
- We decline any responsibility resulting from misuse or any use other than those covered in this booklet.
• We suggest you keep the original box and packaging, as service does not cover any damage resulting from inadequate packaging of the product when this is sent back to an Authorised Service Centre.
• The appliance complies with Regulation (EC) No 1935/2004 of 27/10/2004 on the
materials in contact with food.
Danger for children
- This appliance can be used by children aged from 8 years and above and persons with reduced physical, sensory or mental capabilities or lack of experience and knowledge if they have been given supervision or instruction concerning use of the appliance in a safe way and understand the hazards involved.
- Cleaning and user maintenance shall not be made by children unless they are aged from 8 years and above and supervised.
- Children must be supervised at all times to ensure they do not play with the appliance.
- Do not leave the packaging near children because it is potentially dangerous.
- In the event that this appliance is to be disposed of, it is suggested that the power cord is cut off. It is also recommended that all potentially dangerous components including the power cord are rendered harmless to prevent personal injury. Do not let children play with the appliance or its components.
Danger due to electricity
- Always keep the appliance and the power cord out of the reach of children under the age of 8 years.
- Do not let the power cord hang in a place where it could be grasped by a child.
- Before connecting the unit to the power supply check that the voltage shown on the plate located under the appliance corresponds to the local mains.
- The use of extensions not approved by the manufacturer can result in damage to property and personal injury.
- Before filling the tank, unplug the appliance from the power outlet.
- If the power cord is damaged, it must be replaced by the manufacturer or by its Technical Assistance Service or by a similarly qualified person in order to avoid any hazard.
- Never put live parts into contact with water: It can cause a short circuit!
- The appliance must not be power supplied by external timers or separate remote-controlled systems.
- Remove the plug from the power outlet before cleaning or maintenance.
- Do not immerse the appliance in water or other liquids.
⚠️ Danger of damage originating from other causes
- Choose an adequately illuminated and clean room with easily accessible power outlet.
- NEVER fill the tank beyond the MAX level.
- Never leave the appliance unattended when it is connected to the power supply.
- The appliance must not be used if it has been dropped, if there are visible signs of damage or leaks of water. Do not use the appliance if the power cord or the plug are damaged, or if the appliance is faulty. To prevent any accident, all repairs, in-
cluding the replacement of the power cord, must be carried out by an Authorised Service Centre or by suitably qualified personnel.

Warning of burns
- To adjust the position of the milk nozzle move the lever: Burns hazard!
- The external metallic parts of the appliance and the filter holder must not be touched with the equipment in operation, as it could cause burns. Touch the filter holder handle and the buttons only.
- If water does not come out of the filter holder, it may be because the filter is clogged. In this case, remove and disconnect the filter slowly because any remaining pressure can cause spillage or splashing. Then clean as explained in the relevant paragraph.
- Never remove the water tank or the filter holder while the appliance is operating. Make sure that the indicator lamps of the three buttons are on and turn off the appliance before removing the filter holder or before filling the water tank or the milk container.

Warning - material damage
- The appliance must be used and left at rest on a stable surface.
- Do not use the appliance with no water, this may damage the pump.
- Never fill the water tank with hot or boiling water.
- Do not position the appliance on very hot surfaces or close to open flames to prevent the casing from being damaged.
- The cable must not touch the hot parts of the appliance.
- Do not use sparkling (carbonated) water.
- Never put substances other than coffee powder in the filter. This could cause serious damage.
- Do not leave the machine at ambient temperatures below 0^ (32°F) because the water residue in the boiler could freeze and cause damage.
- Do not use the appliance outdoors.
- Do not remove the water tank or the milk container while the appliance is on. Press the ON/OFF switch (L) to turn off the appliance.
- Do not place the appliance close to or on top of hot electric or gas cookers, or close to a microwave oven.
- Do not leave the appliance exposed to weathering (rain, sun, etc.).

To dispose of product correctly according to European Directive 2012/19/EU, please refer to and read the provided leaflet enclosed with the product.
- SAVE THESE INSTRUCTIONS FOR FUTURE REFERENCE
| A Operation light | H Drip tray |
| B Espresso coffee button | I Milk nozzle lever |
| single 30 ml circa | J Milk container lid |
| double 65 ml circa | K Milk container |
| C Cappuccino button | L On-off switch |
| single 120 ml circa | M Accessory compartment |
| double 200 ml circa | N Water tank |
| D Latte button | O Coffee measure/presser |
| single 240 ml circa | P 1 cup filter/pod |
| double 400 ml circa | Q 2 cups filter |
| E Milk nozzle | R Filter holder |
| F Extendable tray for small cups | S Milk quantity knob |
| G Cup-resting grill |
Identification data
The plate located under the appliance support base shows the following identification data of the appliance:
• manufacturer and CE marking
- model (Mod.)
- serial number (SN)
• electrical supply voltage (V) and frequency (Hz)
• electrical power consumption (W)
• assistance toll-free phone number
When ordering at Authorized Service Centers, indicate the model and serial number.
INSTRUCTIONS FOR USE
Before use
Place the appliance on a flat surface. Remove the packaging materials from inside and outside of the appliance. Remove all the stickers. Wash the coffee filters, the filter holder, the water tank and the milk container as described in the paragraph «Appliance cleaning».
Make sure to remove the orange transport restraint from the bottom of the
water tank. Fill the water tank (N) till the half, with fresh natural water (Fig. 2). Insert the water tank in its place.
NEVER fill the tank beyond the MAX level.
Fill the milk container (K) with water (Fig. 3) till the MAX level. Put the lid (J) on the milk container. Put the milk container and its lid in its place.
NEVER fill the milk container beyond the MAX level.
Place a container under the hooking flange of the filter holder. Make sure that the milk nozzle (E) is inside the vessel. Turn on the appliance and when the indicator light lights up permanently press the cappuccino button twice. When the brewing process stops, turn off the appliance and empty the water tank from the remaining water.
First start-up
Check that the domestic mains voltage is the same as the voltage indicated on the label of the device.
Connect the plug into the socket.
Press the on-off switch (L) to turn on the appliance. The indicator light (A) and the indicator lamps of the buttons (B, C, D) start blinking. Wait that all the lights light up permanently.
Turn the milk quantity knob (S) on the position "Clean" ( ⚙️ ). Press the cappuccino button (C) twice. Water will come out from the filter holder seat (Fig. 4) and contemporaneously water and steam will come out from the milk nozzle. Repeat the cleaning operation of the inner circuit of the boiler until the water in the water tank finishes. To interrupt the water flowing press the cappuccino button.
Wait that the indicator light lights up permanently.
Switch off the appliance. Unplug it from the socket-outlet. Empty the milk container from the residual water. Try the inside of the container. Fill the milk container with fresh milk (Fig. 9). Put the lid on the milk container. Put the milk container and its lid in its place.
The appliance is ready to use.
Choose the suitable cup
Before preparing the desired drink choose the cup basing on the following table:
| Espresso Single | Double | 30 ml circa65 ml circa |
| Cappuccino Single | Double | 120 ml circa200 ml circa |
| Latte Single | Double | 240 ml circa400 ml circa |
HOW TO PREPARE AN ESPRESSO COFFEE
Select the desired filter (P) for 1 cup, and (Q) for 2 cups, insert it in the filter holder (R) (Fig. 6). Measure out the coffee in the filter and lightly press with the specially provided presser (O).
Fit the filter holder in its seat with the handle on the left.
Tighten the filter holder by turning it from left to right. Make sure that the filter holder is correctly positioned in the outlet (Fig. 5).

Warning!
If you have inserted an excessive amount of ground coffee into the filter, turning the filter holder may be difficult and/or during the coffee dispensing there may be leaks from the filter holder.
If you are using a small cup pull out the extendable tray for small cups (F). Make sure that the cup is under the coffee outlet of the filter holder (Fig. 8).
Press the coffee button (B) (Fig. 7) once, for a single coffee.
Press the coffee button twice, for a double coffee. The brewing process of the coffee stops automatically.
Press the coffee button to interrupt the brewing process at any time.
During the brewing process the indicator light starts blinking. At the end of the brewing process the indicator light lights up permanently.

Warning!
As in professional coffee machines, do not remove the filter holder when the brewing is in progress.
Danger of burns!

Warning!
To avoid splashes or sprays of water or coffee, remove the filter holder by turning it slowly from right to left.
To remove coffee residue from the filter holder lift the lock latch of the filter (Fig. 17). Overturn the filter holder and beat it repeatedly to drop the coffee residues.
Wait for the indicator light to light up permanently before preparing another coffee.
How to make coffee with pods
To make coffee with pods it is necessary to install the 1 cup/pod filter (Fig. 20), supplied with the machine, as follows:
1 Place the pod in the filter ring (Fig. 21).
2 Push the pod with your fingers inward. The pod must be well centred and placed inside the filter.
3 Now it is possible to put the filter holder in its seat. Tighten the filter holder making sure it is securely fitted to the flange (Fig. 5).
4 The pod could remain stuck in the upper part of the machine after making the coffee and when removing filter holder. To remove it, tilt the filter holder (Fig. 22) so the pod can fall onto it.
To always have a good coffee, you must purchase pods that show the E.S.E. compatibility mark.
If the pod is not inserted well, or if the filter holder is not tightened firmly, a few drops of water could leak from the filter holder.
HOW TO PREPARE A CAPPUCCINO
Put the cappuccino cup on the cup-resting grill. Make sure that the milk nozzle is inside the cup (Fig. 12). The milk nozzle is extendable. Turn and pull out the milk nozzle from its plastic support. Position the milk nozzle in the right groove. (Fig. 15)
Turn the milk quantity knob on the desired quantity of foam. On (△) for less foam. On (△) for more foam. (Fig. 11) Press the cappuccino button once for a small cup of cappuccino (Fig. 11).
Press the cappuccino button twice for a big cup of cappuccino.
After a few seconds the preparation of the cappuccino will start . The brewing process stops automatically, press the cappuccino button to interrupt it at any time.
Wait for the indicator light to light up permanently before preparing another cappuccino.
HOW TO PREPARE A LATTE MACCHIATO
Put the milk cup on the cup-resting grill. Make sure that the milk nozzle is inside the cup (Fig. 14). The milk nozzle is extendable. Turn and pull out the milk nozzle from its plastic support. Position the milk nozzle in the right groove.
Turn the milk quantity knob on the desired quantity of foam. On (△) for less foam. On (△) for more foam.
Press the latte button twice for a big cup of latte macchiato.
After a few seconds the preparation of the milk will start. The brewing process stops automatically, press the cappuccino button to interrupt it at any time.
Wait for the indicator light to light up permanently before preparing another cup of milk.
Put a vessel on the cup-resting grill. Make sure that the milk nozzle is inside the vessel. Press the latte button for at least three seconds, to clean the milk circuit from any remaining milk.
HOW TO PREPARE THE FROTHED MILK (WITHOUT COFFEE)
If you want to prepare only milk foam to add to your drinks, press the cappuccino button for three seconds (Fig. 10). The indicator lamp of the cappuccino button lights up. The appliance is ready to prepare frothed milk: Press the cappuccino button once for a single portion, twice for a double cup.
At the end of the preparation of the drinks you can remove the milk container from the appliance and put it in the fridge.
USEFUL TIPS TO PREPARE A GOOD COFFEE
The grounded coffee must be slightly pressed in the filter holder. A stronger or weaker coffee depends on the coffee grinding level, on the quantity put into the filter holder and the pressing. A few seconds are required for the coffee to be dispensed into the cups. If the dispensing time is longer, this means that the coffee is ground too fine or that the coffee put into the filter holder has been pressed too much.

Warning!
All cleaning operations described below must be carried out with the appliance off and with the plug disconnected from the outlet.

Warning!
A good maintenance and regular cleaning preserve and maintain the appliance operating efficiently for a longer period greatly reducing the risk of scale formation inside the appliance.
Never wash the appliance components in the dishwasher. Do not use direct jets of water.

Warning!
Every operation must be carried out when the appliance is cold.
Cleaning of components
Remove and wash the water tank (Fig. 16), the milk container, the filter holder, both the filters and the coffee measure/press in water and soap. Rinse and dry all parts thoroughly.
Filters cleaning
Check that the holes are not clogged and if so, clean them with a small brush (Fig. 18). Let boiling water flow from the filter holder with the filter inserted without the powder to dissolve or remove any coffee residue or impurities.

Warning!
Remove and disconnect the filter holder slowly because any remaining pressure could cause splashes or sprays.
Filter holder seat cleaning
With use, it may occur that in the filter holder seat there is a sedimentation of coffee grounds, which can be removed with a toothpick, a sponge (Fig. 19), or letting water run through without fitting the filter holder (Fig. 5).

Warning!
Do not leave the filter holder in the appliance. The seal ring in the filter holder seat could be damaged.
Milk nozzle and milk container cleaning
Unscrew the milk nozzle from the lever (I) and wash it with running water.

Warning!
Perform the operation when the chrome-plated tube is cool to avoid burns.
The milk nozzle can be cleaned with a non abrasive cloth. Put back the milk nozzle and screw it till the end. If necessary clean the milk hole with a pin.
After the milk preparation is it possible to clean the brewing circuit from any remaining milk. Remove the milk container and its lid. Wash both of them with warm water and try carefully. Fill the milk container with water (100 ml circa) and put back the milk container and its lid in the appliance. Put a vessel on the cup-resting grill.
Make sure that the milk nozzle is inside the vessel. Turn the milk quantity knob on the position "Clean" (💡) and press the latte button three times. Repeat the operation if necessary.
Switch off the appliance. Unplug it from the socket-outlet. Remove the milk container from the appliance.
Remove the milk container lid.
Wash the milk container with water and soap. Rinse and dry all parts thoroughly.

Warning!
Do not wash the milk container lid with running water.
Cleaning of the extendable tray, the grill and the drip tray
From time to time, remember to clean the extendable tray and the drip tray (H) with a sponge.
Remove the grill (G) and wash it under running water.
Appliance body cleaning

Warning!
Clean the fixed parts of the appliance using a non-abrasive damp cloth to prevent damaging the body.
DESCALING
Good maintenance and regular cleaning preserve and keep the appliance efficient for a longer period, greatly reducing the risk of scale formation into the appliance.
If despite this, after some time, the appliance operation should be compromised, due to constant use of hard and very hard water, it is possible to carry out a descaling operation of the appliance to eliminate the malfunction. For this purpose use only a descaling product for coffee machines. Ariete does not accept any responsibility whatsoever for damage to components inside the appliance caused by the use of non-compliant products containing chemical additives. If a descaling is required, observe the directions on the instruction sheet of the descaling product.
SETTING THE MACHINE OUT OF SERVICE
In the case of decommissioning of the appliance, it must be electrically disconnected. Empty the drip tray and clean it (see paragraph "Cleaning the appliance"). In case of scrapping you will be required to separate the various materials used in the construction of the appliance and dispose of them according to their composition and to the applicable laws in the country of use.

If there are problems with operation, immediately turn off the appliance and unplug it from the socket-outlet.
| Problems Causes | Remedies | |
| The appliance does not dispense milk. | The milk is not enough and the pump does not draw. | Switch off the appliance. Check the milk level in the milk container. Fill it in case. |
| The exit hole of the milk nozzle is obstructed. | Clean the milk hole from the milk encrustations with a pin. | |
| Coffee overflowing from the filter edges. | Probably too much ground coffee has been put into the filter holder that has prevented fully tighten the filter holder its housing. | Remove and disconnect the filter holder slowly because any remaining pressure could cause splashes or sprays. Clean the coupling seat with a sponge (Fig. 19). Repeat the operation placing the correct amount of coffee in the filter. |
| Ground coffee has remained on the filter holder connection seat. | Clean the seal ring with a toothpick or with a (Fig. 19). | |
| The holes of the filters for the grounded coffee are obstructed. | Remove and disconnect the filter holder slowly because any remaining pressure could cause splashes or sprays. Clean the clogged filter holes with a small brush or a pin. Clean the filter using a tablet of dishwasher detergent. | |
| Coffee is not dispensed or is dispensed too slowly. | The perforated disc located in the coupling seat of the holder has the holes clogged. | Operate the appliance without the filter holder making the waterflow. If the water still does come out from all the holes evenly, carry out the descaling cleaning operation. |
| The holes of the filters for the grounded coffee are obstructed. | Remove and disconnect the filter holder slowly because any remaining pressure could cause splashes or sprays. Clean the clogged filter holes with a small brush or a pin. Clean the filter using a tablet of dishwasher detergent. | |
| Too fine ground coffee blend. | Try using coarser coffee blends. | |
| Too pressed coffee blend. | Press the coffee inside the filter using less pressure. | |
| The coffee is too watery and cold. | The mixture was ground coarsely. | To obtain a more concentrated and hotter coffee must use a more finely grounded blend. |
| The milk does not froth or does not come out from the milk nozzle. | There is no steam. Switch off | the appliance. Check the water level in the water tank. Fill it in case. |
| The milk is not cold enough. | Let the milk cool down before preparing the cappuccino. | |
| The milk nozzle is obstructed | Clean the milk nozzle and the milk container. |
sponge
A PROPOS DU MANUEL
LISEZ ATTENTIVEMENT CES INSTRUCTIONS.
BESCHRIJVING VAN HET APPARAAT
C Knapp for cappuccino L På-bryter
enkel på ca. 120 ml
M Tilbehørsrom
dobbel på ca. 200 ml
N Vanntank
D Knapp for melk
O Målebeger/presse for kaffe
enkel på ca. 240 ml
P Filter for 1 kopp/pods
dobbel på ca. 400 ml
Q Filter for 2 kopper
E Melketut
R Filterholder
F Koppbrett
S Håndtak for regulering av melkeskum
G Kopprist
Merkedata
- WITH REGARD TO THIS MANUAL
- INTENDED USE
- RESIDUAL RISKS
- IMPORTANT SAFEGUARDS
- READ THESE INSTRUCTIONS CAREFULLY.
- Danger for children
- Danger due to electricity
- ⚠️ Danger of damage originating from other causes
- Warning of burns
- Warning - material damage
- Identification data
- INSTRUCTIONS FOR USE
- Before use
- First start-up
- HOW TO PREPARE AN ESPRESSO COFFEE
- Warning!
- HOW TO PREPARE A CAPPUCCINO
- HOW TO PREPARE A LATTE MACCHIATO
- HOW TO PREPARE THE FROTHED MILK (WITHOUT COFFEE)
- USEFUL TIPS TO PREPARE A GOOD COFFEE
- Cleaning of components
- Filters cleaning
- Filter holder seat cleaning
- Milk nozzle and milk container cleaning
- DESCALING
- SETTING THE MACHINE OUT OF SERVICE
- A PROPOS DU MANUEL
- LISEZ ATTENTIVEMENT CES INSTRUCTIONS.
Brand : ARIETE
Model : 1384
Category : Coffee maker