
EN3450CO - Coffee maker ELECTROLUX - Free user manual and instructions
Find the device manual for free EN3450CO ELECTROLUX in PDF.
| Product Type | Automatic espresso machine |
| Brand | Electrolux |
| Model | EN3450CO |
| Dimensions (W x D x H) | Approximately 25 x 30 x 40 cm |
| Weight | Approximately 7 kg |
| Power Supply | 220-240 V, 50/60 Hz, 1300 W |
| Water Tank | 1.7 L (removable) |
| Bean Hopper | 250 g (removable) |
| Pump Pressure | 15 bar |
| Grinder | Metal burr grinder, adjustable grind size (6 settings) |
| Beverages | Ristretto, espresso, coffee, steam (cappuccino, latte) |
| Settings | Strength (1-3 beans), volume (20-180 ml), temperature (3 levels), grind fineness |
| Special Functions | 1 or 2 cups preparation, steam function, auto shut-off (15-120 min) |
| Display | Ergonomic LCD display with navigation |
| Maintenance | Automatic rinsing, cleaning program (tablet), descaling (sachet), Claris filter cartridge (optional) |
| Grounds Container | Removable, with level indicator |
| Steam Wand | Removable, with cleaning needle, compatible with auto-cappuccino set (optional) |
| Safety | Automatic shut-off when not in use, drip tray absence detection |
| Included Accessories | Cup rest grid, dosing scoop, cleaning needle |
| Repairability | Spare parts available, KRUPS consumer service |
Frequently Asked Questions - EN3450CO ELECTROLUX
User questions about EN3450CO ELECTROLUX
0 question about this device. Answer the ones you know or ask your own.
Ask a new question about this device
Download the instructions for your Coffee maker in PDF format for free! Find your manual EN3450CO - ELECTROLUX and take your electronic device back in hand. On this page are published all the documents necessary for the use of your device. EN3450CO by ELECTROLUX.
USER MANUAL EN3450CO ELECTROLUX
FR HOTLINE:BE:3270233159-FR:0974501061-CH:0800377737
DE HOTLINE:DE:08009800000-AT:0800225225-CH:0800377737
EN HOTLINE:UK:0345 3306460-ROI: (01)6774003
NL HOTLINE:NL:0318582424
IT SERVIZIO CONSUMATORI: IT: 199 207701 - CH: 0800 37 77 37
ES HOTLINE:ES:902312300
PT CENTRO DE CONTACTO DO CONSUMIDOR:PT:808284735
EL EANADA:GR:2106371251
RU TOPRAJARJIHHR:RU:4952133228
UK yKPAIHA:UK:0443001304
PL INFOLINIA:PL:0801300420
CS HOTLINE:CZ:731010111
SK ZAKAZNLCKA LINKA:SK:233595224
HU ÜGYFÉLSZOLGÁLAT: HU : (1) 8018434 567

Réf. 8080014573-04 03/2018
KRUPS
EA815 - EA816 - EA817


1
2
1
2

3

4
25
26
27
28
5
6
7
8
29
30
31
32
9
10
11
12
33
34
13
14

15
16

1
18
19
20
2

22
23
24
Congratulations! You are now the proud owner of an Espresso Automatic EA815-EA816-EA817 Series. With your machine, you can make a wide range of drinks: espressos, coffees or ristrettos, completely automatically. You can also make milk-based drinks such as cappuccinos. It has been designed so that you can enjoy restaurant quality coffee at home, whatever the time of the day and every day of the week. You will appreciate its ease-of-use and the quality of your cup of coffee. You can set the amount, strength and temperature of your drinks.
Thanks to its Compact Thermoblock System with built-in percolation chamber, its 15 bar pump, and because it uses coffee beans which have been freshly ground just before making the coffee, your machine will give you hot ristrettos, expressos and coffees from the first cup with maximum aroma and a creamy golden-brown froth.
To give the drink maximum flavour, an espresso is traditionally served in a small, flared porcelain cup. For an optimum temperature espresso and a dense creamy froth, we recommend that you pre-heat your cup.
You will probably need to try several types of coffee before you find the one that suits you.
By experimenting with the blend and/or roast, you will eventually arrive at the ideal result.
Espresso coffee has a richer aroma than classic filter coffee. Despite its stronger taste which remains longer on the palate, an espresso contains less caffeine than filter coffee (around 60 to 80mg per cup compared to 80 to 100mg per cup) due to its shorter percolation period.
The quality of water used is another determining factor which affects the overall quality of the brewed coffee. You should ideally use water which is fresh from the tap (so that it hasn't had time to stagnate due to air contact), which is cold and which does not smell of chlorine.
The ergonomic, compact LCD display makes the machine easy to use. It will guide you through each step, from preparing your drink to servicing your machine.
We wish you many years of enjoyment with your Krups machine.
The Krups team

| Buttons and knobs | |||
| "On-off" button | Navigation button (cursor key) | ||
| Favourite coffee type button A or press B Save favourite button A or press and hold B | To adjust selected settings | ||
| Steam drink button | START STOP Start or stop equipment | ||
| Maintenance and settings button | To adjust how finely ground you would like the coffee beans. | ||
| Symbols | Constant | Flashing | Meaning |
| ● | The coffee grounds collector is missing or improperly positioned | ||
| ● | Empty the coffee grounds collector + empty the drip tray | ||
| ● | Refill the water tank The water tank is not properly in place | ||
| ● | Place a container (0.6 L minimum) under the steam and coffee jets | ||
| ● | Maintenance cycle in progress | ||
| ● | Malfunction: unplug the machine for ten seconds then plug it back in | ||
| ● | Install filter cartridge | ||
| ● | Rinsing cycle in progress | ||
| ● | ● | Clean machine with KRUPS cleaning tablet | |
| ● | Cleaning cycle interrupted | ||
| ● | ● | Descale machine with KRUPS descaling sachet | |
| ● | Descaling cycle interrupted | ||
| ● | Adjust the water hardness | ||
| ● | Enable automatic rinsing of the coffee circuit when the machine starts. | ||
| ● | Program the length of time after which your machine switches off automatically (standby) | ||
| ● | ● | Adjust the coffee temperature/Pre-heating indicator | |
| ● | Favourite A or B - 2 drinks can be saved in memory | ||
| ● | Registering favourite A or B | ||
| ● | ● | Preparation progress indicator | |
| PRESS START | ● | Press the START-STOP button | |
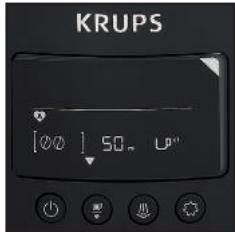
| [000] | ● | Coffee strength indicator | |
| [BBBmmin] | ● | Volume or time indicator | |
| [UP12] | ● | Number of cups (1 or 2) | |
| Active use indicator | |||
| Maintenance or settings selection | |||
APPLIANCE DESCRIPTION
A. Water tank lid
B. Water tank
C. Used grounds collector
D. Coffee outlet and height-adjustable handle
E. Grid and removable drip tray
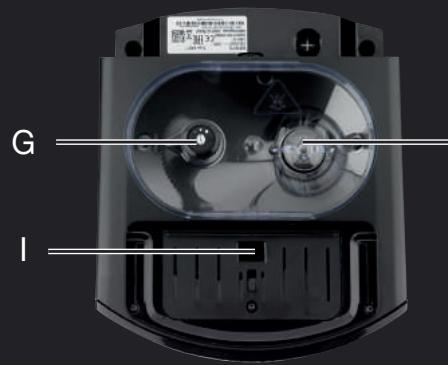
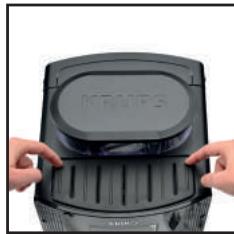
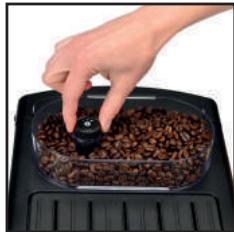
F. Coffee bean container lid ① Coffee bean container
G. Coffee grounds fineness adjustment knob
H. Metal grinder
I. Cleaning tablet funnel
J. Cup grid (may vary according to model)
K. Water level float
2 Graphic screen
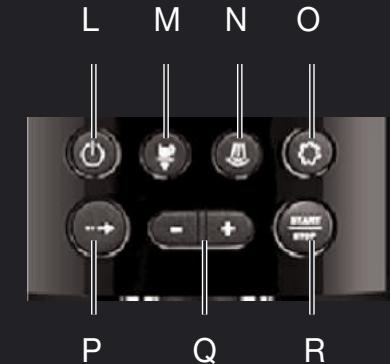
L. On/off button
M. Coffee and favourites button
N. Steam button
0. Settings button
P. Navigation button
Q. + or - button
R. Start/stop button
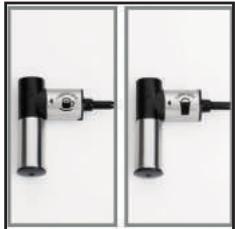
S. Steam nozzle
BEVERAGE PREPARATION
| TYPES OF COFFEE | Number of possible cups | Possible settings Volume (ml) | Possible settings Strength |
| RISTRETTO | 1 | 20 to 30 ml (per 10 ml) | 1 to 3 beans |
| 2 x 1 | 2 x 20 to 30 ml (per 10 ml) In two cycles | ||
| ESPRESSO | 1 | 30 to 70 ml (per 10 ml) | 1 to 3 beans |
| 2 x 1 | 2 x 30 to 70 ml (per 10 ml) In two cycles | ||
| COFFEE | 1 | 80 to 180 ml (per 10 ml) | 1 to 3 beans |
| 2 x 1 | 2 x 80 to 180 ml (per 10 ml) In two cycles |
BEVERAGE PREPARATION
Appliance preparation
To prevent used water spillage from making your work surface dirty and to avoid burning yourself, don't forget to attach the drip tray.
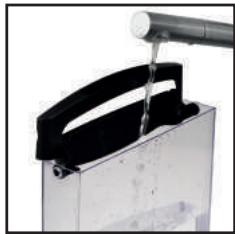
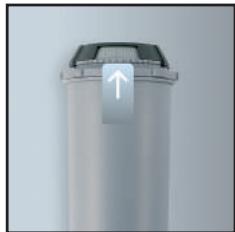
Remove and refill the water tank (1-2).
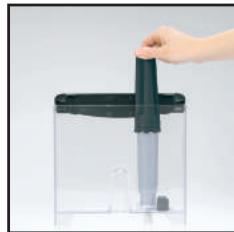
■ Refill the coffee bean container (3).
First use
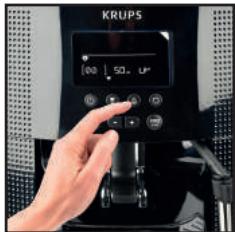
Turn on the appliance by plugging it in then pressing the on/off button (4).
The machine pre-heats. At the end of the cycle, the symbols and start button start to flash.
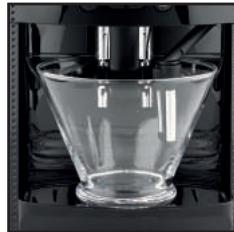
Put a 0.6L container underneath the two coffee and steam nozzles.
■ Press the start/stop button (5). The machine starts and rinses the hydraulic circuits (coffee and steam) for around 2 minutes. At the end of the initialisation cycle, the coffee types menu appears. (6)
■ You are advised to rinse the circuit if you have not used your machine for several days (see the chapter on Maintaining Your Appliance).
Preparing the grinder
You can adjust the strength of your coffee by adjusting how finely the coffee beans are ground.
Generally, the finer the coffee is ground, the stronger and creamier the coffee will be, but this also depends on the type of coffee used.
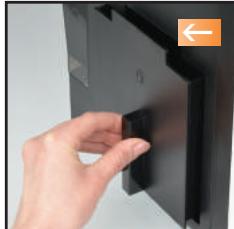
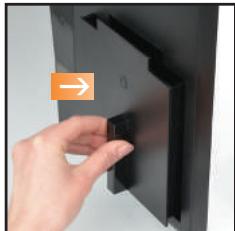
Adjust the fineness of grinding by turning the coffee grounds fineness adjustment knob which is located in the coffee bean container. It is advised that you do this during grinding, one notch at a time.
After 3 rounds, you will notice a pronounced difference in taste. To the left, the grounds are finer. To the right, the grounds are courser. (7)
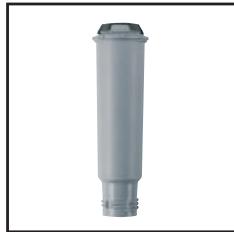
Claris F 088 - Aqua Filter System cartridge (Sold separately)
To optimise the taste of your drinks and the lifespan of your appliance, you are advised to only use a Claris - Aqua Filter System cartridge with your machine (see the chapter OTHER FUNCTIONS - Installing the filter).
Every time you place a Claris-Aqua Filter into the machine you must prime the filter before using the machine by activating the "install filter cartridge" program.
MAKING AN ESPRESSO AND A COFFEE
Note :
The amount of water for making an espresso is between 30 and 70ml
The amount of water for making a coffee is between 80 and 180ml
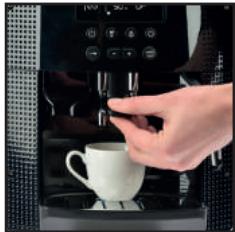
Starting preparation (with 1 or 2 cups)
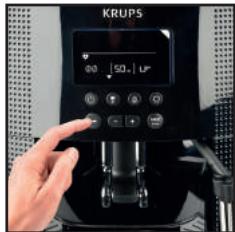
Press the on-off button, and wait for the appliance to finish heating up.
The coffee types menu is displayed. The function indicator is shown above the coffee types button (6).
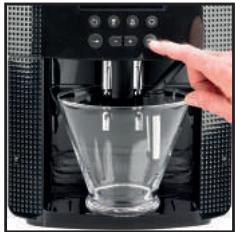
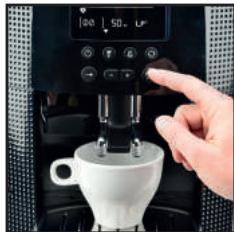
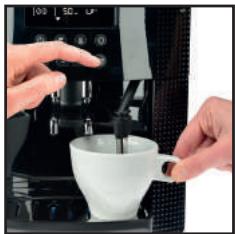
Place one or two cups under the coffee jets. You can lower or raise the coffee jets according to the size of your cup (8). Select the coffee strength (shown coffee beans displayed on the screen in brackets) with the + button to increase or the - button to decrease. (9).
Press the navigation button to set the volume: select the volume of water displayed on the screen between brackets using the + or - buttons (10).
Press the navigation button to set the number of cups: select 1 or 2 cups, displayed on the screen between brackets using the + or - buttons.
Press the START button (11).
■ You can set the water volume at any time using the + or - buttons
To stop the flow into your cup, press the STOP button
■ You can also adjust the temperature of your coffee (see the chapter OTHER functions - Settings).
Two cup function
The appliance will automatically carry out 2 full cycles of coffee preparation.
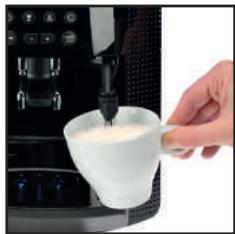
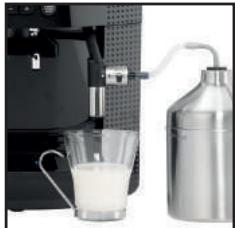
MAKING DRINKS USING STEAM
Steam is used to froth the milk, for example when preparing a cappuccino or caffe latte, and also to heat up liquids. As a higher temperature is required when producing steam than when making an espresso, the appliance will launch an additional pre-heating phase.
Frothing milk
■ For best results, you are advised to use very fresh, very cold pasteurised or UHT milk, recently opened. Unpasteurised milk does not produce the best results.
Check that the steam nozzle is correctly positioned.
Pour the milk into a milk jug which has a handle or into a cappuccino cup. Only fill it half way.
■ When the screen displays the drink selection menu, press the steam button (12). The function indicator is located above the steam button.
Insert the steam nozzle into the milk.
A screen indicates that the appliance is heating up. Once the appliance has finished heating up, you can begin to make steam by pressing START , and following these steps (13):
Step 1: holding the milk jug in place, insert the steam nozzle approximately 2cm into the milk and wait for it to start frothing.
Step 2: raise the container slightly (approximately 1cm ). Do not completely submerge the metal tube.
Step 3: gradually lower the container as the froth accumulates. (14)
■ When you have frothed the milk enough, press the STOP button to stop the cycle. Warning: the cycle does not stop immediately.
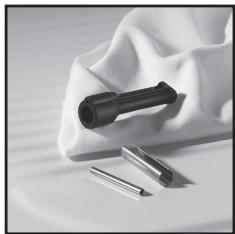
To remove any milk traces from the steam nozzle, place a container under the nozzle and start the steam function again (approximately 10 seconds).
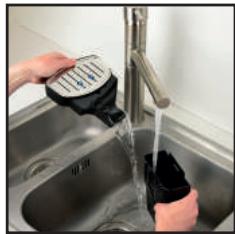
The steam nozzle is removable in order to allow for deep cleaning. Wash it with water and a little non-abrasive detergent using a brush. Rinse and dry (15-16). Before replacing, make sure that the air holes are not clogged with milk residue. Unclog the holes with the needle supplied with your appliance if necessary (17).
To stop the steam, press the STOP button
WARNING: THE CYCLE DOES NOT STOP IMMEDIATELY.
Steam can be produced for a maximum of 2 minutes per cycle.
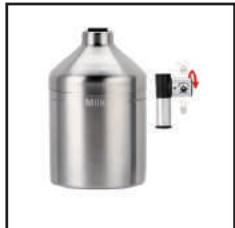
Auto-cappuccino XS 6000 set (sold separately)
This auto-cappuccino accessory enables you to make cappuccinos or lattes (18). Connect the different parts to each other. Ensure that the pipe is not pierced by keeping the knob in the correct place.
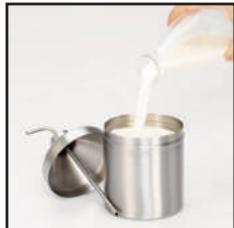
After removing the lid, fill the jug with milk (19) and place a cup or glass under the auto-cappuccino nozzle (20). Select cappuccino or latte on the special nozzle (21).
Start steam, as indicated in the chapter Making drinks with steam.
Once you have made the milk froth, place your cup under the coffee jets and start a coffee cycle (22).
To prevent the milk from drying on the auto-cappuccino accessory, ensure that you clean it thoroughly. You are advised to wash it immediately by running a steam cycle with the accessory jug filled with water in order to clean the inside of the nozzle. For this you can use the KRUPS liquid detergent available separately.
MAINTAINING YOUR APPLIANCE
Emptying the coffee grounds collector and the drip tray
If the symbol starts flashing, empty and clean the drip tray (the drip tray may contain coffee grains) and the coffee grounds collector (23-25).
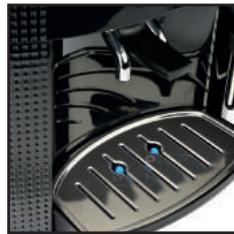
The drip tray is fitted with floats which indicate when it needs to be emptied (26). Once you have removed the coffee grounds collector, you should empty it completely in order to avoid any overflow.
The warning message will continue to be displayed if the coffee grounds collector is not pushed in or inserted correctly (24). You cannot make an espresso or a coffee while the warning message is shown.
Rinsing the circuits :
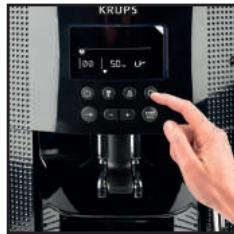
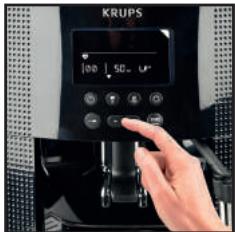
Press the maintenance and settings button (27). The function indicator is shown above the maintenance button.
If necessary, using the navigation button, select the rinse symbol Press START , rinsing starts and finishes when the coffee menu appears.
Automatic rinsing of the circuits when the machine starts.
You can choose to program the machine to be rinsed automatically each time it is turned on. To do this, press the maintenance and settings button (27). Using the navigation button, select the automatic rinsing programming symbol . Press the button to choose ON which confirms this program. If you press the , button, automatic rinsing is disabled.
■ You can return to the coffee types menu by pressing the button.
Warning : after this rinsing process, hot water will be released from the coffee jet. Ensure that the drip tray is in place even when the machine is not being used. The cycle lasts only a few seconds and stops automatically.
Cleaning program - total duration: approximately 13 minutes
You do not have to run the cleaning program as soon as the appliance requests it, but it must be done reasonably soon after. If cleaning is postponed, the alert message will remain illuminated until the process is carried out.
- When the symbol lights up, you can run the automatic cleaning program by pressing the maintenance and settings button. The symbol is selected. The function indicator is shown above the maintenance button.
- the automatic cleaning program is divided into 2 stages: the cleaning cycle itself, followed by the rinse cycle. You can clean the machine at any time by pressing the maintenance and settings button then, using the navigation button select the cleaning symbol .
To run this cleaning program, you will need a container which holds at least 0.6L and which can be placed beneath the coffee jets and the steam nozzle. The symbol flashes.
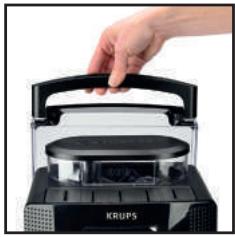
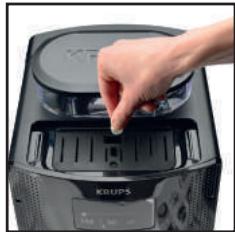
Lift the cup grid (28).
Insert the KRUPS cleaning tablet (29).
Fill the water container to its maximum level of 1.7L (2).
Empty the coffee grounds collector and the drip tray (23-25).
Put a 0.6 L container under the coffee and steam jets (30).
Press START. The symbol becomes constant. The first phase (approximately 10 minutes) begins. When this phase has finished, empty the container and the drip dray. The symbol flashes. Put the parts back in place.
Press START. The symbol becomes constant, the final phase (approximately 3 minutes) begins. When this phase has finished, empty the container and the drip tray. The cycle has finished, the coffee types menu appears.
Note: if you turn off or unplug your machine during cleaning or if there is a power failure, the cleaning program will start from the beginning of the program once the power is restored to the appliance. It is not possible to postpone this process. It is obligatory in order to rinse the water circuit. In this case, a new cleaning tablet may be necessary. It is best to run the full cleaning program in order to avoid any risk of poisoning. The cleaning cycle is irregular: do not put your hands under the coffee jets while the cycle is running.
Dscaling program - duration: approximately 20 minutes
You do not have to run the descending program as soon as the appliance requests it, but it must be done reasonably soon after. If descending is postponed, the alert message will remain illuminated until the process is carried out.
The amount of limescale collected depends on the hardness of your water.
Warning : if your product is fitted with our Claris - Aqua Filter System cartridge, remove the cartridge before descending.
- When the 1 symbol lights up, you can run the automatic descending program by pressing the maintenance and settings button (27). If necessary, using the navigation button, select the 1 symbol. The 1 symbol flashes and the function indicator is located above the maintenance button.
■ To run the descending program, you will need a container which holds at least 0.6 L and a sachet of KRUPS descaler.
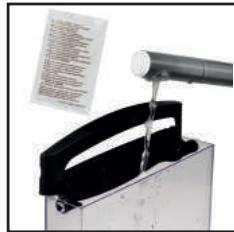
■ Fill the water tank up to the CALC mark then pour in the contents of one sachet (31).
Put a 0.6 L container under the coffee and steam nozzles.
Press START to begin the first phase (approximately 8 min). The symbol becomes constant. When this phase has finished, empty the container and the drip dray. The and symbols flash. Remove and clean the water tank using a sponge.
Once clean, refill your water tank and replace all parts. The symbol disappears.
Press START to begin the second phase (approximately 6 min). The symbol becomes constant. When this phase has finished, empty the container and the drip tray. The symbol flashes.
Press START to begin the final phase (approximately 6 min). The symbol becomes constant. When this phase has finished, empty the container and the drip tray. Dscaling is complete.
Note : if you turn off or unplug your machine during descending or if there is a power failure, the cleaning program will start from the beginning of the program once the appliance is restarted. It is not possible to postpone this process. It is obligatory in order to rinse the water circuit. Running the descending program is advisable. The descending cycle is irregular: do not put your hands under the steam jet.
Once the cycle has finished, the coffee types menu appears.
OTHER FUNCTIONS
■ You can access the appliance's OTHER FUNCTIONS menu by pressing the maintenance and settings button
For all settings, use the navigation button and + or- for the values.
To come out of the maintenance and settings menu, press the button.
MAINTENANCE
All of the following options allow you to run the selected programs:
| MAINTENANCE | Allows you to access rinsing. | |
| K | Allows you to access cleaning. | |
| Allows you to access descaling when the appliance requests it. | ||
| Allows you to prime the filter (Claris cartridge). | ||
| Return to coffee types menu. |
TURING OFF YOUR APPLIANCE
You can turn off your appliance at any time. When stopped, the machine emits a double beep and OFF is displayed on the screen. The appliance has registered your request and will stop as soon as possible.
SETTINGS
All of the following options allow you to run the selected programs:
| SETTING | You can set your water hardness between 0 and 4 by pressing the + or - buttons . See “Measuring water hardness” (below) | |
| You can program automatic rinsing each time the appliance is turned on by pressing the buttons and selecting ON. | ||
| You can choose the period after which your appliance will turn off automatically (between 15 and 120 minutes by pressing the buttons). | ||
| You can adjust the temperature of your coffee to three different levels by pressing the buttons. | ||
| Return to coffee types menu. |
Measuring water hardness
It is advisable to adjust the appliance according to the hardness of the water used. To check the water hardness, use the stick supplied with your machine or contact your local water authority.
| Degree of hardness | Class 0 Very soft | Class 1 Soft | Class 2 Average hardness | Class 3 Hard | Class 4 Very hard |
| ° dH | < 3° | > 4° | > 7° | > 14° | > 21° |
| ° e | < 3,75° | > 5° | > 8,75° | > 17,5° | > 26,25° |
| ° f | < 5,4° | > 7,2° | > 12,6° | > 25,2° | > 37,8° |
| Appliance settings | 0 | 1 | 2 | 3 | 4 |
Installing the filter (Claris - Aqua Filter System cartridge) (32)
Note : To correctly install your cartridge, ensure that you follow the installation procedure each time you replace it. (33) A mechanism which memorises the month in which the cartridge was changed and replaced (after a maximum of 2 months): set the date using the cartridge cursor. Fit the cartridge in the tank (34). In the maintenance and settings menu , the function indicator is located above the maintenance button . Using the navigation button , select the filter cartridge installation symbol The symbols and the start button start to flash.
Place a 0.6L container under the steam nozzle.
Press start. The start-up cycle begins and finished when the coffee types menu appears
If one of the problems described in the table persists, contact KRUPS customer service.
| PROBLEM MALFUNCTION | CORRECTIVE ACTION |
| Your machine detects a fault: a symbol appears. | Switch off and disconnect the machine, remove the filter cartridge, wait for a minute and restart the machine. |
| The appliance does not turn on when the button is pressed. | Check your fuses and plug sockets. Check that the two power plugs are pushed in properly both on the appliance and at the socket. |
| The coffee grinder makes a strange noise. | There is a foreign body in the grinder. Disconnect the machine before investigating. See if you can extract the foreign body using your vacuum cleaner. |
| The steam nozzle makes a noise. | Check that the steam nozzle is correctly attached to its corresponding end piece. |
| The steam nozzle on your machine seems partially or completely clogged. | Ensure that the opening in the end piece is not obstructed by milk residue or limescale. Unclog the holes with the needle supplied with your appliance. |
| The steam nozzle makes little or no milk froth. | For milk-based drinks, you use very fresh, very cold pasteurised or UHT milk. It is also advisable to use a cold container. If the results do not improve, try changing the brand of milk. |
| No steam comes out of the nozzle. | Empty the tank and temporarily remove the filter cartridge. Fill the water tank with mineral water which is high in calcium (>100 mg/l) and run successive steam cycles. |
| The auto-cappuccino setting makes little or no froth. The auto-cappuccino setting does not take in milk. | Check that the accessory is correctly attached to the appliance, remove it then replace it. Check that the flexible tube is not obstructed or pierced and that it is correctly attached to the accessory so as to make it airtight. Rinse and clean the accessory (refer to the "Auto-cappuccino accessory" chapter). |
| There is water underneath the appliance. | Before removing the water tank, wait for 15 seconds after the coffee has finished flowing so that the machine finishes its cycle properly. Check that the drip tray is correctly positioned on the machine; it should always be in place, even when the appliance is not in use. Check that the drip tray is not full. The drip tray should not be removed during a cycle. |
| After emptying the coffee grounds collector, the warning message is still displayed on the screen. | Correctly replace the coffee grounds collector and follow the instructions on the screen. Wait at least 8 seconds before replacing them. |
| The coffee dispenses too slowly. | Turn the coffee fineness knob to the right to make the grounds courser (this could also depend on the type of coffee used).Run one or several rinsing cycles. Run a machine clean (see “Cleaning program”).Change the Claris Aqua Filter System cartridge (see “Installing the filter”). |
| Water or steam comes out abnormally from the steam nozzle. | At the beginning or end of making a drink, the steam nozzle may drip slightly. |
| The coffee fineness knob is difficult to turn. | Only change the grinder setting when it is running. |
| The espresso or coffee is not hot enough. | Increase the coffee temperature in the Maintenance and settings menu ❷. Warm the cup by rinsing it with hot water before making the drink. |
| The coffee is too lightly coloured or too weak. | Avoid using oily, caramelised or flavoured coffee. Check that the coffee bean container has coffee in it and that it is dispensing correctly. Decrease the drink volume, increase the drink strength. Turn the coffee fineness knob to the left to make the grounds finer. Make the drink in two cycles by using the 2 cups function. |
| The appliance is not producing coffee. | A problem has been detected during preparation of the drink. The appliance has restarted automatically and is ready for a new cycle. |
| Why can I not run descending/why does my machine not request a descending cycle? | The machine only requests a descending cycle once it has made a certain number of drinks using steam. |
| A power failure occurs during a cycle. | The appliance is automatically restarted when power is switched back on. |
| The appliance is working but no liquid is coming out. | Check that the water container is in the correct position and that the cord is not jammed between the appliance itself and the water container. |
| Coffee grains have found their way into the drip tray. | This happens if coffee grains fall outside the percolation tank; this keeps the machine clean. |

Danger: Only a qualified technician is authorised to carry out repairs on electrical wiring and carry out work on the electrical grid. If you do not follow these instructions, you risk death by electrocution! Do not use an appliance that is visibly damaged!
Beste klant,
BESCHRIJVING VAN HET APPARAAT
XeIaEM Bam noluyntb MHoro ydoBoNbCTBnOr TaSeMaunHb Krups.
Komahda Krups

KhonknФунки
IoproToBka yctpoiCtBa.
I py npeoTbpaueHn 3aepaHHeHn pa6oey noBepxHocTn npCKa OXORA oT cTeKaHOe NcNoJIb3OBAHHo BObl, He 3a6yDble NoCTaBHTb NOdoH dIra c6opapKaneB.
I3BLeKeNte pe3epByap IЯ BOdbI HAnoHnTe er0 (1-2).
HanoJIHnTe KOHTeINHeP dIa KoFe B 3epHax (3).
PepBoe mNoJIb3OBAHne
3anyctnte MaunHy, noCoeHnHB ee K 3neKtpocetN n Haxkab Khonky BKn./Bbikl (4).
MaunHa BbInonHnreT npOeDpy npEaBapntelbHoro pa3OrpeBa. B KOHcE cIKNa MmraOT NkTOrpaMMbl KhoNka start
YCTaHOBtE KOHTeHep EMMoctbIoo6IIOJ2conlaIJI KoeI napa.
Haxmte Ha KhoNky 3ayncka nIIO octaHOBKn yHKn (5).MaunHa haoDITcBpeXime npombHaHn rnpabuuecknx cncTeM (KoFe n nap) OKOIO 2 MInyT. B KOHe zHKJa ycTaHOBKn Ba6Ooe neNooxeHne Ha ducnnee oTo6paXaeTcMe HIO peCenTOB KoFe. (6)
PekomeHnyetc npombBaHne cntembl uepe3 HeckoIbKO dHei nocJIe IcnoJb3OBAHnA (cm. pa3deI O6cnykBaHne ycTpoIcTBA).
IoproToBka KofemOnk
Bb mokepepeynpobatkpeonocB BaIero KoPe, hacTpaNbaar cTepeHb ToHKoTn NOMOna KoPeHbIX 3epeH. B cIeom, Yem MeIbYe NOMOn KoPeHbIX 3epeH, Tem KpeYue n rUe KoPe. KaeeCTBO nOlyuAemOrHaNTka 3aBcNt TaKxe I OT TIna NcNoIb3yeMOrO KoPe.
Hactpoite ToHKoCTb NOMOA, Bpaaay peryIyIaTOp ToHKoCTn NOMOa 0, paCnoJIOKeHHb B KOHTeHepe dIg KoFeehbIX 3eep. PeKoMeHdyETc BByIOnJIHraTb 3Ty OnpaCNU B npocce Cne NOMOA, nOCTeNEHNO nepeDbIRaeypeKnUohTeB. BbINb 3uAseKn KoPe pa3HOro NOMOA, Bby OTyeTInBO NoCyBCTBye Te pa3Hcy BO BKCy. PpN BpaueHN HAnpabo BVCTabIYeTC 6Oone ToKkN NOMO.Ipn BpaueHN HaNeBO — 6Oone rpy6bl.
MaunHa aBTOMaTnueckn npOn3BODnT 2 nONHbIX ZKJIa pnpiroTOBJeHn KoFe.
ПРИГOTOBЛECHNE C ИСПОЛБОВАHЕМ ПAPA
Iap nCnoB3yetycTg nanyehn nehI 13 MoNoka pnp npiroTOBHeHn KanyuHNo IJI NaTte, a TaKKe dI py noDorpeBa JnkocTei. Nockonbky npOn3BOOCTBO npapa Tpe6yET 6oee BbICOKo TEMepaTybl cem npiroTOBHeHne 3cnpecco, KoFemaunHa npOn3BOOHT DOONHITeHbI 3Tan npedBapNTelbHOro nporpeBaHn. Monouhna nenha
IHaHnlyuWero pe3yNbTaTAt Mbl peKomeHnyem Bam nCnOlb3oBaTb cbExee nactepn3oBaHhoe MoNOKo IIMMOKO, npOweUee TepMo06pa6OtKy. NcNoB3yra bIpoe moNOKo, BbHe do6BeTeCb HnIyWero pe3yNbTaTata.
Iocne nCnoB3OBAHn yHKn npapa, conIO moKet 6bITb ropAUM, mbl coBeTyem Bam noDoxdaTb HeckoJbKO MnHyT, npexJe Yem npoBoDntb KaKe-1JI60 MaHnPyAun C Hm.
y6eHTecb,yTO CONIIO npaBnIbHO yCTaHOJIeHO.
Hane Te MoKO B cocy dIa MOKc pUcOu IIN B uAky dIa KanyuH. He HanoHrye cocy/uaKy 6oJee Yem HanoIOBHy.
KordaHaIinCJIeOTo6pa3ntcMeHIO Bb6opa HAnITKOB,HaKMnTe Ha KOnKy IOnaUn npa (12).INHnKaTOp cyHKun paCnoJoxKeHn KaONKOI npaUn npa
Onyctnte conno dny npa B MoJOKO.
Ha 3kpahe nOraBnTc coo6eHne O npEdbapntelbHom HarpBe np6bopa. KaK TOnbko 3aKoHnTc7 pa3a npEdbapntelbHorO npOrpeBa, Bbl MoXete NaCuTaB npOceDpy o6pa3OBaHnna npa, Haxab Ha KhoNky START , n 3aTeM npEeyUoImm 3tanam (13):
3Tan 1:Onycntte coonno IJnnpa B monoko npinbnte bHo Ha 2 cm Brnyb ndojntecb Hauana obaOBAHnI neHbl.
3Tan 2: CnErga npinOdHmIMTe EMKoCTb (pnp6IIN3nteIbHO Ha 1cm). He norgykaIte noNHO MeTaJIInueckyTO Tpy6KY B MOnKO.
3Tan 3: NocTepeHNo onyckaIte EMKoCTb No Mepe oBa3OBAHn peHbl. (14)
Korda obpaayetycdoctatoohoe konuueCTBO nehbl, haxmnte Ha KhoNky STOP dIra ocTaHOBKn cNKna. BHHMaHHe, ocTaHOBKa cNKnHa He npOxCoDHT MRHOBeHNo.
UTo6bO uOncTnTB cIebl MOkOa C cOnla dIy npapa, nocTaBbTe noI Hero eMKoCTb I CHOBa 3aNyCTne npiroTOBHeHne C nCnoJIb3OBAHNem npapa (okono 10c).
■Дя 60e e rny6okon oynctkn conno dЯ napa moxho demoHTnpobatb. MoTe erO ueTkoB BOe c He60nbM KOnuYeCTBOM Hea6pa3nHBoro MOUSeIcreCTBa dЯ nocybl. 3aTeM cNoONcHNe I BbCyuNtE (15-16). PpeJde Yem ycTaHOBtB conno Ha MeTo y6eINTEcb B Tom, yTO OTBepCTnaI 3abopa Bo3dyxa He 3akynopehbl ocTaTKAMMOJOKa. IpOuHcTne Ix B Cnyae Heo6xoDmOCn C NOMOJIbIO CNEuaJIbHO INJIbl, BXOJaIeB KOMPJIeKT MaUNHbl (17).
I py npekpaene H noaun npapa, hKnHTe Ha KhoNky STOP
BHIMAHNE! OCTAHOBKA LUKJIA HE IPOUCXODIT MTHOBEHHO.
MaKcImaJIbHaJ npOIoJnxIeJIbHocTb obpa3oBaHnI npapa 3a oDIN H cIKN coCTaBJIeT He 6oJee 2 MInHyT. ABToKaIyUnHaT op XS 6000 (npOdaETcOtJeBHo)
■AByokanyHaHTop 06nIeYaET npiroToBHe Hne KanyuHNo IJI NaTte (18). CoeHNHTe ero deTaN MeKdy coBoi. Y6eInTeCb, yTO Tpy6Ka He nepeKepyeHa npri CoXpaHEny uO6HOro nopoKeHn KaHKn.
■Iocne ChTnK Kpblknc Cocya, 3aONHnTe erO MoNOKom (19) n NOMecHTe yaLsKy uIN CTaKaH NOcNO abToKanuHaTopa (20). Bb6epnte noLoXeHne KaynuHno INI NaTTe Ha cneuaJbHom conNe (21).
IpaTe npak 30yka3aHO B rnaBe PpiroToBneHne c npom.
Kak TOnbKO NOBITcM ONoUHa NeHa, NoCTaBbTe YauKy NOD BbInyCKHoe OTBepCTne KoFe N 3aNyCTnTe cNKJ KoFe (22).
ДлгТOrO,ЧтбblИЗБжаТь 3aCbIXAHнЯ MONOKа Ha ABToKAnyUHnATope, HeOBxODIMTO TlaTeIbHo erO OHIuTaB. PekOMeHnyeTcR Mblr erO cpa3y C nMOUbIb 3aNcYCa ZIcKIIa C nCnOJIb3OBAHnEM npa I nOINHbIM bauKOM BODbl Dlry OCHSeHnRA coPbA BHyTpri. ДлгЗггцeIeIeBbl MoKeTe TAKKke NcNoJIb3OBAtB JkIqKoe MOUJee cpeIcTBO KRUPS.
O5CJNYKINBAHNE YCTPOICTBA
OuNTka KOHTeHepa dIy Otpa6oTaHHoro KoPe n IOTka dIy c6opa Kaenb
EcnI NIKTORPAMMa Muraet,OnyCTOuHTe INouchTne IIOdoH dIa c6opa KaJIb (B NOdoH dIra KaIeB MOKeT nonaTaTB HEMHO MONOTOro KoPe) n KONNeKTop dIra KoFeiHoH rUsi (23-25).
IOnDOn dnn c6opara Kanenb NmeeT nonnabKn, KOTOpBie CnHnN3npuyo T Heo6xOJIMOCn OunchKn nOdoHa (26). KaK ToNbko Bbl ChnMITE KOJIeKTop KoceHNOI rUu, Bam Heo6xOJIMO nONHOCTbIO erO ONyCToWHTb, YTO6bl BnOcNeCTBmN 136exKaTb erO nepenONHeHna.
Будет отобраха tcnypeурждаюшee coo6шени, ecn konJIeKTop KofoeHOnI ryUn yctaHOBNeH He npaBnIbHo (24). Korda oToobpaKaetcnypeuypexkaioшee coo6шени, npiroTOBneHne 3cnpecco nI IN Kofoe HeBO3MOxHO.
Ppombibahnene cncTeMbI:
HakmTe Ha KhoNkU o6cIyXuBaHnI u KOnΦuIpyaIu (27). HndIkAtOp fynKuzI paCnoIooKeH na KhoIko 6cIyXuBaHnI.
Ipn Heo6xOaIMOCtN, C nOMOuBn HABURAIOHHO KHOJKN, BbIepeN Te NIKTORpAMMy IpombBAHnA
При Нахати Na Khoну START 3anyckaetc npoecc npombyaHn 3akaHnBaetc pri noRbHeHn HaДисплee MeHIO KoΦe.
A B T O M A T N U C E K O E I P O M B I B A H N E C N C T E M D O 3 a n y c k a M a u n h b i
Bb moke Te BbpaTb nporpammy aBTOMaTHueCKoro npomlbAHnBa BO BpeM kKaJdO 3aNycca.ДЯ 3TOHakmTe Ha KONky o6cnykunBaHnI KOHfnpaun (27).C nOMoUHO HABrAUNHOHKnOHKn, Bbepnte NIKTORpammy aBTOMaTHueCKoro npomlbAHnHa .HaxmTe Ha KONky dJaBbopa ON, yToYTBepxdaet BBOd B DeiCTBne nporpamMbI. EcIn Bb HaxaJIHa KNOHky , aBTOMaTHueCKoe npomlbAHnEOTMeHReTc.
BbMoKeTe BepHyTbCBA MeHIO peeIeITOB, HaxkAB Ha KhoNiky
BhImaHHe! Bo Bpemr Onpaunn No npombIbAHnIO, N3 BByIpyckHOrO OTBepCTnIg KoPe cTeKaET ropaar BaJa. CneIe 3a TeM, YTObIy IooDOn HaxoJINcR Ha CBOe MeCte, DaKe KOrDa MaUnHa He NcPONb3yETc. LkKn DInTcra Bcero HeCKoJIbKO CeKHyN d ABTomAtuYeCKn OCTaHabNIBaETcR.
PpOprpMaMn YnCTKn -NoJIHnA dIInTeBHOCTb: OKoJIo 13 MmHyT
BbI He o63aHbI 3aynckatb nporpammy oucnctkn cpa3y nocne TOrO, KaM MaunHa npouhOpmipyet
Bac o Heo6xOdMocTNe e npOBeDnH. Ho nocTapaIteCb npOBecTn 3Ty npOeDpyk Ka moKHO 6bIcTpee. Ecnn npOceCC ONUCTKN OTKlaDbIBaETcR, pEynpEckdaIOUe cooBSeHne 6yDet BbICBeHNBaTbcr Do Tex nop, nKa He 6yDet OCUSeCTBHeHa ONUCTka.
BoBpMaOTo6paKeHnI NkTOrpaMMbI BblMOKeTe 3aNyCTtB npOrpamMy ABOMaTHueCKoYnCTKN,HaXaBa Ha KhoNky OcbcnyKmbAHn I KOhФuRpaCn .BbIbpaHa NkTOrpaMMA .INHdkatop fynKun paacnoLoKeH nA KhoNko OcbcnyKmbAHn.
■Ppamma ABToMaTnecko OuncTkn CoCTnI 3 DByX qacte: co6cTBehHO ZIKJa OuncTkN, a 3aTeM ZIKNa npombHaHn. B IIO60 MoMeHT Bb MoKeTe 3aNyCTn IpoceDpy OuncTkN HaxKaTHe M KHOKN 06CJIyKnBaHn IN KOHfNguraun, 3aTeM C NOMOsbHabNraUOnHHo KHOKn BBb6paTb NIKTORpamMy OuncTkN
IpyoBeHnIpoUeDpybO uOHTKn, Bam Heo6xoDM COCyE mKocTbO He MeHee 0,6 n, KOtOpBm IOnJKeH 6bIt yctAHOBJIe NOD BvInyCKHbE OTBepCTnI dN KoFe U CoNIO dN BvInycka npa. NIKTOrpAMMa Mmraet.
IOnHnMMTepeWetKyIaWeK(28).
BcTaBaTBe Ta6IeKy UncTaeero CpeIcTBa KRUPS B erO rHe3do(29).
HanoHnHTe pe3epByap dIa BObI do MaKcImaJIbHO rpoBn 1,7 n (2).
Onyctounte KOHTeHep dny Otpa6oTaHHoro KoOe nIoTOK dny c6opa Kaenb (23-25).
YCTaHOBInTe cOcyd EMMoCtBu 0,6 IIOIcONla IINKoFe nnapa (30).
HaxMMTE Ha KhoNkY START. PnIKTOrpMaMa IROPNT NoCToHNo. IepBaa 0a3a (OKOIO 10 MIn) 3ayncKaETc. IIO OKOHuaHm 3ToI a3bI, ONyCToWnte EMKOCTb I NODOn dIra c6opa KapeJIb. CmBON MURAet. YctaHOBtE 3JeMeHTbI Ha MeCTO.
HakbHa KhONky START. Korda cIMBON npekpaaaet MuraTb, 3aynckaeTc 3aKnIOHTeNBa pa3a (OKOJ0 3MnH.). IIO OKOHauHH 3ToI pAs3bl ONyCToWnte EMKocTb I NOdoH dJa c6opa Kaenb. IIO OKOHauHH UKKla OTObpaKaETcMeHIO peceNTOB KoPe.
Pnmueya H: Ecn Bbl BbKIOUaTe MaunHy BoBpMa npOceca OuncTk, nIe ecN Bpyr npoanaet 3JIeKTPuueCTBO, pOrpamMa OHCTKN HaHETcra Chauana npR BO306HOBLeHN IOaHn 3JIeKTPo3Heprn. OTJIOXtB 3Ty Onpaun HeBO3MOxHO, TaK KaK 3TO RaBJeTcra OB3aTeNbHbIM dIg 3aNyCa npOceDpyb IpomBaIBaHn CnCTem. B 3TOM cnyae MoKet NOHaOobntcR NcONb3OBAHne HOBo T aSNeTK qCSTqero cpeCTBa. BaxHo npaBnBHO IN B nonHom oBeMe ocUeCTBnTbp NoceDpy OuncTk, YTObI I36EkaTb ONaCHocTN OTPaBHeHn. Lckl NcCTKn pOn3BOundTCc C nepepbIbAMn, He NODCTabNATb pykn NOD BblYCKhle OTBepcttn Da Iy KoFe BO BpMa zkna.
Iporpamma ydaJIeHnHaKnnn- dIITeIbHocTb: OKOJ0 20 MNHyT
BbI He o63aHbI 3aynckatb nporpammy ydaJIeHnna HAKINn cpa3y nocIte TOrO, KaK MaunHa npOnHfOpMpyet Bac O Heo6xOdImocTne e npOBeHnna. Ho noctapaiTeCb npOBecTn 3Ty npOeDpyk Ka MOKHO 6bICTpee. EcnnpOeJypa ydaJIeHnna HAKINn OTKlaDbIbAeTcra, npEynpexKaIOoUece COo6uHnne bYdET BbICBeHn-BaTbcra Do tex nop, poka OHa He bYdET ocUyIeCTBNeHa.
KoJIuYeCTBO 6Opa3OBAHn HAKINn 3aBnCHT OT XeCTKoCTn IcIOnIb3yeMoN BObl.
BhMaHne! Ecnn BaWa MaunHa OchaueHa 9nIbIpyUoIm NaIPOHom Claris - Aqua Filter System, BbIbTe erO, npexde Yem npicTynaTb K onepaunNo ydaJeHHIO HAKIN.
Korda noraBnaTcnnkTOrpamMa Bb moKeTe 3aynctntb nporpamMy aBTOMaTHueCKoro ydaJIeHnHaKINn, Haxab Ha KONky o6cIyXuBaHnA IN KOHcInrgpaun (27).Ppi Heo6xOIMMocTn, C NOMOUBHO HABNraCIOHNOHKnONK, Bb6epnTe nnkTOrpamMy . Muraet nkiTOrpamMa INDnKaTOp cyHKUN paCnoJoxeH naKONKO obcIyXuBaHnA
I py npoBeHn npOgPamMb ydaHnHaKnn, Bam nTope6yeTc KOHeHep eMKocTbIO He MeHee 0,6 n, a TaKKe cpeDCTBO ydaHnHaKnn KRUPS.
HanoHnHTpeepByapIaBIOdoOTMeTKnCALC,3aTeM NOpEcTHe Tya cpeiCTBo (31).
YcTaHOBInTe cOcyd eMKOcTBIO0,6I npoD conNa IpnKoFe nnapa.
Hakmte Ha KhoNky START 3nyaKepBoro 3Tana (okoJ0 8 mH). NIKTORpMaMroPOT NOCTOHHo. IIO OKOHuaHN 3ToI q3bI onyctoWnte EMKocTB n IOdoH dIra c6opa KaeneB. Miraot NIKTORpMMbl n . CHmnte n ooucHTne r6ko pe3epByap dIra BObl.
3aonHnTe pe3epByap,ecn OH uCTbI,N BepHnte BCE 3neMeHTbHa MeCTO.PIKKtorpaMMA He rOpNT.
Haxmte Ha KhoNky START nIy3ayncka BTOPOrO 3Tana (OKoNo 6 MnH).PiKtorpamma ropnt noCToRHO. IIO OKOHauHH 3ToJ fAs3bI, onyctoUHte EMKocTB n IOdoH dIra c6opa Kaenb.Cmbon mRAeT.
Hakmte Ha START 3nycka 3aKIOHTeBHO 3Tana (OKO6 MN). NKTorpaMa ropnt noctoHH. IIO OKOHauHN 3ToI p3bl, ONOPOXHnTe EMKocTB n POnDOn dNc6opa Kaenb. PpoceDpya ydaJIeHnHaIKIN OKOHHeA.
PnmeaHne: EcnBbblkIooaTe MaunHy Bo Bpemra pnoceca OuncTk, nIe ecn Bdpyr nponaadaet 3JeKtpuecTBO, nporpaMMA ydaIeHna HauHcTc chaua Iprn BO3o6HOBHeHHn NoaChy 3JeKtpo3Heprn. OTJIOXHTb 3Ty onepaIIO HeBO3MOxHO, TAK KAc 3TO YBaJIeTc OB3aTeIbHbIM dJa 3aNycka npOceDpybl npomlbAHNA cNCTeM. DJa npabInbHorO ocUeCTBLeHna pOueDpybl ydaIeHna HauHn. LKKn ydaIeHna HauHn npOn3BOIDTC a NepepbIbAM. 3aIpeaaeTc PndctabTb pykn Iod OTBpcTne dJa Bblvca npapa.
IIO OKOHaHm cKJIa, OTo6paxaetcMeHIO peIeNTOB KoFe.
ДPyгпЕ ФУнКLIN
IocTyB MeHIO dpyRnx FyHKcN yCTpOcTBA OcyuEcTBnEeTcN C NOMoUbK HONKn 0cbnyKINBaHnN I KOHΦnrgypaun
Дян Habстpoek И спльзуйтЕ HabигагционHyю Khoнку n+иn- 一一Дян установки 3начeyн.
IyBbIXOda I3 MeHIO O6cnyKUBaHnI KOnΦuRpyaun,HaXmTe Ha KHOKIky
PABOTA NO YXOy
Bce 3tn onuin n03BoJraHOT 3aynyckaTb Bby6paHHbIe nporpamMbI:
PRZYRZADZANIE ESPRESSO I KAWY
Uwaga:
Ilośc wody do espressoDynosi 30-70 ml.