
ESPRESSERIA EA9000 - Automatic coffee machine KRUPS - Free user manual and instructions
Find the device manual for free ESPRESSERIA EA9000 KRUPS in PDF.
| Product Type | Automatic Coffee Machine |
| Brand | KRUPS |
| Model | ESPRESSERIA EA9000 (Espresso Automatic Series EA9000) |
| Dimensions (H x W x D) | 38.5 x 29.5 x 39.5 cm |
| Weight | 11.5 kg |
| Power Supply | 120 V / 60 Hz |
| Power | 1,450 W |
| Pump Pressure | 15 bar |
| Water Tank Capacity | 1.7 L |
| Bean Hopper Capacity | 280 g |
| Ground Coffee Chute Capacity | 1 scoop (6 g) |
| Display Type | Color Touch Screen |
| Heating System | Compact Thermoblock System with integrated brewing unit |
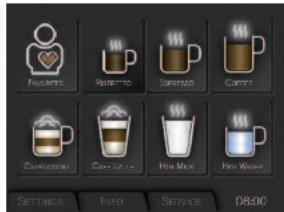
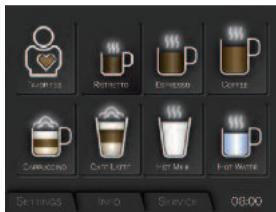
| Main Functions | Ristretto, espresso, coffee, cappuccino, caffe latte, hot milk (with or without froth), hot water, ground coffee |
| Steam/Hot Water Wand | Swivel wand with auto-rinse |
| Maintenance Programs | Rinse, automatic cleaning of coffee circuit and steam wand, automatic descaling |
| Water Filter | Claris Aqua Filter System cartridge (optional, 1 included) |
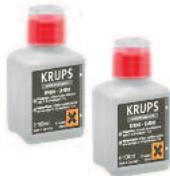
| Included Accessories | 2 cappuccino cups, ground coffee scoop with brush, water hardness test strip, filter cartridge, cleaning tablets, descaling agent, bottle of cleaning liquid, pin |
| Warranty | 2 years and/or 8,000 cycles (max 4,000 cycles/year) |
| Use | Household use only |
| Repairability | Repairs exclusively by a KRUPS authorized service center; wear parts (burrs, valves, seals) not covered |
| Power cord length | Not specified in the manual (removable cable) |
Frequently Asked Questions - ESPRESSERIA EA9000 KRUPS
User questions about ESPRESSERIA EA9000 KRUPS
0 question about this device. Answer the ones you know or ask your own.
Ask a new question about this device
Download the instructions for your Automatic coffee machine in PDF format for free! Find your manual ESPRESSERIA EA9000 - KRUPS and take your electronic device back in hand. On this page are published all the documents necessary for the use of your device. ESPRESSERIA EA9000 by KRUPS.
USER MANUAL ESPRESSERIA EA9000 KRUPS
natural_image
Exterior view of a modern office building (no signage)KRUPS
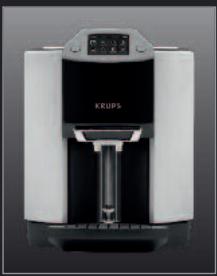
ESPRESSO AUTOMATIC SERIES EA9000

natural_image
Product display of a KRUPS coffee maker with three beverage cups against a black background (no text or symbols visible on main device)WWW.KRUPS.COM

IMPORTANT SAFEGUARDS
When using electrical appliances, basic safety precautions should always be followed to reduce the risk of fire, electric shock, and/or injury to persons including the following :
- Read all instructions prior to first use.
- Do not touch hot surfaces. Use handles or knobs.
- To protect against fire, electric shock and injury to persons, do not immerse cord, plugs or machine in water or other liquid and keeps hands and utensils out of the bean container while grinding and when the machine is plugged in.
- Do not put water into the coffee bean container and/or under the servicing flap.
- Not intended for use by children.
- Close supervision is necessary when any machine is used near children. Keep machine out of reach of children.
- This appliance is not designed to be used by people (including children) with a physical, sensory or mental impairment, or people without knowledge or experience, unless they are supervised or given prior instructions concerning the use of the appliance by someone responsible for their safety.
- Children must be supervised to ensure that they do not play with the appliance.
- Burns can occur from touching hot surfaces, hot water or steam. Exercise caution.
- Exercise caution when using the steam nozzle as steam can cause scalding.
- Unplug machine from outlet as soon as you stop using it and when you clean it. Allow to cool before putting on or taking off parts, before cleaning the machine, and before storing.
- All appliances are subject to stringent quality control. Practical tests using appliances taken at random are conducted and this may explain any slight marks or coffee residue showing prior use.
- Do not operate any machine with a damaged cord or plug after the machine malfunctions, or has been damaged in any manner. Return machine to the nearest Krups Service Center for examination, repair or adjustment.
- To reduce the risk of injury do not drape cord over the counter top or table top where it can be pulled on by children or tripped over accidentally.
- Do not let cord hang over edge of table or counter, or touch hot surfaces.
- The use of accessory attachments not recommended by Krups may result in fire, electric shock or injury to persons.
- Do not use outdoors.
- Do not place on or near a hot gas or electric burner, or in a heated oven.
- Always attach plug to appliance first, then plug cord into the wall outlet. To disconnect the machine, turn the control to "off", then remove plug from wall outlet. Do not yank cord, instead grasp plug and pull to disconnect.
- Do not use the machine for other than intended use.
- Do not pour liquids other than water and descaling solutions specified in this manual into the water tank.
- Protect the machine against humidity and freezing.
- This machine is intended for household use only.
CAUTION SAVE THESE INSTRUCTIONS
This machine is intended for household use only. Any servicing other than cleaning and user maintenance should be performed by the nearest authorized Krups Service Center.
Visit our website at www.krupsusa.com in the USA or www.krups.ca in Canada or contact your respective countries Consumer Service department for the service center nearest to you.
To reduce the risk of fire or electric shock, do not dismantle the machine. Repair should be done by an authorized Krups Service Center only.
SHORT CORD INSTRUCTIONS
A. We do not recommend using a longer detachable power-supply cord or an extension cord with this device.
B. If a longer detachable power-supply cord or an extension cord is absolutely necessary,
1) The marked electrical rating of the longer detachable power-supply cord or the extension cord should be at least as great as the electrical rating of the machine.
2) If the appliance is the grounded type, the longer detachable power-supply cord or the extension cord should be a grounding-type 3-wire cord.
3) the longer cord should be arranged so that it will not drape over the counter top or table top where it can be pulled on by children or tripped over.
In the interest of improving products, Krups reserves the right to change specifications without prior notice.

natural_image
Close-up of a black electronic device casing with two metallic components and a labeled component '7' (no text or symbols on the device itself)WELCOME
natural_image
Exterior view of a modern KRUPS water dispenser (no visible text or symbols on the device body)Dear Customer,
Congratulations! You are now the proud owner of an Espresso Automatic Series EA9000. With your machine, you can prepare a wide range of drinks; espressos, coffees or milk-based drinks, entirely automatically. It is designed so that you can enjoy the same quality at home as in a restaurant, whatever the time of the day and throughout the week. You will appreciate both the quality of the result in your cup and its superior ease-of-use.
Thanks to its Compact Thermoblock System with built-in brewing chamber, its 15 bar pump, and because it can use either coffee beans freshly ground just before the coffee is made or ground coffee fed via a funnel, your machine will give you ristrettos, espressos and coffees hot from the first cup with maximum aroma and a fine creamy golden-brown top.
With its exclusive and patented system for preparing milk-based drinks automatically, you can easily make delicious cappuccinos and caffe lattes, without compromise: hot, with the “three layer effect” and thick, creamy froth. Its automatic steam nozzle rinsing and cleaning programmes guarantee hassle-free hygiene for long-lasting performance, cup after cup.
With the hot water function, you can prepare teas and other drinks instantaneously.
You can also personalise all of these drinks using the “Favourites” menu. You can set the volume, proportions, intensity and temperature of your drinks.
The colour touch-screen makes navigation ergonomic and comfortable. It will guide you through each step, from preparing your drink to servicing your machine.
We wish you many years of enjoyment with your Krups machine.
The Krups team

natural_image
Five different types of beer glasses and cups arranged on a black background, no text or symbols visible.A FEW EXPERT TIPS
Here are a few tips for achieving the best results from your machine:
The quality of your water significantly influences the quality of the flavours. Limescale and chlorine can alter the taste of your coffee. We recommend that you use the Claris Aqua Filter System cartridge or low mineral-content water to preserve all of the flavours of your coffee.
- When preparing ristretto, espresso and coffee recipes, we recommend that you use tulip-shaped porcelain cups, preheated beforehand (by running them under hot water, for instance), and whose size is appropriate for the quantity you want to make. For your cappuccino, caffe latte and hot milk recipes, we recommend that you use thick glass cups, for an appealing, precise and gourmet presentation.
- Roasted coffee beans can lose their flavour if they are not protected. We recommended that you use the amount of beans required for your consumption for the next 4-5 days. As the machine automatically detects when there are no beans, you can be certain that you will always have sufficient beans for preparing your coffee drinks. Though the quality of coffee beans is subjective and varied, we can nevertheless recommend that you use arabica rather than robusta. After a few trials, you will learn how to mix and roast the coffee beans according to your tastes. Lastly, please remember that oily and caramelised coffee beans must be avoided, as they can damage your machine.
The quality and fineness of the grinding determine the strength of the flavours and the quality of the crema. The finer the ground, the richer the crema. Moreover, it must be adapted to the drink you want: fine for ristretto and espresso, coarser for coffee. For your comfort, the machine carries out this operation automatically.
Thanks to the ground coffee funnel and spoon, you can choose to serve your drink differently. You can vary the flavours and strengths of your coffee as you wish. Ground coffee should ideally be stored in the refrigerator in a hermetically sealed bag.
- You can use pasteurised or UHT, skimmed, semi-skimmed or whole milk, straight from the refrigerator (7°C). Using special milks (microfiltered, raw, fermented, enriched, etc.) can produce less satisfactory results especially regarding the quality of the froth. However, we recommend that you use fresh, cold milk for pre-programmed recipes.
CONTENTS
Manufacturer
SAS GSM
Rue Saint-Léonard
F-53104 Mayenne
France
The duration of this guarantee is 2 years.
Please check your guarantee card for more details on the guarantee conditions in your country.
This appliance is intended for domestic use only and is not suitable for commercial or professional use. Any use other than domestic will void the guarantee.
The guarantee does not cover damage or faults resulting from improper use, repair by unauthorised persons or non-observance of the instructions for use. The guarantee will become invalid if all of the maintenance operations and instructions have not been followed, or if cleaning or descaling products which do not comply with the original KRUPS specifications are used; if the Claris Aqua Filter System water filter is not used in accordance with KRUPS instructions. Normal wear and tear of parts (grinding disks, valves, seals) is exempted from the guarantee, as well as damages caused by foreign objects in the coffee grinder (e.g. wood, stones, plastic parts etc.).

Caution: For the guarantee to be valid, this machine must be used only with Krups accessories.
ACCESSORIES (sold separately)
Actual appearance may vary
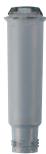
F 088 Claris - Aqua Filter System cartridge (1 cartridge supplied)
XS 9000
(2 bottles of steam nozzle cleaning liquid)
F 054
Descaling powder (1 sachet supplied)
XS 3000 Packet of 10 cleaning tablets (2 tablets supplied)

IMPORTANT INFORMATION ON THE APPLIANCE AND INSTRUCTIONS 6
1.1 Guide to the symbols used in the instructions....6
1.2 Safety guidelines 6
1.3 Correct use 8
1.4 Products supplied with your machine 9
1.5 Factory check....9

OVERALL VIEW 10
2.1 Description of the appliance.... 10
2.2 Presentation of the different symbols 12
2.3 Main operations of the appliance 12

FIRST USE 16
INSTALLING THE APPLIANCE 16
3.1 Before first use 16
3.2 Initial settings 17
3.3 Defining the settings 17

PREPARING DRINKS 21
4.1 Information on recipes 21
4.2 Preparing coffee-based drinks from coffee beans 22
4.3 Preparing coffee-based drinks from ground coffee 25
4.4 Preparing other drinks: hot milk with or without froth, and hot water 27

"FAVOURITES" MENU 30
SETTINGS 33

INFORMATION 34

MAINTENANCE AND CLEANING 36
8.1 Maintenance menu 36
8.2 Automatic cleaning programmes 41

TROUBLESHOOTING 45

TECHNICAL DATA 48

TRANSPORT 48

DISPOSAL OF WASTE 48

IMPORTANT INFORMATION ON THE APPLIANCE AND INSTRUCTIONS
In this manual you will find all of the important information concerning the preparation, use and maintenance of your automatic coffee/espresso machine. Important safety guidelines are also included. Read these instructions carefully before using your appliance for the first time and keep them for reference: Krups may not be held responsible for any incorrect use.
1.1 Guide to the symbols used in the instructions
■ Symbols and associated words used in these instructions.
| SYMBOL | ASSOCIATED WORD | MEANING |
| Danger | Warning against risks of serious or fatal injuries. The lightning bolt symbol warns against electrical dangers. | |
| Caution | Warning against risks of incorrect operation, damage or destruction of the appliance. | |
| Important Note | General or important note on the operation of the appliance. |
1.2 Safety Instructions
Important: These safety guidelines are intended to protect you and other persons, and the appliance. They must therefore be respected.
Conditions of Use
- Do not immerse the appliance in water. Do not immerse the power cord or the mains plug in water or any other liquid. Any contact of the conductive parts of the appliance with moisture or water may lead to fatal injuries due to the presence of electricity! This appliance must only be used indoors in dry areas.
- In the case of a change in the ambient temperature, from cold to hot, wait for a few hours before using your machine so that it is not damaged by condensation.
- Avoid leaving the appliance in direct sunlight, exposed to heat, cold, frost or humidity.
- Do not place the appliance on a hot surface such as a hob or close to a naked flame, in order to avoid any risks of fire or other damage!
-
Keep the appliance out of the reach of children.
-
This appliance is not intended for use by persons (including children) with reduced physical, sensory or mental capabilities, or lack of experience and knowledge, unless they have been given supervision or instruction concerning use of the appliance by a person responsible for their safety.
■ Children should be supervised to ensure that they do not play with the appliance. - In case of ingestion of any of the products supplied with the machine, inform your physician and/or the poison control centre immediately.
Electrical power supply
Danger: Failure to respect these guidelines may lead to fatal injuries due to electricity!
- Check that the supply voltage marked on the rating plate of the appliance is the same as that of your electrical supply. Only connect the appliance to an earthed mains socket.
- Ensure that the mains socket is easily accessible so that the appliance can be unplugged easily, for example in the event of any failure or a thunderstorm. For the safety of the appliance, unplug it from the socket during thunderstorms. Do not pull on the power cord to unplug it from the socket.
- Unplug it from the mains socket immediately if any operational failure occurs or if there is a problem with brewing. Unplug the appliance when it is not to be used for a long period and when you are cleaning it.
- Do not use the appliance if the power cord or the appliance itself is damaged.
- If the power cord or the mains plug is damaged, they must only be replaced by an approved KRUPS service centre.
- Do not let the power cord dangle over the edge of a table or a worktop. Do not leave the power cord close to or in contact with the hot parts of the appliance.
■ We do not recommend the use of extensions or multi-adapter plugs.
■ Any incorrect connection invalidates the guarantee.
Appliance
- Do not pour water into the coffee bean container and/or under the ground coffee funnel.
- Except for cleaning and descaling as described in the instructions for the appliance, all work on the appliance must be carried out by a KRUPS approved service centre.
- For your safety, only use KRUPS approved accessories and consumables as they are perfectly adapted to your appliance.
■ Unplug the appliance when leaving the room or your home for prolonged periods. - Never open the appliance, as there is a risk of fatal injury due to electricity! Any unauthorised opening of the appliance invalidates the guarantee. Do not use your appliance if it is not working correctly or if it has been damaged. In such cases, we recommend having the appliance checked by a KRUPS approved service centre (see the list in the KRUPS Service handbook).
-
For safety and approval (CE) reasons, any transformation or modification of the appliance carried out by an individual is prohibited, as only tested appliances have been approved and the manufacturer is absolved of all responsibility in the event of damage.
-
When producing steam for making cappuccino, hot milk or hot water, do not block the mechanism that brings the steam nozzle forward, downward, upward or backward. In such cases, the manufacturer is absolved of all responsibility in the event of damage to the appliance and the guarantee will not apply.
- For your safety, while producing steam for making cappuccino, hot milk or hot water, do not place your hand under the steam nozzle.
- The steam nozzle can be hot. Do not handle it during or immediately after a preparation.
- Do not place your hand or any other obstacle in front of the nozzle that can hinder the movement of the nozzle.
- If you do not set a cup in place or if you do so incorrectly, there may be risks of pinching or scalding.
- Do not put anything but ground coffee or the cleaning tablet in the funnel provided for this purpose; do not add more than the maximum dose of ground coffee (1 spoon). In such a case, any damage to the appliance will not be covered by the guarantee.
Use and Maintenance
- In the event of a problem or incorrect operation, check the appliance and try to resolve the problem (see Section 9: “Troubleshooting”) or have the appliance repaired if the problem persists.
- Always refer to the instructions for descaling/cleaning the appliance. Unplug from the socket before any maintenance operation.
- Should cleaning or regular maintenance not be carried out or if there is a foreign body in the grinder or in the ground coffee funnel, the guarantee will not be valid.
1.3 Correct use
This Espresso Automatic Series EA9000 coffee/espresso machine must only be used to prepare espresso, coffee, hot water or to froth milk.
This appliance is designed for domestic use only. It is not intended to be used in the following environments and the guarantee will not apply for:
- staff kitchen areas in shops, offices and other working environments,
- farmhouses,
- by clients in hotels, motels and other residential-type environments,
- bed and breakfast-type environments.
This Espresso Automatic Series EA9000 coffee/espresso machine is not designed for commercial or professional use. Any use other than that described in this manual does not comply with these recommendations and may lead to injuries and damage to equipment as well as damage or destruction of the appliance (see Section 1.2, “Safety guidelines”).
1.4 Products supplied with your machine
- Check the products supplied with your machine. If any parts are missing, contact our helpline (see 3.2: “Initial settings”).
Parts supplied:
■ Espresso Automatic Series EA9000
■ 2 bottles of steam nozzle cleaning liquid
■ 2 cleaning tablets
■ 1 descaling sachet
- Claris – Aqua Filter System cartridge with fitting accessory
■ 2 cappuccino cups
■ Ground coffee spoon with built-in brush
■ 1 stick for testing water hardness
- Instructions
■ List of approved Krups service centres
■ Guarantee documents
■ 1 power cord
■ 1 cleaning needle
1.5 Factory check
- Your appliance has been checked and tested before leaving the manufacturing plant. Despite all the care given to its cleaning, you may find traces of coffee in the coffee grinder and/or coffee drops on the drip tray grid. Thank you for your understanding. We also recommend that you rinse the appliance one or more times before you use it for the first time or if you have not used it for several days.

OVERALL VIEW
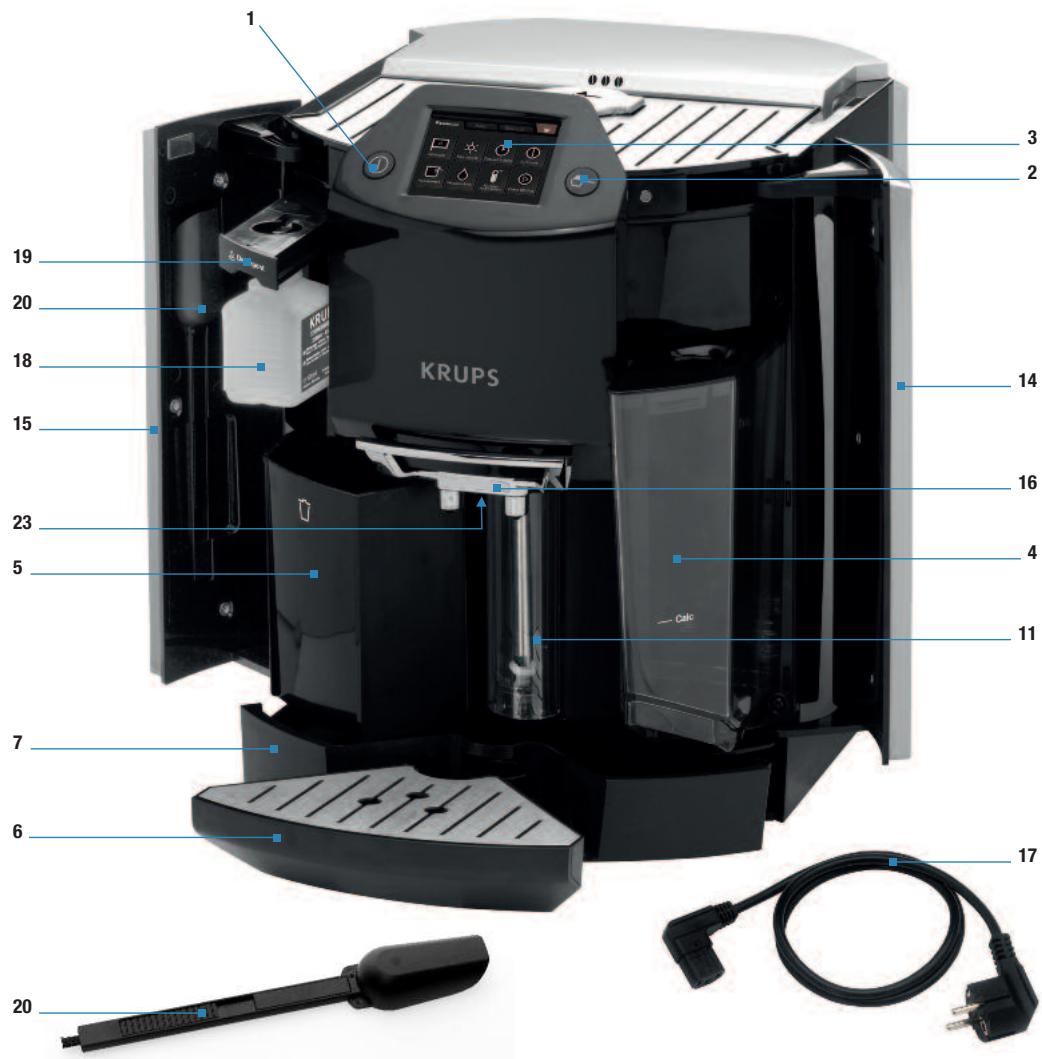
2.1 Description of the appliance
The fold-out page shows a photo of the appliance. Fold out this page. The various controls of the appliance are listed below with a brief description of them:
| No. | IDENTIFICATION | FUNCTION |
| 1 | ON/OFF button | To switch the appliance on and off. |
| 2 | Ground coffee button | To access the machine's ground coffee function and to unlock the ground coffee funnel. |
| 3 | Colour touch screen | To access the recipes and other functions of the machine. |
| 4 | Removable water tank + lid | Contains water for preparing recipes, cleaning and rinsing. |
| 5 | Used coffee collector | Collects the used ground coffee. |
| 6 | Small drip tray and grid: can be removed to position tall cups | To collect water or coffee that might flow out of the appliance during/after preparation.It can be removed to use taller cups (large recipes, caffe latte in particular). |
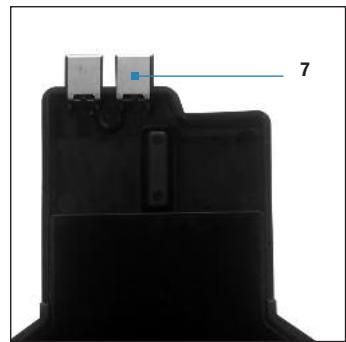
| 7 | Large drip tray with metal contacts | Collects water flowing out of the appliance (when draining the Thermoblock and hydraulic system) or water coming from the small drip tray. |
| 8 | Steam/hot water nozzle | To produce steam to heat or froth milk.OrTo produce hot water. |
| 9 | Steam/hot water tube | |
| 10 | Steam nozzle tip | |
| 11 | Steam nozzle cleaning container | For automatic programmes that rinse and clean the milk nozzle. |
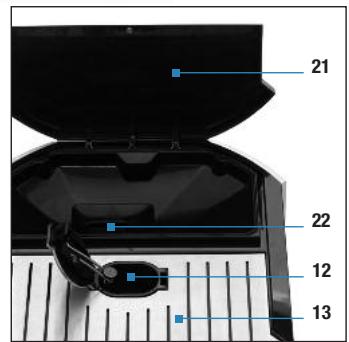
| 12 | Ground coffee funnel | Holds the ground coffee.Holds the cleaning tablet during the automatic cleaning programme. |
| No. | IDENTIFICATION | FUNCTION |
| 13 | Cup rest | To hold and preheat cups. |
| 14 | Right door | To access the water tank. |
| 15 | Left door | To access the cleaning liquid bottle, the ground coffee spoon/brush and the used coffee collector. |
| 16 | Coffee nozzles and height-adjustable handle | To dispense the prepared coffee recipe. |
| 17 | Power cord | To supply power to the machine (removable). |
| 18 | Cleaning liquid bottle | Contains the product necessary for automatic cleaning of the steam nozzle. |
| 19 | Cleaning liquid bottle drawer | Holds the cleaning bottle (fitting). |
| 20 | Ground coffee spoon with built-in brush | To measure the quantity of ground coffee necessary to prepare a ground coffee.The brush is used to remove ground coffee residue from the ground coffee funnel. |
| 21 | Removable bean container lid | Closes the bean container. (Just open the removable lid slightly using the notches on the side of the bean container. Then it opens by itself.) |
| 22 | Coffee bean container | Holds the coffee beans and is equipped with automatic detection. |
| 23 | LED cup lighting | Illuminates your drink as it is being prepared. |
2.2 Presentation of the different symbols
■ The table below summarises all the symbols used on the screen:

To confirm the step.
To return to the previous step.
To scroll through the different options.
To bring the steam nozzle up in some menus.
To bring the steam nozzle down in some menus.
To go to the next step or stop a preparation in progress.
For example, during a cycle of cappuccino, to move from phase the foaming phase to the coffee phase during coffee recipe or interrupt the coffee phase at the end of recipe.
To stop the cycle during preparation.
2.3 Main operations of the appliance
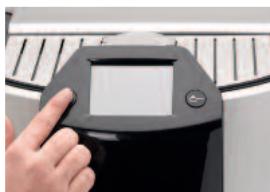
■ Turning the appliance on or off
natural_image
Close-up of a hand pressing a digital tablet on a keyboard (no visible text or symbols)Press the "On/Off" button.
■ Filling the bean container
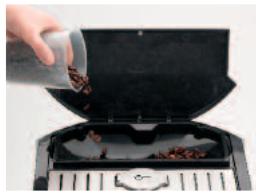
natural_image
Close-up of a hand pouring dried herbs into a black oven with a control panel (no visible text or symbols)Open the bean container lid. Put in the coffee beans. Close the bean container lid.
- Put coffee beans into the container, which has a capacity of about 250 g.
- The machine prompts you to fill the bean container although there are beans in it: Some types of coffee can interfere with optical sensors; you must shake the beans with your hand to make the function operational once again.
- The machine detects beans, but the coffee dispensed is very/too light: Some beans (especially those that are too large or too greasy) do not easily go into the grinder. Use your hand to ease them into the grinder and/or change the type of coffee beans.
- The machine does not detect the absence of coffee beans: Check that a bean is not obstructing the optical sensors. Otherwise, the function is not operational.

Caution: Never put ground coffee or water into the coffee bean container. Ensure that no foreign bodies (e.g. small stones, hard wood) can get into the coffee bean container as they could damage the grinder (not covered by the guarantee).

Danger: Any contact of the conductive parts of the appliance with humidity or water may lead to fatal injuries due to the presence of electricity!
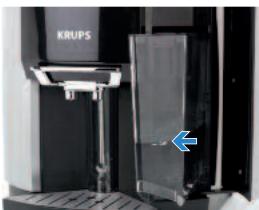
■ Filling the water tank

natural_image
Close-up of a KRUPS coffee maker with hand pointing to its side (no visible text or symbols on device)Open the right door.
Lift and pull the water tank towards you.
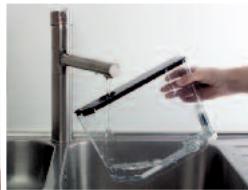
natural_image
Hand pouring liquid into a stainless steel kitchen sink (no text or symbols visible)Fill the tank. Replace the tank.
- The machine prompts you to fill the tank with water although there is water in it: Caution: The machine includes a mechanism that manages the water level required for the requested recipe. It is therefore normal that the water level is not always the same in the tank when there is a request to fill it.
- The machine does not detect my tank: Please check whether the tank has been inserted fully (until you feel resistance).

Caution: Only put water in the tank!
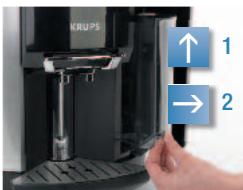
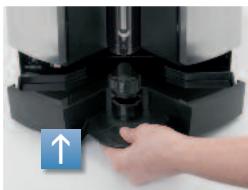
■ Emptying the used coffee collector

natural_image
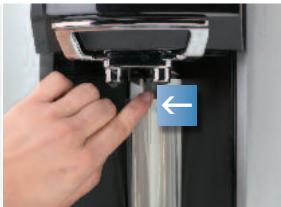
Close-up of a hand operating a KRUPS coffee maker with a blue arrow indicator (no text or symbols on the device itself)Open the left door.
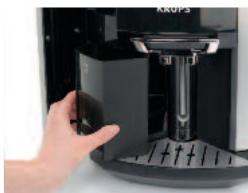
natural_image
Hand operating a KROP3 coffee maker with a hand adjusting the tray (no visible text or symbols)Remove the used coffee collector by pulling it towards you. Empty the used grounds. Replace the used coffee collector.
- Open the left door (15). Remove the used coffee collector (5). Empty and clean it before putting it back in place.

Caution: Do not wash it in the dishwasher.
At stage check the messages on the touch screen
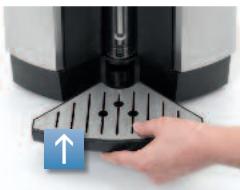
■ Emptying the drip trays

natural_image
Hand pressing down on a mechanical component with arrows indicating motion (no text or symbols visible)Remove the small drip tray.

natural_image
Hand pouring liquid into a stainless steel kitchen sink (no text or symbols visible)Empty the small drip tray.
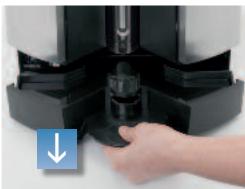
natural_image
Close-up of a hand pressing down on a mechanical component (no visible text or symbols)Remove the large drip tray.
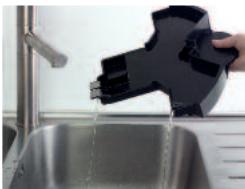
natural_image
Person pouring liquid from a black plastic bag into a stainless steel kitchen sink (no text or symbols visible)Empty the large drip tray. Wipe the metal contacts.
natural_image
Close-up of a hand pressing down on a mechanical component (no visible text or symbols)Replace the large and small drip trays.
natural_image
Hand pressing a button on a mechanical device (no visible text or symbols)Your machine has two drip trays (6 and 7).
- The small drip tray collects drips from the coffee nozzles but can be removed for preparations with tall glasses.
■ The large drip tray collects used water and overflows from the small drip tray. - The large drip tray is fitted with an overflow detection sensor.
- When it needs to be emptied, the request will be made on the screen.
■ The cover of this tray is necessary to avoid excessive condensation and water spills.

Caution: The cover and the grid can fall when you empty the drip tray.
- If the tray is dirty, clean it under running water. If the metal contacts are dirty, clean by scrubbing them under water. Wipe the metal contacts dry before putting them back in the machine.
- The drip trays will be separated when you empty them. Avoid spilling water as much as possible on the metal contacts located at the end of the drip tray.
- If the machine asks you to empty the drip tray when it is empty, check whether the metal contacts at the back of the drip tray are clean and thoroughly dry.
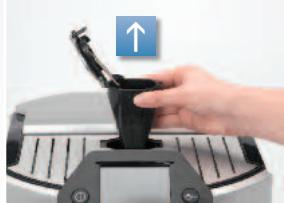
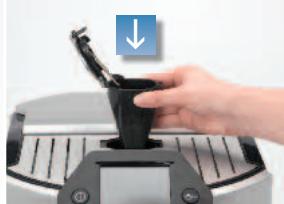
■ Adjusting the coffee nozzle height
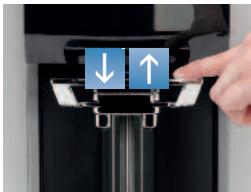
natural_image
Close-up of a hand pressing down and up a blue directional arrow on a device (no text or symbols visible)If using a mug: Caffe latte glass\* without the small drip tray
natural_image
Close-up of a glass being poured into a machine (no visible text or symbols)* Caffe latte glass not supplied
Your machine is supplied with two cups only which can be used for cappuccino or a caffe latte.

FIRST USE

Danger: Connect the appliance to an earthed mains socket. Voltage 220 - 240V. Failure to do so means that you run the risk of fatal injury due to electricity! Respect the safety guidelines (see section “Safety guidelines”).
INSTALLING THE APPLIANCE
Place your machine on a stable, flat, heat-resistant surface away from water splashes and sources of heat. Ensure that the location chosen is sufficiently well ventilated, as the appliance gives off heat. Please do not place the appliance on surfaces such as marble. Remove the protective films from the display and grids.
3.1 Before first use
Before using the appliance for the first time, check the hardness of your water so that you can set the appliance accordingly. This operation should also be carried out when you use your machine in a place where the hardness of the water is different or if you notice a difference in the hardness of the water. To check the water hardness, use the stick supplied with your machine or contact your local water authority.
Measuring the water hardness
Fill a glass of water and immerse the stick in it for 5 seconds. Wait for a minute before reading the water hardness. You will be asked for the hardness class observed (from 0 to 4) during the initial setup of the machine. The red zones on the stick indicate the degree of hardness: class 0 = no red zone, i.e. your water has a very low mineral content. Your water is more or less hard depending on the number of red zones. The details of the classes are given in the table below:
| Degree of hardness | Class 0 | Class 1 | Class 2 | Class 3 | Class 4 |
| ° dH | < 3° | >4° | >7° | >14° | >21° |
| ° e | < 3,75° | >5° | >8,75° | >17,5° | >26,25° |
| ° f | < 5,4° | >7,2° | >12,6° | >25,2° | >37,8° |
| Appliance setting | 0 | 1 | 2 | 3 | 4 |
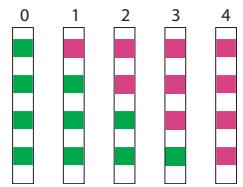
The water hardness classes for the initial setting of the appliance (section 3.2)
When your machine displays this screen to you, or when you have performed the water hardness test, you must indicate the number of red and green zones, using the touch screen. If the stick shows 2 red zones and 2 green zones, press the first two red squares and the last two green squares on the touch screen. The screen will then show an identical representation of your stick.
If you move home or if the quality of your water changes significantly, you can also reset the water hardness at any time.
3.2 Initial settings
When using the machine for the first time, you will be prompted to configure various settings. Follow the indications displayed on the screen. The aim of the following paragraphs is to give you a few visual cues.
3.3 Configuring the settings
Switch on the appliance by pressing the ON/OFF button (1). A welcome message is displayed on the screen, followed by the "Language" setting menu. After each selection, you can go back by using the symbol. Configure the other settings by following the indications on the screen.
The appliance will also require you to set the following parameters:
LANGUAGE
- Your machine has a touch screen.
- Select a display language by pressing the arrows until "Hello" appears in the language of your choice.
- Press OK to confirm.

HOTLINE NUMBER FOR COUNTRY OF RESIDENCE
- This number is associated with the country you have selected. However, you can change it and it may be changed at any time.

UNIT OF MEASURE
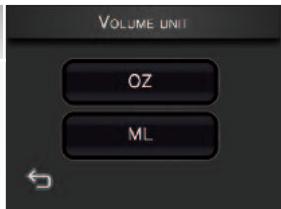
- You can select the volume unit of measure of your choice from oz and ml.
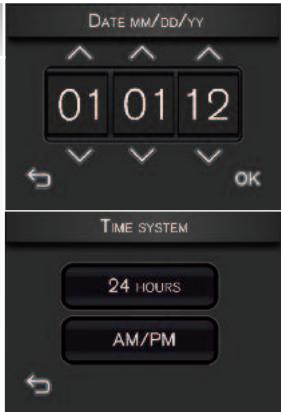
DATE AND TIME
- The correct date should normally be displayed automatically. If necessary, you can set the day, month and year using the arrows .
■ To adjust the time, press the required time format (24H or AM/PM).
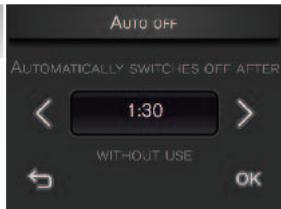
AUTO-OFF
- You can choose the length of time after which your appliance will switch off automatically: from 15 minutes to 2 hours, in 15-minute periods.
- Set automatic switch-off using the arrows < > .
- Press OK to validate.
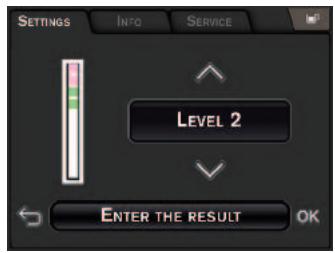
TEMPERATURE
- You can choose the temperature level of your drinks, from level 1 (lowest temperature) to level 3 (highest temperature).

WATER HARDNESS
- You must set your machine according to the water hardness in your area, between 0 and 4 (see P16 and P17).

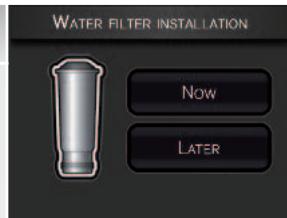
INSTALLING THE FILTER (NOW)
- Filter installation: press "Now".
- Open the right door of the machine and remove the water tank.
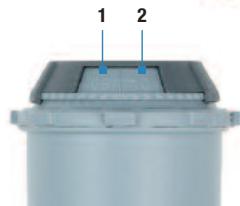
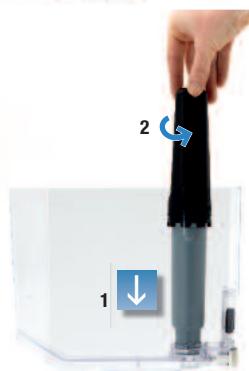
- Remove the filter cartridge and the fitting accessory from the packaging and assemble the cartridge fitting accessory as illustrated.
- Set the month when the cartridge is fitted (position 1 on the illustration, left side figure in the opening) by turning the grey ring located on the upper end of the filter. The month when the cartridge should be replaced is indicated in position 2 on the illustration.
- Attach the cartridge fitting accessory to the filter cartridge as shown in the illustration.
■ Lift the removable lid off the tank.
- Screw the filter cartridge into the screw thread at the bottom of the water tank: place the filter cartridge into the thread and screw in the cartridge. Remove the cartridge fitting accessory from the filter cartridge.
- Fill the water tank and then put it back in the machine.
- Close the right door. Your machine will fill the filter cartridge.
- Your machine will fill the filter cartridge with water. This will take a few seconds. You will then be asked to empty the larger drip tray.

Note: The filter cartridge must be replaced approximately every 50 litres of water or at least every 2 months. Your machine tells you how many days or litres remain before you need to change the cartridge. (see Section 7, “Info menu”)
natural_image
Close-up of a mechanical component with two labeled parts (1 and 2), no visible text or symbols beyond labels.
natural_image
Hand holding a black cylindrical object with two arrows indicating motion (no text or symbols)INSTALLING THE FILTER (LATER)
- Press "Later" and confirm.
■ Remove the water tank from inside the right door. - Fill the water tank and then put it back in the machine.
- Close the right door again.
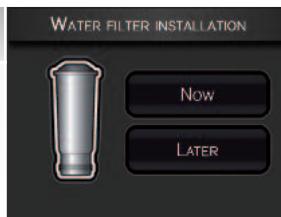

Important: You must remember to run the install function every time you change the cartridge as soon as you can.
INSTALLING THE CLEANING LIQUID
- Press "Now" to confirm or "Later" to do it later.
- Open the left door (15). Pull the container (19) and screw the bottle (18) onto the container.
- Replace the container back with the bottle and close the door.
- Do not screw in the bottle fully.
■ The bottle must be positioned in line with the drawer.

natural_image
Hand inserting a small electronic component into a device labeled 'KRUPS' (no additional text or symbols visible)
natural_image
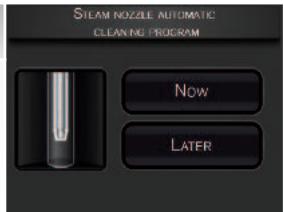
Close-up of a hand inserting a QR code into a KRUPS branded machine (no visible text or symbols on the device itself)AUTOMATIC STEAM NOZZLE CLEANING PROGRAMME
- Your machine will prompt you to start this programme.
- To do so, press "Now". The cycle will last about 5 minutes and the screen will display the progress of the cleaning.
PREHEATING, AUTOMATIC MAINTENANCE, RINSING
- The machine will start by preheating the circuits, then will carry out an automatic test and finally will ask you if the appliance needs to be rinsed or not.
- Place a container under the coffee nozzles and press YES if this is required. The rinsing procedure starts and stops automatically, after around 40 ml have passed through.
- The main drink selection menu is then displayed on the screen.

natural_image
Illustration of a red coiled spring inside a white frame, with an orange button labeled 'Pit-surface' (no other text or symbols)Note: If the first use cycle is interrupted before it has fully completed, you will be asked to save certain parameters again or to confirm certain settings.
Important: Ensure that all of the lids, covers and doors are closed and that all parts of the machine are fitted correctly before starting to prepare a drink.

PREPARING DRINKS
4.1 Information on recipes
■ Depending on the recipes chosen, your Espresso Automatic EA9000 will automatically adjust the quantity of ground coffee as well as the grinding fineness. We recommend that you use appropriately sized porcelain cups, ideally preheated. For your milk-based recipes, we recommend that you use thick glass cups.
Table of drinks and parameters modifiable by the user
| COFFEE RECIPES | Number of cups possible | Possible settings Volume (ml) | Possible settings Strength | ||
| RISTRETTO | 1 | 20 to 35 ml (per 5 ml) | Automatic | ||
| ESPRESSO | 1 | 40 to 70 ml (per 10 ml) | |||
| 2 x 1 | 2x 40 to 70 ml (per 10 ml) in a single cycle | Automatic | |||
| COFFEE | 12 x 1 | 80 to 180 ml (per 10 ml)2x80 to 180 ml (per 10 ml)in two cycles | |||
■ Cappuccino is made with following proportions:
1/3 milk + 1/3 coffee + 1/3 milk froth.
You can obtain a maximum volume of around 300 ml.
■ Caffe Latte is made with following proportions:
3/5 milk + 1/5 coffee + 1/5 milk froth.
You can obtain a maximum volume of around 260 ml.
Hot milk with frothing is made with following proportions: 3/5 milk + 2/5 milk froth.
| Hot milk with frothing | Final volume | Milk |
| Small | 180 ml | 100 ml |
| Medium | 240 ml | 150 ml |
| Large | 310 ml | 200 ml |
| Hot water | Final volume |
| From 20 ml to 250 ml |
4.2 Preparing coffee-based drinks with coffee beans
This section explains how to operate the machine using its features, taking the example of espresso and cappuccino.
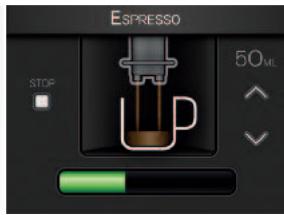
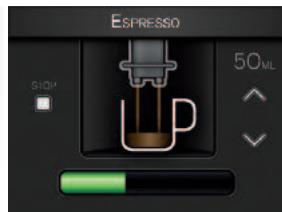
Espresso
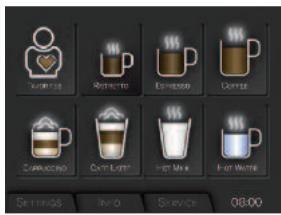
- Press the “Espresso” button on the touch screen.
- If the machine detects no beans when you request this recipe, it will ask you to fill the bean container (see section 2.3).
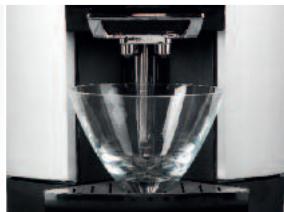
1 If the machine detects no water when you request this recipe, it will ask you to fill the tank. - Place the cup(s) under the coffee nozzles.
- You can lower or raise the coffee nozzle to suit the size of your cup(s).
2
- Possible settings
- You can prepare one or two cups with your appliance.
- Choosing the strength: The more beans you select, the stronger the preparation will be. You can modify the strength using the arrows on the left and right of the symbols (except in the case of double espressos).
- Choosing the volume: The screen displays the last volume setting associated with espresso. You can modify this volume using the arrows
on the left and right of the indicated value - Press the "Start" button on the touch screen to start the preparation.


3
■ Preparing an espresso
- The machine starts preheating, if required, and then grinds the beans, tamps the ground coffee and finally brews the coffee.
- You can adjust the coffee volume during the cycle using the up and down arrows.
- You can stop the preparation by pressing the "Stop" symbol or the On/Off button (1) or the ground coffee button (2).
■ Remove the cup when the screen shows: Your espresso is ready.
Cappuccino
Important: To prepare your Krups milk-based recipes to perfection:
- The recipes suggested were made with cold semi-skimmed UHT milk, straight from a refrigerator (7°C), and served in the cups supplied with the machine.
- You can also use (fresh) cold pasteurised or UHT skimmed, semi-skimmed or whole milk, straight from the refrigerator. What is important is that it should be fresh and at this temperature. Using special milks (microfiltered, raw, fermented, enriched, etc.) can produce less satisfactory results especially when it comes to the quantity and quality of the froth and therefore are not recommended.
- To guarantee the best results, we recommend that you follow the indicated proportions and use the cups supplied with your machine
- If you use a cup other than those supplied with the product, make sure you choose a cup suitable for the volume in the recipe (taking frothing into account).
- If your milk is at room temperature, reduce the pre-heating time (press >> during the recipe).
1
- Press the “Cappuccino” button on the touch screen.
- If the machine detects no beans when you request this recipe, it will ask you to fill the bean container (see section 2.3).
- If the machine detects no water when you request this recipe, it will ask you to fill the tank.
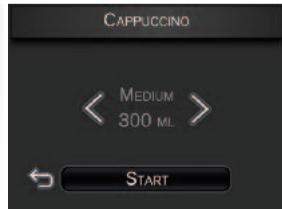
2
- Choosing the volume (small/medium/large).
- The screen shows the last volume setting associated with cappuccino (volume of milk + volume of coffee + volume of froth). You can modify this selection using the arrows on the left and right of the indicated value (small - medium - large).
- Press the "Start" button.
3
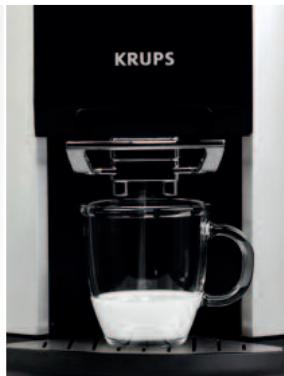
- Fill the cup with the volume of milk indicated.
■ Pour the quantity of milk indicated on the screen into the cup. - Press the OK button.

natural_image
Hand pouring liquid from a bottle into a glass of milk (no text or symbols visible)4
- Place the cup under the coffee nozzles.
- The cup must be placed close to the cleaning container, under the steam nozzle, at the back of the niche.
- However, do not press the cleaning container (11) with the cup; otherwise, it might break off.
- You can lower or raise the coffee nozzle to suit the size of your cup. The steam nozzle will descend just behind the coffee nozzles. Caution: the maximum height of the cup is defined by the coffee nozzles; do not tilt the cup to place it under the coffee nozzles.
■ To use a large cup (or mug), you might have to remove the small drip tray (6). - Press the "OK" button.
natural_image
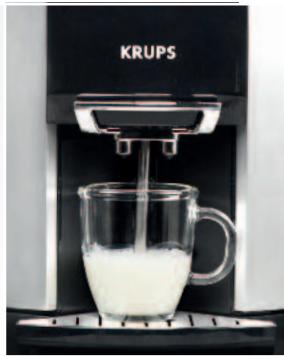
Close-up of a KRUPS coffee maker with a glass mug filled with milk, no visible text or symbols on the device itself.5
- Milk preheating phase: The milk is first preheated and during this time the beans are ground for preparing the coffee.
■ The nozzle moves forward and goes down into the milk - The nozzle tip must be submerged in the milk by 1 cm for perfect results. If this is not the case, the cup is not suitable for the volume chosen; stop the preparation using the "Stop" button and change the cup.
- If the milk used is at an initial temperature higher than 7°C, you can shorten the preheating time by pressing “>>” and move on to frothing to avoid “spoiling” the recipe.
natural_image
Close-up of a KRUPS milk dispenser with a glass mug filled with milk, no visible text or symbols on the device itself.!
Caution: Caution: Do not place your hand or any other obstacle in front of the nozzle that can hinder the movement of the nozzle.
Caution: If you do not set a cup in place or if you do so incorrectly, there may be risks of scalding.
If you press the Stop button, the entire recipe is stopped, and therefore the brewing will be cancelled. The unused ground coffee will then be ejected.
6
- Milk frothing phase: The milk is then frothed according to the chosen recipe.
- You can increase or decrease the frothing time. (Make sure the cup does not overflow).
- Press the “>>” button to stop the frothing and move on to preparing the coffee.

natural_image
Glass mug filled with white milk being pumped by a hand mixer machine (no text or symbols visible)!
Important: The production of steam does not stop immediately after you press the “>>” button (it takes 3 to 5 seconds to stop). Press the button sufficiently early to avoid overflows.
■ The nozzle moves up and draws back to return to its cleaning container.
7
■ Coffee dispensing phases.
■ The machine tamps the ground coffee and then brews it.
■ The volume is consistent with the chosen recipe.
■ However, you can modify the coffee volume during the cycle.
- You can stop the preparation by pressing the "Stop" button.
■ Remove the cup when the screen shows: Your cappuccino is ready.
- Add a little sugar or some chocolate chips/powder to taste. You must add the sugar only at the end of the preparation.
natural_image
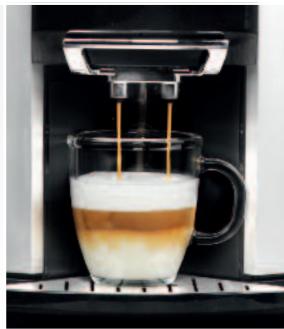
Mug of coffee being poured into a glass machine (no visible text or symbols)8
- Automatic rinsing of the nozzle.
- The nozzle is rinsed automatically after every milk-based preparation to guarantee the hygiene of the machine.
- You must wait for this rinsing to be complete before starting the next preparation.
natural_image
Close-up of a KRUPS printer with visible internal structure and base mount (no text or symbols on device)!
Important: Remember to take out the small drip tray when preparing a caffe latte.
4.3 Preparing coffee-based drinks with ground coffee
■ With your Espresso Automatic EA9000, you can prepare your drinks from ground coffee, if you prefer decaffeinated coffee, if you want variety, or if you have run out of beans.
!
Caution: The volume available under the lid is the maximum quantity of ground coffee permissible.
Please put the ground coffee only once into the funnel for each recipe. Do not tamp the ground coffee inside the funnel. If you open the lid and close it again without putting in ground coffee, the machine will perform a self-test. If an object falls into the machine, you must unplug it and take it to the after-sales service centre.
The ground coffee funnel is locked. To unlock it, press the ground coffee button.
ANY DAMAGE CAUSED BY INTRODUCING AN EXCESSIVE QUANTITY OF GROUND COFFEE WILL NOT BE COVERED BY THE GUARANTEE.
Espresso via the “ground coffee menu”
This section describes how the recipes function when you use ground coffee via the ground coffee funnel, taking the example of espresso. The other recipes are similar. Just follow the instructions on the different screens.
1
- Press the ground coffee button.

natural_image
Close-up of a hand pressing down on a black KRUPS digital kitchen appliance (no visible text or symbols on the device itself)2
- The ground coffee funnel is unlocked.
- Press the “Espresso” button on the touch screen.
- If the machine detects no water when you request this recipe, it will ask you to fill the tank.

3
- Open the ground coffee funnel lid.
- If you notice moisture inside the funnel, it is recommended that you wipe it dry.
natural_image
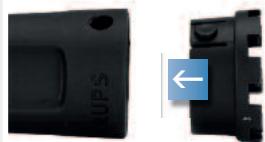
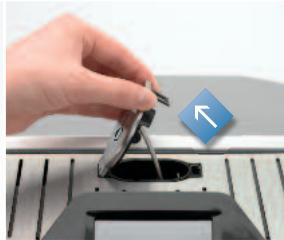
Hand inserting a small object into a device component, with a blue arrow symbol indicating direction (no text or symbols present)4
- Use the coffee spoon (20) in the left door.
natural_image
Close-up of a hand inserting a black component into a KRUPS-branded digital device (no visible text or symbols on device body)5
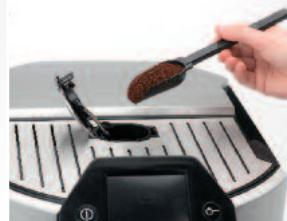
- Introducing the ground coffee.
■ Pour the ground coffee into the funnel.
■ Use only one spoon of ground coffee for each recipe.
■ Close the ground coffee funnel lid.
■ The funnel is then locked by the machine.
natural_image
Close-up of a hand pouring a brown granular substance from a black spoon into a digital kitchen appliance (no visible text or symbols)6
- Choosing the volume.
- Press the "Start" button.

7
- Preparing coffee.
■ The machine tamps the ground coffee and then brews it. - You can stop the preparation by pressing the "Stop" button.
4.4 Preparing other drinks: hot milk with or without froth, and hot water
Hot milk with frothing
1
- Press the "Hot Milk" button on the touch screen.
- If the machine detects no water when you request this recipe, it will ask you to fill the tank.
2
- Choosing: with or without froth.
- Check the "Frothing" box if you want froth in addition to hot milk.
- When you choose a milk recipe “without frothing”, there can still be a very fine layer of froth.
- Press the "Start" button to start the preparation.
- Select the volume (small/medium/large).
3
- Fill the cup with the volume of milk indicated on the screen and place it under the coffee spouts.
- The cup must be placed close to the cleaning container, under the steam nozzle, at the back of the niche.
- However, do not press the cleaning container (11) with the cup; otherwise, it might break off.
- You can lower or raise the coffee nozzle to suit the size of your cup. The steam nozzle will descend just behind the coffee nozzles. Caution: the maximum height of the cup is defined by the coffee nozzles; do not tilt the cup to place it under the coffee nozzles.
■ To use a large cup (or mug), you might have to remove the small drip tray (6). - Press the "OK" button.
natural_image
Close-up of a KRUPS milk tea maker with glass mug and white liquid, no visible text or symbols on the device itself.4
- Milk preheating phase.
■ Milk frothing phase: the milk is then frothed according to the chosen recipe.
natural_image
Glass mug filled with milk being processed by a digital cream machine (no text or symbols visible)
natural_image
Glass mug filled with milk being processed by a hand mixer machine (no visible text or symbols)5
- The nozzle moves up and draws back to return to its cleaning container.
■ Remove the cup when the screen shows: Your milk is ready.
■ Rinsing the nozzle. - The nozzle is rinsed automatically. You must wait for this rinsing to be complete before starting the next preparation.
natural_image
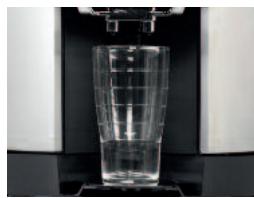
Mechanical testing setup with a vertical cylindrical component mounted on a base (no visible text or symbols)Hot water
1
- Press the "Hot water" button on the touch screen.
- If the machine detects no water when you request this recipe, it will ask you to fill the tank.

2
- Choosing the volume.
- The screen displays the last volume requested. You can modify this volume using the arrows on the left and right of the indicated value.

3
- Place your cup under the coffee nozzles.
- To use a large cup (or mug), you must remove the small drip tray. Make sure that the cup fits under the coffee nozzles without interference.
- The cup must be placed close to the cleaning container.
- Caution: use a cup that matches the volume of the recipe. The maximum height of the cup is defined by the coffee nozzles; do not tilt the cup to place it under the coffee nozzles.
- Caution: Do not press the cleaning container (11) with the cup; otherwise, it might break off.
natural_image
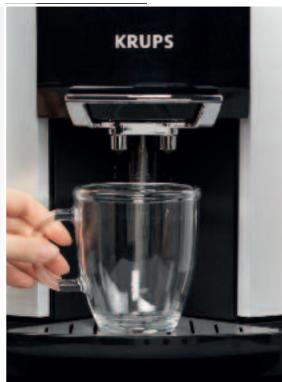
Hand pouring liquid into a glass mug using a KRUPS water dispenser (no visible text or symbols on the device)4
- Press OK. The steam nozzle then comes out of its cleaning container to stop just above your cup.
- You will need to modify the steam nozzle position using the + and - symbols according to your convenience. If the steam nozzle is too high from the bottom of the cup, there is a risk of splashing. Caution: The nozzle must not touch the bottom of the cup either.
- Press the OK button on the touch screen.
natural_image
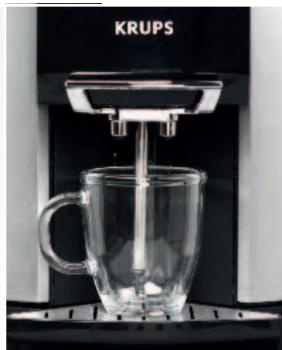
Close-up of a KRUPS coffee maker with glass mug and metal stand (no visible text or symbols)5
- Dispensing hot water through the steam nozzle.
- If necessary, the machine goes into preheating mode, then begins to dispense hot water.
- You can modify the volume of your preparation using the arrows on the left and right of the indicated value.
- Press "Stop" to stop the recipe.
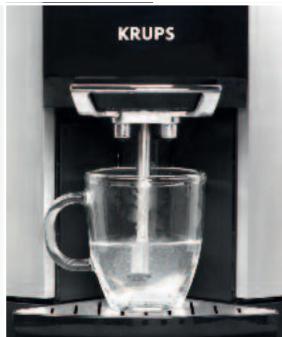
natural_image
Product photo of a KrUPS water dispenser with glass mug and water inside (no visible text or symbols)
Important: The production of hot water does not stop immediately after you press the "Stop" button (it takes 3 to 5 seconds to stop). Press the button sufficiently early to avoid overflows.

"FAVOURITES" MENU

The “Favourites” menu on your Krups Espresso Automatic Series EA9000 allows you to save your favourite recipes and to customise them to your tastes and habits. You can create up to 8 profiles, which can contain up to 8 recipes each. The screens will guide you very intuitively through this entire menu. This section aims to explain the various features this programme offers you, taking the example of espresso.
■ Customisable recipes are those in the main menu (see page 21).
The following criteria can be customised, depending on the recipes: volume of coffee, coffee strength, coffee temperature, volume of milk, preheating time and milk frothing time.
STEPS AND RECIPE SETTINGS IN THE "FAVOURITES" MENU
| RECIPES | STEP 1 | STEP 2 | STEP 3 |
| Ristretto | Choice of volume | Confirm the name | |
| Espresso | Choice between 1 or 2 cups | 1.Volume selection2.Coffee strength (3)3.Temperature (3) | Confirm the name |
| Coffee | Choice between 1 or 2 cups | 1.Volume selection2.Coffee strength (3)3.Temperature (3) | Confirm the name |
| Cappuccino | 1.Volume of cold milk2.Frothing time** | 1.Coffee volume2.Coffee strength (3) | Confirm the name |
| Caffe Latte | 1.Volume of cold milk2.Preheating time*3.Frothing time** | 1.Coffee volume2.Coffee strength (3) | Confirm the name |
| Hot milk | 1.Choice of frothing or not | 1.Volume of cold milk2.Preheating time3.Frothing time** | Confirm the name |
| Hot water | Choice of volume | Confirm the name |
* Allows you to increase the temperature of your recipe.
** Allows you to increase the proportion of froth in your recipe.
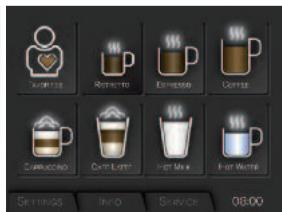
- To enter the “Favourites” menu, press the corresponding visual in the main menu.
■ Before creating customised recipes, you must create a user profile.
CREATING A PROFILE
1
- The first time you go to the “Favourites” menu, your machine will prompt you to create a new profile. Press the OK button.
- During subsequent uses, press the profile.
icon to create a new
icon to create a new


2
- Then enter the name of your profile using the alphabetic keypad displayed on the screen and confirm by pressing OK.

3
- You must then select a colour for your profile. Choose it and confirm by pressing OK.

4
- Your profile will then appear in the Favourites menu. You can associate up to 8 recipes with it. When you press the profile button, you will access the list of recipes associated.

NB: At any time, you can:
- Create a new profile by pressing the + button
- You must then repeat the same operations, i.e. enter the name and choose the colour.
-
Modify the profile characteristics by pressing the (Change) button.
-
Choose the profile you want to modify
- Modify the name entered
- Modify the colour
- Confirm by pressing OK.
- Delete one or more profile(s) by pressing the (Delete) button.
- Choose the profile(s) you want to delete
- Confirm by pressing the OK button.
CREATING A RECIPE
Example of espresso
| 1 | After creating the profile, you can associate a recipe with this profile by pressing the + button.Several recipes are then displayed on the screen. Choose the Espresso recipe, in this case. | 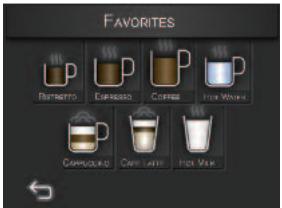 |
| 2 | Choosing the number of cups: Choose 1 or 2 cups by pressing the appropriate box. | 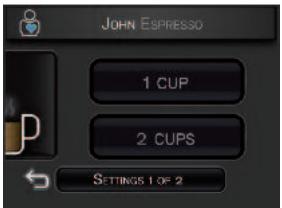 |
| 3 | Choosing the coffee settings: Choose the volume (40 to 70 ml), strength (1 to 3 beans) and temperature (levels 1 to 3) of the espresso you want to store. Confirm by pressing OK. | 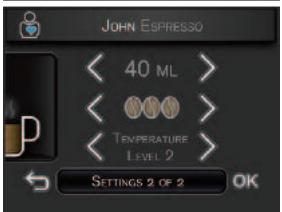 |
| 4 | By default, a name is given to your Espresso recipe. You can decide to keep it (by pressing OK) or modify it (by pressing Change).If you modify it, the indication Espresso will be present in the name and you can add a suffix using the keypad. Then press OK to confirm the new name. |  |
| 5 | Your recipe is then saved with its new name and appears in the screen showing the recipes of the user profile in question. |  |
NB: At any time, you can:
- Create a new recipe by pressing the + button
- You must then repeat the same operations of choosing the recipe settings.
- Modify the recipe characteristics by pressing the (Change) button.
- Choose the recipe you want to change
- Modify the recipe settings
- Modify the recipe name
- Confirm by pressing OK.
- Delete one or more recipe(s) by pressing the (Delete) button.
- Choose the recipe(s) you want to delete
- Confirm by pressing the OK button.

SETTINGS
The “Settings” menu allows you to make changes to optimise your ease of use and suit your preferences. Below are the main settings available. Just follow the instructions on the different screens in the display.
- You can access the "Settings" menu from the main menu by pressing the "Settings" tab.
- You can modify: the language, brightness, date and time, volume unit; but also water hardness, coffee temperature and auto-off mode.
- To go back to the recipe sequence, press the small cup at the top right-hand of the screen.
■ To quit the Settings menu: press the Settings tab. - Among the possible settings, you will find language, date and time, unit of measure, water hardness and coffee temperature.
1
- Brightness
- Increase or decrease the brightness of the screen of your appliance.
- Press OK to confirm.

2
- Auto-off
- Decide how long your appliance must remain turned on before turning off automatically; between 15 minutes and two hours, in steps of 15 minutes.
- Press OK to confirm.
3
- To quit the settings menu
- Go back to the Settings menu by pressing the symbol to the main menu.
- Press OK to confirm.
. Then press the Settings tab to return


INFO
The “Info” menu provides information about your use and about certain stages in the life of your machine. It also informs you about the maintenance of your machine. Below are the main details available. Just follow the instructions on the various screens in the display.
- You can access the "Info" menu from the main menu by pressing the "Info" tab.
- You can then view all the information available on time limits in terms of: rinsing, descaling, replacing the filter, cleaning the nozzles, cleaning the coffee circuit, changing the cleaning liquid and preparation cycles.
■ To quit the Info menu: press the Info tab.
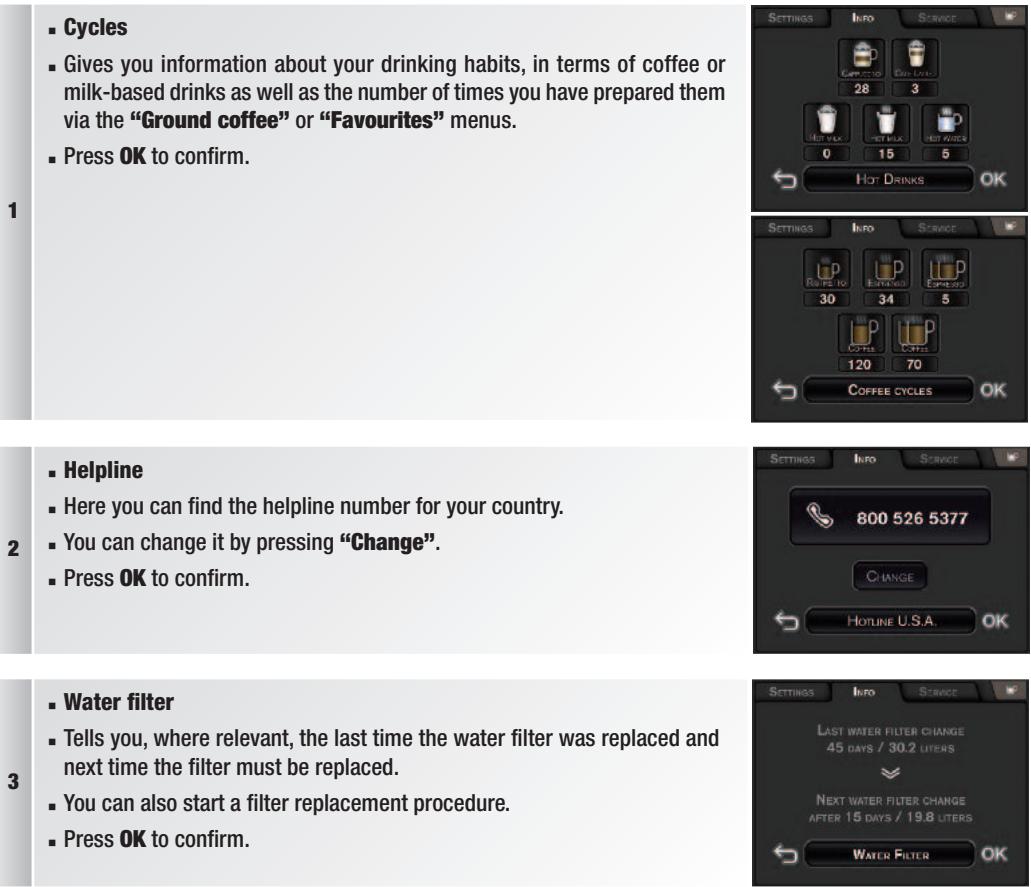
- Cycles
- Gives you information about your drinking habits, in terms of coffee or milk-based drinks as well as the number of times you have prepared them via the “Ground coffee” or “Favourites” menus.
- Press OK to confirm.
1
- Helpline
■ Here you can find the helpline number for your country. - You can change it by pressing "Change".
- Press OK to confirm.
3
- Water filter
- Tells you, where relevant, the last time the water filter was replaced and next time the filter must be replaced.
- You can also start a filter replacement procedure.
- Press OK to confirm.
4
■ Rinsing
- Gives you the number of rinsing cycles already carried out by the machine.
- Press OK to confirm.

5
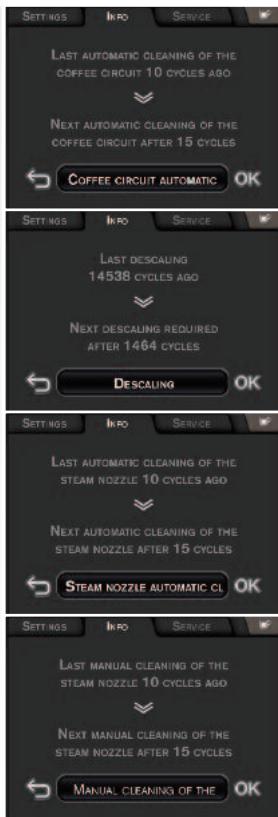
- Cleaning the coffee circuit – Descaling
- Tells you the number of brewing cycles performed since the last cleaning/descaling and the number of cycles that can be performed before the next descaling.
- You can also start a coffee circuit cleaning programme.
- Press OK to confirm.
- Automatic/manual cleaning of the steam nozzle
- Tells you the number of brewing cycles performed since the last automatic/manual cleaning of the steam nozzle and the number of cycles that can be performed before the next automatic cleaning of the steam nozzle.
- You can also start up an automatic/manual programme for cleaning the steam nozzle.
- Press OK to confirm.
6
- Cleaning liquid
- Tells you the number of cycles carried out since the last replacement of the cleaning liquid bottle and the number of cycles possible before the next replacement of the cleaning liquid bottle.
- You can also start a cleaning liquid bottle replacement programme.
- Press OK to confirm.


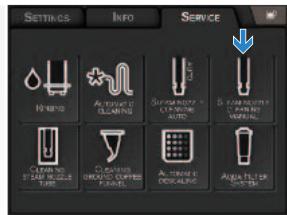
MAINTENANCE AND CLEANING
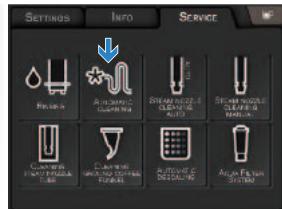
8.1 Maintenance menu
■ Press the Maintenance tab to access the Maintenance menu.
■ Automatic cleaning of the steam nozzle
The machine can automatically clean the nozzle on your request, or automatically.
Automatic cleaning is required depending on the number and type of milk recipes prepared.
Below are the main steps in this automatic cleaning when requested by the user. Otherwise, just follow the instructions on the screens displayed by the machine.
1
- You can access the “Maintenance” menu from the main menu by pressing the “Maintenance” tab.
- Press the “Automatic cleaning of the nozzle” button on the touch screen.
■ NB: The cleaning cycle must not be interrupted. - To quit the “Maintenance” menu, press the “Maintenance” tab.
- If necessary, the machine will ask you to replace the cleaning liquid bottle.
2
- Press Start.
(if you do not do so immediately, you will return to the initial screen).
■ The machine starts by rinsing the nozzle.
■ The nozzle comes out of its cleaning container. - The cleaning liquid is introduced automatically into the nozzle cleaning container.
■ The machine mixes water with the cleaning liquid.
■ Then, the machine cleans the nozzle by soaking it in this mixture.
■ The nozzle is then rinsed twice with water.
■ The cleaning cycle is finished
natural_image
Close-up of a KRUPS printer with visible internal structure and base mount (no text or symbols on device)■ Manual cleaning of the steam nozzle
The machine can ask you to clean the nozzle manually or can clean it on your request. Manual cleaning is requested depending on the number and type of milk recipes prepared.
Below are the main steps in this manual cleaning of the nozzle when requested by the user. Otherwise, just follow the instructions on the screens displayed by the machine.
1
- You can access the “Maintenance” menu from the main menu by pressing the “Maintenance” tab.
- To clean the nozzle and its container, you must follow the sequence shown in the Maintenance tab.
- Failure to follow this sequence may damage the system.
- Press the “Manual cleaning of the nozzle” button on the touch screen.
- To quit the “Maintenance” menu, press the “Maintenance” tab.
2
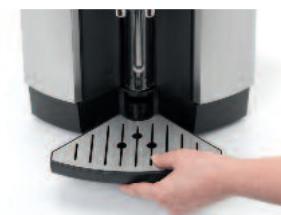
- The nozzle comes out of the cleaning container.
- You can clean all of the parts of the machine located behind the coffee nozzle.
■ Remove the two drip trays.
■ Empty and clean them.
■ The nozzle moves forward and slightly downward.

natural_image
Pure mechanical assembly diagram without any text, numbers, or symbols3
natural_image
Hand pressing down on a mechanical device with a handle (no visible text or symbols)4
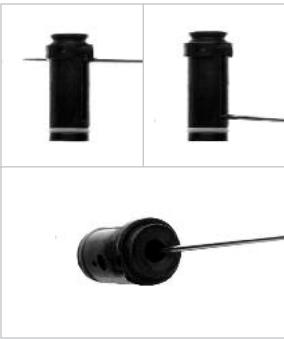
- Unscrew the nozzle tip (10) with the steam nozzle (9).
- Do not remove the tip seals, as this may damage them and affect the frothing performance.

natural_image
Hand inserting a USB into a digital device (no visible text or symbols)
Caution: Risk of scalding while unscrewing; the temperature of the nozzle can be high ( >50^ ).
5
- Clean the three holes on the nozzle tip using the pin supplied for this purpose with the Welcome Pack. You must fully separate the two parts to clean them properly.
- Do not wash the tip in the dishwasher.
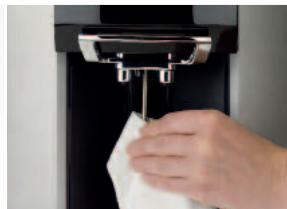
■ Caution: clean the tip properly. - Press the "OK" button.
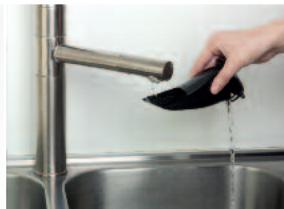
natural_image
Three black cylindrical objects with connecting wires, shown from different angles (no text or symbols visible)- The steam tube moves down.
- You can thus clean it properly with a damp cloth (you can use a little washing-up liquid, but rinse it thoroughly). The steam tube cannot be dismantled.
-
Press the "OK" button. The steam tube moves up so that the nozzle tip and the nozzle can be refitted.
-
Re-screw the nozzle with the tip onto the steam tube.
- Press the "OK" button.
- The steam nozzle assembly moves up and stops above the cleaning container.
natural_image
Close-up of a hand cleaning a white cloth on a black industrial machine (no visible text or symbols)
natural_image
Hand holding a metallic mechanical component, no visible text or symbols- Cleaning the steam nozzle cleaning container (11).
- Press YES to the question: "Do you want to clean your cleaning container?" if you want to clean it.
- Press the top of the container to remove it. Clean it under running water.
- To put the container back, first position the lower part and then press the upper part: you should hear a “click”.
- Press the "OK" button.
natural_image
Close-up of a hand pressing down on a mechanical device with a blue arrow pointing to the handle (no visible text or symbols)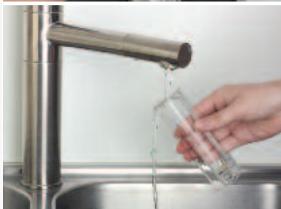
natural_image
Hand pouring liquid into a glass bottle from a stainless steel kitchen faucet (no text or symbols visible)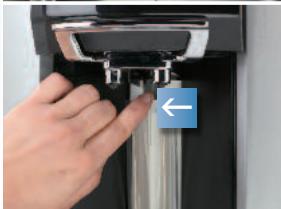
natural_image
Close-up of a hand pressing down on a mechanical device with a blue arrow pointing to the button (no visible text or symbols)- Replace the two drip trays (see visuals p. 13).
■ The manual steam nozzle cleaning cycle is finished.
■ Press OK to confirm and quit.

Caution: The manual cleaning of the nozzle and the cleaning container must be carried out in this sequence: If not, you risk damage to the steam nozzle assembly, malfunction or breakage.
■ Cleaning the steam nozzle cleaning container
- You can access the “Maintenance” menu from the main menu by pressing the “Maintenance” tab.
- To clean the nozzle and its container, you must follow the sequence shown in the Maintenance tab.
- Failure to follow this sequence may damage the system.
- Press the “Cleaning container” button on the touch screen.
- Then follow the instructions on the screen, referring to the visuals in step 9 in the manual cleaning of the nozzle until you see the screen on the right.
■ This cleaning cycle is finished.
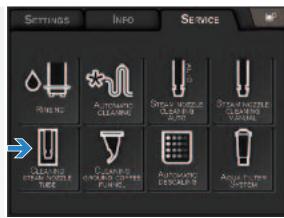
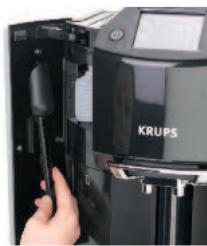
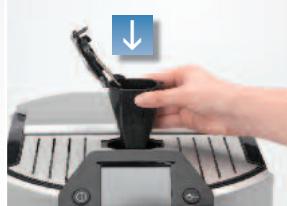
■ Cleaning the ground coffee funnel

Caution: Do not force the funnel open; it is always locked when the recipes are prepared.
1
- You can access the “Maintenance” menu from the main menu by pressing the “Maintenance” tab.
- You cannot clean the ground coffee funnel without going through the Maintenance tab. Always follow the instructions given on the screen.
- Press the “Cleaning the ground coffee funnel” button on the touch screen.
■ The ground coffee funnel lid is then unlocked. - To quit the “Maintenance” menu, press the “Maintenance” tab.
2
- Open the ground coffee funnel lid.
■ Remove the ground coffee funnel.
natural_image
Hand holding a black device with a blue upward arrow icon (no text or symbols on the device itself)3
- Clean the ground coffee funnel.
- You can clean it with the brush or under running water. Caution: Dry it thoroughly. It must be dry when you replace it.
natural_image
Person pouring liquid from a black cloth into a stainless steel kitchen sink (no text or symbols visible)4
- Replace the ground coffee funnel.
- Close the funnel lid. The funnel lid is then locked. If the machine asks you whether you have taken out the funnel: press the OK button on the touch screen.
- Cleaning of ground coffee funnel completed.
natural_image
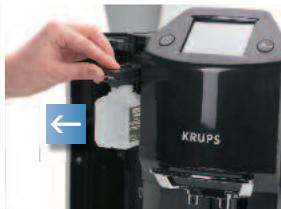
Hand placing a black object into a machine, with a downward arrow indicating action (no text or symbols visible)■ Changing the cleaning liquid bottle
The machine can request the replacement of the cleaning liquid bottle, but you can also make this request.
1
- You can access the “Maintenance” menu from the main menu by pressing the “Maintenance” tab.
- You must always use this programme so that the counters can be updated.
- Press the “Changing the cleaning liquid bottle” button on the touch screen.
- To quit the “Maintenance” menu, press the “Maintenance” tab.

2
- Open the left door (15).
■ Pull out the drawer (19) of the cleaning liquid bottle. - Unscrew the bottle to be changed. Use only Krups bottles. The use of other products that are incompatible or not approved by Krups will invalidate the guarantee.
- Remove the cap from the new bottle of cleaning liquid then screw it onto the drawer without turning too tightly (maximum one and a half turns) (19).
- Screw in the new bottle. Place the liquid bottle in the axis of the drawer.
■ Screw at least two turns.
natural_image
Close-up of a hand inserting a small object into a KRUPS-branded digital device (no visible text or symbols on the device itself)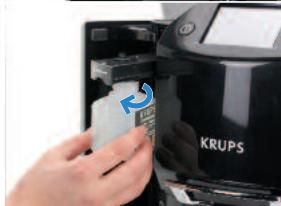
natural_image
Close-up of a hand inserting a white plastic bag into a KRUPS-branded printer (no visible text or symbols on the device itself)3
- Push the drawer to the back.
- Close the door.
- Press OK.
- This programme is finished.
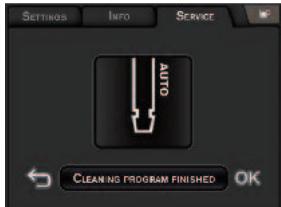
8.2 Automatic cleaning programmes
■ Automatic cleaning programme of the coffee circuit
A message on the screen will indicate when a cleaning programme needs to be run for the appliance. Cleaning is required around every 360 preparations.
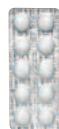
To run this cleaning programme, you will need a recipient with a capacity of at least 0.6 litres which can fit underneath the coffee nozzle, and a KRUPS cleaning tablet (two of which are supplied in the Welcome Pack).
The automatic cleaning programme has three phases: one cleaning cycle and two rinsing cycles. It lasts around 20 minutes.
Protect your worktop from any splashes during the cleaning and descaling cycles, especially if it is made of marble, stone or wood.

Caution: You are not obliged to carry out the cleaning programme immediately the appliance requests it, but it must be carried out reasonably soon.
Only use KRUPS cleaning tablets otherwise the guarantee will not cover any material damage caused by the use of other brands of tablets. Cleaning tablets are available from your KRUPS After-Sales Service Centre.

Caution: To respect the guarantee conditions, the cleaning cycle must be carried out when the appliance requests you not to postpone it further.
Here are the main steps in this programme. Otherwise, just follow the instructions on the screens displayed by the machine.
1
- You can access the “Maintenance” menu from the main menu by pressing the “Maintenance” tab.
- Press the “Cleaning coffee circuit” button on the touch screen.
- To quit the “Maintenance” menu, press the “Maintenance” tab.
2
- Empty the used coffee collector, remove and empty the drip trays, and fill the water tank.
3
- Open the ground coffee funnel lid.
■ Remove the ground coffee funnel. - Clean the ground coffee funnel. You can clean it with the brush or under running water. Caution: Dry it thoroughly. It must be dry when you replace it.
natural_image
Hand holding a black mechanical device with an upward arrow indicator (no text or symbols on the device itself)4
- Put the funnel back without closing the lid.
natural_image
Hand holding a small black device with a blue arrow pointing to it, next to a control panel (no visible text or symbols)5
- Put the cleaning table into the funnel.
- Close the funnel lid. You must run this programme right to the end. The funnel is locked.
- Press the OK button on the screen.
natural_image
Hand inserting a small black object into a device (no visible text or symbols)6
- Place a recipient with a capacity of at least 0.6 litres under the coffee nozzles and press OK.
- Follow the instructions on the screen. Once the cleaning cycle is complete, empty the recipient and put it back under the coffee nozzles and fill the tank again with water. After the second rinsing, empty the recipient and the drip trays.
natural_image
Close-up of a glass funnel being heated by a vertical tube, mounted on a black stand (no visible text or symbols)
Caution: Make sure that the cleaning programme is completely finished.
If the cleaning programme is interrupted by a power cut or accidental unplugging of the machine, it must be started again from the beginning. A new cleaning tablet will be required in this case. The programme must be started again completely in order to rinse the water circuit and eliminate any traces of harmful cleaning products.
■ Automatic descaling programme of the steam circuit
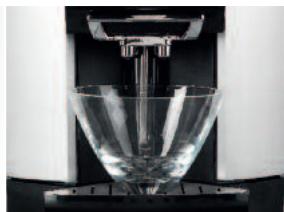
A message on the screen will indicate when a descaling programme needs to be run for the appliance. The frequency of this programme depends on the quality of the water used (the harder the water, the more often the appliance has to be descaled) and on whether a Claris Aqua Filter System filter is used or not. To run the descaling programme, you will need a recipient with a capacity of at least 0.6 litres that may be placed underneath the coffee nozzles and the steam nozzle, and a KRUPS descaling sachet (F 054 – a 40 g sachet is supplied in the Welcome Pack). The automatic descaling programme has three phases: one descaling cycle and two rinsing cycles. The programme lasts approximately 22 minutes.

Caution: You are not obliged to carry out the descaling programme immediately the appliance requests it, but it must be carried out reasonably soon. Only use KRUPS descaler sachets supplied in the Welcome Pack; otherwise the guarantee will not cover any material damage caused by the use of other brands of sachets. Descaler sachets are available from your KRUPS After-Sales Service Centre.

Caution: To respect the guarantee conditions, the cleaning cycle must be carried out when the appliance requests you not to postpone it further.
1
- When the machine requests descaling, confirm to start the programme.
■ Empty the used coffee collector, take out and empty the drip trays.
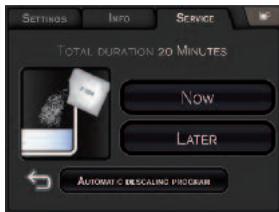
- Remove the water tank.
- If you use the Krups Claris Aqua Filter System filter cartridge, remove it before the descaling operation.
■ Empty the water tank and then fill it with water up to the CALC mark.
■ Pour the descaler into the water tank and put it back. - Use a large spoon with a long handle to mix the water in the tank or remove the water tank and carefully shake it from left to right until the descaler is fully dissolved.
natural_image
Close-up of a KRUPS industrial machine with a blue arrow pointing to a door (no visible text or symbols on the device itself)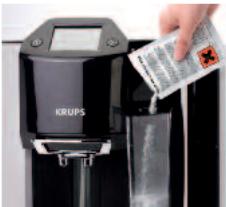
2
3
- Place a recipient with a capacity of at least 0.6 litres under the coffee nozzles and press OK.
■ The descaling phase will start.
natural_image
Close-up of a glass beaker with a vertical tube inserted into it, no visible text or symbols4
- When the descaling is complete: Empty your recipient and put it back, then empty the water tank, rinse it well and fill it again.
■ The first rinsing will start.

natural_image
Hand pouring liquid into a glass bowl on a stainless steel kitchen sink (no text or symbols visible)5
- End of the first rinsing: Empty your recipient and replace it.
natural_image
Close-up of a glass funnel being poured into a black mold (no visible text or symbols)6
- End of the second rinsing and of the steam circuit descaling phase.
■ The nozzle returns to its cleaning container.
■ Refit the Claris Aqua Filter System filter, if necessary.
■ Empty your recipient and fill the water tank.
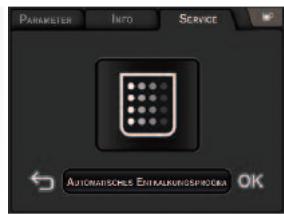

Caution: During the descaling or coffee circuit cleaning programmes, water can splash quite strongly. If required, place a paper towel on the drip tray.

TROUBLESHOOTING
If your machine is not operating correctly, try to resolve it by referring to this troubleshooting guide. If the problem persists in spite of this, contact our helpline (See details at end).
| PROBLEM / MALFUNCTION | PROBABLE CAUSES | CORRECTIVE ACTIONS |
| The machine displays a failure, the software hangs or your machine has a malfunction. | ■ Software problem. | ■ Turn off and unplug the machine. Remove the filter cartridge. Wait for 20 seconds and restart the machine.■ If the failure persists, note down the message on the screen and call the KRUPS customer service. |
| The appliance does not switch on when the ON/OFF button is pressed. | ■ Power failure or blown fuse.■ The mains plug is not pushed into the mains socket correctly or into the machine or the mains socket is faulty.■ The appliance is faulty. | ■ Check the fuses of your electrical installation.■ Check that the plug is correctly inserted into the socket or have the socket repaired.■ Have the appliance checked by a qualified technician. |
| You used pre-ground coffee and the machine does not make coffee. | ■ You have poured too much pre-ground coffee or the pre-ground coffee is too fine. | ■ Use a mixture for espresso coffee machines. |
| The espresso or coffee is not hot enough. | ■ The temperature of the coffee is not set high enough.■ The coffee cup is cold. | ■ Check the coffee temperature in the “Settings” menu.■ Programme your recipe using the “Favourites” function by increasing the temperature.■ Warm the cup by rinsing it with hot water before starting the preparation. |
| The coffee is too lightly coloured or too weak. | ■ There is not enough coffee in the coffee bean container.■ Too much coffee is prepared. | ■ Check that coffee is present in the container and that nothing is obstructing the sensor (coffee bean blocking in the front, etc.).■ Reduce the quantity of water in the coffee. |
| The coffee dispenses too slowly. | ■ The filter cartridge is clogged.■ The machine may need cleaning/descaling. | ■ Start a cleaning of the machine.■ Remove/replace the filter cartridge. |
| The coffee is not creamy. | · The machine may need to run a cleaning cycle.· The coffee is not fresh enough. | · Start a cleaning of the machine (see section 8).· Try using fresher coffee beans / grounds. |
| The coffee grinder makes a strange noise. | · Foreign bodies are inside the grinder. | · Check whether you can extract the foreign body using a tool. Unplug the machine before you do this.· Contact the KRUPS Customer Service. |
| No steam comes out of the nozzle. | · The nozzle or the nozzle support is blocked.· The water used is not suitable for making steam. | · Wash the steam nozzle manually (see section 8); clean and unblock each part.· Check that the steam nozzle is screwed on properly.· Empty the tank and remove the Claris cartridge temporarily.· Fill the water tank with mineral water with high calcium content (>100 mg/l) and carry out steam cycles (5 to 10) consecutively into a recipient until you get a continuous jet of steam. |
| There is not enough milk froth. | · The steam does not come out properly.· The milk is not cold enough. | · See paragraph above.· We recommend that you use cold pasteurised or UHT milk, freshly opened. |
| The milk froth is not fine enough. | · The steam does not come out properly.· The milk is not suitable. | · Check that the milk is fresh and cold.· Check that there is enough milk in the glass.· Wash the steam nozzle manually (see section 8); clean and unblock each part.· Check that the steam nozzle is screwed on properly.· We recommend that you use cold pasteurised or UHT milk, freshly opened. |
| PROBLEM / MALFUNCTION | PROBABLE CAUSES | CORRECTIVE ACTIONS |
| Nozzle cleaning does not take place properly. | No cleaning liquid.The milk used is not suitable. | Check that your preparation does not boil while heating or frothing.If it does, reduce the heating and/or frothing time.Check that the cleaning liquid bottle is not empty.Carry out a manual cleaning.We recommend that you use cold milk. |
| The water tank has been filled,but the warning message is still displayed on the screen. | The water tank is not fitted properly.The float at the bottom of the tank does not move freely.The water tank is scaled up. | Check and unblock the float if necessary.Reinstall the water tank properly until you feel some resistance.Rinse the water tank under running water and descale, if necessary. |
| The drip tray has been emptied,but the warning message is still displayed on the screen. | The metal contacts are dirty. | Clean and wipe the metal contacts at the back of the drip tray. |
| The used coffee collector has been emptied, but the warning message is still displayed on the screen. | The used coffee collector is not fitted properly.The used coffee collector has been fitted back too quickly. | Refit the used coffee collector.Wait for at least 8 seconds before refitting the empty collector. |
| A power failure occurs during the cycle. | The appliance is automatically reinitialised when it is switched back on. | |
| There is water underneath the appliance. | The drip tray is not correctly fitted or is overflowing. | Check that the drip tray has been fitted correctly and empty it if required. |

Note: Programming problems are often resolved by unplugging the appliance for about one minute and then plugging it in again.

Danger: Only a qualified technician is authorised to carry out repairs on the power cord and the 220 - 240V electrical system. Failure to respect this exposes you to fatal injuries due to the presence of electricity! Do not use an appliance that is visibly damaged!

TECHNICAL DATA
| Voltage: | 120V / 60Hz | Weight EA9 metal: | 11.5 kg |
| Power: | In operation: 1450 W | Used coffee collector | |
| Energy consumption: | On standby: 0 W | Small drip tray | |
| Water tank: | 1.7 l | Large drip tray | |
| Coffee bean container | 280 g | Cable length | |
| Pump pressure: | 15 bar | Ground coffee funnel capacity | 1 spoon or 6 grams |
| Dimensions (Height*Width*Depth): | 38.5 * 29.5 * 39.5 cm | ||

TRANSPORT
- Keep the original packaging to transport the appliance.
Before transporting or tilting the appliance, empty the used coffee collector, the bean container, the water tank and the drip trays and remove the cleaning liquid bottle to avoid spilling water or the cleaning or descaling product.

Caution: If the appliance is dropped without its packaging during transport, it is preferable to take it to an After-Sales Service centre to have it checked and avoid any risk of fire or electrical danger.

DISPOSAL OF WASTE
The symbol on the appliance or its packaging indicates that this product may not be processed as household waste. Therefore it must be taken to a waste collection centre for the recycling of electrical and electronic equipment. By sorting waste and disposing of old equipment correctly, you are helping to preserve the natural resources and preventing harmful consequences for the environment and people's health. To obtain more information on waste collection sites, please contact your retailer.

Note: Your appliance contains many materials that may be recycled or recovered.
natural_image
Exterior view of a modern stainless steel refrigerator with a button and side panel (no visible text or symbols)KRUPS
ESPRESSO AUTOMATIC
SERIE EA9000

natural_image
Product image of a KRUPS coffee maker with three smaller cups of different shades of orange and brown, displayed against a black background (no text or symbols visible on the devices themselves).WWW.KRUPS.COM

MISES EN GARDE IMPORTANTES
natural_image
Close-up of a black electronic device with two metallic components and a labeled component '7' (no text or symbols on the device itself)BIENVENUE
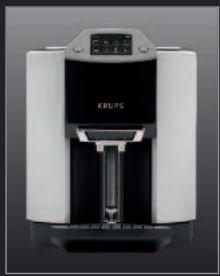
natural_image
Exterior view of a Krupp appliance (no visible text or symbols)Chère Cliente, cher Client,
natural_image
Five white ceramic glasses of varying sizes and shades against a black background, arranged horizontally (no text or symbols)QUELQUES CONSEILS D'EXPERT
natural_image
Close-up of a hand pressing a black electronic device on a keyboard (no visible text or symbols)natural_image
Close-up of a hand pouring coffee into a black open oven with food inside (no visible text or symbols)natural_image
Close-up of a KRUPS coffee maker with a hand pointing to it, showing its black interior and control panel (no visible text or symbols on the device itself)natural_image
Person washing a water bottle from a stainless steel kitchen sink (no text or symbols visible)natural_image
Close-up of a hand operating a KRUPS coffee maker with a blue arrow pointing to it (no text or symbols on the device itself)natural_image
Close-up of a hand operating the KROPS milk dispenser machine (no visible text or symbols)natural_image
Hand pressing down on a mechanical component with a blue arrow indicating downward motion (no text or symbols visible)natural_image
Hand pouring liquid into a stainless steel kitchen sink (no text or symbols visible)natural_image
Close-up of a hand pressing down on a mechanical component with a blue arrow indicator (no text or symbols visible)natural_image
Person pouring liquid from a black plastic bag into a stainless steel sink (no text or symbols visible)natural_image
Close-up of a hand pressing a black mechanical component with a blue arrow indicator (no text or symbols on the device itself)natural_image
Hand pressing down on a mechanical device with a blue arrow indicator (no text or symbols visible)natural_image
Close-up of a hand pressing down and up a blue directional arrow on a device (no text or symbols visible)natural_image
Close-up of a glass being poured into a machine (no visible text or symbols)INSTALLATION FILTRE (IMMÉDIATE)
natural_image
Close-up of a gray plastic container with two blue arrows pointing to top and side panels (no text or symbols)
natural_image
Close-up of a black electronic component with two blue square buttons and directional arrows, no visible text or symbols.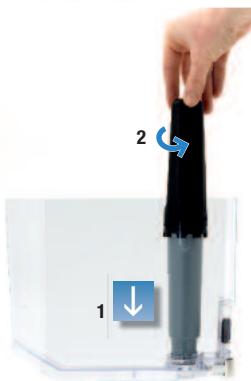
natural_image
Hand holding a black cylindrical object with blue arrow indicating rotation (no text or symbols)INSTALLATION FILTRE (DIFFÉRÉE)
natural_image
Hand inserting a small electronic component into a device labeled 'KRUPS' (no additional text or symbols visible)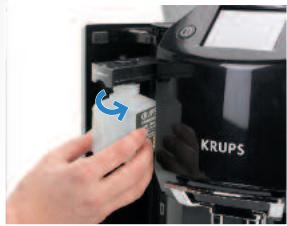
natural_image
Close-up of a hand inserting a QR code into a KRUPS branded machine (no visible text or symbols on the device itself)PROGRAMME AUTOMATIQUE DE NETTOYAGE DE LA BUSE
3
Cappuccino
2
natural_image
Hand pouring milk from a bottle into a glass of milk (no text or symbols visible)4
natural_image
Close-up of a KRUPS milk tea machine with glass mug and white powder, no visible text or symbols on the device itself.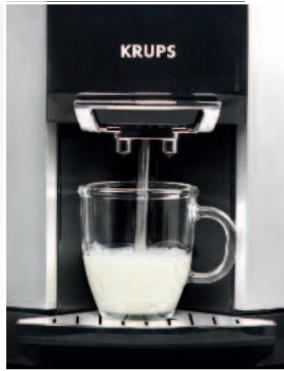
natural_image
Product photo of a Krups coffee maker with a glass mug filled with milk (no visible text or symbols)
natural_image
Glass mug filled with milk being dispensed into a machine (no visible text or symbols)6
natural_image
Mug of coffee being poured into a glass stand (no visible text or symbols)8
natural_image
Close-up of a 3D printing press machine with 'KRUPS' branding visible (no other text or symbols)natural_image
Close-up of a hand pressing down on a black KRUPS digital kitchen appliance (no visible text or symbols on the device itself)1
natural_image
Hand inserting a small object into a mechanical component, with a blue arrow symbol indicating direction (no text or symbols present)4

natural_image
Close-up of a hand inserting a black component into a KRUPS-branded machine (no visible text or symbols on the device itself)5
natural_image
Close-up of a hand pouring a brown granular substance from a black spoon into a digital kitchen appliance (no visible text or symbols)6
7
2
natural_image
Close-up of a KRUPS milk tea maker with glass mug and white liquid, no visible text or symbols on device or background4
natural_image
Glass mug pouring milk from a digital machine (no visible text or symbols)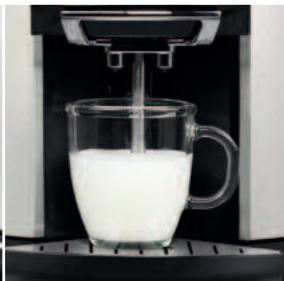
natural_image
Glass mug filled with milk being processed by a digital water dispenser (no visible text or symbols)5
natural_image
Mechanical testing setup with a cylindrical component mounted on a base (no visible text or symbols)Eau chaude
1
natural_image
Hand pouring liquid into a glass mug using a KRUPS machine (no visible text or symbols on the device)4
natural_image
Close-up of a KRUPS coffee maker with glass mug and metal stand (no visible text or symbols)5
natural_image
Product photo of a KrUPS water dispenser with glass mug and water inside (no visible text or symbols)
CRÉER UN PROFIL
1
3
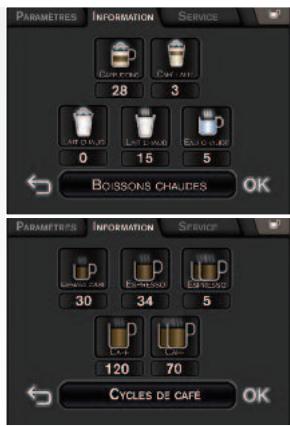
- Hotline
natural_image
Close-up of a KRUPS printer with metallic components and a central vertical shaft (no visible text or symbols)natural_image
Pure mechanical assembly diagram without any text, numbers, or symbols3
natural_image
Hand pressing a button on a mechanical device (no visible text or symbols)4
natural_image
Hand inserting a blue arrow into a black device (no text or symbols visible)
natural_image
Three black cylindrical objects with connecting wires, shown from different angles (no text or symbols visible)natural_image
Close-up of a hand cleaning a white cloth on a black industrial machine (no visible text or symbols)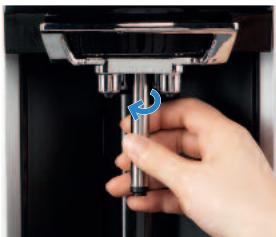
natural_image
Hand holding a mechanical component with a blue arrow indicating rotation (no text or symbols visible)natural_image
Close-up of a hand pressing a metallic component with a blue arrow pointing to it (no text or symbols visible)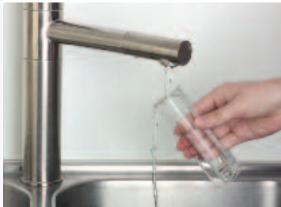
natural_image
Hand pouring liquid into a glass bottle from a stainless steel kitchen sink (no text or symbols visible)
natural_image
Close-up of a hand pressing down on a mechanical device with a blue arrow pointing to the button (no text or symbols visible)natural_image
Hand holding a black mechanical device with an upward arrow indicator (no text or symbols on the device itself)3
natural_image
Person pouring liquid from a black cloth into a stainless steel kitchen sink (no text or symbols visible)4
natural_image
Hand holding a black cup with a blue arrow pointing to it, next to a control panel (no visible text or symbols)natural_image
Close-up of a hand inserting a small object into a KRUPS-branded digital device (no visible text or symbols on the device itself)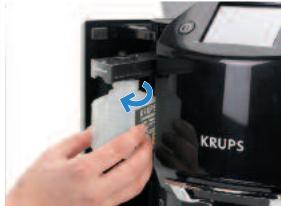
natural_image
Close-up of hands inserting a small white object into a black KRUPS printer (no visible text or symbols on device)3
natural_image
Hand holding a black mechanical device with an upward arrow indicator (no text or symbols on the device itself)4
natural_image
Hand holding a black mechanical device with a blue downward arrow indicator (no text or symbols on the device itself)5
natural_image
Close-up of a hand holding a small black object over a metallic tray (no visible text or symbols)6
natural_image
Close-up of a glass coffee machine with a straw and wooden stand (no visible text or symbols)
natural_image
Close-up of a KRUPS printer with a blue arrow pointing to the door (no visible text or symbols on the device itself)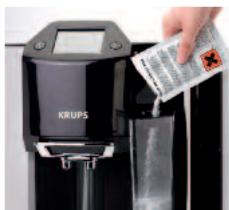
natural_image
Hand pouring liquid into a KRUPS digital water dispenser (no visible text or symbols)3
natural_image
Close-up of a glass beaker with a vertical tube inserted into it, no visible text or symbols4
natural_image
Hand pouring liquid into a glass bowl in a stainless steel kitchen sink (no text or symbols visible)5
natural_image
Close-up of a glass coffee maker with a straw cup, no visible text or symbols6
natural_image
Exterior view of a modern stainless steel refrigerator with a button and side panel (no visible text or symbols)KRUPS
ESPRESSO AUTOMATIC
SERIE EA9000

natural_image
Product image of a KRUPS coffee maker with three smaller cups of different shades of orange and brown, displayed against a black background (no text or symbols visible on the devices themselves).WWW.KRUPS.COM

natural_image
Close-up of a black electronic device casing with two metallic components and a blue indicator line labeled '7' (no text or symbols on the device itself)BIENVENIDA
natural_image
Exterior view of a KRUPS water dispenser (no visible text or symbols on the device body)natural_image
Five white ceramic cups of different types of beer, arranged horizontally against a black background (no text or symbols)ALGUNOS CONSEJOS DE EXPERTO
natural_image
Hand pointing at a digital display on a keyboard (no visible text or symbols)natural_image
Close-up of a hand pouring dark granular substance into a black oven with a side panel (no visible text or symbols)natural_image
Close-up of a hand inserting a Krups into a black KRUPS coffee machine (no text or symbols visible on the device itself)natural_image
Hand pouring liquid into a glass tank in a stainless steel kitchen (no text or symbols visible)natural_image
Close-up of a hand pressing a KRUPS-branded digital cream machine (no visible text or symbols on the device itself)natural_image
Close-up of a hand operating a KROPS coffee maker machine (no visible text or symbols)natural_image
Hand pressing down on a mechanical component with arrows indicating motion (no text or symbols visible)natural_image
Hand pouring liquid into a stainless steel kitchen sink (no text or symbols visible)natural_image
Close-up of a hand pressing down on a mechanical device component (no visible text or symbols)natural_image
Hand pouring liquid into a stainless steel kitchen sink (no text or symbols visible)natural_image
Close-up of a hand pressing a black mechanical component on a white surface (no text or symbols visible)natural_image
Hand pressing a button on a mechanical device (no visible text or symbols)natural_image
Close-up of a hand pressing down and up a blue directional arrow on a mechanical device (no text or symbols visible)natural_image
Close-up of a transparent glass beaker being processed by a machine (no visible text or symbols)natural_image
Top-down view of a gray plastic container with two labeled parts (1 and 2), no text or symbols present.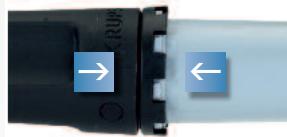

natural_image
Hand holding a black cylindrical object with blue arrow indicating rotation (no text or symbols)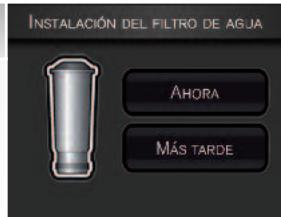
natural_image
Hand inserting a black card into a KRUPS printer (no visible text or symbols on device)
natural_image
Close-up of a hand inserting a QR code into a KRUPS printer (no visible text or symbols on the device itself)PROGRAMA AUTOMÁTICO DE LIMPIEZA DE LA BOQUILLA
2
natural_image
Hand pouring liquid from a white bottle into a glass mug (no text or symbols visible)4
natural_image
Close-up of a KRUPS milk tea machine with glass mug filled with milk, black tray visible (no text or symbols on device)5
natural_image
Product photo of a KRUPS milk dispenser with glass mug and straw (no visible text or symbols)
natural_image
Glass mug filled with milk being processed by a digital water dispenser (no visible text or symbols)
natural_image
Mint on a coffee machine with a glass mug filled with milk and a coffee maker using a pour-overer (no visible text or symbols)8
natural_image
3D printing press machine labeled 'KRUPS' (no additional text or symbols visible)natural_image
Modern KRUPS milk tea maker with glass mug and black control panel (no visible text or symbols)4
natural_image
Glass mug pouring milk from a digital coffee machine (no text or symbols visible)
natural_image
Glass mug filled with milk being processed by a hand mixer machine (no visible text or symbols)5
natural_image
Mechanical testing setup with a vertical cylindrical component mounted on a base (no visible text or symbols)Agua caliente
1
natural_image
Hand pouring liquid into a glass mug using a KRUPS machine (no visible text or symbols on the device)4
natural_image
Close-up of a KRUPS coffee maker with glass mug and stand (no visible text or symbols on device)5
natural_image
Monochrome photo of a KRUPS water dispenser with glass mug and water inside (no visible text or symbols on device)
3
2
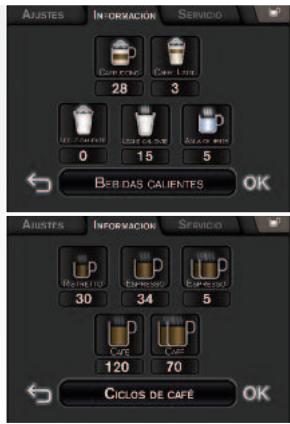
natural_image
Close-up of a KRUPS printer with visible internal structure and base mount (no text or symbols on device)natural_image
Pure mechanical assembly diagram without any text, numbers, or symbols3
natural_image
Hand pressing a black tray on a white surface, with no visible text or symbols4
natural_image
Hand inserting a USB into a digital device (no text or symbols visible)!
natural_image
Three black cylindrical mechanical components with connecting rods, shown from different angles (no text or symbols visible)natural_image
Close-up of a hand holding a white paper towel near a black industrial machine (no visible text or symbols)
natural_image
Hand holding a metallic mechanical component, no visible text or symbolsnatural_image
Close-up of a hand pressing a button on a mechanical device (no visible text or symbols)
natural_image
Hand pouring liquid into a glass bottle into a stainless steel kitchen faucet (no text or symbols visible)
natural_image
Close-up of a hand pressing a button on a device (no visible text or symbols)
natural_image
Hand holding a black cup with a blue upward arrow icon, next to a control panel (no text or symbols visible)3
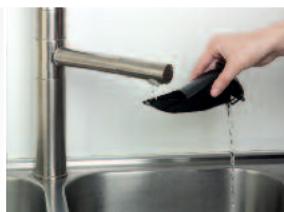
natural_image
Person pouring liquid from a black plastic bag into a stainless steel kitchen sink (no text or symbols visible)4
natural_image
Hand placing a black object into a machine, with a downward arrow indicating action (no text or symbols visible)natural_image
Two-step photo showing hands inserting a QR code into a KRUPS printer (no text or symbols visible)3
natural_image
Hand holding a black mechanical device with an upward arrow indicator (no text or symbols on the device itself)4
natural_image
Hand holding a black mechanical device with a blue downward arrow indicator (no text or symbols visible)5
natural_image
Hand placing a small object into a device component (no visible text or symbols)6
natural_image
Close-up of a glass conical lamp in a black industrial machine (no visible text or symbols)
natural_image
Close-up of a mechanical device with a blue arrow pointing to a door-like opening (no visible text or symbols)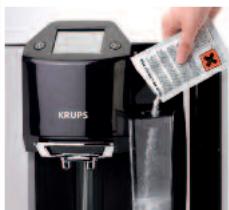
natural_image
Close-up of a hand inserting a card into a KRUPS-branded digital device (no visible text or symbols on device)3
natural_image
Close-up of a glass coffee maker in a processing machine (no visible text or symbols)4
natural_image
Hand pouring liquid into a glass bowl in a stainless steel kitchen sink (no text or symbols visible)5
natural_image
Close-up of a glass funnel being poured into a black mold (no visible text or symbols)
natural_image
Exterior view of a modern stainless steel refrigerator with a button and side panel (no visible text or symbols)KRUPS
EXPRESSO AUTOMATIC
SÉRIE EA9000

natural_image
Product image of a KRUPS coffee maker with three smaller cups of different shades of orange and brown, displayed against a black background (no text or symbols visible on the devices themselves).WWW.KRUPS.COM

ADVERTÊNCIAS IMPORTANTES
natural_image
Close-up of a black electronic device casing with two metallic components and a labeled component '7' (no text or symbols on the device itself)SEJA BEM VINDO!

natural_image
Exterior view of a Krups water purifier (no visible text or symbols)Caro/a Cliente,
natural_image
Five different types of beer glasses and cups arranged on a black background, no text or symbols visible.ALGUMAS RECOMENDAÇÕES ESPECIAIS
PROBLEMAS E ACÇÕES CORRECTIVAS 45

DADOS TÉCNICOS 48

TRANSPORTE 48

ELIMINAÇÃO 48

natural_image
Close-up of a hand pressing a digital display on a metal tray (no visible text or symbols)natural_image
Close-up of a hand pouring dark granular substance into a black open container (no visible text or symbols)natural_image
Close-up of a KRUPS coffee maker with hand pointing at it (no visible text or symbols on device)natural_image
Person washing a glass in a stainless steel kitchen sink (no text or symbols visible)natural_image
Close-up of a hand pressing a KRUPS logo on a black industrial machine (no visible text or symbols)natural_image
Hand operating a KROPS coffee maker machine with a blue arrow indicating left motion (no text or symbols on the device itself)natural_image
Hand pressing down on a mechanical device with a blue arrow indicating downward motion (no text or symbols visible)natural_image
Hand pouring liquid into a stainless steel kitchen sink (no text or symbols visible)natural_image
Close-up of a hand pressing down on a mechanical device component (no visible text or symbols)natural_image
Person pouring liquid from a black plastic bag into a stainless steel sink (no text or symbols visible)natural_image
Close-up of a hand pressing a black mechanical component with a blue arrow indicator (no text or symbols)natural_image
Hand pressing a button on a mechanical device (no visible text or symbols)natural_image
Close-up of a hand pressing down and up a blue directional arrow on a black device (no text or symbols visible)natural_image
Close-up of a transparent glass beaker being processed by a machine (no visible text or symbols)natural_image
Top-down view of a gray plastic container with two labeled parts (1 and 2), no visible text or symbols on the lid itself.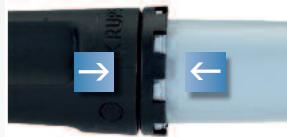
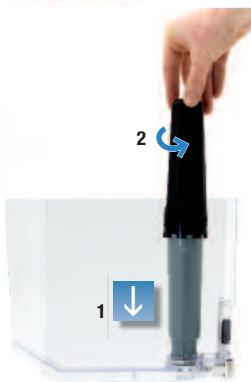
natural_image
Hand holding a black cylindrical object with two arrows indicating motion (no text or symbols)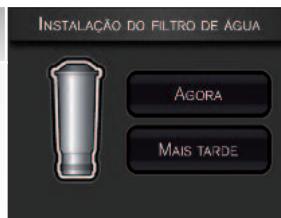
natural_image
Hand inserting a small black object into a device labeled 'KRUPS' (no additional text or symbols visible)
natural_image
Close-up of a hand inserting a QR code into a KRUPS branded machine (no visible text or symbols on the device itself)PROGRAMA DE LIMPEZA AUTOMÁTICA DO BOCAL DE VAPOR
3
Cappuccino
natural_image
Hand pouring liquid from a white bottle into a glass mug (no text or symbols visible)4
natural_image
Close-up of a KRUPS milk tea maker with glass mug and cup, black background (no visible text or symbols)5
natural_image
Close-up of a KRUPS milk dispenser with glass mug and straw, no visible text or symbols on the device itself.
natural_image
Glass mug filled with white milk being dispensed into a machine (no visible text or symbols)
natural_image
Close-up of a glass mug filled with milk and straw being used by a coffee machine (no visible text or symbols)8
natural_image
Close-up of a 3D printing press machine with visible internal structure and 'KRUPS' label (no other text or symbols)4.3 Preparação de bebidas de café à base de café moído
natural_image
Close-up of a hand pouring a brown substance from a black tool into a digital kitchen appliance (no visible text or symbols)6
natural_image
Close-up of a KRUPS milk tea maker with glass mug and white liquid, no visible text or symbols on the device itself.4
natural_image
Glass mug filled with milk being processed by a 3D printer (no visible text or symbols)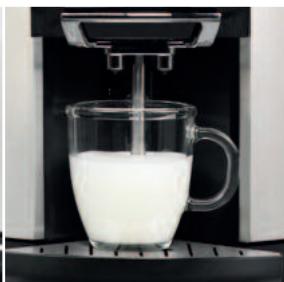
natural_image
Glass mug filled with milk being processed by a hand mixer machine (no visible text or symbols)5
natural_image
Mechanical testing setup with a vertical column and central shaft (no visible text or symbols)Água quente
1
natural_image
Hand pouring liquid into a glass mug using a KrUPS machine (no visible text or symbols on the device)4
natural_image
Close-up of a KRUPS coffee maker with glass mug and metal stand (no visible text or symbols)5
natural_image
Monochrome photo of a KRUPS water dispenser with glass mug and water inside (no visible text or symbols)
3

natural_image
Close-up of a KRUPS printer with visible mechanical components and base mount (no text or symbols on the device itself)1
natural_image
Pure mechanical assembly diagram without any text, numbers, or symbols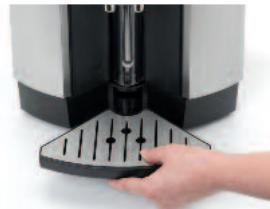
natural_image
Close-up of a hand pressing down on a mechanical device with black adjustment knobs (no visible text or symbols)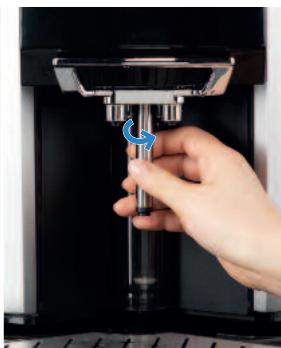
natural_image
Hand inserting a black cylindrical component into a machine (no visible text or symbols)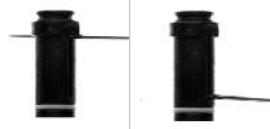
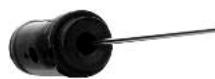
natural_image
Close-up of a hand cleaning a white cloth from a black industrial machine (no visible text or symbols)
natural_image
Hand holding a mechanical component with a blue arrow indicating force (no text or symbols visible)natural_image
Close-up of a hand inserting a device into a lock, with a blue arrow pointing to the lock (no text or symbols visible)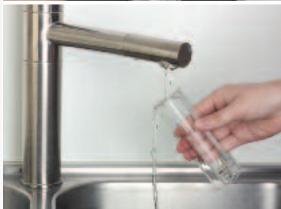
natural_image
Hand pouring liquid into a glass bottle from a stainless steel kitchen faucet (no text or symbols visible)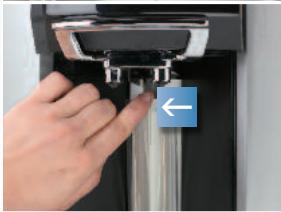
natural_image
Close-up of a hand inserting a device into a control panel with a blue arrow pointing to the left button (no text or symbols visible)- Volte a colocar os dois recipientes de recolha de pingos (ver imagens pág. 13).
- O ciclo de limpeza manual do bocal de vapor terminou.
■ Prima OK para validar e sair.
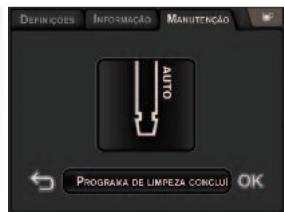
natural_image
Hand holding a black mechanical device with a blue upward arrow indicator (no text or symbols on the device itself)natural_image
Person pouring liquid from a black cloth into a stainless steel kitchen sink (no text or symbols visible)4
natural_image
Hand holding a small black device with a downward arrow indicator (no text or symbols visible)3
natural_image
Hand holding a black device with a blue upward arrow indicator (no text or symbols on the device itself)4
natural_image
Hand holding a black cup with a blue arrow pointing to it, next to a control panel (no visible text or symbols)5
natural_image
Hand inserting a small black object into a device (no visible text or symbols)6
natural_image
Close-up of a glass laboratory funnel with a vertical rod inserted into it, mounted on a black base (no visible text or symbols)
natural_image
Close-up of a KRUPS industrial machine with a blue arrow pointing to a door (no visible text or symbols on the device itself)
natural_image
Close-up of a KRUPS digital water heater with a hand pouring liquid from a bag (no visible text or symbols)4
natural_image
Close-up of a glass beaker with a vertical tube inserted into it, no visible text or symbols5
natural_image
Hand pouring liquid into a stainless steel kitchen sink (no text or symbols visible)6
natural_image
Close-up of a glass coffee maker with a straw and wooden stand (no visible text or symbols)