
LFT419K - Dishwasher ELECTROLUX - Free user manual and instructions
Find the device manual for free LFT419K ELECTROLUX in PDF.

 FR
FR
 AR
AR
 BG
BG
 CS
CS
 DA
DA
 DE
DE
 EL
EL
 EN
EN
 ES
ES
 ET
ET
 FI
FI
 HU
HU
 IT
IT
 KK
KK
 LT
LT
 LV
LV
 MK
MK
 NL
NL
 NO
NO
 PL
PL
 PT
PT
 RO
RO
 RU
RU
 SK
SK
 SL
SL
 SQ
SQ
 SR
SR
 SV
SV
 TR
TR
 UK
UK
| Product type | Range hood |
| Brand | Electrolux |
| Model | LFT419K |
| Number of speeds | 3 speeds + stop |
| Lighting | Integrated LED lamp |
| Grease filter | Dishwasher safe (short cycle, low temperature) |
| Charcoal filter | Active, non-washable, replace every 4 to 6 months |
| Power supply | 220-240 V, 50 Hz |
| Dimensions (W x D x H) | Approximately 60 x 50 x 30 cm (estimate) |
| Weight | Approximately 12 kg (estimate) |
| Noise level | Varies by speed (approx. 50-65 dB) |
| Airflow | Up to 650 m³/h (estimate) |
| Installation | See provided installation instructions |
| Maintenance | Clean grease filters monthly, replace charcoal filter every 4-6 months |
| Safety | Detailed safety instructions in the manual |
| Spare parts | Filters, LED bulb (replacement by technician) |
| Repairability | LED bulb and electronic components replaceable only by a professional |
| Material | Stainless steel (estimate) |
| Recommended use | Cooking with covered or uncovered pots depending on speed |
Frequently Asked Questions - LFT419K ELECTROLUX
User questions about LFT419K ELECTROLUX
0 question about this device. Answer the ones you know or ask your own.
Ask a new question about this device
Download the instructions for your Dishwasher in PDF format for free! Find your manual LFT419K - ELECTROLUX and take your electronic device back in hand. On this page are published all the documents necessary for the use of your device. LFT419K by ELECTROLUX.
USER MANUAL LFT419K ELECTROLUX
The device must be set to the lowest temperature and short cycles. The filter for the oil may dim the LED light, but this does not affect the operation of the device.
- To reinstall the filter, insert the two tabs into the reverse direction. Repeat the tabs for each filter, if necessary.
4.3 Replacing the filter with active carbon

WARNING!
The active carbon filter must be replaced!
To replace the filter:
1. Remove the grease filter. See "Removing the grease filter" in the chapter. 2. Press the release button on the front part of the filter.
Tilt the front part of the filter downwards.
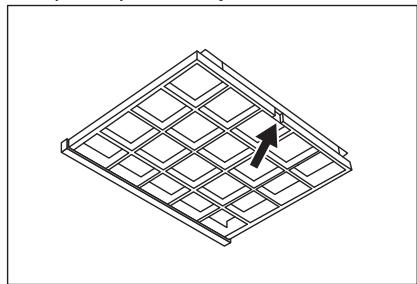
- To install the new filter, insert the tabs into the reverse direction. In any case, it is necessary to replace the filters at least every three months.
4.4 Replacing the lamp
This device is supplied with a lamp and a separate control box (for the lighting mechanism). These parts can only be replaced by technicians. In case of malfunction, see "Service" in the chapter "Safety Instructions".
5. ENVIRONMENTAL PROTECTION
Recycle materials with the symbol . Dispose of packaging in the appropriate recycling containers. Help protect the environment and public health, as well as recycle waste from
electrical and electronic devices. Do not dispose of devices marked with the symbol with household waste. Return the device to your local recycling point or contact your municipal service.
OBSAH
- SAFETY INFORMATION AND INSTALLATION 6
- DESCRIPTION OF THE APPLIANCE 7 3. DAILY USE 7 4. CLEANING AND MAINTENANCE 8
- NOTES ON ENVIRONMENTAL PROTECTION
WE'RE THINKING OF YOU
The filter can be washed!
WE'RE THINKING OF YOU
Thank you for purchasing an Electrolux appliance. You've chosen a product that brings with it decades of professional experience and innovation. Ingenious and stylish, it has been designed with you in mind. So whenever you use it, you can be safe in the knowledge that you'll get great results every time.
Welcome to Electrolux.
Visit our website to:

Get usage advice, brochures, trouble shooter, service and repair information: www.electrolux.com/support

Register your product for better service: www.registerelectrolux.com

Buy Accessories, Consumables and Original spare parts for your appliance: www.electrolux.com/shop
CUSTOMER CARE AND SERVICE
Always use original spare parts.
When contacting our Authorised Service Centre, ensure that you have the following data available: Model, PNC, Serial Number.
The information can be found on the rating plate.
Warning / Caution - Safety information
① General information and tips Environmental information
Subject to change without notice.
1. SAFETY INFORMATION AND INSTALLATION

WARNING!
Refer to the separate Installation Instructions booklet for Safety Information and Installation. Read carefully the Safety chapters before any use or maintenance of the appliance.
2. PRODUCT DESCRIPTION
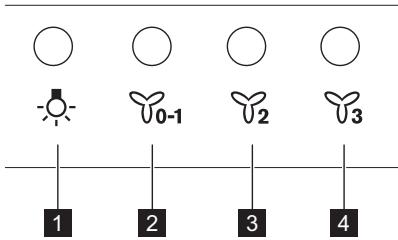
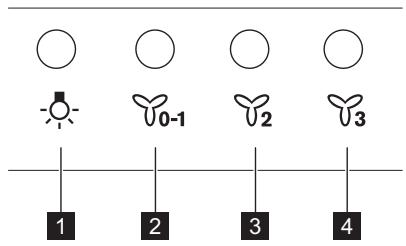
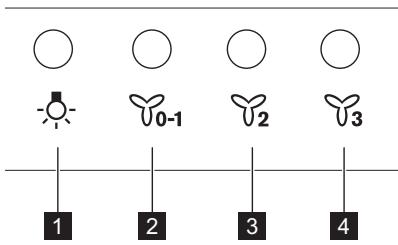
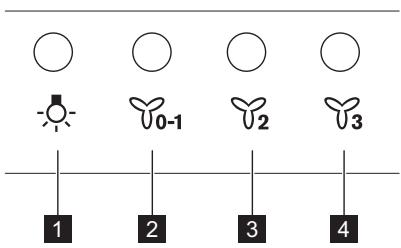
2.1 Control panel overview
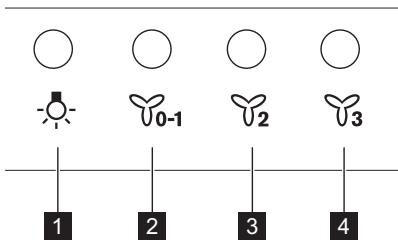
| Function | Description | |
| 1 | Lamp | Turns the lights on and off. |
| 2 | First speed / Off | The motor switches to first speed level. Second press turns off the appliance. |
| 3 | Second speed | The motor switches to second speed level. |
| 4 | Third speed | The motor switches to third speed level. |
3. DAILY USE
3.1 Using the hood
Check the recommended speed according to the table below.
| ♀0-1 | While heating up food, cooking with covered pots. |
| ♀2 | While cooking with covered pots on multiple cooking zones or burners, gentle frying. |
| ♀3 | While boiling and frying big quantities of food without a lid, cooking on multiple cooking zones or burners. |
It is recommended to leave the hood operating for approximately 15 minutes after cooking.
The hood's light works independently of other hood functions. To illuminate the cooking surface, press the light button.
To operate the hood:
- Press the first speed button to switch on the appliance.
- If needed, change the speed by pressing the desired button.
To turn off the appliance, press the first speed button again.
4. CARE AND CLEANING
4.1 Notes on cleaning
| Cleaning Agents | Do not use abrasive detergents and brushes. Clean the surface of the appliance with a soft cloth with warm water and a mild detergent. |
| After cooking some parts of appliance can get hot. To avoid stains appliance must be cooled down and dried with clean cloth or paper towels. | |
| Clean stains with a mild detergent. | |
| Keep the hood clean | Clean the appliance and grease filters each month. Clean the interior and grease filters carefully from fat. Fat accumulation or other residue may cause fire. |
| Grease filters can be washed in a dishwasher. The dishwasher must be set to a low temperature and a short cycle. The grease filter may discolour, it has no influence on the performance of the appliance. | |
| Charcoal filter | The time of saturation of the charcoal filter varies depending on the type of cooking and the regularity of cleaning the grease filter. The activated charcoal filter is not washable, cannot be regenerated and must be replaced approximately every 4/6 months of operation, or more frequently for particularly heavy usage. |
4.2 Cleaning the grease filter
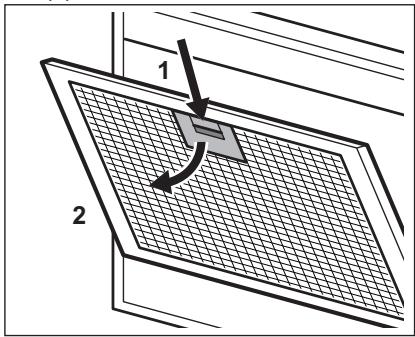
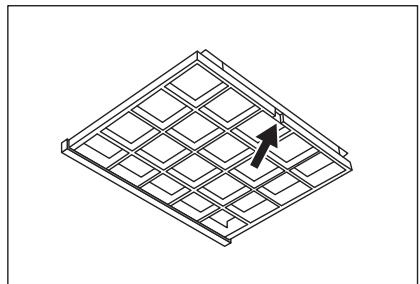
Filters are mounted with the use of clips and pins on the opposite side.
To clean the filter:
- Press the handle of the mounting clip on the filter panel underneath the hood (1).
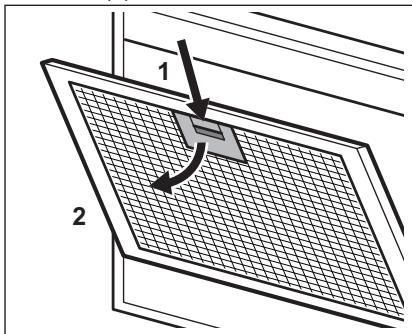
- Slightly tilt the front of the filter downwards (2), then pull.
Repeat the first two steps for all filters.
- Clean the filters using a sponge with non-abrasive detergents or in a dishwasher.

The dishwasher must be set to a low temperature and a short cycle. The grease filter may discolour, but this has no influence on the performance of the appliance.
- To mount the filters back, follow the first two steps in reverse order.
Repeat the steps for all filters if applicable.
4.3 Replacing the charcoal filter

WARNING!
The charcoal filter is non-washable!
To replace the filter:
- Remove the grease filters from the appliance.
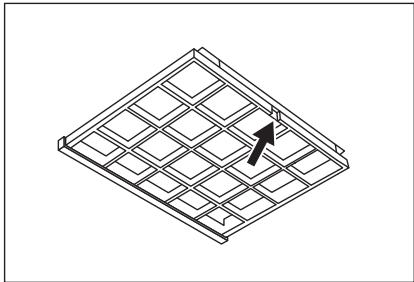
Refer to "Cleaning the grease filter" in this chapter. 2. Press the front edge in slot towards the bottom part of the filter. Slightly tilt the front of the filter downwards.
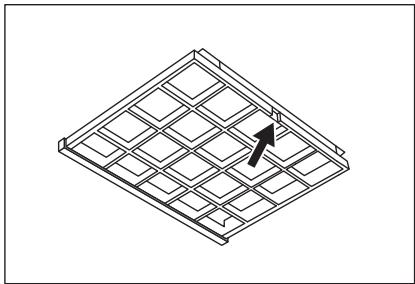
- To install a new filter, perform the same steps in reverse order. In any case, it is necessary to replace the filters at least every four months.
4.4 Replacing the lamp
This appliance is supplied with a LED lamp and separate control gear (LED driver). These parts can be replaced by a technician only. In case of any malfunction refer to "Service" in the "Safety Instructions" chapter.
5. ENVIRONMENTAL CONCERNS
Recycle materials with the symbol. Put the packaging in relevant containers to recycle it. Help protect the environment and human health by recycling waste of electrical and electronic appliances. Do not dispose of
appliances marked with the symbol with the household waste. Return the product to your local recycling facility or contact your municipal office.
- ENVIRONMENTAL ASPECTS 29
WE THINK OF YOU
4.3 Replacing the charcoal filter

WARNING!
The charcoal filter is not washable!
3. DAILY USE
3.1 Using the hood
Check the recommended speed according to the table below.
| ♀0-1 | Prilikom zagrijavanja hrane, kuhanja sPokrivenim posudama. |
| ♀2 | Prilikom kuhanja sPokrivenim posudama na više zona kuhanja ili plame-nika, lagano prženje. |
| ♀3 | Prilikom ključanja i prženja velikih količina hrane bezPoklopca, kuhanja na više zona kuhanja ili plamenika. |
It is recommended to leave the hood running for about 15 minutes after cooking.
To connect the device to the network:

Recommended appliances, kettles, and other electrical devices, measuring instruments, and similar devices:
www.electrolux.com/support
For measuring instruments, use the following recommendation:
www.registerelectrolux.com

Purchase original accessories, consumables, and spare parts from our store:
www.electrolux.com/shop
The appliance is intended for household and similar applications.
When contacting the service center, please provide the following information: model, PNC, serial number.
This will help to avoid unnecessary technical issues.
Expert/safety information about the appliance and its accessories
Instructions for safe installation and use.
1. SAFETY AND INSTALLATION INSTRUCTIONS

WARNING!
Safety and installation
The appliance
intended for
Safe installation instructions
Follow the instructions.
Installation instructions
2. INSTRUCTIONS FOR USE
2.1 Control panel and its purpose
To turn on the water:
- Press the switch (1) on the control panel located on the front part of the device.
- Turn the water tap counterclockwise (2), then pull it. For all taps, repeat the first two steps.
- If the water pressure is too high, adjust it by turning the pressure regulator.

On the pressure regulator, set the temperature to the desired level. It is possible to change the water temperature without affecting the operation of the device.
- To turn off the water, repeat the first two steps in reverse order.
If necessary, repeat the steps for all taps.
4.3 Adjusting the water temperature

__SUPPIMER__
Cy3rhi aybictbyyih:
- Mai cy3rilepiH KypblfblaH anbIbI3. OcbI tapaydaftb"IaM cy3rinepi Ta3anay"6eImiH kapaHbI3.
- AndbihfjkaTaydbCy3riHITemehri 6enirinderi cahbIayfa kapai 6acbHb3.Cy3riHAndbHfbJkaFBH TEmeH Kapa a3dan eHKeTIH3.
- KaHa cy3rHi opHaty uWIn ocbl Kaamdapbl KepiCINHe opbHnDaHbI3. Ke3-KeIreH xaFdaJaCy3rIpepdi KEM DeReHDe Tepa an caBn Ah aybCTbipy KepeK.
4.4 Wamdbiayblipy
BvI KpybIfbl XUd IaMbImeH KHe 6BeIek icke Kocy KypalbEmeH (KUd dpaibepi) Ka6dbkTaNfHaN. BvI 6BeIweKterdi TexnIK KaHa aybcIbpa aIaIbI. AkayIbIK opbIH aIFaH KaFgaJa "Kayinc3dk Hcckaynapbl" TapaybHaIaBbl "KbI3Met Kepcety" 6enimin KapaHbI3.
5. KOPSHAFAH OPTAFA KATbICTbl JAFDAIJIAP
Benri cabihfah MaTePnIaIapbl KaTaN HeDeyH eTKi3yRe TaCbipbHbI. OpaMaTePnIaIaPbIH KaTaN eHeyDcEeK3y yuHIn Tnicti KOHTeHepnepre caIbHbI. 3NeKtpnik XeHe 3JIeKTPoHnKaIbIK KybpIbIbJnapDbIH KaNDbIFbIH KaTaN HeDeyH eTKi3y
apKbIbI, KOpShaFaH opTaFa XaHe aadMbIH DeHCaybIfbHa 3nblh KeTIpeTIn JkaFdainapfa Kon6epMeyre e3 yneciH3di KocbIbI3. Benri CaJIbIHfAH KypblFNbIapDbI TyPmbICTbIK KaIbIKTapMeH 6ipre TactamaHbI3. ΘhimDi xeprinikTi KaIta eHdey
OpTaIbIbIHa eTki3iH3 HeMeCe JepriNkTI MeKemere xa6apnacbl3.
OcbI eHIMHi eHdipinre H KyH cepnIbIK Hemipde KepceTilreH, OHbIH HEMipiHb 6ipHsi caHbI eHdipiree XblDbIH COHfbCaHbHa, ekHsI JcHe yWuHsi caHap anTaHbIH peTTIK HemipieCaiKec KeJeI. MbcAJIb, 14512345 cepnIbIK Hempi eHIM 2021XblDbH KbIPbIK 6ecHsi anTacbHda eHdipirReHH bInDipei.
Thndipuyi: Electrolux Appliances AB, St. Goransgatan 143, 105 45 Stockholm, StBeuia
IIMnpTayuJxOHe EHNdipyuiH yekJIeTTyibMbI:
OOO «Electrolux Rus», Kozhevnichesky proezd 1, 115114,
4. MAINTENANCE AND CLEANING
1. SAFETY INFORMATION AND INSTALLATION

WARNING!
Safety information
Installation safety
In the separate
instructions for
safety and installation.
Before performing
any actions for
use and
maintenance of the appliance
carefully read
the instructions.
Safety instructions.
2. DESCRIPTION OF THE DEVICE
2.1 General control panel
It is recommended to turn on the exhaust fan about 15 minutes after cooking is finished.
Turning on the exhaust fan;
USER MAINTENANCE AND SERVICE
Always use original spare parts.
When contacting the service center, have the following information ready: model, production number, service number.
The manual can be found on the website with technical characteristics.
Suspicion/Defect - Safety information ① Describe information and advice information about the device
Right to change reserved.
1. SAFETY INFORMATION FOR INSTALLATION

WARNING!
Check the fuse
Reparations information:
www.electrolux.com/support
Register your product for better service:
www.registerelectrolux.com

2. PRODUCT DESCRIPTION
2.1 Control panel overview
www.electrolux.com/support
www.registerelectrolux.com
www.electrolux.com/shop


Julll PNC
a>gl 1c loglaall o i j k a
a0dwl10og120-a/
aole jilagogloglo ①
aLoglo
jolw jgduy aio
JgK 1

J 1 Jg>J Jg>J alaiia Jg J JgJ gJgJ JgJ aJgJ JgJ gJ
EHC C

- REPLACING THE FILTER WITH ACTIVE CARBON
- WARNING
- REPLACING THE LAMP
- ENVIRONMENTAL PROTECTION
- OBSAH
- WE'RE THINKING OF YOU
- CUSTOMER CARE AND SERVICE
- SAFETY INFORMATION AND INSTALLATION
- PRODUCT DESCRIPTION
- CONTROL PANEL OVERVIEW
- DAILY USE
- USING THE HOOD
- TO OPERATE THE HOOD
- CARE AND CLEANING
- NOTES ON CLEANING
- CLEANING THE GREASE FILTER
- TO CLEAN THE FILTER
- REPLACING THE CHARCOAL FILTER
- ENVIRONMENTAL CONCERNS
- WE THINK OF YOU
- SAFETY AND INSTALLATION INSTRUCTIONS
- INSTRUCTIONS FOR USE
- CONTROL PANEL AND ITS PURPOSE
- TO TURN ON THE WATER
- ADJUSTING THE WATER TEMPERATURE
- WAMDBIAYBLIPY
- KOPSHAFAH OPTAFA KATBICTBL JAFDAIJIAP
- MAINTENANCE AND CLEANING
- DESCRIPTION OF THE DEVICE
- GENERAL CONTROL PANEL
- TURNING ON THE EXHAUST FAN
- USER MAINTENANCE AND SERVICE
- SAFETY INFORMATION FOR INSTALLATION
- JGK
Brand : ELECTROLUX
Model : LFT419K
Category : Dishwasher