USER MANUAL EQ.6 PLUS S500 ESPRESSO TE655319RW SIEMENS
siemens-home.bsh-group.com/welcome
en Instruction manual
fr Mode d'emploi
nl Gebruiksaanwijzing
pl Instrukcja obslugi
cs Návod k použití
ru Hnctpykunno 3Kcnnyatau
de Gebrauchsanleitung
Register your product online
| en | English | 2 |
| fr | François | 26 |
| nl | Nederland | 52 |
| pl | Polski | 77 |
| cs | Čeština | 103 |
| ru | Russkii | 127 |
| de | Deutsch | 154 |
A
Included in delivery (see page 5)
Contenu de l'emballage (voir page 29)
Leveringsomvang (zie paginga 55)
Zakres dostawy (patrz strona 80)
Součast dodávky (viz strana 106)
Осым постук (см.ст. 130)
Lieferumfang (siehe Seite 157)
E-Nr. .FD...
Dear Coffee Connoisseur,
Congratulations on purchasing this fully automatic coffee machine from Siemens.
This instruction manual describes a number of versions of the appliance with minor differences.
Please also take note of the enclosed Quick reference guide, which you can then keep in the specially provided compartment 16 until you need it again.
How to use these instructions:
You can open up the front cover of this instruction manual to see illustrations of the appliance with each part numbered. These numbers will be referred to throughout the text.
Example: brewing unit 14
These instructions also show display texts and symbols in a special way so that you can clearly see where we refer to texts displayed by the appliance or symbols that are marked on it.
Example of display texts: Espresso Example of control elements:[start/stop]
Contents
Intended use 3
Important safety information. 3
Included in delivery. 5
Overview. 5
Overview of control elements 6
Display 7
Initial use. 8
Own settings "Favourite" 9
Childproof lock. 9
Preparing drinks. 9
Preparing coffee drinks. 10
Preparation using milk. 11
Special beverages. 12
Preparation using ground coffee 13
Menu 13
Care and daily cleaning 16
Cleaning the milk system. 17
Cleaning the brewing unit (Figure G)......18
Service programmes. 19
Cleaning the milk system. 19
Dscaling. 19
Cleaning 20
calc'nClean 20
Tips on energy saving. 21
Frost protection. 21
Storing accessories 22
Accessories 22
Disposal. 22
Guarantee 22
Simple troubleshooting 23
Technical specifications 25
Intended use
This appliance is intended for domestic use only.
Only use the appliance indoors at room temperature and up to 2000 m above sea level.
Please read and follow the operating instructions carefully and keep them for later reference! Enclose these instructions when you give this appliance to someone else.
This appliance can be used by children aged from 8 years and above and by persons with reduced physical, sensory or mental capabilities or lack of experience and knowledge if they have been given supervision or instruction concerning use of the appliance in a safe way and if they understand the hazards involved. Keep children under 8 years of age away from the appliance and connecting cable and do not allow them to use the appliance. Children shall not play with the appliance. Cleaning and user maintenance shall not be made by children unless they are older than 8 years and supervised.
Warning
Risk of electric shock!
The appliance may only be connected to a power supply with alternating current via a correctly installed socket with earthing. Ensure that the protective conductor system of the domestic supply has been correctly installed.
- Connect and operate the appliance only in accordance with the specifications on the rating plate.
- Do not use the appliance if the power cord and/or appliance are damaged.
Only our customer service may repair the appliance, e.g. by replacing a damaged power cord, in order to avoid hazards.
- Never immerse the appliance or mains cord in water.
If there is a fault, pull out the mains plug immediately or switch off the power supply.
Warning
Hazard due to magnetism!
The appliance contains permanent magnets which can affect electronic implants such as pacemakers or insulin pumps. Persons wearing electronic implants must maintain a minimum distance of 10 cm from the appliance and from the following parts upon removal: milk container, milk system, water tank and brewing unit.
Warning
Risk of suffocation!
- Do not allow children to play with packaging material.
Store small parts safely as they can be easily swallowed.
Warning
Risk of injury!
- Do not reach into the grinding unit!
- Improper use of this appliance may result in injury.
Warning
Risk of burns!
The milk system becomes extremely hot. After use, always let it cool down before you touch it.
After use the surfaces of the heating element or hotplate can remain hot for some time.
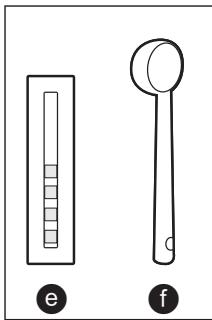
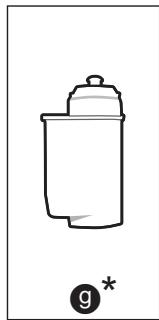
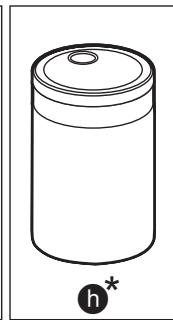
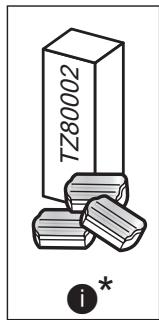
Included in delivery
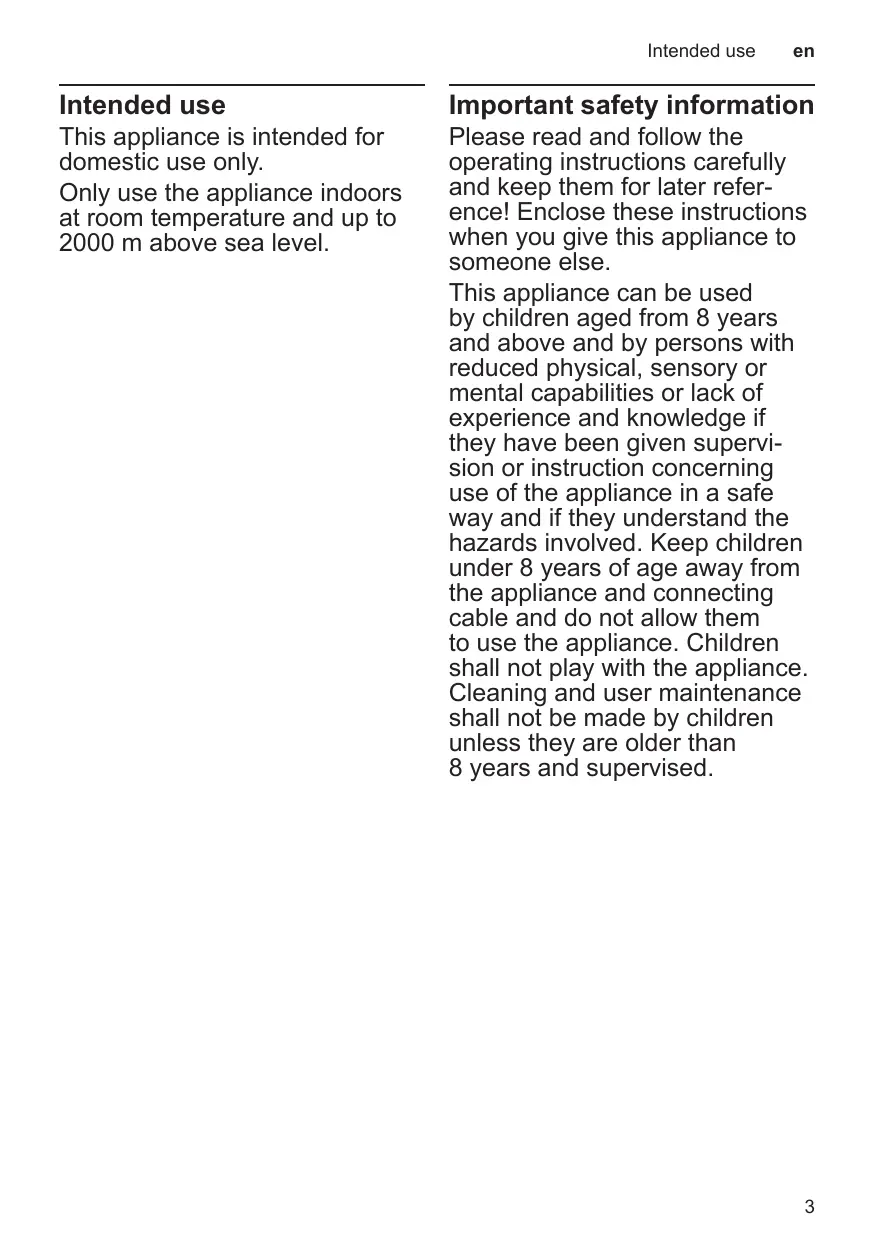
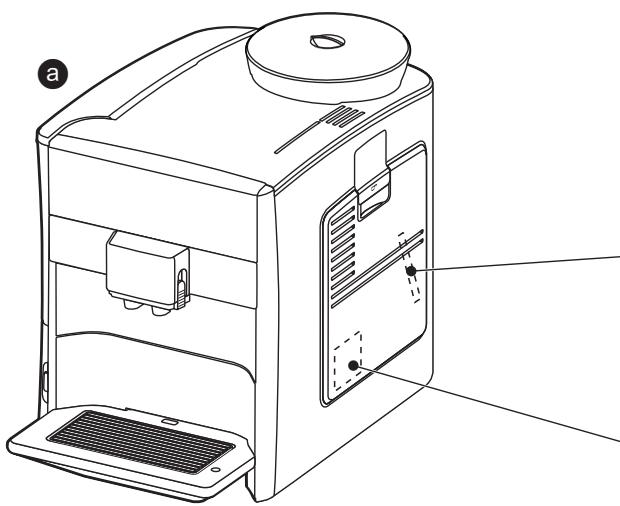
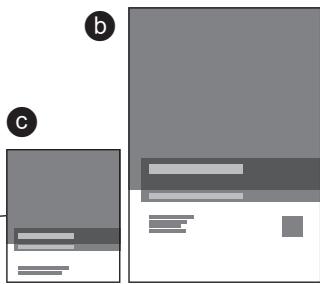
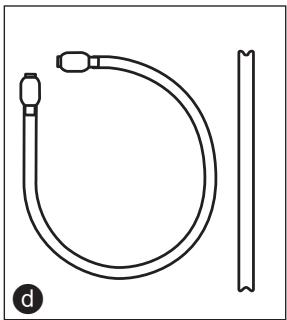
(Figure A on the fold-out pages)
Fully automatic coffee machine
品 User Manual
Quick reference guide
6 Milk tube and suction pipe
Water hardness testing strip
1 Measuring spoon
Water filter
Milk container with "freshLock" lid
Descalging tablets*
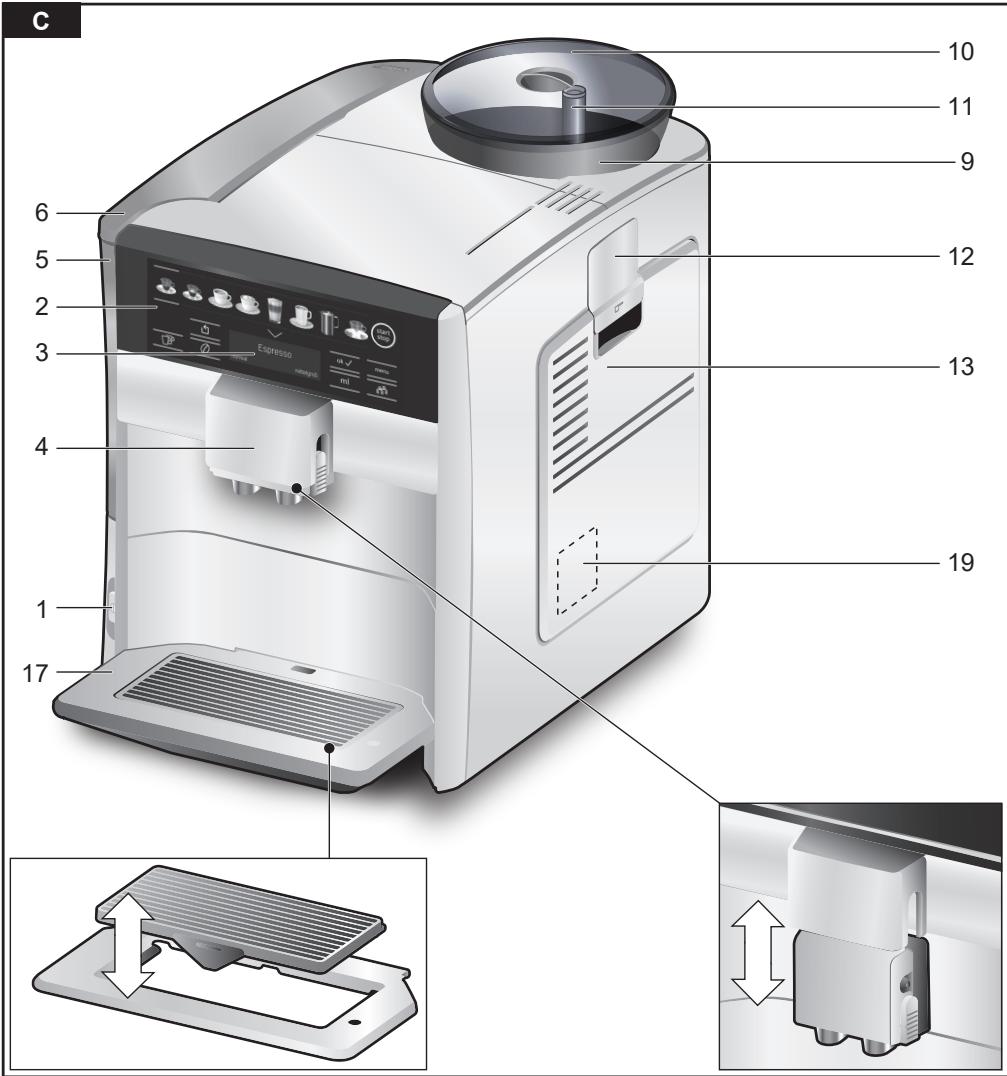
Overview
(Figures B, C, D, E, F and G on the fold-out pages)
1 Mains switch ①
2 Control panel (see next page)
3 Display
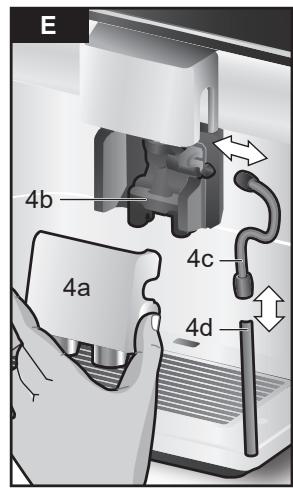
4 Drinks outlet (coffee, milk, hot water), height-adjustable
a) Cover
b) Milk system/coffee outlet (two-part)
c) Milk tube
d) Suction pipe
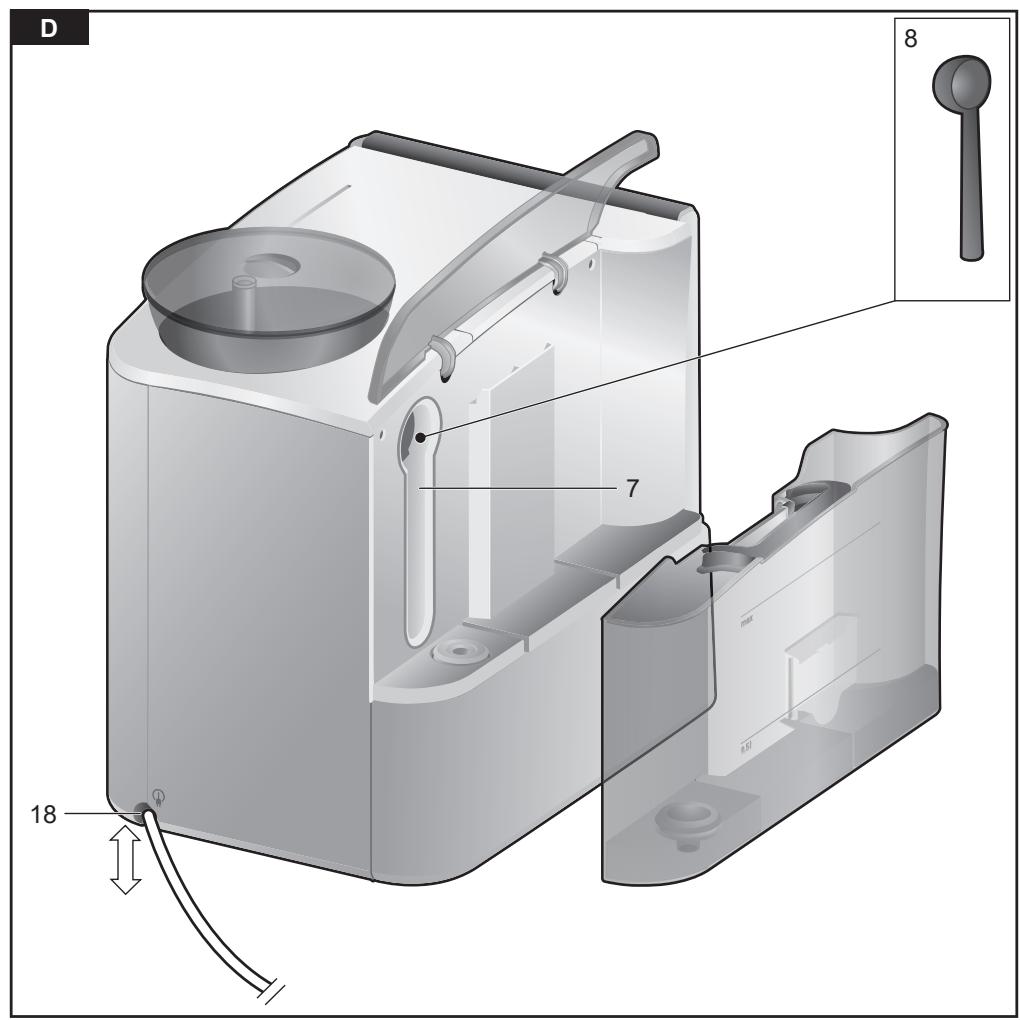
5 Removable water tank
6 Lid for water tank
7 Storage compartment for measuring spoon
8 Measuring spoon (insertion aid for water filter)
9 Bean container
10 Aroma cover
11 Dial selector for grinding level
12.739 (for ground coffee/cleaning tablet)
13 Door to brewing unit
14 Brewing unit a) Locking mechanism b) Cover
15 Eject lever
16 Storage compartment for quick reference guide
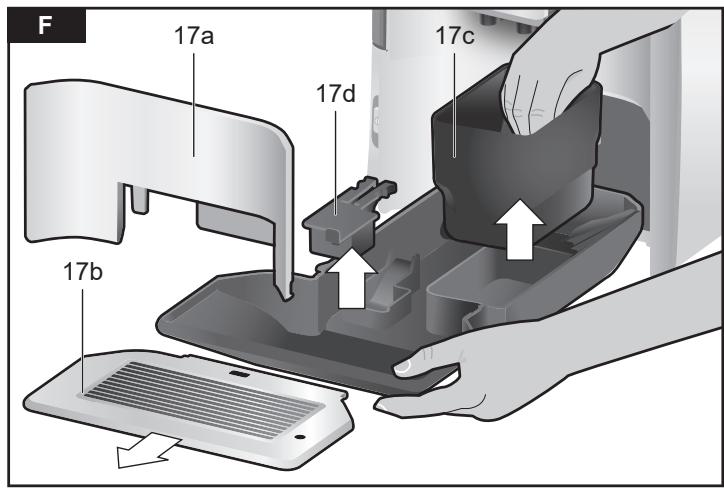
17 Drip tray a) Drip tray panel b) Drip tray (two-section) c) Coffee grounds contai d) Floater
18 Compartment for power cord
19 Rating plate (E number, FD)
- These user instructions describe a number of appliance versions. Items marked * are not present in all models.
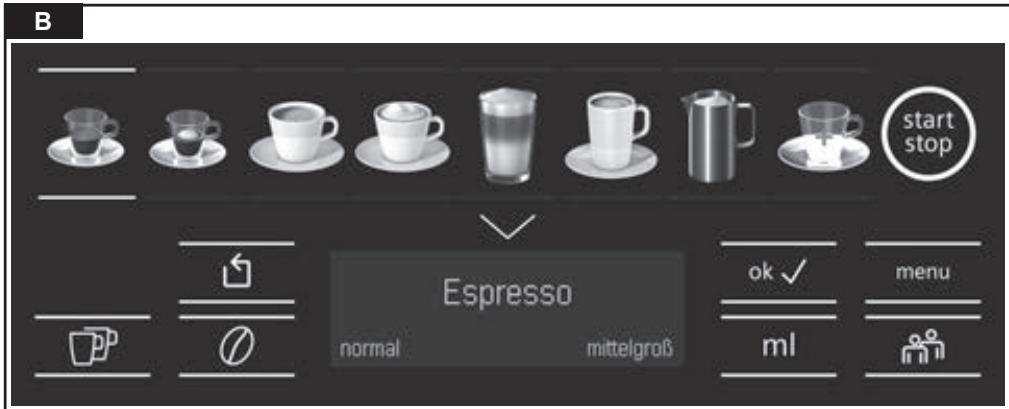
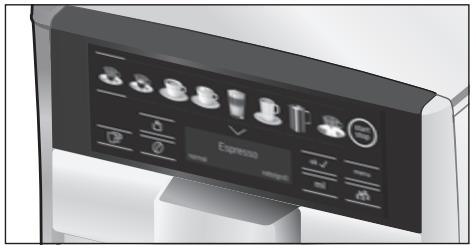
Overview of control elements
(Figure B on the fold-out pages)

The following symbols are visible or backlit depending on the appliance's current operating mode:
| Espresso | Latte Macchiato |
| Espresso Macch. | Caffe Latte |
| Coffee | Milk froth |
| Cappuccino | Special beverages (see the section “Special beverages”). |
| [ start/stop] - Start/stop button | √ [√] - Selection down |
| [ ]- Back | menu [menu] - Open menu |
| [ ]- Dispense two cups simultaneously | ok√ [ok√] - Confirm/Store |
| [ ∅] - Set coffee strength | ml [ml] - Select cup size |
| [ °°] - Call up Favourite (touch briefly) and Childproof lock (touch for at least 3 seconds). | |
Mains switch ①
The mains switch ① is used to switch the appliance on or off. The appliance rinses itself automatically when it is switched on and off.
The appliance does not rinse if:
it is still warm when switched on, or
no coffee was dispensed before it was switched off.
The appliance is ready for use when the symbols and the display on the control panel are lit.
Control panel (touch field)
In the control panel you can easily navigate the controls just by touching the symbols and characters.
You will hear an audible signal.
These audible signals can be switched on or off (see the section "Menu - Key tones").
Drink selection
Touching the corresponding symbol selects the desired drink (see the section "Preparing drinks").
Touching [start/stop] either begins preparing a drink or launches a service programme.
If you touch [start/stop] again while the drink is being prepared, dispensing will be prematurely halted.
Touching [menu] calls up the menu, the navigation symbols will be activated and light up. Touch [√], [ok√] and [∫] to navigate through the menu and call up information or change settings (see the section "Menu").
Drink options
Touching [O] or [ml] adjusts the strength or size of the drink, touching [P] prepares two cups simultaneously as soon as you touch [start/stop] to begin dispensing (see the section "Preparing drinks").
"Favourite" and Childproof lock
Briefly touching [oo] calls up personalised beverages (see the section "Own settings Favourite").
Touching [ n] for 3 seconds or more activates or deactivates the childproof lock (see the section "Childproof lock").
Display
The display shows the selected drinks and settings plus messages reporting the appliance's operating status.
Espresso
regular
medium
Please refill water tank
These messages are cleared as soon as the action has been carried out.
Initial use
General
Fill the appropriate container using only pure, cold, uncarbonated water and solely roasted beans. Do not use coffee beans that have been glazed, caramelised or treated with other additives containing sugar, since they will block the brewing unit. The water hardness setting on the appliance can be adjusted. The factory setting for the water hardness is 4. Use the enclosed test strip to determine the hardness of your water supply. If this shows a value other than 4, you will need to programme the appliance appropriately after it has been taken into service (see section "Menu - Water hardness").
Setting up the appliance
Remove any protective plastic film.
- Place the fully automatic coffee machine on a level, waterproof surface that is able to support its weight.
The appliance's ventilation slits must not be covered or obscured.

Important: Only use the appliance in a frost-free room. If it has been transported or stored at temperatures below 0^ , wait at least 3 hours before taking it into operation.
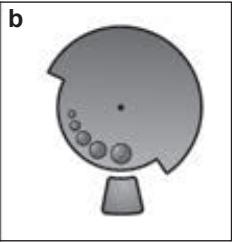
- Connect the power supply (cable storage compartment 18) to the socket. You can adjust the length of the cable by pulling it further out or pushing it back in. To do this, place the appliance with its back flush with the edge of the work surface and either pull the cable out downwards or push it in upwards.
Flip up the lid of the water tank 6.
- Remove the water tank 5, rinse it out and fill it with fresh cold water. Do not fill it past the "max" mark.
- Replace the water tank 5, making sure that it is straight, and push it right down into place.
Reclose the lid of the water tank 6.
Fill the bean container 9 with coffee beans.
Use the main switch ① 1 to switch on the appliance.
The control panel and the display will be activated. The display will show the previously specified language, which will also be used for all subsequent display texts. A number of different languages are available.
- Touch [√] repeatedly until the display indicates the desired language.
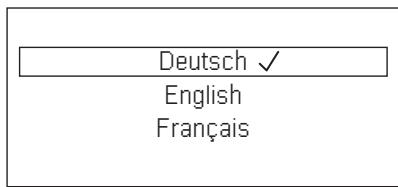
- Touch [start/stop] to confirm your selection.
The chosen language is now stored.
The brand logo will light up on the display 3.
The appliance will heat up and rinse itself, a small amount of water will run out of the drink outlet 4.
The appliance is ready for use when the symbols and the display on the control panel are lit.
The factory settings of the fully automatic coffee machine are programmed for optimal performance. The appliances switches off automatically after a configured time (see the section "Menu - Automatic shut-down").
i When the appliance is used for the first time, after a service program has been run and when it has not been operated for a long period, the first beverage will not have the full aroma and should not be consumed.
i When the fully automatic coffee machine is first used, you will achieve a suitably thick and stable "crema" only after the first few cups have been dispensed.
If the appliance is in use for a long period of time, water droplets will form on the ventilation slits. This is normal.
Own settings "Favourite"
The number of Favourites depends on the model of the appliance. The menu item "Favourite" can be used to store and change individual (personalised) beverages (see the section "Menu - Favourite").
Call up individual beverage
■ Briefly touch [n].
- Select one of the Favourites already stored with your own settings.
- Touch [start/stop] to begin dispensing the beverage.
Childproof lock
The appliance can be locked to protect children against scalding and burns.
Touch [n] for at least 3 seconds.
A key symbol appears on the display 3.
The childproof lock is now active.
It is no longer possible to operate the appliance.
Touch [m] for at least 3 seconds.
The key symbol disappears from the display 3. The childproof lock is now deactivated. The appliance can be used in the usual way.
Preparing drinks
This fully automatic coffee machine grinds fresh beans for every brewing. For optimum quality, store the beans in a cool place in sealed containers.
i Important: Fill the water tank 5 with fresh clean water every day. The tank 5 should always contain sufficient water for operating the appliance.
Cups should be prewarmed, e.g. with hot water. This applies particularly to small thick-walled espresso cups.
i For a number of settings, coffee is prepared in two stages (see "aromaDouble Shot"). Please wait until the process is completely finished.
Different beverages can be prepared just by touching a key.
Drink selection
Touching the appropriate symbol selects the desired drink. Your selection is indicated by lines above and below the symbol. The name of the drink and the currently active values for strength and cup size are shown in display 3.
You can choose from the following drinks:
Touch the "special beverages" button several times to select different drinks one after the other:
Hot water Americano
Warm milk* Flat White
Kleiner Brauner* Cafe Cortado
Coffee pot
Items marked * are not present in all models.
Adjusting the strength, selecting ground coffee
Touch [0] to set the strength of your coffee individually or to specify that ground coffee is to be used.
The following settings are possible:
very mild
very strong
mild
doubleshot strong
regular
doubleshot strong+
strong
Ground coffee
- Touching the appropriate symbol selects the desired drink.
- Touch [] repeatedly until the desired setting e.g. strong or Ground coffee (see the section "Preparation using ground coffee") appears on the display.
aromaDouble Shot
The longer the coffee is brewed, the more bitter substances and undesired aromas are released. This has a negative effect on the taste and makes the coffee less easily digestible. So for extra strong coffee, the appliance has a special aromaDouble Shot function. When half the quantity has been prepared, it grinds and brews fresh coffee beans so that only the pleasant, aromatic scents are released.

The aromaDouble Shot function can be selected for any drink containing a proportion of at least 35 ml coffee volume. It is not available for small drinks such as a small espresso or when the [^p ] setting is enabled.
Select cup size
Touching [ml] individually selects the beverage volume desired.
The following settings are possible:
small
medium
large
- Touching the appropriate symbol selects the desired drink.
- Touch [ml] repeatedly until the display indicates the desired setting.

An arrow or multiple arrows next to the setting, e.g. large 串 , indicate that the preset capacity (see the section "Menu - Set cup size") has been changed.
Two cups at once
Once you have selected a black coffee or milky coffee drink (for some appliances, this applies only to black coffee), touching [P] prepares two cups simultaneously as soon as you touch [start/stop] to begin dispensing. The setting is shown on the display.
- Touching the appropriate symbol selects the desired drink.
Touch [P].
Place two prewarmed cups at left and right underneath the beverage outlet 4.
- Touch [start/stop] to begin dispensing the beverage.
The selected drink will be brewed and will then be dispensed into the two cups.

The drink is prepared in two stages (two grinding operations). Please wait until the process is completely finished.

Depending on the type of appliance:
The function "Two cups at once" may be available only for black coffee, not for milky coffee drinks.
Preparing coffee drinks
The appliance must be ready for use.
- Place a prewarmed cup underneath the beverage outlet 4.
- Touch the appropriate symbol to select the desired drink, Espresso or Coffee. The name of the drink and the currently active values for strength and cup size are shown in display.
Coffee
regular
medium
i You can change the cup size and coffee strength by touching [ml] and [ ] .If you select Ground coffee, follow the procedure described under "Preparation using ground coffee".
For example:
- Touch [ml] repeatedly until the display shows large.
- Touch [] repeatedly until the display shows mild.
- Touch [start/stop] to begin dispensing the beverage.
The coffee is brewed and then dispensed into the cup.
You can touch [start/stop] again to prematurely halt dispensing.
Preparation using milk
This fully automatic coffee machine possesses an integrated milk system that enables you to prepare coffee with milk or milk froth or warm milk alone.

Risk of burns!
The upper and lower sections of the milk system 4b become extremely hot. After use, always let them cool down before you touch them.

Caution!
Dried milk residues are difficult to remove, so you should always clean the appliance after each use (see the section "Cleaning the milk system").

While milk is being prepared you may hear a whistling sound. This is due to the technical nature of the milk system 4b.

Touch [start/stop] again to prematurely halt dispensing.
The appliance must be ready for use.
The milk tube and suction pipe must be connected.
Insert the suction pipe 4d into the milk container.
- Place a prewarmed cup or glass underneath the beverage outlet.
Coffee-based drinks with milk
Touch the appropriate symbol to select Espresso Macch., Caffe Latte, Latte Macchiato or Cappuccino.
The name of the drink and the previously specified values for strength and cup size are shown in display.
i You can change the cup size and coffee strength by touching [ml] and [0]. If you select Ground coffee, follow the procedure described under "Preparation using ground coffee".
- Touch [start/stop] to begin dispensing the beverage.
The milk or milk froth is dispensed into the cup or glass first. Then the coffee is brewed and runs into the cup or glass.
You can touch [start/stop] again to prematurely halt dispensing of the milk or coffee, touching [start/stop] twice stops the entire dispensing process.
Milk froth
- Touch the symbol to select Milk frath.
- Touch [ml] to select the cup size.
- Touch [start/stop] to begin dispensing the beverage.
Milk froth is dispensed from the beverage outlet.
Special beverages
Touch the "special beverages" button several times to select different drinks one after the other.
Items marked * are not present in all models.
Hot water
Before hot water is dispensed, the milk system should be cleaned and the milk tube removed (see the section "Cleaning the milk system"). If the milk system is not cleaned, small amounts of milk may be dispensed together with the hot water.

Risk of burns!
The milk system 4b becomes extremely hot. After use, always let it cool down before you touch it.
The appliance must be ready for use.
- Place a cup or glass underneath the beverage outlet 4.
- Touch the "special beverages" symbol repeatedly until Hot water appears on the display.
- Touch [ml] to select the cup size.
- Touch [start/stop] to begin dispensing the beverage.

If you see the message Please remove suction hose, proceed as follows:
Take off the milk tube 4c and then touch [start/stop] again.
Hot water will flow out of the outlet 4.

You can touch [start/stop] again to prematurely halt dispensing.
Warm milk *
Please read through first and take note of the section "Preparation using milk".
Then:
- Touch the "special beverages" symbol repeatedly until Warm milk appears on the display.
- Touch [ml] to select the cup size.
- Touch [start/stop] to begin dispensing the beverage.
Warm milk will flow out of the outlet 4.

You can touch [start/stop] again to prematurely halt dispensing.
Americano *
- Place a prewarmed cup underneath the beverage outlet 4.
- Touch the "special beverages" symbol repeatedly until Americano appears on the display.
- Select settings such as the cup size and strength as described in the section "Preparing coffee drinks".
- Touch [start/stop] to begin dispensing the beverage.
The coffee is brewed and then dispensed into the cup.

You can touch [start/stop] again to prematurely halt dispensing.
Flat White*, Kleiner Brauner* or Cafe Cortado*
Please read through first and take note of the section "Preparation using milk".
Then:
- Place a cup or glass underneath the beverage outlet 4.
Touch the "special beverages" symbol repeatedly until Flat White, Kleiner Brauner or Cafe Cortado appears on the display.
- Select settings such as the cup size and strength as described in the section "Preparing coffee drinks".
- Touch [start/stop] to begin dispensing the beverage.
First, the milk is dispensed into the cup or glass. Then the coffee is brewed and runs into the cup or glass.

You can touch [start/stop] again to prematurely halt dispensing of milk or coffee. Touching [start/stop] twice stops the entire dispensing process.
Pot function *
- Place a pot underneath the beverage outlet 4.
- Touch the "special beverages" symbol repeatedly until Pot function appears on the display.
- Touch [] to select the desired coffee strength.
- Touch [ml] to select the desired quantity (4 or 6 cups).
- Touch [start/stop] to begin dispensing the beverage.
The coffee is brewed and then dispensed into the pot.

You can touch [start/stop] again to prematurely halt dispensing.
Preparation using ground coffee
This fully automatic coffee machine can also be operated using ground coffee (but not instant coffee).

When using ground coffee, the setting for the strength of the coffee, dispensing two cups at once and aromaDouble Shot is not available.
The appliance must be ready for use.
- Place a prewarmed cup underneath the beverage outlet 4.
- Touch the appropriate symbol to select a black or milky coffee drink.
- Touch [] repeatedly until the display shows Ground coffee.
Open the ground coffee drawer 12.
Place no more than two level measuring spoons of ground coffee in the drawer.

Caution!
Do not place coffee beans or instant coffee in this drawer.
Close the ground coffee drawer 12.
- Touch [start/stop] to begin dispensing the beverage.
The coffee is brewed and then dispensed into the cup.

Touch [start/stop] again to prematurely halt dispensing.
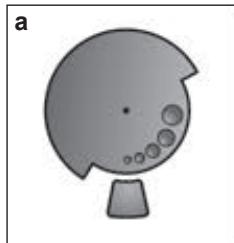
Adjusting the grind setting
You can use the rotary selector 11 to adjust the grind setting from coarse to fine.

Caution!
Adjust the grind setting only while the grinding unit is running, otherwise you may damage the appliance.

Risk of injury!
Do not reach into the grinding unit.
- With the grinding unit running, adjust the selector 11 from fine (a: turn anticlockwise) to coarse (b: turn clockwise).
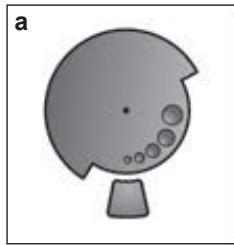

The new setting will not become apparent until after the second cup of coffee.

For dark roast coffee beans, choose a finer grind, for lighter beans a coarser grind.
The menu is used for changing individual settings, accessing information and launching processes.
- Touch [menu] to open the menu. In the display you will see the various setting options, the navigation symbols light up. The current setting is marked on the display.
[√] = move down
[ \text{[ok√]} = \text{confirm / store} ]
[ ] = go back
[menu] = open the menu/ exit from the menu
Touching [ ] displays each setting or selection option in order. After you reach the lowest menu item the topmost one is shown again.
For example:
Setting the coffee temperature to max..
- Touch [menu]. The menu is opened.
- Touch [√] repeatedly until the display shows Coffee temperature.
- Touch [ok√], the display shows e.g. high
- Touch [√] repeatedly until the display shows max.
- Touch [ok√] to store the setting. The display shows the confirmation.
The menu item Coffee temperature appears.
- Touch [ ] to exit from the menu.
You can specify the following settings:
Cleaning and care
Starting the special service programmes. You can select Rinse the milk system, Descale, Clean or calc'nClean.
- Use [√] to choose the desired programme and touch [ok√] to confirm your choice.
- Touch [start/stop] to begin running the programme.

Important: Be sure to take note of the section on "Service programmes".
Info Service programmes
Depending on the type of appliance)
Display how many beverages can still be prepared before it will be necessary to run one of the service programmes.
Use [ ] to display Clean after --- or Descale after --- .
Touch [S] to exit from the display.

For technical reasons the counter does not represent a precise number of cups.
Coffee-milk ratio
The coffee-milk mixing ratio set in the factory can be adjusted in several steps.
- Use [√] to select the beverage (only for coffee drinks with milk) and confirm with [ok√].
Use [ ] to select the desired mixing ratio (setting of milk content in %) and confirm with [ok].
The setting is saved.
Example: If a value of 30% is selected, 30% milk and 70% coffee will be dispensed.
Favourite
The menu item Favourite can be used to create or change personalised beverages. The number of Favourites depends on the model of the appliance.
Use [ ] to select a new or existing profile and confirm with [ok√]
- Touch the desired beverage and confirm with [ok ]
- Your selection for the beverage settings appears on the display depending on the beverage, e.g. ml or Coffee-milk ratio.
Make your settings and confirm with [ok√] each time.
The beverage is now saved in the profile.
Set cup size
Set up the volume dispensed for each drink and each size of cup. The volumes set up in the factory can be adjusted stepwise.
Use [√] to choose a drink and touch [ok√] to confirm your choice.
Use [√] to choose the desired volume and touch [ok√] to confirm your choice.
The setting is then saved.
Water hardness
Set this to the hardness of the local water supply.
Level 1, 2, 3, 4 or Softening system can be selected. The preset level of water hardness is level 4.
Use [√] to choose the desired water hardness and touch [ok√] to confirm your choice.
It is important to set the water hardness correctly, so that the appliance indicates accurately when the descaling programme should be run.
You can check the water hardness using the enclosed test strip or by asking your local water supplier. If a water softening system is installed in the house, please select the Softening system setting.
- Briefly dip the test strip in the water and check the result after one minute.
| Level | Water hardness |
| German (°dH) | French (°fH) |
| 1 | 1-7 | 1-13 |
| 2 | 8-14 | 14-25 |
| 3 | 15-21 | 26-38 |
| 4 | 22-30 | 39-54 |
Automatic shut-down
Setting how long the appliance should wait after the last drink was prepared before it automatically switches itself off.
You can specify values from 15 minutes to 8 hours. The factory setting is 30 minutes.
Use [√] to choose the desired interval and touch [ok√] to confirm your choice.
Coffee temperature
Specifying the temperature for coffee drinks and hot water.
You can choose normal, high, or max.
The setting applies to all types of drink preparation.
Use [V] to choose the desired temperature level and touch [ok√] to confirm your choice.
Water filter
Specifying whether a water filter should be activated or whether no filter is used.
You can choose Activate new filter or No filter.
Using a water filter can prevent the build-up of limescale.
Water filters are available from retail outlets or from customer services (see the section "Accessories").
i Important: Before you can use a new water filter it will need to be rinsed.
Use the measuring spoon 8 to press the water filter firmly into the water tank 5.
- Fill the water tank with water up to the "max" mark.
Connect the milk tube 4c to the milk system 4b and the suction pipe 4d.
Insert the end of the suction pipe 4d into the drip plate 17b.
- Touch [menu] and use [√] to select Water filter.
- Touch [ok√] and use [√] to select Activate new filter.
Empty the drip tray and re-insert.
- Touch [ok√] to confirm.
Water will now flow through the filter to rinse it.
- Then empty the drip tray and re-insert. The appliance is ready for use again. Rinsing the filter simultaneously activates the setting for displaying the message "Please change water filter".
When this message appears, or at the latest after two months, the filter will no longer be effective. It needs to be replaced for reasons of hygiene and to prevent a build-up of limescale (which could damage the appliance).
If you do not intend to insert a new filter, select the setting No filter and touch [ok√] to confirm.

If the appliance has not been used for a prolonged period (for example, while you are on holiday), the existing filter should be rinsed before the appliance is used again. To do this, simply dispense a cup of hot water.
Languages
Setting up the language to be used for display texts.
Use [ ] to choose the desired language and touch [ok] to confirm your choice.
Frost protection
Service programme to prevent frost damage during transportation and storage. This programme completely empties the appliance.

The appliance must be ready for use and the water tank 5 must be filled.
- Touch [start/stop] to begin running the programme.
- Remove the water tank; the appliance automatically empties all its pipes and then switches itself off.
Empty the water tank 5 and the drip tray 17.
Key tones
Switches on or off the tones that you hear when you touch the control panel.
- Touch [ok√] to confirm your choice.
Use [ ] to choose Key tones ON or Key tones OFF and touch [ok] to confirm your choice.
Beverage statistics
Depending on the type of appliance) Shows the volume of drinks dispensed since the appliance was taken into service.
- Touch [☑] to exit from the display.
Factory settings
Resets your own settings to the condition when delivered.
- Touch [start/stop] to clear all your own settings.
Care and daily cleaning

Risk of electric shock!
Before cleaning the appliance, unplug it from the mains. Never immerse the appliance in water. Do not use a steam cleaner.
Wipe the outside of the appliance with a soft, damp cloth.
Clean the control panel with a microfibre cloth.
- Do not use any cleaning agents containing alcohol or spirits.
- Do not use abrasive cloths or cleaning agents.
Always immediately remove any limescale, or residues of coffee, milk, cleaning or descaling solution. It is possible for corrosion to form underneath such deposits.
- New sponge cloths may contain salts that can cause rust films to form on stainless steel, so such cloths should always be thoroughly rinsed before use.
Pull the drip tray 17 and coffee grounds container 17c towards the front and remove them. Take off the panel 17a and drip plate 17b. Empty and clean the drip tray and coffee grounds container.
Wipe out the inside of the appliance (holder, trays) and the drawer for ground coffee (this cannot be removed).
- Remove the float 17d and clean it with a moist cloth (depends on the type of appliance).

Do not put the following parts in the dishwasher:
Panel of drip tray 17a, cover 4a, brewing unit 14, water tank 5 and aroma cover 10.

The following parts may be cleaned in the dishwasher:
Drip tray 17, drip plate 17b, coffee grounds container 17c, measuring spoon 8 and the upper and lower parts of the milk system 4b.

Important: The drip tray 17 and coffee grounds container 17c should be emptied and cleaned every day in order to prevent deposits.

If the appliance is cold when switched on, or if it is switched off after dispensing coffee, it rinses automatically. The system is therefore self-cleaning.

Important: If at any time the appliance is not used for a lengthy period (e.g. holiday), clean the entire appliance thoroughly, including the milk system 4b and brewing unit 14.
Cleaning the milk system

Be sure to clean the milk system 4b every time you make a drink involving milk!

The milk system 4b is automatically cleaned with a short jet of steam directly after preparing a milk drink. For particularly thorough cleaning, the milk system 4b can be automatically rinsed with the programme "Cleaning the milk system" (see the section "Service programmes - Cleaning the milk system").
Cleaning by hand

Risk of burns!
The milk system 4b becomes extremely hot. After use, always let them cool down before you touch them.
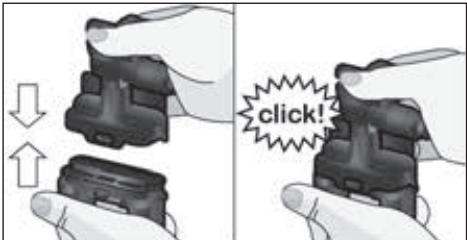
Take the milk system 4b apart to clean it:
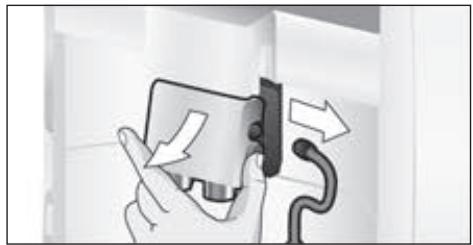
Push the beverage outlet 4 right down.
Take off the cover 4a towards the front and pull off the milk tube.
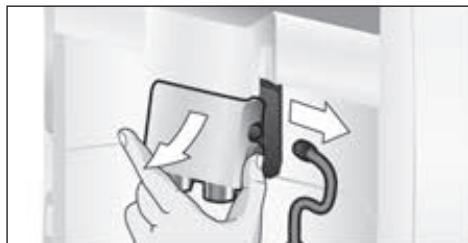
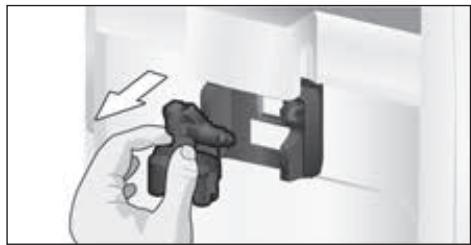
Remove the milk system 4b by pulling it straight forward.
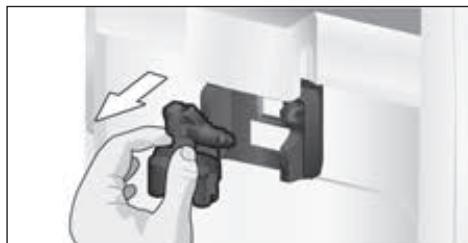
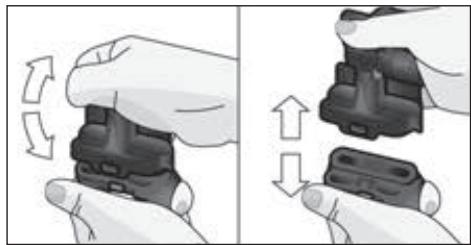
Take apart the upper and lower parts of the milk system 4b.
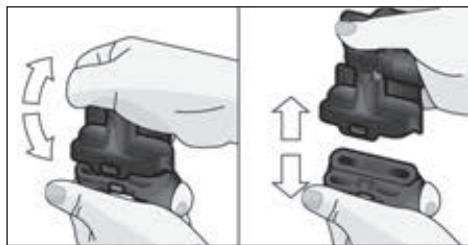
- Separate the milk tube from the suction pipe.
Clean the individual parts with washing-up liquid and a soft cloth.
Rinse all parts with clean water and dry them.
The upper and lower parts of the milk system 4b, the milk tube 4c and the suction pipe 4d can also be cleaned in a dishwasher.
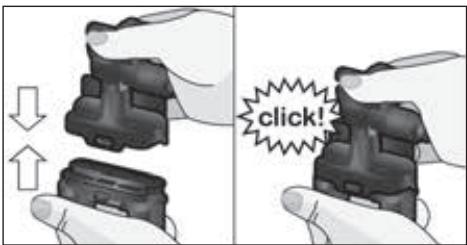
Reassemble the individual parts.
- Place the milk system 4b back in the appliance from the front, making sure it is straight.
Replace the cover 4a.

See also the Quick reference guide in the storage compartment 16.
In addition to the automatic cleaning programme, the brewing unit 14 should be removed regularly for cleaning.
Use the main switch ① 1 to switch the appliance completely off.
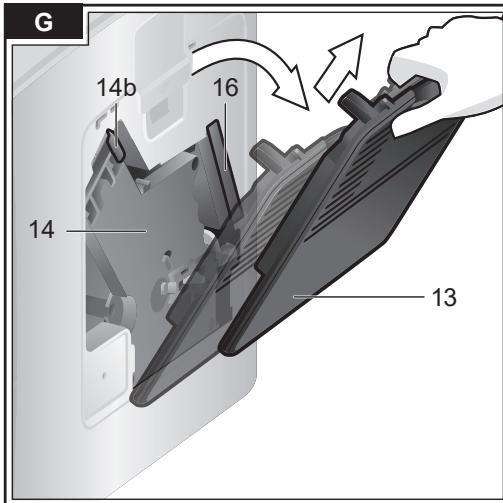
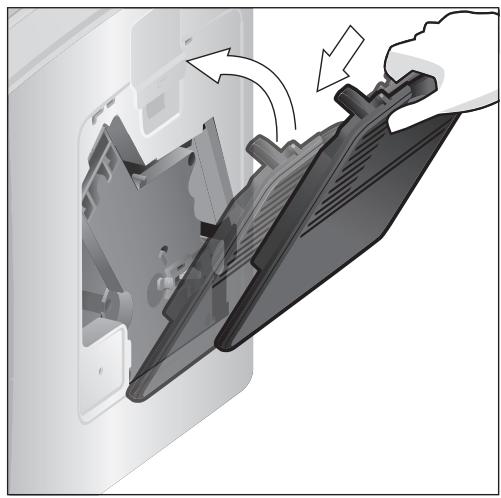
- Open the door 13 to the brewing unit.
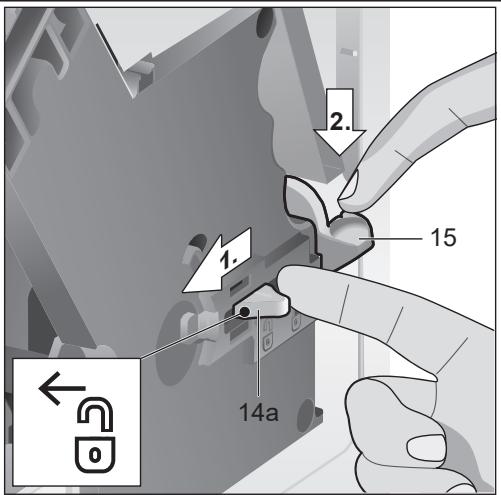
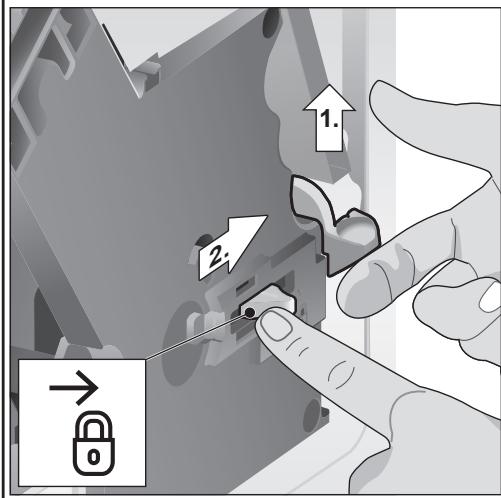
- Slide the red latch 14a on the brewing unit 14 all the way to the left.
Press the eject lever 15 right down. The brewing unit will be released.
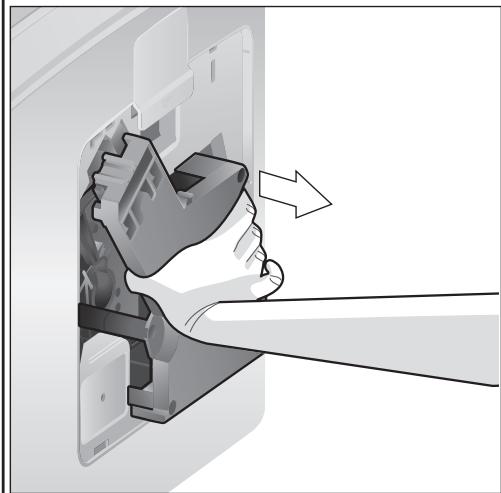
Take hold of the brewing unit 14 by the recessed grips and carefully remove it.

Important: Clean it without using washing-up liquid and do not put it in the dishwasher.
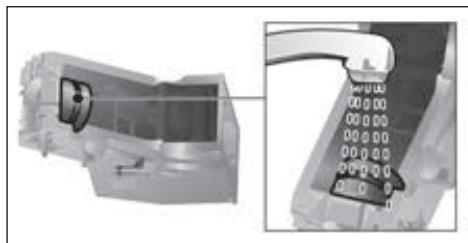
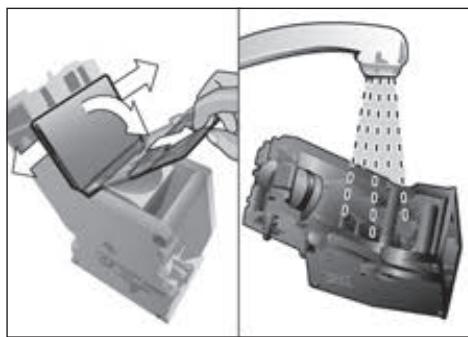
- Remove the cover 14b and thoroughly clean the brewing unit 14 under running water.
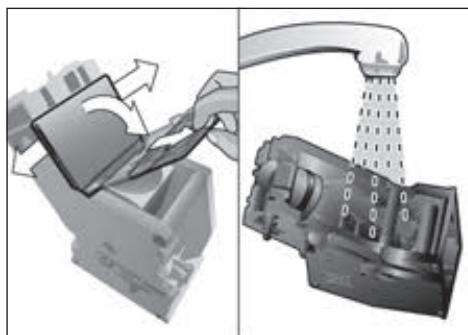
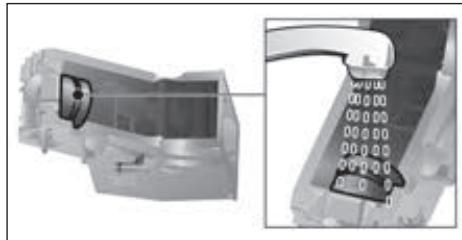
Thoroughly clean the strainer of the brewing unit under the water jet.
Thoroughly clean the inside of the appliance with a moist cloth, removing any coffee residues.
- Allow the brewing unit 14 and the inside of the appliance to dry.
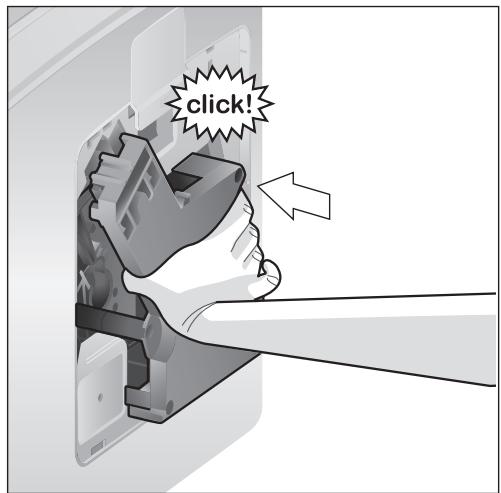
- Replace the cover 14b on the brewing unit and then push the brewing unit 14 back into the appliance until it latches into place.
Press the eject lever 15 right up.
- Slide the red latch 14a all the way to the right and close the door 13.
Service programmes

See also the Quick reference guide in the storage compartment 16.
Following prior notification, either
Descalng necessary or
Cleaning necessary or calc'nClean necessary.
appears in display 3 at certain intervals.
The unit should immediately be cleaned or descaled using the appropriate programme. The two processes Descale and Clean can optionally be carried out together using the calc'nClean function (see the section "calc'nClean"). Failure to carry out the service programme according to the instructions may damage the appliance.

Important: if descending is not performed on the appliance in good time, then the following appears:
Descaling overdue. Appliance will soon be locked press menu for 3 sec. Immediately perform the descending process in accordance with the instructions. If the appliance is locked, it can only be operated again once the descending process has been carried out.

Caution!
For each of the service programmes, use descending and cleaning agents as described in the instructions.
Never interrupt a service programme. Do not swallow any cleaning fluids! Never use vinegar, citric acid or any vinegar-based or citric acid-based agents. Never place descending tablets or other descending materials in the coffee drawer 12!
Before starting the service program
(Descale, Clean or calc'nClean) remove the brewing unit, clean it as instructed and replace it.
Specially developed suitable descending and cleaning tablets are available from retail outlets or from customer services (see the section "Accessories").
Cleaning the milk system
Takes about 1 minute.
Touch [menu] to open the menu.
Use [√] to choose Cleaning and care and touch [ok√] to confirm your choice.
Use [√] to choose Rinse the milk system and touch [ok√] to confirm your choice.
- Touch [start/stop] to begin running the programme.
The display 3 will indicate the progress of the programme:
- Place an empty glass under the beverage outlet 4 and stand the end of the suction pipe 4d in it.
- Touch [start/stop]. The milk system will now clean itself automatically.
- Then empty the glass and clean the suction pipe 4d.
You should also regularly clean the milk system manually (dishwasher or by hand).
Dscaling
Takes about 30 minutes.
The line at the bottom of the display indicates the progress of the descending process.

If there is a water filter in the water tank 5, be sure to remove it before starting the service programme.
- Touch [menu] to open the menu.
Use [√] to choose Cleaning and care and touch [ok√] to confirm your choice.
Use [√] to choose Descale and touch [ok√] to confirm your choice.
- Touch [start/stop] to begin running the programme.
The display 3 will indicate the progress of the programme:
Empty and re-insert the drip tray 17.

The following request appears: Remove water filter if inserted start.
- Remove the filter and then touch [start/stop] again.
Pour lukewarm water into the empty water tank 5 up to the "0.51" mark and then dissolve one Siemens descaling tablet TZ80002 in it.
- Touch [start/stop].
- Place a container with a capacity of 0.5 litre under the beverage outlet 4.
- Place the end of the suction pipe 4d in the container.
- Touch [start/stop].
The descending programme will now run for about 20 minutes.

If there is not enough descending solution in the water tank 5, you will see the prompt Refill descaler start.
- Add more descending solution and then touch [start/stop] again.
Rinse the water tank 5 and refill it with fresh water up to the "max" mark.
If you use a filter, replace it now.
- Touch [start/stop].
The descending programme will now run for about 1 minute and rinse the appliance.
Empty and re-insert the drip tray 17.

Important: Wipe over the appliance with a soft damp cloth to ensure that you immediately remove any traces of descending solution. It is possible for corrosion to form underneath such deposits. New sponge cloths may contain salts that can cause rust films to form on stainless steel, so such cloths should always be thoroughly rinsed before use. Clean the suction pipe 4d of the drinks outlet particularly carefully.
The appliance has finished descaling and is ready for use again.
Cleaning
Takes about 9 minutes.
The line at the bottom of the display indicates the progress of the descending process.
- Touch [menu] to open the menu.
Use [√] to choose Cleaning and care and touch [ok√] to confirm your choice.
Use [√] to choose Clean and touch [ok√] to confirm your choice.
- Touch [start/stop] to begin running the programme.
The display 3 will indicate the progress of the programme:
Empty and re-insert the drip tray 17.
Open the ground coffee drawer 12.
- Drop one Siemens cleaning tablet in the drawer 12 and close it.
- Touch [start/stop].
The cleaning programme will now run for about 7 minutes.
Empty and re-insert the drip tray 17.
The appliance has finished cleaning and is ready for use again.
calc'nClean
Takes about 43 minutes.
calc'nClean combines the functions Descale and Clean.
If both programmes are due to be carried out close together the fully automatic coffee machine will automatically suggest this service programme.
The line at the bottom of the display indicates the progress of the descaling process.

If there is a water filter in the water tank 5, be sure to remove it before starting the service programme.
- Touch [menu] to open the menu.
Use [√] to choose Cleaning and care and touch [ok√] to confirm your choice.
Use [√] to choose calc'nClean and touch [ok√] to confirm your choice.
- Touch [start/stop] to begin running the programme.
The display 3 will indicate the progress of the programme:
Empty and re-insert the drip tray 17.
Open the ground coffee drawer 12.
- Drop one Siemens cleaning tablet in the drawer 12 and close it.
- Touch [start/stop].

The following request appears: Remove water filter if inserted start.
Remove the filter and then touch [start/stop] again.
Pour lukewarm water into the empty water tank 5 up to the "0.51" mark and then dissolve one Siemens descending tablet TZ80002 in it.
- Touch [start/stop].
- Place a container with a capacity of 1 litre under the beverage outlet 4.
- Place the end of the suction pipe 4d in the container.
- Touch [start/stop].
The descending programme will now run for about 28 minutes.

If there is not enough descending solution in the water tank 5, you will see the prompt Refill descaler start.
- Add more descending solution and then touch [start/stop] again.
- Rinse the water tank 5 and refill it with fresh water up to the "max" mark.
If you use a filter, replace it now.
- Touch [start/stop].
The descending programme will now run for about one more minute, and then the cleaning programme will run for about 7 minutes and rinse the appliance.
Empty and re-insert the drip tray 17.

Important: Wipe over the appliance with a soft damp cloth to ensure that you immediately remove any traces of descending solution. It is possible for corrosion to form underneath such deposits. New sponge cloths may contain salts that can cause rust films to form on stainless steel, so such cloths should always be thoroughly rinsed before use. Clean the suction pipe 4d of the drinks outlet particularly carefully.
The appliance has finished descaling and is ready for use again.

Important: If any of the service programmes is ever interrupted, for instance by a power failure, please proceed as follows:
- Rinse the water tank 5 and refill it with fresh water up to the "max" mark.
- Touch [start/stop].
The appliance will be rinsed for approx.
2 minutes for safety reasons.
- Empty and re-insert the drip tray 17. The aborted service programme must be restarted.
Tips on energy saving
- When the fully automatic coffee machine is not in use, use the mains switch ① 1 on the front of the appliance to switch it off.
In the menu, set the Automatic shut-down period to 15 minutes.
If possible, do not interrupt the dispensing of coffee or milk froth. Stopping a process prematurely results in higher energy consumption and the drip tray fills up more quickly.
- Descale the appliance regularly to avoid a build-up of limescale. Limescale residues cause higher energy consumption.
Frost protection

Caution!
To prevent frost damage during transportation and storage, completely empty the appliance beforehand.
See the section "Menu - Frost protection".
Storing accessories
The fully automatic coffee machine has special compartments to hold the measuring spoon and the Quick reference guide.
To store the measuring spoon 8, lift off the water tank 5 and place the spoon in the preformed recess 7.
To store the Quick reference guide, open the door to the brewing unit 13 and insert the guide into the space provided 16.
Accessories
The following accessories are available from retailers or from customer service:
| Accessories | Order number
Retail / Customer service |
| Cleaning tablets | TZ80001/00311807 |
| Descaling tablets | TZ80002 / 00576693 |
| Water filter | TZ70003 / 00575491 |
| Care set | TZ80004 / 00576330 |
| Milk container with “freshLock” lid | TZ80009N / 00576166 |
Disposal

Dispose of packaging in an environmentally-friendly manner. This appliance is labelled in accordance with European Directive 2012/19/EU concerning used electrical and electronic appliances (waste electrical and electronic equipment - WEEE). The guideline determines the framework for the return and recycling of used appliances as applicable throughout the EU. Please ask your specialist retailer about current disposal facilities.
Guarantee
The guarantee conditions for this appliance are as defined by our representative in the country in which it is sold. Details regarding these conditions can be obtained from the dealer from whom the appliance was purchased. The bill of sale or receipt must be produced when making any claim under the terms of this guarantee.
Changes reserved.
Simple troubleshooting
| Problem | Cause | Solution |
| Coffee or milk froth quality varies considerably. | Build-up of limescale in the appliance. | Descale the appliance as described in the instructions. |
| No hot water dispensed. | The milk system or its holder is not clean. | Clean the milk system or its holder (see the section “Cleaning the milk system”). |
| Too little milk froth, or none at all, or the milk system is not taking in any milk. | The milk system or its holder is not clean. | Clean the milk system or its holder (see the section “Cleaning the milk system”). |
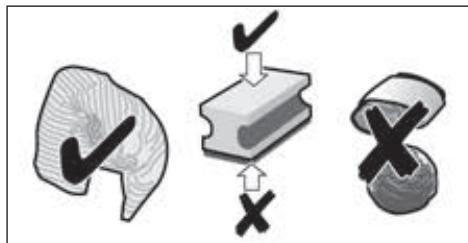
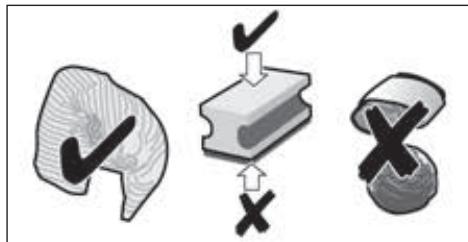
| Milk not suitable for foaming. | Do not use milk that has already been boiled. Use cold milk with a fat content of at least 1.5%. |
| The milk system is incorrectly assembled. | Moisten the upper and lower sections and fit them together. |
| Build-up of limescale in the appliance. | Descale the appliance as described in the instructions. |
| The selected per-cup quantity is not reached. Coffee dispensing slows to a trickle or stops completely. | Coffee is being ground too finely, or the pre-ground coffee is too fine. | Adjust the grinding unit to a coarser setting. Use a coarser ground coffee. |
| Heavy build-up of limescale in the appliance. | Descale the appliance as described in the instructions. |
| Coffee has no “crema”. | Unsuitable type of coffee. | Use a type of coffee with a higher proportion of robusta beans. |
| The beans are no longer fresh. | Use fresh beans. |
| The grinding setting is not suitable for the beans. | Adjust the grinding unit to a finer setting. |
| Coffee is too “acidic”. | The grinding setting is too coarse or the pre-ground coffee is too coarse. | Adjust the grinding unit to a finer setting or use finer pre-ground coffee. |
| Unsuitable type of coffee. | Use a darker roast. |
| Coffee is too “bitter”. | The grinding setting is too fine or the pre-ground coffee is too fine. | Adjust the grinding unit to a coarser setting or use coarser pre-ground coffee. |
| Unsuitable type of coffee. | Change the type of coffee. |
| If you are unable to solve the problem, always call the hotline!
You will find the telephone numbers at the back of these instructions. |
| The coffee tastes "burnt". | The brewing temperature is too high | Reduce the temperature, see the section "Menu-Coffee temperature". |
| The grinding setting is too fine or the pre-ground coffee is too fine. | Adjust the grinding unit to a coarser setting or use coarser pre-ground coffee. |
| Unsuitable type of coffee. | Change the type of coffee. |
| The water filter does not stay in position in the water tank. | The water filter is not mounted correctly. | Firmly press the water filter straight down into the tank connection. |
| The coffee grounds are not compact and are too wet. | The grinding setting is too fine or too coarse, or not enough ground coffee has been used. | Adjust the grinding unit to a coarser or finer setting, or use 2 level measuring spoons of ground coffee. |
| Water dripped onto the inner floor of the appliance when the drip tray was removed. | Drip tray was removed too soon. | Wait a few seconds after the last drink was dispensed before removing the drip tray. |
| Display shows Please refill bean container although the container is already full, or the grinder is not grinding any beans. | Beans are not falling into the grinding unit (beans too oily). | Gently tap the bean container. Possibly change the type of coffee used. When the bean container is empty, wipe it with a dry cloth. |
| Display shows Please empty drip tray despite the drip tray being empty. | Emptying is not detected when the appliance is switched off. | When the appliance is switched on, remove and re-insert the drip tray. |
| The drip tray is soiled. | Clean the drip tray thoroughly. |
| Display shows Refill with still water or change filter | Water tank wrongly inserted. | Insert water tank correctly. |
| Carbonated water in the water tank. | Fill the water tank with fresh tap water. |
| Float is stuck in the water tank. | Remove the tank and clean thoroughly. |
| New water filter did not rinse according to the instructions. | Rinse the water filter according to instructions and then switch on. |
| Air in the water filter. | Dip the water filter into water until no more air bubbles escape, replace the filter. |
| Water filter is old. | Insert a new water filter. |
If you are unable to solve the problem, always call the hotline!
You will find the telephone numbers at the back of these instructions.
| Problem | Cause | Solution |
| Display shows
Please clean brewing unit,
then replace | Brewing unit is soiled. | Clean the brewing unit. |
| Too much pre-ground coffee in the brewing unit. | Clean the brewing unit. Place no more than two level measuring spoons of ground coffee in the drawer. |
| The mechanism of the brewing unit is stiff. | Clean the brewing unit (see the section “Daily maintenance and cleaning”). |
| Display shows
Please restart appliance | Appliance is too warm. | Leave the appliance to cool down. |
| Brewing unit is soiled. | Clean the brewing unit. |
| Display shows
Descaling insufficient.
Repeat process | Incorrect or insufficient descaler or excessive scale existing on appliance. | Perform descaling programme again. |
| Display shows
Please let appliance cool down | Appliance is too hot. | Switch off appliance for 30 minutes. |
| Display shows
Error
Please contact hotline | The appliance has a fault. | Please contact the hotline. |
| If you are unable to solve the problem, always call the hotline!
You will find the telephone numbers at the back of these instructions. |
Technical specifications
| Power connection (voltage – frequency) | 220-240 V – 50/60 Hz |
| Power rating | 1500 W |
| Maximum static pump pressure | 15 bar (TE651.., TE653.., TE654..)
19 bar (TE655.., TE657..) |
| Maximum water tank capacity (without filter) | 1.7 l |
| Maximum capacity of the coffee bean container | ~300 g |
| Length of power cable | 100 cm |
| Dimensions (H x B x D) | 385 x 301 x 458 mm |
| Weight, empty | 10-12 kg |
| Type of grinding unit | Ceramic |
Chere amatrice de cafe,
cher amateur de cafe,
normal doubleshotfort+
fort comp.poudre
Informations relatives aux programmes de maintenance
Proportion lait/café
Baxhble npaBnla TexHnKn 6e3oNaCHOCTN 128
Objem noctabkn 130
063op 130
063op-3JemeHbI ynpaBneHnra 131
Ducnnei 132
Iodrotobka ka pa6ote 133
Co6cTBeHHbIe HacTpoiKn «U36paHHOe> 134
PnirtoBJIeHne HAnrTKOB. 134
PpIroTOBnEHNe KOpeHbIX HAnNTKOB ....136
PnroTOBneHHe HAnrKOB C MoJIOKOM...136
Oco6bIe HAnITKn 137
ПригOTOBлЕнеHaNTKOB
ИЗ молотoroКофe............139
HactpoKa cTepeHn nomola 139
Meho 140
YxOДи exeIeHbHa OUcIcTa 143
OuNTka MOJouHoi CNCTembl 144
OuIncTka 3aBapouChoro 6noka (pnc. G) ...145
CepBnchbIe nporpaMMbl 145
OuNTka MOnoUHOH CNCTeMbI 146
UdaJIeHHe NaKINn 146
OuInCTka 147
calc'nClean 148
CoBeTbI IO 3KOHOMN 3JIeKTo3Heprn1 149
3aunTa OT 3amep3aHnra. 149
XpaheHne npHaadJeKHOCTe 149
PpHaIeXHocTn 149
Utniuaia 150
UcIOBna rapaHTnHoro 06CJyXnBaHHa 150
TexHHueckne xapaKTepeNCTnKn 150
CamocToTaeIbHoe ycTaPahEnHe He6oJIbIuX npO6JeM 151
ИспOLTБОВАне по НаЗHAчЕнIO
3TOT npi6op npeHa3NaueH TOIbKO IJIa DOMaSHHeRo IcNoIb3OBAHnI.
IcnoJb3yIte npnbop TOnbKO BHyTpI NOMeUeHn Ipr KOMHaTHoI TemnepaType Ha BbICOT He BblSe 2000 m naYpOBHeM MOpra.
BaxHbIe npaBnla TexHnKn 6e3OpacHOCTN
BHHMaTeIbHo npOuTnTe
HnCTpyKcNIO NO 3KcPnyaTaCnN,
co6nIoJaTe ee yKa3aHnA
n TuaTeIbHO xpaHnTe ee!
PipeDaBaJ np6Op dpyrOmy
YeNoBeKy, daIte eMy 3Ty
HnCTpyKcNIO.
Данныnpибор может Исполь-30ВаТьСЯ DeТьМВ BOЗразTeOT 8 leT n CTapSe, a TAKKeЛИцamN C OрpaHnueHHbIMNФИЗУЕCKIMN, ceHcOPHBIMNИлу yMCTBeHHbIMN cNoCOb-HOCTaTKOMONbITA n/NII N3HaHn, ecI N OHI HaxODЯТСЯ NOД пИСМOTpOM IINI pОCSе NOЛЧЕHENY uKa3aHn ПОБЗОПАСHOMY INСПЛь3OBaHnIOprIbopa n PОСLE TOrO, KaK OHI OCO3HaJI N ONAChOCTN, CBЯЗAHbIE C HeNPaBnIbHbIM NICNoIb3OBAHnEM.ДeTeN MlaДшe 8 leT HeJIb3Я NOДпYCKaTb K PrNi6bopyN UShypu NiTaHnY; IM HeJIb3ЯNOЛь3OBaTbСЯ PrIN6bOpM.ДeТЯМ 3aIpeUSeHo IrgaTb C PrIN6bOpM.
DeTAM pa3peWaaetcBbINOJHrTb OunchKy u NOpIb3OBAteJIbCKoe 06CJIyXnBaHne TOJIbKO B TOM Cnyuae,ecNI OHN DoCTNI BO3pacta 8 JeT n HaxoJrTcN IOd PnICMOTPOM.
(Pnc.AHa paacklaIbIbAIOUxxCsCTpaHnucax)
Полноctью abTomatnueckая Кофемашна
Hnctpykunno 3Kcnnyataun
KpaTka INHCTpykCIN
山naHdIaMOJOKaN BCacbIBaIOUaA Tpy6ka
INHДИКaTOpHaЯ nOJOCKaДЯ onpeJeIeHnja JecTKoCTN BODJI
Mepnaj IooKka IJMa MOnOToro KoOfe
ΦnJIbTpДЯ BOdbI*
EmKocTbДЯMOJOKaC KpbIshKoI «freshLock»*
TbIeTKn dIy ydaJeHna HauuN*
0630p
(PnC.B,C,D,E,FnGHa packKlaDbIbVAIOUxxCsCTpaHnCuax)
1 CeteBoB BbIKnHouaTeIb ①
2 PanaJIb ynpaBneHnna (CM. cIeJd. CTrpaHnUy)
3 Dusrnnei
4 YcTpoiCTBO pa3JIbBa HAnITKOB (KoFe, MoIOKO, ropJyAra BOa), peryIINpyEmoe NO BbICote
a) Kpbioka
b) Monouhna cncTeMa/ycTpoiCCTBOДЯ pa3JIuBa KoΦe (и3ДВyxЧаTei)
c) lIaHr dIy MoIoka
d) BcabsbAiooJra Tpy6ka
5 CbemHbI KOHTeHep DJIY BODbI
6 KpbiUka KOHTeHepa IJRA BoDJI
7 OTeK dIy XpaHeHMy MepHOJ IoxKn dIy MoToTOro KoOe
8 Mepnaj lojka dny MoJToRo KoOfe (npncno6JeHne dny yCTaHOBKn 0IbTpa dny BObl)
9 EMKocTb IJRA KoFeiHbIX 3epeH
10 Kpbiika, coxpanhaouza apomat
11 Noborotnby peyraTop CTepeHNIOMOJA
12 BbIbNkHoi OTeK dIy MoIOTOro KoΦe (MOIOTbI KcΦe/Ta6NeTka dIy OChCTKn)
13 DBepea 3aBapOchoro 6noka
14 3aBapouhIb6IOK
a)ФИKKcaTop
b) KpbIwka
15 PbyarДЯВыбраьваня
16 OTeK IJIa XpaHeHna KpaTKoI HNCTpyKcnn
17 POnDOn
a) 3acIIOHka
b) ItoK dIa c6opa KaIeIb (n3 DByx YacTei)
c) EMMOCTbIa KooeHOnrUuN
d) TOnJIaBOK
18 Otcek dIy xpaHEnia Ka6eIa
19 TnnoBa TaTabnUka (MoJeIb, FD-Homep)
*B INHCTpyKUIN NO 3KcNJIyatauIN
ONICbIBaIOCTpa3JIuHbIeBapNaHTbl.
06o3HaueHHbIe * 103uCmN IMeOTcra TOnbKO
B onpeJeIeHbIX MoIeJx npIbopa.
i ΦyHKcnei aromaDouble Shot MOxHNOIb3OBAtBCa IЯ npiroTOBHeHnBCEX KOeHbIX HAnITKOB C obemom KoFe He MeHee 35 MJI. IЯ HAnITKOB MaIoro obema, HApnMpE, MaJeHbKOu aUkN 3cnpecco nJIn npn HacTpoKe [P] 3TaФyHKsna He DeIcTByeT.
Bb6op pa3mepa qawkn
ПикаганемКсmboly[mI]ИнДиВиДу-aJIbHo Bblbupaetc OБьem HAnNTka.
Bo3MOxHbI cIeIyUOuNHe NaCTpoKn:
MaJIeHbKIn CpeHn 60nbwo
BbI6epnTe Jxenaembl HAnITOK, npNKoc-HyBUnbc K COOTBeTCTBYUOeMy CmMBOJy.
KacaiTeCb CmBOna [ml]doTexnop, NokaHaDnCnJIe He NoRbNTcHyXHa HAcTpoiKa.
i CTepeKn HCTePkn pIOM c NaCTpoKo, Hapmep, 60JIbwo I NOKa3bIBaOT, YTO yCTaHOBNeHHoe N3rOToBnteNem KOINueCTBO HAnNTka (cm. rJabv <MeHoo-HacTpoKpa3M. qaI).6bIIO n3MeHeHO.
Дычашксрау
Kacahnem [P] nocne BbIbopa KofoeHoro HauNTka NIN KoofoeHNO-MONOHoro HauNTka (Дя ONpeDeHHO Tnna npBopa - ToJIbKO KofoeHoro HauNTka) roTOBArTcBa DBe YaShKn OndOBpeMeHHO, KaK TOnbKO npriToBJeHne 6ydet 3anyuEHO npNKACAHNEM K CmMbony [start/stop].HaCtpoNk oTo6paxa-etcHa DCnJIee.
BbIepeHTe Jxemaembl HAnITOK, npNKoc-HyBUnbc K COOTBeTCTByUOeMy CmMBOJy.
PnIKoCHInTeCb K [P].
IocTaBbTe DBe YaShKn CJIeBa N CnpBaN IOd yCTpOJCTBO pa3JIbHa HAnITKOB 4.
■ПикocнTeCbК [start/stop],чToБы
HaHaTb ПиroTOBJIeHne HAnITKOB.
BbIbpaHHbI HnHITOK 3aBapINBaETcN pa3JIbAeTc3aTeM B O6e YaIKN.

HaHTOK pInrOToBnBaetcB DbA 3Tana (Db npoucecca CmaIbIbAHnKoΦe). PIoJoxdnte, noka npoucecc noJIHOCTbU He 3aKOHHTCra.

B 3aBncmoctn OT Tnna npnbopa:Функця «ДBE YauKu cpa3y»npedIarafaTcra TOnbKOДЯ KoFeiHbIXHaHNTKOB,ДЯ KoFeiHO-MOLOUHbIXHaHNTKOB ee Bb6paTb HeNb3r.
PnroTOBJIeHne KOΦeHbIX HAnNTKOB
PnboopdoJxKeH6bIbTOB Kpa6oTe.
IocTaBbTe nporpeTu Yo aUkY noD yCTpoiCTBO pa3nBa HAnNTKOB 4.
BbI6epTeKeJaembIKoFeHbHn HAnNTOK 3cnpecco nnN KoFe, npNKoCHyB- uIncb K COOTBeTCTByIOUeMy CmBOJy. Ha3BaHHe HAnNTka n HAcTpoEHbIE B DaHHoe BpeM 3HaueHnKpeNoCTn KoFe n pa3Mepa YaShKn OTo6paKaIoTCra Ha dncJIee.
KoΦe
HOpMaJIbHbIe
CpeHn
i Pa3Mep YaWeK IN KpeNoCTb KoFe MoXHO N3MeHnTb, KOcHyBUnCb [mI] n[O].Pnp BbIbope MoIOT. KoFe BblONHnTe DeNCTBnA, ONnCaHHbIe B pa3JeIe «PpuroToBnHeNe KoFeHbIX HAnITKOB N3 MOlOTOro KoFe>
Hanpumep:
KacaiTecb [ml]doTexnop,okaHa DnCnnee He NOBITc8 60JIbwoi.
KacaiTeCb [O]doTexnop,poKaHa DnCnnee He NOBNTcra Cna6bI.
■PnKocHntecb K [start/stop],YTo6bl HaaytbpnpiroTOBJIeHHe HAnNTKOB. KoPe 3aBapnBaetcN 3aTeM HaJIINBaETcR B YaIky.

Ppi npiroTOBneHn HAnNTKOB n3 MoNToTOKoFe HaCTpoIka KpeNoCTn KoFe, pnpiroTOBneHne DByx ChaIeK n aromaDouble Shot oHOBpeMeHHo He DeiCTbYIO.
Pπp6opdoJoxken6bItbrotOBkpa6oTe.
IocTaBbTe nporpeTuO uAaKU NOy UcTpoiCTBO pa3nBa HAnITKOB 4.
BbIePeHTe Jxemaembl KofoeHbI uNkofoeHo-MoOnHbI HAnITOK, pNkOc-HyBUnCb K COOTBeTCTBYUOeMy CmMBOJy.
KacaiTeCb [O]doTexnop, nokaHa dncnnee He noBntc Monot. Kope.
OTKpoTe BbIDBnKHOIOTcEKdJIa MoIOTOro KoPe 12.
3acbInbTe B Hero He 60Jee 2 MepHbIX IOKEK MONOTORO KoPe.

BhimaHne!
He 3acbinaIte HEMOIOIte 3epHa nn pactBOpIMbIKoPe.
3aKpoTe BbIbBnKHOIOTcEK IJIa MoIToTOrO KoPe 12.
■ПиКОСнТЕСьК [start/stop],ЧToБИ
НaчaТь ПиИ�OTOBЛeHиЕ HaNITKOB.
Кофе 3aВариBaEТСЯ И 3aTeM HaJIINBaEТСЯ
В.YaшKy.

Повторнсы КасаимсИМВОЛа [start/stop] moхно пждевремно OCTaHOBNTb pa3JIb HANITka.
Hactpoja cTepeHn nOmoJa
He npikacaiTecb K BHyTppeHHM
yactram KoΦemONK.
Pn pa6oTaUoSei KoFemOJIke yCTaHOBtIb IOBOPHTbI pyyIaTOp 11 MeKdMyMeIKIM NOMOLOm (a:BpaueHne IpOTINbYacOBoi CTpeKN) n 60Je e rpy6bIMNOMOLOm (b:BpaueHne no YacOBoi CTpeJIke).


ДeиctBnE HOBH NaCTPOnK6bET 3aMeTHO JINb HaUNHaC CO BTOPOI YaShK KoPe.

Дя зерен TeMHон оьжаркн Heo6xOДИМО yCTaHOBuTb 60JIe ToHkyUcTepeH b NOMJla, a 3epeH 60JIe cBeTlON o6XapKn - 60JIe rpy6yI.
MeHIO
MeHIO cIyXnT IJIa INDINBnDyaJIbHOrO n3MeHeHnHaCTpoEK, Bbl3Oba INHOpMaunn 3aNycka npoceccOB.
MeHIOOTKpbIbAeTcnpKaacHHeM K CnMBOly [menu].
HaDnCnIe oTo6paKaIoTcpa3NnUHbIe BO3MOxKHOCTn HAcTpoEk, 3aRopaIoTc CmB0JIbI DIIraHaBnRaCuN. TeKu7a HaCTpOJa BbIDJePaTeCn Ha DnCnIee.
Habiruaqna no MeHIO:
[ \left[ \bigvee \right] = \Pi \text{epexoBn3} ]
[ [ok\sqrt{}] = \text{noTBePdntb} / \text{coxpaHnTb} ]
[ ] =BepHyTbca
[menu] = OTKpbITb MEHIO/BblTN N3 MeHIO

EcIn npNKoCHyTbcraK[√],TO BO3MOxHocTHn HAcTpoeK nJIN BbIbOpa6byt OTo6paKaTbcB NOBToPio-ueiCn PocneIOBaTeNbHOCTN. Korda DOCTnHyT cambl HxHn NyHKT MeHIO, Nocne Hero CHOba NoaBJIaETcra cambl BepxHNIpyHKT MeHIO.
Hapnimep:
HacTpoNka MaKc. TempepaTypb KoFe:
KochnTeCb CmBOna [menu]. OtkpbBa-etcra MeHIO.
Kacaintecb [V] Do Tex nop, noka Ha DnCnnee He NoBNTcT Temnepatypa KoPe.
■ПиКОСнITeСьК[ok√],NЯВЛЯТСА,Hарпмер,БыICOKa.
KacaiTebc[√]DoTexnop,poKaHa DnCnIe He NoBNTcMaKc.
Kocnntecb cunmboJa [ok√], YTo6bl coxpaHnTb HacTpOky. Ha dinCnnee noBJIaTeCn IOITBepKdEHe.
IIOBJIaETcnyHKT MeHIO TemnepaTpa KoFe.
PnIKoCHNTecbK[,YTObI BblTNn3 MeHIO.
MOxHOBbINOHNITb CNeDyUOuNe HaCTpoKn:
OuNTKa u yxOa
3aynctte cneuaJIbHbIe cepBnchbIe nporpaMMbl.
Ha Bb6op npedlaaratoC OuCTKa MONOCHN CNTeMb, YdaJIeHHe HAKIN, OoCTKa nn calc'nClean.
Upe3[ ]BbI6epNTe HxKHyo npOpaMMy I NOdTBePdNTe, KOCHyBUnCb [ok].
KochnTebc cmbbola [start/stop],yTo6bl 3anyctntb nporpaMMy.

BaxHo: O6a3aTeIbHo yuHTbIBaIte HnΦopMaζHIO n3 pa3dεna «CepBvncHbIe npOrpaMMbl».
HOpMaunO CepBnCbIX nporpaMMax (B 3aBncmocTOn OT Tnna npnbopa)
PnIKoCHyBbIINcB K[], BblIaNTe N3 HNdkaUN.

HacpoKa CTeneHN JXECTKOCTN BObl Dnla DaHHoMecTHOCTN.
Moxho Bb6paTb CTyneH JecKcOCTn 1,2, 3,4nn HacTpOky BoDoyMaYrTeNbHa YcTaHOKa. IpeBapntbHo JecKcOCTb BObl yctAHOBNeHa Ha 4.
CIMBBOJOM[√]BbIbepNTe Heo6xo-ДИМУO CTeNEHb JKeCTKOCtN BOblI NIOdTBepDInTe, KocHyBwUncb [ok√].

Moxho BbipAaKTHBnHOB.ΦnIbTpnn He yctahOBnEHnIbTp.

EcnHOBbI HOpNbTp He yCTaHaBnBaetc, BbIbepnte HaCtpoKy He yCTaHOBnEH HINbTp INoTBePdnte,KOCHyBwncb [ok√].

Ecπn npnbopДnITeJIbHoe BpeM He nCNoIb3yeTc8 (HaNP., BO BpeM oTnycka), BCTaBLeHHbI ΦnIbTp Heo6xOaHMo npombl TpeE nCNoIb3OBaHneM np6opa.ДЯ 3TOrO npocTo npriTOBbTe YaUKy ropaye Bobl.
3bIKI
HacpoiKa Ja3bIka, Ha KOTOpOM 6yDyT BbIBOINbCt TEKCTbI Ha DnCnPee.
CnMBOJOM[VBbI6epNTeHyKhBn IaIK NIOITBePdNTe,KoCHyBUnCb [ok].
3aunta ot 3amep3aHn
CepBnchna nporpaMMa dIy npedeTbpa- uEHHN IOBpeKdEH N B pe3yIbTaTe BO3deNCTBnXoJOna Bo BVpeMra TpaHCnpTIpOBKn IIN XpAHEnH.N. PIn 3Tom np6bp noNHOCTbO ONOpOKHJeTcR.

Pn6op DoJxeh 6bITb roTOB K pa6ote, a KOHTeHep dIy BObl 5 3aONHeH.
KochnTeCb CmBbola [start/stop], YTo6bl 3anyCTNtB nporpaMMy.
I3BJIeKInTe KOHTeHep IJy BOJbI, nocJe Yero np6op aBTOMaTnuecckn CInBaET KINIOKCTb N3 Tpy6OK N OTKNHOaETcra.
OnopoxHNTe KOHTeHep IJRA BObI 5 nnoDIOH 17.
3BykndnKHO
BkIIOUeHne N BbIKIOUeHne 3ByKOB dIpy KHOJOK npN kacAHn nAHeN ynpaBJeHn.
IOnTBePdntb Bbl6op, KocHyBUnCb [ok√].
CIMBONOM[ BBb6epnte 3ByKn dNn KHOON BKN. INN 3ByKn dNn KHOIN. BIKN. nIOITBePdNTe, KOCHyBwncb [ok].
HΦoPm.0 HanITkax
(B 3aBnCmOCTN OT TnIa IpIbopa)
HnIkaun, KaKOE KOJIueCTBO HAnITKOB 6bIIO nprirotobneHO C Haayana BBoDa npnbopa B EKnIpyatauio.
IpiNKoCHyBUNcB K[], BbIMnTe n3 INHdNkauuN.
3aBODCKHe NaCTpOKn
C6poc BCex CO6CTBeHHbIX HAcTpoEK I BO3BpaT K COCTOHHIO pI NIOCTaBKe.
KoCHInTeCb [start/stop],yTo6bI ydaJIInTb BCE co6cTBHeHbIe HacTpOiKN.
YXODIeKeiHeBHaOuNCTKa

Onachoctb nopaxeHnra TOKOM!
IpeepoNCTKO BbInbTe WTeNcEJIb n3 po3eTKn. 3aIpeuaeTcra nOrpykaTb np60p B Ody.He nCnoJb3yIte napOBbie oOncTtEnJI.
BbITpnte KOpnyc MmKoB BnaXHOn TKaHbI.
OuHCTnTe NaHeB ynpaBJIeHnMa MmKpOΦn-6poBoN canpeTko.
He nCnoIb3yIte MoIOUne CpeIcTBA, coedePkaUne aJIKoRoiB NJIIN cNInrT.
He npmehnTe rpy6yU TKaHb nn a6pa3NBhIe YNCTAUNe CpeDCTBa.
OcTaTKn HaknIn, KoFe, MoNoka n pactBopa dIy ONUCTKn yUdAneHn HaknIn ydaJYte HeMeJeHNo. IOn TaKIMN OCTaTKamM MOrTy o6pa3OBbI-BaTbcr OarN KoppoHN.
B HOBbIX ry6yataIbIX caIΦeTKaX MOrYT coJepKATbc cOJI. CoJI MOrYT npINBeCTN K O6pa30BaHNIO HaJIeTa pKaB- YHbI Ha CTaJIbHbIX DeTJIaIX, N03TOMy nepeI nCNoJIb3OBAHNEM r6yAtbIX caIΦeTOK INx CJIeDyET TIIaTeJIbHO npONoLOCKaTb.
BbHbTe NODOH 17c eMKocTbIO JnKofoeHHOI rUuN 17c,NotraHyB INX BpePeJ.CNHMTe 3acNoHKy 17a n peWetKy 17b.OnopoxHNTE IOHCTNe IPOdoH nEMKOCTb DnRA KOfoeHHOI rUuN.
IpoTpnte BHTpeHHee npoctpaHCTBO np6opa (Hmnn Dnna PNOHOHB) IN BbDnKHOOTcEK DnRA MOnTOrO KoΦe (He cHnMaetc).
CHIMNTE nonlaBOK 17d n ouHCTnTe erO BnaXHOI TKaHbIO (B 3aBNCMOCTN OT TnPa npi6opa).

Hnkeyka3aHHbIe DeTaNHeJIb3MaITb B NocydomoeyHO MaINHe:
3acIOnKa IoIOnHa 17a, KpbIuKa 4a, 3aBa- pOuyHbI 6nok 14, KOHTeHep DJI BODbl 5, KpbIuKa, CoXpaHraUOua apOMaT 10.

He cTabBe B nocydomoeyuMoAsnHy CneDuOuNe DeTaIi:
IIOIOH 17,peWetKa 17b,EMKoCTb IJRA KOeHHOI rUu 17c,MepNa JIOXka IJRA MOIOTOrO KoPe 8,BerXHra N HIXHra YaCTb MOIOUHOI CNCTEmbl 4b.
BaxHo. IoIIOH 17 n EMKocTb IJRA KoPeHnO rUuN 17c HxKHO eKeIHeBHO OOnOpXHrTb N OCHUaTb BO I36ExKaHne CNoeB OTJIOKeHnI.
i Pn BkIIOUeHn IpIbopaB XOIOHOM COCToHn INBbIKHOyeHn erO nocJe npiroTOBHeHn KoFe OH aBTOMaTneCKn IpomblBaETc. TaKm oBa3oM, cncTeMa Ounuzaetc camocToTebHo.
Baxho: PnpДПnteHbHompepepbIbe B INCIOJIb3OBAHmN (HaNP., BOBpeMg OTnysCa) np6op NpIHocTbIO, BKIIoua MOnOCHyIO CNTeMy 4bN 3aBapOHybIb 6nok 14, cJeNyET TuaTeJIbHO OcHCTnTb.
OuNCTKa MOJOnHON CnCTeMbI
Iocne kaxdoTo npiroTOBHeHnnaHNTka C MoNOKOM o63aTeJbHO OunuTaB MOOnHyU cncTemy 4b!
i MoNoUHnA cnCTema 4b HEnOcpe- CTBeHHo NocIe npriroTOBHeHn MONoUHOr HAnITKa OUnIaETCa KpaT-KOBpeMeHHo NODaue CTPuN napa. IJa Oco6o TuaTeNbHO OUnCTKMONoUHcNCTEmbl 4b MOxHO BOCNoJIb3OBAtbcra ABToMaTuYeCKo npOrpAMMoI 一 U 中 T k a MOnOuHo CNCTEMbl》(cm. pa3dJN «CepBnChbIe npOrpAMMb-I OUnCTKa MOnOuHn CNCTEMbl))
OuHcTka BpyHyU

Onachoctb oxora!
MoOnuHa nCTeMa 4b cnIbHo pa3oRpeBaetc. Iocne nCNoIb3OBAHncaHana DoXdntEc b ee OxJaXKeHnna, npexJe Yem pNkacatbc K Hei.
Дяоунstкп pa3берпte моюнуocntemy 4b:
- OToDnBnHbTe yCtpoNcTBo pa3nBaHaNITKOB 4 Do ynopa Ha3aJ.
KpbIuKy 4a CHNIMTe BnpeEi, a 3aTeM CHNIMTe UJNaHr Dnla MOJOKa.
I3BnKeKInTe MoIOUHyIO CnCTeMy 4b, NOrHb ee npraMo Bnpei.
Pa36epnte BepxHIO HnKHOU qactb MOIOuHOn CNTEmbl 4b.
- OToCoeDInHInTe UJNaHr IJMa MOnOka N BCaCbIBAHOU Tpy6Ky.
OuCTNTe DeTaIIMMbIbHbIMpactBOPOM MMRKOKTKaHbIO.
BceIeTaJIH Heo6xOIMo Ipomblb YHCTO BODOn I npocuWHTb.

BepxHIOU HnXHIOU qacTb MoOnOH CNCTeMbI 4b, a TaKKe IaHaNr IJRA MOJOKa 4c IN BCaCbIbAIOUTOpy6ky 4d MOKHO MbITb IN B NOCyDOMoeHNO MaUNHe.
CHOBA CMOHTNPOBaT DeTaJI.
CHOBA BCTaBnTb MOIOHyo CnCTeMy 4bВ np6op pOBHo cnepeNi.
YcTaHOBnTb Ha MeCTO KpbIuKy 4a.
OuIncTka 3aBapOuHoro 6Ioka (pnc. G)

CM. TaKke KpaTkyIO INHcTpkyCNIIO B CnEuaJbHOM OTcKe 16.
BdoonHeHneK aBTOMaTnuecko nporpaMMe OuNCTKn Heo6xOdmo peyIapHo CHMaTb 3aBaOpUHbI 6nok 14 dny OuNCTkn.
IIOHOCTBIO BbIKJIOUHTe PnBOp C NOMOuBIO CeTeBOrO BbIKJIOUaTeJI 1 ①
Ötkpoǐte Dībēpú 13 3aBapoʊhOró 6lòka.
CzBnHbTe KpaChbI qKcTOp 14a Ha 3aBaPouHOM 6JIOke 14 do ynpa BJeBO.
HaxmTe pbyarДЯ BbI6paCbBAHn1 15do ynpa BHN3.3abapOHyB6nOK OTcoeINHReTcR.
Bo3bMnte 3aBapOHyb 6nok 14 3a yrIy-6neHnI OCTOPOXHO n3BNeKeITe erO.

BaxHo: BbIOpJIHrTe OunchKy 6e3 IcNoIb3OBoAHnI MOUxN CpeDCTB N He KJaIITe 6nok B nocydomoehHyo MaunHy.
CnHmnte KpbIuKy 14b c 3aBapOuHoro 6noka n TuaTeNbHO npOMoTe 3aBapOuHbN 6nok 14 npToOuHoi BOdoi.
TtataTeNbHO npOMoIte CnTO 3aBapOuHOrO 6noka nOd cTpye BODbl.
TtataTeNbHO NOuHCTnTe BHyTppeHHee npocTpaHCTBO npi6opa BnaJHoN TkaHbIO u ydaJIte BO3MOxHO IMeHouNeC8 ocTaTKn Kofoe.
IpoJokDnTe, noka 3aBapOchbI 6nok 14 IN BHyTpEnHHe npocTpaHCTBO He BbICoxHyT.
CHOBA yCTAHOBHTe KpbIuKy 14b Ha 3aBaP OOHbI 6LOK IN BCTaBbTe 3aBaPOHbI 6nOK 14 Do ynpoA B npu6op.
HaxMnte pbyar IJIaBbIbpaCbBAHn1 15doynopa BBepx.
CdBnHbTe KpaChbI qnkCaTOp 14a Do ynpa BnpaBn3akpoTe DBepy 13.
CepBnchbIe nporpaMMbl

CM. TaKke KpaTkyu INHcTpkyuINB CnEuaJbHOM OTCKe 16.
C onpeIeJIeHNo IepnoIduNHyocTbIO nOcIe 13BeueHna DaicPiee 3 NoaBJIaTeTC
Tpe6yetca ydaNTb Haknib nn
TpebyetcOuNTKann
PnoBectn calc'nClean.
Pn6bOp Heo6xOIMMo HEmeJNeHNO OuCTNtB npn NOMOUs COOTBeTCTByIOUe npOrpAMMbI INy UdaNtB HaKINb.Ppoeccby YdaEnHe NaKInn N OuaCTKa MOxHO oBeDuHNtB cyHKunE calc'nClean (cm. pa3dE 己 calc'nClean').Pnp HApUSeHnYka3aHn NO BbINOJIHeHIO cepBUCHO npOrpAMMbIBO3MOxHO nOBpeXDeHne np6bopa.

Baxho: EcIn cBoeBpeMeHNo He ouHCTnTb np6op OT hAKIN, Ha dncnnee nOBtca HyxHo ydan. HAKINb.Annapat ckopo 6ydet 6nOKuPOBaH --> HAKIMaTb 3 cek. menu. Iocne coo6uEHHeMeDJIeHHo BbIOnNHte npouecc ydaJeHHa HAKIN. EcIn np6op 6nOKuPoBaH, IM MOxHO 6ydet CHOBA nonb30BaTbCra TOnbKO nOcNE BbIOnHeHHoro npoucecca ydaJeHHa HAKIN.

BhimaHne!
Длкakdoi cepBnCHOn nporpaMMbl
NcnoIb3yIte cpeDCTBa IJydaJIeHnA
HaKNII N OCHCTKN B COOTBEcTBMnC INHCTpyKcIe. Hn B Koem Cnyae
He OCTa-HaBnBaIte cepBnCHyIO
nporpamMy! He neIte npImeHReMbIe
JxIDKOCTn! He DoNYCKaETcN cNoIb3OBAHNye YKcCyCa, cpeDCTB, copeXaUnxYKcyc, JIMMOHOn KNCLOTBI INN
cpeDCTB, copeXaUnx JIMMOHHyO
KNCLOTy!
3anpeaetcKnaCTbTabneTknIydaJIeHnHaKnIIINHbIe CpeIcTBAIydaJIeHnHaKnINB BblBnKHOIOTcK IJMOIOTOrKOoe 12!
Ipeed 3aynckom COOTBeTCTByUocei cepBnCHOH nporpaMMbl (ydaJIeHne HaKInn, ouNCTka nn calc'nClean) Heo6xoJIMO cHrTb 3aBaOpHuBn 6JIOK, OuNCTnTb eRO B COOTBeTCTBnN C INHCTpyKUnei n CHOBA BCTaBNTb.
CneuHaIbHo pa3pa6oTaHHbIe Ta6JIeTkn IydaJIeHnHaKnnn N OChCTKn MOxHO npNo6peCTn B Mara3nHax nIu chpe3 cepBnCHyu Cnyk6y (CM. pa3dcl «PpHaIaJIeXhOcTHN»).
OuNCTKa MOJOnHON CnCTeMbI
IpoDOnJXnTeNbHocTb: npn6n. 1 MInHyTa.
OTKpoITe MeHIO, KocHyBUIncb [menu].
CnMBOJOM[√]BbIbepNTeOuNCTKaUyOДиNoTBePdnte,KoCHyBUnncb[ok].
CIMBOJOM [√] BbIbepNTe OuCTKa MOnIOUHON CNTeMbI IN NOITBepNTe, KOCHyBUnCb [ok].
KochnTeCb cImBOna [start/stop], yTo6bl 3anyCTnTb nporpaMMy.
Iucnne3BeetBacno nporpamme.
IocTaBbTe NcyToN cTaKaH NOyCtpoiCTBa pa3nBa HAnNTKOB 4 INOnyCTNTE KOHeuC BcAcBbAHOSeI Tpy6Kn 4d B CTaKaH.
Kochnitecb cunboJa [start/stop]. Tepeb MOnOuHaNc SInTeMa OUnIaetcra ABToMATUeCKN.
IocJIe 3tOrO cIeIte JIKIOKcTb N3 CTaKaHa H ONUCTInTe BCacBIBaHOU Tpy6ky 4d.
IOnoJIHnTeIbHO HyXHo peYJnPaHOr TuaTeJIbHO OUnIaTb MoIOuHyO CnCTeMy (B NocydomoeuHoi MaunHe IIN BpyHyO).
YdaJIeHne HaknIIN
Пюдгкintьнocть: npn6n. 30 MmhyT. Cтрka на дсплjee Bни3у nokаыBaetnpdOДжintьнocть npoceca.

EcnI qnJIbTp dIa BOIb HaxoIITcB KOHTeHepe Ia BOIb 5,063aTeJbHO n3BJIeKInTe erO nepeI 3anyCKOM cepBnCHOn pOrpamMbI.
- OTKpoIte MeHIO, KocHyBImcB [menu].
CIMBOJOM[ ]BbI6epNTeOuNCTKaUyOДиNoITBepDNTe,KoCHyBUnCb[ok].
CIMBOJOM[VBbIbepuTe YdaJIeHHeHaKINnIOaTBePdTe, KOCHyBwUcB [ok].
KoCHnTeCb CmBOna [start/stop], 706bI 3aNyCTnTb npOrpamMy.
Iucnne3 BeetBac no nporpamme.
CneTe JIKKOCb N3 POnDoHa 17 n CHOBa BCTaBbTe erO.

PonBnEeTc3aIpoc
EcnHyxHo,CHIMITEΦnIbTp dna BOdbI start.
CHIMMTEФиЛьТИСHOBAKOCHITecb CIMBOJa[ start/stop].
HaJIeIeBnCyToN KOHTeHep IJNA BObI 5 TeNlnyo BODy IO OTMeTKn «0,5I» IN pactBOpnte B Hei 1 Ta6IeTky IJNAyIaJIeHnna Haknn TZ80002 Siemens.
KochnTeCb cMBOJa [start/stop].
IocTaBbTe 0,5-JntPoByo EMKocTb NOyycTpoiCTBO pa3JINBa HAnNTKOB 4.
Onyctnte KOHeU BCaCbBaHOuSeI Tpy6Kn 4d B eMKoCTb.
KochnTeCb cMBOJa [start/stop]. TepeB nporpaMa ydaJeHnHaKnPi nnITc np6I.20 MInyT.

EcnB KOHTeHepdIy BoDbI
5 cNIuKOM MaIO cpeCTBa dna ydaJIeHnHaKINn, NOBnIeTcra Tpe6oBaHne DoabBe cpeCTBO dna ydan.Haknn start.
IIO6aBbTe cpeDCTBO ydaJIeHnHaKINI IN CHOBA KOCHTecb CIMBOJa[ start/stop].
■PpOMoTe KOHTeHepIaBbI5 HAnOJIHnTe eRo CBexKe BDoOn Do OTMeTKI «max»
EcnnncnoJIb3yETcqnIbTp,CHOBa BCTaBbTeero.
KochnTeCb CmB0la [start/stop]. Tenepb nporpamma ydaJeHna Haknni nnITcra np6bl.1 MHyTu n IpombIbaet np6op.
CneITe JIKIOKOCb N3 PNOHOHa 17 m CHOBa BCTaBbTe eTo.

BaxHo: IpoTnpaIte np6oP mRkoB BIAJHcO TKAHbIO, YTObI cpa3y Je ydaJIHTb OCTaTKI pAcTBopa dJaYdaJIeHnHaKINPi. IOp TaKIMN OCTaTKAMM MOrT oBa3OBbIBaTbc8 OaARn Koppo3m. B HOBbI r6uTaBHx caJIqETkAX MOrT coDEpKaTbC8 CoIN MOrT pInBeCTn K o6pa3OBaHN HoJAEta pKaBHyhIb HA CTaJIbHbIX DeTaJAx, N03OTomy nepeD nCNOJIb3OBaHNem r6uTaBHx cAIpTeOK IX CLeNyET TuaTeJIbHO npONoNocAtb. TuaTeJIbHO ONUCTITe BCacBlaBOUOy ToPy6ky 4d yCTPOINCTBa pa3JIINBa HAnNTKOB.
Hakinb B npnbope ydaJeHa, n OH cHOba roTOB K pa6Ote.
OuInCTka
PpOdoJXKnteNbHocTb: npu6n. 9 MmHyT. Ctpoka Ha dncnnee BHN3y noka3Baet npoDoJXKnteNbHocTb npocecca.
- OTKpoIte MeHIO, KocHyBUnicb [menu].
CnMBOJOM[VBbI6epNTeOuNCTKaUyOaI NIOITBepDNTe,KoCHyBwncb[ok].
CIMBOJOM[VBbIbepnteOuHcTkaN IOITBepdnte,KoCHyBUnncb[OK].
KochnTebc CmBbola [start/stop], YTo6bl 3aynctntb nporpaMMy.
Iucnne3BeetBacno nporpamme.
CJeITe JxNdkocTb N3 POnDoHa 17 n CHOBa BCTaBbTe eTo.
OTKpoTe BblBnXHOn OTCEK JIЯ MoIToTOrO KoPe 12.
IIO6aBbTe YnCTaYU Ta6NeTky Siemens n 3aKpOte BblBnXHOn OTCek 12.
KochnTeCb cImBOJa [start/stop].
Tenepb nporpamma ouncTk nnntcnpn7 MNHyT.
CneITe JxNdkocTb N3 PNOdoHa 17 n CHOBa BCTaBbTe eTo.
Pπi6oB oUHüeH n CHOba rTOb K pa6oTe.
calc'nClean
Ecnn HeB03MOXHO ycTpaHnTB HenoJaKy, o6ra3aTeJbHo CBxKntEcB C《rOpyeJInHne!Homepa TeIeΦoHOB yka3aHbI Ha nocLeDnX CTpaHnCuax IHCTpyKuIN.
www.siemens-home.bsh-group.de
AE United Arab Emirates,
BSH Home Appliances FZE
Round About 13, Plot Nr MO-0532A
Jebel Ali Free Zone - Dubai
Tel.: 04 881 4401
mailto:service.uae@bshg.com
www.siemens-home.bsh-group.com/ae
AL Republika e Shqiperise, Albania
ELEKTRO-SERVIS sh.p.k
Rr. Shkelqim Fusha, Selite,
Pallati "Matrix Konstruktion",
Kati 0 dhe +1
1023 Tirane
Tel.: 42278130, -131
Fax: 4 2278 130
mailto:info@elektro-servis.com
EXPERT SERVIS
Rugae Kavajes,
Kulla B Nr 223/1 Kati I
1023 Tirane
Tel.: 44806061
Tel.: 42274941
Fax: 4 227 0448
Cel: +355 069 60 45555
mailto:info@expert-servis.al
unter: www.siemens-home.bsh-group.at
Gate 1, 1555 Centre Road
Clayton, Victoria 3168
Tel.: 1300 167 425*
Fax: 1300 306 818
mailto: aftersales.au@bshg.com
www.siemens-home.bsh-group.com/au
*Mo-Fr: 24 hours
BA Bosna i Hercegovina, Bosnia-Herzegovina
"HIGH" d.o.o.
Gradačačka 29b
71000 Sarajevo
Tel.: 061 10 09 05
Fax: 033 21 35 13
mailto:bosch_siemens_sarajevo@
yahoo.com
BE Belgique, Belgie, Belgium
BSH Home Appliances S.A.
www.siemens-home.bsh-group.com/be
BG Bulgaria
BSH Domakinski Uredi
Bulgaria EOOD
115K Tsarigradsko Chausse Blvd.
European Trade Center Building,
5th floor
1784 Sofia
Tel.: 0700 208 18
Fax: 02 878 79 72
mailto:informacia.servis-bg@
bshg.com
www.siemens-home.bsh-group.com/bg
BH Bahrain,
Khalaifat Est.
P.O.Box 5111
Manama
Tel.: 017400553
mailto:service@khalaifat.com
CH Schweiz, Suisse, Svizzera, Switzerland
BSH Hausgeräte AG
www.siemens-home.bsh-group.ch
CY Cyprus, KUtpo
BSH Ikiakes Syskeves-Service
39, Arh. Makaariou III Str.
2407 Egomi/Nikosia (Lefkosia)
Tel.: 7777 8007
Fax: 022 65 81 28
mailto:bsh.service.cyprus@
cytanet.com.cy
CZ Ceska Republika, Czech Republic
www.siemens-home.bsh-group.com/cz
DK Danmark, Denmark
BSH Hvidevarer A/S
Telegrafvej 4
2750 Ballerup
Tel.: 44 89 89 85
Fax: 44 89 89 86
mailto:BSH-Service-DK@BSHG.com
www.siemens-home.bsh-group.com/dk
EE Eesti, Estonia
SIMSON OÜ
Turi tn.5
11313 Tallinn
Tel.: 0627 8730
Fax: 0627 8733
mailto:servicenet@servicenet.ee
www.simson.ee
Renerki Kaubanduse OÜ
Tammsaare tee 134B
(Euronici kaupluses)
12918 Tallinn
Tel.: 0651 2222
Fax: 05167171
mailto klienditeenindus@rererk.ee
www.renerk.ee
Eliser OÜ
Mustamäe tee 24
10621 Tallinn
Tel.: 0665 0090
mailto:hooldus@eliser.ee
www.kodumasinate-remont.ee
ES España, Spain
www.siemens-home.bsh-group.es
FI Suomi, Finland
BSH Kodinkoneet Oy
Italahdenkatu 18 A
PL 123
00201 Helsinki
Tel.: 0207 510 700
Fax: 0207 510 780
mailto:Siemens-Service-Fl@bshg.com
www siemens-home.bsh-group.com/fi
+7snt/min (alv 24%
S.R.L. "Rialto-Studio"
yn. Lycceba 98
2012 KIshnHeB
TeN./φaKc: 022 23 81 80
MK Macedonia,Makeonna
GORENEC
Jane Sandanski 69 lok.3
1000 Skopje
Tel.: 02 2454 600
Mobil: 070 697 463
mailto:gorenec@yahoo.com
MT Malta
Aplan Limited
The Atrium
Mriehel by Pass
BKR3000 Birkirkara
Tel.: 025 495 122
Fax: 021 480 598
mailto:lapap@aplan.com.mt
NL Nederlande, Netherlands
www.siemens-home.bsh-group.nl
NO Norge, Norway
www.siemens-home.bsh-group.com/no
NZ New Zealand
BSH Home Appliances Ltd.
Unit F2, 4 Orbit Drive
Mairangi Bay
Auckland 0632
Tel.: 0800 245 700*
Fax: 0800 256 535
mailto:repairaction.nz@bshg.com
(exclude public holidays)
PL Polska, Poland
www.siemens-home.bsh-group.pl
PT Portugal
BSHP Electrodomésticos,
www.siemens-home.bsh-group.com/pt
RO Romania, Romania
BSH Electrocasnice srl.
Sos. Bucuresti-Ploiesti,
nr. 19-21, sect.1
13682 Bucuresti
Tel.: 021 203 9748
Fax: 021 203 9733
mailto:service.romania@bshg.com
www.siemens-home.bsh-group.com/ro
RU Russia, Pocsn
OOO“BCXБbITOBaTExHnKa
CepBnC OT npOn3BODnteIa
Manay Kanyckka 19/1
119071 MockBa
Ten.: 4957372962
mailto:mok-kdhl@bshg.com
www siemens-home.bsh-group.ru
SE Sverige, Sweden
BSH Home Appliances AB
Landsvagen 32
169 29 Solna
Tel.: 0771 11 22 77 local rate
mailto: Siemens-Service-SE@bshg.com
www.siemens-home.bsh-group.com/se
SG Singapore, 新加坡
BSH Home Appliances Pte. Ltd.
Block 4012, Ang Mo Kio Avenue 10
01-01 Techplace 1
Singapore 569628
Tel.: 6751 5000*
Fax: 6751 5005
mailto:bshsgp.service@bshg.com
- Mo-Fr: 8.30am to 7.00pm, Sa: 8.30am to 5.30pm (exclude public holidays)
SI Slovenija, Slovenia
BSH Hišni aparati d.o.o.
Litostrojska 48
1000 Ljubljana
Tel.: 015830701
Fax: 01 583 08 89
mailto:informacije.servis@bshg.com
www siemens-home.bsh-group.com/si
SK Slovensko, Slovakia
www siemens-home.bsh-group.com/sk
TR Türkiye, Turkey
BSH Ev Aletteri Sanayi
Ve Ticaret A.S.
Fatih Sultan Mehmet Mahallesi
Balkan Caddesi No: 51
34771 Umraniye, Istanbul
Tel.: 02164446688*
Fax: 0 216 528 9188*
mailto:careline.turkey@bshg.com
www siemens-home.bsh-group.com/tr
www siemens-home.bsh-group.com/ua
XK Kosovo
SERVICE-GENERAL SH.P.K.
Rruga Mag Prishtine-Ferizaj
70000 Ferizaj
Tel.: 0290 321 434
Tel.: 0290 330 723
mailto:a_service@
gama-electronics.com
XS Srbija, Serbia
BSH Kučni aparati d.o.o.
Milutina Milankovica br. 9ž
11070 Novi Beograd
Tel.: 011 353 70 09
Fax: 011 205 23 89
mailto:informacije.servis-sr@bshg.com
www.siemens-home.bsh-group.com/rs
ZA South Africa
BSH Home Appliances (Pty) Ltd.
15th Road Randjespark
Private Bag X36, Randjespark
1685 Midrand-Johannesburg
Tel.: 086 002 6724
Fax:0866171780
mailto:applianceserviceza@bshg.com
www siemens-home.bsh-group.com/za
Service-Hotlines
www siemens-home.bsh-group.com
AE 048030501
AL 0662064794
AT 0810550522
AU 1300368339
BA 033213513
BE 070222142
BG 029315062
CH 0434554095
CN 4008899999
Call rates depend on the network used
CZ 0251095546
DE 091170440044
DK 44898985
EE 06278730
ES 902118821
FI 0207510700
Lankapuhelimitsa 8,28 snt/puhelu + 7 snt/min (alv 24%)
Calls charged at local or mobile rate
GR 18182 (Aotikxptewo)
HR 013028226
HU 003614895461
IE 014502655
0.03 € per minute at peak. Off peak 0.0088 € per minute.
IL 08977222
IS 05203000
IT 800 018 346 (Line Verde)
LI 052741788
LU 26349300
LV 067425232
ME 050432575
MK 022454600
NL 0884244020
NO 22660600
PL 801 191 534
PT 214250720
RO 021 203 9748
RU 88002002962
SE 0771 11 22 77 (local rate)
SK 0244452041
SL 012007017
TR 4446688
Cagri merkezini sabit hatlardan aramanin bedeli sehir ici Ücretlientirme, Cep telefonlarindine ist kullanan terafite goreDegreekenikgostemtekledir
US 8664474363(toll free)
XK 044172309
XS 0112139552
www.siemens-home.bsh-group.com
TapaHTnHbI cPOK n cPOK cnJyKbI nCUncNIAOTc C daTbI NOKynK, IIN6O npn HeBO3MOXHOCTn INx yCTaHOBJIeHnC daTbI n3rTOBJIeHn, HaNecEHNO Ha TInOBYu Ta6NJUky N3dJIeN.
B COOTBeTCTBnC o CTaHdApTOM n3rOToBnTeIaTa n3rOToBJIeHnMa MapKnpyeTcF D F TMM, rDe IΓ Αb03Haayet rOД n3rOToBJIeHn - 1920, a MM - MecaI n3rOToBJIeHn.
OprHn3aunei, yIOnHOMOeHHo H3rOToBtTeIeMa Ha OCHOBaHIM DOROBopa C HIM, YBnAETcA