USER MANUAL EQ5 SIEMENS
en English
fr Français
pl Polski
nl Netherlands
cs Cestina
ru Pycckn

TE506.RW
TE509.RW
Instruction manual
Mode d'emploi
Instrukcja obstugi
Gebruiksaanwijzing
Návod k použití
Hnctpykunno3Kcnnyataun
SIEMENS
en 6
fr 24
pl 43
nI 63
CS 82
ru 101
Included in delivery (see page 7) / Contenu de l'emballage (voir page 25)
Zawartosc zestawu (patrz strona 44) / Leveringsomvang (zie pagina 64)
Included in delivery. 7
Overview. 7
Controls 8
-
Power on/off switch O/I 8
-
button 8
-
off / i button 8
-
/ button. 8
-
start button 8
-
"Coffee strength" rotary knob 8
-
"Drink selection" rotary knob 8
-
Rotary selector. 9
Display messages 9
aromaDouble Shot. 9
Before using for the first time. 9
Water filter 11
Menu settings 11
-
SHUT OFF. 12
-
FILTER. 12
-
START CALC'N'CLEAN 12
-TEMP. 12
-
LANGUAGE 12
-
WATER HARDNESS. 12
-
DRINK COUNTER 12
Adjusting the grinding unit 12
Preparation using coffee beans. 13
Preparation using ground coffee 13
Dispensing hot water 14
Preparing milk froth and warm milk 14
Maintenance and daily cleaning 15
Tips on energy saving 17
Service Programmes 17
-Calc'n'Clean. 19
Frost protection. 20
Accessories 20
Disposal. 20
Guarantee. 20
Simple troubleshooting. 21
Technical data. 23
Congratulations on purchasing this fully automatic espresso machine from Siemens.
These instructions describe various models with different features.
Please also note the enclosed quick reference guide. It can be kept in the special storage compartment (5c) until it is needed.
Safety instructions
Please read the operating instructions carefully and keep them for future reference. Please pass on these manuals to the new owner if you sell the appliance. This fully automatic espresso machine is designed for preparation of small amounts of coffee for domestic use or for use in non-commercial, household-like environments, such as staff kitchens in shops, offices, agricultural and other small businesses or for use by guests at bed-and-breakfast establishments, small hotels and similar residential facilities.
Risk of electric shock!
Connect and operate the appliance only in accordance with the specifications on the rating label.
Do not use if either the power cord or the appliance is damaged.
Use indoors at room temperature only.
This appliance is not intended for use by persons (including children) with reduced physical, sensory or mental capabilities, or lack of experience and knowledge, unless they have been given supervision or instruction concerning use of the appliance by a person responsible for their safety.
Keep children away from the appliance.
Children should be supervised to ensure that they do not play with the appliance.
In the event of malfunction, unplug the appliance immediately.
To avoid potential hazards, repairs such as replacing a damaged cord should only be performed by our service personnel.
Never immerse the appliance or power cord in water.
Do not reach into the grinding unit.
Use the appliance only in frost-free rooms.
Risk of scalding!
The milk frother outlet (6a) gets very hot.
After use, allow to cool down first before touching.
Use this appliance only after the milk frother
(6) has been fully assembled and installed.
Risk of suffocation!
Do not allow children to play with packaging material.
Included in delivery
(see overview image at the start of the instructions)
Fully automatic espresso machine TE506/TE509
Quick reference guide
Instruction manual
Milk frother
Water hardness testing strip
Measuring spoon
Milk container
Overview
(see overview images A, B, C, D and E at the beginning of this instruction manual)
1 Bean container
2 Aroma cover
3 Selector for grind setting
4Drawer (ground coffee/cleaning tablet)
5 Brewing unit (Fig. E)
a) Brewing unit
b) Door
c) Storage compartment for quick reference guide
d)Push button
e) Lock
6 Milk frother (Fig. C) removable
a) Outlet
b) Rotary selector for warm milk/ milk froth
c) Milk tube
d) Upper part
e) Air nozzle
7 Coffee outlet, height-adjustable
8 Drip tray (Fig. D)
a) Drip tray panel
b) Coffee grounds container
c) Drip tray for coffee outlet
d) Grate for coffee outlet
9 Power on/off switch O/I
10 start button
11 button
12 / button
13 念 off/i button
14 "Coffee strength" rotary knob
15 "Drink selection" rotary knob
16 Display
17 Removable water tank
18 Lid for water tank
19 Measuring spoon (insertion aid for water filter)
20 Storage compartment for measuring spoon
21 Power cable with storage compartment
22 Milk container
Controls
Power on/off switch O/I
The power switch O/I (9) is used to switch the appliance on or to switch it off fully (power supply off).
Important: Before switching off, run the cleaning programme or use the off / i button (13) to switch off.

Press the button (11) to prepare two cups of the selected drink at the same time. The button can be activated for drinks without milk and without the aromaDouble Shot function.
When the off / i button (13) is pressed briefly, the appliance rinses and switches off. Pressing and holding down the off / i button (13) displays the user settings or starts the descaling and cleaning function.
Press the 心 / 心 button (12) to generate steam for preparing milk froth or warm milk. This button is also used to dispense hot water.
Press the start button (10) to begin drink preparation or to start a service programme. Press the start button (10) again during drink preparation to cut the dispensing process short.
"Coffee strength" rotary knob
| double
shot | This rotary knob (14) is used to set the coffee strength. |
| ∅ | VERY MILD |
| to | MILD |
| NORMAL |
| STRONG |
| ∅ | DOUBLESHOT STRONG+
DOUBLESHOT STRONG++ |
| double
shot | With these coffee strengths the coffee is brewed in 2 stages. See “aromaDouble Shot” on page 9. |
"Drink selection" rotary knob
| This rotary knob (15) is used to select the required drink and the per-cup quantity. It is also used to change user settings. |
| Coffee-based drinks without milk: |
| SMALL ESPRESSO ESPRESSO |
| SMALL CAFÉ CRÈME |
| CAFÉ CRÈME |
| LARGE CAFÉ CRÈME |
| Coffee-based drinks with milk: |
| SMALL CAPPUCCINO |
| LARGE CAPPUCCINO |
| SMALL MACCHIATO |
| MACCHIATO |
| LARGE MACCHIATO |
| RINSE MACHINE |
| RINSE MILK SYSTEM |
N.B.: If a drink is selected that cannot be prepared, INVALID COMBINATION appears in the display. Change the coffee strength or the selected drink.
Rotary selector
To dispense milk froth – for example for a latte macchiato or cappuccino – turn the symbol to the front.
To dispense warm milk, turn the symbol to the front.
To dispense hot water, set the rotary selector to the horizontal position.
Display messages
The display (16) shows not only the current operating status, but also various messages that give you status information or let you know when you need to take action. As soon as you have taken the necessary action, the message disappears and the menu for drink selection is displayed again.
aromaDouble Shot
The longer the coffee is brewed, the more bitter substances and undesired aromas are released. This has a negative effect on the taste and makes the coffee less easily digestible. So for extra strong coffee the TE506/TE509 has a special aromaDouble Shot function. When half the quantity has been prepared, coffee is ground and brewed again so that only the pleasant, aromatic scents are released.
The aromaDouble Shot function is activated with the following settings:


Before using for the first time
General
Fill the water tank with fresh, cold, uncarbonated water only, and preferably use only beans for fully automatic coffee and espresso machines. Do not use coffee beans that have been glazed, caramelised or treated with other additives containing sugar, since they will block the brewing unit.
The water hardness setting can be adjusted on this appliance. The factory default setting for the water hardness is 4. Check the water hardness with the enclosed test strip. If the check reveals a value other than 4, change the setting on the appliance accordingly after switching on (see "Menu settings" WATER HARDNESS on page 12).
en
Switching on the appliance
- Remove the protective film.
- Place the fully automatic espresso machine on a flat, water-resistant surface that can take its weight. Make sure that the machine's ventilation slots remain unobstructured.
Important: Only use the appliance in frost-free rooms. If the appliance has been transported or stored at temperatures below 0^ , wait at least 3 hours before operation.
- Pull the power cord out of the storage compartment (21) and plug in. Adjust the length of the cable by pushing it back in or pulling it out. The easiest way to do this is to place the appliance so that its back is flush with the edge of the counter and either pull the cable downward or push it upward.
- Install the milk frother. Operate the machine only after the milk frother (6) has been fully assembled and installed.

- Lift the lid of the water tank (18).
- Remove and rinse the water tank (17) and fill it with fresh cold water. Do not fill above the max mark.
- Replace the water tank (17) and push it firmly downward into place.
- Close the lid of the water tank (18) again.
- Fill the bean container (1) with coffee beans (for preparation using ground coffee, see "Preparation using ground coffee" on page 13).
-
Press the power switch O/I (9). The display (16) shows the menu for setting the display language.
-
Select the required display language with the upper rotary knob (15). The following languages are available:
ENGLISH NEDERLANDS
FRANCAIS ITALIANO
SVENSKA ESPANOL
POLSKI MAGYAR
TÜRKCE DANSK
NORSK SUOMI
PORTUGUES CESTINA
EAAHNIKA 6bJIAPCKN
Pycckn
-
Place a receptacle under outlet (6a).
-
Press the start button (10).
The language you selected is saved.
The appliance heats up and rinses. Some water will run out of the coffee outlet.
When the drink selection menu is shown in the display, the appliance is ready for use.
Switching off the appliance
If the appliance has not been used for an hour, it rinses automatically and then switches off (time span can be programmed, see "Menu settings" SHUT OFF on page 12).
Exception: The appliance switches off without rinsing if only hot water or steam were dispensed.
To switch the appliance off manually before this, press the off / i button (13). The appliance rinses and switches off.
N.B.: If the appliance is being used for the first time, a service program has been run, or the appliance has not been operated for a long period, the first beverage will not have the full aroma and should not be consumed.
When using the espresso machine for the first time, you will achieve a suitably thick and stable "crema" only after the first few cups have been dispensed.
After extended use, water droplets may form on the ventilation slots. This is normal.
Water filter
A water filter can prevent scale buildup. Before a new water filter is used, it must be rinsed. To do this, proceed as follows:
- Press the water filter firmly into the water tank with the aid of the measuring spoon (19).
- Fill the water tank (17) with water up to the max mark.
- Press and hold the off / i button (13) for at least three seconds. The menu opens.
- Press the off / i button (13) repeatedly until the display shows NO / OLD FILTER.
- Select ACTIVATE FILTER with the upper rotary knob (15).
- Press the start button (10).
- Place a receptacle with a capacity of 0.5 litres under the outlet (6a).
- Press the start button (10).
- Water will now flow through the filter to rinse it.
- Empty the container.
The appliance is ready to use once more.
Note: Rinsing the filter simultaneously activates the setting for the CHANGE FILTER! display.
The filter is no longer effective when the CHANGE FILTER! display appears, or at the latest after 2 months. It needs to be replaced for reasons of hygiene and so that there is no build-up of limescale (this could damage the appliance). Replacement filters can be obtained from retailers (TZ70003) or from customer service (467873). If no new filter is used, turn the FILTER setting to No / Old.

Note: You can use the filter indicator to mark the month in which you inserted the filter. You can also mark the month in which you will need to replace the filter next (at the latest after two months).
Note: If the appliance has not been used for a prolonged period (e.g. vacation) the filter should be rinsed before the appliance is used again. To do so, dispense a cup of hot water and pour it away.
You can adapt the appliance to your individual needs in the menu settings.
- Hold the off / i button (13) down for at least 3 seconds.
- Press the off I button (13) repeatedly until the required menu item appears in the display.
- Select the required setting with the upper rotary knob (15).
- Confirm by pressing the start button (10).
To leave the menu without making any changes, turn the rotary selector to EXIT and press the start button (10).
en
You can set the following:
SHUT OFF: Here you can set the time span after which the appliance automatically switches off following the last drink preparation. A time between 15 minutes and 4 hours can be set. The default time is 1 hour, but this can be shortened to save energy.
FILTER: Here you can set whether a water filter is being used. If a water filter is not being used, turn the setting to NO / OLD. If a water filter is being used, turn the setting to ACTIVATE FILTER. New water filters have to be rinsed before use (see "Water filter" on page 11).
START CALC'N'CLEAN: The service programmes (CALC'N'CLEAN / DESCALING / CLEANING) can be selected manually here. Press the start button (10) and run the selected programme (see "Service Programmes" on page 17).
TEMP.: The brewing temperature (HIGH / MIDDLE / LOW) can be set here.
LANGUAGE: The display language can be set here.
WATER HARDNESS: The water hardness setting can be adjusted on this appliance. It is important to set the water hardness correctly, so that the appliance indicates accurately when the descaling programme should be run. The factory setting for the water hardness is 4.
You can check the water hardness using the enclosed test strip or by asking your local water supplier.
Dip the test strip briefly in water, gently shake off any drips, and check the result after one minute.
| Level | Water hardness |
| German (°dH) | French (°fH) |
| 1 | 1-7 | 1-13 |
| 2 | 8-14 | 14-25 |
| 3 | 15-21 | 26-38 |
| 4 | 22-30 | 39-54 |
DRINK COUNTER: This displays how many drinks have been dispensed since the appliance was first put into operation.
Adjusting the grinding unit
The rotary selector (3) adjusts the grind settings from coarse to fine.
Warning!
Adjust the grinding unit only while it is running! Otherwise the appliance may be damaged. Do not reach into the grinding unit.
- While the grinding unit is running, adjust the rotary selector (3) from fine (a: Turn anticlockwise) to coarse (b: Turn clockwise) as required.


Note: The new setting will not become apparent until after the second cup of coffee.
Tip: For dark roast coffee beans, choose a finer grind, for lighter beans a coarser grind.
Preparation using coffee beans
This fully automatic espresso machine grinds beans freshly for each brew.
The appliance must be ready for use. To prepare a coffee-based drink with milk, first insert the milk tube into a milk container and turn the rotary selector (6b) to "Milk froth".
Important: Dried milk residue is difficult to remove, so the milk frother (6) must be cleaned with lukewarm water immediately after use and rinse using the RINSE MILK SYSTEM programme (see page 15).
Tip: If possible, use only beans for fully automatic coffee and espresso machines. For optimal quality, deep-freeze the beans or store in a cool place in sealed containers. Coffee beans can be ground while frozen.
Important: Fill the water tank (17) with fresh water every day. The tank (17) should always contain sufficient water for operating the appliance.
Preparation
- Place the pre-warmed cup(s) under the coffee outlet (7).
Tip: For a small espresso, always preheat the cup, e.g. using hot water.
- Select the required coffee and the required per-cup quantity by turning the upper rotary knob (15). The selected coffee and the per-cup quantity are shown in the display.
- Select the required coffee strength by turning the lower rotary knob (14). The selected coffee strength is shown in the display. To prepare two cups at the same time, press the button (11) (only for drinks without milk and without the aromaDouble Shot function).
- Press the start button (10).
Coffee is brewed and then poured into the cup(s).
N.B.: With some settings the coffee is prepared in two stages (see “aromaDouble Shot” on page 9). Wait until the procedure is fully completed.
Press the start button (10) again to cut the brewing process short.
Preparation using ground coffee
This fully automatic espresso machine can also be operated with ground coffee (not instant coffee powder).
The appliance must be ready for use. To prepare a coffee-based drink with milk, first insert the milk tube into a milk container and turn the rotary selector (6b) to "Milk froth".
N.B.: The aromaDouble Shot function cannot be used when coffee is prepared using ground coffee.
Important: Dried milk residue is difficult to remove, so the milk frother (6) must be cleaned with lukewarm water immediately after use and rinse using the RINSE MILK SYSTEM programme (see page 15).
Important: Fill the water tank (17) with fresh water every day. The tank (17) should always contain sufficient water for operating the appliance.
Preparation
- Open the drawer (4).
- Pour in no more than 2 level measuring spoons of ground coffee.
Warning: Do not use whole beans or instant coffee.
- Close the drawer (4).
en
- Select the required drink by turning the upper rotary knob (15) (only one cup possible).
- Press the start button (10).
Coffee is brewed and then poured into the cup.
N.B.: Repeat the procedure for another cup of coffee. If no coffee is taken within 90 seconds, the brewing chamber empties automatically to avoid overfilling. The appliance rinses.
Dispensing hot water
Risk of burns!
The milk frother (6) gets very hot. Hold the milk frother (6) by the plastic part only.
The appliance must be ready for use.
- Place the pre-warmed cup or glass under the outlet of the milk frother (6).
- Set the rotary selector (6b) to the horizontal position.

- Press and hold the 12 button (12) for approx. 3 seconds. The appliance heats up. Hot water runs out of the milk frother outlet (6) for about 40 seconds.
- Press the 心 / 心 button (12) again to cut the process short.
Preparing milk froth and warm milk
Risk of burns!
The milk frother (6) gets very hot. Hold the milk frother (6) by the plastic part only.
Tip: You can foam the milk first and then dispense coffee, or foam the milk separately and pour it onto the coffee.
The appliance must be ready for use.
- Place a pre-warmed cup under outlet (6a).
- Insert the milk tube (6c) into a milk container.
- Turn the rotary selector (6b) to "Milk froth" or "Warm milk".

- Press the 念 / 念 button (12). The 念 / 念 button (12) flashes and the appliance now heats up for approx. 20 seconds.
Risk of burns!
Milk froth or warm milk comes out of the milk frother (6) at high pressure. Splashes of milk can scald. Do not touch the outlet (6a) or aim it at anyone.
5. End the process by pressing the 心 / 心 button (12).
Tip: For optimal milk froth quality, use cold milk with a fat content of at least 1.5% if possible.
Important: Dried milk residue is difficult to remove, so the milk frother (6) must be cleaned with lukewarm water immediately after use and rinse using the RINSE MILK SYSTEM programme (see page 15).
Maintenance and daily cleaning
Risk of electric shock!
Unplug the appliance before cleaning it. Never immerse the appliance in water. Do not use a steam cleaner.
- Wipe the outside of the appliance with a soft, damp cloth.
- Do not use abrasive cloths or cleaning agents.
Always remove any limescale, coffee, milk or descending fluid residue immediately. Such residue can cause corrosion.
- Pull the drip tray (8c) with the coffee grounds container (8b) forward and out. Remove the panel (8a) and the grate (8d). Empty and clean the drip tray and coffee grounds container.
- Remove drawer (4) and clean.

-
Do not put the following items in the dishwasher: cover of the storage compartment (5c), drip tray panel (8a), drawer (4), brewing unit (5a).
-
The following items are dishwasher-safe: drip tray for coffee outlet (8c), coffee grounds container (8b), grate for coffee outlet (8d), aroma cover (2) and measuring spoon (19).
- Wipe out the inside of the appliance (tray holders and drawer).
Important: Drip tray for coffee outlet (8c) and coffee grounds container (8b) should be emptied and cleaned daily to prevent mould from developing.
N.B.: If the appliance is cold when switched on with the power switch O/I (9) or if it switches off automatically after coffee has been dispensed, it rinses automatically. In other words the system cleans itself.
Important: If the appliance has not been used for a prolonged period of time (e.g. after a vacation), clean the entire appliance thoroughly, including the milk system and brewing unit.
Do not put the lid and the insulating cover of the milk container (22) in the dishwasher. The inside of the milk container is dishwasher-safe.
Cleaning the milk system
If the milk system was not cleaned after milk has been dispensed, after a certain amount of time the message CLEAN MILK SYSTEM! will appear on the display. Clean the milk system immediately after use! To clean, leave the rotary selector (6b) in the same position it was in when last used.
To pre-clean the milk system automatically:
- Select by turning the rotary knob (15).
- Place a tall, empty container under the outlet (6a).
- Push the outlet as close as possible to the container.
- Place the end of the milk tube (6c) into the container.
- Press the start button (10).
en
The machine automatically releases water into the container and vacuums it up again via the milk tube to rinse the milk system. The rinse procedure stops automatically after about 1 minute.
- Empty the container and clean the milk tube (6c).
In addition to this, clean the milk system thoroughly at regular intervals (by hand or in the dishwasher).
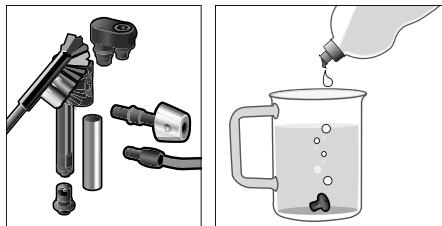
Dismantling the milk system for cleaning:
- Pull the milk frother (6) forward out of the appliance.
- Dismantle the milk frother into its individual parts (6a to 6d) (see figure C at the start of the operating instructions).

- Clean the individual parts with a detergent solution and a soft brush. If necessary, soak in a warm detergent solution.

- Rinse all parts with clear water and dry them.
- Reassemble all the parts and replace fully in the appliance.

Risk of scalding!
Use this appliance only after the milk frother (6) has been fully assembled and installed.
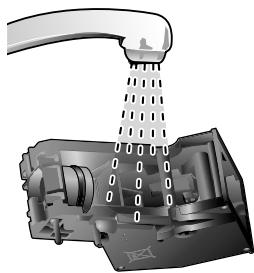
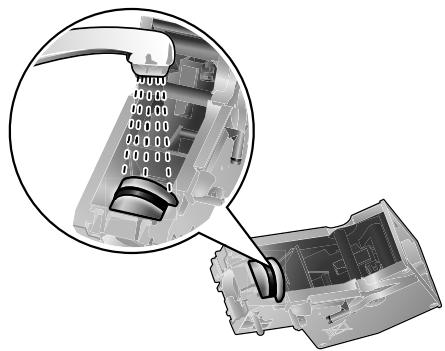
Cleaning the brewing unit
Clean the brewing unit regularly!
To pre-clean the brewing unit automatically:
- Select 念 by turning the rotary knob (15).
- Place an empty glass under outlet (6a).
- Press the start button (10).
The appliance rinses.
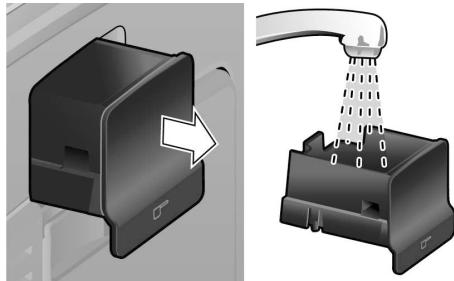
In addition to the automatic cleaning programme, the brewing unit (5a) should be removed regularly for cleaning.
(See figure E at the start of the operating instructions.)
- Switch the appliance off at the power on/off switch O/I (9). No buttons are lit.
- Open the door (5b) to the brewing unit.
- Slide the red lock (5e) on the brewing unit completely to the left.
- Press the red button (5d), grasp the brewing unit by the recessed grips and remove carefully.
- Rinse the brewing unit (5a) thoroughly under running water.
- Hold the brewing unit sieve under the running water.

Important: Do not clean with detergent or other cleaning agents and do not put it in the dishwasher.
- Wipe out the inside of the appliance thoroughly with a damp cloth and remove any coffee residues.
- Allow the brewing unit (5a) and the inside of the appliance to dry.
- Reinsert the brewing unit (5a) fully into the appliance.
- Slide the red lock (5e) fully to the right and close the door (5b).
Tips on energy saving
- The fully automatic espresso machine switches off automatically after one hour (factory setting). The default time of one hour can be shortened (see "Menu settings" SHUT OFF on page 12).
- Switch off the fully automatic espresso machine when not in use. To do this, press the off / i button (13). The appliance rinses and switches off.
- If possible, do not interrupt coffee or milk froth dispensing. Cutting the coffee or milk froth dispensing process short results in higher energy consumption and in more residual water collecting in the drip tray.
- Descale the appliance regularly to avoid a build-up of limescale. Limescale residue results in higher energy consumption.
Service Programmes
Tip: Refer also to the quick reference guide in the storage compartment (5c).
Depending on usage, the following messages will appear on the display at certain intervals:
DESCALE REQUIRED!
or
CLEAN REQUIRED!
or
CALC'N'CLEAN REQUIRED!
The appliance should be cleaned or descaled immediately using the corresponding programme. You also have the option of combining both processes with the Calc'n'Clean function (see "Calc'n'Clean" on page 19). If the service programme is not run as instructed, the appliance may be damaged.
Warning!
Each time you run the service programme, you should follow the instructions for using the descaling and cleaning agents. Please observe the safety instructions on the packaging of the cleaning agent.
Never interrupt the service programme!
Do not drink the liquids!
Never use vinegar, vinegar-based products, citric acid or citric acid-based products!
Never put descending tablets or other descending agents in the ground coffee drawer or the drawer for cleaning tablets (4)!
Specially developed descending and cleaning tablets are available from retailers or customer service.
| Order number | Retail | Customer service |
| Cleaning tablets | TZ60001 | 310575 |
| Descaling tablets | TZ60002 | 310967 |
en
Dscaling
Duration: approx. 25 minutes.
Important: If there is a filter in the water tank (17), it needs to be removed before the descending programme is run.
If the message DESCALE REQUIRED! appears on the display, press the off / i button (13) for 3 seconds and then press the start button (10). The descending programme will start.
To descale the appliance before being prompted, press the off / i button (13) for at least 3 seconds. Then press the off / i button (13) briefly twice. Turn the upper rotary knob (15) until START DESCALING appears in the display. To start the descal-ing procedure, press the start button (10). The display will guide you through the programme.
EMPTY DRIP TRAY
INSERT DRIP TRAY
- Empty drip tray (8) and replace them.
N.B.: If the water filter is activated, the display will prompt you to remove the filter and then press the start button (10) again. Remove the filter now if you have not already done so. Press the start button (10).
FILL DESCALER
PRESS START
- Pour lukewarm water into the empty water tank (17) up to the 0,5l mark and dissolve 2 Siemens descaling tablets in it.
- Press the start button (10).
PLACE CONTAINER
PRESS START
- Place a receptacle with a capacity of at least 0.5 litres under the outlet (6a).
- Press the start button (10).
DESCALE IN PROGRESS
The descending programme will now run for about 20 minutes.
CLEAN/FILL WATER TANK PRESS START
- Rinse the water tank (17) and refill it with fresh water up to the max mark.
- Press the start button (10).
DESCALE IN PROGRESS
The descending programme now runs for about 3 minutes and rinses the appliance.
EMPTY DRIP TRAY
INSERT DRIP TRAY
- Empty drip tray (8) and replace them.
Replace the filter if one is being used. The appliance has completed descaling and is ready for use again.
Important: Wipe down the appliance using a soft, damp cloth to immediately remove any descaler residue. Such residue can cause corrosion. New sponge cloths may contain salts. Salts can cause rust film on stainless steel and must therefore be washed out thoroughly before use.
Cleaning
Duration: approx. 10 minutes.
If the message CLEAN REQUIRED! appears on the display, press the off / i button (13) for 3 seconds and then press the start button (10). The cleaning programme will start. To clean the appliance before being prompted, press the off / i button (13) for at least 3 seconds. Then press the off / i button (13) briefly twice. Turn the upper rotary knob (15) until START CLEANING appears in the display. To start the cleaning procedure, press the start button (10).
The display will guide you through the programme.
EMPTY DRIP TRAY
INSERT DRIP TRAY
- Empty drip tray (8) and replace them.
CLEANING IN PROGRESS
The appliance rinses twice.
OPEN DRAWER
FILL CLEANER
- Drop a Siemens cleaning tablet in the drawer (4) and close.
CLEANING IN PROGRESS
The cleaning programme will now run for about 8 minutes.
EMPTY DRIP TRAY
INSERT DRIP TRAY
- Empty drip tray (8) and replace them. The appliance has finished cleaning is ready for use again.
Calc'n'Clean
Duration: approx. 35 minutes.
Calc'nClean combines the separate functions of descending and cleaning. If both programmes are due to be run soon, the espresso machine automatically suggests this service programme.
Important: If there is a filter in the water tank (17), it needs to be removed before the service programme is run.
If the message CALC'N'CLEAN REQUIRED! appears on the display, press the off / i button (13) for 3 seconds and then press the start button (10). The service programme will start.
To run Calc'nClean before being prompted, press the off / i button (13) for at least 3 seconds. Then press the off / i button (13) briefly twice. Turn the upper rotary knob (15) until START CALC'n'CLEAN appears in the display. To start Calc'nClean, press the start button (10).
The display will guide you through the programme.
EMPTY DRIP TRAY
INSERT DRIP TRAY
- Empty drip tray (8) and replace them.
CALC'N'CLEAN IN PROGRESS
The appliance rinses twice.
OPEN DRAWER
FILL CLEANER
- Drop a Siemens cleaning tablet in the drawer (4) and close.
N.B.: If the water filter is activated, the display will prompt you to remove the filter and then press the start button (10) again. Remove the filter now if you have not already done so. Press the start button (10).
FILL DESCALER
PRESS START
-
Pour lukewarm water into the empty water tank (17) up to the 0,5l mark and dissolve 2 Siemens descending tablets in it.
-
Press the start button (10).
PLACE CONTAINER
PRESS START
CALC'N'CLEAN IN PROGRESS
The descending programme will now run for about 22 minutes.
CLEAN / FILL WATER TANK
PRESS START
CALC'N'CLEAN IN PROGRESS
The descending programme now runs for about 10 minutes and rinses the appliance.
EMPTY DRIP TRAY
INSERT DRIP TRAY
- Empty drip tray (8) and replace them.
en
Replace the filter if one is being used. The appliance has finished cleaning is ready for use again.
Important: Wipe down the appliance using a soft, damp cloth to immediately remove any descaler residue. Such residue can cause corrosion. New sponge cloths may contain salts. Salts can cause rust film on stainless steel and must therefore be washed out thoroughly before use.
Frost protection
To avoid damage from low temperatures during transport and storage, the appliance must be completely emptied first.
Note: The appliance must be ready for use and the water tank (17) filled.
- Place a large receptacle under outlet (6a).
- Press the 心 / 心 button (12) and allow the appliance to steam for about 15 seconds.
- Switch the appliance off at the power on/off switch O/I (9).
- Empty the water tank (17) and the drip tray (8).
Accessories
The following accessories can be obtained from retailers and customer service.
| Order number | Retail | Customer service |
| Cleaning tablets | TZ60001 | 310575 |
| Descaling tablets | TZ60002 | 310967 |
| Water filters | TZ70003 | 467873 |
| Milk container (insulated) | TZ70009 | 673480 |
Disposal

Dispose of packaging in an environmentally-friendly manner. This appliance is labelled in accordance with European Directive 2012/19/EG concerning used electrical and electronic appliances (waste electrical and electronic equipment – WEEE). The guideline determines the framework for the return and recycling of used appliances as applicable throughout the EU. Please ask your specialist retailer about current disposal facilities.
Guarantee
The guarantee conditions for this appliance are as defined by our representative in the country in which it is sold. Details regarding these conditions can be obtained from the dealer from whom the appliance was purchased. The bill of sale or receipt must be produced when making any claim under the terms of this guarantee.
Right of modification reserved.
Simple troubleshooting
| Problem | Cause | Solution |
| Display shows
REFILL BEANS! although
the bean container (1) is full,
or the grinding unit does not
grind the beans. | Beans are not falling into
the grinding unit
(beans too oily). | Gently tap the bean
container (1).
Change the type of coffee if
necessary.
When the bean container (1)
is empty, wipe it with a
dry cloth. |
| No hot water dispensed. | The milk frother (6) is soiled. | Clean the milk frother (6),
see “Maintenance and daily
cleaning”. |
| Too little or no milk froth
or
the milk frother (6) does not
draw the milk in. | The milk frother (6) is soiled. | Clean the milk frother (6),
see “Maintenance and daily
cleaning”. |
| Milk unsuitable for frothing. | Use low-fat milk (1.5 % fat). |
| The milk frother (6) is not
correctly assembled. | Wet the milk frother parts
and press together firmly. |
| Build-up of limescale in the
apppliance. | Descale the appliance
using two descaling tablets,
if necessary repeat the
procedure. |
| Coffee dispensing slows to
a trickle or stops completely. | Coffee is ground too finely.
Pre-ground coffee is too
fine. | Adjust the grinding unit to a
coarser setting. Use coarser
pre-ground coffee. |
| Build-up of limescale in the
apppliance. | Descale the appliance. |
| Coffee has no “crema”. | Unsuitable type of coffee. | Use a type of coffee with a
higher proportion of robusta
beans. |
| The beans are no longer
fresh. | Use fresh beans. |
| The grinding setting is not
suitable for the beans. | Adjust grinding setting to
fine. |
| If you are unable to solve the problem, please call the hotline.
You will find the telephone numbers at the back of these instructions. |
Simple troubleshooting
| Problem | Cause | Solution |
| Coffee is too "acidic". | The grinding setting is too coarse or the pre-ground coffee is too coarse. | Adjust the grinding unit to a finer setting or use finer pre-ground coffee. |
| Unsuitable type of coffee. | Use a darker roast. |
| Coffee is too "bitter". | The grinding setting is too fine or the pre-ground coffe is too fine. | Adjust the grinding unit to a coarser setting or use coarser pre-ground coffee. |
| Unsuitable type of coffee. | Change type of coffee used. |
| Display shows
ERROR
CALL HOTLINE | The appliance has a fault. | Please call the hotline. |
| The water filter does not stay in position in the water tank (17). | The water filter is not mounted correctly. | Firmly press the water filter straight down into the tank connection. |
| Display shows
CHECK
WATER TANK | Water tank has been incorrectly inserted or the new water filter has not been rinsed according to instructions. | Insert the water tank correctly or rinse the water filter according to instructions and then switch on. |
| The coffee grounds are not compact and are too wet. | The grinding setting is too fine or too coarse, or not enough ground coffee has been used. | Adjust the grinding unit to a coarser or finer setting, or use 2 level measuring spoons of ground coffee. |
| Display shows
CLEAN BREWING UNIT | Brewing unit (5) is soiled. | Clean brewing unit (5). |
| Too much pre-ground coffee in the brewing unit (5). | Clean brewing unit (5). (Pour in no more than 2 level measuring spoons of ground coffee). |
| The brewing unit's mechanism is stiff. | Remove and clean the brewing unit, see "Mainte-nance and daily cleaning". |
| Coffee or milk froth quality varies considerably. | Build-up of limescale in the appliance. | Descale the appliance with two descaling tablets as described in the instructions. |
| If you are unable to solve the problem, please call the hotline.
You will find the telephone numbers at the back of these instructions. |
Simple troubleshooting
| Problem | Cause | Solution |
| Water dripped onto the in-
ner floor of the appliance
when the drip tray (8) was
removed. | Drip tray (8) removed too
early. | Wait a few seconds after
the last drink was dispensed
before removing the drip
tray (8). |
| Display shows
INSERT BREWING UNIT | Brewing unit (5) is missing
or was not recognised. | Switch off the appliance with
the brewing unit (5) in place,
wait three seconds and
switch on the appliance. |
| Restore the unit to its
original factory settings
("Reset"). | You changed some settings
and want to discard them. | Turn off the unit with
the power on/off switch
O/I (9). Press and hold
the Ⓞ off / i (13) and the
ü /ɪ (12) button and turn
the appliance on with the
power on/off switch O/I (9).
Confirm by pressing the
start button start (10). The
factory settings are now
activated. |
| If you are unable to solve the problem, please call the hotline.
You will find the telephone numbers at the back of these instructions. |
Technical data
| Power connection (voltage/frequency) | 220-240 V / 50-60 Hz |
| Heater wattage | 1600 W |
| Maximum static pump pressure | 15 bar |
| Maximum water tank capacity (without filter) | 1.7 liters |
| Maximum capacity of the coffee bean container | 300 grams |
| Length of power cable | 100 cm |
| Dimensions (H x W x D) | 385 x 280 x 479 mm |
| Weight, empty | 9.3 kg |
| Type of grinding unit | Ceramic |
fr
Sommaire
-TEMP. 30
-
LAngue. 30
-
EAU DURETE. 30
-
COMPTEUR DE BOISSONS 30
Régler la finesse de la mouture 30
Le nettoyage commence.
CALC'N'CLEAN EN COURS
CALC'N'CLEAN EN COURS
CALC'N'CLEAN EN COURS
Duur: circa 25 minutes.
PROBÍHA CALC'N'CLEAN
PROBÍHA CALC'N'CLEAN
Odvapnovaciprogramynipobeziasi
PpIroTOBJIeHne KoFeiHbIX HAnITKOB n3 KoFeiHbIX 3epeH. 109
PnroTOBHeHne KoFeeHbIX HAnITKOB n3 MOnToTOro KoPe 109
PpiroToBnIe HrpoJeu Bovbl 110
PpIroTOBJIeHne MOJOhN IeHbI N TeJIoro MoJoka 111
PtoaBnem Bac c nokynkO 3ToI noHocbO aBTOMaTnecko KoFemaunHbI 3cnpecco fnpmbi Siemens.
B daHno nHCTpykun no 3KcNpyaTcuon ONncbIbaOTc pa3nUHbIe MoJeN, OTJNUOuOuneC NO OCHaUeHNIO.
Ipocb6a TaKke yuHTbBaTb npnaraemyo KpaTKyIO HNCTpyKcHIO.
Ee moKHO xpaHbT b CpeuaJIbHOM OTcKe
(5c)do daIbHeIWeIeIO IcONb3OBAHnI.
Yka3aHnI NO TexHnKe 6e3OpacHOCTN
BHNMaTeJbHO O3HaKoMbTecb C H-CTpyKcneI IO 3KcNpyaTaun, npn pa6oTe pyKOBoDCTByNTecb yKa3aHnA Mn DaHHO IHCTpyKcUN I COxpaHnIe ee IJaDaJIbHeIWeO NcNoJIb3OBAHn! B cnyae npodaxn np6opa npoc6bapepeDaTb IHCTpyKcUN IO 3KcNpyaTaun HOBOMy BnaDeIbuy.
DaHnA NOJIHOCTbO ABTOMaTHUeCKa KoΦeMaUHa 3cnpcecco npedHa3Ha-yeHa dIg 6bITOBORIO nCNoJb3OBAHn I paccHTaHa Ha COOTBeTCTBYIOuYIO npON3BODNTeNbHOCTb; OHa He npedHa3HaueHa dIg IpomblJeHHORO npimHeHn.
Onachoctb nopaxeHnY TOKOM!
Ppi npoknoueHH npibopa n npa pa6ote co6IIOdaTb daHHbIe, npBBeHHe Ha TINOBOI Ta6JIuYe.
TOnb3ObaTbCpnp6opm DOnyckaetc TOnbKO pnp OTCyTCTBn NOBpeKdEHN Ka6eJIa n np6opa.
ru
He pa3pe7aIte DeTm IrgaTb C ypaKOBOHybIM MaTePnaJIOM.
KOMnJIeKT NOCTaBKn
(CM. 06309Hy IOIINIOCTpaCNIIO B Hauane INHCTpyKcIM)
ПлJOнOCТьЮ aВТOMaTиЧeСКая
Кофемашина 3спpecco TE506/TE509
KpaTka INHCTpykUa
Hnctpykunpo 3Kcnnyataun
HacaKa dIpy npiroTOBneHnmoJIOUHOI neHbI
HnDnKaTOpHa nONoCKa DnA onpeJeHEny JecTKoCTN BODbl
Mepnaj IIOKka dIy MONOTORO KoCf e
9 EmKoCTb DnMa MoNoka
063op
(Cm. pncyHKn A, B, C, D n E b hauane HNCTpyKun)
1 EMKoCTbДЯ KoΦeHbIx 3epeH
2 Kpbuika, coxpaHraioa apomat
3 ПоворOTьп peулгTOp CTepeHn pOMOJa
4 BbDnKHOIOTcEKdIaMOnOTOro KoFe (MOONtBIKOe / TaBNETka dIa OuNCTKN)
5 BLOK 3aBapuBaHnna (pnc.E)
a)БлokЗавиваня
b)Дерца
c) OTeCek dIЯ xpaHEnHa KpaTKoI INHCTpyKUnI
d) HaximnaKa KhoNka
e)ФИкcaTop
6 Hacaika Дяп ри��овлени моочныпehы (pnc. C) CHIMATbCЯ
a) Bbinyckna Tpy6ka
b)ПepeключateлpeхиMuOB «TeПлoe MOnOko》/«МоЛоЧнагпЕн»
c) Tpyka noidaun MOIoka
d)BepxHraaactb
e) Tpy6ka noidaun Bo3dya
7 UcTpoIcTBo pa3nBa KoFepepynpyemoe no BbICOTe
8 POnDOnH nIy KanepJIb (pnc. D)
a)3acJIOHka
b)EmkocTbДЯ KoceHOnIyu
c)Подюн ДЯ Калель поусточьом раимь кофe
d) PešteKa-nOcTbKa nOd yctpoiCTbOM pa3JIbBa KoΦe
9 CeTeBOB BbIKIOHaTeJIb O/1
10 KhoNka start
11 Khonka
12 Khonka /
13 KhoNka off / i
14 PerynayTop «Kpenocb Koce»
15 PerjTOp «Bb6op HanITka»
16 Dusrnnei
17 CbemnaeMKoCTb JIy BObl
18 KpbiIka eMKoCTn DJIa BObl
19 Mepna loxka Iy MoNToRo KoFe (npncnoc6JeHne Iy yCTaHOBKn 0JIbTp aIy BObl)
20 OtceK dIy xpaHEny MepHOJ IIOxKn
21 Kaßelb ПИтань с OTсЕКOM ДЯ有很大храненя
22 EmKoCTb DnIa MoIoka
Злем entblу упраьени.
CetBoB BbIKnIOuATEJb O/1
Ceteboi BbIKIouaTeIb O/1 (9) nCnOJIb3yeTcA DnB BKJIIOUeHnN IONHO BbIKIIOUeHnI npIbopa (noDaay Toka npepbIBaETc).
BhImaHne: Npeed BbIKNoUeHnEm 3aNyCTnte nporpamMy OuNCTKn INI HaxMnTe KHOkky off / i (13), TTO6bl BbIKIOuHTb np6op.
KhoNka
Haxmnte KhoNky (11)Длг OndHOBpeMeH-Horo npiroTOBHeHnry DByx YaWeK BbIbpaH-Horo HAnITka.3TaФyHKZnI DAocTyHnHa npi npiroTOBHeHn HAnITKOB 6ez Do6abHeHnMyOJOKa,a TaKKe B TOM Clyuye,ecJIH He nCNoJIb3yETcRfYHKzna aromaDouble Shot.
Khonka off / i
PnKpaTkoBpeMeHHOM HxKaTmN KHOJKn off / i (13) BbIOnHReTcR OOnaACKNbAHne n BByKJIouChHe NpN6opa. EcIn HxKaTb N yDepXkNBaTB KHOJky off / i (13) HxKaToi, TO Ha DInCJIeE OTo6paXaJOTC NOb3OBATeJIbCKNe HacTroPoiKu NII NaUHaeTcR IpOuecc YdaJeHnna HAKUN N OoNCTKn Pnp6opa.
Khonka/1/8
HaKmnte Ha KhONky 心/小(12),YTO6bl reHepnOBaTb nap dIpy npriROTOBHeHn MOOnOH neHb IIN TEIIOrO MoNoka.3Ta KHONka NcNoJIb3yETcraTakJe IIN HAJIbAHHra TOpRaeB WObl.
Khonka start
При Надахати на Кногку start (10) начигаETСЯпоцECС рИгOTOBлЕня нанТka ИВыINOLHЯETCS cEpBИСЧАnpогрмma.
IbTOpHbIM HaxaTneM KhoNkN start (10) BO BpEm npriROToBJIeHn HaNTKa MoXHO DocpoHOb OCTaHOBtB IpOceC.
PeryJrTop «Kpenocb Kode»
YXODI eXeIHeBHaOuNCTKa
AnachocTh npaxeHn TOKOM!
Ipeed OuchTKoB BbHbTe BnJIky npN6opa n3 pO3eTKn.
3aPepaaetnporpykaTb npibopB Body.
He nCnoB3OBAt b npoBbIe ouNCTeJI.
- IpoTpnte KOpnyc MArKoB BJIaXHOb TkaHbIO.
3anpeaaetcncnoJIb3OBAHne rpyboi TKAHNIIINCHCTAUNX CpeDCTB.

- Octatkn Hakinn, KoFe, MoIoka n pactbopa dIy ydaIeHnna HAKINu ydaJIraTe cpa3y je. IoN taKIMN OCTaTKamn MOryt BO3HnKaTb Oyar N KoppO3nn.
- IpoaIte nOdoH dJa Kaenb (8c) c emKocTbIO dJa KoFeiHOr rUu (8b) Bpeedn HapyKy. Chmnte 3acIoHky (8a) npeweTKy-nOCTabKy (8d).OnopokHnte INouchTe IPOdoH dJa Kaenb n EMKOCTb dJa KoFeiHOr rUu.
- 13BnEKeNTe BbIbNkHOJ OTcEK IJIa MoIToTOro KoOe (4) nNouchTe erO.
ru
He MoTe B NocydomoeyHoi MaunHe cnedyuune DeTan: KpbIshka OTceKa dnia XpaHEnia KpaTko INCTpyKcnn (5c), 3acNoHka PNOHOHa dnia KapeIb (8a), BblDnXHHoOTcK dnia MOnOTOro KoPe (4), 6nok 3abapnbHna (5a).
CJIeIyUOUIne DeTaIIIM MOKHO Mblb B NocydomoEHHoM MaUNHe: NODOH dJa KaIeNB IOJ yCTPOiCTBOM pa3JIbBa KoFe (8c), EMKOCTb IJRA KOFeHoi HO rUaN (8b), peWetka-IOndCTabKa IOJ yCTPOiCTBOM pa3JIbBa KoFe (8d), COxpaHЯIoUaAp oMaT KpbIuKa (2) n MeHna JIoXkA dJa MoJIoTOrO KoFe (19).
- IpoTpnte BHyTpeHHne NOBepxHocTN npi-bopa (dEpkataTeIN PNOHOB IN BBIDBnK-HoIOTcEK DnRA MOJTOrO KoΦe).
Baxho: PoiDOn DnI KAneIb NOD yCTpoN CTBOM pa3nBa KoFe (8c) n EMKoCTb DnI KoFeHoi rUu (8b) Heo6XoDmO eKe- DHeBHO ONOpOxHrTb N UcHtTu DnI ppeD0TbPaueHn IOaBHeHn IPiCeHn.
Yka3aHHe:Ecnn npi6op haoDntcB xOJIOHOM COCToHNN,6ydyu BkJIIOUHeHHbIM C NOMOUsbCteBOrO BbIKIIOUaTeJIa O/1 (9), JIN6o ecnn OH BbIKJIIOUaETcA bTOMaTnueCKN Nocne nprirotOBJeHnKoPe,ONOAcknBaHne TaKke npOnCXoDNT B aBTOMaTnueCKOM pexKmE. IHaue roBOp, PpeDyCMOTpeHa CAMOOuNCTKa CNCTeMbI.
Baxho: Ecnn npnbop He nCnoIb3ObaIcnaDIOroe Bpemn (Hapnpmep, BO BpeM OTOyCka), TuaTeNbHO pPOMOIte erO CEJIHKOM, BKJIOUyA CNTEmy NODaCh MOJOKa N 6JIOK 3aBaPUNBaHn.
KpbIshky nI3OInpyUOyH HacaIky EMKOCTn IJRA MOJOKa (22) HeJIb3r MblTb B NOCY-OMOeHNoMaunHe. BHyTpEnHry ChAcTb EMKoCTn IJRA MOJOKa He npriOndHa IJRA MbITbB NOCyDOMOeHNo MaunHe.
OuNCTka cnCTembl IOnaUn MOJOKa
EcnI He BbINOpHnTb OChCTky CNTeMbI NOaHu MOJOKa Nocne HaJIuBa MOJOKa, To Ycepe3 HeKoTOpoe Bpemr Ha DnCnPee NOBHTc4 CoObSeHne OChCTNtB MoJIOUH. CNT!.
CnCTemy noDaun MoIoka Ounuatab nocJe kaxdoRo nCnoB3ObaHnra! Iyra BblonHeHHa OoNCTKn OCTaBtpe nepeKJIouateJb (6b) B TOM Jx POJIOXeHN, B KOTOpOM OH HaXoDINcRBO Bpemn oocJeHero ceaHca pa60tbl.
Для abTomatnueckо пpeDbapntelbhoj OuchTkn CnCTembl NOdaH MOnoka:
- Onopokhnte emKoCTb n OuHCTbTe Tpy6-ky noaun Mooka (6c).
Kpome toro, cneNyet peryIaTeIb-HO npOMbIbTaB CNTeMy NOdaH MOnoka (B NocydomoeHNo MaunHe IIN BpyHyU).
Pazbopka CnCTembl NpaMoloka dny OCHCTKN:
- Bыдьньт e hacaiky dя npiroTOBleHnma monouhoi nehbl (6) n3 npiobopa.
- Pa36epnte Hacaiky dIЯ nprirotoblenma MOnOuHOH IeHbI Ha OTdJIbHbIe DeTaII (6a-6d) (cM. pnc. C B hauJaIe daHHoH INCHtpyKcNn IO 3KcPiLyataCnn).

- OuHCTnTe DeTaJI N IO OTdIeNbHOcTn Iprn NOMOUI pACTBOPa MOIOUero CpeDCTBa IN MRAKOJ UeTKN.Iprn Heo6XoDMOCtN IORpy3HTeDeTAJI N TEJIbI pACTBOP MOIOUero CpeDCTBa.
- BCE deTani npombyt b uCToB BOOu n npocuyntb.
- OπaTb co6paTb HacaIky dIpy npiroTOBJIeHn MOnOuHOI NeHbI N BCTaBNTb ee B npi6op do ynpa.

Onachoctb oXora ropaeyen KNDKOCTbH!
IcnoIb3yIte np6op TOnIbKO nOce c6OpKn I yCTaHOBKn HacaIkn dJa nprirotobJeHnma MoNoHoi neHbI (6).
OuICTka 6Joka 3aBapNbHnA
PeryIpaHNo OuNuaTe 6JOK 3aBapnBaHnA.
ДЯ aTOMaTnueckO npeDbapntelHoN
OuchTkn 6JOKa 3aBapnBaHnA:
- Поворачивая рergyтор (15), Вьберпг.
- Помecтinte пусто CTaKaH NOB BbIpyCKHO Tpy6KoI (6a).
- HακaMb KhONky start (10).
ПровODиТСЯпрOMьИВka пибopa.
Дононтельно К nporpamme abTomatnueckо OuHCTkn 6LoK 3aBapNBaHna (5a) cNe dyet peYIpaHNo I3BLeKaTb ДЯчNTkn (Cm. pnc. E B haJaJIe INHCTpyKcIIIN NO 3KcNJIyatauIN).
- OTKIHOHTb npH6Op CeTeBbIM BblKIIHOuATEJEM O/I (9). Hn OJa KHOJka He DOJIxHa CBETITbCra.
- OtkpbItb DBepu (5b) 6noka 3abapuBaHnI.
- KpacHbI ΦnKcaTOp (5e) Ha 6Ioke 3aBa-puBaHnA CDbHnHTb Do yNopa BJIeBO.
- HαKaTb Ha KpaChHyo HαKmMHyO KhONKy (5d), B3rTb 6Iok 3aBapuBaHn8 3a Na3bl N OCTOPOXHO I3BJIeYb.
- ПомоTe 3abapOчьн 6лok (5a) ВпpoToUHоВОе.

ru
- ПомоTe сntO 6noka 3abapuBaHnA CTpyeB0Dbl.
BaxHo: IJIy OUHCTKn 6JIOka 3aBapuBaHnIe HJIb3r ICSNOJIb3OBAt b MOJOune NJIY UNCTAAIe CpeCDTa. HeJIb3ra TAKKeMbITb erO B INOCyDOMoeHOn MaUNHe.
- Tsqatelbno npotpnte BHyTpeneHHIO NOBepxHocTb npnbopa BlaJxHO TkaHbIO u ydaJIte OCTaTKn KoPe.
- Порocушпешьлк Завариваня (5a) в ВHTpeHHne NOBepxHOCtN npi6opa.
- BCTaBtB 6Iok 3aBapuBaHnra (5a) do ynpa.
- KpacHbI ΦnKcaTOp (5e) cDnBnHyTb Do ynpa BnpaBO n 3akpbTb DBepb (5b).
CObEыI NO 3KOHOMN 3HeprN
-Плноctью abTomatUnecKa KofoMaшина 3cnpecco OTKJIIOUcaETcra abTomatUnecKn NO ICTeHEn OJHO Yaca(ЗавODсая установka).Врем,установЛehhoe NO yMOnuahNIO,MOKHO COKpaTNTb (cM. BblkI. YePE3 Ha cTp.107).
- BbIKIyauaTe NOnHocTbU aBtOMaTnueckyU KoΦeMaunHy 3cnpceCO, ecn OHa He nCNoJIb3yETc.ДЯ 3TOrO HaxMITE KhONKy 念 off/ i (13). BydET BbINOpHeo ONoJACKnBaHne n OTKInOuHeHne np6Opa.
-ПОВЗМохнocTи He npepbIbAып pro-цecc pnpiroTOBnEHHa KOFe mNIMMOIOHOnпehbl.прждеврemeHHoe npepbIbAHne
PnirTOBJIeHnI KOe IJIN MOnOuHoi NeHbI PnIBoDnT K NOBblIeHHOMy paCXOdy 3HepTnn N 6bICTpOMy 3aONHeHIO NOdOHa dJa KaJIb.
PeryIpaHNO npOboIDnB MeOpnpTnA NO ydaJIeHnIO HaKIN, YTO6bI npeIoTbPaaTaB o6pa3OBaHne N3BeCTKOBbIX OTNoXeHm. N3BeCTKOBbIE OTNoXeHnBEdyTK nobbiEHHOMy paCXoYd 3Heprn.
CepBnchIe nporpaMMbl
CoBcT: Cm. TaKKe KpaTkUO HNcTpkyuIO B OTeCeKe IJn XpaHeHn (5c).
B 3aBnCIMoCTN OT nCNoIb3OBAHnA, c Onpe-DeIeHHbIMn INHTepBaIamn Ha IINcPiee 6y- dyT NOBbIbTbcS CNeDyUoiue COo6uHnA: TPE6VETCA YdJI. HAKIIb! nn TPE6VETCA OUYCTKA! nn TPE6VETCA CALC'N'CLEAN!
B 3TOM cnyuae cneIyET He3aMeIInTeIbHO npOn3BeCTn OunCTKy npi6opAp nn YuJaIeHne HAKINn PnP NOMOUs COOTBeTCTByUoIeCepBnCHoN pOrpAMMbI. Po BbI6Opy oBe Onerpaun MOxHO oBeJINHTB F yHKUnn Calc'nClean(cm.«Calc'nClean»HaCtp.116). PnnpAyuSeHn yka3aHn no BbIpONHeHIO cepBnCHoN pOrpAMMbI BO3MOxHO NOBpeK-DeHne npi6opa.
BHHMaHHe!
PnBbIOnHeHn CepBnCHoN nporpaMbI BcERda NcNoJIb3OBA Tb CpeDCTBa Dny ydaJIeHnHaKuINu OChTKn COINaCHO INHCTpyKUIN. Co6IIoJaTe IHCTpyKUIN NO TEXNIke 6e3OpaNCHOCTN, yKa3aHHbIe Ha yNaKOBKe MOUoJero CpeDCTBa.
3anpeaaetcnpepbBaTb BblonHeHncepBnCHOn nporpaMMbl!
He nIb npImeHReMbIe KNDKoCTn!
He donyckaetc nCNoIb3ObaTb yKcyc, cpeCTBa Ha oCHOBE yKcyca, NIMOHHyo KNCIOTy IIN CpeCTBa Ha OCHOBE NIMOHHO KNCIOtby!
3anpeaetc 3arpykaTb TabneTNI INHbIe CpeDCTBa IydaJIeHnHaKININ B BblBnKHOOTCEK DnN MONOTOro KoΦe (4)!
CneunalbHo pa3pa6oTaHHbIe IyJaLeHnHaKnII N OuchTkn TaJleTKN MoXHO npno6peCTn Upe3 ToproByIO Cetb Hnn cepBnCHyo clyx6y.
| Homep зараза | Toproвая сөть | Сер vibсан сlüжба |
| Тамлекни дли оочECTКи | TZ60001 | 310575 |
| Тамлекни дли удаlefnéни наkins | TZ60002 | 310967 |
YdaneHne HAKINN
ДиNTeJIbHocTb: npu6n. 25 MmHyT
Baxho: Ecnn B eMKocTb Dnla BObl (17) yCTaHOBnEH qnIbTp Dnla BObl, O6raTeNbHO n3BJIeKInTe erOp nepei 3anyckOM npOrpamMblydJIeHnHaKnII.
EcnHa dnCnnee oTo6paXaETc coo6ueHne TPEbYETc YdAJI. HAKINb!, HaxMnte Ha KHOkky 念 off /i (13) n ydepXnBaIte ee B HaxaTOM IonoXeHHN B TeueHne 3 cekyHd, a 3aTeM HaxMNTe KhoNky start (10). HauHaeTc npoueecc ydaIeHHa HakuHn.
IIyaIeHHa KaHnN Do nOraBHeHHa NcKa3OK HaxMNTe KHOkky 念 off /i (13) n ydepXnBaIte ee B HaxaTOM IonoXeHHN B TeueHne He MeHee 3 cekyHd. 3aTeM DbaXdbI kpaTKOBpeMeHHo HaxMNTe KHOkky 念 off /i (13). PobopauBaIte BepxHn peRyIaTOp (15) do tex nop, noka Ha dnCnnee He OTO6pa3nTc 3AnyCK OU. OT HAKIN. HaxMNTe KhoNky start (10), YTO6bl Haatb npoueecc ydaIeHHa HakuHn.
CoobueHnHa DnCnpee npoBeyT no nyHTAM npoPpMMbl.
OuHCTNTE IOIDIOH
BCTABbTE IOIOH
- Onopokhnte u yctaHOBTe nOdoH dJa KaapeIb (8).
BaxHo: EcInn AKTINBnPOBaH fNtBtp DnA BOIbI, Ha DCnJIeE OTO6pa3NTcR NOCKa3Ka CHaTb fNtBtp N IOBtOPHO HAXaTb KONky start (10). CnIMnTe fNtBtp, ecn Bbl eue 3TORo He cDenai. HaxaTb KONky start (10).
3ACbIbTE AHTINHAKIN.
HAXMITE START
- Těnnую Bóvy 3aJnTb B nycTyO eMkoCTbДЯ BɔdBi (17) Do OTMeTkn 0,5I n pactBo-puTb B BoJe 2 Ta6NeTk Siemens Дя удалеснй Habип.
- HaxaTb KhoNkY start (10).
NOMECTYTE KOHTENHEP
HAXMITE START
- Помет范围内 EMKOCTB obemom He Mehee 0,5л по ВынчскhoT py6koi (6a).
- HaxaTb KhoNkY start (10).
IIDET YDAJI. HAKINII
Pporpamma ydaeneHnaKnDnTcra npn6bn3ntelbno 20 mHyT.
OuNC./3AIOJI.EMK.I/BOIDJI
HAXMITE START
- PpOmbIb EMcKoCTb IaB ODoI (17) n 3a- pONHHTb ee BOoI Do OTMeTkn max.
- HaxaTb KhoNkY start (10).
IIDET YDAJ. HAKINN
Pporpamma ydaIeHna HaknPi dNITc npi-6bn3ntelbHO MInHyTbI, nocne yero BblONHareTc npomblkApnpibopa.
OCHNTTEIOIDOH
BCTABbTE IOIOH
- Onopoxhnte n yctahOBHTe noDIOH dIy kaneB (8).
YcTaHOBnTeФnJIbTp,ecnTakOBOn nC- noIb3yeTc. Pnp6Op 3aBepuJ nporpaMMy ydaJeHnHaKnPiN u CHOba rTOB K paBoTe.
ru
BaxHo: PpOtpnTe npin6op MmKoB BnaK-Ho TkaHeBoC aIpeTko, YTO6bI cpa3y Je y6paTb octaTkn pactbopa dny Udaenna Hakinn. PoTakIMN OCTaTKamn MOrT o6pa3OBbIBaTbc OarH Koppo3nn. B HObIX ry6uATbxC aIpeTkax MOrT cOePkaTbc COII. CoN MoRy npINBeCTn K o6pa3OBaHIO HAJIeta pXaBcHbI Ha cTaJIbHbIX DeTaNJx, N03tOMy nepeD NcNoJIb3OBaHNEM ry6uATbX caIpeTOK INx CneJeYET TuaTeNbHO npOnIoNCKaTb.
OuHCTka
ДиNTeIbHocTb: npu6bl. 10 MmHyT
EcIn Ha DnCnIe oTo6paXaETcCoO6ueHne TPE6YETcO UNCTKA!, HauKmTe Ha KhoNky 念 off /i (13) u ydepKuBaIte ee B HauKaTOM NIOJKeHHB TeUeHne 3 cekyHd, a 3aTeM HauKmTe KhoNkY start (10).HaunHaeTc npOceCC OUnCTKn.
Дяоунсткп рибора до появлени робсka3OK нахмITE кногку off / i (13) иуderжИВайт eee B нажатOM пОJOжEHINВ Teue�не He MeHee 3 cekyHd. 3aTeMдвжды КраТКOBрЕмEHNO нахмITE кногкуoff / i (13).ПоворачиВайт ВерхниperулгTOP (15)do tex pop, noka Ha dinc-njee He otobpa3ntc 3ApyCK OчИСТКИ.HaxmITE Kногку start (10),чTOБы НаЧаТьproucec очистк.Соошени на диспee npOBeHTNo ryнКТamПрогрмbl.
OuHCTNTE IOJIOH
BCTABbTE IOIOHO
- Onopoxhnte u yctahOBHTe nOdoH dJa KaapeIb (8).
IDET ONUCTKA
PnboBpDbaKdbbBbINOJIHReT IpOMbIKy.
OTKPOI'TE OTCEK
- OTKpbIb BbIDBnKHOIOTcEK IJIa MoIToTO ro KoPe (4).
3ACbIbTE OCHNTTEJIb
-ДобавиТь OndHyЧИстяуTo tabNeTky Siemens n 3akpybIb BblBnKHOI OTcEK dЯ MONOTOrO KoPe (4).
IDET ONUCTKA
ДиTeJIbHOCTb BbIIOJIHeHnI ПpoIpaMMbl OuNCTkn npN6IIN3IteJIbHo 8 MmHyT.
OCHNTTE NOIOH
BCTABbTE NIOIOH
- Onopoxhnte u yctahOBHTe nOdoH dJa Kaenb (8).
OuicKa npi6opa 3aBepseHa, n OH rOTOB Ka daJIbHeIWe 3KcNJIyatauIN.
Calc'n'Clean
3ACbINbTE AHTNHAKIN.
HAXMITE START
- Teŋnyo Bódy 3aŋntb B nyctyio eMKocTb Dnra BoDbl (17) do OTmTeKn 0,5I n pactBo-pntb B BoDe 2 Ta6Netkn Siemens dny ydaJIeHnHaKnN.
- HαkaTb KhoNkγ start (10).
NOMECTITE KOHTEHEP
HAXMITE START
-ПомecNTe EMKoCTb ObemOM He MeHee 1л по ВынскHо Tpy6koi (6a).
- HaxaTb KhoNkY start (10).
IDET CALC'N'CLEAN
AE United Arab Emirates,
aai
BSH Home Appliances FZE
Round About 13,
Plot Nr MO-0532A
Jebel Ali Free Zone - Dubai
Tel.:048814401
mailto:service-uae@bshg.com
www.siemens-home.com/ae
AL Republika e Shqiperise, Albania
AERTECH SH.P.K.
Rr. Sami Frasheri
Pallati i Avacionit te vjetar
Shkalla 1, Hyrja 2
Tirana
Tel.: 067 337 4106
Fax: 071 733 222
mailto:volina@ovi.com
HEATHERTON, Victoria 3202
Tel.: 1300 368 339
mailto:bshau-as@bshg.com
www.siemens-home.com.au
BA Bosnia-Herzegovina, Bosna i Hercegovina
"HIGH" d.o.o
Gradačačka 29b
71000 Sarajewo
Info-Line: 061 10 09 05
Fax:033213513
mailto:delicnanda@hotmail.com
BE Belgique, Belgie, Belgium
BSH Home Appliances S.A.
European Trade Center Building,
5th floor
1784 Sofia
Tel.: 02 892 90 47
Fax: 02 878 79 72
newsletter:informacia.servis-bg@
bshg.com
www.siemens-home.bg
BH Bahrain,
Khalaifat Est.
P.O.Box 5111
Manama
Tel.: 017592233
mailto:service@khalaifat.com
CH Schweiz, Suisse, Svizzera, Switzerland
BSH Hausgeräte AG
Werstkundendienst
für Hausgeräte
Fahrweidstrasse 80
8954 Geroldswil
www.siemens-home.com/ch
CY Cyprus, Kuppos
BSH Ikiakes Syskeves-Service
39, Arh. Makaariou III Str.
2407 Egomi/Nikosia (Lefkosia)
Tel.: 77 77 807
Fax:022658128
mailto:bsh.service.cyprus@
cytanet.com.cy
CZ Ceska Republika, Czech Republic
+7 snt/min (alv 23%)
+17 snt/min (alv 23%)
FR France
BSH Electroménager S.A.S.
To arrange an engineer visit,
to order spare parts or accessories or for product advice please visit
www.siemens-home.co.uk or call
Tel.:0844 892 8999*
*Calls from a BT landline will be charged
at up to 3 pence per minute. A call set-up fee of up to 6 pence may apply.
GR Greece, Eλας
BSH Ikiakes Siskeves A.B.E.
Central Branch Service
17 km E.O. Athinon-Lamias &
Potamou 20
14564 Kifisia
Pavevanov:181 82
(aotikxpeωon)
www.siemens-home.gr
HK Hong Kong, 香港
BSH Home Appliances Limited
Unit 1 & 2, 3rd Floor
North Block, Skyway House
3 Sham Mong Road
Tai Kok Tsui, Kowloon
Hong Kong
Tel.: 2565 6151
Fax: 2565 6681
mailto:service.siemens@bshg.com
www.siemens-home.com.hk
HR Hrvatska, Croatia
BSH kučni urežaji d.o.o.
Kneza Branimira 22
10000 Zagreb
Tel.: 016403609
Fax: 01 640 36 03
mailto:informacije.servis-hr@
bshg.com
www.siemens-home.com/hr
www.siemens-home.com/hu
IE Republic of Ireland
BSH Home Appliances Ltd.
Unit F4, Ballymount Drive
Ballymount Industrial Estate
Walkinstown
Dublin 12
Service Requests, Spares and
Accessories
Tel.:014502655
Fax: 01450 2520
www siemens-home.com/ie
IL Israel,
C/S/B Home Appliance Ltd.
Uiel Building
2, Hamelacha St.
Industrial Park North
71293 Lod
Tel.:089777222
Fax:089777245
mailto:csb-serv@zahav.net.il
www.siemens-home.co.il
IN India, Bharat, अर्वल
BSH Customer Service
Front Office
Shop No.4, Everest Grande,
Opp. Shanti Nagar Bus Stop,
Mahakali Caves Road,
Andheri East
Mumbai 400 093
IS Iceland
Smith & Norland hf.
Noatuni 4
105 Revkjavik
Tel.: 0520 3000
Fax: 0520 3011
www.sminor.is
IT Italia, Italy
www.siemens-home.com/it
KZ Kazakhstan, Ka3akctah
IP "Batkayev Ildus A."
B. Momysh-uly Str.7
Chymkent 160018
Tel./Fax: 0252 31 00 06
mailto:evrika_kz@mail.ru
LB Lebanon,
Tehaco s.a.r.l
Boulevard Dora 4043 Beyrouth
P.O.Box 90449
Jdeideh 1202 2040
Tel.:01255211
mailto:Info@Teheni-Hana.com
LT Lietuva, Lithuania
Baltic Continent Ltd.
Lukšio g. 23
09132 Vilnius
Tel.:052741788
Fax: 05 274 1765
mailto:info@balticcontinent.It
www.balticcontinent.lt
LU Luxembourg
General Serviss Limited
Bullu street 70c
1067 Riga
Tel.:07424137
mailto:bt@olimpeks.lv
MD Moldova
S.R.L. "Rialto-Studio"
yn. Lycceba 98
2012 KuniHneB
TeJ./paKc:022 23 81 80
MK Macedonia, MaKeDoHnJa
GORENEC
Jane Sandanski 69 lok. 3
1000 Skopje
Tel.: 02 2454 600
Mobil: 070 697 463
mailto:gorenec@yahoo.com
MT Malta
Aplan Limited
The Atrium
Mriehel by Pass
BKR3000 Birkirkara
Tel.: 025 495 122
Fax: 021 480 598
mailto:lapap@aplan.com.mt
NL Nederlande, Netherlands
Unit F 2, 4 Orbit Drive
Mairangi Bay
Auckland 0632
Tel.: 094770492
Fax:094772647
mailto:bshnz-cs@bshg.com
PL Polska, Poland
www.siemens-home.com/pt
RO Romania, Romania
BSH Electrocasnice srl.
Sos. Bucuresti-Ploiesti,
nr. 19-21, sect.1
13682 Bucuresti
Tel.:021 203 9748
Fax: 021 203 9733
mailto:service.romania@
bshg.com
www.siemens-home.com/ro
RU Russia, Pocsn
OOO "BxC BbITOBa TExHnKa"
CepBnC OT npOn3BovnteIa
Manay Kanyxckaa 19/1
119071 MockBa
TeJ.: 495 737 2962
mailto:mok-kdhl@bshq.com
www.siemens-home.com/ru
SE Sverige, Sweden
BSH Home Appliances AB
Landsvagen 32
169 29 Solna
Tel.:0771112277
mailto:Siemens-Service-SE@
bshg.com
www.siemens-home.se
SG Singapore, 新加坡
BSH Home Appliances Pte. Ltd.
37 Jalan Pemimpin
Union Industrial Building
Block A, #01-03
577177 Singapore
Tel.:6751 5000
Fax:67515005
mailto:bshsgp.service@bshg.com
SI Slovenija, Slovenia
BSH Hišni aparati d.o.o.
Litostrojska 48
1000 Ljubljana
Tel.:015830700
Fax:015830889
www.siemens-home.com/sk
TR Türkiye, Turkey
BSH Ev Aletleri Sanayi
ve Ticaret A.S.
Fatih Sultan Mehmet Mahallesi
Balkan Caddesi No: 51
34771 Umraniye, Istanbul
Tel.:02164446688
Fax:02165289188
mailto:careline.turkey@bshg.com
www.siemens-home.com/tr
UA Ukraine, YkpaHa
TOB "БСХ Побутoba Тхиka"
Tei.: 044 490 2095
www.siemens-home.com.ua
XK Kosovo
NTP GAMA
Rruga Mag Prishtine-Ferizaj
70000 Ferizaj
Tel.: 0290 321 434
Tel.: 00377 44 172 309
mailto:a.service@
gama-electronics.com
XS Srbija, Serbia
BSH Kučni aparati d.o.o.
Milutina Milankovića 11a
11070 Novi Beograd
Tel.: 011 205 23 97
Fax: 011 205 23 89
mailto:informacije.servis-sr@
bshg.com
www.siemens-home.rs
ZA South Africa
BSH Home Appliances (Pty) Ltd.
15th Road Randjespark
Private Bag X36, Randjespark
1685 Midrand-Johannesburg
Tel.:086 002 6724
Fax:0866171780
mailto:applianceserviceza@
bshg.com
www.siemens-home.com
UK Calls provided by a UK BT Landline will be charged at up to 3 pence per minute.
A Call Set-Up Fee of up to 6 pence per call applies to calls from residential lines.
Mobile and other providers' costs may vary. See www.bt.com/pricing for details.
HR 016403609
HU 014895461
IE 014502655
IS 05203000
LT 052741788
LU 26349300
LV 067425232
ME 020662444
MK 022454600
PL 801 191 534
RO 021 203 97 48
RU 4957372962
SI 041991100
SK 0244452041
XS 0116147110
AU 1300368339
09/11
www.siemens-homeappliances.com
9000874856