
D99L11N0 - Kitchen hood NEFF - Free user manual and instructions
Find the device manual for free D99L11N0 NEFF in PDF.
| Product Type | Kitchen Hood |
| Brand | NEFF |
| Model | D99L11N0 |
| Use | Extraction or recirculation (with optional module) |
| Maximum supported weight | 55 kg |
| Power supply | Earthed power socket, 220-240 V, 50 Hz (estimated) |
| Power cable length | Approx. 1.30 m |
| Fan power levels | Levels 1 and 2, plus boost power P1 (5 min) and P2 (10 min) |
| Run-on function | Yes, adjustable to 3, 6 or 9 minutes |
| Intermittent extraction function | Yes, approximately 5 minutes per hour |
| Lighting | LED, adjustable brightness |
| Grease filters | Metal, dishwasher-safe or hand-washable |
| Activated carbon filter | Optional, to be replaced approximately twice a year |
| Cleaning the grease filters | Once a month for normal use (1-2 h/day) |
| Audible signal | Yes, can be deactivated |
| Minimum distance above an electric hob | 550 mm |
| Minimum distance above a gas hob | 650 mm |
| Installation type | Wall-mounted |
| Warranty | Refer to conditions in the after-sales service manual |
| After-sales service | Contact NEFF (see directory) |
Frequently Asked Questions - D99L11N0 NEFF
User questions about D99L11N0 NEFF
0 question about this device. Answer the ones you know or ask your own.
Ask a new question about this device
Download the instructions for your Kitchen hood in PDF format for free! Find your manual D99L11N0 - NEFF and take your electronic device back in hand. On this page are published all the documents necessary for the use of your device. D99L11N0 by NEFF.
USER MANUAL D99L11N0 NEFF
Information on protection of the environment 9
Before using the appliance for the first time 9
Safety instructions 10
Intended use 10
Technical safety 10
Special information for gas cookers 10
Proper use 10
Correct installation 10
Operation 11
Cleaning and care 12
Removing and installing the grease filters 12
Electrical connections 13
Installation 13
Installation preparations 13
Attachment 13
Installing the flue ducts 14
Accessories 51
Operating instructions
Additional information on products, accessories, replacement parts and services can be found at www.neff-international.com and in the online shop www.neff-eshop.com
Please find the contact data of all countries in the enclosed customer service list.
To book an engineer visit and product advice
GB 0844 8928989
Calls from a BT landline will be charged at up to 3 pence per minute. A call setup fee of up to 6 pence may apply.
IE 014502655
Trust the expertise of the manufacturer, and rest assured that the repair will be carried out by trained service technicians using original spare parts for your domestic appliance.
General information
INFORMATION ON PROTECTION OF THE ENVIRONMENT
Disposal of transport packaging
Your new appliance was sent to you in protective packaging. All utilised materials are environmentally safe and recyclable. Please help us by disposing of the packaging in an environmentally friendly manner.
RISK OF INJURY
Packaging parts can be hazardous for children. In particular, danger of suffocation from plastic film and plastic bags. Therefore keep them outside the reach of children.
Disposal of the old appliance
Old appliances are not worthless rubbish. Valuable raw materials can be reclaimed by recycling old appliances.
This appliance is identified according to the European Directive 2002/96/EC on waste electrical and electronic equipment – WEEE). The directive specifies the framework for an EU-wide valid return and re-use o
Before disposing of your old appliance, render it unusable.
Never treat your old appliance as nonrecyclable waste!
Please ask your dealer or inquire at your local authority about current means of disposal.
Ensure that the old appliance is kept childproof until it is disposed of.
BEFORE USING THE APPLIANCE FOR THE FIRST TIME
NOTE: These operating instructions apply to several appliance models. It is possible that individual features are described which do not apply to your appliance.
Before switching on your new appliance, please read the operating instructions carefully. They contain important information on safety and how to use and look after the appliance.
Keep the operating and instructions in a safe place and pass them on to any subsequent owner of the appliance.
Faults
If is not possible to operate the extractor hood:
Disconnect the extractor hood from the mains electricity supply by pulling out the plug or switching it off at the main fuse box. Wait for approx. 1 minute and then switch it on again.
Please contact customer service regarding any queries or faults.
(See list of customer service centres.)
When calling, please quote:
E-Nr. FD
The numbers can be found on the rating plate, after removal of the grease filter, inside the extractor hood. Enter the numbered in the above fields.
Intended use
This extractor hood complies with the stipulated safety regulations. Improper use may result in injury or damage.
The extractor hood may be used in the household only. The manufacturer is not liable for damage which is caused by improper use or incorrect operation.
The manufacturer cannot be made responsible for damage which can be attributed to non-observance of the safety instructions.
#
RISK OF INJURY
Do not allow children to play with the extractor hood! Adults and children must never operate the appliance unsupervised
- if they are not physically or mentally capable of doing so
- or if they do not have the knowledge and experience to operate the appliance correctly and safely.
Technical safety
The extractor hood left the factory in perfect condition. Nevertheless check the appliance for visible damage before installation. If it is damaged, do not switch it on!
If the power cord of the extractor hood is damaged, it must be replaced by the manufacturer, his customer service or a similarly qualified person to prevent hazardous situations.
Only a qualified technician may install (including electrical connection), service or repair the extractor hood. Always isolate the extractor hood by pulling out the mains plug or switching off the fuse!
If the appliance is improperly installed, serviced or repaired, the user may be placed in considerable danger for which the manufacturer is not liable.
Changes to the electrical or mechanical installation are dangerous and must not be undertaken! They may also cause the extractor hood to malfunction.
Special information for gas cookers
When installing the extractor hood above gas hobs, observe the appropriate national statutory regulations (e.g. in Germany: Technische Regeln Gasinstallation TRGI).
Observe the currently valid installation regulations and instructions of the gas appliance manufacturer.
During installation, ensure that only one side of the extractor hood is situated directly next to a high-sided unit or a wall. Otherwise, there is a risk of heat build-up. The gap between the extractor hood and the wall or high-sided unit must be at least 50~mm .
RISK OF BURNS
Do not operate more than 2 gas cooking areas simultaneously over a period of max. 15 minutes at maximum thermal load. Due to the effect of the heat there is a risk of burns if the surfaces of the housing are touched!
Note that one large burner of more than 5kW (Wok) is equivalent to the power of 2 gas burners.
The extractor hood may be damaged by the intense heat.
Never operate a gas cooking area without a cooking utensil on it. Regulate the flame in such a way that it does not project over the cooking utensil.
Proper use
Clean the extractor hood thoroughly before using for the first time.
Before cleaning and servicing the extractor hood, isolate it from the power supply by pulling out the mains plug or switching off the fuse.
Bulbs (especially halogen bulbs) become very hot during operation. Even some time after the appliance has been switched off, there is still a risk of burns!
Before changing bulbs, isolate the extractor hood from the power supply and leave the bulbs to cool down!
Do not operate the extractor hood without bulbs inserted.
Always switch on the extractor hood if a hotplate is being used. If the extractor hood is not switched on, condensation may form. As a result, the appliance may corrode.
#
RISK OF FIRE
Do not flambé under the extractor hood or work with a naked flame. When switched on, the extractor hood draws flames into the filter. There is a risk of fire due to deposits on the grease filter!
Do not leave pans, frying pans or deep-fat fryers unattended if you are cooking food with oils or fats, e.g. chips. Overheated oils or fats can easily ignite!
A risk of fire can be prevented by cleaning the grease filters regularly and changing the activated-carbon filter in good time.
Never operate the extractor hood without grease filters.
Correct installation
Check the manufacturer's specifications for the cooker to determine whether an extractor hood can be operated over it.
If the manufacturer of the cooker has not specified any significant safety distances, the following minimum distances apply
- 550 mm between electric hob and the lower edge of the extractor hood,
- 650 mm between gas hob (upper edge of pan support) and the lower edge of the extractor hood (see fig. 1, page 2).
If various cookers are used, the greatest indicated distance applies.
The width of the extractor hood must correspond to the width of the cooking area.
The extractor hood must not be installed over a solid fuel heating appliance which may be a fire risk (e.g. flying sparks) unless the heating appliance has a closed, non-detachable cover and the country-specific regulations are observed. This restriction does not apply to gas cookers and gas hobs.
To avoid damaging the hob, cover it when installing the extractor hood.
NOTE: It is recommended to switch on the blower when you start cooking and not to switch it off again until several minutes after you have finished cooking. In this way the kitchen fumes are removed most effectively.
RISK OF INJURY
from hot cooking utensils.
When operating the extractor hood, do not reach over hot cooking utensils.
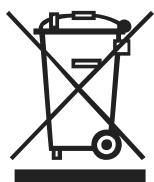
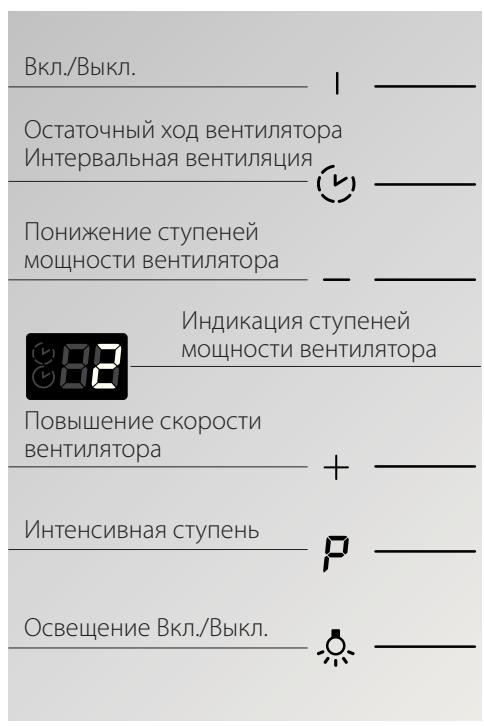
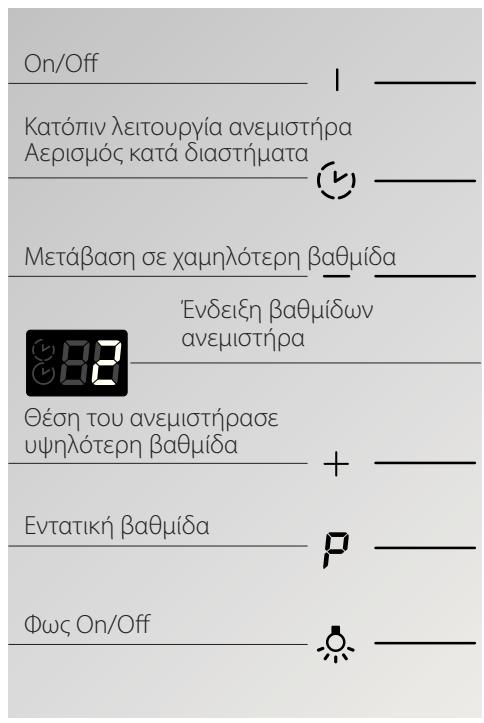
Setting the fan
Press the ① button to switch on the appliance. The fan starts at setting 2.
Increase fan setting by pressing the + button and reduce it by pressing the - button.
Intensive setting
You can use the Intensive setting for particularly strong odour and fume generation.
PI -approx.5minutes
P2 -approx.10 minutes
Press the ±bP button. ±bP±bE is indicated on the display. Press the - button to reduce the setting to ±b±bI .
The duration is limited. Then the fan is automatically reduced to a lower setting. You can reduce the setting any time by pressing the ±bP button.
Fan run-on
Press the button. The fan runs for 6 min at Setting 1. Then the fan switches off automatically.
To change the run-on times, press the + or - button.
Display : approx. 3 minutes
Display : approx. 6 minutes
Display : approx. 9 minutes.
Intermittent ventilation
Press the button 2x. The fan runs approx. 5 min per hour.
To switch off intermittent ventilation, press the ① button.
Light
The light can be switched on and off independently of the fan.
Press button.
Setting the brightness
Hold down the button until the required brightness is obtained.
LED lights
Defective LED lights may be replaced by the manufacturer, or a qualified technician (electrician) only.
RISK OF INJURY
Do not look directly into the switched on LED lights for longer than 100 seconds.
Acoustic signal
When a button is pressed, an acknowledgement signal sounds.
Switching off the acoustic signal
When the fan is switched off, simultaneously hold down buttons ① and ^+ for approx. 3 seconds.
An acknowledgement signal sounds.
Switching on the acoustic signal
Repeat the "Switch off acoustic signal" process.
LOOKING AFTER THE APPLIANCE
Suitable cleaning agents and care products for your appliance can be purchased via the Hotline or from the Online Shop (see cover page).
Appliance surfaces
NOTE: Observe the warranty regulations in the enclosed service booklet.
The appliance surfaces and controls are scratch-sensitive. Therefore observe the following cleaning instructions:
- Avoid cleaning the extractor hood with dry cloths, abrasive sponges, scouring agents, cleaning agents containing sand, soda, acid, chlorine or any other aggressive substances.
Clean the appliance surfaces and controls with a soft, damp cloth, washing-up liquid or a mild window cleaner only. - Do not scrape off dried dirt, but moisten with a damp cloth.
Clean carefully in the area of the controls to avoid liquid from getting into the electronics.
NOTE: Clean the stainless steel surfaces in the direction of the ground surface only! Do not use stainless steel cleaner for the control buttons!
Looking after the appliance
Suitable cleaning agents and care products for your appliance can be purchased via the Hotline or from the Online Shop (see cover page).
Metal-mesh grease filters
The inserted metal-mesh grease filters absorb the grease particles from the kitchen fumes.
The filter mats consist of fire-proof metal.
RISK OF FIRE
As the filters become more saturated with greasy residue, the flammability increases. The function of the extractor hood may also be impaired.
The risk of fire is prevented by cleaning the metal-mesh grease filters in good time.
When cleaning the grease filters, also remove grease deposits from the accessible parts of the housing with a damp cloth.
Cleaning the metal-mesh grease filters ...
Under normal operation (daily 1 to 2 hours), the metal-mesh grease filters must be cleaned 1x month.
... in the dishwasher
The metal-mesh grease filters can be cleaned in the dishwasher. Slight discolouration may occur but this will not affect the function of the grease filters.
The filters must be placed loosely in the dishwasher. They must not be wedged in.
NOTE: Do not clean heavily saturated metal-mesh grease filters together with utensils.
... by hand
When cleaning by hand, soak the grease filters in a hot detergent solution, brush off the dirt, rinse thoroughly and leave to dry.
Do not use any aggressive, acidic or alkaline cleaning agents.
If dirt is particularly stubborn, we recommend using a special grease solvent spray. This can be ordered via the Online Shop.
Removing and installing the grease filters
Before removing and installing the grease filters, always follow the instructions and warnings in the chapter entitled "Safety instructions"!
Removing and installing the metal-mesh grease filters
- Open the lock and fold down the grease filters. In doing so, hold the underside of the grease filters with your other hand.
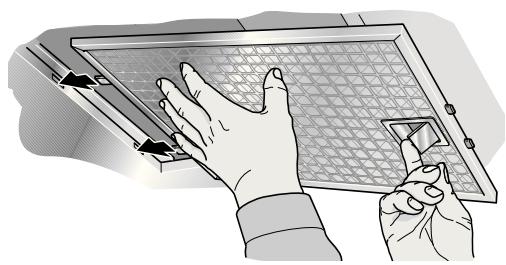
- Clean the grease filters.
- Reinsert the cleaned grease filters.
Changing the activated carbon filter
Under normal operation (daily 1 to 2 hours) the activated carbon filters must be replaced approximately 2x year.
The activated carbon filter is available from specialist outlets, customer service or the Online Shop (see Optional accessories). Use original filters only.
Activated carbon filters do not contain any pollutants. They can be disposed of in the household refuse.
- Remove metal-mesh grease filter.
- Unlock flue duct on both sides and slide downwards.
- Remove both activated-carbon filters forwards and replace.
- Push flue duct upwards until it clicks into position.
Before connecting the appliance to the power supply, always follow the instructions and warnings in the chapter entitled "Safety instructions"!
The extractor hood may only be connected by a qualified electrician who is familiar with the regulations of the relevant electricity supply company.
RISK OF INJURY
If the power cord of the extractor hood is damaged, it must be replaced by the manufacturer, his customer service or a similarly qualified person to prevent hazardous situations.
The power cord must be stowed away securely following connection to the mains.
The extractor hood may be connected to a correctly installed earthed socket only.
Attach the earthed socket as directly as possible behind the flue duct.
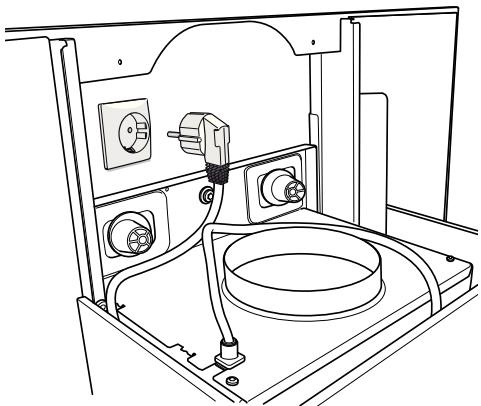
- The earthed socket should be connected via its own circuit.
- If the earthed socket is no longer accessible following installation of the extractor hood, a disconnector must be fitted as for a permanent connection.
If a permanent connection is required
A disconnector must be provided on the installation side. Switches with a contact opening of more than 3mm and all-pole disconnection are regarded as disconnectors. This includes LS switches, fuses and contactors.
Electrical specifications
The required connection data can be found on the rating plate inside the appliance when the grease filters have been removed.
Length of the power cord: approx. 1.30m
This extractor hood complies with the EC interference suppression regulations.
Prior to installation, always follow the instructions and warnings in the chapter entitled "Safety instructions".
The extractor hood is designed to be mounted on the wall.
During installation, optional accessories may also require fitting.
Observe the minimum distance between hob and extractor hood (see "Safety instructions")!
Avoid damaging the sensitive surfaces!
Preparing the wall
RISK OF INJURY, DAMAGE TO PROPERTY
Before drilling the holes for the designated installation location, check for concealed electrical cables and other lines.
The wall must be level and vertical.
The enclosed screws and wall plugs are suitable for solid brickwork. Use the appropriate fixing materials for other wall structures (e.g. plaster board, porous concrete, poroton bricks).
Ensure that the wall has adequate load bearing capacity.
Ensure that the depth of the drilled holes corresponds with the length of the screws.
Ensure that the wall plugs are secure.
Max. weight in kg: 55
Design subject to modification in line with technical development.
Installation preparations
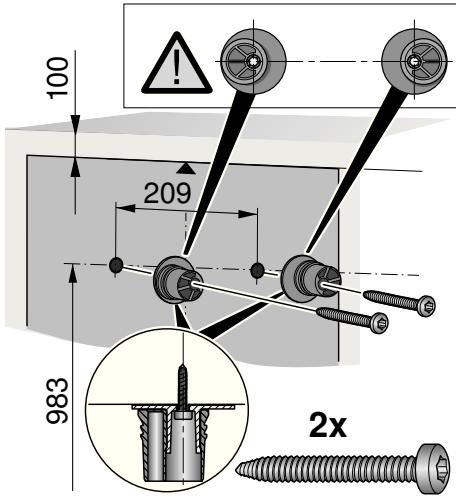
- Using the enclosed template, mark positions for the screws and, to facilitate attachment, the contour of the attachment area. The lower edge of the template corresponds to the lower edge of the extractor hood.
- Drill 2 × 8 ~mm holes for suspension of the extractor hood and press in wall plugs flush with the wall.
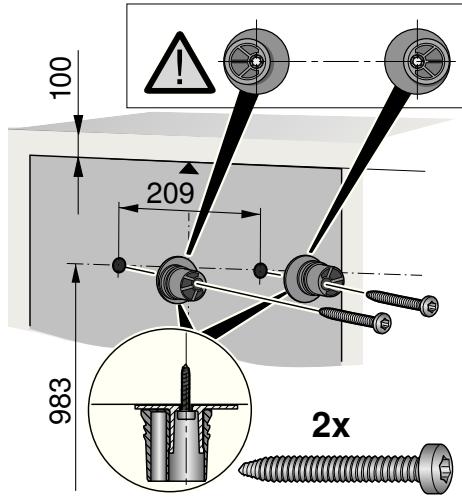
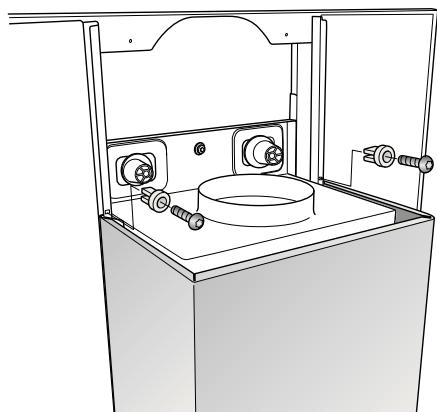
3. Screw on the brackets for the extractor hood: hand tight, max. 3 Nm Ensure that the washers and brackets are positioned correctly!
Attachment and alignment
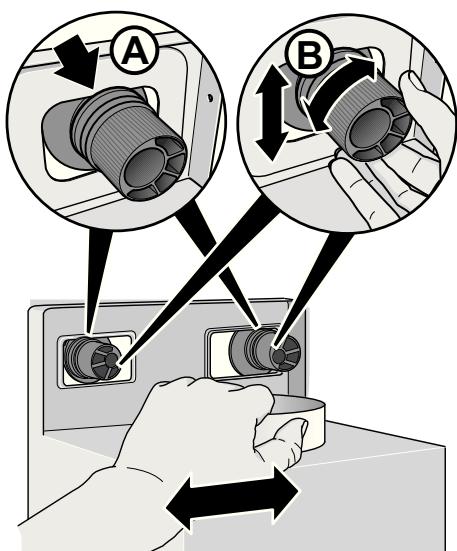
- Mount the extractor hood, ensuring that the back is attached firmly to the brackets A.
- Align the extractor hood horizontally by turning the brackets. If required, the extractor hood can be moved to the right or left (B).
Locking screws and locking caps
- Mark the holes for the safety screws. Detach the extractor hood, drill holes for the safety screws and press in wall plugs flush with the wall.
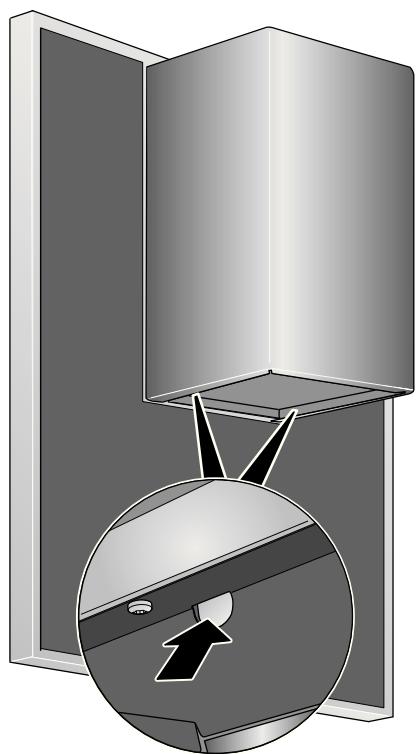
- Attach the extractor hood and screw in the safety screws tightly.
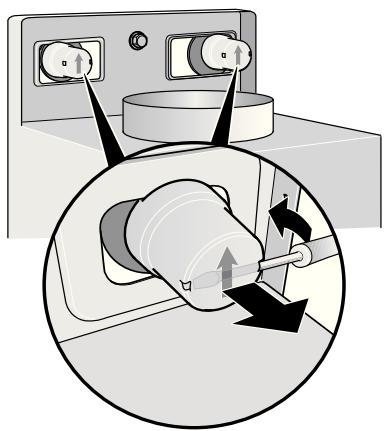
- Press the safety caps with the arrow upwards onto the brackets until they click into position .
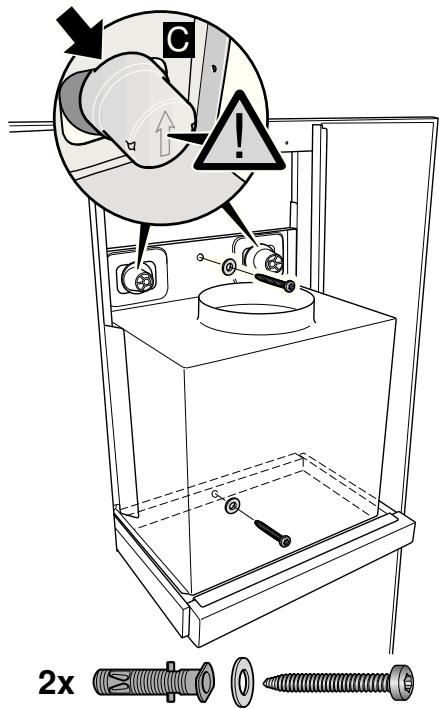
RISK OF INJURY
Check that all locking screws and locking caps have been attached securely!
- Connect the pipes (see "Connecting pipes").
- Connect to the power supply (see "Electrical connection").
Removing the safety caps
Remove the locking caps from the brackets using a suitable tool, e.g. a flat-blade screwdriver.
Circulating air module
- Place the circulating air module on the air connection and screw tight.
- Insert the activated-carbon filters.
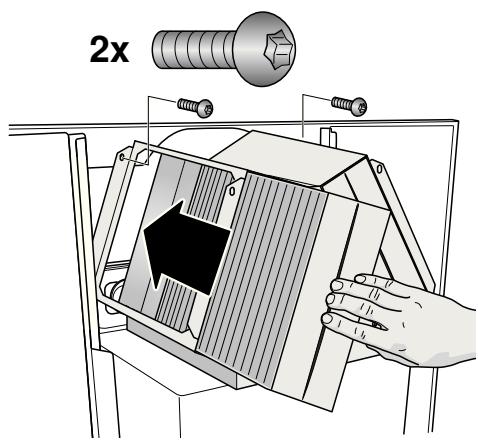
Installing the flue ducts
RISK OF INJURY
The insides of the flue ducts may have sharp edges. We recommend wearing protective gloves during installation.
- Remove the protective film from both flue ducts.
- Insert flue into the guide rails and slide down.
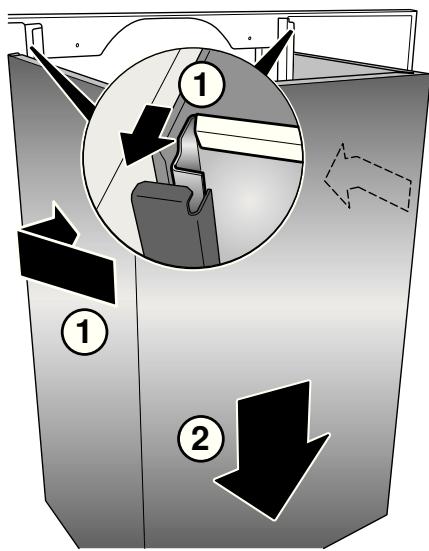
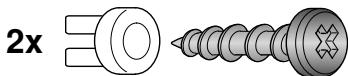
- Insert 2 securing elements and screw tight.
- Push flue duct upwards until it clicks into position.
- Insert metal-mesh grease filter.
Informations generales 15
PI - circa 5 minuten
P2 - circa 10 minutes
Weergave :: circa 3 minuten
Weergave circa 6 minuten
Weergave : circa 9 minuten.
Intervalventilatie
obopyoBaHnra(waste electrical and electronic equipment - WEEE).InpeKtNbO anpeJeT npaOK c6opa n yTuN3aun CTapbIX 6bITOBbIX np6opOB Ha TeppntOpnn BCEx cTpaH EC.
Ipepey tyni3auee Bby o63aHb npnbectn CBOI CTapbI 6bTOBOI np60pB HnnpiroHOe IJIg EKcPnyatauCocToHne.
HIN B KOEM CNYue He Bbl6paCBAaTe OTCnyKWBn CBOI cPOK 6bITOBO INpN6Op B MYCOPHbI OEoXobI!
AktyaIbHyIO INΦOpMaζιO 6yTnIIm3aζiN Bby MoKTe ΦolyuTb B cneζaJIaN3InpoBaHHOM MaIa3IHe IIN B aДmHInCTpaζiN NO MecTy JXITeJIbCTBa.
ПюСеДиTe 3a TeM,чTOБы OTCnyЖИВши CBО CTpOK bIToBOМ рпборdo YtINn3aци XpaHnICB H HeIOCTyHOMДЯ DeTei MeCTe.
NEPEI NEPBbIM IcIOJIb3OBAHHeM
ONACHOCTbIOLUyeHnIaTPABM
He pa3pewaIte DeTAM INrpaTbCBA BbITaKo! He octabnIte 6e3 NaD3opa B3pocblix nDeTeB BO BpemA KcPnIyatauN 6bITOBORO npnbopaBTEX CnyaAx,
ecnOHnN3UneCKnIJyMCTBeHHHO B COCToRHH CnpaBNTcC 3TUM
IIN ECNI OHN He BnAeIOT DOCTaTOUHbIMN 3HaHnAIMN IN ObITOM DJIЯ PpaBnJIbHOJ N HaJeXHOJ EKcPnyaTauni 6bITOBORO npu6opa.
Texnuecka 6e3oNaCHOCTb
BbITaJka NOKHnyla 3aBOD B NCnpaBHOM COCTOHN. Tem He MeHee, OCMOTpTE 6bITOBOI npi6Op neped MOHTaXOM Ha npEIMet HAIuYnIOBpeKdEHNI B Clyuae HAIuYnIOBpeKdEHNI npi6Op HeJIb3A BCTpaNBaTb nIN yCTaHaBInBaTb!
И3-3a coo6paJekHn 6e3oNaChOcTn 3aMeHa IOBpeKdEHHORO CoeDHNHTeBHOr IPOBOda BbITAXKN DOnJXHa OCUyEcCTBnTbCra IpeDnPnAtnEM-N3ROTOBnTeJEm,ero Cnyx60BJ CepBnCa INI nDpyTmN KBaJIuΦnUcapOBaHHbIMn CneLuaJIntAmN.
MoHTaX (BkIIOUaJ 3NeKTpnueCKoe NOdkJIIOUeHne),TexO6cJIyKJBaHHe n peMOHT BbITRAKKN DOJIKNHbBI bINOLHnTbCnTOJIbKO KBAIIINΦuINpOBaHHbIMn CNEuNAInCTAmN. B IIO6oM cIyae BbITRAKKy CnEduYet o6ecToCHb, BbITAYB WTeNCeJIbHyIO BVNIky n3 pO3ETKn IIN BbIKIQUChN PpeOxpaHNTen!
BcneCTBnE HeKbAInuΦnUnpoBaHNO BbIIOJIHeHHOrO MOHTaJx, TeXOBcNjxuBaHnI INI pEMOHTa MOKeT BO3HNIKHyTb CepBe3HaI ONaCHOCTb IJIa NOJIb3OBaTeJIa, 3a KOTOpyI N3ROTOBtJIb OTBETCTBEHHOCTn HE HecET.
Измени в Зелктуческоил mexahuecko KoHCTpyKuIN -Опсы n 3anpeшebl! OHI MOrγt npNBecTn TaKke K HeICnPabHOCCTaB pa6Ote BbITJxKn.
CneuaJIbHbIe yKa3aHnIЯ ra3OBbIX nIIT
Пи PMontaxke BbITaRKe HAd ra3OBbIMN PInNTAMn Heo6xOJMoM CO6JIOnDaTb COOTBeTCTByIOUe 3aKOHHbIe ppeINCaHnA, DeiCTByIOUeB KOHKpeTHoN CTpaHe (HaNP.,B TepMaHH:N:TexHnueckne npabuIa Dnra ra3OBbIX yCTaHOBOK TRGI).
O6raTeIbHO co6JIouJaIte COOTBeCTBHyUOJIne DeIcTBtIeHbIe HOpMbI n IpeIINsCAHnI yCTaHOBKn I3rTOBtIeI ra3oBOrO o6OpyDoBaHnI.
Bo Bpem MoTtJxHa Heo6XoJMoO 6paTbBHNMaHHe Ha To, YTO JINbC OJHO CTOpOHbBbITKKn pRdOM MOKeT HAXOINTbCnHENoCpeCTBeHHo BbICOKN uKaΦ NIn CTeHa.B npOTNBHom Cnyae MOKeT BO3HnKHTbONaCHOCb NepePeba. PaCctOJHne OT cTeHbIN BbICOKOru KaΦ aDJIHXo COCTaBnTb He MeHee 50 MM.
ONACHOCTbIIOJUYEHNAOXKOROB
BkIIOUaJIte He 60JIe IbYx Ra3OBbIX KOHΦOpOK OJHOBpeMeHHOДЯ pa6OToB b TeueHne MaKc. 15 MInHyT npi MaKcImaJIbHoH TeNIOBOH Harpy3ke.ПоД BO3dEiCTBnEM TeIIa NOBepxHOCtN KOpNyCa MOrTy HArPeTbCЯ TaK, YTO pRi PnIKoCHOBeHm K HIM rPo3NT OnaCHOCTb NOLyHeHn OXKOrOB!
O6paTInTe BHNMaHne Ha To, YTO 60JIb7aR ropeIka Ha 6OJee 5 kBt (KNTaIckn «BOK») COOTBeTCTByET MOUHOCTn DByx Ra3OBbIX ropeIOK.
ПОД BOЗдЕИСТВЕМ CИЛьНО ТЕпla B ВытЯЖКЕ MOГТ BO3нИКHyТь NOВржДeHЯ.
Hnkorga He kcnnyatpyte ra30byo nnity 6e3 yctaHOBJeHHo Ha He KyxOHHOI NOcYbl. YCTaHOBInTe PnAm TaKIM O6pa3OM, 4TO6bl OHO He BbIXOIO 3a IpeJebl KxyOHHOI NOcybl.
PpabnIbHoe o6paueHne
WInpHa BbITaXKn DOJXHa COOTBETCTBOBaTb WInpHHe KxOHHOIINTbI.
BbTJxKu HaOaYOM IJIcXnIaHIN TBepDOrTO TOnJIbA,OT KOTOPo MOxET NxCOINTb ONaCHOCTb BO3HnKHOBEHIN NOxapa (HaNP.,I3-3a pa3JIeTaIOUxxCr NCKp), DOnyUCKaETcRA YCTaHaBnBaTcBcT OToBKO B Tom Cnyuae,ecN OuaR Cha6KeH CEJIbHbIM HecBemHbIM NOKpbITnEM IOTBvaeT Tpe6OBaHNM KOHKPeTHOI CTpaHbl. 3TO ORpaHnueHHe OTHOCITcK Ra3OBbIM PInTAM IN Ra3OBbIM BApOCHbIM NaHeIaM.
Bo Bpem MoTaxa BbTJkK KyXOHHyo PINTy HeO6xOIMO PrKpbTb 3aunTbOT BO3MOXHbIX NOBpejDeHn..
Yka3aHHe: BkIIOUaHTe BbITJxKBy BHaayane
PnIroTOBLeHnN PNIuN N BiKIOUaHTe IINb
CnyCTrHECKOJIbKO MInHyT NocLe OKOHuaHn
PnIroTOBLeHn. TaKIM O6pa3OM, KyXOHhIe
IcnapeHn HaIbOJeE 3ΦΦeKTUBHO
YCTpaHJOTc.
ONACHOCTb TPABMPOBAHIN
ropaey Kxohno nocyo. Bo Bpemy npablenya BbTjKoN 36eaiTe npoctpaHCTBa Hnd ropaey Kxohno nocyo.
PeryunpoBaHne BeHTnIaTopa
BKNIOHTe npn6Op c nOMOuHbKHOJKn ①. BeHTINIaTOp HaunHaet pa6oTaB Ha ckopocTn 2.
CkopocTb BeHTnIaTopa NObblIaeTCnC NOMOuBIO KHOPIK CNOMOuBIO KHOPIKN+N NOHIXaETCn C NOMOuBIO KHOPIKN-
HTHeCNBHa CTyneHb
BkIIOuaiTe INHTEHCINBHyIO CTyPeHbДJIYCTpaHEHnOOC6eHHo CINbHbIX 3aIaxOBnICnpaHn.
PI -OKOJI05MnHyT
P2 -OKOJIO 10 MNHT
Hakmite Ha KhoNky P. Ha DnCpIee NOBJIaETc coo6UeHne P2. HacMITE Ha KHONky -, YTObI nepeKJIIOuHTb O6paTHO Ha CKOpOCTb PI.
IpoJOnJxHtJIbHoCTb pa60Tb IOrpaHnueHa
IIO BpEmHe. IocJe 3TOrO BeHTnIaTOp
aBTOMaTnueCKn IpeKJIouaetc Ha 6OJIee
HN3KyU CKoPocTb. IOBTopHbIM HaxaTneM Ha
KHONky P Bbl MoKeTe BJIooBe BpEm
IpeKJIouHTb 6paTHo.
YctaHOBKa OCTaTOHOrO XoJa BeHTnIaTopa
Haxmte Ha KOnkky BeHTnIaTOp pa6Otaet 6 MIn HA cKOpocTn 1. 3aTeM BeHTnIaTOp aBTOMaTuYeCKN BbIKJIouyaeTCra.
ДлЯИЗМЕHeHЯОCTaTOUHOrO XOJa BEHTNIIrTOPa HaxIMaIteHa KHOJIKN+ИЛI-。
INdknkaun:OKO03MmHyT
INnKauN:OKONo6MnHyT
INDnKaIaI OKOIO 9 MNHyT
HHTepBaIbHaBBeHTnlaZna
ONACHOCTbIPOJUyeHnIaTPABM
Bpe3yIbTaTe BO3dEiCTBnBcBEToIOIOHbIX lamm,rgynpa pncka 1.He cmoTpnte 60nee 100 cekynd npraMo BO BKJIIOueHHbIe CBETOIOIDhbIe lamnbl.
3BykoBoCnHaI
ONACHOCTb NOJUyeHnTPABM
I3-3a coo6paJekHn 6e3OpacHOCTn 3aMeHa NOBpeKdEHHbIX COeINHITeJIbHbIX IPOBOOB BbITRAKKN DOJIHKHA OCUJCECTBIAITcR npEiPnIaTNIEM-N3ROTOBHTeIeM,ero CnyjXbO CEpBICA INI dpyrIMN KBaIIINΦuNUPOBaHHbIMC CNEUaJINTaMI.
CoeINHTenbHbIKa6bIbNoCteNoDKJIUOHeHNA K CETN Heo6xOIM0 6e3OnacHO yIOXHTb.
BbTJkKy pa3peWaeTcnoDkJIouaTb TOJbKO K yCTaHOBJeHHoCOrJaCHO npEiNCAHnM pOeTke C 3aUHTbIM KOHTaKTOM.
P03eTKy C 3aUHTbIM KOHTaKTOM
JKeJaTeMbHO paCNOLOXnTb IIO BO3MOxHOCTHI
I03aI N O6uWKn BbITaXHo Tpy6bl.

- P03eTka C 3aUHTbIM KOHTAKTOM IOnJXHa IOnKJIUOuATcR K JANEKTPOCETN Upe3 CO6CTBeHHbI KOHTyp TOKa.
- Ecni nO 3aBepseHn MOHTaKa BbITaKKn PO3EtKa C 3aIINTHbIM KOHTaKTOM OKa3aJaCbB HeIOCTyHOM MecTe, TO B 3TOM CJIyae Heo6XoIMo yCTaHOBtB pa3BeiHNHeTbHoe yCTpoiCTBO, KaK pRNa CTaCNoHApHOM NOdkJIIOUeHn.
Pn Heo6xOaHMoCTN B CtaCNoHapHom PNOKJIoueHH
Длп подклоченя Клжтрocети Тгсуетсу yctановka pa3beDNHITeBHO YCTPOnIcTBA.В каесстBE pa3beDNHITeBHyX YCTPOnIcTB CNeDyET NCSNoJIb3OBAtB Пе配电ЛючateNIM CЗАОрамIM Мжд КонтakтamN 60lee 3 MM И OTKЛчЧЕнEM Всex ПОЛЮСOB.CIOda OTHOCrTc IINHeHbIe 3aUHTbIe aBTOMaTbI,пpeDoxpaHITeN IN КонтakTOpbl.
3neKtpnueckne xapaKtepcntkN
Heo6xoIIMbIe IJIa 3JIeKTpOIOKnIoueHnI XapaKTePrcntIKN BbI HaJTeE HaΦIpMeHHoT Ta6NIuKe BHyTpN 6bITOBORO npiBOpa, CnB JInpoUyIaBIIBaIOUIne ΦINbTpbl.
Дина coeunHntbHoro ka6eJia: ok.1,30 M
ONACHOCTb NOJUyeHnra TPABM, ONACHOCTb NOBPEXKeHn
Ipeed Tem KaHaayb CBePInb OTBepCTna, npOBepbTe, He Tn Ha IpeDyCMOTpeHHOM dI MaHTaxa yuaCTke paCNOJKeHHbIX Poi dTsykAtypKoJ 3JeKtpnueeCKnx n IpOuNX 6bITOBbIX pOBOIOB.
CTeHa dOJnxHa 6bIb poBHOu BepTnKaJIbHOH.
BxOJaIe B KOMJIeK T NOCTaBKn BINHTbI nIIO6eII paCCHTaHbHa MACCnBHyIO KInPNIuHyIO KlaKy. IJra CTEN DpyrO KoHCTpyKcII (HaNP., n3 rINCOkApTOHa, NOPICTORo 6eToHa, KInPNIu O NpOToHa) Heo6XoIMMo NcNOJB3OBaT BoOTBetCTBeHHO dpyrIe, IOdXoJIAIe CpeDCTBa KpeJIeHnI. IpocJeIte, YTO6bl cTeHa O6IaIana IDOCTaTOHOr HeCySeCnOCo6HOctbIO.
CTapaTecb, TTO6blIy6bHa BbICBepNeHHbIX OTBepCTNI COOTBeTCTBOBaJaNINHe BNHTOB.
ПозабOTbTeCb O npOuHNo ФиКcaциДюбел.
MaKc.Bec BbITaXkN:55Kr
B KOHCTpyKcIIO MOrT BHOcNTbCn3MeHeHnB paMKaX texHnueCKOro pa3BVttna.
Ioprotobka MoNTaxa
1.C NOMOUsbI O npJlaRaemOro 7a6NoHa 06o3NaUte Ha CTHe TOcKn IJN KpeJIeHnB INHTOB N KOHTyp UyactKa NOBBeuBaHn BbITXKn, YTO6bI O6JIeYrTb NOBBeuBaHne. HIXKNI KpaI 7a6NoHa COOTBetCTByET HIXKHemy KpaIO BbITXKn.
2.Прсверліte 2 OTьерстя 8 MM Ддя Крелпеня Вытжки в БдавиTe Дюбелу 3аюнluco CO CTehoN.
3.ПиВИNTIte NOДБЕСье ONOpы ДЯ ВыTЯЖК: npOчHo, мaкс. 3 Hm CneДITE 3a npaBиьнБiM pacNoJIoKeHNeM NOДКЛаДНьx KOJIeц и NOДБЕСьx ONOp!
online-shop: www.neff-eshop.com
Ta otoxieia eikoiuvwiaic oawv twv xwpwv
0a ta 8poeite otov nivaka Ytnpeoic texviknc
Eunnpetnoic neatow nou npapadibetai maCi.
Evtoh EIOKEuC kai ououLe C eπeipintwoBβaβnc
GR 2104 277 701
Eumiouteite Tnv Eunieipia tou kataoekuaotn. Etoi EaoopaaiZeTe, otI n EIOKEUN yivetai ano Eknaiodeuévouc texvikooc Tou oepic, nou eiva Eonlaiope
Fevikecπλnpoφopiec
YINOAEIEEIGIATHN IPOSTAIA TOY INPEIBALONTO
AnouponTnc ouokueaioiac muatapopac
H oukeuaia npoataeuei tvkaioupyia oac oukeun kata tn metapopá mexpi to oniti oac. Ola ta xnpoiioiouveva uiká oukeuaia c evai abaa n yia to nepiabalov kai npopoivv av
Eavaxpnoiopoioihouv. Napakaoume va ouvteloeote ki eoeic otnv npootaia tou nepiabalovtoc, kai v' anooape t n oukeuaia me tpanto abaa n yia to nepiabalov.
KINΔYNOΣ TPAYMATIΣMOY
KINDYNOPTPAYMATIEMOY
aT KauTa MaeyEpiKa OKeUn. KaT Tov Xeipmo Tou anoppopntnpa un V IaVETe NwW aT KauTa MaeyEpiKa OKeUn.
Pouion avemiotnpa
KINDYNOPTPAYMATIEMOY
Piv aio kaTe Kaatapioo kai povtida o anoppoqntnpac npentie va anopovwvea an to diktuo tou peuatoC yaovtac to apic an to tny npica n katebaocvtac tnv aoopaia stov nkektpooyiko nivaka.
EnipavEIEc TNC OoKEuNc
YNOAEIEH:PiooEETcIgiaTaeiceyyunong, oTo eiuovantóevo qulambdaio sepici.
Oi eipavieic tnc ouokueuc kai ta otoixia xepioou evai euaiaoeta otic auiuxec, I' auto npooeTe tic akoloutheta utoodeiEc kaapioou: