
KV26B - KV26N - KV26S - Fridge SMEG - Free user manual and instructions
Find the device manual for free KV26B - KV26N - KV26S SMEG in PDF.



User questions about KV26B - KV26N - KV26S SMEG
0 question about this device. Answer the ones you know or ask your own.
Ask a new question about this device
Download the instructions for your Fridge in PDF format for free! Find your manual KV26B - KV26N - KV26S - SMEG and take your electronic device back in hand. On this page are published all the documents necessary for the use of your device. KV26B - KV26N - KV26S by SMEG.
USER MANUAL KV26B - KV26N - KV26S SMEG
Instruction booklet (EN)
(AR)
Mode d'emploi (FR)
Instruction booklet (EN)
(AR)
Mode d'emploi (FR)
- Read the instructions closely before installing and/or using the hood.
- The manufacturer will not be held liable for damage caused by installation that is incorrect or not up to standard.
- We recommend that all installation and adjustment procedures are carried out by trained personnel.
- When the hood is taken out of its packaging inspect it to ensure that it is intact. If the product is damaged, do not use it and contact the Smeg assistance service.
- Before making any connections, make sure that the mains voltage corresponds to the voltage shown on the label located inside the appliance.
- For Class I appliances, check that the domestic power supply guarantees adequate earthing.
- The minimum distance between the hob and the lower part of the hood must be at least 650mm.
- The extracted air must not be conveyed in a duct used to conduct fumes from appliances powered by gas or other fuel.
- Connect the outlet for the air extracted by the hood to fumes dischargedsucts with a suitable internal diameter, and no less than 120~mm .
- The room must be adequately ventilated when the hood or gas appliances are used simultaneously.
- If the power cable is damaged it must be replaced by the manufacturer or its technical assistance service, or nonetheless by an individual with a similar qualification, so as to prevent any risk.
- Comply with any legal regulations relative to the extraction of air when operating the extraction hood.
OPERATION
- Do not cook or fry in a way that creates strong flames. These could be drawn into the hood during operation and cause a fire.
- Do not flambé food under the kitchen hood; Fire hazard
- The hood can be used by individuals under the age of 8 and by individuals with physical, sensorial or mental impairments, or without experience or the required knowledge, as long as they are under supervision or have been given instructions on safe use of the appliance and are familiar with
the dangers it entails.
- Children must be supervised to ensure that they do not play with the appliance
- ATTENTION: The accessible parts can become very hot if they are used with cooking equipment.
MAINTENANCE
- Before carrying out any maintenance procedure or cleaning, disconnect the appliance from the electricity supply.
- Carry out thorough and timely maintenance of the filters in accordance with the intervals recommended by the manufacturer.
- To clean the hood surfaces, use a damp cloth and a mild liquid detergent.
- Cleaning and maintenance carried out by the user must not be performed by children without supervision;
- THE MANUFACTURER DECLINES ALL RESPONSIBILITY IF THE ABOVE INDICATIONS ARE NOT FOLLOWED
USE:
- This appliance was designed to be used as an EXTRACTION (extraction of air to the outside) or FILTER hood (recirculation of air indoors).
- EXTRACTION VERSION: To turn the hood into the extraction version connect the motor inlet, by means of a rigid or flexible pipe with a suitable internal diameter and no less than 120mm , directly to the external vapour and odour extraction duct.
NB. Remove any active carbon odour-control filters.
- FILTER VERSION: If it is not possible to direct the air outdoors, the hood can be transformed into the filter version. In this version, the air and vapours are purified by active carbon filters and recirculated into the room through the lateral ventilation grilles of the flue.
Note: using the hood in filter mode can increase the level of noise perceived.
INSTALLATION INSTRUCTIONS:
The hood is supplied with all the accessories necessary for its installation. The minimum distance between the lower surface of the hood and the hob must be at least 650mm for electric hobs (Fig. 1). If the motor inlet is equipped with a non-return valve for fumes, make sure it can open and close freely.
For easy installation it is recommended to follow the procedures described below:
1) The hood must be centred with respect to the hob surface.
2) There are different installation procedures depending on the hood model. Choose one of the following fixing systems:
a) 2 levelling hooks that fasten on with the supplied expansion plugs (Fig. 2)
b) Rear levelling bracket that fastens on with the supplied expansion plugs (Fig. 3)
c) For island models refer to the special installation attachment.
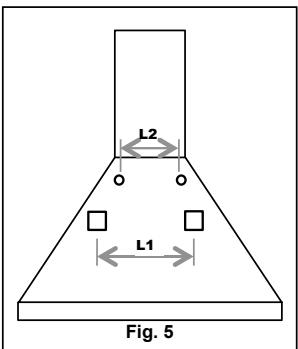
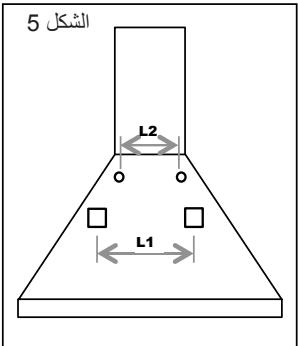
N.B.: Fixing systems a) and b) fit on to the back of the hood in the holes L1 (Fig. 5).
3) Remove the grease filters and position the hood on the wall and mark the reference position for the holes to anchor the relative fixing system.
4) Drill the 2 holes previously marked after removing the hood from the wall
5) Anchor the fixing system to the wall by tightening the expansion plug
6) Mark holes L2 on the wall to secure the plugs safely in the holes. (plugs supplied)
7) Hang the hood on the fixing system (fig. 2 and 3) and level it using the adjustment screws ( fig.2 ).
8) Securely fix the hood by fully tightening the two expansion screws of the holes L2
AIR CONNECTION SYSTEMS:
EXTRACTION version:
Connect the fume expulsion duct (inside diameter 150 mm) to the exhaust of the motor inlet. The expulsion duct must not have a diameter of less than 120~mm .
Note that if the hood is supplied with an active carbon filter, this must be removed (see page 8)
Deviation for Germany:
When the hood and other appliances powered by energy other than electricity are simultaneously ON, the negative pressure in the room must not exceed 4 Pa (4 x 10^-5 bar).
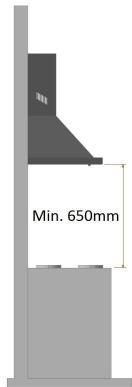
Fig. 1
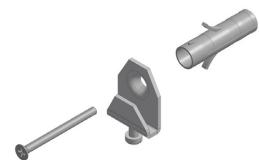
Fig. 2
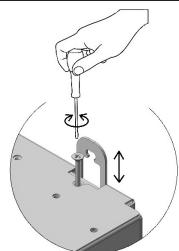
Fig. 3
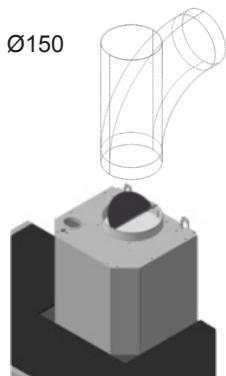
Fig. 4

FILTER version:
Leave the motor inlet free. Install the active carbon filters as shown on page 8.
If the hood is not supplied with an active carbon filter you must buy it separately at your nearest authorised Smeg dealer.
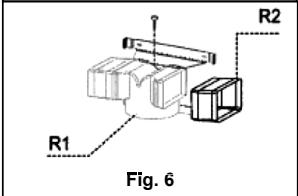
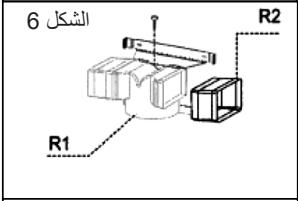
For some models there is a standard set of fittings (fig.6) to be fixed to the wall by expansion plugs at a suitable height in order to channel the airflow in correspondence with the flue slits. Insert laterally the extensions R2 on the fitting R1. Connect the fitting R1 at the outlet of the hood body by means of a tube of diameter D.150mm.
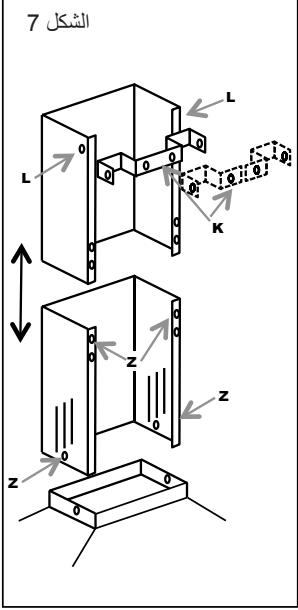
FLUE ASSEMBLY (fig. 7):
Position the one-piece or two-piece (K) flue bracket to the required top limit.
Mark the two holes on the wall to fix the bracket. Drill and fix the bracket with the supplied expansion plugs.
Carefully position the flue unit on the hood. Fix the lower flue to the hood by means of the screws Z. Carefully extend the top flue to the upper limit.
Secure the top flue to the flue bracket K using the screws L.
ELECTRIC CONNECTION
We recommend that electric connections are carried out by a professional installer.
In the case of a direct electric connection to the mains, between the appliance and the mains, place a bipolar switch with a minimum opening of 3mm between contacts, sized to the load and compliant with the current regulations.
USER INSTRUCTIONS
CONTROLS UNIT
For an optimal and efficient use of the product it is advisable to start the hood a few minutes before you start cooking and to keep it on for at least 15min after you have finished cooking or until steam and odours have completely disappeared. To start the hood, identify the command type of the hood and then follow the relative indications:
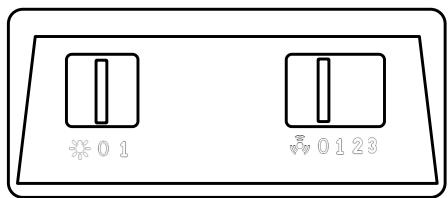
SLIDER:
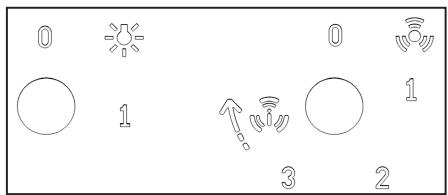
- Slider (A) lighting ON/OFF
- Slider (B) with four positions:

Motor OFF

ON/Speed selection
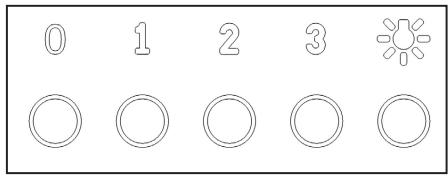
ELECTRO-MECHANICAL PUSHBUTTON PANEL:

Lights ON/OFF key

Motor OFF key

Power key/hood speed selection
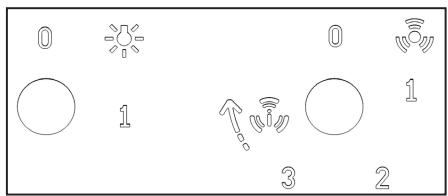
KNOBS:
Hood speed selection

Start timed intensive speed
(A)
(B)
(A)
(B)

Timed intensive speed:
The timed intensive function is that mode of service for which the hood, for a limited time, works at its maximum capacity. The timed intensive speed of the hood is activated by turning the knob (B) clockwise from position 3. Once the timed intensive speed is activated, the knob automatically turns to position 3. The intensive speed can be switched off by turning the control (B) counter-clockwise again. When the intensive speed timer has expired it returns to the third speed by default.
2-DIGIT 10-KEY CAPACITIVE PUSHBUTTON BOARD:

A

B

C

D

E


F

G

H

1

L
| Key | Function | Display |
| A | Turns the suction motor on / off. | Displays the set speed |
| B | Decreases the operation speed. | Displays the set speed |
| C | Increases the operation speed. | Displays the set speed |
| D | Activates the Intensive speed from any speed even with the motor off, this speed is timed. At the end, the system returns to the speed previously set. Suitable for dealing with the maximum emissions of cooking fumes. | Displays alternatively HI |
| Hold the button down for about 5 seconds, when all loads are off (Motor + Light), to switch the keyboard lock On / Off. | " - " Keyboard lock On. | |
| E | 24 H function Activates the motor at the first speed and allows extraction for 10 minutes every hour. | It displays 24 and the point at the bottom right flashes once a second, while the motor is in operation. Press the key to disable it. |
| Holding the button down for about 5 seconds when all loads are off (Motor + Light), holding key "B" down during the animation, the Active Carbon Filters Alarm switches On / Off. | Displays a rotary animation for 5 seconds. "EF" flashes twice in activation. "EF" flashes once in deactivation. | |
| F | Delay function Enables the automatic shutdown delay of 30'. Suitable for removing residual odours. Can be activated from any position. You disable it by pressing the key or turning the motor off. | Displays the operating speed and the point on the lower right flashes. |
| G | With the filter alarm in progress, pressing the key for about 3 seconds resets the alarm. | After the procedure, the signal previously displayed turns off: FF signals the need to wash the metallic grease filters. The alarm comes on after 100 hours of actual operation of the Hood. EF signals the need to replace the active carbon filters and the metallic grease filters must also be washed. The alarm comes on after 200 hours of actual operation of the Hood. |
| H | Decreases the light intensity at each press of the Key in a cyclic manner. | |
| 1 | Turns the lighting system on and off at maximum intensity. | |
| L | Increases the light intensity at each press of the Key in a cyclic manner. | |
Keyboard lock command: you can lock the keyboard, for example, to clean the glass surface, when the Hood has the motor and lights switched off. By pressing key D for about 5 seconds, you can enable or disable the keyboard lock which is always confirmed with:
"-" Keyboard lock On.
1-DIGIT CAPACITIVE PUSHBUTTON BOARD:
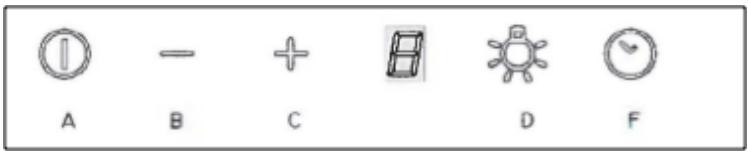
| KEY | FUNCTION | DISPLAY |
| A | SWITCH THE SUCTION MOTOR ON / OFF. | DISPLAYS THE SET SPEED |
| B | DECREASE THE OPERATING SPEED | DISPLAYS THE SET SPEED |
| C | INCREASE THE OPERATING SPEED START TIMED INTENSIVE SPEED | DISPLAYS THE SET SPEED FLASHING TIMED INTENSIVE SPEED |
| D | TURN THE LIGHTING SYSTEM ON AND OFF | |
| F | ENABLES THE AUTOMATIC SHUTDOWN DELAY OF 15' | FLASHES |
SOFT TOUCH ELECTRONIC PUSHBUTTON BOARD:
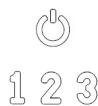
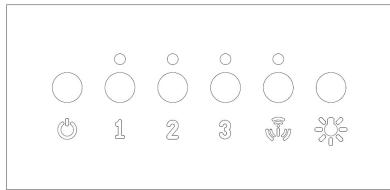
Motor OFF key/ Filters reset key
Power key/hood speed selection
Start timed intensive speed
Lights ON/OFF key
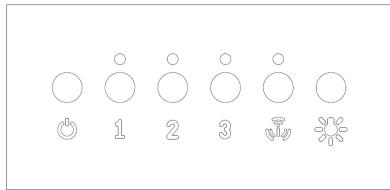
The timed intensive function is that mode of service for which the hood, for a limited time, works at its maximum capacity.
Activating the function is displayed by the LED located under the key flashing. When the intensive speed timer has expired it returns to the third speed by default.
OPTIONAL FUNCTIONS:
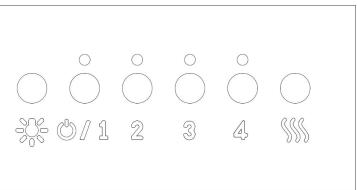
- TIMED AUTO POWER OFF: By pressing one of the motor speed keys (2-3), twice, you will activate the function "Timed Auto Power Off" which turns off both lights and hood motor after 10 mins. Activating this function is demonstrated by the LED immediately above the pressed button flashing.
- FILTER CLEANING SIGNAL: the simultaneous flashing of the 4 LEDs, (programmed to run every 200h of operation), is to indicate the need to clean /replace the filters.
By pressing the OFF button, the 200h time can be reset. N.B. Accidentally pressing the OFF button before the 200h does not result in the filter being reset in the filter cleaning memory. It is good practice to clean the grease filters and replace the active carbon filters every 200h of operation.
N.B. In some countries, the 4-speed version is also available, with the layout shown on the right, where:
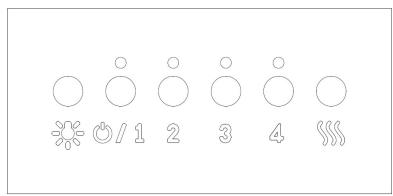
Filters Reset Key
FUNCTIONS AND MAINTENANCE:
Before performing any maintenance and/or cleaning always disconnect the hood from the power supply
Regular cleaning guarantees good operation and a long appliance service life. The grease filters and filter hoods with carbon filters require special care.
N.B. The accumulation of grease inside the filter panels as well as affecting the performance of the extractor, can also create a fire hazard.
EXTERNAL CLEANING: The external and internal cleaning of the hood must be carried out using a damp cloth and mild liquid detergent. Completely avoid the use of solvents or abrasives. It is recommended to use specific products, following the instructions on the product. It is advisable to clean the hood by always rubbing the steel in the direction of the surface finish.
METAL FILTER CLEANING:
Particular attention should be paid to the metal grease filter panels. The accumulation of grease inside the filter panels as well as affecting the performance of the extractor, can also create a fire hazard.
In order to minimise the risk of fire, the filters must be cleaned regularly, at least once a month or with greater frequency in the case of a particularly intensive use of the appliance.
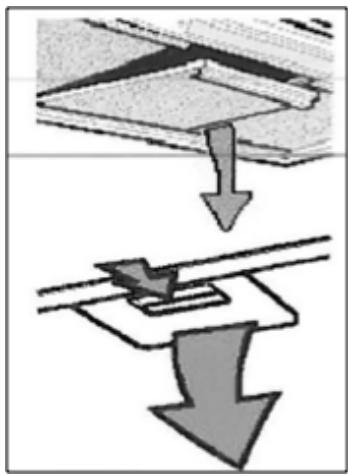
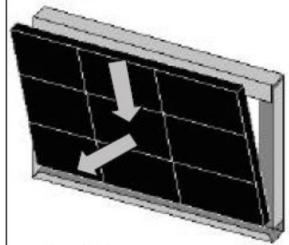
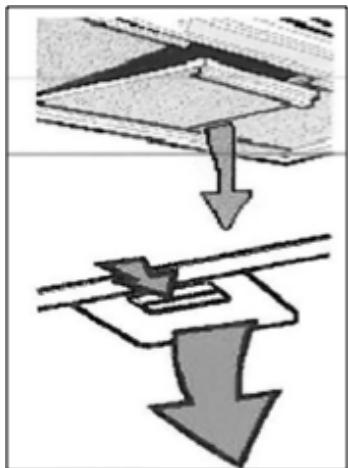
After identifying your hood model, remove one filter at a time as shown in the next figure. Thoroughly wash filters with a mild detergent either by hand or in the dishwasher. Replace the filters, making sure that the handle is on the outside of the hood
REPLACING CARBON FILTERS: (Only for the filter version)
The carbon filters are capable of retaining odours until the carbon reaches saturation level. They cannot be washed and they are not renewable, therefore, it is recommended to replace them at least every six months or more often if the hood is used often.
Before starting operations make sure the electrical power supply to the hood is disconnected.
Access the active carbon filters by removing the metal filters as described above.
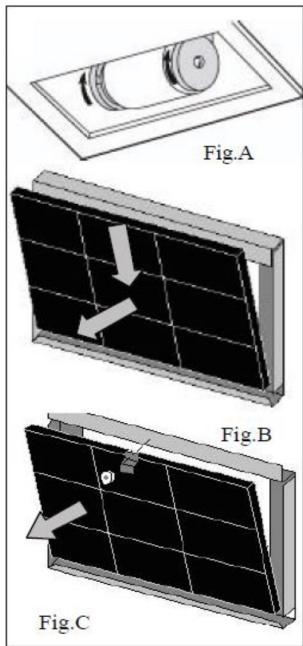
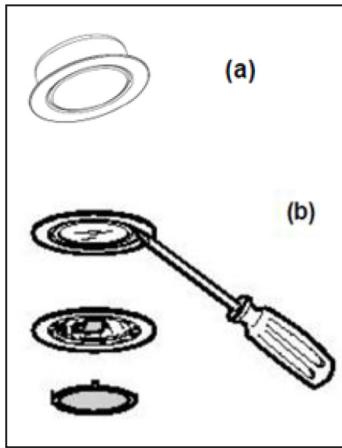
With the help of the figures, identify the carbon filters kit supplied with the hood.
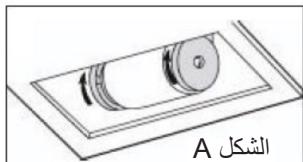
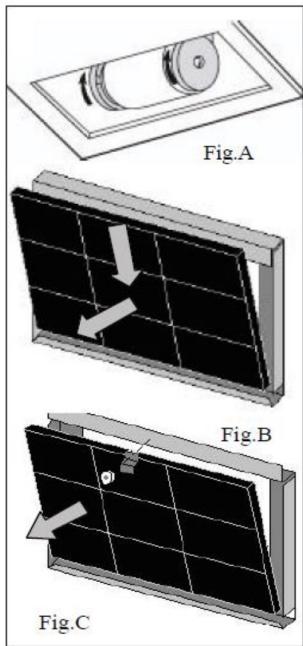
In the case of the disc filter, simply tilt the two filters by 90^ as shown in (fig.A) and then extract them from their housing.
In the case of a cartridge filter attached with springs, (fig.B) exert the pressure required to counteract the resistance of the spring and then remove the filter
In the case of a cartridge filter blocked with a bracket and threaded knob, (fig. C), unscrew the knob, remove the locking bracket and then remove the active carbon filter. Replace the carbon filters and the metal non-grease filters by performing the operations in inverse order
REPLACEMENT LAMPS:
Before performing any maintenance and/or cleaning always disconnect the hood from the power supply
Depending on the model, the hood can be equipped with different types of lighting, with LED or halogen lamps:
a) WITH LED LIGHTS: The LED lights guarantee a significant number of hours of operation. Should it be replace due to being worn or faulty, the entire spotlight must be replaced. In this case, contact qualified Technical Support. This appliance is equipped with Class 1M white LED light, in accordance with EN standard 60825-1: 1994 + A1:2002 + A2:2001; maximum emitted optical power@439nm: 7 W . Do not look directly at the light with optical instruments (binoculars, magnifying glass...).
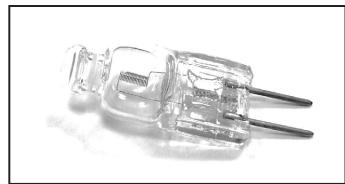
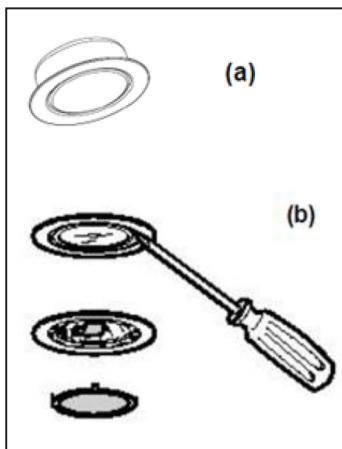
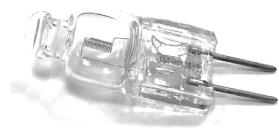
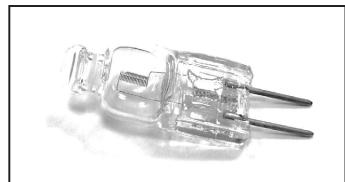
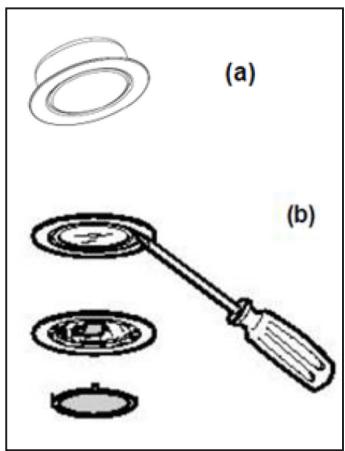
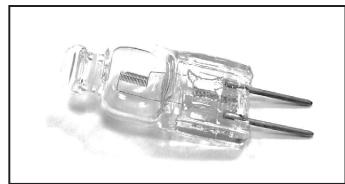
b) Halogen: lamp with G4 fitting, 20W power and 12V voltage. Replace the lamp by removing the glass support ring of the spotlight with a screwdriver. Once the glass is removed, remove the faulty lamp from its housing and fit the new lamp. Replace the glass of the spotlight by blocking it with the ring. Code ILCOS: HSG/C/UB-20-12-G4

WEEE DISPOSAL:
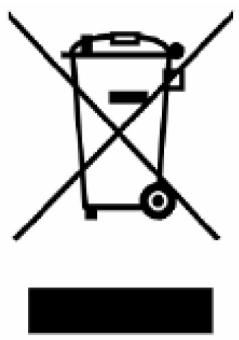
Pursuant to art. 26 of the Italian Legislative Decree dated 14 March 2014, no. 49 "Implementation of directive 2012/19/EU on Waste Electrical and Electronic Equipment (WEEE)"
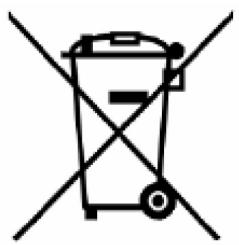
The crossed out wheeled bin symbol on the equipment or its packaging indicates that the product at the end of its useful life must be collected separately from other waste.
Therefore, any products that have reached the end of their useful life must be given to waste disposal centres specializing in separate collection of waste electrical and electronic equipment.
As an alternative to autonomous disposal, the device you want to dispose of can be given back to the retailer at the time of purchasing new similar equipment.
At electronic product retailers with a sales area of at least 400m^2 , it is possible to return, without any obligation to buy, electronic products to dispose of with dimensions below 25 cm free of charge.
The separate collection for the delivery of the equipment to recycling, to treatment and environmentally compatible disposal helps avoid possible negative effects on the environment and health and promotes the reuse and/or recycling of materials that make up the equipment.
a jy 11 g a i g jz12 o jz13 caii


ue/2012/19 4 14 49 26 (RAEE)
a j 100000000000000000000000000000000000000000000000000000000000000000000000000
():
J 1 J 1 J 1 J 1 J 1 J 1 J 1 J 1 J 1 J 1 J 1 J 1 J 1 J 1 J 1 J 1 J 1 J 1 J 1 J 1 J 1 J 1 J 1 J 1 J 1 J 1 J 1 J 1 J 1 J 1 J 1 J 1 J 1 J 1 J
blalil glail pliswlll lla g aal s jilgi
Jy jll Jjll jn baiil cui aui 1i iui 1u 1u 1u 1u 1u 1u 1u 1u 1u 1u 1u 1u 1u 1u 1u 1u 1u 1u 1u 1u 1u 1u 1u 1u 1u 1u 1u 1u 1u 1u 1u 1u 1u 1u
90° 12345678900123456789001234567890012345678900123456789001234567890012345678900123456789001234567890012345678900
Baaal (B) jy jy aagb jy jlll lla .jell Cj jy jy gla Jc jlll y ball
(C K)jlll jillg gall yab yjall jge 10000000000000000000000000000000000000000000000000000000000
.

:
laal 1aai g/ g aai al jai sly pall
yueeaiy jiaiie 1 yj yj yj yj yj yj yj yj yj yj yj yj yj yj yj yj yj yj yj yj yj yj yj yj yj yj yj yj yj yj yj yj
Lule LED i:LED
jill jlll jlll jlll jlll jlll jlll jlll
aall oal aolLcI 1Jzll Jzll
001 2j j jll 12. j gall ac all jy j
EN 60825-1: JyJdIaIbI 1M aIe Ie Ie Ie LED
g 1994 + A1:2002 + A2:2001
emessa@439nm:7
aee (juliall jio) aiey
(……)
120G4
e 1
ILCOS:HSG/C/UB-20-12-G4
(b
4 4 4 4 4 4 4 4 4 4 4 4 4 4 4 4 4 4 4 4 4 4 4
:ie yila aill jullal pannill
jill sbio sle! jj
:ii.
aaiy aaii iie baiii laiaai aiil gaiial
aagaaagaaal jdlall alalal 4g jglal lglal 1gc g jzaii oiaaall aillll
. jy Jlly Jai jill jllg 6 jilall jiaial llaal
a
:
jlll 10000000000000000000000000000000000000000000
Clllill lil 1000 Clll iio pliio jnuiu .jiaua uie g 5g jisi gill al gall ciullal all
aal aal alal gai yai baiu uusui iall s
aiee aiee
J 1 J 1 J 1 J 1 J 1 J 1 J 1 J 1 J 1 J 1 J 1 J 1 J 1 J 1 J 1 J 1 J 1 J 1 J 1 J 1 J 1 J 1 J 1 J 1 J 1 J 1 J 1 J 1 J 1 J 1 J 1 J 1 J 1 J 1 J
:
8a
g jn nn nnnnnnnnnnnnnnnnnnnnnnnnnnnnnnnnnnnnnnnnnnnnnnnnnnnnnnnnnnnnnnnnnnnnnnnnnnnnnnnnnnnnnnnnnnnnnnnnnnnnnnn
Smeg jy Jyly
(6) (51)
yj yj yj yj yj yj yj yj yj yj yj yj yj yj yj yj yj yj yj yj
Cduaagaiallge laiAiiaal Cuaiey Luy aegll
CjR1AeR2
150 1
:(7)
gall (K) jie bai jdo aiaa
a aalaa aagall gglg .gall ggl jil jll
aall gill
abw yabwll dssall ci bll lcl jzlal all aga aie
aal gllgai gglal aiaall jj .blzll Z yolwaa
.
Kaisall gale gals all aisall L yalwal plisily
y
15
a
y
aie 1
ylll lllll 1 3
aillll 1
(1.5)650 650
j 1
y
olil 1s jll llaal yii iii sill al gwd
aill bail aail bail bai
Culli 2
: 1
(2) (1)
(3) (w)
j 1
aall
gblall cie (1) (1) aabil aaii pi:alaia
.(5)L1
g 3
alall ci ciil laii iaii gai
jIzJIyIe JIyIe IaJIyIe JIyIe JIyIe JIyIe JIyIe
5
ailll aiaill n jgll lal alal ll g aill all cllac g 1 J
aiiall i5 wll le b wii jll aiaia jll lal gall w jlll aayw g aiaia jll
jll mll wcbio g aibr jilab aiaia pial w gblwl cbwif ybll aill
ailll jll bbll lglm g y blll aaiiaaall aaiiaaall gailll lac!
.0e i 1 1 1 1 1 1 1 1 1 1 1 1 1 1 1 1 1 1 1 1 1
j 1
JbIy jn y g JgBjIy BgBjIy BgBjIy BgBjIy BgBjIy BgBjIy BgBjIy BgBjIy BgBjIy BgBjIy BgBjIy BgBjIy BgBjIy BgBjIy BgBjIy BgBjIy BgBjIy BgBj1y BgBj1y BgBj1y BgBj1y BgBj1y BgBj1y BgBj1y BgBj1y BgBj1y BgBj1y BgBj1y BgBj1y BgBj1y BgBj1y BgBj1y BgBj1y BgBj1y
Jill 15
Jg jn Jy jll yjill aikl g oJy jilall 1 1 1 1 1 1 1 1 1 1 1 1 1 1 1 1 1 1 1 1 1 1 1 1 1 1 1 1 1 1 1 1 1 1 1 1 1 1 1 1 1 1 1 1 1 1 1 1 1
1
1
a 1
aalal aal alal aal alal aal alal
Jaeil jieoad
I 1
aill llll 1 a jai iia aiai jaaai i jai ai bai
.Smeg aee
i 1
j_1 = 1( 2 - 1)
aaii aaiiaai iaiiaai aiiaai aiiaai aiiaai aiiaai
. 1234567890
650 1alaii glaill jajl gall cbw nn lll alal alln
y
jIJIJI
5 1111111111111111111111111
120 1
aai jia jia jia jia jia jia jia jia jia jia jia jia jia jia jia jia jia jia jia jia jia jia jia jia jia jia jia jia jia jia jia jia jia jia jia jia jia jia jia
a a a a a a a a a a a a a a a a a a a a a a a a a a
j 1
Aisallblawjuiiiepalllgllliyaiiaialaigillll
1
aaii iiaaii aaii ayaiai aiai
y j 1
J 8 jn Jnn nn nnnnnnnnnnnnnnnnnnnnnnnnnnnnnnnnnnnnnnnnnnnnnnnnnnnnnnnnnnnnnnnnnnnnnnnnnnnnnnnnnnnnnnnnnnnnnnnnnnnnnnn
a a a a a a a a a a a a a a a a a a a a a a a a
Aaabjoll jbs110g jess 1001
jie 1
gall 124 124 124 124 124 124 124 124
smeg
Instruction booklet (EN)
(La) (AR)
Mode d'emploi (FR)
REEMPLACEMENT DES LAMPES:
Instruction booklet (EN)
(AR)
Mode d'emploi (FR)
ILCOS-Code: HSG/C/UB-20-12-G4
Instruction booklet (EN)
(AR)
Mode d'emploi (FR)
Tast OFF motor/Reset fibre
Taending/regulering hastighed
Aktivering tidsunderlagt intensiv hastighed
Tast ON/OFF belysning
Instruction booklet (EN)
L (AR)
Mode d'emploi (FR)
Instruction booklet (EN)
(AR)
Mode d'emploi (FR)
Instruction booklet (EN)
(AR)
Mode d'emploi (FR)
Instruction booklet (EN)
L (AR)
Mode d'emploi (FR)
Instruction booklet (EN)
AR)
Mode d'emploi (FR)
Instruction booklet (EN)
(AR)
Mode d'emploi (FR)
MEPbI PPEIOCTOPOXHOCTN!
YCTAHOBKA
- Перед установкови/NИЛ ИСПОЛБЗOBAHнЕМ ВБТЯЖК, BHIMATEЛьноюпочтайтунчтукци.
- I3ROTOBNTeJIb CHIMaET C Ce68 BCaKyU OTBETCTBeHHOCtB 3a yUepe6, HaneceHbI B pe3yJIbTaTe He npBaBnIbHO nIi He COOTBETCTByUoIeN O6uEpnHrTbIM npBaBnIam yCTaHOBKn.
- PeKOMeHnyeTcra, YTObI BCE Opeaunn No yCTaHOBKe n HanaDke BbINOnHЯJIncb KBaInΦuNUPoBaHHbIM nepcoHaJOM.
- После ИЗВLEЧЕНИа ВБITЯЖКИ ИЗ yypakOBKN, поверпге ee цIoCTHOCТь.ЕслИЗделп NOВрждЕНО, He NOЛьзУТecь ИМ И образиТeСь B ceТ texHnueCKOrO obcnyЖВанЯ «Smeg».
- Параь влполноим Камх-лбо подлочenv, убдntecь, чо наразжени
СетиcoOTBETCTByeTнадряжenvу, уka3aHHOMyHaэТИКЕСССЕцифИКацИМN,
КOTOPЯ расюожehа BHTpru yctpoiCTba.
B cnyuae npnbopob Klacca I Heo6xoJnMo y6eHntbC8, YTO Domaunna 3neKtpnueckara cetb obecneuBaet npabunbHOe 3a3emHeHne. - МинимальhoepacctoHneMexky HnKHeI NOBepxHOCTbIO BbITaKKN I BapOCHNOBepxHOCTbIO DOJIHKHO COCTaBnTb He MeHee 650 MM.
- BcacbIbAembI BO3dUx He DoJXeH OTBOIDTCB KaHaJI, IcNoJIb3yEmblДЯ BbInycka DbIMOB OT yCTpOINCTB, KOtOpBIE pa6oTaHT Ha ra3y nII Na dpyrom TOnnIBe.
Heo6xoIIMO IOdCOeINHHTb BbIXoB CaCbBaEMOBO3dyxa BblrKn K DbIMOXOyIOxOJaIero BHyTpeHHeRo dnaMeTp a, He Mehee 120 MM.
Korda BbIyKka nIIN pa60aUzne Ha ra3y yCtpoiCTBa IcNIOJIb3yOTcOdHOBpeMeHHO, DOnJkHa 6bITb npedYCMOTpeHa COOTBetCTByUOa a3paunia NOMEuEHHa. - Ecπι καβεπβ Κλεκτροπηταινη πονβεχδεη, ΘεοδxογιΜΟ εἰο 3aΜΕΗΤβ. Дίπα ἀτότος Σζεύγετ Εθραμιατβς κ Ιλστότοθυπελήν, B εἰος Σζυχδύγ τεχΗνεcksόν Ποδερχκη Μλήν Απρυγήθεῦ ἡτο ραδθηκύγ co CXOXεŋ KBαλινφικαύηε, ΒΟ Ιλδεχανην ένδόθο ποῦ ροῦ ριςκα.
CobIouaTe Tpe6OBaHn 3aKoHOdaTeJbCTBa B OTHOSeHn BblNycka OTBOIMORO BO3dyxa npB BCaCbIBaIOUeM yHKUHOHIpOBaHn BBITJxKn.
3KcPJIyATAUIN
- He BBINOJIHЯIe BAPky IIN JxapKy TAKIM O6pa3OM, YTO6bl O6pa3OBbIbAIOcB CIIbHOe OTKpbIToe PJIaMry, KOTOpoe MOKeT 6bITb NODXBauHeO pa60TaHOSei BbITJIKKo, INPOBOUnpy noXap.
-
Пд Кухоннов Вьтяжков Заразецно Фламбирваиме: опасость пожара.
-
BbIyJIKoMOryT IOnb3OaTbc8 Detn MnaIaIe 8 let n IInuca C orpaHnueHHbIMn Φn3nueckmN, ceHCOPhIMN u YMCTBeHHbIMN cNoCObHoCTaMn, a TaKke IInuca, He NMeHOUne OblTa IIN Heo6xOdImbIX 3HaHn, pRy UcNOBm, UTO OHN HaxOJaTcR IOd Na6JIouDeHnEM IIN IOnyUHn INHCTpykUIN PO6e3ONaChOMy IOnb3ObaHnIO npi6Opom I OCO3HaIOT CBra3aHbIe C 3TtM OnaCHOCTN.
Heo6xOIMO npncmatpmba3aTebMn, YTO6bl OHn He ngpaJIc c pnp6opom
BHIMAHNE!IocTyNHbIe qactn MOryT HArpeBaTbcrdo BbICOKo TEMpepaTpybl npu nCNoJIb3OBAHn BApOHybIX npucNOC6JeHn.
TEXOBCJLYJKBBAHNE
- Пара поведенем Лобьх работ по Тхиескому обслуживаимю лим уостke, оTKЛЮЧИТЕ усточп STBO OT јЕКтческOTO петаши.
- Bылпоггийт e tцаTeNbHoe n CBOeBpeMeHHoe TExNHyeCKOE o6cIyKnBaHne ФильТров,придерЖИВась ГаФиka, peKOMeHДОВaHHOrO пОиЗБоДТeЛeМ.
-ДячNTК NOBepxHOCTeEN BbITaKKN IOCTaTOUHO NcNoIb3OBAb BJIaXHyOBETOsb HNeITpAlbHoe XnIDKOE MOIOUe CpeDCTBO.
OuNTky n Texo6cnykBaHne, Bo3JaaraUzncEa Ha noJb30BaTeJIa, He DoJIxHbI BblONHrTb DeTn 6e3 npICMOTpa B3pOCJIbIX;
B CJIyAE HEBbIINJHEHNA BblSEYKA3AHhbIX IPEdINCAHNI, IPON3BOIDNTIEL OTKIOHRET KAKYIO-JI5O OTBETCTBEHHOCTb. IcNoJIb3OBAHNE:
-Данhoe yctpoiCTBO cnpoeKTHPOBAHO dny NCNoJIb3OBaHnB KaueCTBe BCACbIBAIOUeI (BbIBoD BO3dyxa HapyKy) nIn FNJIbTPYIOUeI (peunpkyIpyIByBa BO3dyxA B NOMEuEHN) BbITJxKN.
BAPNAHT C ACINPAUEN:ДЯ NOJUyeHnB Bercn BCacbBaOuSeB bITJXKNI, POKJIIOHTe BXODHoe OTBepCTne DBrAteJIa, C NOMOUII IOI6KOJ IIN JxecTKoI Tpy6bl NOxOJaIero BVHytpenHero DnaMeTpa, He MeHee 120 MM, K HApyXHOMy BbIBODY napOB n3anaxOB.
Приимechаиме.СнIMITE BO3MOXHbI aHTn3aAnxObIe ΦиЛьТрbl HaakTINBIPOBaHHOM yrIe.
BAPNAHT C ΦNJbTPALIEN: B clyuae oTcyTCTBnB 03MOxHOCn BblBOda DblMOB HApJy, MoJHO NcNoIb3OBA Tb ΦNJbTPyUoSyu BepCnO BblTjXKn. B TaKoB BepCnN BO3dYx N napbO uOnaHOTc aHTn3aPaxOBbIMn ΦNJbTpAmn Ha AKTNBvPoBaHOM yIe N BO3BpaUaOTcB INpOCTpaHCTBO C NOMOu bO6OKOBbIX peWetOK a3paunBHeNTnJIaUHOHH Tpy6bl.
AknBaunIHTeHCBHOrOpexKIMa
BbITARKKI
(A)
(B)

Функци ИNTeHcNbHOro peKIma BbITJxKn C yCTaHOBJIeHHbIM BpeMeHem
cpa6aTaBbAHn
Функци ИnteHcINBHO rpeKIMa BbITrJkN C yCTaHOBJIeHHbIM BpeMeHem Cpa6aTbIBaHnR - 3TO ORpaHnueHHbI BpeMeHem peKIM pa6oTbI, B TeUHeN KOTOPORO BbITrJkKa pa3BnBaET MAKCImaJIbHyIO npOn3BOIDTeJIbHOCTb. AKTUBaZnI INHTeHCINBHO rpeKIMa BbITrJkKn IPOUCXODNT BpaUeHNEM pUKN (B) no YacOBoi CTpeJIke n3 NpOJOKeHn 3. PnI AKTUBaZnI peKIMa INHTeHCINBHO CKOpOCTn, NO ppoJeCTBnYcTAHOBJIeHHOrO BpeMeHn, pUcKa aBTOMaTHeCKn BO3BpaUaETCn B NpOJOKeHne 3. INHTeHCINBHa cKOpOCTb MOxET b6bIT oKJIuOHeHa NOBOPOTm pyUKN (B) npOTNB YacOBoi CTpeJIkn. No NcTeUHeN INHTeHCINBHOpeKIMe, nO yMOJIuaHIO BOCCTaHaBJIbNAeTc TpeTBAckopOCTb.
EMKOCTHA KHONOUHAR NAHEJIb 2 DIGIT HA 10 KHONOK:

A

B

C

D

E


F

G

H

1

L
BnraHna Ha 3ofoekTbHBOCTb BbITaXKN, MoKe TaKKe npNBECTN K OnaCHOCTN
BO3HnKHOBeHnI NOXapa.
YXOД 3A BHEUSHEN NOBEPXHOCTbIO:
BHeuHn H BuTpeHHa YNCTKa BbITXKn DOnJXHa IPOBOINbCc NcIOnlb3OBAHmE BnAIXHO BToUHN HeItpaJIbHOro MOUeero CpeIcTBa, KaterOpunCeckN 36eRa npImeHEnna pactBopnteNei nIa6pa3NBbIX BeueCTB. PekomeHdyetcN cNoJIb3OBaTb CneuaJIbHbIe CpeIcTBA, CoBNIODa npInBeDeHHbIe Ha HNX yka3AHn. PekomeHdyetcB bIIOJIHrTa YNCTKy BbITXKn, BbITnpaCR TaJIbHyIO
NOBepxHOCTb NO HappaBHeHIO OTdJIKN.
CHCTKA METAJINUeCKNX ΦINbTPOB:
Ocofoe BHIMaHHe cIeDyET yIeIaTb MeTaIINueCKIM aHTNXnPOBbIM fNtBtpyIOUcM naneLam. HAcONneHne XnPOB BHyTpNI fNtBtpyIOUx naneNei, KpOME HeraTnBHO RnHNHn Ha 3ΦΦeKTHBHOCTb BbITXKKN, MOKe TaKKe npINBeCTN K ONaCHOCTN BO3HNKHOBEHn IOKapa.
Дя ИСКПЮЧЕНИА BO3MOЖHOCTN BO3HNUKHOBEHЯ NOJAKA,ФИЛБТРБI DOЛЖНБI ПЕПОДИЧЕСКI NOДВЕРÀТСЕ OЧИСТKE, He pexe ODHORO pa3a B Meciц NiN YuASe, B Cnyuae OCOбО ИNTEHCUHBON 3KcPnPyatauIN yCTpoICTBa.
OnpeJIbMbIcNOJb3yEMOBBbITJXKN, cIeNyET CHIMaTb IoohepEno NO ODNOMY fNtpy, KaK NOKa3aHO Ha PnCyHKax pRdOM. TtateJIbHO Ipomblb fNtbpH HeINTPaJIbHbIM MOIOUIM CpeCTBOM, BpyHyIO INB NOCyDOMoeHNO MaUNHe. YCTaHOBVtB fNtbpO6paTHO, oBaPaJgA BHNMaHne Ha To, YTObI pyUka bbla HAnpabJIeHa KnapyKn BbITJXKN.
3AMEHA YTOJIbHbIX ΦIIbTPOB: (ToIbKO dIyBaVapnAHT cΦIJIbTaPauNei BO3dyxa)
YroIbHbIe fIbTpbl ImeIOT OcO6eHHocTb 3aIepKINBaTb 3anaxn Do TOro MOMeHTa, NOKa yroIb He IocTirHer TPOBHa HacbIeHn. Ix HeJIb3a MbITb N BOCCTaHaBJIuBaTb, IO3tOMy peKOMeHNdyETcN IX 3aMeHa He pexe OJHO ra3a B WeCTb MeCaeB INIy aUe, B Cnyuae OcO6O nHTeHCINBbIX ycIOBn NCIOJIb3OBAHn BbITXKN.
Ipeed hauanom onepaun ybeintecb, yTO BbITXKa OTKnHueHa OTeKtpocetn.
Дя дocуракиьтамсakTNBnPoBaHHbIM yIeM Heo6xOdIMO ChTb MeTaJIHueCKne ФильТрbl, KaK yka3aHO BblIe. C nOMOtsIO nIIIOCTpaUOnpeJeITb Habop yroIbHbIX ФильТрOB, BXODaUx B KOMNKeTAuIO BblTJKKN.
B clyuae tapelbHaTOro fInIbTppa DoCTaTOH NOBepHyTb Ha 90^ Dba fInIbTppa, KaK noka3aHO Ha PnC. A, a 3aTeM N3BneYb nx n3 CBOero rHe3da. B clyuae natpoHHoro fInIbTppa, 3akpenIIeHHoro c nomOuBIO npyXnH, (Pnc.B), HadaBVtB TaK, YTo6bl ppeOJIoTe b COnpOTNBHeHne npyXnHbI, a 3aTEM CHrTb fInIbTp.
B cnyae npatponHoro fnnbtpa, boknpoBaHHoro ckobn np e3bboBo pyko (Pnc. C), oTKpyTNb pyky, BbInyTb fNKcnpuOuyo ckoby, a 3aTeM cHrTb fnnbTp c AKTNBnPoBAHHbIM yIeM. YcTaHOBt bYroNbHbIe fnnbTpbl mEtalnHeCKne IpOTNBOXnPoBBie fnnbTpbl, BblONHra paHee onncAHhbIe Oepaunn B o6paTHOM nopJKe.
3AMEHA JAMN:
Ipeed npoBeHeHem IIObIx pa60T NO TEXHnueckomy 06cIvXnBaHnO N/ Nn OYnCTKe BceTdA OTKnIOaHte
BbITAAKKYOT3JIeKTPnueckoCetN
B 3aBcIMOCTN OT MOJIIN BbITJIKKa MOKET 6bITb OCHAUHe pa3JIuHbIMn TINAmN OCBTeNTeNbHbIX
Pnip60pOB:CBETOIOIDhbIMNINIraIOReHHbIMNJAMnAMN.
a) CBeToIOIOHbIe IaMnbl: CBeToIOIOHbIe NCTOHNKcBETA rapaHTnpHyOT 60JIbUoE KOINueCTBO qacOB pa6Obl. B cIyuae 3aMeHbI IaMnbl NO npuNHe uHocA INHeNCnPpABHOCTNI HeoBXODIMO 3aMeHNTb CBETINbHNIKZeINKOM.B 3TOM cIyuae LyuHSe O6paTtbc8 3aKBaINOpuROBaHHo TExNHueCKO NOMUbIO. 3TOT npi6op OCHaUeH CBeToIOIOHJ lamPoNc6eblm CBeTOM KlaCCa1MBcooTBetCTBnCOcTaHapTomEN60825-1:1994 + A1:2002 + A2:2001; MaKcImaJIbHaN 3JIyuaeMaonOTNUeCKa MoUHOCtB @439nm: 7μBT.He cmOTpeTb Ha IaMnpy, nCIOJIb3yra ONTIueckme INHCTPymEtbl (6HnOKJIb, lyna...).
b) FanoerHbIe JAMbl: JAMnC KpeJIeHem G4, MOUHOCTbIO 20 Bt N HApJxKeHem 12 B. UTo6bl 3aMeHNTb JAMnC, C NOMOUsbIO OTBepTKn CHrTb ONOPHoe KOJIbTO CTekJIa CBETNJbHnka. IocJne CHrTmC TcEKJa BBHyTB DeΦeKTHyIO JAMnY IN3 HHe3Da N YcTaHOBtB HOByIO. YcTaHOBtB Ha MeCTO CTekJIO CBETNJbHnka, 3a6NOKIpOBab ero KOJIbCuM.
KoI ILCOS: HSG/C/UB-20-12-G4
YTNIN3ALUNO330RAEE):

Co2nacHo cm. 26 3aKoHodameJIbHOzo deKpema N9 49 om 14
Mapma 2014 zoDa «IcnoJHeHue dupeKmueB1 2012/19/EC o6
ymuJuaquu omxodo8 3JeKmpoHNO zu 3JeKmpuueckozo
obopydoBaHna (RAEE)»
Instruction booklet (EN)
L (AR)
Mode d'emploi (FR)
Instruction booklet (EN)
L (AR)
Mode d'emploi (FR)