
HR2355/09 - Pasta machine PHILIPS - Free user manual and instructions
Find the device manual for free HR2355/09 PHILIPS in PDF.
| Product type | Pasta maker |
| Brand | Philips |
| Model | HR2355/09 |
| Dimensions (L x W x H) | 215 x 343 x 300 mm |
| Net weight | 6.9 kg |
| Power supply | 220-240 V, 50 Hz |
| Motor power | 200 W |
| Maximum flour capacity | 500 g per batch |
| Available portions | ~300 g (1-2 servings) or ~600 g (3-4 servings) |
| Production programs | Automatic (kneading + extrusion) and extrusion only |
| Preparation time | ~10 min for 300 g, ~15 min for 600 g |
| Types of pasta possible | Regular pasta, egg pasta, vegetable pasta |
| Included shape discs | Spaghetti and fettuccine |
| Provided accessories | Main unit, lid, mixing chamber, mixing paddle, disc holder, 2 shape discs, flat cleaning tool, flour cup, water cup |
| Main material | Plastic |
| Cleaning | Removable parts hand washable, do not put in dishwasher, do not immerse main unit |
| Safety | Safety button on the front and lid, automatic shutdown if incorrect assembly detected |
| Recommended continuous operation time | 45 minutes maximum, then 15 minutes rest |
| Warranty and service | Consult www.philips.com/support or contact Consumer Service |
| Recycling | Do not dispose with household waste, follow local regulations |
Frequently Asked Questions - HR2355/09 PHILIPS
User questions about HR2355/09 PHILIPS
0 question about this device. Answer the ones you know or ask your own.
Ask a new question about this device
Download the instructions for your Pasta machine in PDF format for free! Find your manual HR2355/09 - PHILIPS and take your electronic device back in hand. On this page are published all the documents necessary for the use of your device. HR2355/09 by PHILIPS.
USER MANUAL HR2355/09 PHILIPS
Always there to help you
Register your product and get support at
www.philips.com/welcome

HR2355/09
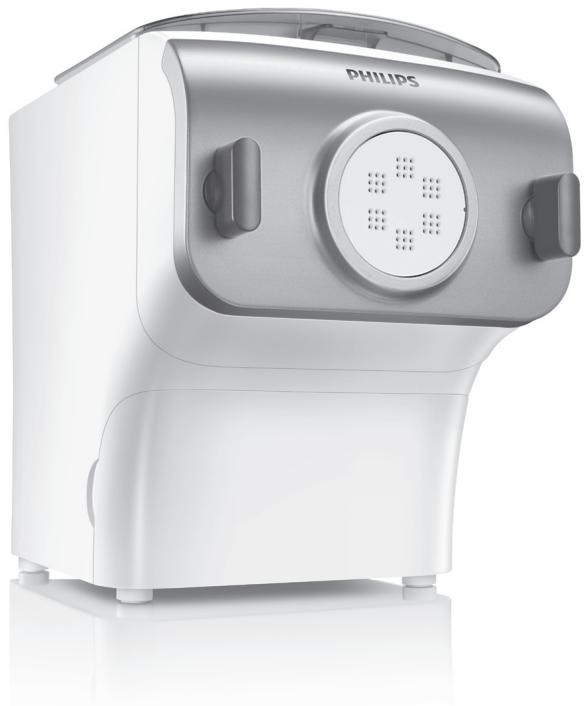
natural_image
White Philips kitchen appliance with a circular control panel and side buttons (no visible text or symbols on the device body)EN User manual 2
Congratulations on your purchase, and welcome to Philips!
To fully benefit from the support that Philips offers, register your product at www.philips.com/welcome.
Read this user manual carefully before you install and use the unit. Save it for future reference.
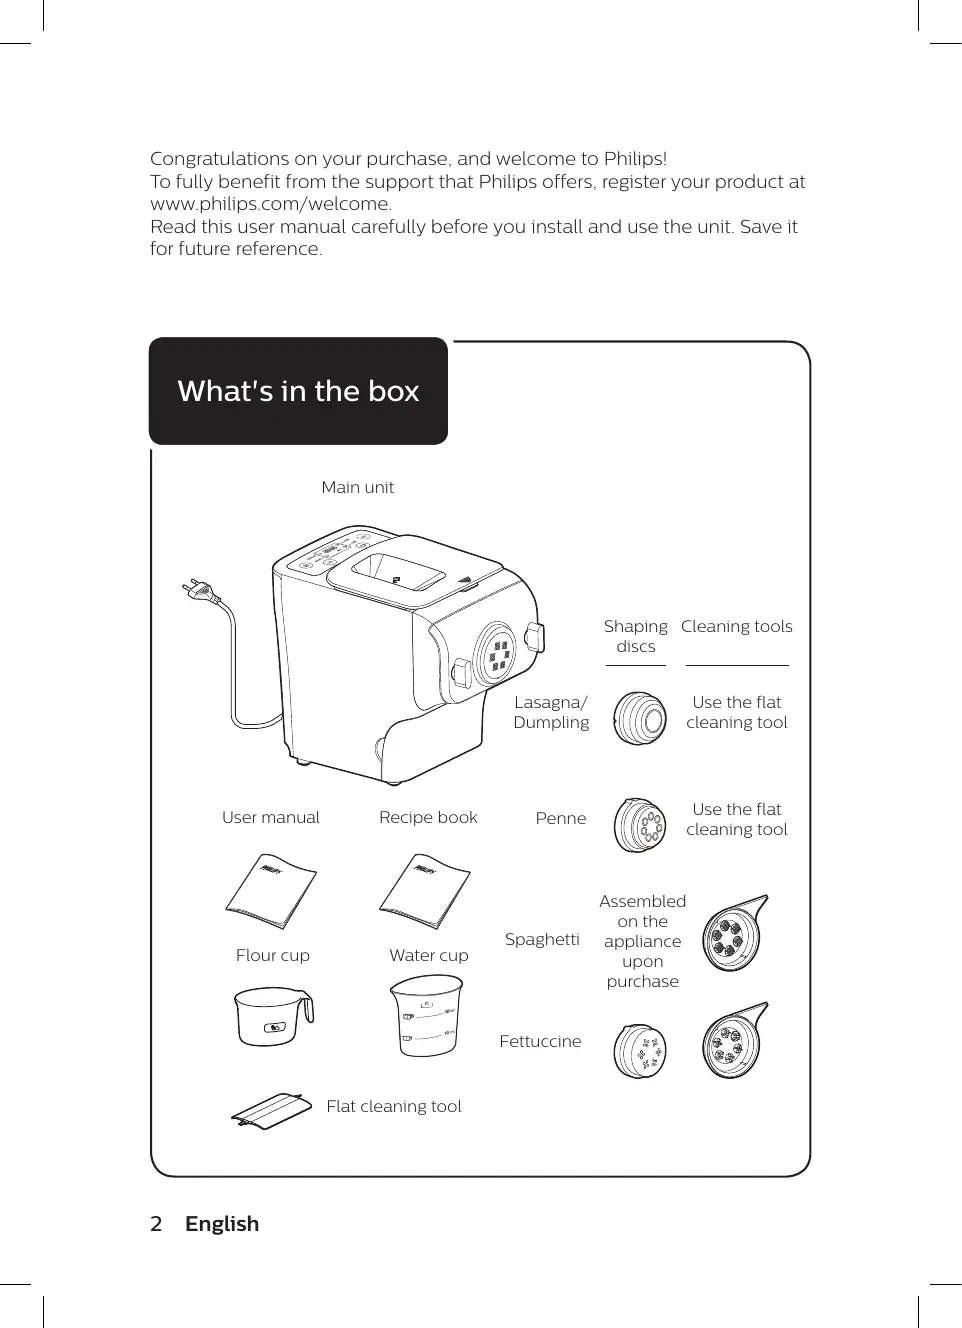
What's in the box
Main unit

natural_image
Line drawing of a Lasal Dumer machine with power outlet and control panel (no text or symbols on the device itself)Lasagna/Dumpling
Shaping discs
Cleaning tools

Use the flat cleaning tool
User manual
Recipe book
Penne

Use the flat cleaning tool
Flour cup
Water cup
Spaghetti
Assembled on the appliance upon purchase

Fettuccine

Flat cleaning tool
2 English
Contents
What's in the box 2
Important 4
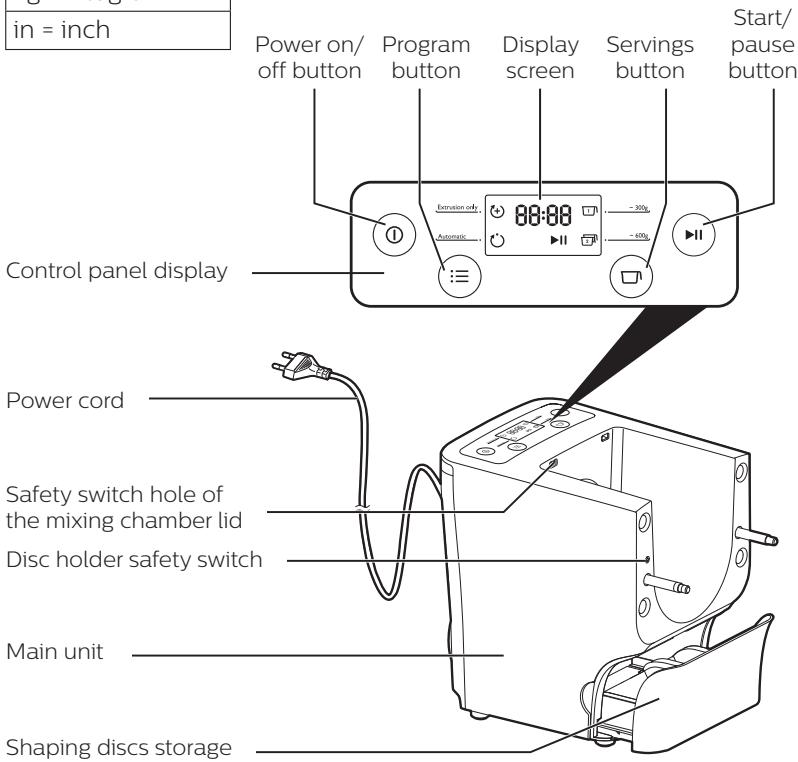
Overview 8
Disassembling and cleaning before first use 10
Assembling 12
Using the Pasta maker 14
Cleaning 20
Troubleshooting 23
Product information 25
Recycling 25
Guarantee and service 25
Important
Safety
- Read this user manual carefully before you use the appliance, and save it for future reference.
Warning
- Before you connect the appliance to the power, make sure that the voltage indicated on the bottom of the appliance corresponds to the local power voltage.
- Make sure that your hands are dry before you insert the plug into the power outlet.
- Make sure that the plug is firmly inserted into the power outlet.
- Never connect this appliance to a timer switch.
- Before you insert the plug into the power outlet, make sure that the appliance is assembled correctly.
- If the power cord, the plug, or other parts are damaged, do not use the appliance.
- If the power cord is damaged, you must have it replaced by Philips, a service center authorized by Philips or similarly qualified persons to avoid a hazard.
- Do not replace parts of the appliance yourself.
4 English
Warning
- This appliance shall not be used by children. Keep the appliance and its cord out of reach of children.
- This appliance can be used by persons with reduced physical, sensory or mental capabilities or lack of experience and knowledge if they have been given supervision or instruction concerning use of the appliance in a safe way and if they understand the hazards involved.
- For their safety, do not allow children to play with the appliance.
- To prevent any accidents, do not use the appliance if it is damaged for any reason.
- Always disconnect the appliance from the supply if it is left unattended and before assembling, disassembling or cleaning.
- Switch off the appliance and disconnect from supply before changing accessories or approaching parts that move in use.
Caution
- Before using the appliance for the first time, disassemble and wash the accessories thoroughly (see “Disassemble and cleaning before first use” section.)
- The appliance is intended for household use only.
- Do not use this appliance on an unstable or uneven surface.
- Do not disconnect the power cord before processing is complete. If you have to stop processing, disconnect the power cord before you perform other operations.
- To better protect the lifetime of the appliance, we recommend the continuous working time to be less than 45 minutes. You can restart using the appliance after 15 minutes.
- If you intend to use the appliance continuously, clean the shaping disc with the supplied cleaning tool each time after use. For cleaning ease, do not soak the shaping disc into the water directly.
- Do not bend the power cord forcibly, jerk, twist, bundle nor put under heavy items.
- Do not put metal or flammable objects in the mixing chamber.
- Unplug the appliance when not in use.

Caution
- Do not use the appliance near flammable objects such as table cloth or drapes.
- Pull out the power plug immediately when you detect smoke.
- When unplugging the power cord, do not pull the cable but grab the plug part.
- Keep the power plug clean.
- Do not put heavy objects on the appliance.
- This appliance is designed as consumer kitchen appliance. Do not use for any other purpose
- Do not move the appliance while it is operating.
- Disconnect the power and remove the power cord before cleaning or disassembling this appliance.
- Do not immerse the main unit in water.
- Place the appliance in a dry and well ventilated place after use.
- To prevent a short circuit or an electric shock, do not pour water or any liquid into the safety switch.
- Do not use a dishwasher to clean the machine or the accessories.
EMF
This Philips appliance complies with all applicable standards and regulations regarding exposure to electromagnetic fields.
Overview
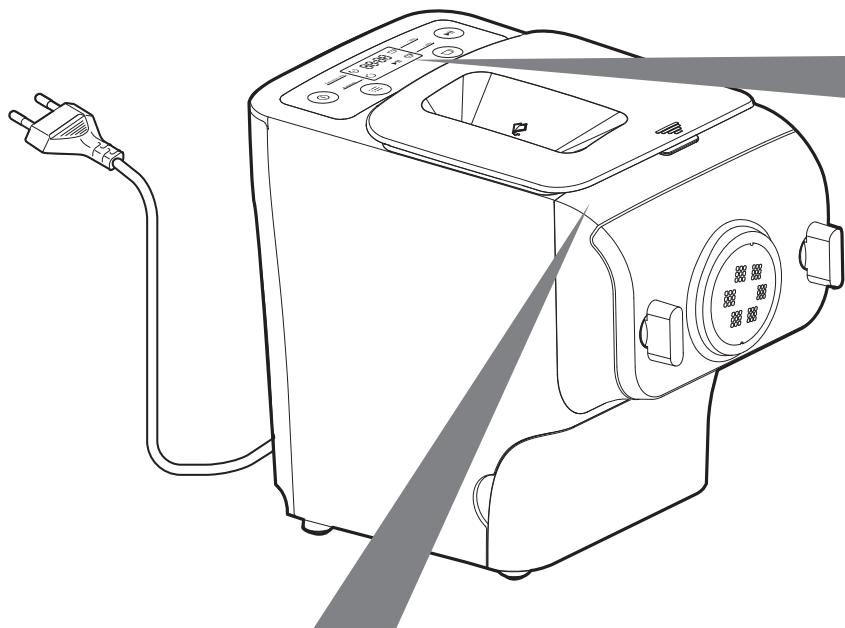
natural_image
Line drawing of a kitchen appliance with a power outlet and control panel (no text or symbols)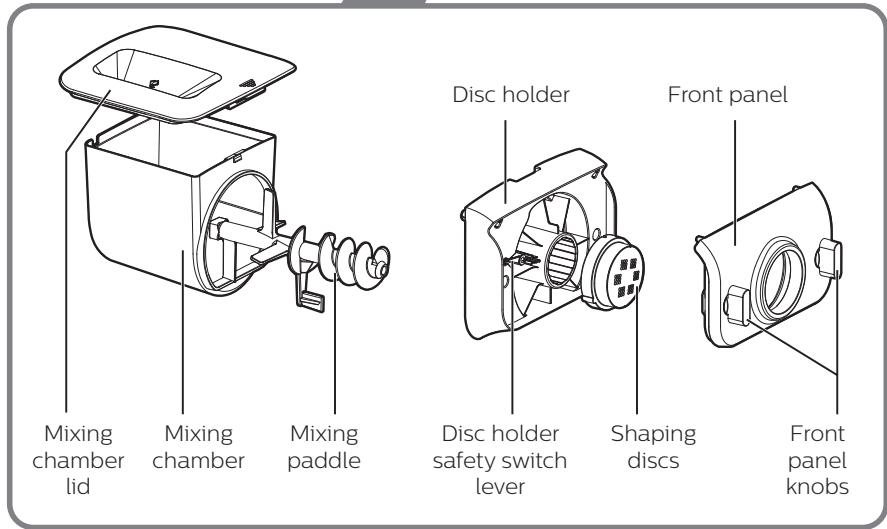
| Abbreviations |
| g = grams |
| ~ = approximately |
| ml = milliliters |
| mm = millimeters |
| kg = kilogram |
| in = inch |
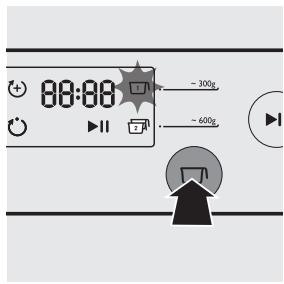
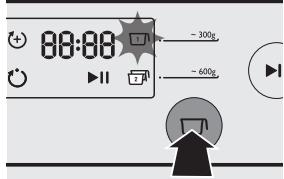
Program button - select the extrusion-only program ⏻ or automatic program ⏻.
Servings button - select 1 to make \~ 300g, 1-2 servings or 2 to make \~ 600g, 3-4 servings of fresh pasta.
Disassembling and cleaning before first use
Important
- Before using the appliance for the first time, remove and safely discard any packaging material and /or promotional labels.
- Take out all the parts and accessories, wash and thoroughly dry all parts and accessories (see "Cleaning" section).
- Do not use water to rinse or soak the main unit.
- Do not use a scourer or similar cleaners as these will scratch the plastic surface and affect the lifetime of the Pasta maker.
- This appliance is intended for household use only.
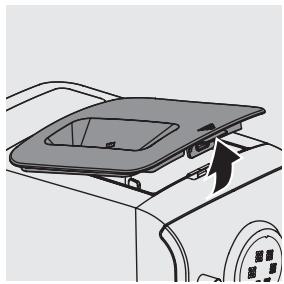
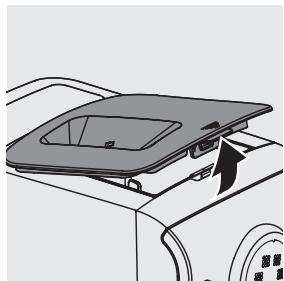
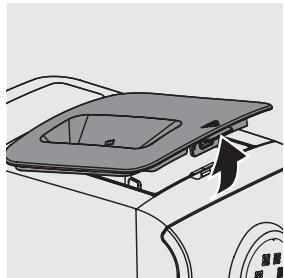
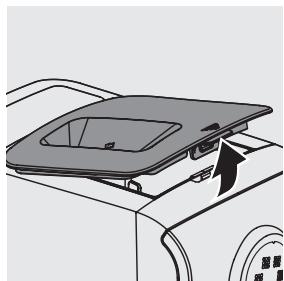
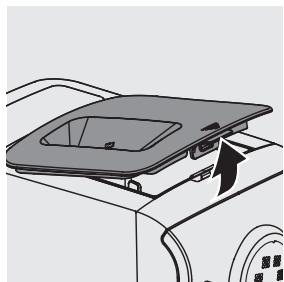
1 Remove the mixing chamber lid from the appliance.
natural_image
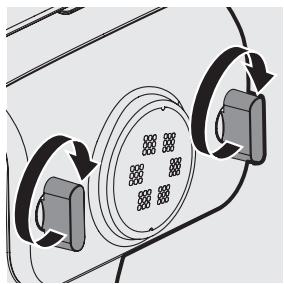
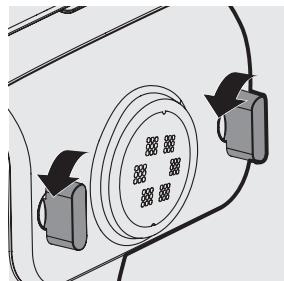
Diagram of a car interior showing a lid and vent, with no visible text or symbols2 Loosen the front panel control knobs.
Note:
- The front panel is heavy. Take extra caution when removing it.
natural_image
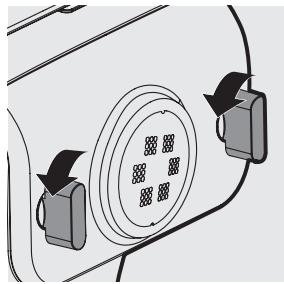
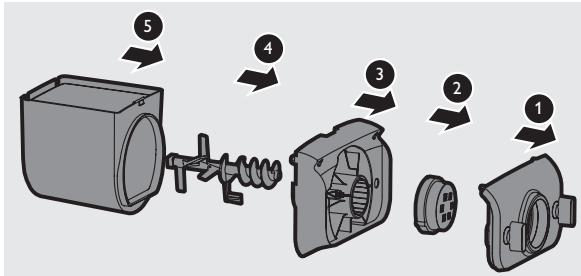
Diagram of a vehicle's rearview mirror with two directional arrows indicating rotation (no text or symbols)3 Disassemble the front panel, the shaping disc, the shaping disc holder, the mixing paddle, and the mixing chamber in order.
4 Clean all detachable parts, and wipe them dry.
natural_image
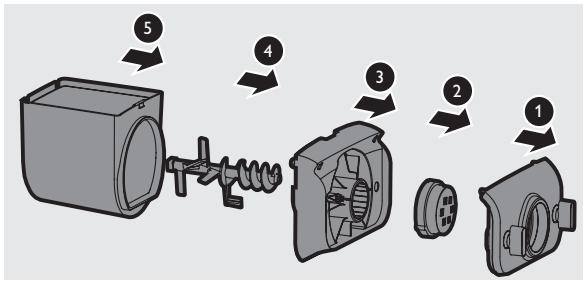
Two technical illustrations of a mechanical device with a handle and internal components, shown from different angles (no text or symbols present)Assembling
Follow below assembling steps to install the Pasta maker.
Important
- Make sure to tighten the front panel knobs during assembly.
- Make sure the appliance is not plugged in when assembling the appliance.
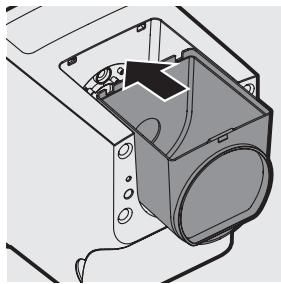
1 Push the mixing chamber into the appliance.
natural_image
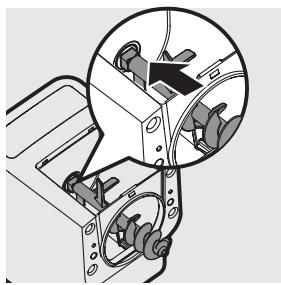
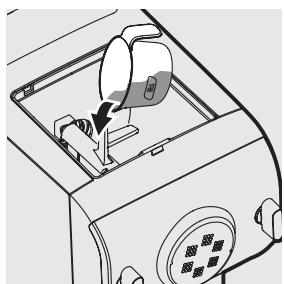
Technical line drawing of a mechanical assembly with no visible text or symbols2 Point the mixing paddle to the hole in the main unit. Insert the mixing paddle all the way into the main unit.
natural_image
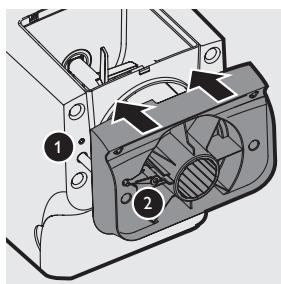
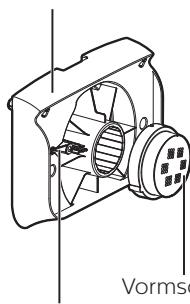
Mechanical assembly diagram showing a motor with rotating components and a magnified inset highlighting a specific component (no text or symbols present)3 Attach the disc holder onto the appliance.
① Disc holder safety switch
② Disc holder safety switch lever
Note:
- Check that the safety switch ① and safety switch lever ② are set as shown in the illustration to the right.
12 English
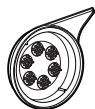
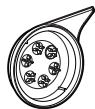
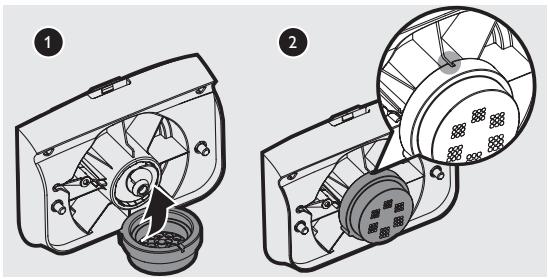
4 Put the shaping disc onto the disc holder ①, and make sure it is firmly fixed on the disc holder ②.
Note:
• Make sure the inner cavity of the shaping disc and disc holder is properly fitted.
natural_image
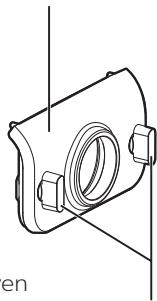
Two technical diagrams of a fan or fan assembly, showing internal components and mounting holes (no text or labels)5 Attach the front panel to the main unit.
① Disc holder safety switch lever
Note:
- Make sure the front panel is completely fastened before using the appliance.
- The front panel is heavy. Take extra caution when assembling it.
natural_image
Diagram of a device interior showing internal components and directional arrows (no text or symbols)6 Fasten the front panel control knobs.
Note:
- If the front panel or the shaping disc is not properly assembled, the safety switch will prevent the appliance from working.
natural_image
Diagram of a car interior showing circular components and directional arrows indicating rotation or movement (no text or symbols)7 Close the mixing chamber lid properly.
Note:
- If the mixing chamber lid is not properly installed, the safety switch will prevent the appliance from working.
Using the Pasta maker
Important
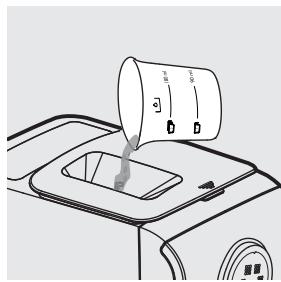
- Make sure to follow the right order to add flour and water into the mixing chamber. Put the flour into the mixing chamber first, then place the chamber lid onto the chamber. Start the Pasta maker, and then slowly pour water along the entire length of the opening in the lid.
- Never put excessive ingredients into the Pasta maker. Otherwise, it will damage the appliance. The maximum amount of flour used for each batch is 500g.
- Do not put any ingredients that are 60^ C / 140^ F or above into the Pasta maker, nor place the Pasta maker in surroundings with high temperature ( 60^ C / 140^ F), for instance in a high temperature sterilization. This will deform the appliance.
- Never pour water into the mixing chamber before you place the chamber lid onto the chamber. Do not pour any liquids into the safety switch hole.
- Do not pour water into the mixing chamber before turning on the Pasta maker. Follow the instruction carefully to enjoy homemade pasta.
Preparing the ingredients
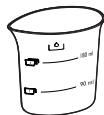
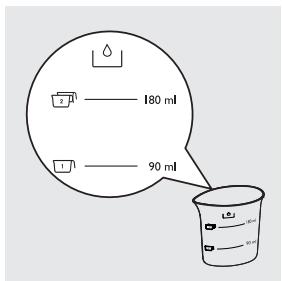
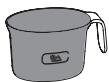
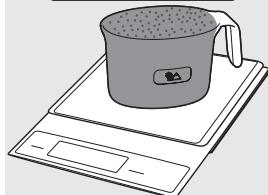
1 Measure one full cup of flour. Scrape off any excessive flour from the cup edge with the supplied flat cleaning tool. One full cup is equivalent to 1-2 servings.
Note:
- Do not shake or hit the flour cup to remove excessive flour. This will affect the flour weight.
You can also use a kitchen scale to measure the flour. For instance, \~250g flour makes approximately 1-2 servings; \~500g flour makes approximately 3-4 servings of fresh pasta.
natural_image
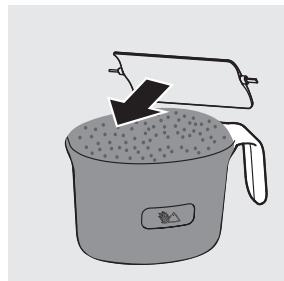
Illustration of a cooking pot with a lid and lid removed, showing a drop in grain (no text or symbols)
14 English
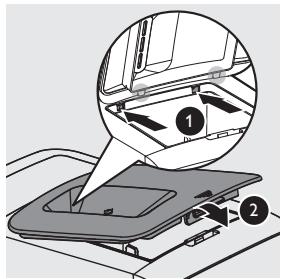
2 Remove the chamber lid.

natural_image
Diagram of a car front panel with a lid and directional arrow indicating movement (no text or symbols)3 Pour the flour into the chamber. If you want to make 3-4 servings, add a second cup of flour as you will need 2 cups (\~500g) of flour in total.
natural_image
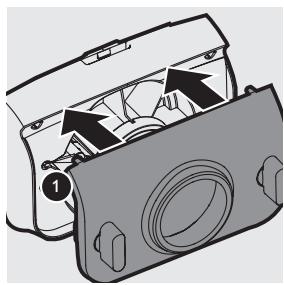
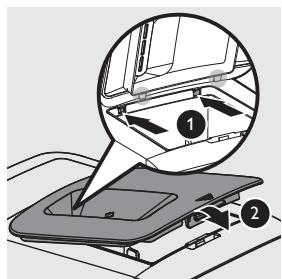
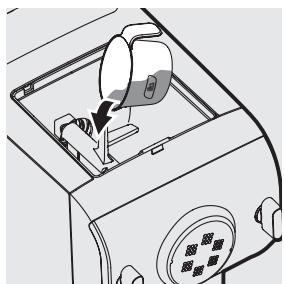
Line drawing of a device interior with a hand inserting a component (no text or symbols)4 Close the chamber lid properly.
Note:
- Insert the two hooks into the appliance first ①, and then push the lid against the main unit ②.
- The appliance will not start working if the chamber lid is not properly closed. During the pasta making process, if the chamber lid becomes loose, the appliance will automatically stop working.
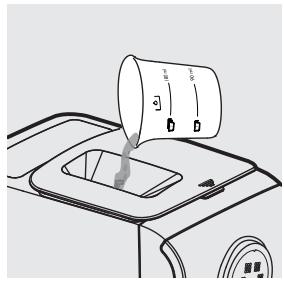
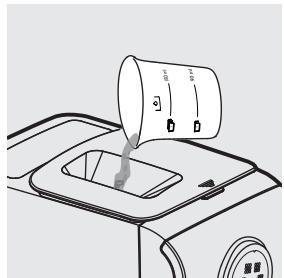
5 Use the “Pasta making recipe table” and measure the required amount of water.
Note:
- Do not pour water into the mixing chamber before turning on the Pasta maker.
- There are 2 sets of water markings on the supplied water cup. One set is for normal pasta making, and the other set is for egg pasta and other flavor pasta making.
Pasta making recipe table
For more information, you can visit www.philips.com/kitchen.
| Flour/water ratio table | ||||
| Flour | Normal pasta | Egg pasta | Processing time | Output |
| Water (marking) | Water + egg mixture (marking) | |||
 1 flour cup (~250g) 1 flour cup (~250g) | 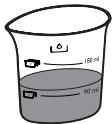 Amount of water needed for a cup of flour (~90ml) Amount of water needed for a cup of flour (~90ml) | 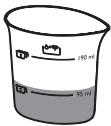 Amount of water + egg mixture needed for a cup of flour (~95ml) Amount of water + egg mixture needed for a cup of flour (~95ml) | 10 minutes | ~ 300g fresh pasta.This is sufficient as a main meal for 1-2 persons, or as a side dish for 4-6 persons. |
 2 flour cups (~500g) 2 flour cups (~500g) | 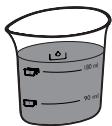 Amount of water needed for 2 cups of flour (~180ml) Amount of water needed for 2 cups of flour (~180ml) | 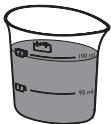 Amount of water + egg mixture needed for 2 cups of flour (~190ml) Amount of water + egg mixture needed for 2 cups of flour (~190ml) | 15 minutes | ~ 600g fresh pasta.This is sufficient as a main meal for 3-4 people, or as a side dish for 8-10 people. |
Important
- The pasta recipes provided in the user manual and recipe book have been tested for success. If you experiment with or use other pasta recipes, the flour and water/egg ratios will need to be adjusted to the flour and water cup ratios included with the Pasta maker. The Pasta maker will not operate successfully without adjusting the new recipe accordingly.
Note:
- To ensure the quality of the pasta, use gluten flour to make pasta. Follow the recommended proportion to add the ingredients.
- Seasonal changes and using ingredients from different regions may affect the flour/water ratio. You may adjust based on the recommended proportion.
- When making the egg pasta or vegetable pasta, make sure you whisk the egg mixture or vegetable juice evenly with the water before pouring into the chamber through the slot in the lid. When adding ingredients, make sure the ingredient is in a liquid form.
- See the recipe book provided for additional pasta recipe variations and many delicious new recipes to try.
Selecting the pasta making program
Important
- Do not select the extrusion-only program before the dough mixing is complete. Otherwise, this will damage the Pasta maker and its lifetime.
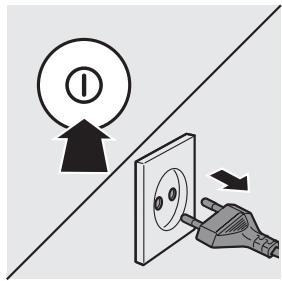
- Do not disconnect the power cord before processing is complete. If you have to stop processing, press the on/off button Ⓞ to turn off the Pasta maker and then disconnect the power cord from outlet before performing other operations.
- To better protect the lifetime of the appliance, it is recommended the continuous working time be less than 45 minutes. You can restart using the appliance after a 15 minute rest.
- If you intend to use the appliance continuously, clean the shaping disc with the supplied cleaning tool each time after each pasta making session. For cleaning ease, do not soak the shaping disc directly in water.
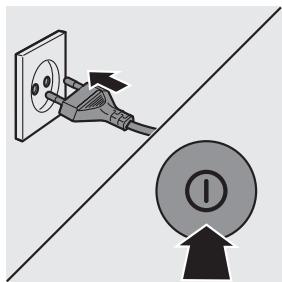
1 Connect the power plug to any 220-240V AC outlet. The Pasta maker will sound once, and all indicators will flash once. Press the power on/off button Ⓤ to switch on the Pasta maker.
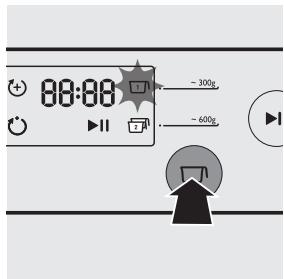
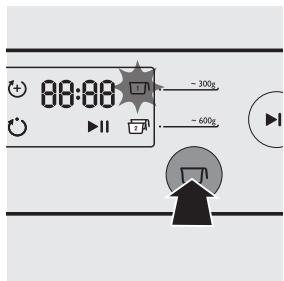
2 Based on the amount of flour, press the servings button ☑ to select 1 to make \~ 300g or 2 to make \~ 600g of fresh pasta.
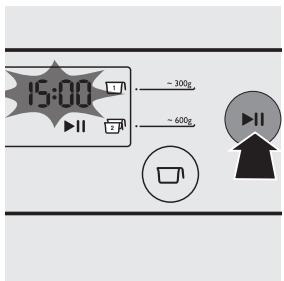
3 Press the start/pause button ⬤ to start processing, and the processing time starts to count down.
Note:
- By default, the program is set as automatic. If this is not the case, press the program button ⏰ to re-select.
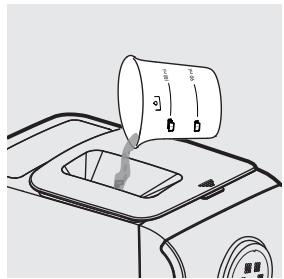
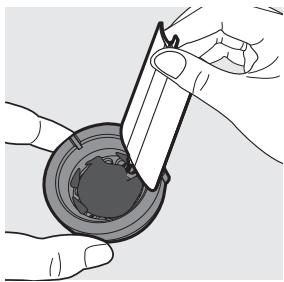
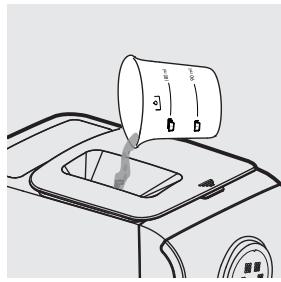
4 After the kneading starts, slowly pour in the water or water + egg mixture along the entire length of the slot in the lid.
Note:
- During dough mixing, do not add other ingredients after you have poured in the water. Otherwise, it will affect the results of the pasta texture.
natural_image
Line drawing of a car interior with a hand pouring liquid into a container (no text or symbols)5 The pasta will start extruding out after a few minutes. Place a container right under the outlet. Cut the pasta into the desired length with the supplied cleaning tool.
Note:
- You may find some fine pasta threads on the pasta surface, especially at the beginning and the end of the extrusion.
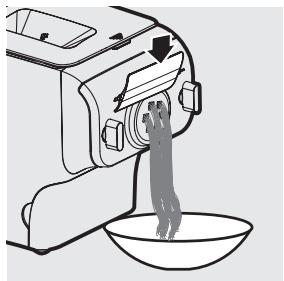
natural_image
Line drawing of a kitchen mixer with a bowl of food being poured into it (no text or symbols)- If you notice the program is not set as automatic while pasta is extruding, press the start/pause button ⏻ to stop the program. Then, press the power on/off button Ⓤ and disconnect the plug from the power socket. After cleaning the shaping discs, you can restart the process.
- If the ratio of liquid and flour is not correct, the extrusion will not succeed. In this case, prepare the ingredients again.
- Move the cleaning tool downwards to cut the pasta.
6 After the pasta making is complete, if you notice there is some leftover dough inside the chamber, you can press the extrusion-only button (+) and press the start/pause button ⏻ for extra extrusion.
Note:
- The countdown timer of the extrusion-only program is 3 minutes.
- The cooking time of the pasta varies depending on personal preferences, pasta shapes, and number of servings.
Cleaning
Important
- Disconnect the power and remove the power cord before cleaning or disassembling this appliance.
- Do not immerse the main unit in water.
- Do not use a scourer, caustic cleaners, or abrasive cleaners (for examples, gasoline, alcohol, and propanol) to clean the appliance.
- Clean the appliance each time after use, or the appliance might not operate properly.
- Take extra caution when cleaning the appliance to avoid getting cut by any sharp edges.
1 Press the power on/off button Ⓓ to turn off the Pasta maker, and then disconnect the plug from the power outlet.
2 Remove the chamber lid from the appliance.
natural_image
Diagram of a car interior showing a lid and vent, with no visible text or symbols3 Loosen the front panel control knobs.
Note:
- The front panel is heavy. Take extra caution when removing it.
natural_image
Diagram of a vehicle's rearview mirror with directional arrows indicating motion (no text or symbols)4 Disassemble the front panel, the shaping disc, the shaping disc holder, the mixing paddle, and the mixing chamber in order.
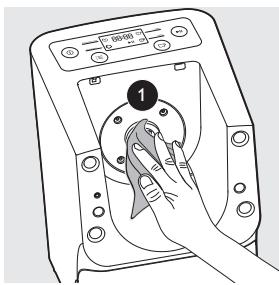
5 Use a dry cloth to clean flour residue in the hole ① where the mixing paddle is placed.
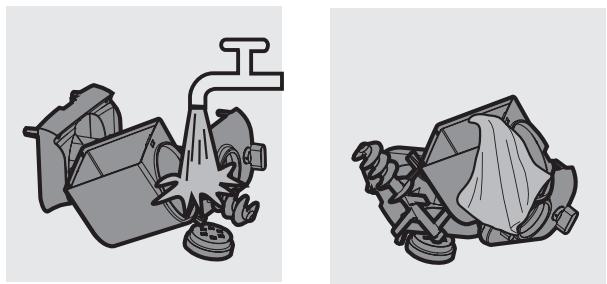
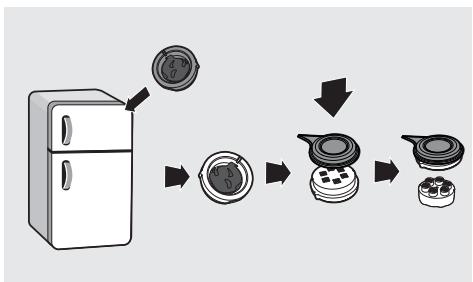
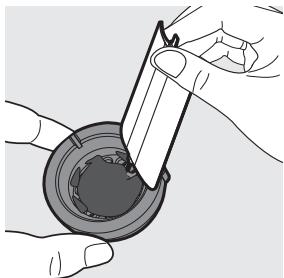
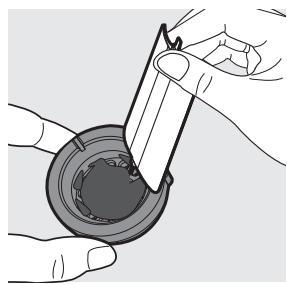
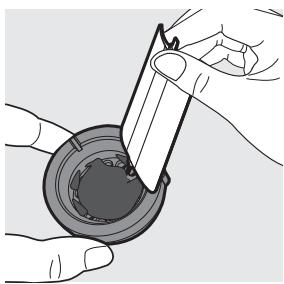
6 Clean the shaping disc with the supplied cleaning tool to remove the dough residues. After that, you can clean it with water.
Tip:
- For the spaghetti and fettuccine shaping discs, put the shaping disc into the freezer for 2 hours. Then use the corresponding cleaning tool to poke out the dough in the holes.
flowchart
graph TD
    A["Refrigerator"] --> B["Step 1: Screen with circular component"]
    B --> C["Step 2: Screen with four circular components"]
    C --> D["Step 3: Screen with four circular components"]
    D --> E["Final Container"]

natural_image
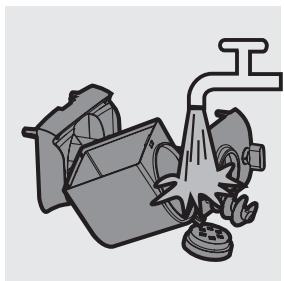
Illustration of hands using a tool to apply material to a circular component (no text or symbols visible)7 Clean all detachable parts.
natural_image
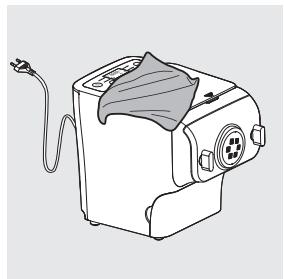
Illustration of a kitchen tool with a drain and fan (no text or symbols)8 Use a dry cloth to clean the main unit, control panel, and the exterior of the Pasta maker.
natural_image
Line drawing of a sewing machine with a cloth cover and cable (no text or symbols)9 Store the Pasta maker in a dry, well ventilated place after use.
Note:
- After cleaning, make sure all parts and the shaping disc are completely dry before storing. Assemble the Pasta maker back for next use.
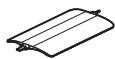
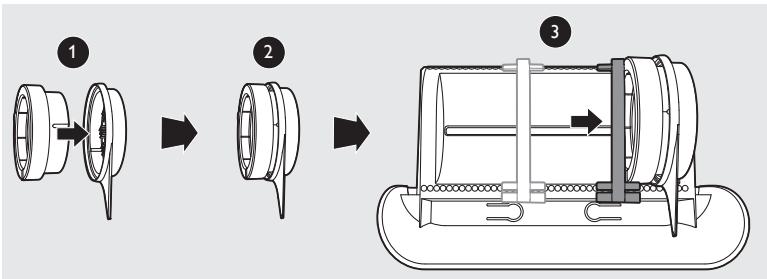
Storing the shaping discs and cleaning tools
1 Insert the shaping disc ① and cleaning tool ② together. Put ① and ② into the storage drawer. Move the sliding bar ③ to secure the shaping discs and cleaning tools.
Make sure the cleaning tools and shaping discs are dry before putting them into the storage drawer.
22 English
Troubleshooting
This chapter summarizes the most common problems you could encounter with the appliance. If you are unable to solve the problem with the information below, visit www.philips.com/support.
The indicators do not light up.
- The power plug is not connected correctly.
Check whether the power plug is plugged correctly and the outlet is working properly.
• The on/off button is not pressed.
Press the power on/off button ⓘ.
After pressing the start/pause button ⏻ the appliance sounds but it does not work.
• The chamber is assembled incorrectly.
The shaping disc, or the front panel is assembled incorrectly.
Make sure you follow the user manual to assemble all parts correctly.
• The preferred servings is not selected.
Make sure you have selected the servings before pressing the start/pause button.
The safety switch is triggered and the appliance suddenly stopped or suddenly restarts during the processing.
• The front panel knob is loose.
Make sure the front panel is securely assembled.
• Excessive ingredients in the Pasta maker.
The maximum amount of flour used for each batch is 500g. If more than 500g is added, reduce the amount of flour before next batch.
During processing, the appliance stops. There is no alarm sound or flashes.
- The Pasta maker has overheated due to long continuous working time. Disconnect from the power, and allow the Pasta maker to cool down. To better protect the lifetime of the appliance, the continuous working time should be less than 45 minutes. You can restart using the appliance after 15 minutes of rest.
The appliance stops during processing, then the indicators are flashing quickly, and the alarm sounds.
- The mixing paddle may be blocked by some foreign objects.
The dough may be too dry.
The wrong program is selected.
Disconnect from the power, clean the Pasta maker, and follow the user manual again to restart the pasta making.
Too much leftover dough inside the chamber.
- The flour is either exposed to moisture before use, or the dough is too wet.
Keep your flour dry during storage. Follow the user manual instructions to restart the pasta making. - The chamber, the mixing paddle, the shaping disc are not cleaned properly before use.
Make sure all parts are clean before use.
• The mixing paddle or the chamber is still wet.
Make sure all parts are completely dry before use.
• Water is not added in the right order.
The flour type is not suitable.
Incorrect servings was selected.
Follow the user manual instructions to make pasta.
Small amount of water is leaking out from the appliance.
• Water is added before the program starts.
Follow the user manual instructions to add water right after the program starts.
The mixing paddle is running idle, and there is no pasta coming out.
- The ratio of the flour and water is incorrect. Disconnect the plug from the power socket and discard dough. Clean the Pasta maker, re-measure ingredients correctly and follow the user manual instructions again to restart the pasta making.
Product information
| Model | HR2355/09 |
| Motor power | 200W |
| Rated voltage | AC220-240V (50Hz) |
| Dimensions (L x W x H) | 215mm x 343mm x 300mm /8.5 in x 13.5 in x 11.8 in |
| Net weight | 6.9kg / 15.2 lb |
- For rated voltage and frequency information, refer to the typeplate on the product. Product information is subject to change without prior notice.
Recycling
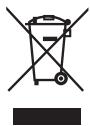
- This symbol means that this product shall not be disposed of with normal household waste (2012/19/EU).
- Follow your country's rules for the separate collection of electrical and electronic products. Correct disposal helps prevent negative consequences for the environment and human health.
Guarantee and service
If you have a problem, need service or need information, see www.philips.com/support or contact the Philips Consumer Care Center in your country.
natural_image
Line drawing of a kitchen microwave oven with a power outlet and control panel (no text or symbols)natural_image
Line drawing of a kitchen appliance with a power outlet and control panel (no text or symbols)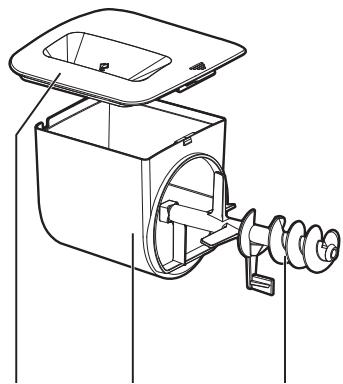
natural_image
Technical line drawing of a mechanical device with internal components and a spring (no text or symbols)natural_image
Technical line drawing of a mechanical fan or impeller assembly (no text or symbols)natural_image
Technical line drawing of a mechanical component with no visible text or symbolsnatural_image
Line drawing of a car's front compartment showing the lid and side door (no text or symbols)natural_image
Diagram of a vehicle's rearview mirror and side-mounted sensors (no text or symbols)natural_image
Two technical illustrations of a mechanical device with a handle and internal components, shown from different angles (no text or symbols present)Sestavení
natural_image
Technical line drawing of a mechanical housing or enclosure component (no text or symbols visible)natural_image
Mechanical assembly diagram showing a gear mechanism with a magnified inset (no text or symbols)natural_image
Two technical illustrations of a fan assembly showing internal components and a close-up view (no text or symbols)natural_image
Diagram of a device interior showing internal components and directional arrows (no text or symbols)natural_image
Diagram of a car interior showing circular components and directional arrows indicating rotation or movement (no text or symbols)natural_image
Illustration of a cooking pot with a lid and lid removed, showing a downward arrow indicating compression (no text or symbols)
2 Sundejte víko komory.
natural_image
Diagram of a car interior showing a lid and vent, with directional arrows indicating movement or flow (no text or symbols)natural_image
Diagram of a device interior showing a hand inserting a component into a fan (no text or symbols visible)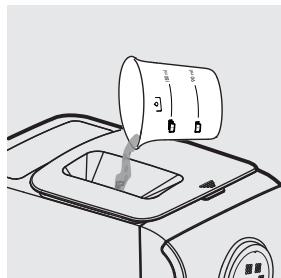
natural_image
Line drawing of a car interior with a container and directional arrows indicating flow or movement (no text or symbols)
natural_image
Line drawing of a kitchen mixer with a bowl of food being poured into it (no text or symbols)Čištění
Důležité
natural_image
Diagram of a car front panel with a lid and directional arrow indicating movement (no text or symbols)natural_image
Diagram of a vehicle's rearview mirror with directional arrows indicating motion (no text or symbols)flowchart
graph TD
    A["Refrigerator"] --> B["Cut into a circular component"]
    B --> C["Close-up of the lid"]
    C --> D["Close-up of the lid with four buttons"]
    D --> E["Final container with four buttons"]
natural_image
Illustration of hands using a tool to apply material to a mechanical component (no text or symbols visible)natural_image
Illustration of a kitchen tool with a drain and fan (no text or symbols)natural_image
Line drawing of a hairdryer machine with a cloth cover and cable (no text or symbols)natural_image
Line drawing of a kitchen appliance with control panel and power outlet (no text or symbols on the device itself)Λαζάνια/ Ντάμπλινγκ
Δίσκοι σχήματος
Εργαλεία καθαρισμού

natural_image
Line drawing of a kitchen appliance with a power outlet and control panel (no text or symbols)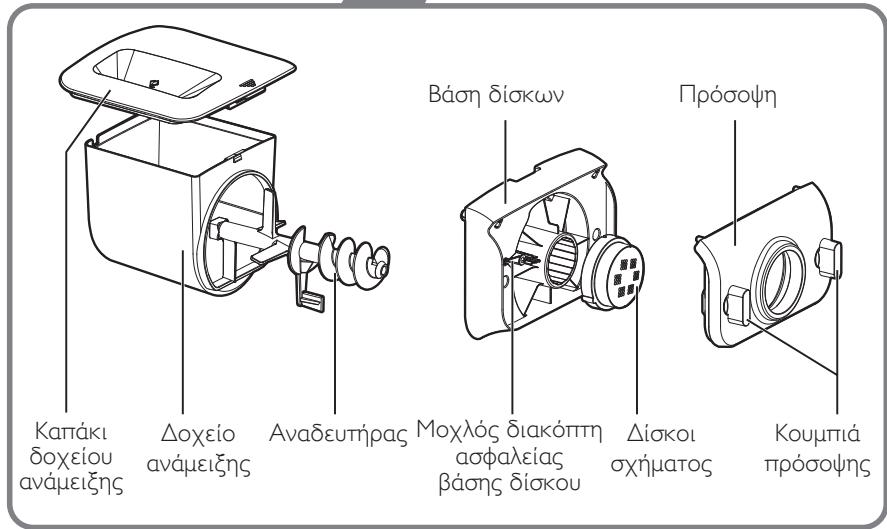
natural_image
Diagram of a car interior showing a solar panel mounted on the roof, with no visible text or symbols.natural_image
Diagram of a vehicle's rearview mirror and side-mounted sensors (no text or symbols)natural_image
Two technical illustrations of mechanical components, one showing a valve and the other a gear mechanism (no text or symbols)Συναρμολόγηση
natural_image
Technical line drawing of a mechanical housing or enclosure component (no text or symbols visible)natural_image
Mechanical assembly diagram showing a motor with rotating components and a magnified inset highlighting a specific component (no text or symbols present)natural_image
Two technical illustrations of a device with internal components, showing fan and motor assembly (no text or symbols)natural_image
Diagram of a device interior showing internal components and directional arrows (no text or symbols)natural_image
Diagram of a car interior showing circular components and directional arrows indicating rotation or movement (no text or symbols)natural_image
Illustration of a cooking pot with a lid and lid removed, showing a downward arrow indicating compression or cooling (no text or symbols)
natural_image
Diagram of a car front panel with a lid and directional arrow indicating movement (no text or symbols)natural_image
Line drawing of a device interior showing a hand inserting a component into a fan (no text or symbols)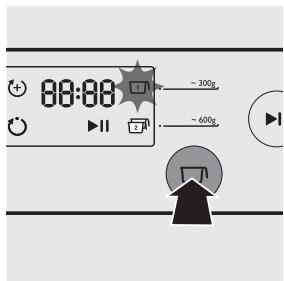
natural_image
Line drawing of a car interior with a cylindrical container pouring liquid into a tray (no text or symbols)natural_image
Line drawing of a kitchen mixer with a bowl of food being poured into it (no text or symbols)natural_image
Diagram of a car interior showing a lid and door mechanism (no text or symbols)natural_image
Diagram of a vehicle's rearview mirror with directional arrows indicating motion (no text or symbols)
flowchart
graph TD
    A["Refrigerator"] --> B["Reinforced Plate"]
    B --> C["Reinforced Stove"]
    C --> D["Reinforced Oven"]
natural_image
Illustration of hands using a tool to apply liquid or oil in a container (no text or symbols visible)natural_image
Illustration of a kitchen tool with a drain and fan (no text or symbols)natural_image
Line drawing of a kitchen machine with a cloth cover and power cord (no text or symbols)flowchart
graph LR
    A["Step 1: Component 1"] --> B["Step 2: Component 2"]
    B --> C["Step 3: Final Assembly with Internal Component"]
natural_image
Line drawing of a kitchen appliance with control panel and power outlet (no text or symbols)Lasagne/ravioli
Disques de forme
Outils de nettoyage
Mode d'emploi
Livre de recettes
Penne

natural_image
Line drawing of a kitchen appliance with a power outlet and control panel (no text or symbols)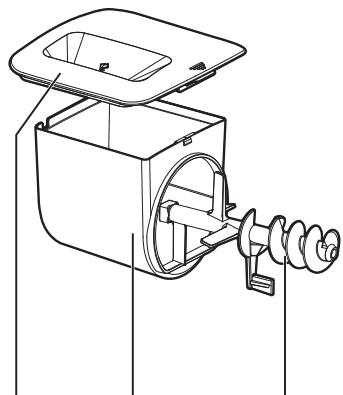
natural_image
Technical line drawing of a mechanical device with a housing and internal components (no text or symbols)natural_image
Diagram of a car interior showing a lid and seat with an arrow indicating direction (no text or symbols)natural_image
Diagram of a vehicle front panel with circular vent and directional arrows indicating movement (no text or symbols)82 Français
natural_image
Two technical illustrations of a mechanical device with a handle and internal components, shown from different angles (no text or symbols present)Assemblage
natural_image
Technical line drawing of a mechanical housing or enclosure component (no text or symbols visible)natural_image
Mechanical assembly diagram showing a gear mechanism with a magnified inset highlighting a specific component (no text or labels present)84 Français
natural_image
Two technical illustrations of a fan assembly showing internal components and a close-up view (no text or symbols)natural_image
Diagram of a device interior showing internal components and directional arrows (no text or symbols)natural_image
Diagram of a car interior showing circular components and directional arrows indicating rotation or movement (no text or symbols)natural_image
Illustration of a cooking pot with a lid and lid removed, showing a drop in grain (no text or symbols)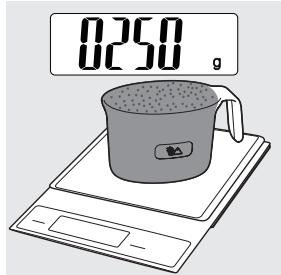
natural_image
Diagram of a car front panel with a lid and directional arrow indicating movement (no text or symbols)natural_image
Line drawing of a device interior showing a hand inserting a component into a fan (no text or symbols)Remarque :
natural_image
Line drawing of a car interior with a cup pouring liquid into a sink (no text or symbols)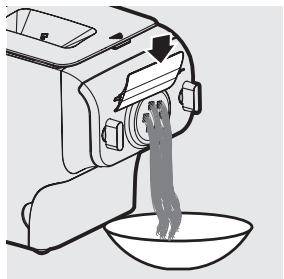
natural_image
Line drawing of a kitchen mixer with a bowl of food being poured into it (no text or symbols)Nettoyage
Important
natural_image
Diagram of a car front panel with a lid and directional arrow indicating movement (no text or symbols)92 Français
natural_image
Diagram of a vehicle's rearview mirror with directional arrows indicating motion (no text or symbols)
flowchart
graph TD
    A["Refrigerator"] --> B["Reinforced Plate"]
    B --> C["Reinforced Stove"]
    C --> D["Reinforced Oven"]

natural_image
Illustration of hands using a tool to apply material to a circular component (no text or symbols visible)natural_image
Illustration of a kitchen tool with a drain and fan (no text or symbols)natural_image
Line drawing of a hairdryer machine with a cloth cover and cable (no text or symbols)flowchart
graph LR
    A["Step 1: Component 1"] --> B["Step 2: Component 2"]
    B --> C["Step 3: Final Assembly with Internal Component"]
94 Français
Dépannage
natural_image
Line drawing of a kitchen appliance with a power outlet and control panel (no text or symbols)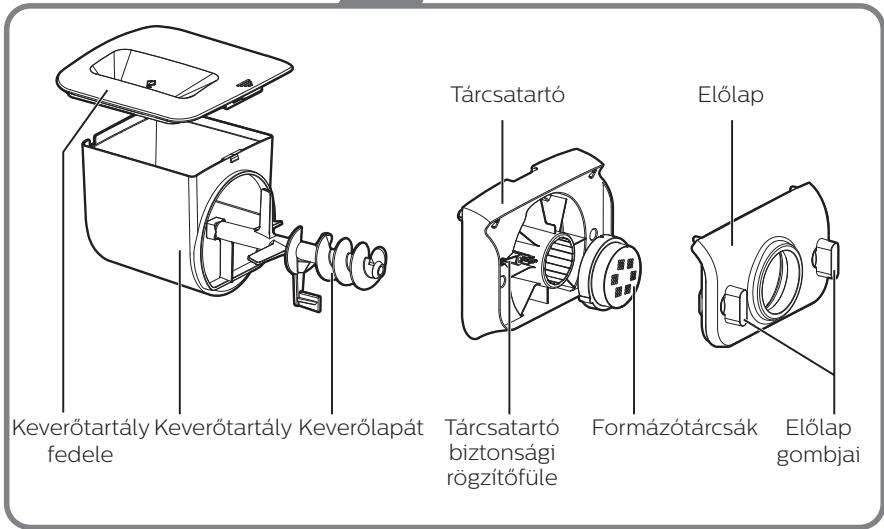
natural_image
Diagram of a car interior showing a lid and steering wheel (no text or symbols)natural_image
Diagram of a vehicle's rearview mirror with directional arrows indicating rotation (no text or symbols)natural_image
Two technical illustrations of a mechanical device with no visible text or symbolsÖsszeszerelés
natural_image
Technical line drawing of a mechanical housing or enclosure component (no text or symbols visible)natural_image
Mechanical assembly diagram showing gear and motor components with a magnified inset (no text or labels)natural_image
Technical illustration of two views of a fan assembly, showing internal components and mounting holes (no text or symbols)natural_image
Diagram of a car interior showing internal components and directional arrows (no text or symbols)natural_image
Diagram of a car interior showing circular components with directional arrows indicating rotation or movement (no text or symbols)natural_image
Illustration of a cooking pot with a lid and lid removed, showing a drop in contents (no text or symbols)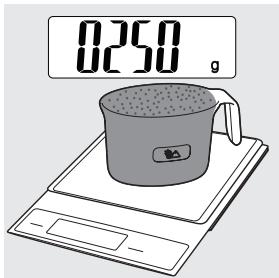
natural_image
Diagram of a car front panel with a lid and directional arrow indicating movement (no text or symbols)natural_image
Line drawing of a device interior showing a tray with a bag and a handle, no text or symbols present
natural_image
Line drawing of a car interior with a container and a pouring cup (no text or symbols)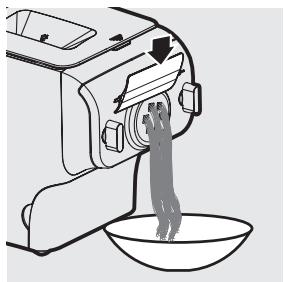
natural_image
Line drawing of a kitchen mixer with a bowl of food being poured into it (no text or symbols)Tisztítás
Fontos
natural_image
Diagram of a car front panel with a lid and arrow indicating direction (no text or symbols)natural_image
Diagram of a vehicle's rearview mirror with directional arrows indicating motion (no text or symbols)Tipp:
flowchart
graph TD
    A["Refrigerator with lid"] --> B["Cut into plastic cup"]
    B --> C["Close-up of cup with lid"]
    C --> D["Close-up of cup with lid"]
    D --> E["Final packaging with lid"]
natural_image
Illustration of hands using a tool to apply liquid into a container (no text or symbols visible)natural_image
Illustration of a kitchen sink with steam rising from a chimney (no text or symbols)natural_image
Line drawing of a kitchen electric oven with a cloth cover and power cord (no text or symbols)Hibaelhárítás
natural_image
Line drawing of a kitchen electric oven with control panel and power plug (no text or symbols on the device itself)natural_image
Line drawing of a kitchen appliance with a power outlet and control panel (no text or symbols)
natural_image
Technical line drawing of a mechanical device with an open lid and internal components (no text or symbols)natural_image
Technical line drawing of a fan or vent assembly with no visible text or symbolsnatural_image
Technical line drawing of a mechanical component with flanged ends and bolted joints (no text or symbols)Manopole del pannello anteriore
Cavo alimentazione
natural_image
Diagram of a car interior showing a lid and steering wheel (no text or symbols)2 Svitare le manopole del pannello anteriore.
Nota
natural_image
Diagram of a vehicle's rearview mirror and adjacent air vent with directional arrows indicating motion (no text or symbols)natural_image
Two technical illustrations of a mechanical device with no visible text or symbolsMontaggio
natural_image
Technical line drawing of a mechanical housing or enclosure with mounting holes and internal components (no text or symbols)natural_image
Mechanical assembly diagram showing a gear mechanism with no visible text or symbolsNota
natural_image
Two technical illustrations of a fan assembly showing internal components and a close-up view (no text or symbols)natural_image
Diagram of a device interior showing internal components and directional arrows (no text or symbols)6 Serrare le manopole del pannello anteriore.
Nota
natural_image
Diagram of a car interior showing circular components with directional arrows indicating rotation or movement (no text or symbols)natural_image
Illustration of a cooking pot with a lid and handle, showing a drop in grain (no text or symbols)0250
natural_image
Illustration of a coffee cup on a digital counter (no text or symbols)natural_image
Diagram of a car front panel with a lid and directional arrow indicating movement (no text or symbols)natural_image
Line drawing of a device interior with a hand inserting a component (no text or symbols)Nota
natural_image
Line drawing of a car interior with a container and a bucket pouring liquid (no text or symbols)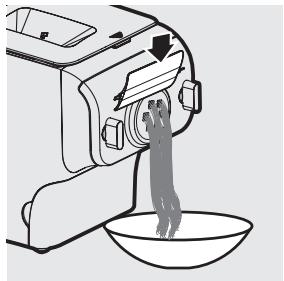
natural_image
Line drawing of a kitchen mixer with a bowl of food being poured into it (no text or symbols)Pulizia
Importante
natural_image
Diagram of a car interior showing a lid and vent, with no visible text or symbols3 Svitare le manopole del pannello anteriore.
Nota
natural_image
Diagram of a vehicle's rearview mirror with directional arrows indicating motion (no text or symbols)
flowchart
graph TD
    A["Refrigerator"] --> B["Cut into a circular component"]
    B --> C["Close-up of the lid"]
    C --> D["Close-up of the lid with four buttons"]
    D --> E["Final container with four buttons"]
natural_image
Illustration of hands using a tool to apply material to a circular component (no text or symbols visible)natural_image
Illustration of a kitchen tool with a drain and fan (no text or symbols)natural_image
Line drawing of a sewing machine with a cloth cover and power cord (no text or symbols)142 Italiano
natural_image
Line drawing of a kitchen appliance with a power outlet and control panel (no text or symbols)Vormschijven
Lasagne/knoedels

natural_image
Line drawing of a kitchen appliance with a power outlet and control panel (no text or symbols)
natural_image
Technical line drawing of a mechanical device with a housing and internal components (no text or symbols)Deksel mengkom
Schijfhouder
natural_image
Technical line drawing of a fan assembly with no visible text or symbolsVormschijven
Voorpaneel
natural_image
Technical line drawing of a mechanical component with no visible text or symbolsKnoppen voorpaneel
| Afkortingen |
| g = gram |
| ~ = ongeveer |
| ml = milliliter |
| mm = millimeter |
| kg = kilogram |
| in = inch |
natural_image
Diagram of a car interior showing a solar panel mounted on the roof, with no visible text or symbols.natural_image
Diagram of a vehicle's rearview mirror with two directional arrows indicating rotation (no text or symbols)natural_image
Two technical illustrations of industrial equipment, one showing a pipe outlet and the other a mechanical component (no text or symbols)In elkaar zetten
natural_image
Technical line drawing of a mechanical housing or enclosure component (no text or symbols visible)natural_image
Mechanical assembly diagram showing a motor with rotating components and a magnified inset highlighting a specific component (no text or labels)natural_image
Two technical illustrations of a mechanical device with internal components and mounting holes, labeled ① and ② (no text or symbols present)natural_image
Diagram of a device interior showing internal components and directional arrows (no text or symbols)natural_image
Diagram of a car interior showing circular components and directional arrows indicating rotation or movement (no text or symbols)natural_image
Illustration of a cooking pot with a lid and lid removed, showing a drop in the lid (no text or symbols)
natural_image
Diagram of a car front panel with a lid and directional arrow indicating movement (no text or symbols)natural_image
Line drawing of a device interior with a hand inserting a component (no text or symbols)
natural_image
Line drawing of a car interior with a cup pouring liquid into a tray (no text or symbols)
natural_image
Line drawing of a kitchen mixer with a bowl of food being poured into it (no text or symbols)Schoonmaken
Belangrijk!
natural_image
Diagram of a car interior showing a lid and seat with an arrow indicating direction (no text or symbols)natural_image
Diagram of a vehicle's rearview mirror with directional arrows indicating motion (no text or symbols)flowchart
graph TD
    A["Refrigerator with lid"] --> B["Cut into a circular component"]
    B --> C["Close-up of the lid"]
    C --> D["Close-up of the innermost part of the lid"]
    D --> E["Final finished product"]

natural_image
Illustration of hands using a tool to apply liquid or oil in a container (no text or symbols visible)7 Maak alle afneembare onderdelen schoon.

natural_image
Illustration of a kitchen tool with a drain and fan (no text or symbols)natural_image
Line drawing of a small kitchen machine with a cloth cover and power cord (no text or symbols)flowchart
graph LR
    A["Step 1: Component 1"] --> B["Step 2: Component 2"]
    B --> C["Step 3: Final Assembly with Internal Component"]
Problemen oplossen
natural_image
Line drawing of a kitchen appliance with a power outlet and control panel (no text or symbols)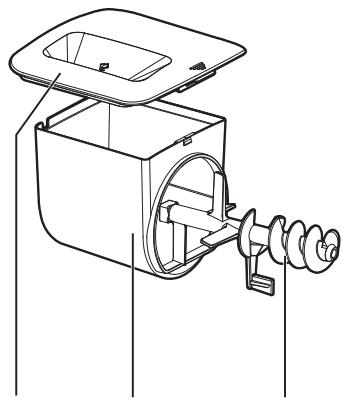
natural_image
Technical line drawing of a mechanical device with a housing and internal components (no text or symbols)natural_image
Technical line drawing of a mechanical fan or impeller assembly (no text or symbols)natural_image
Technical line drawing of a mechanical component with no visible text or symbols
natural_image
Technical line drawing of a device with labeled components, showing wiring and a plug (no text or symbols present)Разборка и очистка
перед первым
использованием
Важно
natural_image
Diagram of a car interior showing a roof cover and directional arrow (no text or symbols)natural_image
Diagram of a vehicle's rearview mirror and side-mounted sensors (no text or symbols)natural_image
Two technical illustrations of a mechanical device with no visible text or symbolsСборка
natural_image
Technical line drawing of a mechanical housing or enclosure component (no text or symbols)natural_image
Mechanical assembly diagram showing a gear mechanism with a magnified inset (no text or symbols)natural_image
Two technical illustrations of a fan assembly showing internal components and a close-up view (no text or symbols)natural_image
Diagram of a device interior showing internal components and directional arrows (no text or symbols)natural_image
Diagram of a car interior showing circular components with directional arrows indicating rotation or movement (no text or symbols)Важно
natural_image
Illustration of a cooking pot with a lid and lid removed, showing a drop in grain (no text or symbols)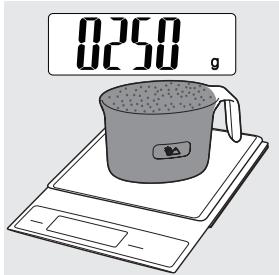
natural_image
Diagram of a car front panel with a lid and directional arrow indicating movement (no text or symbols)natural_image
Line drawing of a device interior with a hand inserting a component (no text or symbols)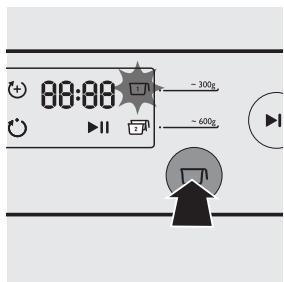
natural_image
Diagram of a car front panel with a lid and directional arrow indicating movement (no text or symbols)natural_image
Diagram of a vehicle's rearview mirror with directional arrows indicating motion (no text or symbols)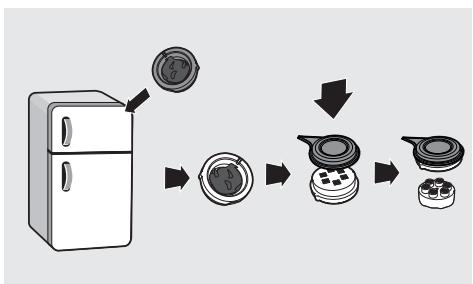
flowchart
graph TD
    A["Refrigerator"] --> B["Close-up of circular component"]
    B --> C["Close-up of circular component with internal parts"]
    C --> D["Close-up of circular component with outer rings"]

natural_image
Illustration of hands using a tool to apply liquid into a container (no text or symbols visible)natural_image
Illustration of a mechanical device with a pipe and flange (no text or symbols)natural_image
Line drawing of a kitchen machine with a cloth cover and attached cable (no text or symbols)natural_image
Line drawing of a kitchen appliance with control panel and power outlet (no text or symbols)lazane/ halušky
Tvarovacie disky
Nástroje na čistenie

natural_image
Line drawing of a kitchen appliance with a power outlet and control panel (no text or symbols)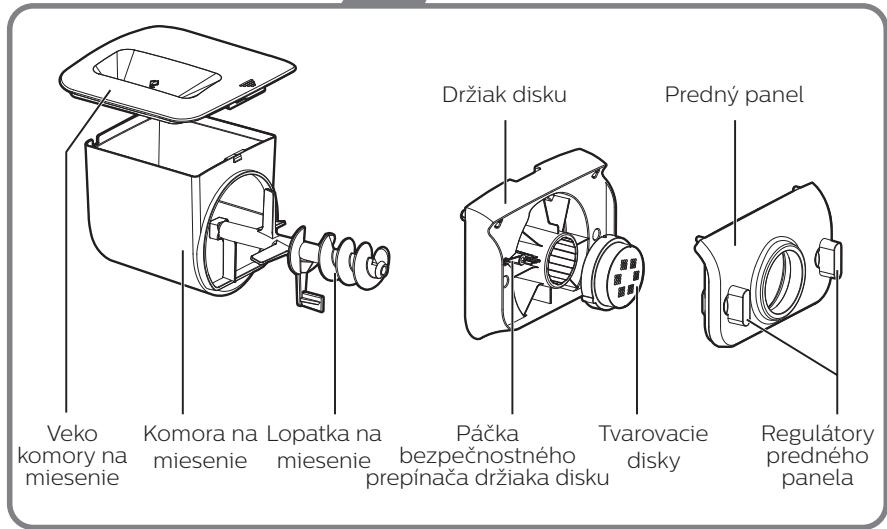
natural_image
Diagram of a car interior showing a lid and air vent (no text or symbols)natural_image
Diagram of a vehicle interior showing a circular component with four circular elements and directional arrows indicating movement (no text or symbols)natural_image
Two technical illustrations of a mechanical device with no visible text or symbolsZostavenie
natural_image
Technical line drawing of a mechanical component with no visible text or symbolsnatural_image
Mechanical assembly diagram showing a gear mechanism with a magnified inset highlighting a specific component (no text or labels present)natural_image
Technical illustration of two views of a mechanical device with internal components and mounting holes (no text or symbols)natural_image
Diagram of a device interior showing internal components and directional arrows (no text or symbols)natural_image
Diagram of a car interior showing circular components and directional arrows indicating rotation or movement (no text or symbols)Používanie strojčeka na cestoviny
Dôležité!
natural_image
Illustration of a cooking pot with a lid and lid removed, showing a drop in grain (no text or symbols)
2 Otvorte veko komory.
natural_image
Diagram of a car front panel with a lid and directional arrow indicating movement (no text or symbols)3 Múku nasypte do komory. Ak chcete pripravit 3 – 4 porcie, nasypte do komory aj druhú odmerku múky, pretože celkovo budete potrebovat 2 odmerky múky (\~ 500 g).
natural_image
Diagram of a device interior showing a hand inserting a component into a device casing (no text or symbols visible)4 Veko komory poriadne zatvorte.
Upozornenie:
natural_image
Line drawing of a car interior with a container and a cylindrical container pouring liquid (no text or symbols)natural_image
Line drawing of a kitchen mixer with a bowl of food being poured into it (no text or symbols)Upozornenie:
2 Zo zariadenia zložte veko komory.
natural_image
Diagram of a car interior showing a lid and vent, with no visible text or symbolsnatural_image
Diagram of a vehicle's rearview mirror with directional arrows indicating motion (no text or symbols)
flowchart
graph TD
    A["Refrigerator"] --> B["Cut into a circular component"]
    B --> C["Close-up of the lid"]
    C --> D["Close-up of the lid with four buttons"]
    D --> E["Final container with four buttons"]

natural_image
Illustration of hands using a tool to apply material to a mechanical component (no text or symbols visible)natural_image
Illustration of a kitchen tool with a drain and fan (no text or symbols)natural_image
Line drawing of a small electric stove with a cloth cover and power cord (no text or symbols)flowchart
graph LR
    A["Step 1: Component 1"] --> B["Step 2: Component 2"]
    B --> C["Step 3: Final Assembly with Internal Component"]
Riešenie problémov
natural_image
Line drawing of a food microwave oven with control panel and power plug (no text or symbols)natural_image
Line drawing of a kitchen appliance with a power outlet and control panel (no text or symbols)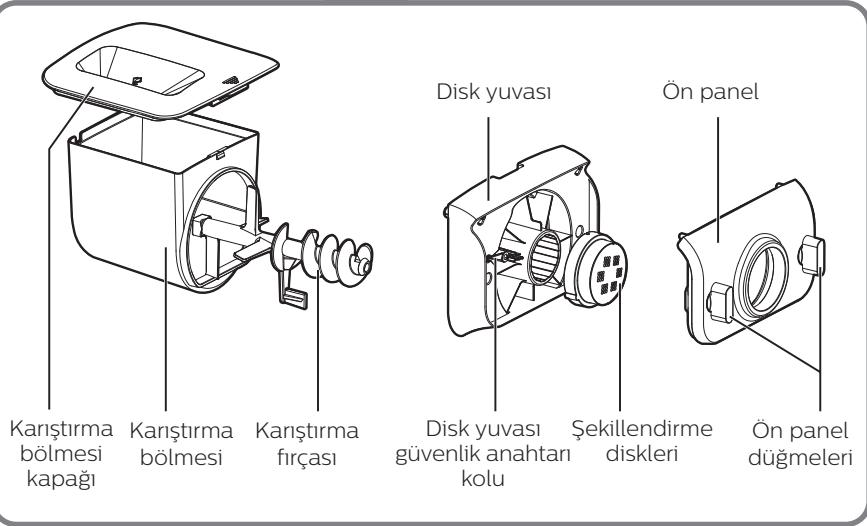
Güç kablosu
natural_image
Diagram of a car's front compartment showing the lid and side door (no text or symbols)natural_image
Diagram of a vehicle's rearview mirror with two directional arrows indicating rotation (no text or symbols)natural_image
Two technical illustrations of a mechanical device with no visible text or symbolsMonte etme
natural_image
Technical line drawing of a mechanical housing or enclosure with mounting holes and internal components (no text or symbols)natural_image
Mechanical assembly diagram showing gear and motor components with a magnified inset (no text or labels)natural_image
Technical illustration of two views of a fan assembly, showing internal components and mounting holes (no text or symbols)natural_image
Diagram of a device interior showing internal components and directional arrows (no text or symbols)natural_image
Diagram of a car interior showing circular components and directional arrows indicating rotation or movement (no text or symbols)Makarna makinesini kullanma
Önemli
natural_image
Illustration of a cooking pot with a lid and lid removed, showing a black arrow pointing downward (no text or symbols)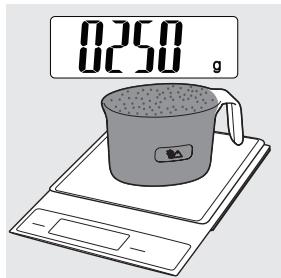
natural_image
Diagram of a car front panel with a lid and directional arrow indicating movement (no text or symbols)natural_image
Diagram of a device interior showing a hand operating a button with a circular dial (no text or symbols)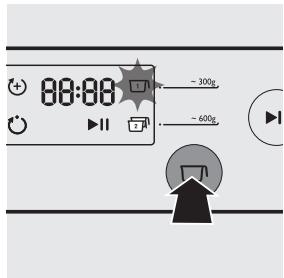
natural_image
Line drawing of a car interior with a cup pouring liquid into a tray (no text or symbols)
natural_image
Line drawing of a kitchen mixer with a bowl of food being poured into it (no text or symbols)Temizleme
Önemli
natural_image
Diagram of a car interior showing a lid and vent, with no visible text or symbolsnatural_image
Diagram of a vehicle's rearview mirror with directional arrows indicating airflow or movement (no text or symbols)flowchart
graph TD
    A["Refrigerator"] --> B["Reinforced Plate"]
    B --> C["Reinforced Stove"]
    C --> D["Reinforced Oven"]

natural_image
Illustration of hands using a tool to apply material to a circular component (no text or symbols visible)natural_image
Illustration of a kitchen tool with a drain and fan (no text or symbols)natural_image
Line drawing of a kitchen electric machine with a cloth cover and power outlet (no text or symbols)flowchart
graph LR
    A["Step 1: Component 1"] --> B["Step 2: Component 2"]
    B --> C["Step 3: Final Assembly with Internal Component"]
Sorun giderme


- Always there to help you
- What's in the box
- English
- Contents
- Important
- Safety
- Warning
- English
- Caution
- EMF
- Overview
- Disassembling and cleaning before first use
- Note:
- Assembling
- English
- Using the Pasta maker
- Preparing the ingredients
- English
- Pasta making recipe table
- Selecting the pasta making program
- Cleaning
- Tip:
- Storing the shaping discs and cleaning tools
- English
- Troubleshooting
- The indicators do not light up.
- After pressing the start/pause button ⏻ the appliance sounds but it does not work.
- The safety switch is triggered and the appliance suddenly stopped or suddenly restarts during the processing.
- During processing, the appliance stops. There is no alarm sound or flashes.
- Too much leftover dough inside the chamber.
- Small amount of water is leaking out from the appliance.
- The mixing paddle is running idle, and there is no pasta coming out.
- Product information
- Recycling
- Guarantee and service
- Sestavení
- Čištění
- Důležité
- Συναρμολόγηση
- Français
- Assemblage
- Français
- Remarque :
- Nettoyage
- Français
- Français
- Dépannage
- Összeszerelés
- Tisztítás
- Fontos
- Tipp:
- Hibaelhárítás
- Nota
- Montaggio
- Pulizia
- Importante
- Italiano
- In elkaar zetten
- Schoonmaken
- Belangrijk!
- Problemen oplossen
- Разборка и очистка
- перед первым
- использованием
- Важно
- Сборка
- Zostavenie
- Používanie strojčeka na cestoviny
- Dôležité!
- Upozornenie:
- Riešenie problémov
- Monte etme
- Makarna makinesini kullanma
- Önemli
- Temizleme
- Sorun giderme
Brand : PHILIPS
Model : HR2355/09
Category : Pasta machine