
Viva Collection HR2370 - Pasta machine PHILIPS - Free user manual and instructions
Find the device manual for free Viva Collection HR2370 PHILIPS in PDF.


| Brand | Philips |
| Model | Viva Collection HR2370 |
| Product type | Electric pasta machine |
| Power | 200 W |
| Power supply | 220-240 V ~ 50/60 Hz |
| Dimensions (W x D x H) | 38 x 20 x 30 cm |
| Weight | 4.5 kg |
| Pasta capacity | Up to 1 kg per cycle |
| Housing material | ABS plastic |
| Disc material | Stainless steel |
| Number of discs included | 6 (spaghetti, fettuccine, tagliatelle, lasagna, macaroni, spaghettini) |
| Extrusion type | Motorized auger |
| Auto shut-off | Yes, in case of overload |
| Cleaning | Removable parts, hand or dishwasher safe |
| Included accessories | Cleaning brush, measuring spoon, discs |
| Warranty | 2 years |
Frequently Asked Questions - Viva Collection HR2370 PHILIPS
User questions about Viva Collection HR2370 PHILIPS
0 question about this device. Answer the ones you know or ask your own.
Ask a new question about this device
Download the instructions for your Pasta machine in PDF format for free! Find your manual Viva Collection HR2370 - PHILIPS and take your electronic device back in hand. On this page are published all the documents necessary for the use of your device. Viva Collection HR2370 by PHILIPS.
USER MANUAL Viva Collection HR2370 PHILIPS
natural_image
Black Philips air mask with transparent glass cover, no visible text or symbols on device bodyUser manual / 2
When using electrical appliances, basic safety precautions should always be followed including the following:
Read this user manual carefully before you use the appliance and save it for future reference.

Warning
1 Read all instructions.
2 Before you connect the appliance to the power, make sure that the voltage indicated on the bottom of the appliance corresponds to the local power voltage.
3 To protect against risk of electrical shock, do not immerse main unit, cord or plug in water or other liquid; do not rinse them under tap either.
4 This appliance is not intended for use by persons (including children) with reduced physical, sensory, or mental capabilities, or lack of experience and knowledge, unless they are closely supervised and instructed concerning use of the appliance by a person responsible for their safety. Close supervision is necessary when any appliance is used by or near children. Children should be supervised to ensure that they do not play with the appliance.
5 Do not leave the appliance unattended when in use.
6 Do not move the appliance while in operation.
7 Make sure the plug is firmly inserted into the power outlet.
8 Make sure your hands are dry before you insert the plug into the power outlet.
9 Do not operate any appliance with a damaged cord or plug or after the appliance malfunctions, or is dropped or damaged in any manner. For assistance in the U.S. or Canada only, call 1-866-309-8817.
10 Do not place any part of this appliance on, in or near a hot gas, electric, convection or microwave oven or on a hot gas or electric burner.
11 The use of accessory attachments not recommended or sold by the appliance manufacturer may cause fire, electric shock or injury.
12 This appliance is designed for household use only, do not use outdoors.
13 Do not let cord hang over edge of table or counter, or touch hot surfaces.
14 Do not use this appliance on an unstable or uneven surface, near the edge of a bench top, counter or table during operation. Ensure the surface is level, clean and free of water, flour and other substances.
15 Never connect this appliance to a timer switch or separate remote control system, to avoid a hazardous situation.
4 English
Warning
16 Always make sure the appliance is properly assembled before putting the plug into the wall outlet and operating the appliance. The appliance will not operate unless it is properly assembled.
17 Keep hands, hair, clothing, as well as spatulas and other utensils away from appliance during operation to reduce the risk of injury to persons, and/or damage to the appliance.
18 Do not place hands, fingers or utensils in the mixing chamber of the appliance unless the control knob is in the OFF position, the appliance is unplugged and the motor and mixing paddle have come to a complete stop. Ensure the motor and the mixing paddle have completely stopped before disassembling, cleaning or storing.
19 Do not put your fingers or other objects into the Pasta Maker opening while it is in operation. Avoid contact with moving parts.
20 Do not attempt to defeat the cover interlock mechanism.
21 To prevent a short circuit or an electric shock, do not pour water or any liquid on the appliance especially on the interlock switch.
22 Do not exceed the maximum operation cycle of 2 cycles continuously at all applications.
23 Make sure the shaping disc hole is unblocked each time before using.
24 The shaping discs and all detachable parts of the appliance are dishwasher safe. When you clean them in dishwasher, make sure to select the proper program which has a maximum temperature at no higher than 60°C (140°F).
25 Do not hold and move the appliance by grabbing the shaping disc holder. Hold the main unit to do so.
26 Use only on properly grounded outlet.
27 Extension cords may be used if care is exercised in their use. If an extension cord is used: The marked electrical rating of the cord must be as great as the rating of the appliance. The longer cord should be arranged so that it will not drape over the edge of the counter or table top where it could be pulled by children or tripped over unintentionally. If the appliance is of grounded type, the extension cord should be a grounded-type 3-wire cord.
28 Turn the appliance OFF, then unplug from the outlet when not in use, before assembling or disassembling parts and before cleaning. To unplug, grasp the plug and pull from the outlet. Never pull from the power cord.
SAVE THESE INSTRUCTIONS
Table of Contents
IMPORTANT SAFEGUARDS ....4
What's in the box 7
Overview 8
Disassembling and cleaning before first use 10
Assembling 12
Using the pasta maker ....15
Cleaning 23
Storage 26
Troubleshooting 27
Disposal 30
Warranty 31
Congratulations on your purchase, and welcome to Philips!
To fully benefit from the support that Philips offers, register your product at
www.philips.com/welcome.
Read this user manual carefully before you install and use the appliance. Save it for future reference.
What's in the box
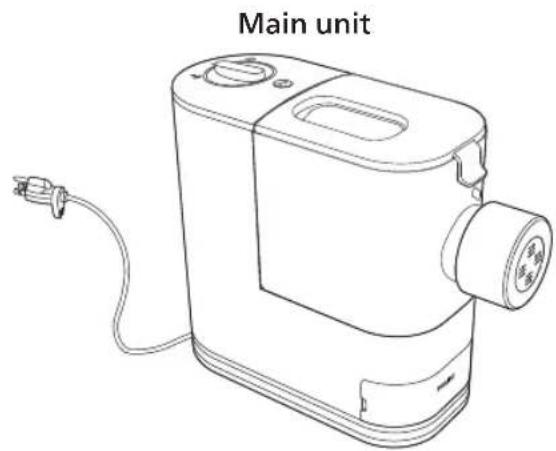
natural_image
Line drawing of a main unit device with a cable and power plug (no text or symbols on the device itself)User manual

Recipe book

Spaghetti shaping disc*

Fettuccine shaping disc

Penne shaping disc

Cleaning brush

Flat cleaning tool

Flour cup
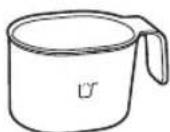
Water cup

* The spaghetti shaping disc is assembled on the appliance upon purchase.
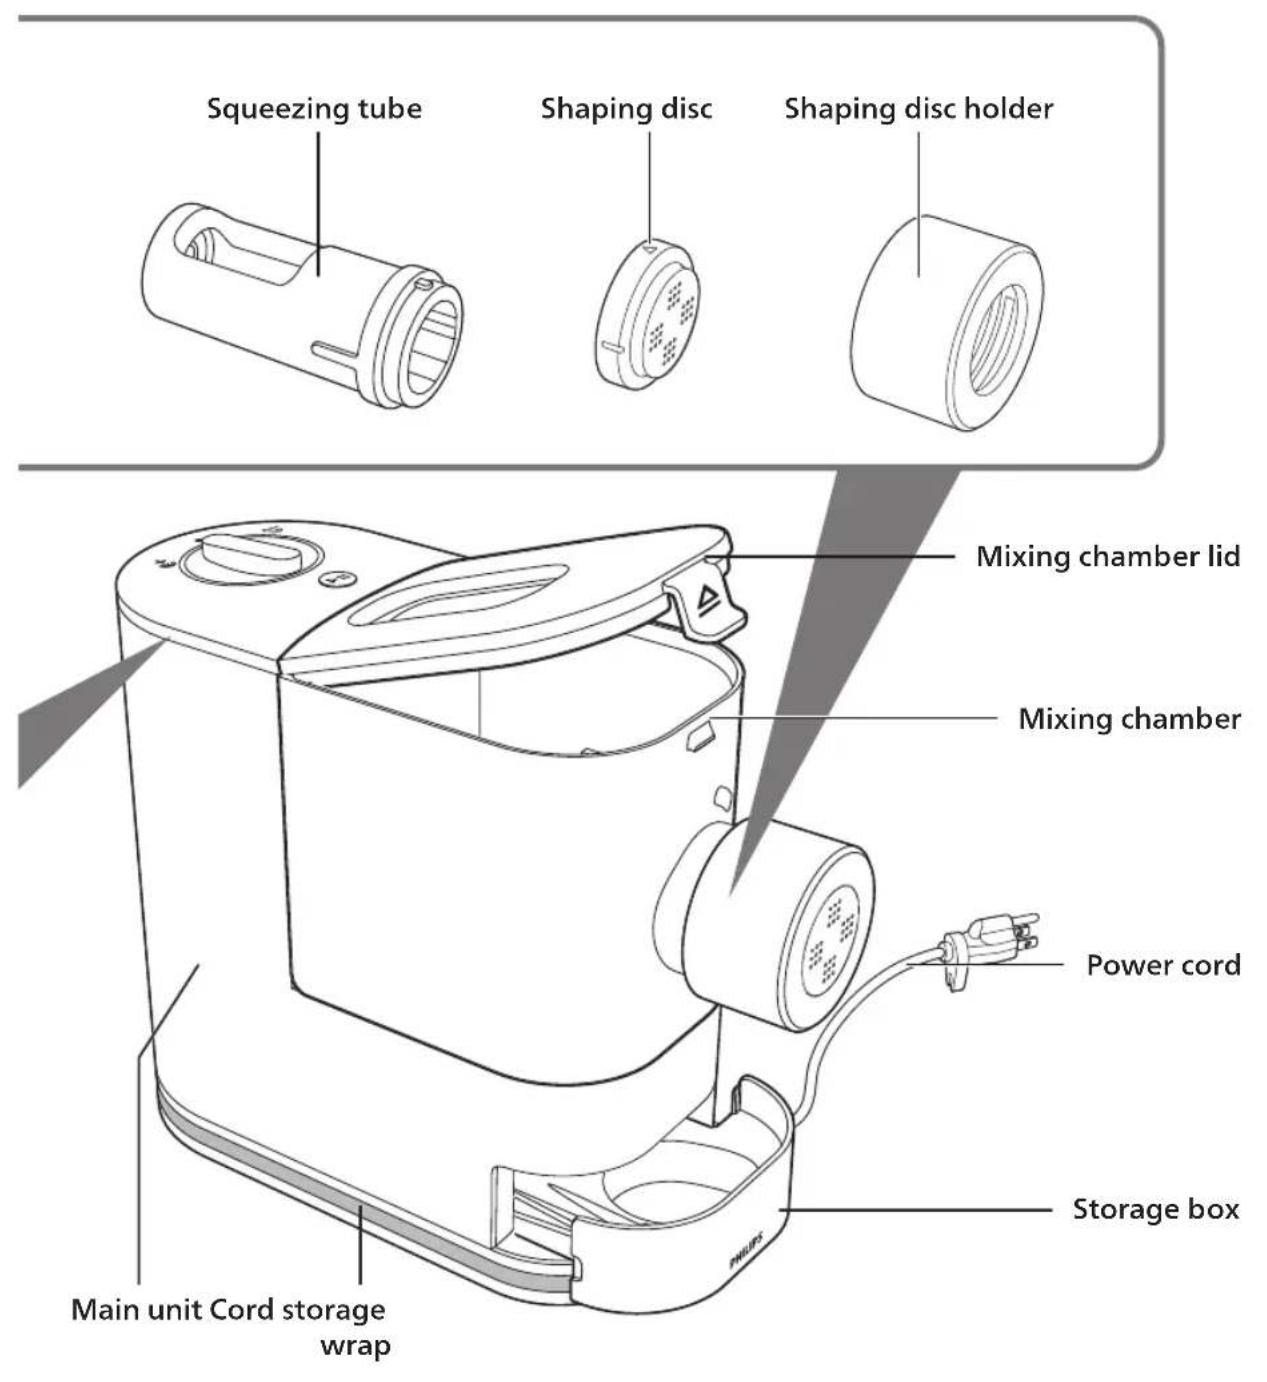
Overview
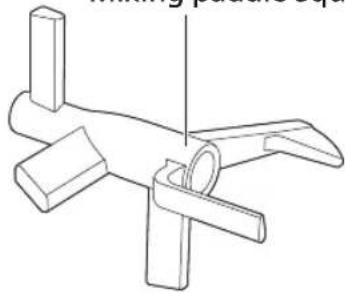
Mixing paddle Squeezing bar
natural_image
Technical line drawing of a mechanical clamp or bracket assembly (no text or symbols)
natural_image
Technical line drawing of a twist drill bit with spiral end (no text or symbols)
8 English
Disassembling and cleaning before first use
Important
- Before using the appliance for the first time, remove and safely discard any packing material and /or promotional labels.
- Take out all parts and accessories, wash and thoroughly dry all parts and accessories (refer to the chapter "Cleaning").
- Do not use water to rinse or soak the main unit, the power cord, and the power plug.
- Do not use a scouring pad or similar cleaners as these will scratch the plastic surface and affect the lifetime of the pasta maker.
- The shaping discs and all detachable parts of the appliance are dishwasher safe. When you clean them in a dishwasher, make sure to select the proper program which has a maximum temperature at no higher than 60°C (140°F).
• This appliance is intended for household use only.
1 Pull the lid to unlock it and then remove the lid from the mixing chamber.

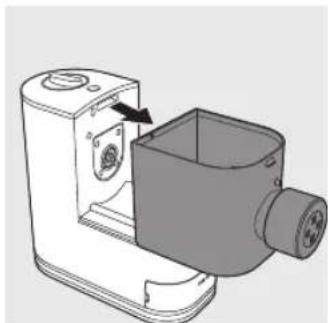
2 Slide the mixing chamber off the main unit.
natural_image
3D rendering of a mechanical device with a highlighted component and arrow indicating direction (no text or symbols)3 Turn the shaping disc holder counterclockwise to remove it from the mixing chamber outlet.

natural_image
Diagram of a mechanical device with a rotating wheel and directional arrows indicating motion (no text or symbols)4 Put your finger in the mixing chamber and push the squeezing tube outwards to slide it out of the mixing chamber outlet. Detach the shaping disc, and then pull the squeezing bar out of the squeezing tube.

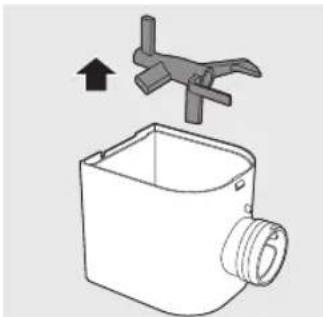
5 Take the mixing paddle out of the mixing chamber.
natural_image
Diagram of a mechanical device with a pin and arrow, no text or symbols present6 Clean all detachable parts and accessories, and then wipe them dry.

natural_image
Illustration of a kitchen sink with a faucet and pipe fittings, alongside a close-up of a gas bag filled with tubing (no text or symbols)Assembling
Follow below assembling steps to install the pasta maker.
Important
- Make sure the appliance is not plugged in during assembly.
1 Slide the mixing chamber onto the main unit. Note:
- Make sure the fixing levers ① on the main unit are fitted with the openings on the bottom of the mixing chamber.
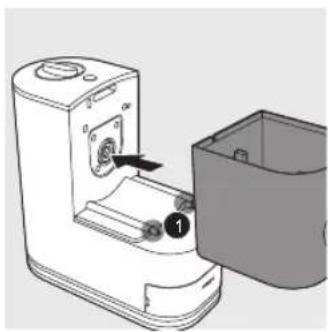
natural_image
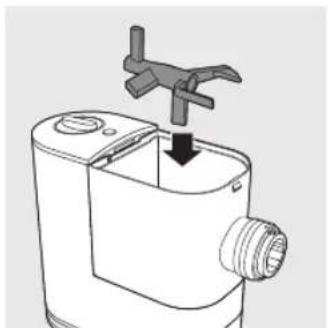
Diagram of a device with a button labeled '1' and an open box, showing no text or symbols beyond the number marker.2 Put the mixing paddle in the mixing chamber as shown in the illustration.
natural_image
Diagram of a mechanical device with a handle and arrow indicating assembly or operation (no text or symbols)12 English
3 Insert the squeezing tube into the mixing chamber.
Note:
- Make sure the big opening on the squeezing tube faces up when you insert the tube into the chamber.

natural_image
Technical line drawing of a mechanical component with a cylindrical shaft and threaded end (no text or symbols)4 Insert the squeezing bar into the mixing chamber. Make sure the squeezing bar slides all the way through both the squeezing tube and the mixing paddle and into the shaft in the main unit.
Note:
- Slightly turn the mixing paddle to make sure the squeezing bar is connected correctly with the shaft 1 in the main unit.

5 Attach the shaping disc on the mixing chamber outlet.
Note:
• Make sure the flat side of the shaping disc is facing out.
- Make sure the shaping disc fits into the fixing point on the squeezing bar.
- Make sure the arrow on the shaping disc face upwards when you attach it on the mixing chamber outlet.

natural_image
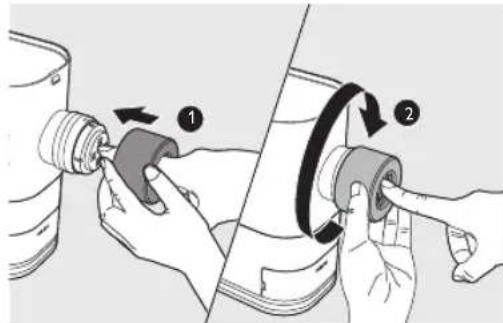
Technical line drawing of a mechanical component with a magnified inset showing a pin (no text or symbols present)6 Press the shaping disc through the opening of the shaping disc holder, and then assemble the holder on the mixing chamber outlet. Turn the holder clockwise to firmly lock it in place.
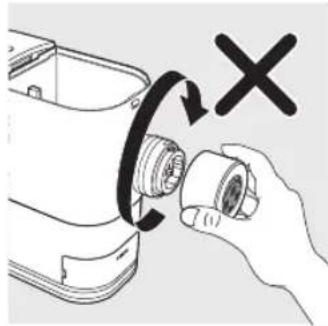
Always attach the shaping disc on the mixing chamber outlet before you assemble the shaping disc holder. Never put the shaping disc in the shaping disc holder and assemble them on the mixing chamber outlet at the same time.
natural_image
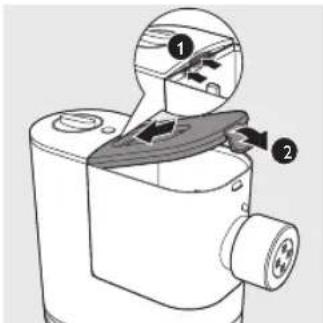
Line drawing of a hand holding a small mechanical component with a circular arrow indicating rotation (no text or symbols)7 Attach the lid onto the mixing chamber.
Note:
- If the mixing chamber lid is not properly installed, the safety switch will prevent the appliance from working.
14 English
Using the pasta maker
Important
- Place the product on a flat surface and prevent table shaking or vibration.
- Make sure all the parts are well assembled before plugging in.
- Do not put less than 200 g/7 oz (1 flour cup) or more than 400 g/14 oz (2 flour cups) of flour in the chamber.
- Pour in the liquid slowly through the water slot after the appliance starts kneading.
- If you want to dispose of the weighed flour before processing with the next batch, empty the chamber and restart the appliance by unplugging and plugging in again.
- Do not put any ingredients that are 60^ C/140°F or above into the pasta maker, or place the pasta maker in surroundings at high temperature ( 60^ C / 140°F), for instance in a high temperature sterilization environment. This will deform the appliance.
- Do not pour liquid into the mixing chamber before the Pasta maker starts running.
- Make sure the shaping disc and shaping disc holder are assembled properly before plugging in the appliance.
Preparing and measuring the flour
1 Scoop one full cup of flour using the flour cup. Scrape off any excessive flour from the cup edge with the supplied flat cleaning tool. 1 full cup of flour weighs around 200 g/7 oz, and 2 full cups of flour weigh around 400 g/14 oz.

natural_image
Illustration of a cooking pot with flour and a downward arrow indicating compression (no text or symbols)Note:
- Do not shake or hit the flour cup to remove excessive flour. This will affect the flour weight.
- Use a kitchen scale to measure the weight more accurately.
- 200 g/7 oz of flour makes about 200 g/7 oz fresh pasta/noodles. 400 g/14 oz of flour makes about 450 g/16 oz fresh pasta/noodles.
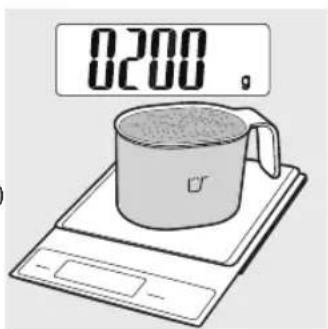
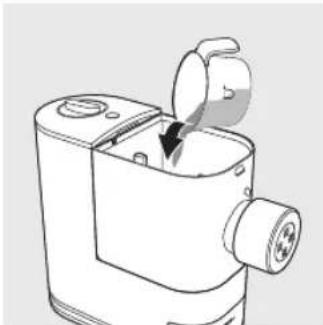
2 Pull the lid to unlock it and then remove the lid from the mixing chamber.

3 Pour the flour into the chamber. If you want to make 2-3 servings, add a second cup of flour as you will need 2 cups (\~400 g/14 oz) of flour in total.
natural_image
Line drawing of a mechanical device with a handle and internal components (no text or symbols)Note:
- Do not pour liquid into the mixing chamber at this point. Only pour liquid after the Pasta maker starts running.
- Do not put less than 200 g/7 oz or more than 400 g/14 oz of flour in the chamber. If you put too little or too much flour in the chamber, the appliance may not operate.
- Do not pour the flour into the opening of the squeezing tube, otherwise the flour in the squeezing tube will not be mixed evenly.

natural_image
Diagram showing two views of a device interior with arrows indicating movement or change, no text or symbols present.Preparing and measuring the liquid
1 Measure the liquid volume at eye level on a flat surface.
Note:
- Do not pour liquid into the mixing chamber before the Pasta maker starts running.

There are 2 sets of water markings on the supplied water cup.
When using all-purpose flour and egg mixture to make plain egg pasta, refer to side A with two liquid levels.
- Level 1 (80ml): required egg mixture amount for 1 cup of flour.
- Level 2 (160ml): required egg mixture amount for 2 cups of flour.

Side A
To make egg mixture for plain egg pasta, crack 1 egg into the water cup. Add water up to the required amount as shown on side A, and then whisk the water and egg to combine.

When using the following combinations of flour and liquid to make pasta, refer to side B with specific volume.
- All-purpose flour mixed with pure water/vegetable juice mixture.
- Various other flours (as shown in the following tables) mixed with egg mixture/pure water/vegetable juice mixture.

Side B
Check the following tables for detailed water and flour ratio.
Note:
- These tables show the flour-liquid ratio base on 200 g/7 oz of flour. When using 400 g/14 oz of flour to make pasta, double the liquid volume (including egg) to get the right flour-liquid ratio.
When using egg mixture to make pasta, crack 1 egg into the water cup. Add water up to the required amount as shown below, and then whisk the water and egg to combine.
| Flour Egg mixture (ml) Water cup | ||
| Durum (Semolina flour 150 g/5 oz + all-purpose flour 50 g/1.8 oz)* | 75 | Side B |
| Whole wheat 200 g/7 oz 90 | ||
| Spelt 200 g/7 oz 90 | ||
| Bread flour 200 g/7 oz 80 | ||
| Soba (buckwheat flour 130 g/4.6 oz + all-purpose flour 70 g/2.5 oz)* | 80 |
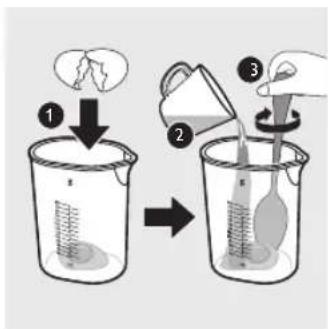
When using pure water to make pasta, add water to the required amount as shown below.
| Flour Pure water (ml) Water cup | ||
| All-purpose flour 200 g/7 oz 70 | Side B | |
| Durum (Semolina flour 150 g/5 oz + all-purpose flour 50 g/1.8 oz)* | 65 | |
| Whole wheat 200 g/7 oz 80 | ||
| Spelt 200 g/7 oz 65 |
When using vegetable juice (including 1 egg) to make pasta, crack 1 egg into the water cup. Add vegetable juice up to the required amount as shown below, and then whisk the juice and egg to combine.
| Flour | Spinach juice (including 1 egg) (ml) | Beet juice (including 1 egg) (ml) | Carrot juice (including 1 egg) (ml) | Water cup |
| All-purpose flour200 g/7 oz | 75 80 80 | Side B | ||
| Durum (Semolina flour150 g/5 oz + all-purpose flour 50 g/1.8 oz)* | 75 75 75 |
* Use a kitchen scale to measure the weight more accurately.
Important
- The pasta recipes provided in the recipe book have been tested for success. If you experiment with or use other pasta recipes, the flour and water/egg ratios will need to be adjusted to the flour and water cup ratios included with the Pasta maker. The Pasta maker will not operate successfully without adjusting the new recipe accordingly.
Note:
- For best results, use all-purpose flour with the recommended liquid proportions indicated on the cup.
- Seasonal changes, using ingredients from different regions may affect the flour/water ratio.
- "Gluten" is a binder which ensures the pasta does not break easily. Gluten-free flour does not contain a binder, therefore it needs a thickener to act as a "binder" eg. Xanthan gum or Guar. Various kinds of gluten-free flour perform differently when making pasta. Some flours are not suitable for making varieties pasta such as coconut flour and white rice flour; some flour varieties work well, such as quinoa and buckwheat.
• See the recipe book provided for more delicious pasta and noodle ideas.
Starting the pasta making program
Important
- Do not select the extra extrusion program before the dough mixing is complete. Otherwise, this will damage the Pasta maker and its lifetime.
- Do not disconnect the power cord before the processing is complete. If you have to stop the pasta making process, turn the control knob to "OFF" to stop the working process and then disconnect the power cord from outlet before performing other operations.
- Do not exceed the maximum operation cycle of 2 cycles continuously at all applications. To better protect the lifetime of the appliance, you can restart using the appliance after 30 minutes upon 2 continuous operation cycles.
- If you intend to use the appliance continuously, clean each shaping disc with the supplied cleaning tool each time after the pasta making session. For easy cleaning, do not soak the shaping disc directly in water.
1 Put the plug of the appliance into the power outlet. The Pasta maker will sound once.
Note:
- Make sure all the parts are well assembled before plugging in.

natural_image
Hand inserting a plug into an electrical outlet (no text or symbols visible)2 Attach the lid onto the mixing chamber.
Note:
- The appliance will not start working if the chamber lid is not properly closed. During the pasta making process, if the chamber lid becomes loose, the appliance will automatically stop working.
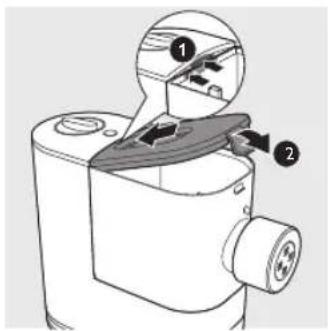
3 Turn the control knob to select the automatic pasta making process, and then press the Start/Pause button.
Note:
- The whole working process (including kneading and extruding) takes around 12 minutes for 200 g/7 oz of flour and 18 minutes for 400 g/14 oz of flour.

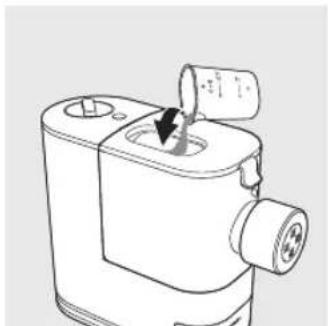
4 After the kneading starts, slowly pour in the liquid along the entire length of the slot in the lid.
Note:
- During dough mixing, do not add other ingredients after you have poured in the liquid. Otherwise, it will affect the results of the pasta texture.
natural_image
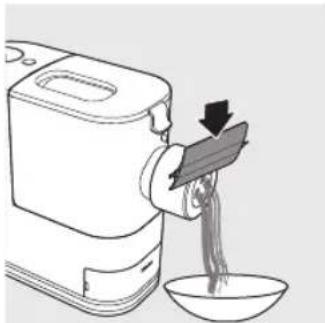
Line drawing of a small industrial machine with a handle and spout, showing internal components (no text or symbols)5 After the Pasta maker finishes kneading, it will beep a few times and the pasta extrusion will start after a few seconds. Place a container right under the outlet. Cut the pasta into the desired length with the cleaning tool.
Note:
- If the ratio of liquid and flour is not correct, the extrusion will not succeed. In this case, prepare the ingredients again.
- Move the cleaning tool downwards to cut the pasta.
natural_image
Illustration of a food delivery machine pouring noodles into a bowl (no text or symbols)6 When the extrusion process is complete, the appliance will beep a few times.
Note:
- Do not turn the control knob to the "OFF" position before the whole process is over (you will hear the "beep" sound).
7 After the pasta making is complete, if you notice some leftover dough inside the chamber, you can turn the control knob to the OFF position first, and then turn the control knob to the extra-extrusion position. Press the Start/Pause button to start the extra-extrusion program.
Note:
- You may find some fine pasta threads on the pasta surface. This is normal.
- The cooking time of the pasta varies depending on personal preferences, pasta shapes, and number of servings.

22 English
Cleaning
Important
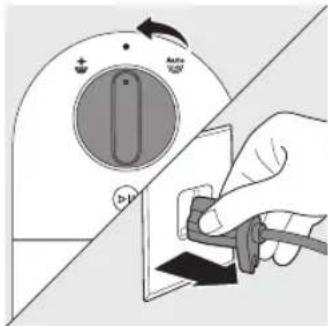
- Turn the control knob to "OFF", disconnect the power and remove the power cord before cleaning or disassembling this appliance.
- Do not immerse the main unit in water.
- Do not use a scouring pad, caustic cleaners, or abrasive cleaners (for examples, gasoline, alcohol, and propanol) to clean the appliance.
- Clean the appliance each time after use, or the appliance might not operate properly.
• Take extra caution when cleaning the appliance to avoid getting cut by any sharp edges. - The shaping discs and all detachable parts of the appliance are dishwasher safe. When you clean them in a dishwasher, make sure to select the proper program which has a maximum temperature at no higher than 60°C (140°F).
1 Turn the control knob to "OFF" and disconnect the plug from the power outlet.
2 Pull the lid to unlock it and then remove the lid from the mixing chamber.

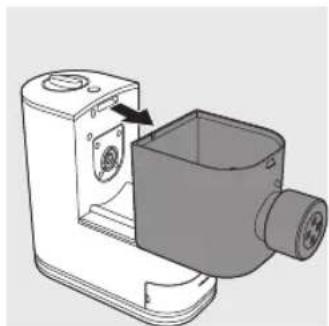
3 Slide the mixing chamber off the main unit.
natural_image
3D rendering of a mechanical device with a housing and mounting bracket (no text or symbols visible)4 Turn the shaping disc holder counterclockwise to remove it from the mixing chamber outlet.

natural_image
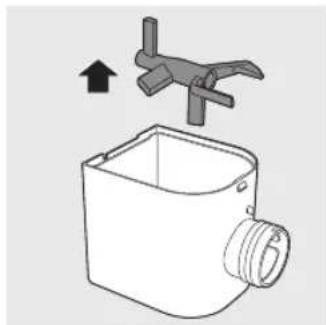
Line drawing of a mechanical component with a pulley and rotating arrow (no text or symbols)5 Put your finger in the mixing chamber and push the squeezing tube outwards to slide it out of the mixing chamber outlet. Detach the shaping disc, and then pull the squeezing bar out of the squeezing tube.

6 Take the mixing paddle out of the mixing chamber.
natural_image
Diagram of a mechanical device with a handle and clamping mechanism, no text or symbols present24 English
7 Clean the shaping disc with the supplied cleaning tool to remove the dough residues. After that, you can clean it with water.

natural_image
Illustration of hands using a tool to apply material to a circular device (no text or symbols visible)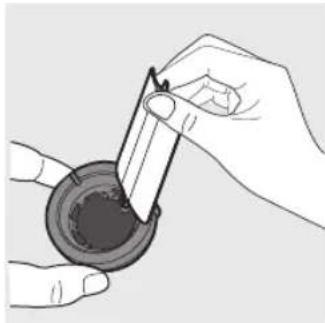
natural_image
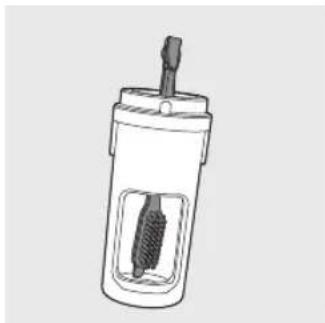
Illustration of hands using a pipette to apply liquid into a container (no text or symbols visible)8 Use the supplied cleaning brush to clean all detachable parts with dishwashing liquid and warm water or clean in the dishwasher. Wipe all parts dry.
Tip:
- Use the pointing end of the cleaning brush to clean the inner bottom of the squeezing tube.
natural_image
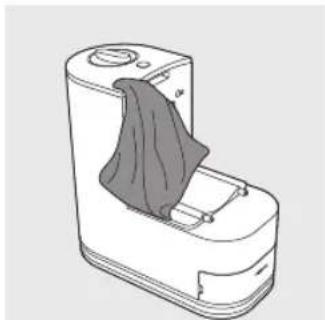
Line drawing of a mechanical device with a screw and handle (no text or symbols)9 Use a dry cloth to clean the main unit, control knob, and the exterior of the pasta maker.
Note:
- After cleaning, make sure all parts and the shaping disc air dry thoroughly before storing. Assemble the pasta maker back for next use.
natural_image
Line drawing of a mobile phone device with a cloth cover (no text or symbols)This appliance has no other user-serviceable parts. For assistance in the U.S. or Canada only call 1-866-309-8817.
Storage
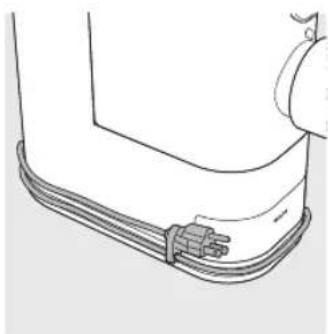
1 Set the power cord in the clip on the power plug and wind the power cord around the cord storage wrap.
2 Dry the shaping discs and store them in the storage box.
The small groove in the storage box is designed for the cleaning tool of the angel hair shaping disc, which is not included in this pasta maker. They will be launched and sold separately.
3 Store the pasta maker in a dry, well ventilated place after use.
natural_image
Line drawing of a mechanical component with a coiled cable or plug (no text or symbols)
natural_image
Line drawing of a tray with two circular compartments and a handle (no text or symbols)Troubleshooting
This chapter summarizes the most common problems you could encounter with the appliance. If you are unable to solve the problem with the information below, visit www.philips.com/support or in the U.S. or Canada only, call 1-866-309-8817 for assistance.
The appliance does not sound after the plug is put in the wall outlet.
- The plug is not connected properly, or the outlet is not connected to power source. Check whether the power plug is plugged correctly and the outlet is working properly.
The appliance does not start the pasta making process after the plug is put in the wall outlet.
- You have not chosen a pasta making program or pressed the start button. Choose a pasta making program and press the start button
After pressing the start button; the appliance makes alarm sounds and does not work.
- The chamber lid is not assembled properly. Make sure you follow the user manual to assemble the chamber lid properly.
The chamber lid is pushed open from the inside.
- There's too much flour in the mixing chamber.
The maximum amount of flour for each batch is 400g / 14 oz. If you have put more than 400g / 14 oz of flour in the mixing chamber, reduce the amount and make another batch of pasta. - The ratio of flour and water provided in the "Flour/water ratio table" was not followed. The dough is too wet.
Disconnect from the power source, clean the pasta maker, and follow the user manual again to restart the pasta making.
• The chamber lid is not assembled properly.
Make sure you follow the user manual to assemble the chamber lid properly.
During processing, the appliance stops working when you open the lid.
- For safety reasons, the appliance always stops working when the lid is opened during processing.
If you need to resume the previous operation, close the lid properly, and press the Start/pause button.
During the pasta making process, the appliance stops working, and there is no alarm sound.
- The pasta maker has overheated due to long and continuous working time.
Disconnect from the power source, and allow the pasta maker to cool down. To better protect the lifetime of the appliance, the continuous working time should be less than 40 minutes. You can use the appliance again after 30 minutes of rest.
During the pasta making process, the appliance stops working, and makes alarm sounds.
- The ratio of flour and water provided in the "Flour/water ratio table" was not followed. The dough may be too dry.
- The mixing paddle may be blocked by some foreign objects.
- The wrong program is selected.
Disconnect from the power source, clean the pasta maker, and follow the user manual again to restart the pasta making.
The mixing paddle is running idle, and there is no pasta coming out.
- The ratio of the flour and water is incorrect.
Disconnect the plug from the power source and discard dough. Clean the pasta maker, measure ingredients correctly (use a kitchen scale to measure the flour weight more accurately), and follow the user manual again to restart the pasta making
- The flour becomes damp after longtime storage.
Use flour that is fresh or properly stored.
The pasta breaks easily.
- The ratio of the flour and water is incorrect.
Disconnect the plug from the power source and discard dough. Clean the pasta maker, measure ingredients correctly (use a kitchen scale to measure the flour weight more accurately), and follow the user manual again to restart the pasta making.
- You did not use the correct type of flour.
Use all-purpose flour or flour with higher protein content (refer to the chapter 'Using the pasta maker' in the user manual or the supplied recipe book).
The pasta sticks together.
- The ratio of the flour and water is incorrect, too much water is poured in the mixing chamber. Measure flour and water with the provided flour and water cup and according to the "flour/water ratio table". Use a kitchen scale to measure the flour weight more accurately.
Too much leftover dough inside the chamber.
- The flour is either exposed to moisture before use, or the dough is too wet.
Keep your flour dry during storage. Follow the user manual instructions to restart the pasta making. - The chamber, the mixing paddle, the shaping disc are not cleaned properly before use.
Make sure all parts are clean before use. - The mixing paddle or the chamber is still wet.
Make sure all parts are completely dry before use.
• Water is not added in the right order.
The flour type is not suitable.
Follow the user manual instructions to make pasta.
Small amount of water is leaking out from the appliance.
• Water is added before the program starts.
Follow the user manual instructions to add water right after the program starts.
After pasta making, the squeezing tube cannot be pushed out of the mixing chamber.
- The appliance is stopped during extrusion before the pasta making process is finished completely.
- Restore the disassembled parts back in place until the appliance is assembled properly, and turn the control knob to the OFF position.
- Plug in, select the automatic pasta making program, and press the start button. Keep the mixing paddle rotating for around 10 seconds, and then turn the control knob to the OFF position.
- Unplug the appliance, disassemble and clean the appliance as described in the user manual (see chapter "cleaning").
Disposal
Your product is designed and manufactured with high quality materials and components, which can be recycled and reused. For recycling information, please contact your local waste management facilities or visit www.recycle.philips.com.

This symbol on the product's nameplate means it is listed by Underwriters Laboratories, Inc.
Warranty
One Year Limited Warranty
Philips warrants that this product shall be free from defects in material, workmanship and assembly, under normal use, in accordance with the specifications and warnings, for a period of one year from the date of purchase. This warranty extends only to the original purchaser of the product, and is not transferable. To exercise your rights under this warranty, you must provide proof of purchase in the form of an original sales receipt that shows the product name and the date of purchase. For customer support or to obtain warranty service, please visit our website www.philips.com/support. THERE ARE NO OTHER EXPRESS OR IMPLIED WARRANTIES. Philips' liability is limited to repair or, at its sole option, replacement of the product. Incidental, special and consequential damages are disclaimed where permitted by law. This warranty gives you specific legal rights. You may also have other rights that vary from state to state, province to province or country to country.
In U.S. only
Importer
Philips Domestic Appliances North America Corporation
1600 Summer Street,
Stamford, CT 06905,
United States of America
Canada only
Philips Domestic Appliances Canada, Inc.
40 University Avenue, Suite 904,
Toronto, Ontario M5J 1T1 Canada
Manufactured for:
-- Colombia: 01 8000 423 558
-- Costa Rica: 0800-507-7445
-- República Dominicana: 1-800-751-2673
-- Ecuador: 1-800-10-1045
-- El Salvador: 800-6024
-- Guatemala: 1-800-299-0007
--Honduras:8002-791-9273
©2021 Philips Domestic Appliances North America Corporation
All rights reserved.
PRECAUCIONES IMPORTANTES
natural_image
3D rendering of a mechanical device with a highlighted component and arrow indicating direction (no text or symbols)natural_image
Diagram of a box with a pulley and directional arrow indicating rotation (no text or symbols)natural_image
Diagram of a mechanical device with a propeller above it and an arrow indicating upward motion (no text or symbols)natural_image
Two technical illustrations: one showing a pipe outlet with a flame, the other showing a gas collection device with tubing and a cloth cover (no text or symbols)Montaje
natural_image
Diagram of a device with a handle and labeled component (no text or symbols present)natural_image
Line drawing of a mechanical device with a handle and arrow indicating direction (no text or symbols)natural_image
Technical line drawing of a mechanical component with a cylindrical shaft and threaded end (no text or symbols)natural_image
Technical line drawing of a mechanical component with a magnified inset showing a circular detail (no text or symbols)natural_image
Diagram of a hand holding a small mechanical component with a circular arrow indicating rotation (no text or symbols present)42 Español
natural_image
Illustration of a cooking pot with a lid and lid removed, showing dough inside (no text or symbols)Nota:
natural_image
Line drawing of a mechanical device with a knob inserted into a housing (no text or symbols)Nota:
natural_image
Diagram of a car gear shift lever mechanism with a checkmark and arrow (no text or symbols)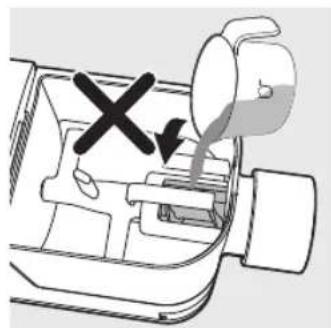
natural_image
Diagram of a device interior with a funnel and a cross mark, no text or symbols present
natural_image
Hand inserting a plug into an electrical outlet (no text or symbols visible)natural_image
Line drawing of a manual pump device with a dial and handle (no text or symbols)natural_image
Illustration of a food delivery machine pouring noodles into a bowl (no text or symbols)Limpieza
Importante
natural_image
3D rendering of a mechanical device with a housing and internal components, showing no text or symbols.natural_image
Diagram of a mechanical device with a pulley and rotating arrow (no text or symbols)natural_image
Diagram of a mechanical device with a handle and clamping mechanism, showing no text or symbols52 Español
natural_image
Illustration of hands using a tool to apply material to a circular device (no text or symbols visible)
natural_image
Illustration of hands using a pipette to apply liquid into a container (no text or symbols visible)natural_image
Line drawing of a mechanical component with a screwdriver inserted into a housing (no text or symbols)natural_image
Line drawing of a mobile phone with a cloth cover (no text or symbols)natural_image
Line drawing of a mechanical component with a coiled cable or connector (no text or symbols)natural_image
Line drawing of a tray with two circular compartments and a handle, no text or symbols presentPhilips Domestic Appliances North America Corporation
1600 Summer Street,
Stamford, CT 06905,
Philips Domestic Appliances Canada, Inc.
40 University Avenue, Suite 904,
Toronto, Ontario M5J 1T1, Canadá
Fabricado para:
-- Colombia: 01 8000 423 558
-- Costa Rica: 0800-507-7445
-- República Dominicana: 1-800-751-2673
-- Ecuador: 1-800-10-1045
-- El Salvador: 800-6024
-- Guatemala: 1-800-299-0007
-- Honduras: 8002-791-9273
-- México: 0800 837 0900
-- Nicaragua: 1-800-507-0018
-- Panamá: 800-8300
PHILIPS y Philips Shield son marcas registradas de Koninklijke Philips N.V.
©2021 Philips Domestic Appliances North America Corporation
natural_image
Line drawing of a small industrial machine with attached plug (no text or symbols)Mode d'emploi
natural_image
3D rendering of a mechanical device with a highlighted component and arrow indicating direction (no text or symbols)natural_image
Diagram of a box with a pulley and rotating arrow, no text or symbols presentnatural_image
Diagram of a mechanical device with a propeller and directional arrow, no text or symbols presentnatural_image
Illustration of a water tap and a plastic bag with hoses, no text or symbols presentMontage
natural_image
Diagram of a device with a labeled component, showing internal components and a separate housing (no text or symbols present)natural_image
Line drawing of a mechanical device with a handle and arrow indicating assembly (no text or symbols)natural_image
Technical line drawing of a mechanical component with a cylindrical shaft and threaded end (no text or symbols)natural_image
Technical line drawing of a mechanical component with a close-up inset showing a pin (no text or symbols)natural_image
Illustration of a hand inserting a component into a device with a 'X' mark, no text or symbols presentnatural_image
Illustration of a cooking pot with a lid and a downward arrow indicating compression (no text or symbols)Remarque :
72 Français
natural_image
Line drawing of a mechanical device with a handle and internal components (no text or symbols)Remarque :
natural_image
Line drawing of a car interior showing a hand holding a tool, with a checkmark and arrow indicating action (no text or symbols present)
natural_image
Diagram of a mechanical device with a valve and cross mark, no text or symbols presentnatural_image
Hand inserting a plug into an electrical outlet (no text or symbols visible)natural_image
Line drawing of a mechanical device with a knob and handle, showing internal components (no text or symbols)natural_image
Line drawing of a food delivery machine pouring noodles into a bowl (no text or symbols)natural_image
3D rendering of a mechanical device with a housing and internal components, no visible text or symbolsnatural_image
Line drawing of a mechanical device with a pulley and rotating wheel (no text or symbols)natural_image
Diagram of a mechanical device with a handle and arrow indicating upward motion (no text or symbols)natural_image
Illustration of hands using a tool to apply liquid onto a circular device (no text or symbols visible)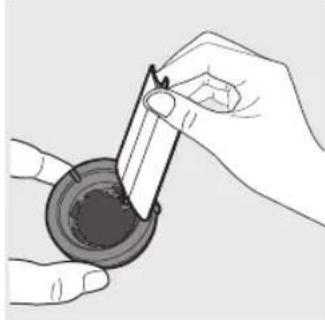
natural_image
Illustration of hands using a tool to apply liquid into a circular container (no text or symbols visible)natural_image
Line drawing of a mechanical device with a screw and handle (no text or symbols)natural_image
Line drawing of a mobile phone with a cloth cover, no text or symbols presentnatural_image
Line drawing of a mechanical component with a coiled cable or connector (no text or symbols)
natural_image
Line drawing of a microwave oven with two chambers and a handle (no text or symbols)Dépannage
Philips Domestic Appliances North America Corporation
1600 Summer Street,
Stamford, CT 06905,
Philips Domestic Appliances Canada, Inc.
40 University Avenue, Suite 904,
Toronto, Ontario M5J 1T1 Canada
Fabriqué pour :
-Colombie:01 8000 423 558
– Costa Rica : 0800 507-7445
©2021 Philips Domestic Appliances North America Corporation
©2021 Philips Domestic Appliances North America Corporation
All rights reserved.


- Warning
- English
- SAVE THESE INSTRUCTIONS
- Table of Contents
- What's in the box
- Overview
- Disassembling and cleaning before first use
- Important
- Assembling
- English
- Note:
- English
- Using the pasta maker
- Preparing and measuring the flour
- Preparing and measuring the liquid
- Starting the pasta making program
- English
- Cleaning
- English
- Tip:
- Storage
- Troubleshooting
- The chamber lid is pushed open from the inside.
- During processing, the appliance stops working when you open the lid.
- During the pasta making process, the appliance stops working, and there is no alarm sound.
- During the pasta making process, the appliance stops working, and makes alarm sounds.
- The mixing paddle is running idle, and there is no pasta coming out.
- The pasta breaks easily.
- The pasta sticks together.
- Too much leftover dough inside the chamber.
- Small amount of water is leaking out from the appliance.
- After pasta making, the squeezing tube cannot be pushed out of the mixing chamber.
- Disposal
- Warranty
- One Year Limited Warranty
- In U.S. only
- Canada only
- PRECAUCIONES IMPORTANTES
- Montaje
- Español
- Nota:
- Limpieza
- Importante
- Español
- Montage
- Remarque :
- Français
- Dépannage
Brand : PHILIPS
Model : Viva Collection HR2370
Category : Pasta machine