
Avance Collection HR2354 - Pasta machine PHILIPS - Free user manual and instructions
Find the device manual for free Avance Collection HR2354 PHILIPS in PDF.


| Product type | Automatic pasta machine |
| Brand | Philips |
| Model | Avance Collection HR2354 |
| Power supply | 220–240 V, 50–60 Hz |
| Power | 200 W |
| Bowl capacity | 300 g flour |
| Dimensions (W × D × H) | 31 × 23 × 24 cm |
| Weight | 6.2 kg |
| Main material | ABS plastic, stainless steel |
| Color | White and silver |
| Included accessories | 6 pasta discs (spaghetti, tagliatelle, fettuccine, lasagne, etc.) |
| Main functions | Automatic kneading and extrusion |
| Preparation time | About 10–15 minutes |
| Noise level | ~80 dB(A) |
| Maintenance and cleaning | Clean with a damp cloth; removable parts washable with water |
| Safety | Safety lock, automatic shut-off in case of overload |
| Spare parts and repairability | Repairability index not communicated; parts available from the manufacturer |
| Warranty | 2 years |
Frequently Asked Questions - Avance Collection HR2354 PHILIPS
User questions about Avance Collection HR2354 PHILIPS
0 question about this device. Answer the ones you know or ask your own.
Ask a new question about this device
Download the instructions for your Pasta machine in PDF format for free! Find your manual Avance Collection HR2354 - PHILIPS and take your electronic device back in hand. On this page are published all the documents necessary for the use of your device. Avance Collection HR2354 by PHILIPS.
USER MANUAL Avance Collection HR2354 PHILIPS
Always here to help you
Register your product and get support at www.philips.com/welcome

HR2354/12

natural_image
White Philips kitchen appliance with a circular control panel and a balance scale icon (no text or symbols on the device body)EN User manual 1
Disassembling and cleaning before first use

2 English
Assembling

natural_image
Technical diagram of a mechanical component with labeled parts (no readable text or symbols)
natural_image
Mechanical assembly diagram showing a bracket with a magnified inset highlighting a specific component (no text or symbols present)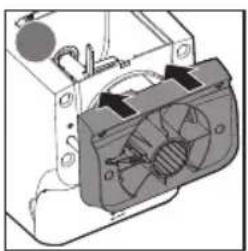
natural_image
Technical line drawing of an electrical enclosure with fan and circuit components (no text or symbols)
natural_image
Line drawing of a fan with a bucket and handle, no text or symbols present
natural_image
Technical line drawing of a mechanical device with no visible text or symbols
natural_image
Diagram of a car interior showing directional arrows and circular components (no text or symbols)
Using the pasta maker

natural_image
Hand holding a cable with a plug inserted into a wall socket, no text or symbols visible

natural_image
Diagram of a refrigerator with a lid and air conditioner unit, showing no text or symbols
natural_image
Illustration of a gray coffee cup with a lid and label, no text or symbols present
natural_image
Line drawing of a refrigerator interior with a door and fan (no text or symbols)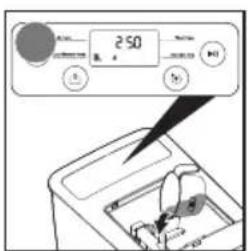



natural_image
Illustration of a hand pouring liquid into a machine (no text or symbols visible)
natural_image
Line drawing of a kitchen mixer blending liquid into a bowl (no text or symbols)Congratulations on your purchase, and welcome to Philips!
To fully benefit from the support that Philips offers, register your product at www.philips.com/welcome.
Read this user manual carefully before you install and use the appliance.
Save it for future reference.
What's in the box

natural_image
Line drawing of a Siemens 4.0 air fryer with control panel and power outlet (no text or symbols on device body)User manual Recipe bookMain unit

Water cup

Flour cup


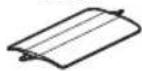
Flat cleaning tool
Lasagna/
Dumpling Penne
Shaping discs
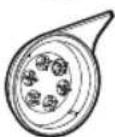
Cleaning tools

Use the flat cleaning tool

Angel hair


Spaghetti
Assembled on the appliance upon purchase
Shaping discs
Cleaning tools


Fettuccine

Thick
Spaghetti


4 English
Table of Contents
Quick Start Guide 2
What's in the box 4
Important 6
Overview 10
Disassembling and cleaning before first use ....12
Assembling 14
Using the pasta maker ....16
Cleaning 23
Troubleshooting 26
Product information 30
Recycling 30
Guarantee and service 30
Important
Safety
Read this user manual carefully before you use the appliance, and save it for future reference.
Warning
- Before you connect the appliance to the power, make sure that the voltage indicated on the bottom of the appliance corresponds to the local power voltage.
• Make sure that your hands are dry before you insert the plug into the power outlet. - Make sure that the plug is firmly inserted into the power outlet.
- Never connect this appliance to a timer switch.
- Before you insert the plug into the power outlet, make sure that the appliance is assembled correctly.
- If the power cord, the plug, or other parts are damaged, do not use the appliance.
- If the power cord is damaged, you must have it replaced by Philips, a service center authorized by Philips or similarly qualified persons to avoid a hazard.
- Do not replace parts of the appliance yourself.
- This appliance shall not be used by children. Keep the appliance and its cord out of reach of children.
- This appliance can be used by persons with reduced physical, sensory or mental capabilities or lack of experience and knowledge if they have been given supervision or instruction concerning
Warning
use of the appliance in a safe way and if they understand the hazards involved.
- For their safety, do not allow children to play with the appliance.
• To prevent any accidents, do not use the appliance if it is damaged for any reason.
• Always disconnect the appliance from the supply if it is left unattended and before assembling, disassembling or cleaning. - Switch off the appliance and disconnect from supply before changing accessories or approaching parts that move in use.
Caution
- Before using the appliance for the first time, disassemble and wash the accessories thoroughly (see “Disassemble and cleaning before first use” section.)
- The appliance is intended for household use only.
- Do not use this appliance on an unstable or uneven surface.
Caution
- Do not disconnect the power cord before processing is complete. If you have to stop processing, disconnect the power cord before you perform other operations.
- To better protect the lifetime of the appliance, we recommend the continuous working time to be less than 45 minutes. You can restart using the appliance after 15 minutes.
- If you intend to use the appliance continuously, clean the shaping disc with the supplied cleaning tool each time after use. For cleaning ease, do not soak the shaping disc into the water directly.
- Do not bend the power cord forcibly, jerk, twist, bundle nor put under heavy items.
- Do not put metal or flammable objects in the mixing chamber.
- Unplug the appliance when not in use.
- Do not use the appliance near flammable objects such as table cloth or drapes.
- Pull out the power plug immediately when you detect smoke.
- When unplugging the power cord, do not pull the cable but grab the plug part.
- Keep the power plug clean.
- Do not put heavy objects on the appliance.
- This appliance is designed as consumer kitchen appliance. Do not use for any other purpose
- Do not move the appliance while it is operating.
Caution
- Disconnect the power and remove the power cord before cleaning or disassembling this appliance.
- Do not immerse the main unit in water.
- Place the appliance in a dry and well ventilated place after use.
• To prevent a short circuit or an electric shock, do not pour water or any liquid into the safety switch.
- Do not use a dishwasher to clean the machine or the accessories.
Electromagnetic fields (EMF)
This Philips appliance complies with all applicable standards and regulations regarding exposure to electromagnetic fields.
Overview

natural_image
Line drawing of a Philips washing machine with a power outlet and control panel (no text or symbols)
| Abbreviations |
| g = grams |
| ~ = approximately |
| ml = milliliters |
| mm = millimeters |
| lb = pound |
| kg = kilogram |
| in = inch |
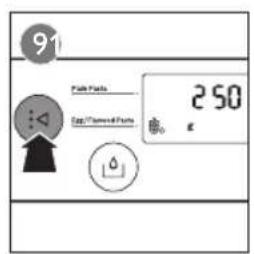
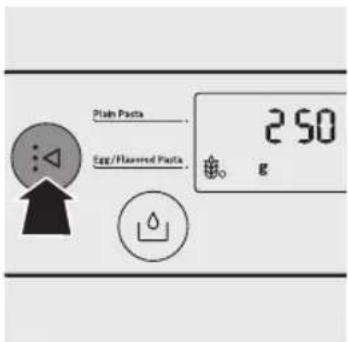
Program selection - press to select "Plain Pasta" or "Egg/Flavored Pasta".
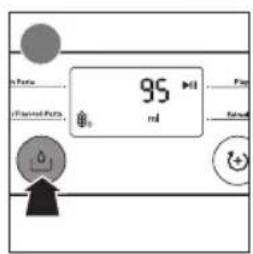
Liquid calculation - press to show the required liquid quantity based on the amount of flour poured in.
Program Liquid Display Extra Start/selection calculation screen extrusion pause

Disassembling and cleaning before first use
Important
- Before using the appliance for the first time, remove and safely discard any packaging material and /or promotional labels.
• Take out all the parts and accessories, wash and thoroughly dry all parts and accessories (see chapter "Cleaning"). - Do not use water to rinse or soak the main unit.
- Do not use a scourer or similar cleaners as these will scratch the plastic surface and affect the lifetime of the pasta maker.
- The shaping discs and all detachable parts of the appliance are dishwasher safe. When you clean them in a dishwasher, make sure to set the temperature below 60°C (140°F).
• This appliance is intended for household use only.
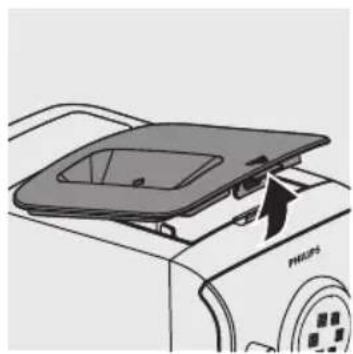
1 Remove the mixing chamber lid from the appliance.
natural_image
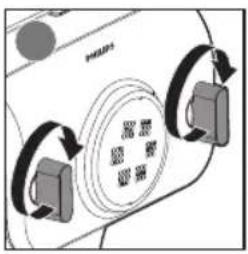
Diagram of a car interior showing a roof cover and directional arrow, no text or symbols present2 Loosen the front panel control knobs.
Note:
- The front panel is heavy. Take extra caution when removing it.

12 English
3 Disassemble the front panel, the shaping disc, the shaping disc holder, the mixing paddle, and the mixing chamber in order.

4 Clean all detachable parts, and wipe them dry.

natural_image
Two grayscale illustrations of industrial waste sorting machines, one with a funnel and pile, the other with a meshing device (no text or symbols)Assembling
Follow below assembling steps to install the pasta maker.
Important
• Make sure to tighten the front panel knobs during assembly.
- Make sure the appliance is not plugged in when assembling the appliance.
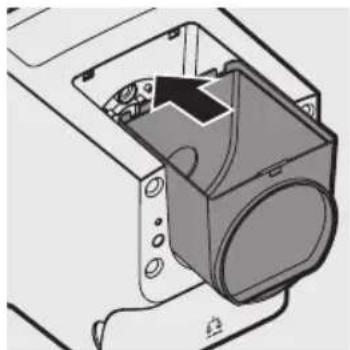
1 Push the mixing chamber into the appliance.
natural_image
Technical line drawing of a mechanical component with no visible text or symbols2 Point the mixing paddle to the hole in the main unit. Insert the mixing paddle all the way into the main unit.

natural_image
Mechanical assembly diagram showing a bracket with levers and a magnified inset of a component (no text or symbols)3 Attach the disc holder onto the appliance.
① Disc holder safety switch
② Disc holder safety switch lever
Note:
- Check that the safety switch ① and safety switch lever ② are set as shown in the illustration to the right.

14 English
4 Put the shaping disc onto the disc holder ①, and make sure it is firmly fixed on the disc holder ②.
Note:
• Make sure the inner cavity of the shaping disc and disc holder is properly fitted.

natural_image
Two technical diagrams showing a fan assembly process with labeled parts (1 and 2), no text or symbols present.5 Attach the front panel to the main unit.
① Disc holder safety switch lever
Note:
• Make sure the front panel is completely fastened before using the appliance.
- The front panel is heavy. Take extra caution when assembling it.

6 Fasten the front panel control knobs.
Note:
- If the front panel or the shaping disc is not properly assembled, the safety switch will prevent the appliance from working.

7 Close the mixing chamber lid properly.
Note:
- If the mixing chamber lid is not properly installed, the safety switch will prevent the appliance from working.

Using the pasta maker
Important
- Place the product on a flat surface to prevent any shaking or vibration.
- Make sure that all the parts (including the chamber lid) are well assembled before plugging in.
- Do not shake or move the appliance when it is weighing the flour.
- Do not put any object on the appliance when it is weighing the flour.
- Do not move or touch the power cord when the appliance is weighing the flour.
- Do not put less than 200g or more than 500g (2 cups) of flour in the chamber.
- Press the liquid calculation button after the flour weight is confirmed on the display.
- Pour in the liquid slowly through the water slot after the appliance starts kneading.
- If you want to dispose of the weighed flour before processing the next batch, empty the chamber and restart the appliance by unplugging and plugging in again.
- Do not put any ingredients that are 60^ C / 140^ F or above into the pasta maker, nor place the pasta maker in surroundings with high temperature ( 60^ C / 140^ F), for instance in a high temperature sterilization. This will damage the appliance.
- Never pour water into the mixing chamber before you place the chamber lid onto the chamber. Do not pour any liquids into the safety switch hole.
Preparing the ingredients
1 Put the plug in the power socket. The pasta maker will sound once, and all indicators will flash once.
Note:
• Make sure that all the parts are well assembled before plugging in.

natural_image
Illustration of a hand inserting a plug into a wall socket with an arrow indicating power input (no text or symbols)2 Wait until displays on the screen.
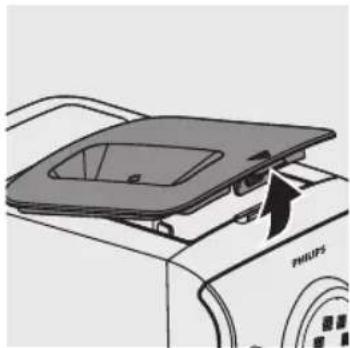
3 Remove the chamber lid.
4 Wait until 000 displays on the screen.
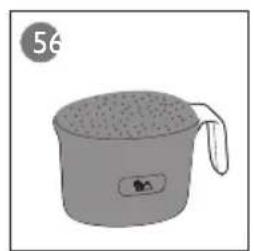
5 Measure the flour with the flour cup. One full cup is equivalent to 1-2 servings.
Note:
- One full cup of flour weighs around 250 gram (1-2 servings).

natural_image
Diagram of a refrigerator with a door cover and an arrow indicating direction (no text or symbols)

natural_image
Simple line drawing of a cooking pot with lid and handle (no text or symbols)6 Pour the flour into the chamber. If you want to make 3-4 servings, add a second cup of flour as you will need 2 cups (\~500g) of flour in total.
Note:
- Do not put less than 200g or more than 500g of flour in the chamber. If you put too little or too much flour in the chamber, the appliance will not operate.
7 The appliance automatically weighs the flour, and shows the flour weight in grams.
Note:
- Do not shake or move the appliance when it is weighing the flour.
- Do not put any object on the appliance when it is weighing the flour.
- Do not move or touch the power cord when the appliance is weighing the flour.
- Some recipes (for example cookies, gluten free pasta) require you to skip the weighing part. In this case, press the start/pause button▶II for 3 seconds, and the appliance will start kneading and extruding directly.

natural_image
Diagram of a Philips air conditioner unit showing internal components and fan (no text or symbols)
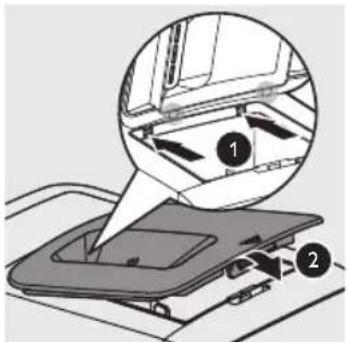
8 Close the chamber lid properly.
Note:
- Insert the two hooks into the appliance first ①, and then push the lid against the main unit ②.
- The appliance will not start working if the chamber lid is not properly closed. During the pasta making process, if the chamber lid becomes loose, the appliance will automatically stop working.
9 Press the program selection button:◀ to choose the type of pasta you want to make.

18 English
| Program Tip Corresponding recipe | ||
| Plain Pasta/ noodle | When you are making pasta with flour and water only, select the "Plain Pasta" program | Wheat noodleDurum noodleRamenUdonCurried noodle |
| Egg/ Flavored Pasta/ noodle | When you are making pasta with flour and other ingredients (eggs or veggie juice), select the "Egg/ Flavored Pasta" programFor dumpling sheet or soba, select this program as well. | Wheat pastaDurum pastaDumpling sheetWhole wheat pasta/noodleSpelt pasta/noodleCarrot pasta/noodleTomato pasta/noodleSobaBeet pasta/noodleSpinach lasagna/dumpling/ wontonFennel pepper pasta/noodlePasta neroHerb pasta/noodle |
10 Wait until the flour weight is confirmed, and then press the liquid calculation button ⬇ and the required amount of water or egg mixture displays on the screen.
Note:
- Only press the liquid calculation button after the flour weight is confirmed on the display.
11 Measure the correct amount of water, egg mixture or vegetable mixture with the supplied water cup.

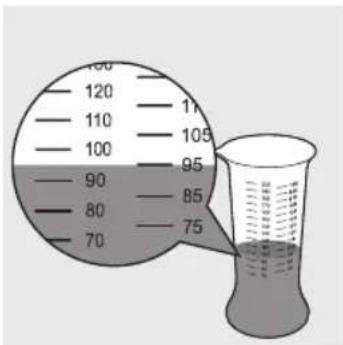
Note:
• Make sure to measure the liquid volume at eye level on a flat surface.
- When making the egg mixture, crack the egg into the water cup. Add water up to the required amount, and then whisk the water and egg to combine.
• If preferred, 2 eggs can be used instead of 1.
- When making the vegetable mixture, crack the egg into the water cup. Add vegetable juice up to the required amount, and then whisk the juice and egg to combine.

Starting the pasta making program
Important
- Do not select the extra extrusion program before the dough mixing is complete. Otherwise, this will damage the pasta maker.
- Do not disconnect the power cord before the processing is complete. If you have to stop processing, press the start/pause button▶II to stop the working process and then disconnect the power cord from outlet before performing other operations.
- To prolong the lifetime of the appliance, the continuous working time of the appliance should be less than 45 minutes. You can restart using the appliance after a 15 minute rest.
- If you intend to use the appliance continuously, clean the shaping disc with the supplied cleaning tool each time after each pasta making session. For easy cleaning, do not soak the shaping disc directly in water.
1 Press the start/pause button t▶start processing, and the processing time starts to count down.

2 After the kneading starts, slowly pour in the water or egg mixture along the entire length of the slot in the lid.
Note:
- During dough mixing, do not add other ingredients after you have poured in the water. Otherwise, it will affect the results of the pasta texture.
3 After the pasta maker finishes kneading, it will beep a few times and start extruding pasta after a few seconds. Place a container right under the outlet. Cut the pasta into the length you need with the flat cleaning tool.
Note:
- If the ratio of liquid and flour is not correct, the extrusion will not succeed. In this case, prepare the ingredients again.
- Move the cleaning tool downwards to cut the pasta.

natural_image
Illustration of a funnel pouring liquid into a washing machine (no text or symbols)
natural_image
Illustration of a sewing machine pouring liquid into a bowl (no text or symbols)4 After the pasta making is complete, if you notice some leftover dough inside the chamber, you can press the extra extrusion button first, and then press the start/pause button for extra extrusion.
Note:
• The countdown timer of the extra extrusion program is 3 minutes.
- You may find some fine pasta threads on the pasta surface. This is normal.
- The cooking time of the pasta varies depending on personal preferences, pasta shapes, and number of servings.
5 If you want to make another batch of pasta right after the first batch is finished, press the program selection button:◀ and wait until 000 displays on the screen. Then start from step 3 (remove the chamber lid) at Page 17, and all the rest steps are the same as the first batch.
Note:
• Make sure that all the parts (including the chamber lid) are well assembled before plugging in.
Pasta type reference table
This table is for your reference to select the right program to make various pasta. You can find the recipes in the recipe book.
| Program | Tip Corresponding recipe | |
| Plain Pasta/noodle | When you are making pasta with flour and water only, select the "Plain Pasta" program | Wheat noodleDurum noodleRamenUdonCurried noodle |
| Egg/Flavored Pasta/noodle | When you are making pasta with flour and other ingredients (eggs or veggie juice), select the "Egg/Flavored Pasta" programFor dumpling sheet or soba, select this program as well. | Wheat pastaDurum pastaDumpling sheetWhole wheat pasta/noodleSpelt pasta/noodleCarrot pasta/noodleTomato pasta/noodleSobaBeet pasta/noodleSpinach lasagna/dumpling/wontonFennel pepper pasta/noodlePasta neroHerb pasta/noodle |
Important
- The pasta recipes provided in the recipe book have been tested for success. If you experiment with or use other pasta recipes, the flour and water/egg ratios will need to be adjusted to the flour and water cup ratios included with the pasta maker. The pasta maker will not operate successfully if you do not adjust the new recipe accordingly.
Note:
- To ensure the quality of the pasta, use gluten flour to make pasta. Follow the recommended proportion to add the ingredients.
- Seasonal changes and using ingredients from different regions may affect the flour/water ratio. You may adjust based on the recommended proportion.
- When making egg pasta or vegetable pasta, make sure you whisk the egg mixture or vegetable juice evenly with the water before pouring into the chamber through the slot in the lid. When adding ingredients, make sure the ingredient is in a liquid form.
- See the recipe book provided for additional pasta recipe variations and many delicious new recipes to try.
- When making gluten free pasta/noodles or cookies, do not follow the recommended liquid amount indicated by the machine.
22 English
Cleaning
Important
- Disconnect the plug from the power outlet before cleaning or disassembling the appliance.
- Do not immerse the main unit in water.
- Do not use a scourer, caustic cleaners, or abrasive cleaners (for examples, gasoline, alcohol, and propanol) to clean the appliance.
- Clean the appliance each time after use, or the appliance might not operate properly.
• Take extra caution when cleaning the appliance to avoid getting cut by any sharp edges. - The shaping discs and all detachable parts of the appliance are dishwasher safe. When you clean them in a dishwasher, make sure to set the temperature below 60°C (140°F).
1 Disconnect the plug from the power outlet.

natural_image
Illustration of a plug inserted into an electrical outlet with a black arrow indicating direction (no text or symbols)2 Remove the chamber lid from the appliance.
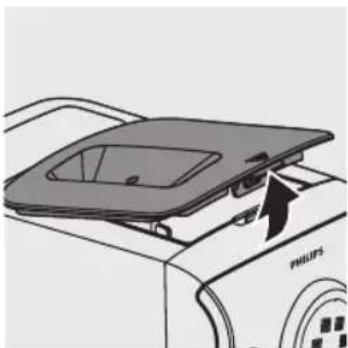
natural_image
Diagram of a refrigerator with a door panel and fan, showing airflow direction (no text or symbols)3 Loosen the front panel control knobs.
Note:
- The front panel is heavy. Take extra caution when removing it.

4 Disassemble the front panel, the shaping disc, the shaping disc holder, the mixing paddle, and the mixing chamber in order.
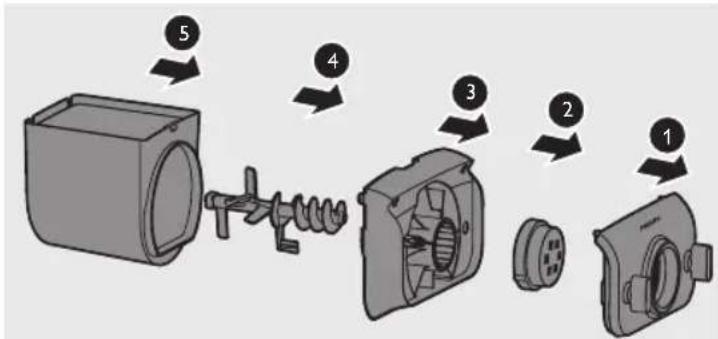
5 Use a dry cloth to clean flour residue in the hole ① where the mixing paddle is placed.
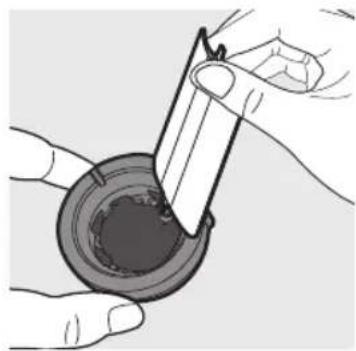
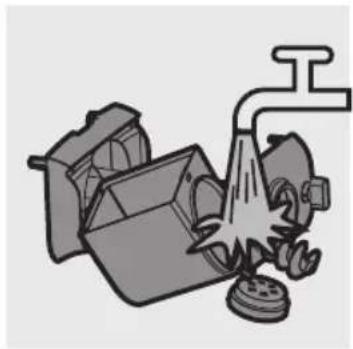
6 Clean the shaping disc with the supplied cleaning tool to remove the dough residues. After that, you can clean it with water.
Tip:
- For the spaghetti, thick spaghetti, angel hair and fettuccine shaping discs, put the shaping disc into the freezer for 2 hours. Then use the corresponding cleaning tool to poke out the dough in the holes.

flowchart
graph LR
    A["Refrigerator"] --> B["Close Top Cover"]
    B --> C["Close Bottom Cover"]
    C --> D["Close Top Cover with Cover"]
    D --> E["Close Bottom Cover with Cover"]

natural_image
Illustration of hands using a tool to apply liquid into a container (no text or symbols visible)24 English
7 Clean all detachable parts.

natural_image
Illustration of a mechanical device with a pipe and explosion effect (no text or symbols)8 Use a dry cloth to clean the main unit, control panel, and the exterior of the pasta maker.

natural_image
Line drawing of a sewing machine with a cable and attached plug (no text or symbols)9 Store the pasta maker in a dry, well ventilated place after use.
Note:
- After cleaning, make sure all parts and the shaping disc air dry thoroughly before storing. Assemble the pasta maker back for next use.
Storing the shaping discs and cleaning tools
1 Insert the shaping disc ① and cleaning tool ② together. Put ① and ② into the storage drawer. Move the sliding bar ③ to secure the shaping discs and cleaning tools.
Make sure the cleaning tools and shaping discs are dry before putting them into the storage drawer.

flowchart
graph LR
    A["Step 1: Component 1"] --> B["Step 2: Component 2"]
    B --> C["Step 3: Internal Component with arrows indicating assembly"]
Troubleshooting
This chapter summarizes the most common problems you could encounter with the appliance. If you are unable to solve the problem with the information below, visit www.philips.com/support.
The indicators do not light up.
- The power plug is not connected correctly. Check whether the power plug is plugged correctly and the outlet is working properly.
After pressing the start/pause button the appliance sounds but does not work.
- The chamber is assembled incorrectly. The shaping disc, or the front panel is assembled incorrectly. Make sure you follow the user manual to assemble all parts correctly.
The safety switch is triggered and the appliance suddenly stopped or suddenly restarts during the processing.
- The front panel knob is loose. Make sure the front panel is securely assembled. - Excessive ingredients in the pasta maker. The maximum amount of flour used for each batch is 500g. If more than 500g is added, reduce the amount of flour before next batch.
During processing, the appliance stops. There is no alarm sound or flashes.
- The pasta maker has overheated due to long continuous working time. Disconnect from the power source, and allow the pasta maker to cool down. To better protect the lifetime of the appliance, the continuous working time should be less than 45 minutes. You can restart using the appliance after 15 minutes of rest.
When weighing the flour, the weight shown on the screen changes all the time.
- You are touching the appliance or the power cord.
When the appliance is weighing the flour, do not touch the appliance or the power cord.
The appliance stops during processing, EEEE displays on the screen, the indicators are flashing quickly, and the alarm sounds.
- The mixing paddle may be blocked by some foreign objects.
The dough may be too dry.
The wrong program is selected.
Disconnect from the power source, clean the pasta maker, and follow the user manual again to restart the pasta making.
Too much leftover dough inside the chamber.
- The flour is either exposed to moisture before use, or the dough is too wet.
Keep your flour dry during storage. Follow the user manual instructions to restart the pasta making. - The chamber, the mixing paddle, the shaping disc are not cleaned properly before use.
Make sure all parts are clean before use.
• The mixing paddle or the chamber is still wet.
Make sure all parts are completely dry before use.
• Water is not added in the right order.
The flour type is not suitable.
Follow the user manual instructions to make pasta.
Small amount of water is leaking out from the appliance.
• Water is added before the program starts.
Follow the user manual instructions to add water right after the program starts.
The mixing paddle is running idle, and there is no pasta coming out.
• The ratio of the flour and water is incorrect.
Disconnect the plug from the power source and discard dough. Clean the pasta maker, re-measure ingredients correctly and follow the user manual instructions again to restart the pasta making.
Unable to make pasta successfully with the liquid calculation function.
- The required liquid amount indicated on the display screen does not apply to some recipes (for example cookies, gluten free pasta).
These recipes require you to skip the liquid calculation part. In this case, press the start/pause button for 3 seconds, and the appliance will start kneading and extruding directly.
After the flour is poured in the mixing chamber, the weight shown on the display screen changes a bit after the lid is closed.
• After the appliance is plugged in, the chamber lid is removed when the weighing system is still calibrating.
Strictly follow step 2, 3 and 4 on page 17.
The kneading process does not start and E1 displays on the screen.
- There are more than 500g of flour in the mixing chamber.
Make sure that you do not put more than 500g of flour in the mixing chamber for one batch.
The kneading process does not start and E2 displays on the screen.
- There are less than 200g of flour in the mixing chamber.
Make sure that you do not put less than 200g of flour in the mixing chamber for one batch.
E3 displays on the screen.
- The weighing system has been reset.
When using the appliance, make sure to put it on a flat and stable surface.
E4 displays on the screen.
- Software in the appliance is not working.
Contact the Philips Consumer Care Center in your country.
E5 displays on the screen.
- The total weight exceeds the upper limit of the weighing system (approximately 999 grams).
Unplug the appliance, remove any objects placed on the appliance, empty the mixing chamber, and start again from step 1 in chapter "Preparing the ingredients" (page 16).
EEEE displays on the screen.
- Excessive current is flowing through the circuit.
Pull power plug out of outlet first and then plug in again to reset the appliance.
Product information
| Model HR2354/12 | |
| Motor power 200W | |
| Rated voltage AC220-240V | (50Hz) |
| Dimensions (L x W x H) 343mm x 215mm x 315mm / 13.5 in x 8.5 in x 12.4 in | |
| Net weight 6.9kg / 15.2 lb | |
- For rated voltage and frequency information, refer to the typeplate on the product. Product information is subject to change without prior notice.
Recycling

This symbol means that this product shall not be disposed of with normal household waste (2012/19/EU).
Follow your country's rules for the separate collection of electrical and electronic products. Correct disposal helps prevent negative consequences for the environment and human health.
Guarantee and service
If you have a problem, need service or need information, see www.philips.com/support or contact the Philips Consumer Care Center in your country.


natural_image
Line drawing of a French food maker with control panel and power plug (no text or symbols)
Wasserbecher
Mehlbecher


natural_image
Line drawing of a Philips washing machine with a power outlet and control panel (no text or symbols)
natural_image
Diagram of a car interior showing a solar panel mounted on the roof, with no visible text or symbols.natural_image
Two grayscale illustrations of industrial machinery components, one with a pipe outlet and the other with a meshed component (no text or symbols)Zusammenbau
natural_image
Technical line drawing of a mechanical component with no visible text or symbolsnatural_image
Mechanical assembly diagram showing a bracket with internal components and a magnified inset highlighting a specific section (no text or symbols present)42 Deutsch
natural_image
Two technical illustrations of a fan assembly, showing internal components and a close-up view (no text or symbols)natural_image
Illustration of a hand inserting a plug into a wall socket with a cable (no text or symbols)44 Deutsch
natural_image
Diagram of a refrigerator with a door cover and air vent, showing airflow direction (no text or symbols)natural_image
Simple line drawing of a gray cooking pot with lid and handle (no text or symbols)Hinweis:
natural_image
Diagram of a Philips air conditioner unit showing internal components and fan (no text or symbols)


natural_image
Line drawing of a kitchen mixer with a bowl of food being poured (no text or symbols)Hinweis:
natural_image
Illustration of a plug inserted into an electrical outlet with a black arrow indicating direction (no text or symbols)natural_image
Diagram of a refrigerator with a door panel and fan, showing airflow direction (no text or symbols)natural_image
Hand cleaning a device with a cloth, showing the button labeled '1' (no text or symbols on the device itself)Tipp:
flowchart
graph LR
    A["Refrigerator with lid"] --> B["Close-up of interior panel"]
    B --> C["Close-up of circular component with lid"]
    C --> D["Close-up of circular component with lid"]

natural_image
Illustration of hands using a tool to apply material to a circular component (no text or symbols visible)52 Deutsch
natural_image
Illustration of a mechanical device with a pipe and explosion effect (no text or symbols)natural_image
Line drawing of a hair dryer with a cable and connector (no text or symbols)natural_image
Line drawing of a Huawei Pi 30 electric kitchen machine with power cord and control panel (no text or symbols on device body)natural_image
Line drawing of a Philips washing machine with a power outlet and control panel (no text or symbols)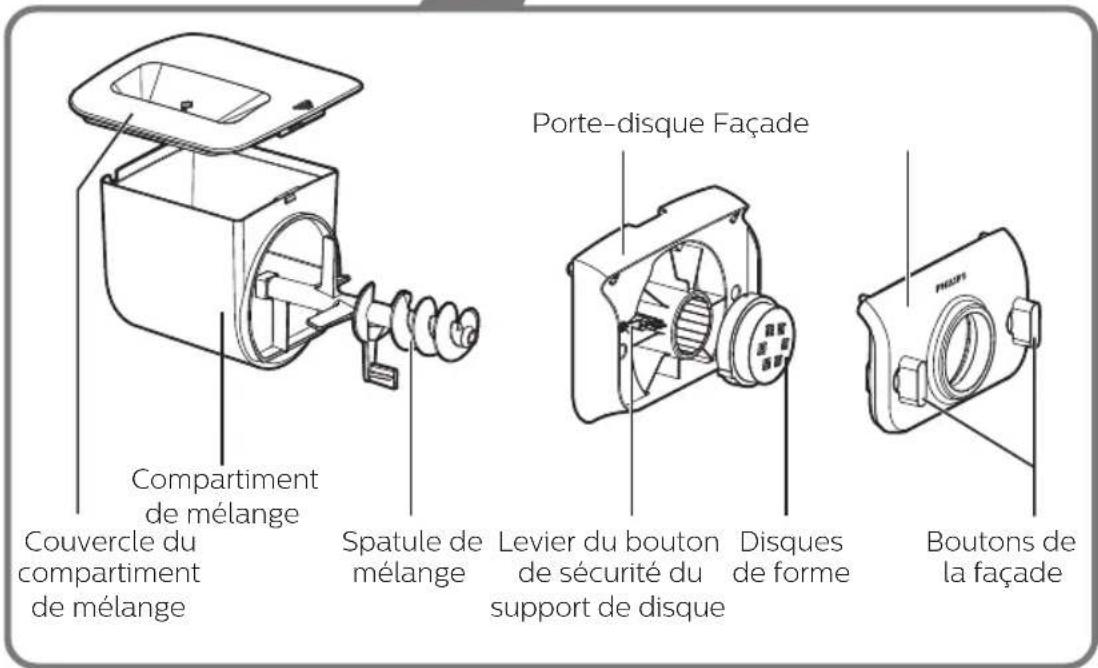
natural_image
Diagram of a car interior showing a roof cover and fan (no text or symbols)natural_image
Two grayscale illustrations of industrial waste sorting machines, one with a drain and pile, the other with a bag (no text or symbols)Assemblage
natural_image
Technical line drawing of a mechanical component with no visible text or symbolsnatural_image
Mechanical assembly diagram showing a bracket with gears and a circular inset highlighting a component (no text or symbols)natural_image
Two technical illustrations of a fan assembly, showing internal components and a close-up view (no text or symbols)natural_image
Hand inserting a plug into a wall socket with a black arrow indicating the electrical component (no text or symbols present)72 Français
natural_image
Diagram of a refrigerator with a door panel and an arrow indicating airflow direction (no text or symbols)natural_image
Simple line drawing of a cooking pot with lid and handle (no text or symbols)Remarque :
natural_image
Diagram of a Philips air conditioner unit showing internal components and fan (no text or symbols)
74 Français
natural_image
Illustration of a funnel pouring liquid into a washing machine (no text or symbols)
natural_image
Line drawing of a kitchen mixer blending liquid into a bowl (no text or symbols)natural_image
Illustration of a hand inserting a plug into a wall socket (no text or symbols)natural_image
Diagram of a refrigerator with a door lid and fan, showing airflow direction (no text or symbols)natural_image
Illustration of a hand cleaning a device with a cloth (no text or symbols visible)Conseil :
flowchart
graph LR
    A["Refrigerator with lid"] --> B["Cut into a circular component"]
    B --> C["Close-up of the lid"]
    C --> D["Close-up of the lid with four buttons"]
    D --> E["Final product with four buttons"]
natural_image
Illustration of hands using a pipette to apply liquid into a circular container (no text or symbols visible)natural_image
Illustration of a mechanical device with a lever and explosion effect (no text or symbols)natural_image
Line drawing of a sewing machine with a cable and attached plug (no text or symbols)flowchart
graph LR
    A["Step 1: Component 1"] --> B["Step 2: Component 2"]
    B --> C["Step 3: Final Assembly with Internal Component"]
Dépannage
natural_image
Diagram of a car interior showing a roof cover and directional arrow, no text or symbols present2 Svitare le manopole del pannello anteriore.
Nota
natural_image
Two grayscale illustrations of industrial waste or mechanical components, one showing a pipe pouring into a container and the other with a bag partially filled (no text or symbols)Montaggio
natural_image
Technical line drawing of a mechanical component with no visible text or symbols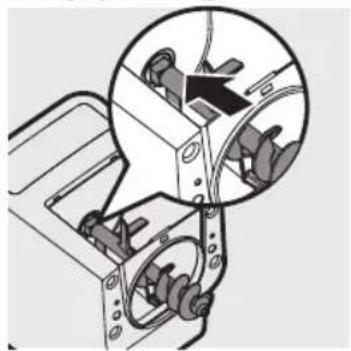
natural_image
Mechanical assembly diagram showing a bracket with internal components and a magnified inset (no text or symbols)
natural_image
Two technical diagrams showing a fan assembly process: one with internal components and the other with a circular fan (no text or symbols present)natural_image
Hand inserting a plug into a wall socket with an arrow indicating the electrical component (no text or symbols present)natural_image
Diagram of a refrigerator with a door lid and fan, showing airflow direction (no text or symbols)natural_image
Simple line drawing of a cooking pot with lid and handle (no text or symbols)Nota
natural_image
Diagram of a Philips air conditioner unit with internal components and fan (no text or symbols)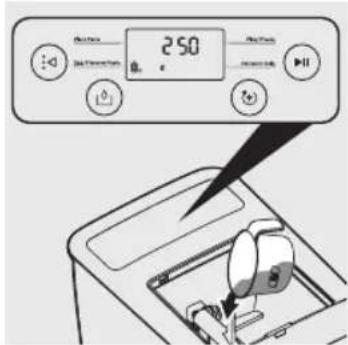

102 Italiano
natural_image
Illustration of a funnel pouring liquid into a washing machine (no text or symbols)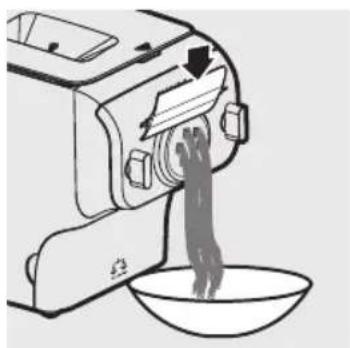
natural_image
Line drawing of a kitchen mixer with a bowl of food being poured into it (no text or symbols)natural_image
Illustration of a plug inserted into an electrical outlet with a black arrow indicating direction (no text or symbols)natural_image
Diagram of a refrigerator with a door panel and fan, showing airflow direction (no text or symbols)3 Svitare le manopole del pannello anteriore.
Nota
natural_image
Illustration of a hand cleaning a device with a cloth (no text or symbols)Suggerimento:
flowchart
graph LR
    A["Refrigerator with lid"] --> B["Cut into a bowl"]
    B --> C["Close-up of the bowl with lid"]
    C --> D["Close-up of the cup with lid"]
    D --> E["Final oven with lid"]

natural_image
Illustration of hands using a tool to apply liquid into a circular container (no text or symbols visible)natural_image
Illustration of a mechanical device with a pipe and explosion effect (no text or symbols)natural_image
Line drawing of a sewing machine with attached cable (no text or symbols)natural_image
Line drawing of a Siemens washing machine with power outlet and control panel (no text or symbols)| Afkortingen |
| g = gram |
| ~ = ongeveer |
| ml = milliliter |
| mm = millimeter |
| lb = pound |
| kg = kilogram |
| in = inch |
natural_image
Diagram of a car interior showing a lid and fan, with no visible text or symbolsnatural_image
Two grayscale illustrations of industrial waste or mechanical components, one showing a pipe pouring into a container and the other showing a pile of waste with a bag (no text or symbols)In elkaar zetten
natural_image
Technical line drawing of a mechanical housing or enclosure component (no text or symbols visible)natural_image
Mechanical assembly diagram showing a bracket with levers and gears, no text or symbols presentnatural_image
Two technical diagrams showing a fan assembly process: one with internal components and the other with a circular fan (no text or symbols present)natural_image
Illustration of a hand inserting a plug into a wall socket with a black arrow indicating the electrical component (no text or symbols present)natural_image
Diagram of a refrigerator with a door cover and air vent, showing airflow direction (no text or symbols)natural_image
Simple line drawing of a cooking pot with lid and handle (no text or symbols)Opmerking:
natural_image
Diagram of a Philips air conditioner unit with internal components (no text or symbols)

132 Nederlands
natural_image
Illustration of a funnel pouring liquid into a washing machine (no text or symbols)
natural_image
Line drawing of a kitchen mixer with a bowl of food being poured into it (no text or symbols)natural_image
Illustration of a hand inserting a plug into a wall socket (no text or symbols)natural_image
Diagram of a refrigerator with an air vent and directional arrow indicating airflow or movement (no text or symbols)natural_image
Illustration of a hand cleaning a device with a cloth (no text or symbols visible)Tip:
flowchart
graph LR
    A["Refrigerator with lid"] --> B["Cut the cup into earpiece"]
    B --> C["Close-up of cup, so open again"]

natural_image
Illustration of hands using a pipette to apply liquid into a circular container (no text or symbols visible)7 Maak alle afneembare onderdelen schoon.
natural_image
Illustration of a mechanical device with a handle and wheels, no text or symbols presentnatural_image
Line drawing of a hair dryer with a cable and connector (no text or symbols)flowchart
graph LR
    A["Step 1: Component 1"] --> B["Step 2: Component 2"]
    B --> C["Step 3: Final Assembly with Internal Component"]
Problemen oplossen


- Always here to help you
- English
- Assembling
- Using the pasta maker
- What's in the box
- English
- Table of Contents
- Important
- Safety
- Warning
- Caution
- Electromagnetic fields (EMF)
- Overview
- Disassembling and cleaning before first use
- Note:
- English
- English
- Preparing the ingredients
- English
- Starting the pasta making program
- Pasta type reference table
- English
- Cleaning
- Tip:
- English
- Storing the shaping discs and cleaning tools
- Troubleshooting
- The indicators do not light up.
- Too much leftover dough inside the chamber.
- Small amount of water is leaking out from the appliance.
- The mixing paddle is running idle, and there is no pasta coming out.
- Unable to make pasta successfully with the liquid calculation function.
- After the flour is poured in the mixing chamber, the weight shown on the display screen changes a bit after the lid is closed.
- The kneading process does not start and E1 displays on the screen.
- The kneading process does not start and E2 displays on the screen.
- E3 displays on the screen.
- E4 displays on the screen.
- E5 displays on the screen.
- EEEE displays on the screen.
- Product information
- Recycling
- Guarantee and service
- Zusammenbau
- Deutsch
- Deutsch
- Hinweis:
- Tipp:
- Deutsch
- Assemblage
- Français
- Remarque :
- Français
- Conseil :
- Dépannage
- Nota
- Montaggio
- Italiano
- Suggerimento:
- In elkaar zetten
- Opmerking:
- Nederlands
- Problemen oplossen
Brand : PHILIPS
Model : Avance Collection HR2354
Category : Pasta machine