OX6778FR - Multicooker MOULINEX - Free user manual and instructions
Find the device manual for free OX6778FR MOULINEX in PDF.
Download the instructions for your Multicooker in PDF format for free! Find your manual OX6778FR - MOULINEX and take your electronic device back in hand. On this page are published all the documents necessary for the use of your device. OX6778FR by MOULINEX.
USER MANUAL OX6778FR MOULINEX
14 Cooking time selector
19. Stop/change during cooking
STOPPING COOKING DELAYED START KEEP WARM
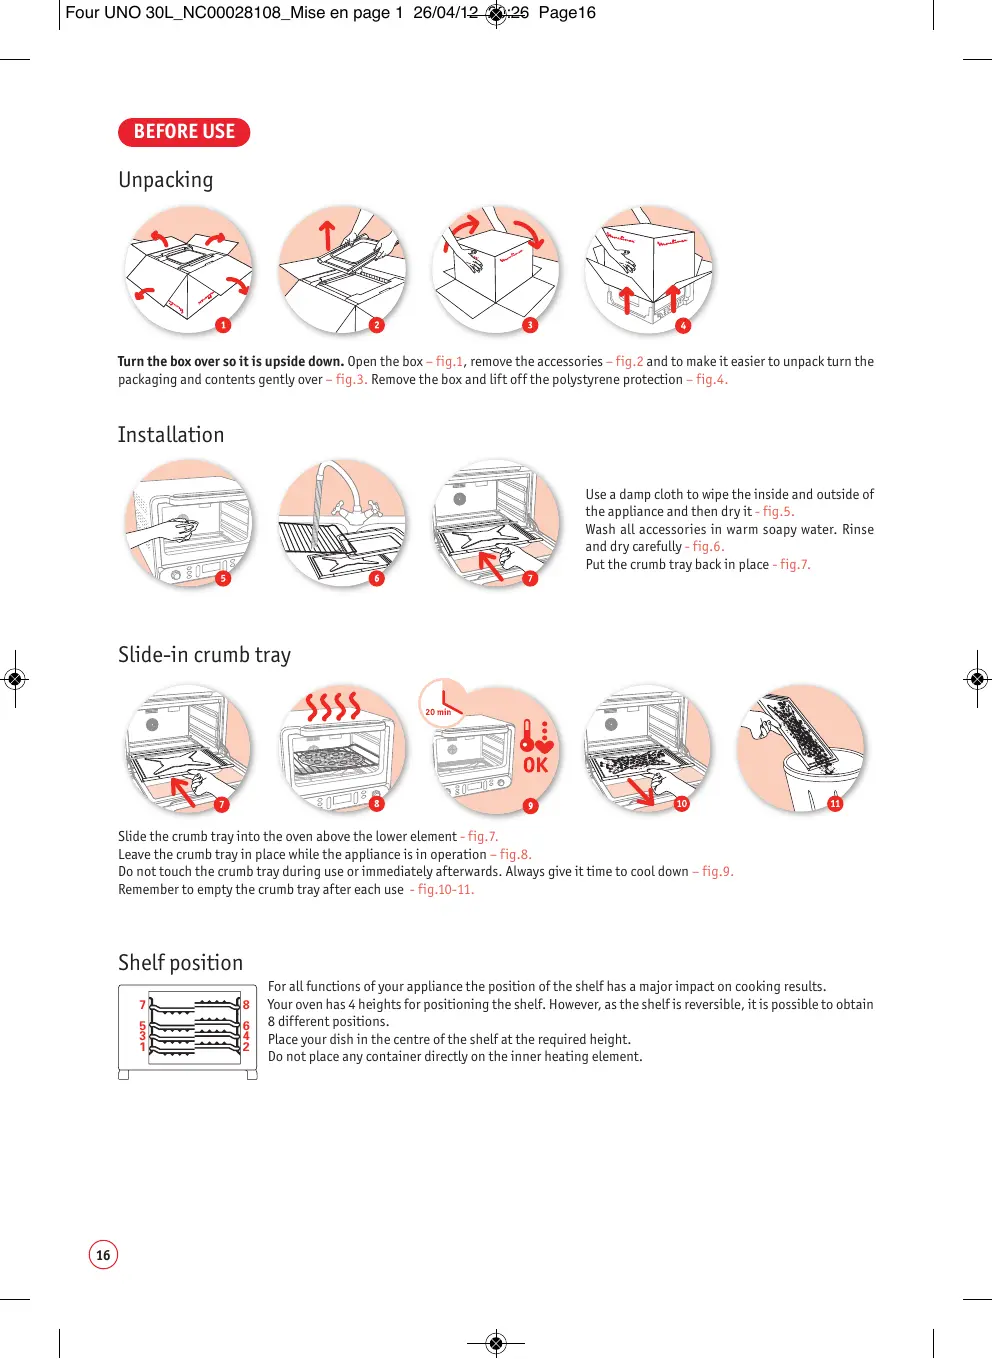
Turn the box over soit is upside down. Open the box - fig.1, remove the accessories - ig.2 and to make it easier to unpackturn the packaging and contents gently over - fig.3. Remove the box and Lift offthe polystyrene protection - fig... Installation Use a damp cloth to wipe the inside and outside of the appliance and then dryit-fig.5. Wash all accessories in warm soapy water. Rinse and dry carefully- 9.6. Put the crumb tray back in place - fig.7. Slide the crumb tray into the oven above the lower element - fig.7. Leave the crumb tray in place while the appliance is in operation fig.8. Do not touch the crumb tray during use or immediately afterwards. Always give it time to cool down - fig.9. Remember to empty the crumb tray after each use - fig.10-11. Shelf position For al functions of our appliance the position ofthe shelf has a major impact on cooking results. 7 22225 | Youroven has 4 heights for positioning the shelf. However, as the shelis reversible, itis possible to obtain 5 6 | 8 different positions. H | place your ish inthe centre ofthe shelf at the required height. Do not place any container directly on the inner heating element. fe, a)
Four UNO 30L_NCO00028108_Mise en page 1 26/04/12 Setting the time After plugging in the oven - fig.12, the digital display automatically shows the time as “00:00” with the hours flashing - fig.13. Set the hour using the Left rotating knob - fig.14. Validate by pressing the clock button -fig.15. The minutes will then flash automatically - ig.16. Set the minutes using the Left À rotating knob - fig. 17. Validate by pressing the clock button again -#ig.18. To change the time press and hold the clock button for a few seconds. WARNING! Do not confuse the clock button and the delayed start button @. First use while empty Before first use the oven must be operated while empty for 20 minutes to remove anv possible manufacturing residue. knob - fig.20. The “convection” logo [should appear on the LCD screen - fig.21. Validate by pressing “mode” again - fig.22. ur Em, (Fr) à à) CE) D = L#)
The temperature flashes - fig.23. Select the temperature: 240° using the Left rotating knob - fig.24. Validate by pressing "temperature" - fig.25. The hours wilL flash - fig.26. Leave the hours at 0. Validate by pressing the clock button - fig.27. The minutes will flash - fig.28. Set the minutes: 20 minutes using the Left rotating knob - fig.29. Validate by pressing the clock button again = fig.30- fig. 31. Press [1) once to stop cooking -fig.32.
Four UNO 30L_NCO00028108_Mise en page 1 26/04/12 TOMATIC MODE Using the programmed menus On first use, some smoke may escape from the oven - fig.33. This is normal and will gradually disappear with use. After 20 minutes the ven will beep and then stop automatically - fig.34. Leave the appliance to cool -fig35. The oven is plugged in and the time set. Press “menu” - fig.36. The menu and the cooking time wil flash - fig.37. Select your menu using the right rotating knob - fig.38. Press “menu” again to validate - fig. 30.
The weïght will flash - fig.40. Selectthe weight (see table describing the automatic menu modes) using the right rotating knob = fig.41 and validate by pressing the “weight” button - fig.42. The cooking time is automatically displayed according to the validated weight. To program a delayed start or keep warm mode see the appropriate chapters. Press [1 once to start cooking -fig.43. The cooking chart is for information purposes. Depending on your tastes, cooking can be continued in manual mode. UE LL Atthe end of cooking the oven will beep and stop automatically - ig.44-45-46.
- The cooking chart is for information purposes only and is not to be taken as a reference.
Natural convection (or conventional oven): Natural convection (or conventional oven): the heat is generated by the oven's upper and Lower elements. This traditional cooking mode is suitable for cooking meat, fish and puddings. GrilL (upper element): the heat is generated by the oven's upper element. This can be used for traditional griling/barbecuing and also to brown dishes. his special function operates the fan at the rear of the oven in order to reduce the defrosting time of the ingredients that you put in your oven, without any risk of them being cooked. The temperature cannot be changed in defrost mode. Fan oven: the heat is generated then blown around bya fan located atthe rear ofthe oven which guarantee exceptionally even cooking anywhere in the oven. The blowing around of the air allows your food to be cooked eventy. For conventional, grilLand convection modes, the temperature can be set at between 100°C and 240°C. Using the manuals menus The oven is plugged in and the time set. Place the shelf at the required height. Place the tray with the food in the oven - fig.£7 and close the door. Press “mode” fig.48. The cooking mode will flash - Fig.49. Select the cooking mode using the Left rotating knob - fig.50. Validate by pressing “mode” again “fig5l. The temperature will flash - fig.52. Select the temperature using the Left rotating knob - ig.53.
ee») PLEASE NOTE: the temperature cannot be changed in defrost mode. Validate by pressing "temperature" - fig.54. The cooking timewilL flash fig.55: setthe time by turning he left rotating knob - #ig.56, validate by pressing the clock button -fig.57.
The minutes wlLflash - 9.58. Setthe minutes by turmng the Let rotating knob - 1.59, validate by pressing the clock button again — #ig.60. The maximum cooking time is 3h59. To program a delaved start or keep warm mode see the appropr Press [1] once to start cooking - fig.61. LL db Atthe end ofthe cooking time, the oven will beep and stop automatically - Fig.62-63-64. Cooking table : manual mode* (5e Fe Pepe pes Pie O 4 0 233°C 37 min Fruit cake 3 10 185°C 45 min Quiche O 4 0 233°C 37 min Clafoutis (E] 4 10 193°C 45 min O 4 10 185°C 23 min Sponge cake 4 10 185°C 25 min Roast pork (1 kg) Ka 5 0 193°C 1h20 min
- The cooking chart is for information purposes only and is not to be taken as a reference.
STOPPING CO ING DELAYED START Press [F) once - fig.65. Change your program (cooking mode, temperature and/or cooking time), press [] once to validate and start cooking again - fig.66. To stop cooking, press and hold [F] untilthe appliance switches to standby mode - 9.67. The delayed start function allows you to program the start of cooking from 5 minutes to 24 hours later. WARNING! Do not confuse the delayed start button andthe clock button The cooking mode, time and temperature have already been set using manual mode or the programmed menu mode (see appropriate chapters on programming). Press the “delayed start” button @ - fig.68. The "delayed Start” pictogram and the clock will flash - fig.69. Set the cooking start time using the Left rotating knob - fig.70. Validate by pressing the “delayed start” button again - fig.71. The “delayed start” pictogram @ wilLthen appear onthe screen. This means that the delayed start program has been entered correctiy = fig.72. Press [1] once to start cooking - fig.73. When the timer has started, thetwo points separating the hours and minutes wi flash - Fig. 74. This display allows vou to be sure that the program has started. PLEASE NOTE! When a delayed start has begur normal for the oven light not to come on until cooking start.
| Four UNO 30L_NC00028108_Mise en page 1 26/04/12-@$-27 Page23 The cooking parameters have been set. Press the “keep warm" button -fig.75. The “keep warm” pictogram 4 and the clock will flash - fig.76. RSet the required time for keeping the oven warm using the Left rotating knob -fig.77. Validate by pressing the “keep warm” button again - fig.78 -fig.79. Press [1] once to start cooking - fig.80. Atthe end of cooking, the oven willautomatically switch to “keep warm” mode. The two delayed start and keep warm functions can be combined. ossible to set the keep warm function while cooking is in progress (see chapter on changes during cooking). with defrost mode. This safety feature prevents any change to the cooking settings by children under 8 years of age who should not use this appliance unless continuous supervision by a responsible adult is given. After starting cooking - fig.51, press and hold the weight button - fig.82. SECU will then appear on the screen - fig.83 and will disappear after a few seconds. The control panel is now locked. To unlock the control panel, press and hold the weight button again. SECU will be displayed on the screen and will disappear after a Few seconds. The control paneLis now unlocked. PLEASE NOTE! When the control panel locking is activated, the button [: is still accessible but the control panel remains Locked. To access the other keys, unlock the control panel. GENERAL REMARKS PLEASE NOTE! no action is carried out for 30 seconds the oven automatically goes into standby mode. TROUBLESHOOTING GUIDE
ERR1 Faulty temperature probe Consult an After-Sales Service Centre ERR2 Electrical problem Consult an After-Sales Service Centre ERR3, ERR4 Temperature regulation problem Consult an After-Sales Service Centre
Do not allow grease to build up on the appliance. Before any maintenance, cleaning or storage unplug the appliance and allow it to cool down - fig.84-85. Do not use any harsh cleaning products (especially oven cleaning products and metal or abrasive scouring pads) -fig.56-87. To clean the outside of the appliance simply wipe over with a sponge - fig.88. Clean the door, non-stick or lacquered surfaces and the glass components with a damp sponge dipped in à gentle soap solution - fig.89. Do not use cleaning products intended for metal (for stainless steel, copper, etc.). Your oven has non-stick walls which can easily be cleaned with soapy water. Allaccessories can be cleaned with soapy water.