CHEERIO - Stroller CHICCO - Free user manual and instructions
Find the device manual for free CHEERIO CHICCO in PDF.
User questions about CHEERIO CHICCO
0 question about this device. Answer the ones you know or ask your own.
Ask a new question about this device
Download the instructions for your Stroller in PDF format for free! Find your manual CHEERIO - CHICCO and take your electronic device back in hand. On this page are published all the documents necessary for the use of your device. CHEERIO by CHICCO.
USER MANUAL CHEERIO CHICCO
natural_image
Line drawing of a stroller with adjustable seat and wheels (no text or symbols)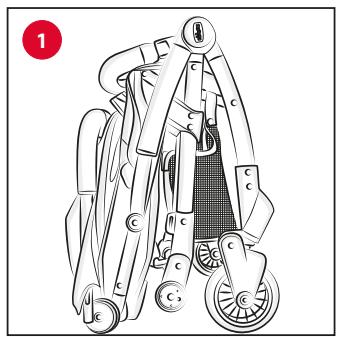
natural_image
Line drawing of a stroller with wheels and buttons, no text or symbols present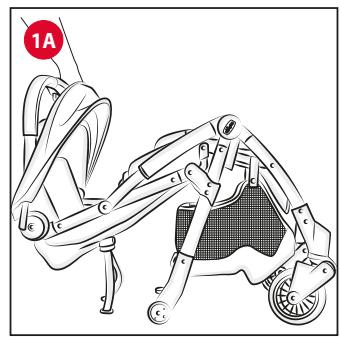
text_image
1A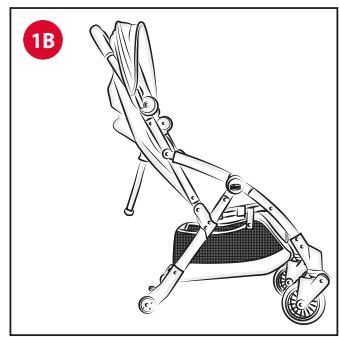
natural_image
Line drawing of a small outdoor scooter with wheels and handle (no text or symbols)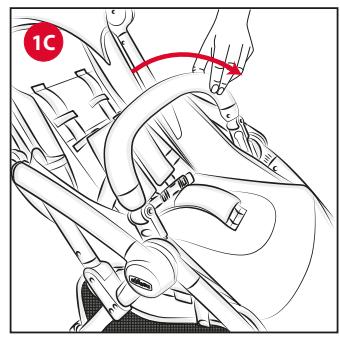
natural_image
Technical illustration of a car seatbelt mechanism with hand placement and red arrow indicating rotation (no text or symbols)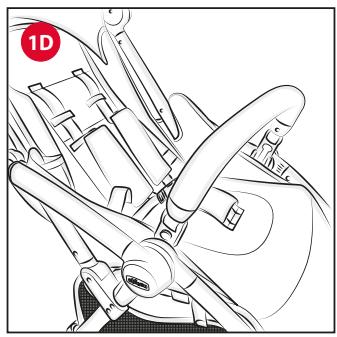
natural_image
Line drawing of a car's seatbelt mechanism with no text or symbols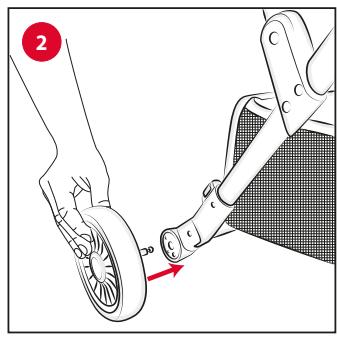
text_image
2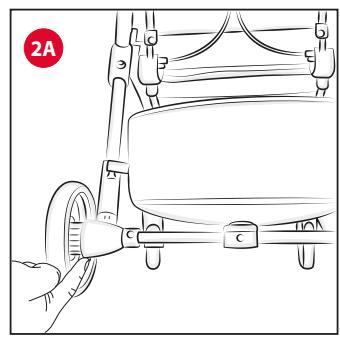
natural_image
Line drawing of a bicycle suspension system with a hand operating the wheel (no text or symbols)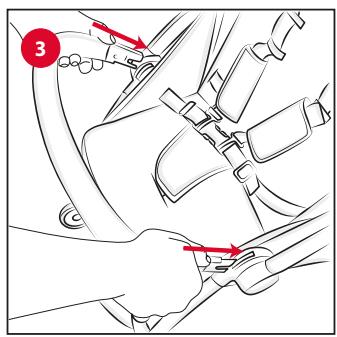
text_image
3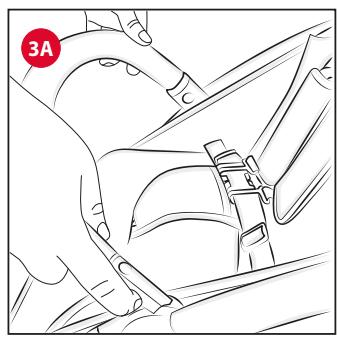
natural_image
Line drawing of a car interior showing hands adjusting the seatbelt (no text or symbols)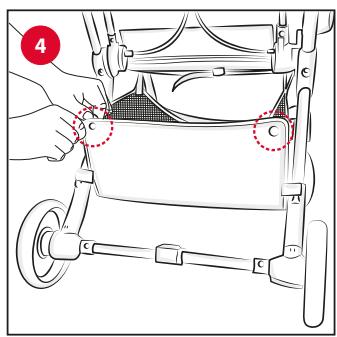
text_image
4 C C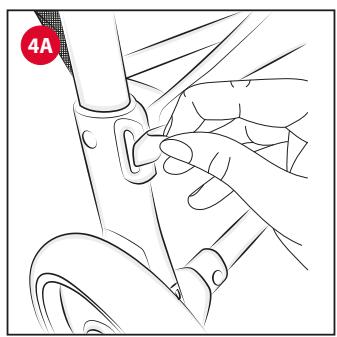
natural_image
Line drawing of a hand adjusting a bicycle seatbelt (no text or symbols)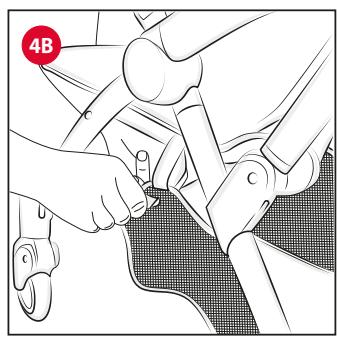
text_image
4B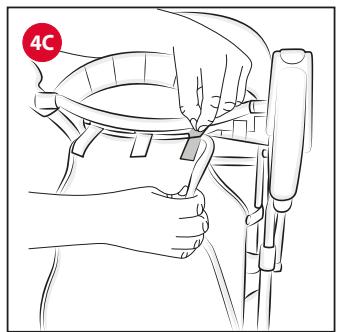
text_image
4C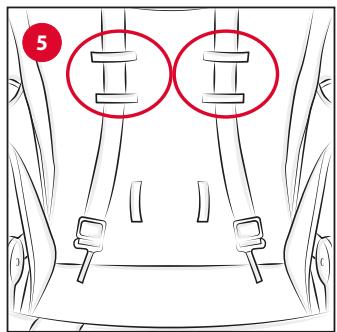
text_image
5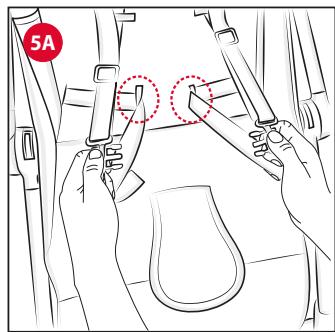
text_image
5A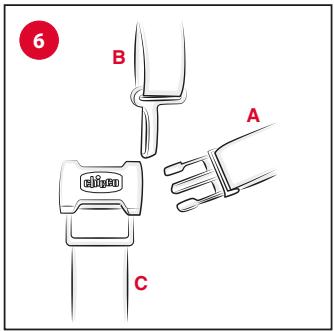
text_image
6 B A C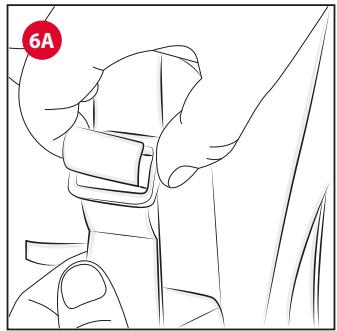
natural_image
Line drawing of a hand adjusting a seatbelt, no text or symbols present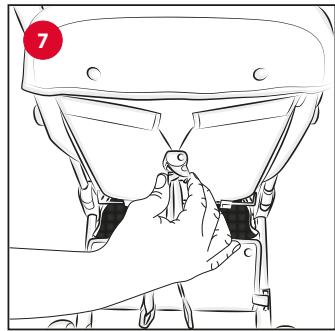
natural_image
Line drawing of a hand adjusting a mechanical component, no text or symbols present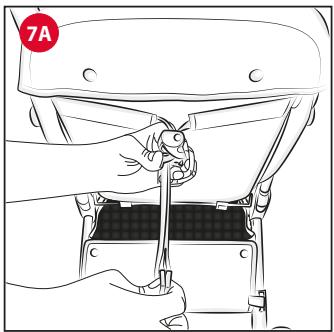
natural_image
Illustration of a hand using a tool to adjust or install a car seat panel (no text or symbols visible)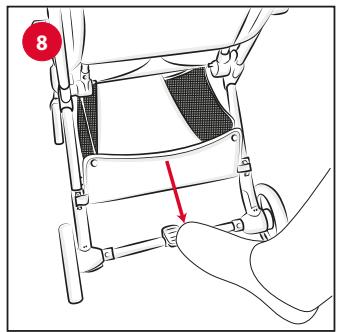
text_image
8
text_image
8A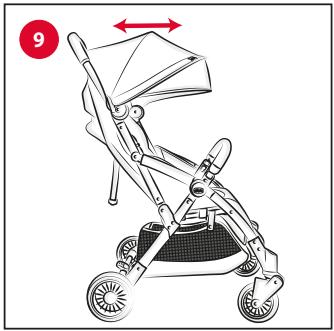
natural_image
Illustration of a baby stroller with a seatbelt, showing body positioning and seat number 9 (no text or symbols on the device itself)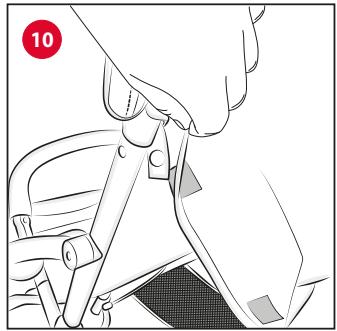
natural_image
Illustration of a hand adjusting a seatbelt mechanism (no text or symbols visible)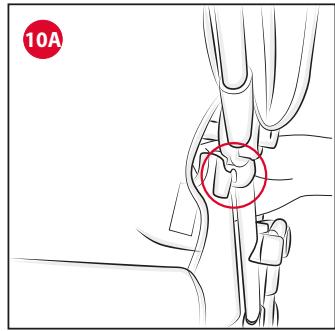
natural_image
Anatomical illustration of a joint with a red circle highlighting a specific area, labeled '10A' in the top-left corner (no other text or symbols)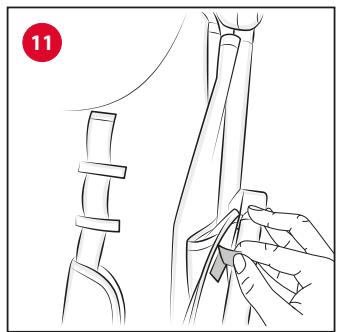
natural_image
Illustration of a medical procedure showing a surgical tool interacting with a mechanical component (no text or symbols present)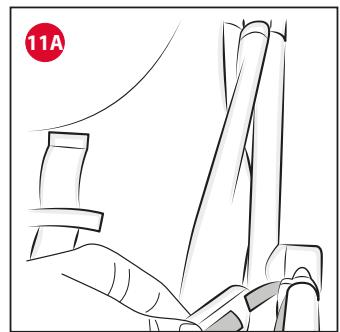
natural_image
Line drawing of a hand holding a rolled-up document or scroll, with no visible text or symbols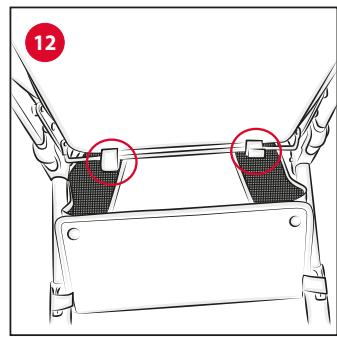
natural_image
Technical line drawing of a mechanical component with two red-circled features (no text or symbols)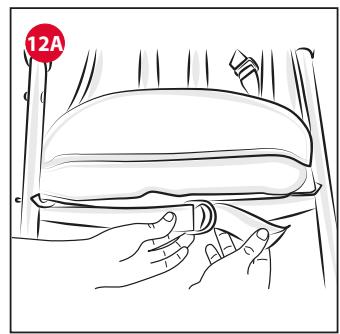
natural_image
Line drawing of hands holding a pillow and sponge inside a vehicle seat (no text or symbols)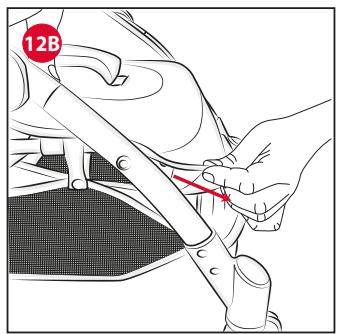
text_image
12B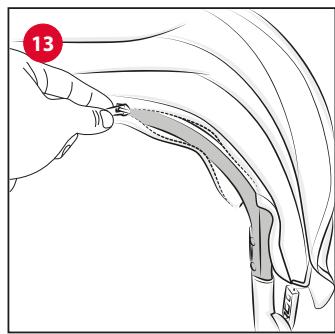
natural_image
Illustration of a hand holding a curved object with shaded area, no text or symbols present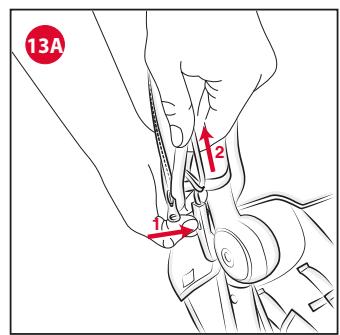
text_image
13A 1 2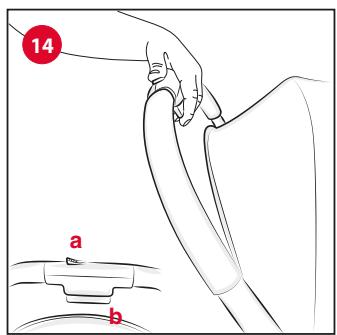
text_image
14 a b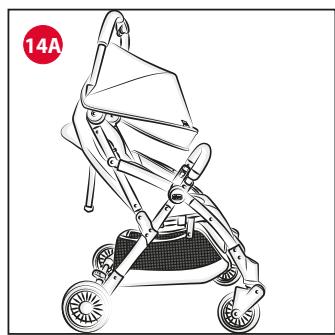
natural_image
Line drawing of a baby stroller with wheels and a red circular label '14A' (no text or symbols on the device itself)
natural_image
Line drawing of a stroller with wheels and a handle, no text or symbols present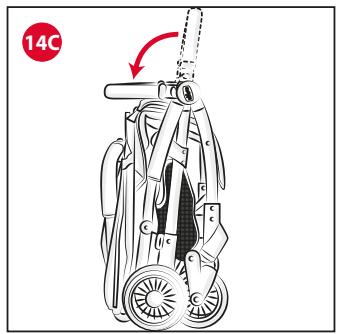
text_image
14C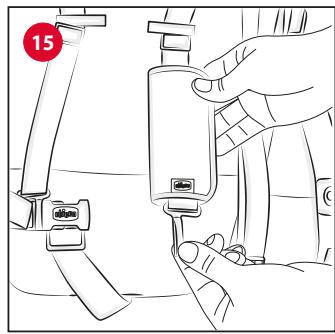
natural_image
Line drawing of a hand inserting a small device into a seatbelt (no text or symbols)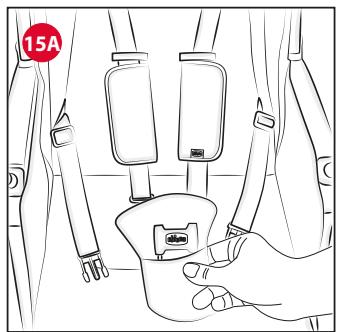
natural_image
Line drawing of a hand inserting a plug into a seatbelt (no text or symbols)
natural_image
Line drawing of a stroller with wheels and internal compartments (no text or symbols)
CHEERIO
ISTRUZIONI D'USO
IMPORTANTE - LEGGERE ATTENTA- MENTE E CONSER- VARE PER FUTURO RIFERIMENTO.
ATTENZIONE: PRIMA DELL'USO RIMUOVERE ED ELIMINARE EVENTUALI SACCHETTI DI PLASTICA E TUTTI GLI ELEMENTI FACENTI PARTE DELLA CONFEZIONE DEL PRODOTTO O COMUNQUE TENERLI LONTANI DALLA PORTATA DEI BAMBINI.
AVVERTENZE
IMPORTANT – READ CAREFULLY AND KEEP FOR FUTURE REFERENCE.
WARNING: BEFORE USE, REMOVE AND DISPOSE OF ALL PLASTIC BAGS AND PACKAGING MATERIALS AND KEEP THEM OUT OF REACH OF CHILDREN.
WARNINGS
- WARNING: Never leave the child unattended.
- WARNING: Ensure that all the locking devices are engaged before use.
- WARNING: To avoid injury ensure that the child is kept away when unfolding and folding this product.
- WARNING: Do not let the child play with this product.
- WARNING: Always use the restraint system.
• The use of the safety harness is necessary to guarantee the safety of your child. Always use the complete safety harness. - WARNING: This product is not suitable for running or skating.
- The stroller is intended for use with children aged between 0 and 36 months, up until 15 kg.
-
It is recommended that the back-rest should be used in its most reclined position for children from birth to 6 months of age.
-
The brake must always be engaged when positioning or removing your child from the stroller.
- Use the brake every time you stop.
- Never leave the stroller on a sloped surface with a child on board, even with the brakes engaged.
- Do not overload the storage basket. Maximum weight 3 kg.
- Any weight attached to the handles and/or backrest and/or on the sides of the stroller may affect the stability of the stroller.
- Do not transport more than one child at a time.
- Do not use accessories, replacement parts, or any component not supplied or approved by the manufacturer / distributor.
- Do not use this product if any part is broken, torn or missing.
- Before assembly, ensure that the product and its components have not been damaged during transportation. In this case, do not use and keep out of reach of children.
- During adjustment operations, ensure that the moving parts of the stroller do not come into contact with your child.
- Make sure that the person using the stroller knows how to operate it in the safest way.
- The product must only be assembled by an adult.
• This product must only be used by an adult. - To avoid all strangulation hazards, never give children objects with cords or strings attached, or leave them close to such objects.
- Never use the stroller on staircases or escalators: you could suddenly
lose control of it.
• Always pay attention when going up and down steps or pavements.
- If the stroller is left exposed to direct sunlight for an extended period of time, allow it to cool down before placing your child inside. Prolonged exposure to direct sunlight may cause the colour of the materials and fabric to fade.
- Prevent the stroller from coming into contact with salt water. It may cause rusting.
- Do not use the stroller on the beach.
- When not in use, the stroller should be kept out of reach of children.
TIPS FOR CLEANING AND MAINTENANCE
This product requires periodical maintenance. Cleaning and maintenance should only be carried out by an adult.
CLEANING
The seat of the stroller can be removed (please see the section FITTING AND REMOVING THE STROLLER LINING). Clean the fabric parts using a wet terrycloth and neutral soap. Periodically wipe the plastic parts clean with a soft damp cloth. To prevent the formation of rust, always dry metal parts if they have come into contact with water. The washing symbols and relative meanings are indicated below:

Hand wash

Do not bleach

Do not tumble dry

Do not iron

Do not dry clean
MAINTENANCE
If necessary, lubricate the moving parts with dry silicone lubricant. Regularly check the condition of the wheels and clean off all dust and sand. To avoid friction that may compromise the correct functioning of the stroller, make sure all plastic parts that run along the metal tubes are clean of dust, dirt and sand. Keep the stroller in a dry place.
GENERAL INSTRUCTIONS
OPENING THE STROLLER AND FIRST ASSEMBLY
WARNING: When opening the stroller, make sure that your child or other children are at a safety distance.
WARNING: Make sure that during these operations the moving parts of the stroller do not come into contact with your child.
- Grip the handle (Fig. 1) and pull upwards (Fig. 1A) until the structure opens fully (Fig. 1B). In the event that the bumper bar has been mounted on the stroller, after opening the frame reposition the bumper bar by rotating it forward until it locks in place (Fig. 1C-1D).
WARNING: Before use, ensure that the stroller is locked in the open
position, checking that the mechanism is effectively locked.
- Assemble the rear wheels by inserting the pin of the wheel into the appropriate hole located on the rear tube, until it locks in place (Fig. 2). To remove them, use the button located on each wheel (Fig. 2A).
WARNING: Before use, ensure that the wheels have locked correctly.
- Install the bumper bar (if it hasn't been mounted already) by inserting it into the appropriate slots located on the joints of the stroller (Fig. 3). Should you need to remove it, press the buttons on both sides (Fig. 3A).
WARNING: Never use the bumper bar to lift the stroller up with your child sitting in it.
CARRY-ALL BASKET
The storage basket is already installed. Should you need to remove it, follow the steps outlined below.
- The storage basket is attached to the frame at several points. Unsnap the 2 buttons located on the rear of the basket (Fig. 4); remove the lateral straps on the rear legs of the stroller (Fig. 4A); unsnap the buttons present under the seat (Fig. 4B); open the velcro straps on the front under the footrest (Fig. 4C).
To reassemble the basket follow the same steps backwards.
HOW TO USE THE SAFETY HARNESS
This stroller has a five-point safety harness featuring two shoulder straps, two adjustment holes, a waist strap and a crotch strap with buckle.
-
WARNING: To use it with children from birth to approx. 6 months of age, you must use the shoulder straps, first threading them through two adjusting holes (Fig. 5), and threading the waist strap through the vertical holes (Fig. 5A).
-
After laying the child in the stroller, fasten the straps (Fig. 6) by passing first the two forks (A) inside the shoulder strap buckle (B) and then inside the crotch strap buckle (C); adjust the height of the shoulder straps so that they correctly fit your child's shoulders (Fig. 6A).
Always make sure that the straps are fastened correctly. To unfasten the strap, press and pull the side clips (A).
WARNING: To guarantee the safety of your child, the safety harness must be fastened at all times.
To make sure that the belts are fastened properly to the anchoring points, after placing your child inside the stroller, pull the end parts of the belts firmly.
The backrest can be adjusted to several positions.
- To recline the backrest, use the strap located on the rear; press on both sides of the clip and adjust the inclination to reach the desired position (Fig. 7). To lift the backrest press on the clips and pull down on the strap (Fig. 7A).
WARNING: The child's weight can make these operations more difficult.
REAR BRAKES
The rear wheels have linked brakes, which can be applied simultaneously on both rear wheels by using the support tube.
- To activate the brakes, press down on the pedal located centrally (Fig. 8). To release the brakes, press the pedal in the opposite direction (Fig. 8A).
SUN CANOPY
The canopy is already installed on the stroller.
- To open and adjust the canopy use the front arch (Fig. 9). The canopy is equipped with a retractable sunshade.
FITTING AND REMOVING THE STROLLER LINING
To remove the lining from the seat, follow the steps below:
-
Detach all the velcro fasteners and snap buttons that connect the backrest to the hood (Fig. 10) and remove the straps on both sides from the plastic hooks that attach the backrest to the handle of the frame (Fig. 10A).
-
On the sides of the seat, remove the velcro fasteners (Fig. 11)
and slip the fabric tab out from the plastic ring on the frame (Fig. 11A). Complete this operation for both sides of the stroller.
- Open the two velcro fasteners that bind the seat to the metal rod on the rear (Fig. 12). Free the strap located under the seat (Fig. 12A) and pull out the front section of the seat (Fig. 12B).
- The canopy can be removed: open the zip fastener that covers the tube above the backrest (Fig. 13) and free the arch from the joints on either side by pressing the button shown in figure 13 A and pulling up at the same time. Complete the operation by undoing the two buttons on the back of the backrest.
To put the lining back on the stroller follow the same steps backwards.
WARNING: Check regularly that the belt under the seat is tight (fig. 12A).
If the strap is loose, tighten it.
WARNING: When opening or closing the stroller, make sure that your child or other children are at a safe distance.
Make sure that during these operations the moving parts of the stroller do not come into contact with your child.
Before closing the stroller, ensure that the storage basket is empty. The stroller has a closing device that can be used with one hand.
- To close the stroller, push switch A to the left and simultaneously press button B (Fig. 14); push down on the handle and the stroller will close automatically. The stroller will automatically lock in the closed position. When closed, the stroller stands up on its own (Fig. 14 A-B). To make the stroller even more compact when closed, the bumper bar can be turned towards the handle (Fig. 14C).
ACCESSORIES
WARNING: The accessories described below may not be included in some product versions. Carefully read the instructions for the accessories that came with the model you have purchased.
SHOULDER STRAPS AND CROTCH STRAPS
The stroller is fitted with padded shoulder straps and a soft crotch strap to ensure the safety and comfort of your child.
- For assembly, insert the shoulder straps (Fig. 15) and the crotch strap in the relevant padding (Fig. 15A).
WARNING: Adjust the waist belt if necessary by pressing on the buckles.
WARNING: To guarantee the safety of your child, the safety harness must always be fastened.
RAIN COVER
- To fit the rain cover, fasten the straps around the stroller's frame in the positions shown in Fig. 16 (steps to be repeated on both sides of the stroller).
When you have finished using the rain cover, allow it to dry properly if it is wet.
WARNING: The rain cover cannot be used on the stroller without the hood being extended, as it may cause suffocation.
WARNING: When the rain cover is fitted on the stroller, never leave it exposed to direct sunlight with your child inside, as the temperature will rise considerably.
WARRANTY
The product is guaranteed against any conformity defect in normal conditions of use as provided for by the instructions. The warranty shall not therefore apply in the case of damage caused by improper use, wear or accidental events. For the duration of the warranty on conformity defects please refer to the specific provisions of applicable national laws in the country of purchase, where appropriate.
NOTICE D'UTILISATION
IMPORTANT - À LIRE ATTENTIVE- MENT ET À CONSER- VER POUR CONSUL- TATION ULTÉRIEURE.
AVERTISSEMENT : AVANT L'EMPLOI, ENLEVER ET ÉLIMINER TOUS LES SACS EN PLASTIQUE ET ÉLÉMENTS QUI FONT PARTIE DE L'EMBALLAGE DU PRODUIT ET LES TENIR HORS DE PORTÉE DES ENFANTS.
AVERTISSEMENTS
SET SCHULTERGURTE UND SCHRITTGURT
RÅD FÖR RENGÖRING OCH SKÖTSEL
INDSTILLING AF RYGLÆN
LUKNING AF KLAPVOGNEN
RÅD FOR RENHOLD OG VEDLIKEHOLD
ARTSANA GERMANY GMBH
Borsigstrasse 1-3
28923 Alcorcon (Madrid)-Spain
902 117 093
www.CHICCO.es

ARTSANA PORTUGAL S.A.
ARTSANA POLAND Sp.zo.o.
Aquarius, Ul. Połczyńska 31 A
01-377 Warszawa
+48 22 290 59 90
www.CHICCO.com

ООО "Артсана Рус"
ARTSANA BRASIL LTDA.
Dec V. Ruben Dario 1015
Colonia Lomas De Providencia 44647
Guadalajara, Jalisco-Mexico
01800 702 8983
www.CHICCO.com.mx

ARTSANA ARGENTINA S.A.
Uruguay 4501
Victoria Cp(1644)
San Fernando- Buenos Aires-Argentina
0810-888-2442
www.CHICCO.com.ar

ARTSANA INDIA PRIVATE LIMITED,
7Th Floor, Tower B, Paras Twin Towers,
Golf Course Road, Sector 54
Gurgaon - 122002 - Haryana, India
(+91)(124)(4964500)
www.CHICCO.in

ARTSANA S.p.A.
22070 Grandate (CO) - Italy
Tel. (+39) 031 382 111
Fax (+39) 031 382 400
www.CHICCO.com