LM850D10 MASTERMIX - Food Processor MOULINEX - Free user manual and instructions
Find the device manual for free LM850D10 MASTERMIX MOULINEX in PDF.
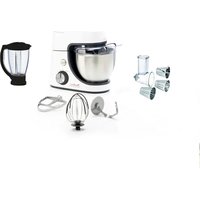
| Product type | Food processor / Blender |
| Brand | Moulinex |
| Model | LM850D10 MASTERMIX |
| Bowl capacity | 1.75 liters |
| Bowl material | Graduated glass |
| Blade material | Stainless steel |
| Motor speed | Continuous variable (Min-Max) |
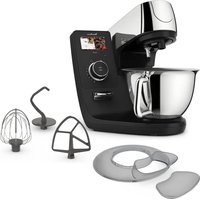
| Programmed functions | Ice Crush, Smoothie, Pulse, Auto Clean |
| Maximum continuous operating time | 3 minutes |
| Recommended rest time | 1 minute between cycles |
| Safety | Bowl safety lock, thermal cut-off |
| Maximum temperature of hot liquids | 80 °C |
| Cleaning | Glass bowl and lid dishwasher safe (top rack, ECO program) |
| Motor unit cleaning | Damp cloth, never immerse |
| Auto Clean function | Yes (45 seconds with water and dish soap) |
| Included accessories | Complete blender (bowl, lid, cap, blade, gasket) |
| Dimensions (approx.) | Not specified (estimated: 25 cm x 20 cm x 40 cm) |
| Weight (approx.) | Not specified (estimated: 3 kg) |
| Power supply | 220-240 V, 50/60 Hz (not confirmed, estimate) |
| After-sales service | Contact an authorized repair center |
Frequently Asked Questions - LM850D10 MASTERMIX MOULINEX
User questions about LM850D10 MASTERMIX MOULINEX
0 question about this device. Answer the ones you know or ask your own.
Ask a new question about this device
Download the instructions for your Food Processor in PDF format for free! Find your manual LM850D10 MASTERMIX - MOULINEX and take your electronic device back in hand. On this page are published all the documents necessary for the use of your device. LM850D10 MASTERMIX by MOULINEX.
USER MANUAL LM850D10 MASTERMIX MOULINEX
BESCHRIJVING VAN HET APPARAAT
A Motoreenheid
B Bedieningspaneel
HET APPARAAT SCHOONMAKEN
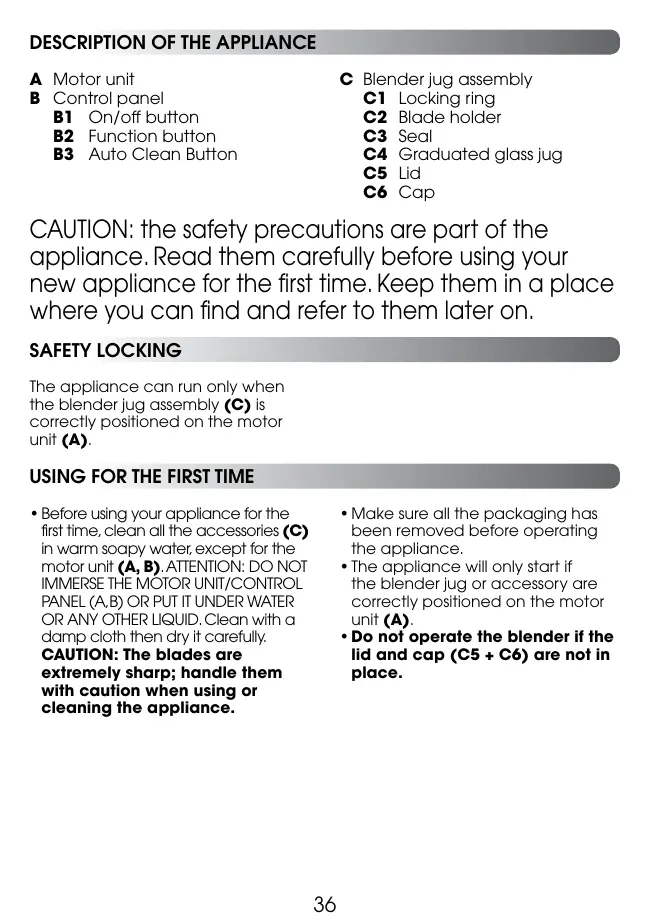
DESCRIPTION OF THE APPLIANCE
A Motor unit
B Control panel
B1 On/off button
B2 Function button
B3 Auto Clean Button
C Blender jug assembly
C1 Locking ring
C2 Blade holder
C3 Seal
C4 Graduated glass jug
C5 Lid
C6 Cap
CAUTION: the safety precautions are part of the appliance. Read them carefully before using your new appliance for the first time. Keep them in a place where you can find and refer to them later on.
SAFETY LOCKING
The appliance can run only when the blender jug assembly (C) is correctly positioned on the motor unit (A).
USING FOR THE FIRST TIME
- Before using your appliance for the first time, clean all the accessories (C) in warm soapy water, except for the motor unit (A, B). ATTENTION: DO NOT IMMERSE THE MOTOR UNIT/CONTROL PANEL (A, B) OR PUT IT UNDER WATER OR ANY OTHER LIQUID. Clean with a damp cloth then dry it carefully.
CAUTION: The blades are extremely sharp; handle them with caution when using or cleaning the appliance.
- Make sure all the packaging has been removed before operating the appliance.
- The appliance will only start if the blender jug or accessory are correctly positioned on the motor unit (A).
-
Do not operate the blender if the lid and cap (C5 + C6) are not in place.
-
Moisten the seal (C3) and position it correctly onto the blade unit (C1).
- Place the assembly (C1+C3) on the base of the jug (C4). Lock it by rotating the blade unit through a quarter turn in the anticlockwise direction. (Fig. 2).
- Place the ingredients into the assembled jug without exceeding the maximum level indicated:
* 1,75 litres
- Fit the lid (C5) on the jug. Place the measuring cap (C6) in its recess on the lid.
- Place the blender jug assembly (C) on the motor unit (A).
- Make sure that the appliance has been switched off and position the jug on the motor unit so that the notches of the jug engage with the grooves on the motor unit. Check that the jug is positioned horizontally and the appliance is on a flat, stable, heat-resistant surface away from sources of heat or water splashes.
- The blender motor runs the blades at high speed in order to ensure thorough mixing. Consequently, it is important that the blender is always placed on a flat, dry surface before it is operated. Check that the jug is positioned correctly on the motor unit. If not, the blender will not operate.
- Never use the blender for more than 3 minutes at a time. Let the blender rest for 1 minute before you operate it again (in order to avoid overheating).
Caution: leaks can occur if the jug is not locked correctly.
- Plug in the appliance and turn the function selector to "program", and the indicator lights of the on/
off button and the function buttons start flashing. Choose the optional program function by means of the buttons "ice crush", "smoothie" or "auto-clean". Each function has a programed processing time (see more under the different functions), but blending can be stopped manually by pressing the on/off button in the middle of the function selector. The blender also has a variable speed selector that is activated by turning the function button to setting min-max.
- Your appliance is equipped with a thermal cut-out. In case of overheating your appliance will turn off automatically. Disconnect the appliance and let it cool down for about 30 minutes, then resume use.
Functions of the blender:
Ice crush: Put max 200 g of ice cubes in the jug. The blender works in pulse intervals for approx. 1 minute unless it is switched off manually by means of the on/off button or by pressing the ice crush button.
Smoothie: The blender works at various speeds alternating for approx. 1 minute unless it is switched off manually by means of the on/off button or by pressing the smoothie button.
Auto Clean: This function allows you to clean the jug. Add 1250ml of warm water and a drop of washing up liquid inside the blender jug. Press Autoclean button.
The blender works at various speeds alternating for 45 seconds, unless it is switched off manually by means of the on/off button or by pressing the Autoclean button again. Then rinse thoroughly.
Min-max speed: The blender has a variable speed setting. Start at a low speed and increase if needed. Note that ice crush, smoothie and the auto clean functions cannot be activated, when you use the variable speed function. Turn the function selector to the required speed and start the blending by means of the on/off button. Switch off the blender by pressing the on/off button in the middle of the function button and turn the function button back to 0.
- We recommend that you experiment to find the speed that is best for the ingredients to be mixed. Always check on the mixing and switch off the appliance, when the desired result has been obtained. Always unplug after use.
- Never remove the glass jug while the motor is on.
NOTE! Do not operate the blender with only dry ingredients (e.g. nuts) in the jug, as this may damage the blender. Always add a small amount of liquid before you operate the appliance.
Mixing of hot liquid
-
The glass jug can withstand hot ingredients and hot liquids/ soups. Be careful if hot liquid is poured into the blender as it can be ejected out of the appliance due to a sudden build up of steam. In order to avoid this, proceed as follows:
-
The temperature of the liquid in the blender should not exceed 80^ .
- Fill the jug half way up with the desired ingredients (e.g. vegetables, etc.).
- Operate the blender at MIN setting and pour the liquid (hot stock, cream or similar) slowly through the opening in the lid. Do not switch off the
blender while doing this. If the blender is switched off when the jug contains hot liquid and is restarted, pressure from the bottom may cause the lid to eject due to the high rotation of the motor.
- If the blender has been switched off during the above process and needs to be restarted, place a towel, oven glove or similar over the jug and hold it down with your hand. When operating the blender remember that hot liquid may be ejected.
- Hot liquids alone must not be processed in the blender, since the pressure in the jug will be too high. Important! We do not recommend that you mix only frozen berries/frozen fruit alone as they may freeze to a lump and block the blades.
- If you want to add more ingredients or liquid during use, you can do so, but make sure that the blades have stopped before you remove the cap or the entire lid. Make sure that the ingredients to be added are not too viscous or too dry or heavy for the motor to process. You may add some additional liquid through the hole in the lid if the mixture seems heavy or you could scrape the mixture towards the blade using a rubber spatula.
MAKE SURE THAT THE LID AND CAP HAVE BEEN REFITTED BEFORE YOU RESTART THE BLENDER! Important! After blending ice cubes the glass jug should only be cleaned in lukewarm water, as the jug will have cooled, and hot water may cause thermal shock to the glass and make it shatter.
- Recipe
Carrot and Cumin Soup: Ingredients:
- 700 g carrots, cut into cubes of 15 ~mm × 15 ~mm
- 1050 ml cold water or stock
- 1 teaspoon ground cumin
- salt and freshly ground black pepper
Put the carrot pieces in the glass jug and add the water or stock. Process on max speed for 3 minutes maximum. Turn off the appliance. Pour the mixture into a saucepan, add the cumin and simmer for about 30 min. You can add water during cooking for a thinner soup. Add salt and pepper according your taste.
CLEANING YOUR APPLIANCE
- Unplug the appliance and remove the blender jug assembly (C).
- Handle the blender unit (C1) with caution: the blades on the blender jug are sharp.
- Remove the jug and rinse it and the lid under running water.
- To clean the motor unit (A), use a damp cloth. Dry it carefully.
- Never immerse the motor unit (A) in running water.
- For easy cleaning, to wash the removable parts in water and a little washing-up liquid immediately after use. Alternatively, use the Auto Clean program (see page 67).
To clean the blender jug (C) easily, unlock the blade unit (C1) by rotating it through a quarter turn in the clockwise direction. Remove the seal (C3). Clean the locking ring (C1), blade holder (C2) and seal (C3) under running water or in the dishwasher on the upper rack using the "ECO" program (except the the seal - C3 which is not dishwasher safe).
- The glass jug (C4) can be cleaned in the dishwasher on the upper rack - use the 'ECO' or 'LOW SALT' program..
WHAT TO DO IF YOUR APPLIANCE DOES NOT WORK ?
| Problems | Causes | Solutions |
| Product does not work. | The plug is not fitted correctly into the socket. | Plug the appliance into a socket and switch on. |
| The jug or accessory is not correctly positioned or locked on the motor unit. | Check that the jug or accessories are correctly positioned and locked onto the motor unit as shown in the figure in the manual. | |
| Excessive vibrations. | The product is not placed on a flat, stable, heat-resistant surface. | Place the product on a flat surface. |
| Volume of ingredients is too high. | Reduce the quantity of ingredients processed. | |
| Leak from the lid. | Volume of ingredients is too high. | Reduce the quantity of ingredients processed. |
| The lid is not correctly positioned. | Lock the lid correctly on the blender jug. | |
| Leak from the base of the blender jug. | The blender jug gasket (C3) is not positioned correctly or is missing. | Reposition the gasket and lock the blade holder correctly. |
| The blade does not turn easily. | Pieces of food too large or too hard. | Reduce the size or quantity of ingredients processed. Add liquid. |
| Impossible to lock the blade unit with the gasket (C1-C2+C3) on the jug (C4). | The gasket (C3) is not positioned correctly. | Reposition the gasket. |
Your blender still does not work?
Contact an approved service centre (see list in service booklet).
cllll 1iilbc co 1uie 1
.
aia (A) aai
A
.
aljai jbjilge wajl jbjill algwl
Jilu Jn Jn Jn Jn Jn Jn Jn Jn Jn Jn Jn Jn Jn Jn Jn Jn Jn Jn Jn Jn Jn Jn Jn Jn Jn Jn Jn Jn Jn Jn Jn Jn Jn Jn
Jaxxjy J 5
A
a 2
1
j ci jll jdo jdo jdo jdo jdo
ailll alll lcls Juaaal 1 ail jull
a blll aoc jj j sl j j j jsl
culll j pailll cullt all j l 1i i
aaii j say gill aiisall j nn aai.
45
jllgall jilalil kay. jlll
JIS
i j k l n a e i j k l
bball jia aseio abwolg
bD
i 1
y
g 1
.0jaiy y
:Jgall jzjll 1
:
15 10000000000000000000000000000000000000000000000000000000000000000000
10x15
all jujillo 1050 -
jGall jol 0joo
Jolj
a 1
jla 3 ad gaaill ac jall gl bisiclal
aallll lllll
gssal gabg jusll iia
gllll llll alalai kay 30
Lalall Lall. aaiy jyuyu yle Uusll
.
Jia#i jiey 1
aaii 1
Jusssic blll lgl, blll aoe
jocai jiaai jiaai jiaai jiaai jiaai jiaai
Jaxi 12
e e e e e e e e e
S OBC = S COD + S_ BOC
Cllgall bale kylal j 1
(jol:JlaljLg)dall
i 1
ab 与 a 共线 ③ b//a 平分 AB = AC
Liljogjglallbiciill jaiibc
i 1
aiisall ciisall jssj (Jiai)
ylo
1
80 80
a aal 2015 2
(.)
"MIN" 1
J L aL Sll aiisall ayir gaiil) Jil gail
jai jia jiallal biai jia (di)
J 1
.5
j 1
0dcl c 15s a
biinl alniinl 1
jLilas aebi Jaeiwol 1bally Suaa
jss j s2- dlls l a j j jll j
jolgall jaaa a o
g laa aiaiial jil gaiu Jj
yIle
blll 2j. aagall 2aall cglg aaii
yiy gill cie wall gaiial "jil o jia" ayalnai
yly yll cial gl jiali jia i jy jay
giy - gai dall yjz
jia gai jy jai jai jai jai jai jai jai jai jai jai jai jai jai jai jai jai jai jai jai jai jai jai jai jai jai jai jai jai jai jai jai jai jai jai jai jai jai jai jai jai jai jai jai jai jai jai jai jai jai jai jali
:blal
200 1
Jbbl.
aI bll c
al y la dla aad ad hiaill Jauill
abw on/off Jauill Ciaaabw Lg
jgl l aie al
Kai aieo oae le bslal Jaa gaw
Lg aai p la od aag ad sl glia
baaall abw on/off Jauill Ciaaabw
gaw Gla
45 aol cale calio ie bll Jauy
Jauill ciaaabw ly adl aay pl la aai
caiiil ciaa le baw ay on/off
Jaue iat ait sra Gia
bll iia jay
Aasial ae wally [Jai gbs] Juei Saly
abll aegy
jai gssg cll tgsa Bg j
Agbg Juaaiu ic Iaaiy jay Aalall
le cial ll ciai qin."Jai gbs"
Ciaaabw ly abll dy laa jy gill ac y all
Ciaea ie bainly bll Jauill
cillbll jiaa ciaa ba w gall Jauill
0"gall dl bll gll zia
(C3)aBbllal (C1+C3)aBblll (C4) (2)Aeall Baeol yo 175*
yRgEgele C5)cBblll (C6)wbll
Aeall glc (C)clblll aSjz
(A)
yIeJyIeJyIeJyIeJyIeJyIeJyIeJyIeJyIeJyIeJyIeJyIeJyIeJyIeJyIeJyIeJyIeJyIeJyIeJyIeJyIeJyIeJyIeJyIeJyIeJyIe J
Lalai
AeayBaaBblld Aae J
no clll jiai i jiall jiall jiall jiall jiall jiall jiall jiall jiall jiall jiall jiall jiall jiall jiall jiall jiall jiall jiall jiall jiall jiall jiall jiall jiall jiall jiall jiall jiall jiall jiall jiall jiall jiall
bokal
Jiayi zai C1
C2
C3
J 1234567890
C5
A
B
B1
B2
suljzijl jbiil C3B3
J 1 J 1 J 1 J 1 J 1 J 1 J 1 J 1
Sj(A) jgsa oJ 1
i 1
S OBC = S COD + S_ BOC
(A)
S ACD = S COD + S DCE - S BOC
AS jyjzjjz. jwJyS y
jla jla clabdaolai jw
a
1 = 2
J MIN 1 J S b3.3
1 J (j) a L y j s g w)
J 2 J 2 J 2 J 2 J 2 J 2 J 2 J 2 J 2 J 2 J 2 J 2 J 2 J 2 J 2 J 2 J 2 J 2 J 2 J 2 J 2 J 2 J 2 J 2 J 2 J 2 J 2 J 2 J 2 J 2 J 2 J 2 J 2 J 2 J
J
J
J
J
J
J
J
J
J
J
J
J
J
J
J
J
J
J
J
J
J
J
J
J
J
J
J
J
J
J
J
J
J
J
J
J
J
J
J
J
J
J
J
J
J
J
J
J
J
J
J
J
J
J
J
J
J
J
J
J
J
J
J
J
J
J
J
J
J
J
J
J
J
J
J
J
J
J
J
J
J
J
J
J
J
J
J
J
J
J
J
J
cui oai yj aai jy jy jao J
la i (iiaolua jiu ciao gla JSLAC
Gus Gs ay dsi y g u s bgl
Lw y gals/4a 10d Jua L
Jb glaa ay dya SLac Jtail
AS CwU CwU Jy Jy Jy Jy Jy
Caybui jy ay dy aas nJy
Jg uae min-max yj
Jue olkui jy ay jy Jau law olkui
Jy Ue jy cuau yu wu yu oii
Jy uagal yagal jy yag Jau law olkui
Jy uay jy yuy jy Jy Jy Jy Jy
Jy oai oaiu oji yj yj Sis 30
:is bglua 1sla
200 jS 1. 1s appr
JLg LgA/1s gR J Ooalu Lg
gogolz bgs 24 s 45
Gla Gc yj Sb gls gagw
aq 1. 1s gJ appr ggl
45 j oaiu Lg ius gss
smoothie aLd Jlglg A gogol
gogolz
45 jLg Gg 1s gds jgs
S y jy 1250 . jy 1
blg 1s 1s 1s 1s 1s
1 r jLg 1s 45 45
gogolz
gogolz
45 jLg 1s 1s 1s
45 jLg 1s 45
45 jLg 1s 1s 1s
45 jLg 1s 45
45 jLg 1s 1s 1s
(C3) 17
C4)0g (C1+C3) 2
(2) j (C6) j (C6) j (C6) j (C6) j (C6) j (C6) j (C6) j (C6) j (C6) j (C6) j (C6) j (C6) j (C6) j (C6) j (C6) j (C6) j (C6) j (C6) j (C6) j (C6) j (C5) 175
Gj Gj Gj Gj Gj Gj Gj Gj Gj Gj Gj Gj Gj Gj Gj Gj Gj Gj Gj Gj Gj Gj Gj Gj Gj Gj Gj Gj Gj Gj Gj Gj Gj Gj Gj Gj Gj Gj Gj Gj Gj Gj Gj Gj Gj Gj Gj Gj Gj Gj Gj
GJ 1,75
GJ 1,75
GJ 1,75
GJ 1,75
GJ 1,75
GJ 1,75
GJ 1,75
GJ 1,75
GJ 1,75
GJ 1,75
GJ 1,75
GJ 1,75
GJ 1,75
GJ
jS bJoo jS Joo C
Jaa C1
AoojooC2
C3
C4
C5
C6
JgA
Jis
jgsal/ jgrsB
B2
B3
jolki jolaiw jI jia jiiu wolol j 1iuaa oikui j 1iuaa glilal cllal .blilal
iayj
(golid 124 43 45 46
(C)Jbglj0jS jla
AaBj j(A)jyo
a
j54j1 jdsdiAipai4sdyjiaab
100 100
ASgurusBaaa aalolol
J 1 J 1 1 1 1 1 1 1 1 1 1 1 1 1 1 1 1 1
aui 0
MopKBaHm CyI 3 KMNHOM:
ПразукTN:
-700 rр моркви Нацьду 15х 15 MM
-1050Mn BOIN
-1 yaHa loXka KMnHy
-cinb nepeucb
Bau 6IeHep oci He npaioe?
3BepHtbcra do cepBicHO rHTpy (nVB. cepBICHY KHNK).
ONICAHNE YCTPOINCTBA
A Bnok dBniratena
B NaHeNb ynpabVeHnna
B1 KhoNka BkJIIOueHnA/ BbIKJIIOueHnA
B2 ΦyHKQUHOHaJIbHaJ KHONKa
B3 KhoNka aBTOMaTnuecko ONUCTKN
CБLOK KUWBUNHa 6JIeHepa
C1 Φικυργίους κοῦς
C2 DepeKaTeJIb HOKa
C3 YnnotHnteIb
C4 rpaynopBaHHbI CTekJIaHHbI KyBUnH
C5 Kpbioka
C6 Kpbioka nodaun
BHIMAHHE! Co6JIoJeHne npaBnI TexHnKn 6e3OJaCHocTn
YBJIaETc8 O6JIaTeJIbHbIM npN IcNoJIb3OBaHm NycPoJCTBa.
BHIMaTeJIbHO O3HaKombTeCb C HmN IpeE nepBbIM
IcNoJIb3OBaHmEM HOBOrO yCTpoJCTBa. XpaHInTe INX B
IOCTyINHom MecTe dIЯДЛьнeHseIro IcNoJIb3OBaHnI.
TUDEJATb,ECNLYCTPOICTBOHEPABOTAET?
KYPbIJIbIhbl3 XYMbIC ICTEMCE, HE ICTENCI3?
| Масelenер | Себentер | Шешимер |
| Өнím куmbics ictemeimi. | Аша розеткаfa дурьс Косылмаган. | Курьлгынь розеткаfa Kосыл, Косынь3. |
| Куmbьра hememe Косалкы Кралл Коталдьш 6догында дурьс орhalаctырлмаган hememe Кльлпталмаган. | Курьра hememe Косалкы Краллар hyckayлбтarkы Сурты Керсетигн徴 Коталдьш 6догында дурьс орhalаctырлмаган көнүй КльлпталганTekceрін3. | |
| Арък дірінder. | Өнím teric, тyperak'tы, кызуfas Тezідіді betke кουл'mаferан. | Өнім'di teri betke Кουл'mь. |
| Инр dedиентэрдін келемп Ть'm Кэп. | Өн'de latɪн Инр dedиentsнтэрдін Мәлшерін asаітьнь3. | |
| Кakпakта arу бap. | Инр dedиentsнтэрдін келемп Ть'm Кэп. | Өн'de latɪn Инр dedиentsнтэрдін Мәлшерін asаітьнь3. |
| Кakпak дурьс орhalаctырлмаган. | Бүн'deр курьсарында курь'tы дурьс Кльлптань3. | |
| Бүн'deр курьсарындін Herізіндіе arу bap. | Бүн'deр курьсарындін Ть'flidazdablsh(C3) дypbic орhalаctырлмаган hememe жok. | Ть'flidzdaflitsыкaita орhalаctырлм锡3ЖбHeпышakтар устafышьн дурьс Кльлптань3. |
| Пьшak оонai aihaimai'dы. | Тамak Бөліктereп тыm унken hememe Ть'm KaTTы. | Өн'de latɪн Инр dedиentsнтэрдін сінчeMH hememe мәлшерін asаітьнь3.Сүьктвк Косылнь3. |
| ПьшakтарблгийКурьларыft(B4)Ть'flidzdaflits(C1-C2+C3)apkblы Кул'lltay MUMKINemec. | Ть'flidzdaflits(C3) dpyрьс орhalаctырлмаган. | Ть'flidzdaflitsыкaita орhalаctырлmь3. |
Бленьдр си яхьс ictemeу typ ma?
Bekitirreh cepbinctik optabikka xabpanacbH3 (Kb3mTe Kepcety KITanwacbHdaftiTiimKi kapaHb3).
| INTERNATIONAL GUARantee: COUNTRY LIST | |||||||
| ARGENTINA | 0800-122-2732 | EGYPT | 16622 | SLOVENIA SLOVIA | 02 234 94 90 | MALAYSIA | 603 7802 3000 |
| žIBUISTUDU ARMENIA | 010 55-76-07 | EESTI ESTONIA | 668 1286 | ELLADA GREECE | 2106371251 | MEXICO | (01800) 112 8325 |
| AUSTRALIA | 1300307824 | SUOMI FINLAND | 09 622 94 20 | 香港 HONG KONG | 8130 8998 | MOLDOVA | 22 929249 |
| ÖSTERREICH AUSTRIA | 01 890 3476 | France Continentale + Guadeloupe, Martinique, Réunion, Saint-Martin | 09 74 50 47 74 | MAGYARORSZÁG HUNGARY | 06 1 801 8434 | NEDERLAND The Netherlands | 0318 58 24 24 |
| الإستعمال BAHRAIN | 17716666 | DEUTSCHLAND GERMANY | 0212 387 400 | INDONESIA | +62 21 5793 7007 | NEW ZEALAND | 0800 700 711 |
| BELAPYCb BELARUS | 017 2239290 | العربية OMAN | 24703471 | ITALIA ITALY | 1 99 207 354 | NORGE NORWAY | 815 09 567 |
| BELGIQUE BELGIIE BELGIUM | 070 23 31 59 | POLSKA POLAND | 801 300 420 koszt jak za polacze niche lokaîne | 日本 JAPAN | 0570-077772 | SOUTH AFRICA | 0100201730 |
| BOSNIA I HERCEGOVINA | Info-linja za potrošače 033 551 220 | PORTUGAL | 808 284 735 | AZECH JORDAN | 5665505 | ESPANA SPAIN | 902 31 24 00 |
| BRASIL BRAZIL | 11 2915-4400 | QATAR | 44485555 | KAZAKCTAH KAZAKHSTAN | 727 378 39 39 | SVERIGE SWEDEN | 08 594 213 30 |
| Българий BULGARIA | 0700 10 330 | REPUBLIC OF IRELAND | 01 677 4003 | 한국어 KOREA | 1588-1588 | SUISE SCHWEIZ SWITZERLAND | 044 837 18 40 |
| CANADA | 1-800-418-3325 | ROMANIA | 0 21 316 87 84 | Кожд KUWAIT | 24831000 | Лжучим薄弱 THAILAND | 02 769 7477 |
| CHILE | 02 2 884 46 06 | POCCNIA RUSSIA | 495 213 32 30 | LATVJA LATvia | 6 616 3403 | TURKIYE TURKEY | 444 40 50 |
| COLOMBIA | 018000520022 | الإستعمال SAUDI ARABIA | 920023701 | العربي LEBANON | 4414727 | الإستعمال UAE | 8002272 |
| HRVATSKA CROATIA | 01 30 15 294 | SRBILJA SERBIA | 060 0 732 000 | LIETUVA LITHUANIA | 5 214 0057 | Уkraine UKRAINE | 044 300 13 04 |
| ČESKA REPUBLKA CZECH REPUBLIC | 731 010 111 | SINGAPORE | 6550 8900 | LUXEMBOURG | 0032 70 23 31 59 | UNITED KINGDOM | 0345 602 1454 |
| DANMARK DENMARK | 44 663 155 | SLOVENSKO SLOVAKIA | 232 199 930 | MAKEDOHIJA MACEDONIA | (02) 20 50 319 | U.S.A. | 800-395-8325 |
| VENEZUELA | 0800-7268724 | 22/12/2015 | |||||
Date of purchse : 14 / 03 / 14 / 03 / 14 / 03 / 14 / 03 / 14 / 03 / 14 / 03 / 14 / 03 / 14 / 03 / 14 / 03 / 14 / 03 / 14 / 03 / 14 / 03 / 14 / 03 / 14
购日/购入日/月日
Product reference: /Reference du produit / Reference du produits / No produit de prototype / Type de produits / Typ�数er des Géralles / Artiklemnonen van het apparat / Referencemember / Productrefereign / Artiklemnoner / Tautemenero / refecrance du product / Model / Gamino numerais / Tootei vitenções / Tip aperat / Väriskåle kête / Typ výrodko / Produktas atues numurs / Model provzka / Ozanska provzka / Cod produits / Produk rujnak / Refereisi produkh / Mān shāmī/ Urūn kodu / Maŋeə / Maŋeə / Maŋeə na ypeəa / Maŋeə / Koiokoc; piovorovico / Uqinlj 1 / uqinlj/ iuskič/ 品模型/ 酒品 L'luèvien sanceres号/ 茶苦尼/ 1/ 1/ 1/ 1/ 1/ 1/ 1/ 1/ 1/ 1/ 1/ 1/ 1/ 1/ 1/ 1/ 1/ 1/ 1/ 1/ 1/ 1/ 1/ 1/ 1/ 1/ 1/ 1/ 1/ 1/ 1/ 1/ 1/ 1
Raler nme and adress: / Nom et adres du vende / Nom y direction de revendre / Nome e indirzio de negozio / Nane und Anschrift des Handlers / Naem an de van de dealer / Fohrander nain & adres / Aterforsjahrns namn och adres / Fohrander nain ogad / Jallehenyinn yin ni jas oalse / Naive airdes prnnae / Nanaia airdes prnnae / Nanaia airdes prnnae / Parduttouros pranidnes / Mitya kauja naad / Nasiv in rassov trogine / Tiplusian / Naiva airdes prnnae / Vekhal airdes naunisum / Nanaia airdes prnnae / Nanaia airdes prnnae / Nanaia airdes prnnae / Nanaia airdes prnnae / Nanaia airdes prnnae / Nanaia airdes prnnae / Nanaia airdes prnnae / Nanaia airdes prnnae / Nanaia airdes prnnae / Nanaia airdes prnnae/ Nanaia airdes prnnae / Nanaia airdes prnnae / Nanaia airdes prnnae / Nanaia airdes prnnae / Nanaia airdes prnnae / Nanaia airdes prnnae / Nanaia airdes prnnae / Nanaia airdes prnnae / Nanaia airdes prnnae /Nanaia airdes prnnae / Nanaia airdes prnnae / Nanaia airdes prnnae / Nanaia airdes prnnae / Nanaia airdes prnnae / Nanaia airdes prnnae / Nanaia airdes prnnae / Nanaia airdes prnnae / Nanaia airdes prnnae / NANAIAA
Distributer stam 1 / 2015/12/29 14:30:00 PM
FR p. 1-5
ES p. 6-10
PT p. 11-15
IT p. 16-20
EL p. 21 - 25
NL p. 26 - 30
DE p. 31 - 35
EN p. 36-40
AR p. 45-41
FA p. 50 - 46
UK p. 51 - 55
RU p. 56 - 60
KK p. 61 - 65