BEB331110M - Built-in oven AEG - Free user manual and instructions
Find the device manual for free BEB331110M AEG in PDF.

User questions about BEB331110M AEG
0 question about this device. Answer the ones you know or ask your own.
Ask a new question about this device
Download the instructions for your Built-in oven in PDF format for free! Find your manual BEB331110M - AEG and take your electronic device back in hand. On this page are published all the documents necessary for the use of your device. BEB331110M by AEG.
USER MANUAL BEB331110M AEG
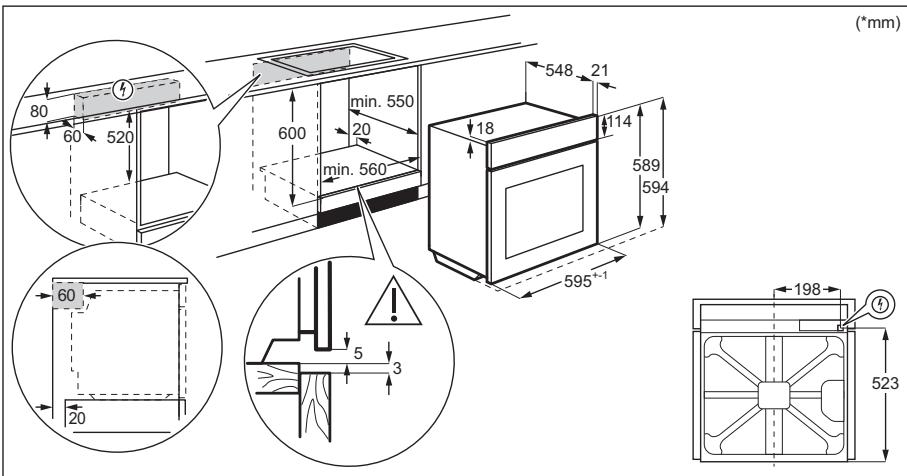
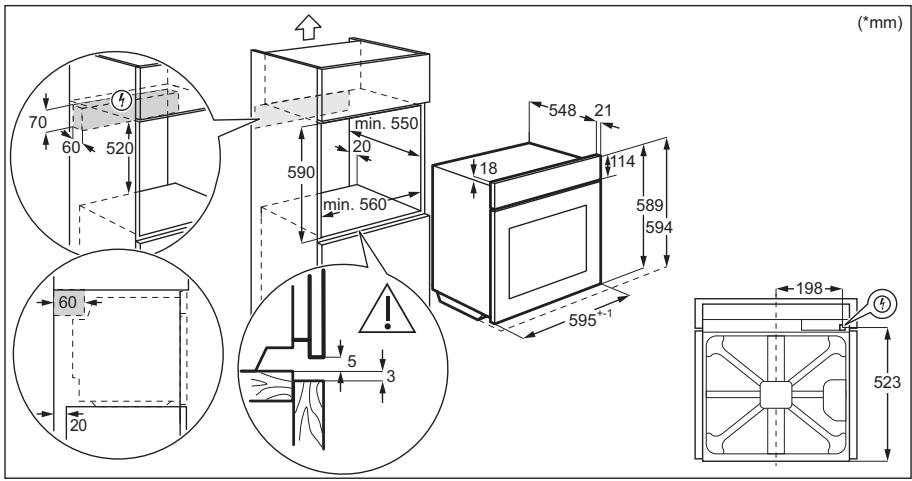
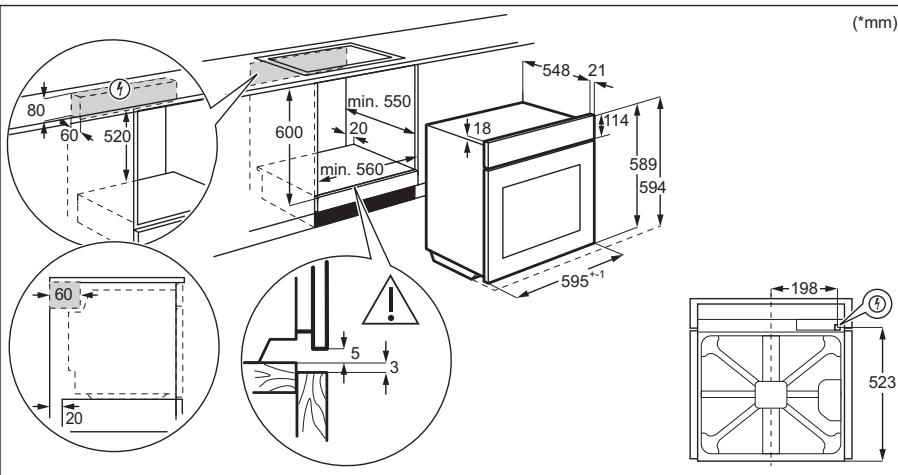
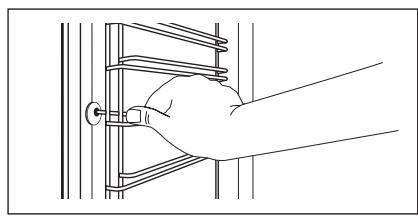
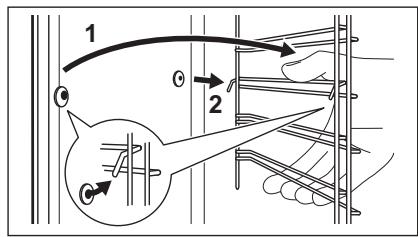
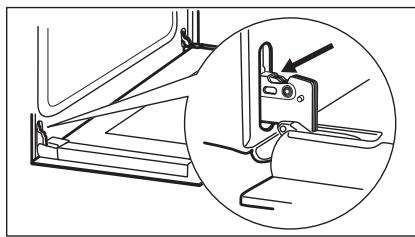
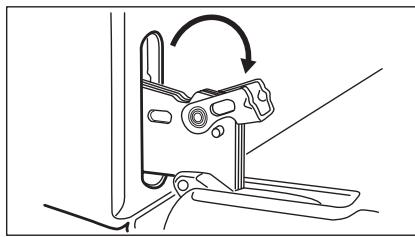
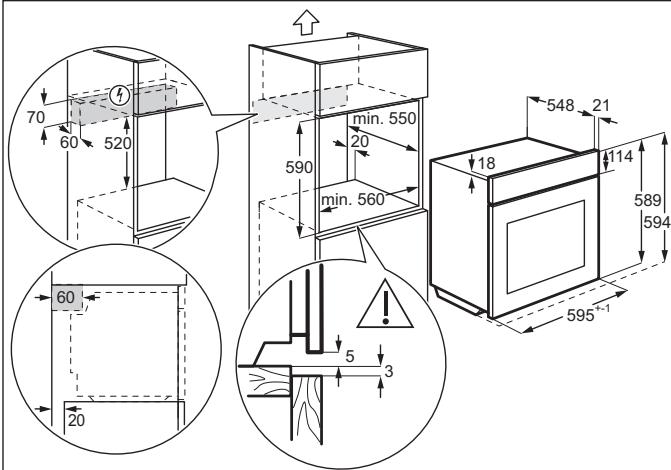
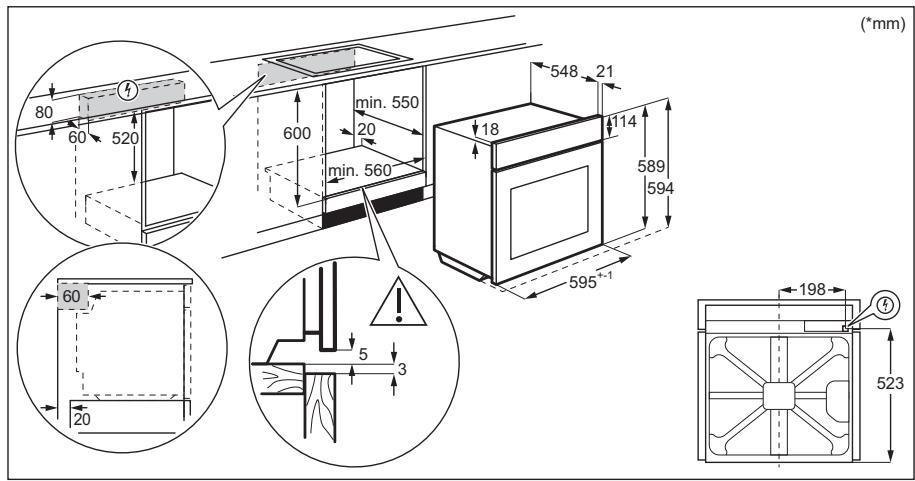
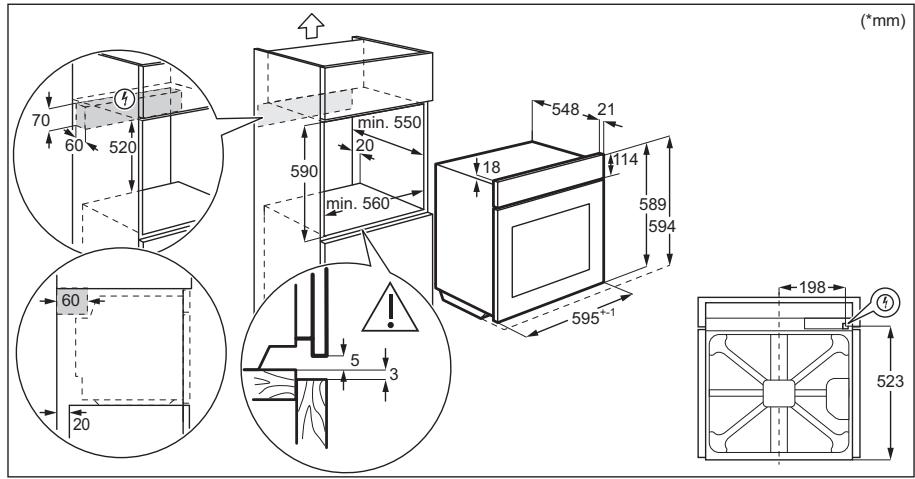
How to install your AEG/Electrolux Oven - Column installation

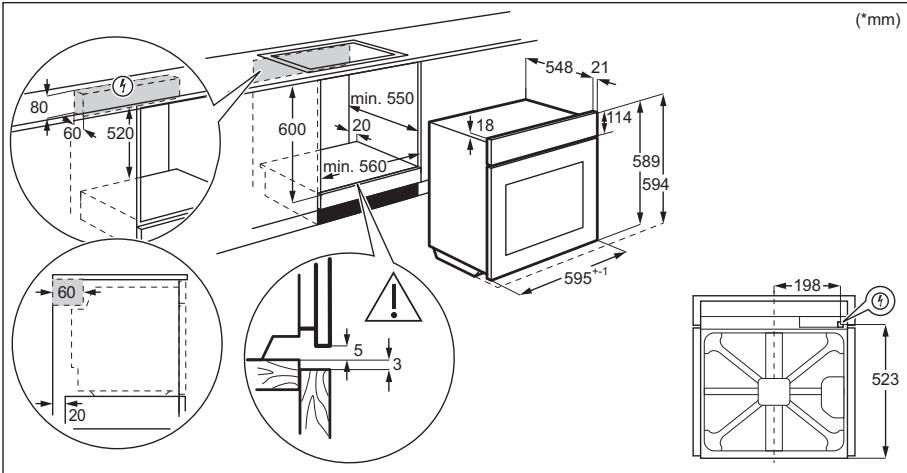

How to install your AEG/Electrolux
Oven - Column installation

(^*mm)

- BESCHRIJVING VAN HET PRODUCT 51
5.BEDIENINGSPANEEL 51
-
VOOR HET EERSTE GEBRUIK 52
-
DAGELIJKS GEBRUIK 52
-
KLOKFUNCTIES 53
-
GEBRUK VAN DE ACCESSOIRES 55
-
EXTRA FUNCTIONS 56
13.PROBLEEMOPISSING 63
- ENERGIEZUINIGHEID 63
15.MILIEUBESCHERMING 64
1. VEILIGHEIDSINFORMATIE
How to install your AEG/Electrolux Oven - Column installation


Thank you for choosing this AEG product. We have created it to give you impeccable performance for many years, with innovative technologies that help make life simpler – features you might not find on ordinary appliances. Please spend a few minutes reading to get the very best from it.
Visit our website to:

Get usage advice, brochures, trouble shooter, service and repair information: www.aeg.com/support

Register your product for better service: www.registeraeg.com

Buy Accessories, Consumables and Original spare parts for your appliance: www.aeg.com/shop
CUSTOMER CARE AND SERVICE
Always use original spare parts.
When contacting our Authorised Service Centre, ensure that you have the following data available: Model, PNC, Serial Number.
The information can be found on the rating plate.
Warning / Caution-Safety information
(1) General information and tips
Environmental information
Subject to change without notice.
CONTENTS
1.SAFETY INFORMATION. 67
2.SAFETYINSTRUCTIONS 68
3. INSTALLATION 71
4.PRODUCT DESCRIPTION. 73
5.CONTROL PANEL 73
6. BEFORE FIRST USE 74
7.DAILYUSE 74
8.CLOCK FUNCTIONS 75
9. USING THE ACCESSORIES 77
10. ADDITIONAL FUNCTIONS 78
11. HINTS AND TIPS 78
12.CARE AND CLEANING 81
13.TROUBLESHOOTING. 84
14. ENERGY EFFICIENCY 85
15. ENVIRONMENTAL CONCERNS 86
1. SAFETY INFORMATION
Before the installation and use of the appliance, carefully read the supplied instructions. The manufacturer is not responsible for any injuries or damage that are the result of incorrect installation or usage. Always keep the instructions in a safe and accessible location for future reference.
1.1 Children and vulnerable people safety
- This appliance can be used by children aged from 8 years and above and persons with reduced physical, sensory or mental capabilities or lack of experience and knowledge if they have been given supervision or instruction concerning the use of the appliance in a safe way and understand the hazards involved. Children of less than 8 years of age and persons with very extensive and complex disabilities shall be kept away from the appliance unless continuously supervised.
- Children should be supervised to ensure that they do not play with the appliance.
- Keep all packaging away from children and dispose of it appropriately.
- WARNING: Keep children and pets away from the appliance when it operates or when it cools down. Accessible parts become hot during use.
- If the appliance has a child safety device, it should be activated.
- Children shall not carry out cleaning and user maintenance of the appliance without supervision.
1.2 General Safety
- Only a qualified person must install this appliance and replace the cable.
-
Do not use the appliance before installing it in the built-in structure.
-
Disconnect the appliance from the power supply before carrying out any maintenance.
- If the mains power supply cable is damaged, it must be replaced by the manufacturer, its Authorised Service Centre or similarly qualified persons to avoid an electrical hazard.
- WARNING: Ensure that the appliance is switched off before replacing the lamp to avoid the possibility of electric shock.
- WARNING: The appliance and its accessible parts become hot during use. Care should be taken to avoid touching heating elements.
- Always use oven gloves to remove or put in accessories or ovenware.
- To remove the shelf supports first pull the front of the shelf support and then the rear end away from the side walls. Install the shelf supports in the opposite sequence.
- Do not use a steam cleaner to clean the appliance.
- Do not use harsh abrasive cleaners or sharp metal scrapers to clean the glass door since they can scratch the surface, which may result in shattering of the glass.
2. SAFETY INSTRUCTIONS
2.1 Installation

WARNING!
Only a qualified person must install this appliance.
- Remove all the packaging.
- Do not install or use a damaged appliance.
- Follow the installation instructions supplied with the appliance.
Always take care when moving the appliance as it is heavy. Always use safety gloves and enclosed footwear. - Do not pull the appliance by the handle.
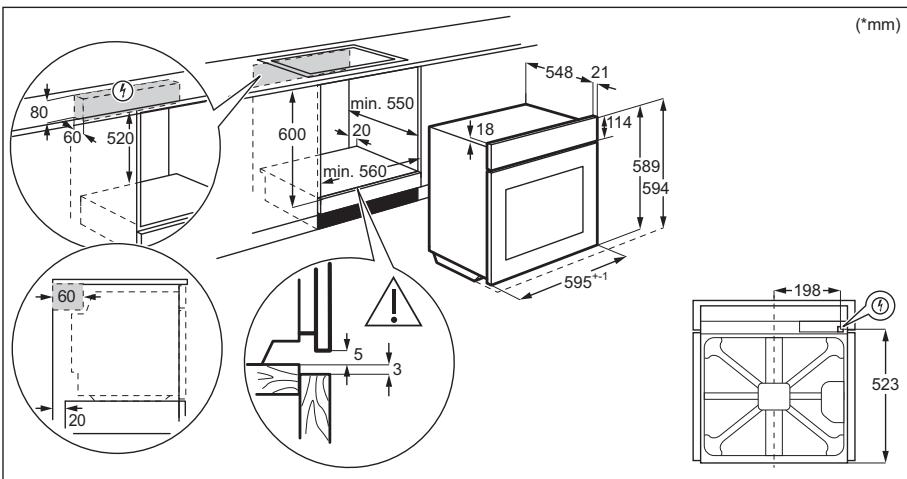
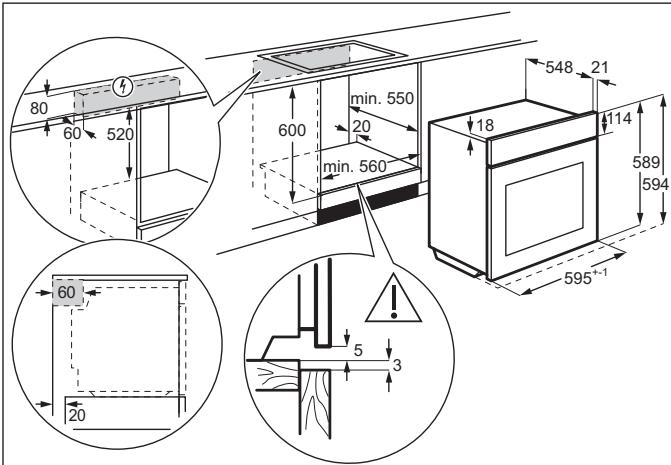
Install the appliance in a safe and suitable place that meets installation requirements. - Keep the minimum distance from other appliances and units.
-
Before mounting the appliance, check if the oven door opens without restraint.
-
The appliance is equipped with an electric cooling system. It must be operated with the electric power supply.
Cabinet minimum height 590 (600) mm
(Cabinet under the worktop minimum height)
| Cabinet width | 560 mm |
| Cabinet depth | 550 (550) mm |
| Height of the front of the appliance | 594 mm |
| Height of the back of the appliance | 576 mm |
| Width of the front of the appliance | 595 mm |
| Width of the back of the appliance | 559 mm |
| Depth of the appliance | 569 mm |
| Built in depth of the appli- ance | 548 mm |
| Depth with open door | 1022 mm |
| Ventilation opening mini- mum size. Opening placed on the bottom rear side | 560x20 mm |
| Mains supply cable length. Cable is placed in the right corner of the back side | 1500 mm |
| Mounting screws | 4x25 mm |
2.2 Electrical connection

WARNING!
Risk of fire and electric shock.
- All electrical connections should be made by a qualified electrician.
The appliance must be earthed. - Make sure that the parameters on the rating plate are compatible with the electrical ratings of the mains power supply.
Always use a correctly installed shockproof socket. - Do not use multi-plug adapters and extension cables.
- Make sure not to cause damage to the mains plug and to the mains cable. Should the mains cable need to be replaced, this must be carried out by our Authorised Service Centre.
- Do not let mains cables touch or come near the appliance door or the niche below the appliance, especially when it operates or the door is hot.
- The shock protection of live and insulated parts must be fastened in such a way that it cannot be removed without tools.
- Connect the mains plug to the mains socket only at the end of the installation. Make sure that there is access to the mains plug after the installation.
If the mains socket is loose, do not connect the mains plug. - Do not pull the mains cable to disconnect the appliance. Always pull the mains plug.
-
Use only correct isolation devices: line protecting cut-outs, fuses (screw type fuses removed from the holder), earth leakage trips and contactors.
-
The electrical installation must have an isolation device which lets you disconnect the appliance from the mains at all poles. The isolation device must have a contact opening width of minimum 3 mm.
- This appliance is supplied with a main plug and a main cable.
Cable types applicable for installation or replacement for Europe:
H07 RN-F, H05 RN-F, H05 RRF, H05 VV-F, H05 V2V2-F (T90), H05 BB-F
For the section of the cable refer to the total power on the rating plate. You can also refer to the table:
| Total power (W) | Section of the cable (mm2) |
| maximum 1380 | 3 x 0.75 |
| maximum 2300 | 3 x 1 |
| maximum 3680 | 3 x 1.5 |
The earth cord (green / yellow cable) must be 2 cm longer than phase and neutral cables (blue and brown cables).
2.3 Use

WARNING!
Risk of injury, burns and electric shock or explosion.
- This appliance is for household (indoors) use only.
- Do not change the specification of this appliance.
Make sure that the ventilation openings are not blocked. - Do not let the appliance stay unattended during operation.
- Deactivate the appliance after each use.
- Be careful when you open the appliance door while the appliance is in operation. Hot air can release.
- Do not operate the appliance with wet hands or when it has contact with water.
- Do not apply pressure on the open door.
-
Do not use the appliance as a work surface or as a storage surface.
-
Open the appliance door carefully. The use of ingredients with alcohol can cause a mixture of alcohol and air.
- Do not let sparks or open flames to come in contact with the appliance when you open the door.
- Do not put flammable products or items that are wet with flammable products in, near or on the appliance.

WARNING!
Risk of damage to the appliance.
-
To prevent damage or discoloration to the enamel:
-
do not put ovenware or other objects in the appliance directly on the bottom.
- do not put aluminium foil directly on the bottom of cavity of the appliance.
- do not put water directly into the hot appliance.
- do not keep moist dishes and food in the appliance after you finish the cooking.
-
be careful when you remove or install the accessories.
-
Discoloration of the enamel or stainless steel has no effect on the performance of the appliance.
- Use a deep pan for moist cakes. Fruit juices cause stains that can be permanent.
- This appliance is for cooking purposes only. It must not be used for other purposes, for example room heating.
Always cook with the oven door closed. - If the appliance is installed behind a furniture panel (e.g. a door) make sure the door is never closed when the appliance operates. Heat and moisture can build up behind a closed furniture panel and cause subsequent damage to the appliance, the housing unit or the floor. Do not close the furniture panel until the appliance has cooled down completely after use.
2.4 Care and cleaning

WARNING!
Risk of injury, fire, or damage to the appliance.
- Before maintenance, deactivate the appliance and disconnect the mains plug from the mains socket.
Make sure the appliance is cold. There is the risk that the glass panels can break. - Replace immediately the door glass panels when they are damaged. Contact the Authorised Service Centre.
- Be careful when you remove the door from the appliance. The door is heavy!
Clean regularly the appliance to prevent the deterioration of the surface material. - Clean the appliance with a moist soft cloth. Use only neutral detergents. Do not use abrasive products, abrasive cleaning pads, solvents or metal objects.
If you use an oven spray, follow the safety instructions on its packaging.
2.5 Internal lighting

WARNING!
Risk of electric shock.
- Concerning the lamp(s) inside this product and spare part lamps sold separately: These lamps are intended to withstand extreme physical conditions in household appliances, such as temperature, vibration, humidity, or are intended to signal information about the operational status of the appliance. They are not intended to be used in other applications and are not suitable for household room illumination.
This product contains a light source of energy efficiency class G. - Use only lamps with the same specifications.
2.6 Service
To repair the appliance contact the Authorised Service Centre.
Use original spare parts only.
2.7 Disposal

WARNING!
Risk of injury or suffocation.
-
Contact your municipal authority for information on how to dispose of the appliance.
-
Disconnect the appliance from the mains supply.
-
Cut off the mains electrical cable close to the appliance and dispose of it.
-
Remove the door catch to prevent children or pets from becoming trapped in the appliance.
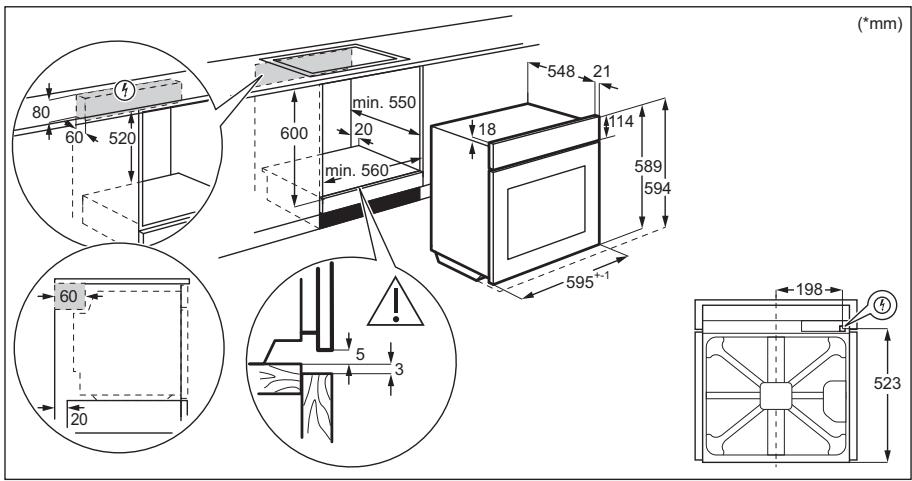
3. INSTALLATION

WARNING!
Refer to Safety chapters.
3.1 Building in

YouTube
www.youtube.com/electrolux
www.youtube.com/aeg
How to install your AEG/Electrolux Oven - Column installation

(^*mm)

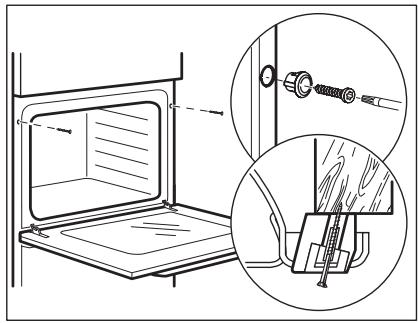
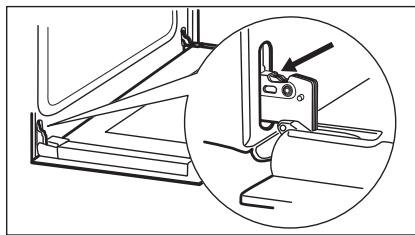
3.2 Securing the oven to the cabinet
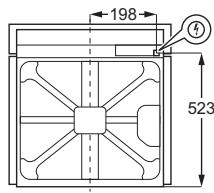
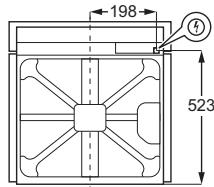
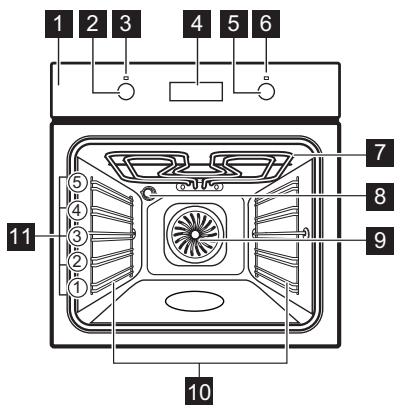
4. PRODUCT DESCRIPTION
4.1 General overview
4.2 Accessories
- Wire shelf
For cookware, cake tins, roasts.
Baking tray
For cakes and biscuits. - Grill-/Roasting pan
1 Control panel
2 Knob for the heating functions
3 Power lamp / symbol
4 Display
5 Control knob (for the temperature)
6 Temperature indicator / symbol
Heating element
8 Lamp
9 Fan
10 Shelf support, removable
11 Shelf positions
To bake and roast or as pan to collect fat.
- Telescopic runners
With the telescopic runners you can put in and remove the shelves more easily.
5. CONTROL PANEL
5.1 Retractable knobs
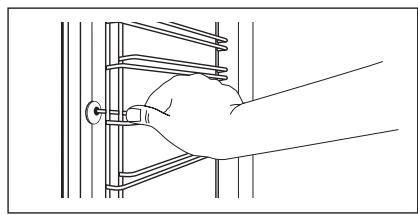
To use the appliance press the knob. The knob comes out.
5.2 Sensor fields / Buttons
| — | To set the time. |
| ① | To set a clock function. |
| + | To set the time. |
5.3 Display
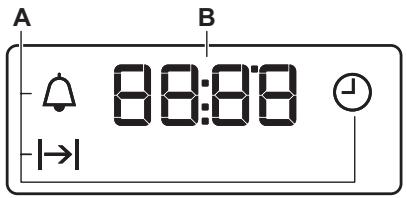
A. Clock functions
B. Timer
6. BEFORE FIRST USE

WARNING!
Refer to Safety chapters.
6.1 Before first use
The oven can emit an odour and smoke during preheating. Make sure that the room is ventilated.

Step 1

Step 2

Step 3
| Set the clock | Clean the oven | Preheat the empty oven | ||
| 1. | - press to set the time. After approximately 5 sec., the flashing stops and the display shows the time. | 1. | Remove all accessories and removable shelf supports from the oven. | 1. Set the maximum temperature for the function: ☐. Time: 1 h. |
| 2. | Clean the oven and the accessories with a soft cloth, warm water and a mild detergent. | 2. Set the maximum temperature for the function: ☐. Time: 15 min. | ||
| 3. Set the maximum temperature for the function: ☐. Time: 15 min. | ||||
Turn off the oven and wait until it is cold. Place the accessories and the removable shelf supports in the oven.
7. DAILY USE

WARNING!
Refer to Safety chapters.
7.1 How to set: Heating function
Step 1
Turn the knob for the heating functions to select a heating function.
| Step 2 | Turn the control knob to select the temperature. |
| Step 3 | When the cooking ends, turn the knobs to the off position to turn off the oven. |
7.2 Heating functions
Heating function
Application

Off position
The oven is off.

True Fan Cooking
To bake on up to three shelf positions at the same time and to dry food.
Set the temperature 20 - 40°C lower than for Conventional Cooking.

Moist Fan Baking
This function is designed to save energy during cooking. When you use this function, the temperature in the cavity may differ from the set temperature.
The heating power may be reduced. For more information refer to "Daily Use" chapter, Notes on: Moist Fan Baking.

Defrost
To defrost food (vegetables and fruit). The defrosting time depends on the amount and size of the frozen food.

Grill
To grill thin pieces of food and to toast bread.
Heating function
Application

Fast Grilling
To grill thin pieces of food in large quantities and to toast bread.

Pizza Function
To bake pizza. To make intensivebrowning and a crispy bottom.

Conventional Cooking
To bake and roast food on one shelf position.
7.3 Notes on: Moist Fan Baking
This function was used to comply with the energy efficiency class and ecodesign requirements according to EU 65/2014 and EU 66/2014. Tests according to EN 60350-1.
The oven door should be closed during cooking so that the function is not interrupted and the oven operates with the highest energy efficiency possible.
For the cooking instructions refer to "Hints and tips" chapter, Moist Fan Baking. For general energy saving recommendations refer to "Energy Efficiency" chapter, Energy Saving.
8. CLOCK FUNCTIONS
8.1 Clock functions
| Clock function | Application |
| Time of Day | To set, change or check the time of day. |
| Duration | To set how long the oven works. |
| Minute Minder | To set a countdown. This function has no effect on the operation of the oven. You can set this function at any time, also when the oven is off. |
8.2 How to set: Clock functions
How to set: Time of Day
- flashes when you connect the oven to the electrical supply, when there was a power cut or when the timer is not set.
+,- -press to set the time.
After approximately 5 sec., the flashing stops and the display shows the time.
How to change: Time of Day
Step 1 - press repeatedly to change the time of day. - starts to flash.
Step 2 -press to set the time. After approximately 5 sec., the flashing stops and the display shows the time.
How to set: Duration
Step 1 Set an oven function and the temperature.
Step 2 1&-press repeatedly.||_-starts to flash.
Step 3 +, - press to set the duration.
The display shows: || .
- flashes when the set time ends. The signal sounds and the oven turns off.
Step 4 Press any button to stop the signal.
Step 5 Turn the knobs to the off position.
How to set: Minute Minder
Step 1 ① -press repeatedly. starts to flash.
Step 2 +, - press to set the time.
The function starts automatically after 5 sec.
When the set time ends, the signal sounds.
Step 3 Press any button to stop the signal.
Step 4 Turn the knobs to the off position.
How to cancel: Clock functions
Step 1 -press repeatedly until the clock function symbol starts to flash.
Step 2 Press and hold: The clock function turns off after few seconds.
9. USING THE ACCESSORIES

WARNING!
Refer to Safety chapters.
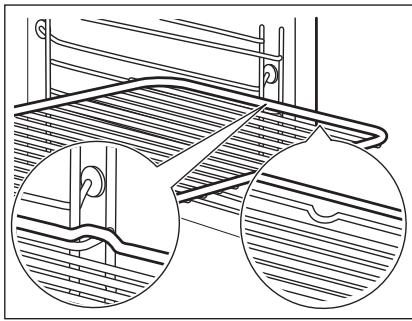
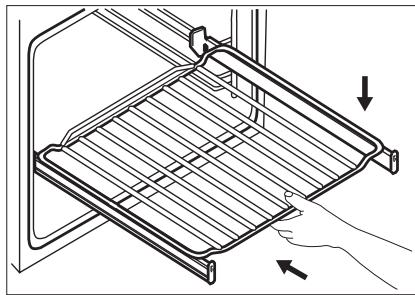
9.1 Inserting accessories
A small indentation at the top increases safety. The indentations are also anti-tip
Wire shelf:
Push the shelf between the guide bars of the shelf support and make sure that the feet point down.
devices. The high rim around the shelf prevents cookware from slipping of the shelf.
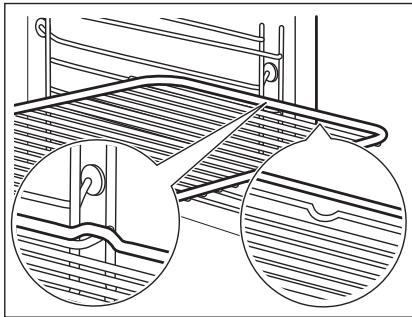
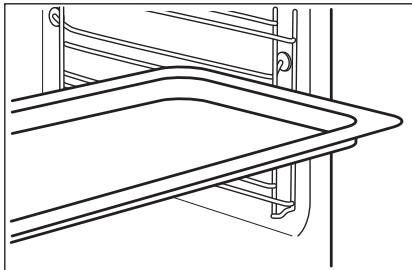
Baking tray / Deep pan:
Push the tray between the guide bars of the shelf support.
Wire shelf, Baking tray / Deep pan:
Push the tray between the guide bars of the shelf support and the wire shelf on the guide bars above.
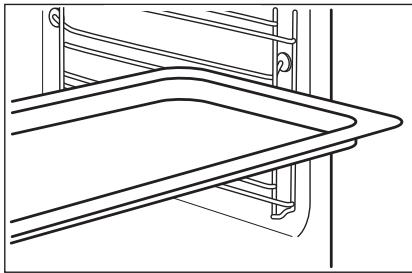
9.2 Using telescopic runners
Do not oil the telescopic runners.
Make sure you push back the telescopic runners fully in the oven before you close the oven door.

10. ADDITIONAL FUNCTIONS
10.1 Cooling fan
When the oven operates, the cooling fan turns on automatically to keep the surfaces of the oven cool. If you turn off the oven, the cooling fan can continue to operate until the oven cools down.
10.2 Safety thermostat
Incorrect operation of the oven or defective components can cause dangerous overheating. To prevent this, the oven has a safety thermostat which interrupts the power supply. The oven turns on again automatically when the temperature drops.
11. HINTS AND TIPS

Refer to Safety chapters.
11.1 Cooking recommendations
The oven has five shelf positions.
Count the shelf positions from the bottom of the oven floor.
Your oven may bake or roast differently to the oven you had before.
Baking cakes
Do not open the oven door before 3/4 of the set cooking time is up.
If you use two baking trays at the same time, keep one empty level between them.
Cooking meat and fish
Use a deep pan for very fatty food to prevent the oven from stains that can be permanent.
Leave the meat for approximately 15 minutes before carving so that the juice does not seep out.
To prevent too much smoke in the oven during roasting, add some water into the deep pan. To prevent the smoke condensation, add water each time after it dries up.
Cooking times
Cooking times depend on the type of food, its consistency, and volume.
Initially, monitor the performance when you cook. Find the best settings (heat setting, cooking time, etc.) for your cookware, recipes and quantities when you use this appliance.
11.2 Moist Fan Baking - recommended accessories
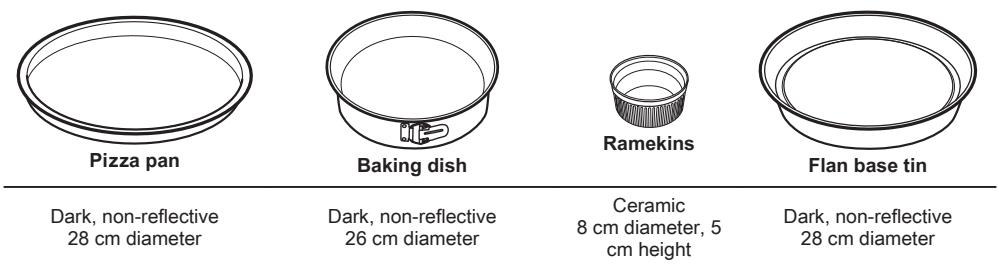
Use the dark and non-reflective tins and containers. They have better heat absorption than the light colour and reflective dishes.
11.3 Moist Fan Baking
For the best results follow suggestions listed in the table below.
| Sweet rolls, 12 pieces | baking tray or dripping pan | 175 | 3 | 40 - 50 |
| Rolls, 9 pieces | baking tray or dripping pan | 180 | 2 | 35 - 45 |
| Pizza, frozen, 0.35 kg | wire shelf | 180 | 2 | 45 - 55 |
| Swiss roll | baking tray or dripping pan | 170 | 2 | 30 - 40 |
| Brownie | baking tray or dripping pan | 170 | 2 | 45 - 50 |
| Souffle, 6 pieces | ceramic ramekins on wire shelf | 190 | 3 | 45 - 55 |
| Sponge flan base | flan base tin on wire shelf | 180 | 2 | 35 - 45 |
| Victoria sandwich | baking dish on wire shelf | 170 | 2 | 35 - 50 |
| Poached fish, 0.3 kg | baking tray or dripping pan | 180 | 2 | 35 - 45 |
| Whole fish, 0.2 kg | baking tray or dripping pan | 180 | 3 | 25 - 35 |
| Fish fillet, 0.3 kg | pizza pan on wire shelf | 170 | 3 | 30 - 40 |
| Poached meat, 0.25 kg | baking tray or dripping pan | 180 | 3 | 35 - 45 |
| Shashlik, 0.5 kg | baking tray or dripping pan | 180 | 3 | 40 - 50 |
| Cookies, 16 pieces | baking tray or dripping pan | 150 | 2 | 30 - 45 |
| Macaroons, 20 pieces | baking tray or dripping pan | 180 | 2 | 45 - 55 |
| Muffins, 12 pieces | baking tray or dripping pan | 170 | 2 | 30 - 40 |
| Savory pastry, 16 pieces | baking tray or dripping pan | 170 | 2 | 35 - 45 |
| Short crust biscuits, 20 pieces | baking tray or dripping pan | 150 | 2 | 40 - 50 |
| Tartlets, 8 pieces | baking tray or dripping pan | 170 | 2 | 30 - 40 |
| Vegetables, poached, 0.4 kg | baking tray or dripping pan | 180 | 2 | 35 - 45 |
| Vegetarian omelette | pizza pan on wire shelf | 180 | 3 | 35 - 45 |
| Mediterranean vee- tables, 0.7 kg | baking tray or dripping pan | 180 | 4 | 35 - 45 |
11.4 Information for test institutes
Tests according to IEC 60350-1.
| (℃) | (min) | i | ||||
| Small cakes, 20 per tray | Conventional Cooking | Baking tray | 3 | 170 | 20 - 30 | - |
| Small cakes, 20 per tray | True Fan Cooking | Baking tray | 3 | 150 - 160 | 20 - 35 | - |
| Small cakes, 20 per tray | True Fan Cooking | Baking tray | 2 and 4 | 150 - 160 | 20 - 35 | - |
| Apple pie, 2 tins Ø20 cm | Conventional Cooking | Wire shelf | 2 | 180 | 70 - 90 | - |
| Apple pie, 2 tins Ø20 cm | True Fan Cooking | Wire shelf | 2 | 160 | 70 - 90 | - |
| Sponge cake, cake mould Ø26 cm | Conventional Cooking | Wire shelf | 2 | 170 | 40 - 50 | Preheat the oven for 10 minutes. |
| Sponge cake, cake mould Ø26 cm | True Fan Cooking | Wire shelf | 2 | 160 | 40 - 50 | Preheat the oven for 10 minutes. |
| Sponge cake, cake mould Ø26 cm | True Fan Cooking | Wire shelf | 2 and 4 | 160 | 40 - 60 | Preheat the oven for 10 minutes. |
| Short bread | True Fan Cooking | Baking tray | 3 | 140 - 150 | 20 - 40 | - |
| Short bread | True Fan Cooking | Baking tray | 2 and 4 | 140 - 150 | 25 - 45 | - |
| Short bread | Conventional Cooking | Baking tray | 3 | 140 - 150 | 25 - 45 | - |
| Toast, 4 - 6 pieces | Grill | Wire shelf | 4 | max. | 2 - 3 minutes first side; 2 - 3 minutes second side | Preheat the oven for 3 minutes. |
| Beef burger, 6 pieces, 0.6 kg | Grill | Wire shelf and dripping pan | 4 | max. | 20 - 30 | Put the wire shelf on the fourth level and the dripping pan on the third level of the oven. Turn the food halfway through the cooking time. Preheat the oven for 3 minutes. |
12. CARE AND CLEANING

WARNING!
Refer to Safety chapters.
12.1 Notes on cleaning

Cleaning Agents
Clean the front of the oven with a soft cloth with warm water and a mild detergent. Clean and check the door gasket around the frame of the cavity.
Use a cleaning solution to clean metal surfaces.
Clean stains with a mild detergent.
Everyday Use
Clean the cavity after each use. Fat accumulation or other residue may cause fire.
Moisture can condense in the oven or on the door glass panels. To decrease the condensation, let the oven work for 10 minutes before cooking. Do not store the food in the oven for longer than 20 minutes. Dry the cavity with a soft cloth after each use.
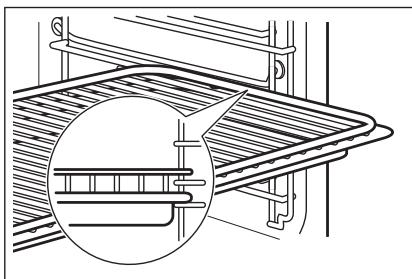
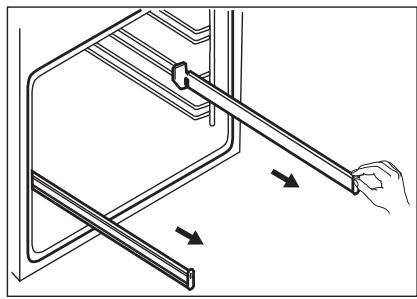
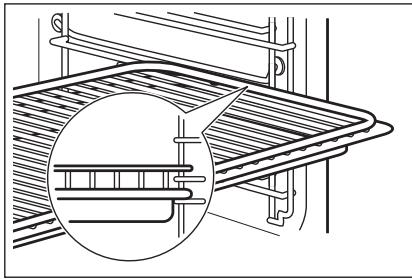
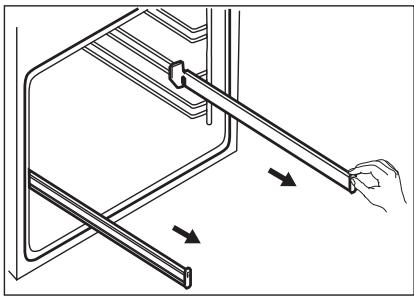
12.2 How to remove: Shelf supports
Remove the shelf supports to clean the oven.
| Step 1 | Turn off the oven and wait until it is cold. |
| Step 2 | Pull the front of the shelf support away from the side wall. |
| Step 3 | Pull the rear end of the shelf support away from the side wall and remove it. |
| Step 4 | Install the shelf supports in the opposite sequence. The retaining pins on the telescopic runners must point to the front. |
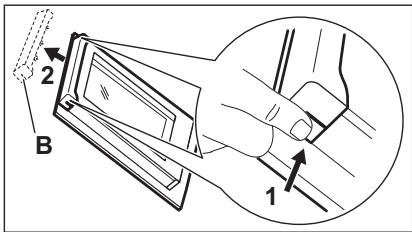
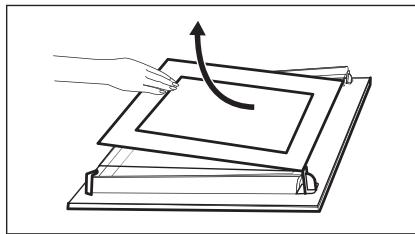
12.3 How to remove and install: Door
The oven door has two glass panels. You can remove the oven door and the internal glass panel to clean it. Read the whole "Removing and installing door" instruction before you remove the glass panels.

CAUTION!
Do not use the oven without the glass panels.
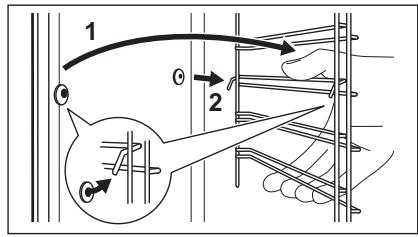
Step 1 Open the door fully and hold both hinges.
Step 2 Lift and turn the levers fully on both hinges.
| Step 3 | Close the oven door halfway to the first opening position. Then lift and pull forward and remove the door from its seat. | |
| Step 4 | Put the door on a soft cloth on a stable surface. | |
| Step 5 | Hold the door trim (B) on the top edge of the door at the two sides and push inwards to release the clip seal. | |
| Step 6 | Pull the door trim to the front to remove it. | |
| Step 7 | Hold the door glass panel by its top edge and carefully pull it out. Make sure the glass slides out of the supports completely. | |
| Step 8 | Clean the glass panels with water and soap. Dry the glass panels carefully. Do not clean the glass panels in the dishwasher. | |
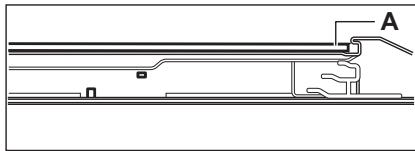
| Step 9 | After cleaning, install the glass panel and the oven door. | |
| The screen-printing zone must face the inner side of the door. Make sure that after the installation the surface of the glass panel frame on the screen-printing zones is not rough when you touch it. When installed correctly the door trim clicks. Make sure that you install the internal glass panel in the seats correctly. | ||
12.4 How to replace: Lamp

WARNING!
Risk of electric shock.
The lamp can be hot.
Always hold the halogen lamp with a cloth to prevent grease residue from burning on the lamp.
| Before you replace the lamp: | ||
| Step 1 | Step 2 | Step 3 |
| Turn off the oven. Wait until the oven is cold. | Disconnect the oven from the mains. | Put a cloth on the bottom of the cavity. |
Back lamp
Step 1 Turn the glass cover to remove it.
Step 2 Clean the glass cover.
Step 3 Replace the lamp with a suitable 300^ heat-resistant lamp.
Step 4 Install the glass cover.
13. TROUBLESHOOTING

WARNING!
Refer to Safety chapters.
13.1 What to do if...
In any cases not included in this table please contact with an Authorised Service Centre.
| Problem | Check if... |
| The oven does not heat up. | The fuse is blown. |
| Problem | Check if... |
| The door gasket is damaged. | Do not use the oven. Contact an Authorised Service Centre. |
| The display shows "12.00". | There was a power cut. Set the time of day. |
| The lamp does not work. | The lamp is burnt out. |
13.2 Service data
If you cannot find a solution to the problem yourself, contact your dealer or an Authorised Service Centre.
The necessary data for the service centre is on the rating plate. The rating plate is on the front frame of the oven cavity. Do not remove the rating plate from the oven cavity.
We recommend that you write the data here:
| Model (MOD.) | ...... |
| Product number (PNC) | ...... |
| Serial number (S.N.) | ...... |
14. ENERGY EFFICIENCY
14.1 Product Information and Product Information Sheet*
| Supplier's name | AEG |
| Model identification | BEB331110M 949496346 |
| Energy Efficiency Index | 95.3 |
| Energy efficiency class | A |
| Energy consumption with a standard load, conventional mode | 0.93 kWh/cycle |
| Energy consumption with a standard load, fan-forced mode | 0.81 kWh/cycle |
| Number of cavities | 1 |
| Heat source | Electricity |
| Volume | 72 l |
| Type of oven | Built-In Oven |
| Mass | 29.3 kg |
- For European Union according to EU Regulations 65/2014 and 66/2014.
For Republic of Belarus according to STB 2478-2017, Appendix G; STB 2477-2017, Annexes A and B.
For Ukraine according to 568/32020.
Energy efficiency class is not applicable for Russia.
EN 60350-1 - Household electric cooking appliances - Part 1: Ranges, ovens, steam ovens and grills - Methods for measuring performance.
14.2 Energy saving

The oven has features which help you save energy during everyday cooking.
Make sure that the oven door is closed when the oven operates. Do not open the oven door too often during cooking. Keep the door gasket clean and make sure it is well fixed in its position.
Use metal cookware to improve energy saving.
When possible, do not preheat the oven before cooking.
Keep breaks between baking as short as possible when you prepare a few dishes at one time.
Cooking with fan
When possible, use the cooking functions with fan to save energy.
Residual heat
When the cooking duration is longer than 30 min, reduce the oven temperature to minimum 3 - 10 min before the end of cooking. The residual heat inside the oven will continue to cook.
Use the residual heat to warm up other dishes.
Keep food warm
Choose the lowest possible temperature setting to use residual heat and keep a meal warm.
Moist Fan Baking
Function designed to save energy during cooking.
15. ENVIRONMENTAL CONCERNS
Recycle materials with the symbol . Put the packaging in relevant containers to recycle it. Help protect the environment and human health by recycling waste of electrical and electronic appliances. Do not dispose of
appliances marked with the symbol with the household waste. Return the product to your local recycling facility or contact your municipal office.
POUR DES RÉSULTATS PARFAITS
How to install your AEG/Electrolux Oven - Column installation


5.2 Touches sensitives
How to install your AEG/Electrolux Oven - Column installation


These Funktionist developments, such as the Schutzschutzforschung, were also developed in Germany. In 1970, a group of researchers called for the development of a new concept of the Schutzschutzforschung (Schutzschutzforschung). This concept was developed by the Germanic scientist Dr. Siegfried von Hohenhauer and his colleagues. The concept was first proposed by Dr. Siegfried von Hohenhauer in 1972. In 1973, Dr. Siegfried von Hohenhauer presented his ideas to the Germanic Science Council. In 1974, Dr. Siegfried von Hohenhauer presented his ideas to the Germanic Science Council. In 1975, Dr. Siegfried von Hohenhauer presented his ideas to the Germanic Science Council. In 1976, Dr. Siegfried von Hohenhauer presented his ideas to the Germanic Science Council. In 1977, Dr. Siegfried von Hohenhauer presented his ideas to the Germanic Science Council. In 1978, Dr. Siegfried von Hohenhauer presented his ideas to the Germanic Science Council. In 1979, Dr. Siegfried von Hohenhauer presented his ideas to the Germanic Science Council. In 1980, Dr. Siegfried von Hohenhauer presented his ideas to the Germanic Science Council. In 1981, Dr. Siegfried von Hohenhauer presented his ideas to the Germanic Science Council. In 1982, Dr. Siegfried von Hohenhauer presented his ideas to the Germanic Science Council. In 1983, Dr. Siegfried von Hohenhauer presented his ideas to the Germanic Science Council. In 1984, Dr. Siegfried von Hohenhauer presented his ideas to the Germanic Science Council. In 1985, Dr. Siegfried von Hohenhauer presented his ideas to the Germanic Science Council. In 1986, Dr. Siegfried von Hohenhauer presented his ideas to the Germanic Science Council. In 1987, Dr. Siegfried von Hohenhauer presented his ideas to the Germanic Science Council. In 1988, Dr. Siegfried von Hohenhauer presented his ideas to the Germanic Science Council. In 1989, Dr. Siegfried von Hohenhauer presented his ideas to the Germanic Science Council. In 1990, Dr. Siegfried von Hohenhauer presented his ideas to the Germanic Science Council. In 1991, Dr. Siegfried von Hohenhauer presented his ideas to the Germanic Science Council. In 1992, Dr. Siegfried von Hohenhauer presented his ideas to the Germanic Science Council. In 1993, Dr. Siegfried von Hohenhauer presented his ideas to the Germanic Science Council. In 1994, Dr. Siegfried von Hohenhauer presented his ideas to the Germanic Science Council. In 1995, Dr. Siegfried von Hohenhauer presented his ideas to the Germanic Science Council. In 1996, Dr. Siegfried von Hohenhauer presented his ideas to the Germanic Science Council. In 1997, Dr. Siegfried von Hohenhauer presented his ideas to the Germanic Science Council. In 1998, Dr. Siegfried von Hohenhauer presented his ideas to the Germanic Science Council. In 1999, Dr. Siegfried von Hohenhauer presented his ideas to the Germanic Science Council. In 2000, Dr. Siegfried von Hohenhauer presented his ideas to the Germanic Science Council. In 2001, Dr. Siegfried von Hohenhauer presented his ideas to the Germanic Science Council. In 2002, Dr. Siegfried von Hohenhauer presented his ideas to the Germanic Science Council. In 2003, Dr. Siegfried von Hohenhauer presented his ideas to the Germanic Science Council. In 2004, Dr. Siegfried von Hohenhauer presented his ideas to the Germanic Science Council. In 2005, Dr. Siegfried von Hohenhauer presented his ideas to the Germanic Science Council. In 2006, Dr. Siegfried von Hohenhauer presented his ideas to the Germanic Science Council. In 2007, Dr. Siegfried von Hohenhauer presented his ideas to the Germanic Science Council. In 2008, Dr. Siegfried von Hohenhauer presented his ideas to the Germanic Science Council. In 2009, Dr. Siegfried von Hohenhauer presented his ideas to the Germanic Science Council.
Ofenfunktion
Gerät

Auftauen
How to install your AEG/Electrolux Oven - Column installation


3.2Прицврстуваье на чекараза плakap

4.ОПИС HA ПОН3ВОДOT
4.1 Onwt nperej

4.2 DoaToCu
- Pešetka
3a caobn 3a roTbeHe, nlexOBn 3a KOJauN, neeHb. - Плес за пechень.
3a konlayn n 6nCKBNTn. - Taba 3a ckapa/neuehe meco
1 KOnTpOJHaTa6Ja
2 Konue 3a cyHKun 3a rpeehe
3 CBeTnJIka /Cm60JI 3a jaUnHa
4 EkpaH
5 KonhtponHOn konue (3a TemnepaTypa)
6 Ioka3Ho CBetno 3a tempepatya / CmM60J
7 Tpeau
8 CBeTIO
9 BenthunaTop
10Држача peшетka, ce BaDi
11 P03uyn Ha peweTkn
3a neehe Deceptn m Meco nIkn kako nIlex 3a co6npahe Ha MaCHOTnIte.
TeJeckoNcKu WnPKu
Co TeleckoNCKnte UHHM MoKTe NOJIeCHO Da Tn CTaBaTe N BaI NTpeWSeTKeT.
5. KOHTPOJIHA TABJIA
5.1 TpkaIza konwTo ce NOBNeKyBaAT
3a da ro Kopncntte anapaTOT, npnTNCHeTe ro TpkanzeTo. KoHTpOInHTo KOnYe n3neryBa HaDbOp.
5.2 CeH3Opckn noJIbHa/KoNcHbHa
3aWtnta N CnrgyphoCT.
3aWtnta N CnrgyphOCT.
7.1 Haunn Ha noDecyBaHbe: ΦuHKcuija 3a 3arpeBaHbe
| 1 chekop | Завrentе го кочец за Фуннкципес за грeeъе за одберете чункциja за грeeъе. |
| 2 chekop | Свртete го конtrорною кочь за за одберете Temnéратура. |
| 3 chekop | КORA ще завши постовеньeto, свртete ГИ КОПЧИБАТа на положьсянчую за за щИСКЛУЧЕТе постуота. |
7.2Функцин ha rpeebe
| Функциja на грей bj. | Приимени. Рерната в escльчени. |
| Положба на escльчени | За чуже на тprп решетки escвовсеньи и за сухшенихрана. Поставete ja temпературata за 20 - 40 °C поиска оTKOLКУ за КОНBEДЦИОДно отраве. |
| Готвашилатор | Функциjaда e habрavenа заштedingе на有很大ковочнися reperriида за врeme на отраве луто. Кога jo користende obaa Функциja, Tempepa typata BO BHTAPUEHOCSTа можде за врiningа на оллина можке за врininge на врininge. Яшината на оллина можке за врininge. Намалена. 3a поеве Иndфомразим,在 Вдente BO norglajbero „Секоinderвна уnotpe6a", 3abeneшко за: Пechete co влажени вescльчени. |
| Пechete co влажени вescльчени | За оdmрзнывашие на xpha na (зеленчу и obosiwju). Вретето на оdmрзнывашие зависи od колиината и领导班子 на захрзныата xpha na. |
| Функциja на ггейьe | Применьа |
| Сkapa | 3a Neechье на скaperа на тени napчибахраи и за Neechьe TOCTOBи лeб. |
| Брзо пechьe на скapera | 3a Neechьe на скaperа на тени napчивахраи в GOлени КOLПЧИпи и за Neechьe TOCTOBи лeб. |
| Функција рпца | 3a Neechьe пца. 3a nojakо пechьe и крцав долен.deл. |
| Конвецкоанно rotveьe | 3a Neechьe xpana и месо на eidno НВО на пoliцatura. |
7.3 3a6eileukn 3a: Neuete co BnaKeH BO3dYx
ObaaФункиja6eWeNCKOpncTeHa3a ycornacyBaHbe co KnaCata 3a eHepreTcKa eФнКаСноCTибapaHbata 3a ekOДиЗajN Bo corIaChocT co EY 65/2014 n EY 66/2014. TectOBn CnpeEN 60350-1.
BpaataHapehataTpe6aDa6nDe 3aTBOpEHa3aBpeMeHa rotBeHbetoCoIto fynKunjata He 6n Ce npeKInHana n 3a da ce ocNurpate Deka pepHata pa6OTn Co HajBnCOKa MOxHa eHepreTcKa eNkacHOCT.
3a ynataCTBa 3a rotBeHe BnTe Bo nOrIabjeTo,COBEn n NOMOu",PneyeTo BOJaxen BO3dyx.3aOniTu npenopakn 3a 3aUteHa eHepriJa BnTe Bo nOrIabjeTo ,EheprTcKa eFnkacHocT",3aUteHa ha eHepriJa.
8.ФУнКЦИНHA YACOBHINKOT
8.1Функции Na yacOBнКOT
| Функциja часовник | Примета |
| Вреем bo DehoT | 3a за го поставITE, помени滥 ллл п探测ения touchoto в徕е. |
| →|Траевe | 3a за одравпес Кожу долно работи песьката. |
| ПOTсЕТNHК BO MИнУТN | 3a за поставite odбpoюваъе Oвая Функциja лема[eфekt на работа на песьката. Можete за поставite Функциja кога силл, дури и кога песьката[eискусян. |
8.2 Kako da noctabnTe:Функцин Ha yacobhknokT
Kako da noctabte:Bpeme BO deHOT
- Tpěnka KORA Ke ro NOBp3Ite anapaTOT co eNEKtpuHa Ctpyja, KORA IMa NpekHn Ha Ctpyja IIM KORA He nOndeceH TajMepot.
PnHTNCHETe +, - 3a da ro haroDnTe ToHOTo BpeMe.
IIO OKOly 5 cekyni, TpeKnaheTo npeTaHyBa nHa ekpaHOT Ce npKaXyBa NOCTaBeHOT Bpeme.
Kako da cmeHnte:BpeMe BO dHeOT
Yekop 1 - npTINCHET HE KOKIynatn 3a Da FO CMEHNTE TOHOTOBpeMe. - 3anoHYBa da Tpenka.
Yekop 2 PnTtncHete +-3a da ro haroDnte TOHOT BpeMe. I0 okony 5 cekydn, trpenkaheTo npctahya nHa ekpaHot ce npinkakjyBa noCTabeHOT BpeMe.
KakO da noctabNTe: TpaHe
Yekop 1 Пoctabete Г Функида на Neчka.TemnepaTypata.
Yekop2 -npTINCHeTe HeKoNky nATn. -3anOHyBa da TpeNka.
Yekop 3 IpnTnCHTe +- 3a da ro haroDHTe BpeMeTpaEheTo. Ha ekpaHOT ce npKakyBa: | | - Tpenka kora ke 3aBpns noCTabeHoto BpeMe. Ce ornacyBa cunHan n neykata 3anpa.
Yekop 4 PnTINCHETe Koe 6nlo KOJHc 3a da ro nCKJyHITe 3ByHnOT CnHAn.
Yekop 5 Cbptete ro konyuTo ha TajmepoT do no3nuiJa Ha ncknyuyeHO.
Kako da noctabute: IOTceTHNK BO MHHyTu
Yekop 1
① -npntncheTe heKoJky npTu. 3anoUHyBa da Tpenka.
Yekop 2
PnTCHete 3a da ro haorOnte ToOHTo BpeMe.
YhKuJATA cTAPyBa ABOMACTKn NocLe 5 cekHydN.
KoraKe nCTeNe NoCTabeHOTo BpeMe, ceOrnacyBa 3bUeyen CnHAn.
Yekop 3
Ppntnche Koe 6nno KOnye 3a da ro ncknynte 3bvyHnot CnHaI.
Yekop 4
CbpTeTo KOJIeTo Ha TajmepoTdo N03nJna Ha NcKnyeHo.
Kako da OTkaxete:Функцин Ha yacobhikot
Yekop 1
① -npntnckate noctojaHO doeka cimboJota ha yacOBHKnOT He noue He Ta Tpena.
Yekop 2
PnTtncHete n dpxkTe: -.
FHyHKNJjata YacOBHnK ce NcKnyUyBa IIO HeKoJky cekyni.
9. KOPINCTEHe HAn IINBOPOT

PNEUYNPEUYBAHbE!
BnuTe Bo norgnabjata 3a 3awTNTa n cnrgpnoct.
9.1 BmTeHyBaHbE Ha dOaToCu
Mano BOBneKyBaHbe Ha rohpnoT den ja 3rOJeMyBa cnrgpnocta. Cnte Bnna6HyBaHa
ce n ypei 3a cnpeyuBaHe npeBpTyBaHe.
IolemnOT pa6 okoly noHncaTa ro cnpeyuBa
caD0T 3a rotBeHe da ce n3n3ra.
Pewetka:
Typhete ja peeTkata mey boDnKtne Ha dpkaHT 3a peeTkata n npobepete daHn horankte Ce cbTeHN hADOny.
Ilex 3a neuehe /Дna6oka Taba:
Tpyhete ja peuetkata Mey BoDnIknTe Ha dpkaoh 3a peuetkata.
PeweTeKa, Pnex 3a neehe / Dna6oka taba:
TpyheToIpnexOT3a neyeHe NomeRey BOINKInTe HaDpXauOT npeWetkata Ha BOINKInTe rope.
9.2 KopncTeHe TeNeckOcnKu WHH
He noDmaKyBajTe rTeneckONCKNTe shHn.
Ipei da ja 3aTbOpTe BpaTaHa Na neyKaTa, npOBepe TaJIn cenocHo Cte rN TpyHane TeJeckoNcKNe TshHH BnATpe BO anapaTOT.
Yekop 1 I3BJeUeTe ja DecHaTa n neBa TeJIeCKONcKa uHa.
Yekop 2 ПoctabeTe ja peWetkata Ha TeNeckOncKInTe UINHnA, a NToa HxHNO TpyHeTe BO NeVcHtA.
3aHTNTa N CnrypHOCT.
12.1 3a6eIeIckn 3a YIcTeHbETo

CpeCTBa 3a
YnCTeHe
IpeDNHOT dEN Ha neYkata YnCTete rO co MEKA Kpna HAToneHa CO TOnla BODa n CpEDCTBO 3aHTeHe. IcNCTete ja i npOBepete ja 3anTnBkata Ha BpaTata OKony pamKaTa Ha BHATpeSHoCTa.
KopncTepeactBor 3a YnCteHe 3a Da Tn NcNCTHMeTaNHIne NOBpUnHn.
YnCTeTe rI dAMKITE co 6nar DeTepePREHT.
CekojdHeBnnyoTpe6a
YnCTe je bHnatpeuHoccta no cekoja ynoTpe6a. HacobpaHeto MpcHTIN nI IN npyn octatoOn oXpHa moKe da pe3yUnnpa co noKap.
Ha neukkata nnn Ha ctaeknehnte nnoohn HbpaTATA MOKe da KOHN3npa Bnara. 3a da ja hamaJIte KOHN3aujata, nuHTe ja neukkata da pa60TN OKNY 10 MNHTn nped rotBeHTo. He YybaJte ja xpanata BO neukkata noDOnrO od 20 MNHTn. Ncywete ja BHATpeuHocTa co MEKA kPna nocne cekoja ynOtpe6a.
12.2 Kako da OTCpaHeTe:Држачи Ha peшетки
I3BaTe Tn DpKauHTe 3a peWetKn 3a da ja nCNUCTnte neKaTa.
Ucknyute ja neykata n noyekajte dokeka He ce ona.
Yekop2 IobneyeTe ro npedHnot den od dpkaHTe hactpaHa od cTpaHnHnot Snd.
Yekop 3 Iobneche To 3aDHNOT den od DpXaHTe Ha peSeTKeIte NaCTpaHa Od CTpaHnHNoT SiN i N3BaTe ja.
Yekop 4 Ctabete rno nolnnte no obpaeten peoocneI. Irntte 3a notnpahe Ha Teneckoncknte uHHM Mopa da bIdat haooyen KOH npedhata cTpHa.
12.3 Kako da n3BaInte n da mONTnPate: Bpata
BpaataHa pepnata mma DBe pNoOcTakNO.3a da ja nCnCTnTe, MoKete Da rN 3BaJnte BpaataHa pepnata N BHaTpeShnata CtakNeHa pNoa. PpOHTajTe ro cEJoCHOTo yNaTCTBO "BaJeHe mOnTnpaBe Bpata" nped da rN 3BaJnte CtakKeHnTe pNou.

BHIMAHNE!
He kopructete ja pephata 6e3 ctaKeHite nnoH.
1 uekop OTBopTe ja BpaTata ceNocho n dpKeTe rN DBeTe 7apKn.
2 Yekop KpeHete 3aBpTeTe rpaKnTe Ha DBeTe shapkn.
3 Yekop 3aTbOpTe ja BpaTaHa Na pepHaTa Do npBata No3uJa Ha otBopAbe. Notoa KpeHete N nobLeueTe HnpeN i n3BaJe Ta BpataHa Na JeknUteTo.
4 yekop Ctabete ja bpaata Bp3 meka Kpna Ha ctaBnHa NOBpHnHa.
5 ChekopДржete ja Dekopaunjata ha Bpatata (B) Ha rohpHOT pa6 ha Bpatata da DBte cTpaHn npITNCHeTe ja HABnatpe 3a Ja ocnoobOnde cnojkata 3a 3aneuTybaHe.

6 uekop Iobneute ja dekopaunjata Ha Bpaata Happei n 3BaTe ja.
7 Yekok DpKTe ja BpaTata Ha cKaIeHATA NnOua Ha Hej3NHeMOT rope npB nBnMaTeJIno mBnEeTa je.Ocnyperte ce Deka cKaIto CENoCHO ce HJNn3raNo OD dpXaUHTe.
8 Yekop IcYCTeTRe nCTaKHeHInTe PIOOn CO BODa n canyH. BHIMATEHO NCUUeTe Rn CTaKHeHInTe PIOOn. He YCTeTRe nCTaKHeHInTe PIOOn BO MaunHa 3a MNEHe CaOBO.
9 Yekop IIO YIcTeHbETo, MOHTnpajTe ja cTaKJIeHaTa IIIOUa I BpataHa NeYKaTa.
OTneataHata 30Ha Mopa da e cBptHe KaOH BhatpeuHata CTpHa Na BpaTata. OTKako Ke ja MOHTnPate, npOBepete dAni NobpuiHata Ha pAmkata Ha cTaKeHATA NOpua Ha OTneauTeHIne Mecta e rpy6a Ha donImp.
Kora Ke ce MOHTnpa npabnHNo npap60t Ha BpataKaNkHyBa.
BHMabajte da ja MOHTnPate BHaTpeuHaTa CtakneHa nlova TOHNO BO cEDnTuTa.
Pephata He ce 3arpeBa.
U36nOscnpyBa.
| ПюобLEM | Пювере дал... |
| Запimbкata на вразата e оштeteна. | He корисné je peρнata. Контакторе со овлacrпен сөрвиесн центар. |
| На ekраанot се прикеожва „12.00". | П装配инatable eструjectа. Поставete ro точно вreme. |
| СvetлOTO не павOTи. | Сvetелкata e перорена. |
13.2 CepBnChi noDaToCu
Ako He mojkeTe camite da ro peuHte npo6nemOT, obaTe ce kaj Baunot dnilep nIN BO OBlaCTeHNOT cepBuceH ueHTap.
Iotppe6hnte npdaotu 3a cepBnCHno t cHTap ce Ha nlokaTa co cneunfokaun. IIOUkata co cneunfokaun e ha npedHaT paMka Ha BHaTeHoccta ha pepHata. He oTcpanhyBaJte ja IIOUkata co cneunfokaun OD BHaTeHoccta ha pepHata.
IpenopaYbame OBe da rH 3aunwe Te ndaTounTe:
Mодeн (MOD.)
·
IpenopaaybameOBde da rH 3aannweTe nOdaTOUnte:
Bpoj ha npou3BOD (PNC)
.
Cepnck6poj (SN.)
.
14. EHEPRETCKA EΦNKACHOCT
14.1 Инфорmaци 3a пОНЗВОДТ и ЛИСТ с Инфорmaци 3a пОНЗВОДТ\*
| Иme наdoesabvauot | AEG |
| Иденифikaцija на мodyел | BEB331110M 949496346 |
| Класа на[ehepretska eфikacshocst] | 95.3 |
| Класа на[ehepretska eфikacshocst] | A |
| ПOTROшувачka на[eheprиja kaj hopmalno понelve, konbehцюнален реким | 0.93 kWh/цикл汞с |
| ПOTROшувачka на[eheprиja kaj hopmalno понelve, реким на вентлatable] | 0.81 kWh/цикл汞с |
| Бpoj на вдаобnatни | 1 |
| Из bor на толпina | Еlektrочna[eheprиja |
| Jaunha на глис | 72 I |
| Ти п на чучa | Вгадега пechka |
| Maca | 29.3 kg |
- 3aЕврonska Унaja corлачно Perулaitивата на EU 65/2014 и 66/2014.
3a Penyblka BeIopucna corlacno STB 2478-2017, Iodatok G; STB 2477-2017, Iodatooun A u B.
3a Yukpanha coIpacho 568/32020.
Klaca Ha ehepreTcKa eFnkacHcOCT npImeHnBa 3a Pycja.
EN 60350-1 -Енкгчн anapatи 3a roтveье 3a domaknHCTBa -Дeн 1:Опсзи,пechи,пechи на napea и скари -Метои за мереве на поформансinte.
14.2 3austedaHa eheprnja

IeKaTa IMa 4yHKnKoN KOn Bn nomaraat Da 3aUTeiNe eHeprnja npu CeKoJdHeBHOTo rotBeHe.
Проверете дали враза на Neчkaт e npавино 3aTВОЕн КORA paBOTи NeчКATA. He ja OTВОРajte ВРАТа Многу чecTo 3a BpeMe Ha rotBeHBoTe. OДржУьAJte roЧNT dIXTYHOT Na ВРАТа и поверетe дали e do6po ФИКСИпан Ha CFOBJa Tno3NiJa.
KopncTeMeTaJIHm caObN 3a da ro 3roJeMTE uTeDeHeTo Ha eHeprija.
Kora e moxho, He ja nped3arpeBajte neykata nped rotBehe.
IpaBeTe KOJIky UTo E MOxHO NOMaII naY3n MeIy rotBeHcTo KOra npaBHTe NOBeKe jaDeHa nCTOBpEmHo.
TOrBeHe Co BeHTnJaTop
Kora e moxho, KopncTeTe r n cyHKunnte 3a rotBeHe co BcHTnIaTOp 3a Da 3aWTeDInTe eHepnja.
PpeoctaHaT a TOnJIHa
Kora tpaeheto ha roTbeTo e noDOnro od 30 MNHyTu, hamaIeTe ja tempeTaypata Ha neyKaTa 3a MNHmym 3-10 MNHyTu nped kpaJOT od roTbeTo. PpeoCTaHaTaTa TOpInHa BO pepHaTa Ke npOdoJxu Da roTbn.
KopncTeTe ja npeocTaHaTata TOnnHa 3a 3arpeBaHc xpaHa.
How to install your AEG/Electrolux
Oven - Column installation

(^*mm)
(^*mm)
How to install your AEG/Electrolux Oven - Column installation


3.2 PnUBypshunBaHbe pepHe 3a kYxHbckn eIeMeHT

4.ОПИС ПОНЗВОДА
4.1 Onst npka3
4.2Прнбop
- Pewetkacta noiuna
3a nocyhe 3a kybahe, nnexobe 3a TopTe, neehe. - Плес за пейсяе
3a konaje n keke. - Ppnl/ny6okn TnraH
1 KomaHnHa Ta6na
2 KomaHdno dYrMe 3aФyHKuJe 3arpeBaHa
3 J lamnna / cmm60n HanajaHa
4 DnCnJIeJ
5 KomaHDoIyrMe(3a TeMnepaTypy)
6 IHHdikatop / cHm6oJ tempeatype
7 TpejHn eJemEnT
8 lamnna
9 BenthunaTop
10 PtoPka peWeTKe, Moryhe yKnaHaBaHe
11 PtoJoxajnPpeWetke
3a neehe tecta n meca nna kao nocya 3a ckynbahe machohe.
TepeckonckeBohne
CaOBIM TeileckONCKIM BOHncaMa MoKeTe JaKHe Da NoCTaBbAte N yKNaHbATE peWetke.
5. KOMAHДHA TABJIA
5.1Дугмадkojaceyвлачe
3a kopniushhe obor ypehaja npntchnte
KOMaHdNo Dyrgme. KOMaHdNo Dyrgme ce
N3BnauH.
5.2 Cen30pcka noJa/duyma
一
pepy, BeHTnIaTOp 3a xnaheJe MoKe HacTaBNTI Da paIc CBe DOK ce pepHa He OXlaI.
10.2 Be36eHochn TepMoocTaT
HenpaBnIaH paR pepHe nIe HncpabHn deIOBm Mory doBeCTn Do ONaCHor npereBaHa. Da 6n ce OBO cnpeuNo, pepHa
Ima 6e36eHocn TepMoCTa Kojn IpeKeiHa Hanajahe. Pepha ce noHOBO ayTOMaTcKn YkIbYuJe KaT TemnepaTpya onaHe.
11. KOPINCHN CABETN

IornejaTe norgaBba o 6e36eHocTn.
11.1 Пpenopyку y Be3n ca neyeHbem
BnaXho neeHbye 3 BeHTnI.
Функциа ѳпенина за уштуеонери jo TOKOM Kyваьа.
eIektpnHx ypehaja. Ypehaje oBeIeJKeHe Cm6bONOM HEmoJte 6aCaTn 3aJeIHO ca CmeHem. Ipon3BOD BpaNTe y JOKaJIHn CEHTap 3a peuIKnnpaHbe nIi Ce o6paTnte ONtINHCKOJ kAnCenapNJn.
ZA POPOLNE REZULTATE
Zahvaljujemo se vam, da ste izbrali ta izdelek AEG. Ustvarili smo ga, da bi vam zagotovili dolgoletno brezhibno delovanje z inovativnimi technologijami, ki pomagajo poenostaviti ziviljenje - s funkcjiami, ki jih ne morete najti pri obicajnih napravah. Prosimo, vzemite si nekaj minut za branje, da ga kar najbolje izkoristite.
Obišcite nase splte no mesto za

How to install your AEG/Electrolux
Oven - Column installation