
CTL7181B0 - Coffee maker BOSCH - Free user manual and instructions
Find the device manual for free CTL7181B0 BOSCH in PDF.




| Product type | Automatic coffee machine with grinder |
| Brand | Bosch |
| Model | CTL7181B0 |
| Dimensions (H x W x D) | 44.6 x 59.4 x 39.6 cm |
| Weight | 20.6 kg |
| Power supply | 220-240 V, 50/60 Hz |
| Power | 1500 W |
| Pump pressure | 20 bar |
| Water tank capacity | 2.2 L |
| Bean container capacity | 400 g |
| Grinder type | Ceramic |
| Main functions | Coffee, espresso, latte macchiato, cappuccino, hot water, DoubleShot, TripleShot |
| Integrated milk system | Yes, with removable milk tank |
| Connectivity | Home Connect (Wi-Fi) |
| Touch screen | Yes, with message display and settings |
| Child safety | Yes, electronic lock |
| Automatic shut-off | Yes, adjustable |
| Water filter | Yes, optional (INTENZA) |
| Maintenance programs | Cleaning, descaling, calc'nClean, milk system cleaning, frost protection |
| Grind adjustment | Yes, 5 levels |
| Cord length | 170 cm |
| Interior lighting | Yes, adjustable |
| Acoustic pressure (dB) | Approx. 75 dB (estimated) |
| Number of simultaneous cups | 2 |
Frequently Asked Questions - CTL7181B0 BOSCH
User questions about CTL7181B0 BOSCH
0 question about this device. Answer the ones you know or ask your own.
Ask a new question about this device
Download the instructions for your Coffee maker in PDF format for free! Find your manual CTL7181B0 - BOSCH and take your electronic device back in hand. On this page are published all the documents necessary for the use of your device. CTL7181B0 by BOSCH.
USER MANUAL CTL7181B0 BOSCH
Register your new device on MyBosch now and get free benefits: bosch-home.com/welcome
Fully automatic espresso machine
CTL7.. CTL9..
[de] Gebrauchsanleitung Kaffeevollautomat 7 [en] Information for Use Fully automatic espresso machine 40 [i] Manuale utente Macchina automatica per espresso 71 [fr] Manuel d'utilisation Machine à expresso automatique 104 [n] Gebruikershandleiding Volautomatische espressomachine 137 [es] Manual de usuario Cafetera automática 170 [uk] Керівництво з експлуатації автоматична кавомашина 203 [tr] Kullanım kılavuzu Tam otomatik kahve pişirme makinesi 237
A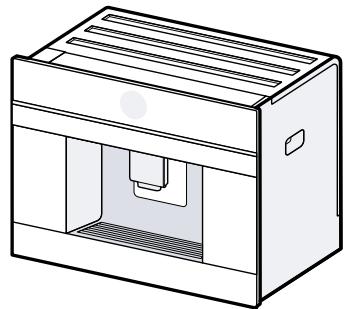
J
1
H
G
B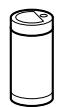
C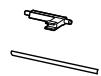
D
E
F
1 2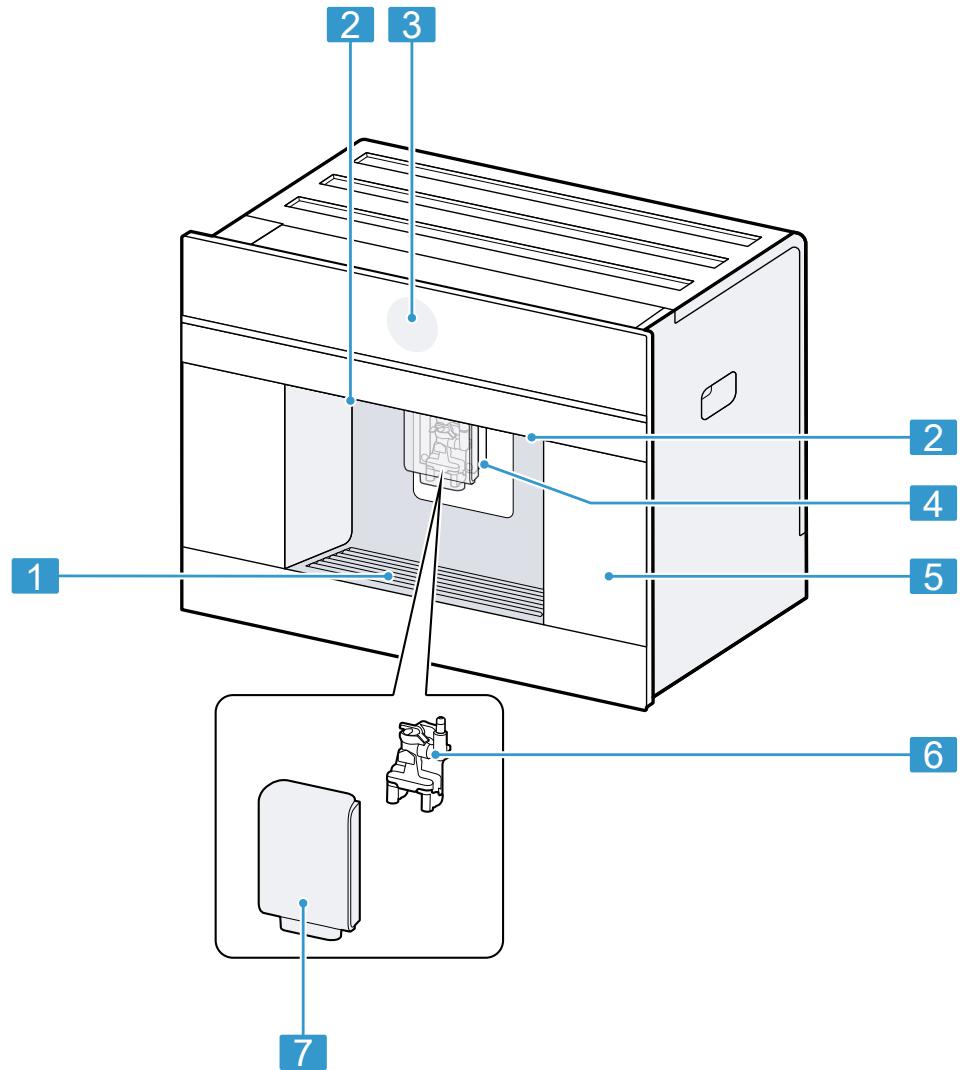
3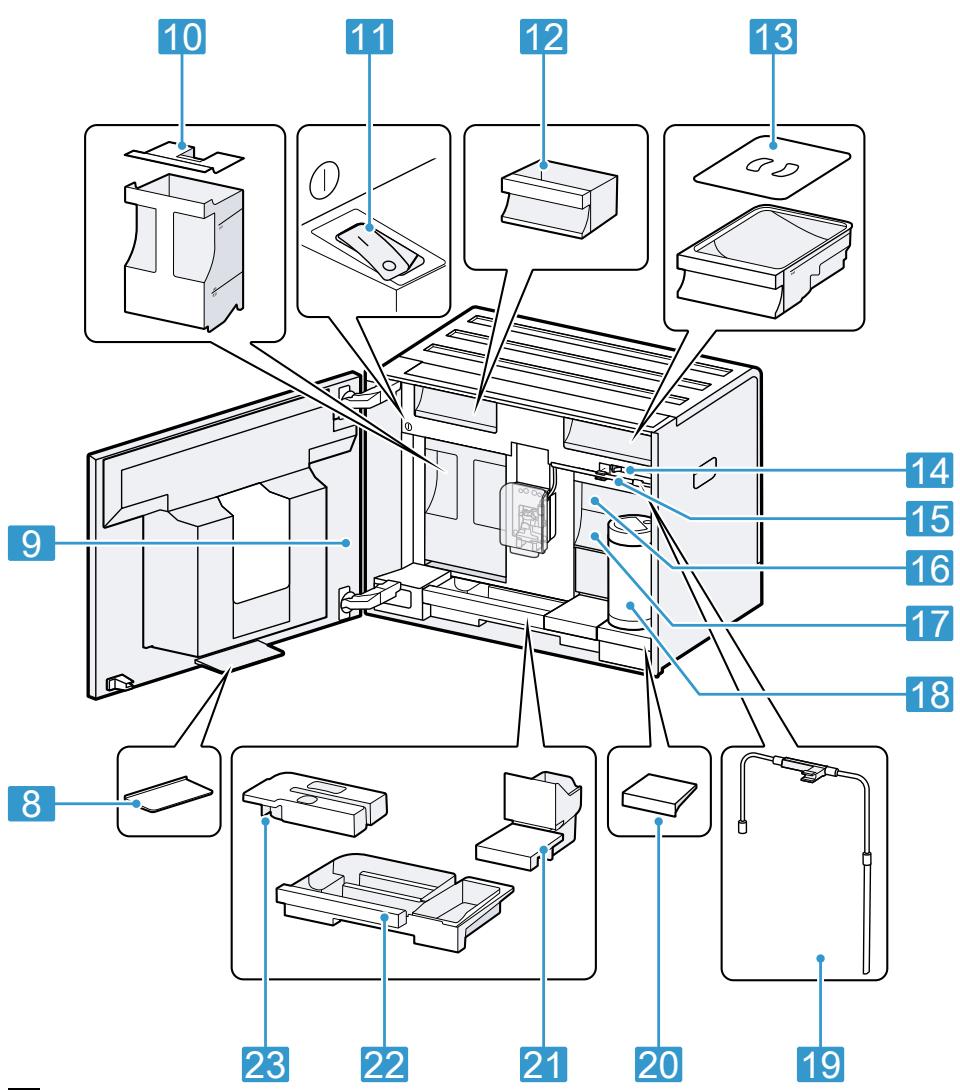
4 5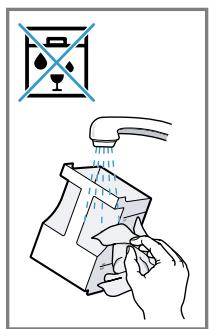


14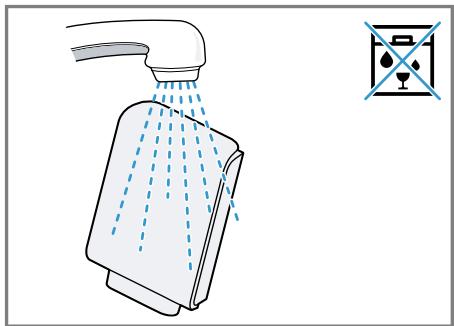
15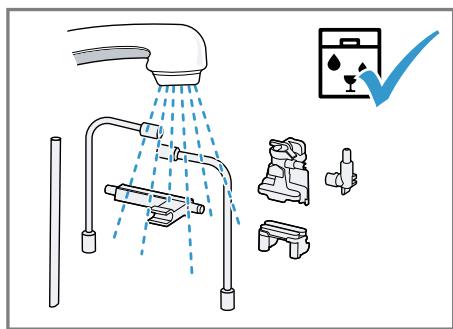
16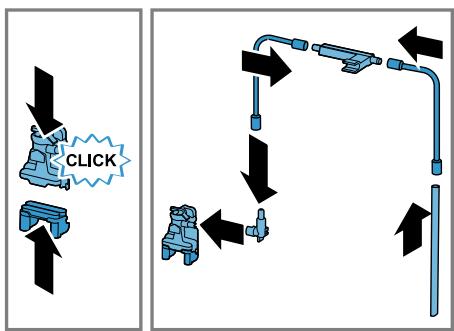
17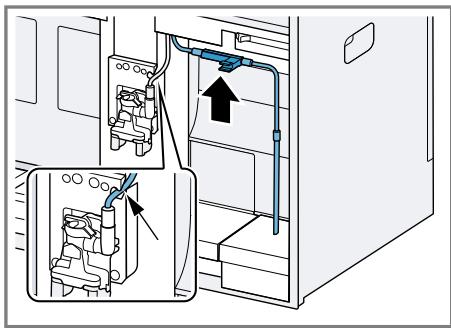
18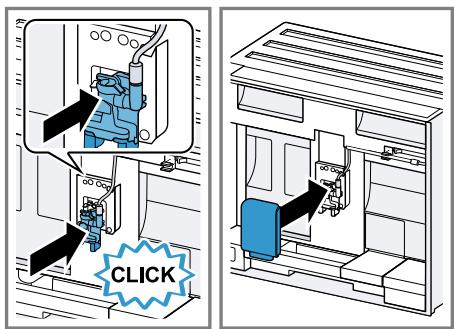
19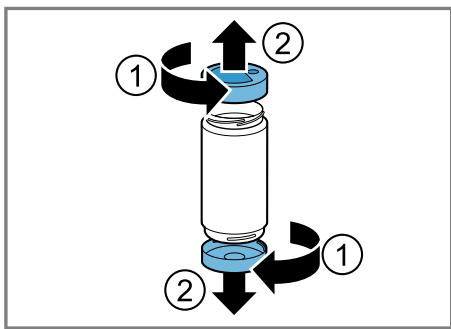
20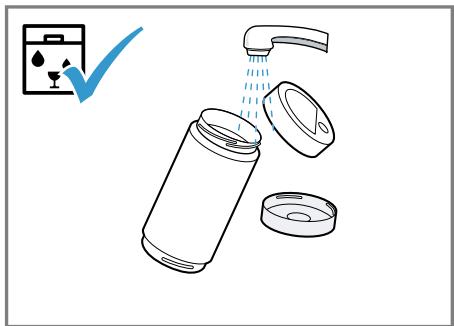
21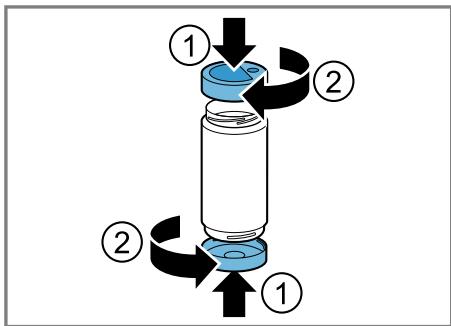
22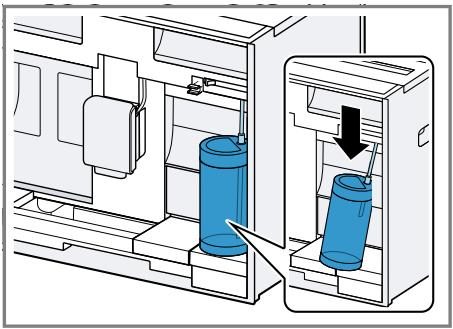
23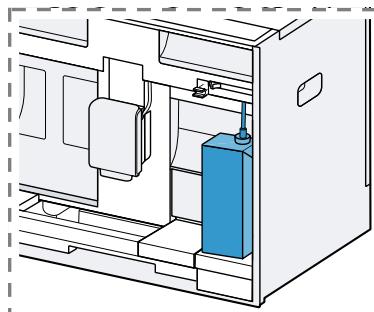
24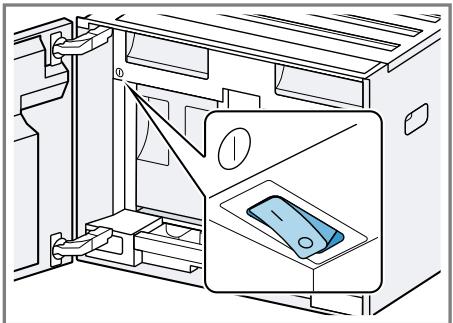
25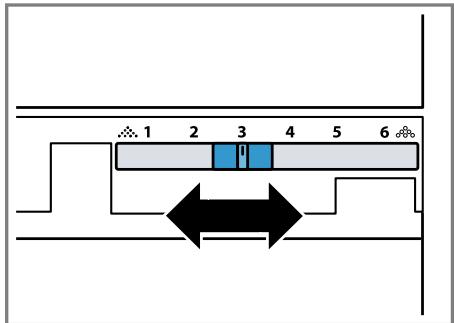
26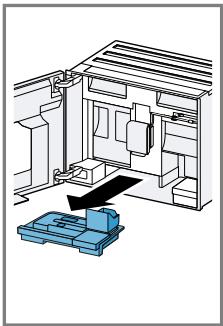
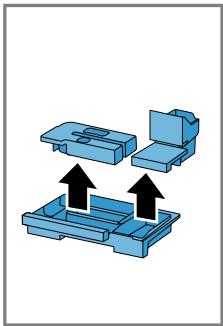
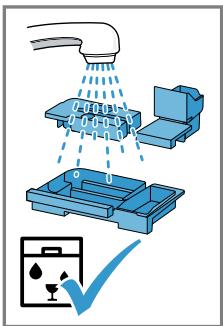
27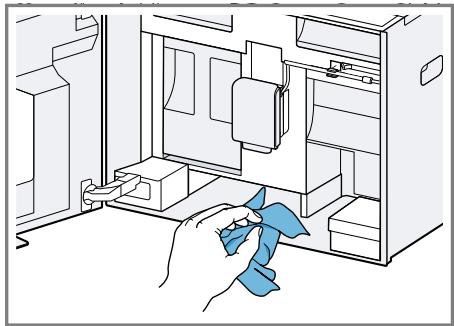
Subject: "OSSREQUEST"
5 GHz band (5150-5350 MHz +
5470-5725 MHz): max. 100 mW
Further information and explanations are available online:
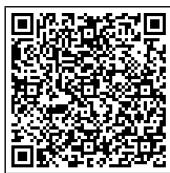
Table of contents
1 Safety 42
1.1 General information 42 1.2 Intended use 42 1.3 Restriction on user group..... 42 1.4 Safe installation 42 1.5 Safe use 43
2 Preventing material damage .... 46
3 Environmental protection and saving energy 46
3.1 Disposing of packaging 46 3.2 Tips for saving energy 46
4 Installation and connection..... 46
4.1 Scope of delivery 46 4.2 Installing and connecting the appliance 47 4.3 Connecting the appliance to the electricity supply 47
5 Familiarising yourself with your appliance. 47
5.1 Appliance 47 5.2 Control panel 48
6 Accessories 48
7 Before using for the first time.. 49
7.1 Preparing and cleaning the appliance 49 7.2 Checking the water hardness 49 7.3 Water filter 50 7.4 Performing initial start-up 50 7.5 General information 50
8 Basic operation 51
8.1 Switching the appliance on or off 51 8.2 Dispensing beverages 51 8.3 DoubleShot and tripleShot..... 52 8.4 Dispensing a coffee drink with milk 52 8.5 Dispensing two cups at once.. 52
9 Grinder 53
9.1 Setting the grinding level.... 53
10 Milk container shelf. 53
10.1 Using the milk container shelf 53 10.2 Using your own milk container 53
11 Childproof lock. 53
11.1 Activating the child-proof lock 53 11.2 Deactivating the childproof lock 54
12 Favourites. 54
12.1 Creating favourites from Favourites menu 54 12.2 Create favourites from Classic or Coffee World 54 12.3 Changing a favourite 54 12.4 Deleting a favourite 54 12.5 Sorting favourites 54
13 Home Connect 55
13.1 Setting up the Home Connect app 55 13.2 Setting up Home Connect.... 55
13.3 Home Connect settings.... 56 13.4 Remote diagnostics 56 13.5 Data protection 56
14 Basic settings. 57
14.1 Changing settings 57 14.2 Overview Settings 57
15 Cleaning and servicing. 59
15.1 Dishwasher-safe components 59 15.2 Cleaning agent 59 15.3 Cleaning the appliance 60 15.4 Cleaning the drip tray and coffee dregs container 61 15.5 Cleaning the milk container .. 61 15.6 Service programmes 61
16 Troubleshooting 63
17 Transportation, storage and disposal 68
17.1 Activating frost protection .... 68 17.2 Disposing of old appliance ... 68
18 Customer Service 68
18.1 Product number (E-Nr.), production number (FD) and consecutive numbering (Z-Nr.) 68
19 Technical specifications. 69
19.1 Information regarding Free and Open Source Software... 69
20 Declaration of Conformity 69

1 Safety
Observe the following safety instructions.
1.1 General information
- Read this instruction manual carefully.
- Keep the instruction manual and the product information safe for future reference or for the next owner.
- Do not connect the appliance if it has been damaged in transit.
1.2 Intended use
Only use this appliance:
for preparing hot drinks. - In private households and in enclosed spaces in a domestic environment. Up to an altitude of max. 2000 m above sea level.
1.3 Restriction on user group
This appliance may be used by children aged 8 or over and by people who have reduced physical, sensory or mental abilities or inadequate experience and/or knowledge, provided that they are supervised or have been instructed on how to use the appliance safely and have understood the resulting dangers.
Do not let children play with the appliance.
Children must not perform cleaning or user maintenance unless they are at least 8 years old and are being supervised.
Keep children under the age of 8 years away from the appliance and power cable.
1.4 Safe installation
WARNING - Risk of electric shock!
Incorrect installation is dangerous.
- Connect and operate the appliance only in accordance with the specifications on the rating plate. Always use the supplied power cable for the new appliance.
- Connect the appliance to a power supply with alternating current only via a properly installed socket with earthing.
- The protective conductor system of the domestic electrical installation must be properly installed.
If the appliance or the power cord is damaged, this is dangerous. - Never operate a damaged appliance. - Never operate an appliance with a cracked or fractured surface. - Never pull on the power cord to unplug the appliance. Always unplug the appliance at the mains. - If the appliance or the power cord is damaged, immediately unplug the power cord or switch off the fuse in the fuse box. ▶ Call customer services. → Page 68
Incorrect repairs are dangerous.
Repairs to the appliance should only be carried out by trained specialist staff. - Only use genuine spare parts when repairing the appliance. - If the power cord of this appliance is damaged, it must be replaced with a special connection cable, which is available from the manufacturer or his Customer Service.
1.5 Safe use
WARNING - Risk of suffocation!
Children may put packaging material over their heads or wrap themselves up in it and suffocate.
- Keep packaging material away from children. Do not let children play with packaging material.
Children may breathe in or swallow small parts, causing them to suffocate.
- Keep small parts away from children.
- Do not let children play with small parts.
WARNING - Risk of electric shock!
An ingress of moisture can cause an electric shock.
- Never immerse the appliance or the power cord in water.
- Liquids must not be spilled on the appliance plug connection.
- Only use the appliance in enclosed spaces.
- Never expose the appliance to intense heat or humidity.
en Safety
- Do not use steam- or high-pressure cleaners to clean the appliance.
WARNING - Risk of fire!
The appliance will become hot.
- Ventilate the appliance adequately.
- Never operate the appliance with the cupboard door closed. It is dangerous to use an extended power cord and non-approved adapters.
- Do not use extension cables or multiple socket strips.
- Only use adapters and power cords approved by the manufacturer.
- If the power cord is too short and a longer one is not available, please contact an electrician to have the domestic installation adapted.
WARNING - Risk of burns!
Some parts of the appliance become very hot.
- Never touch hot appliance parts.
- Allow hot appliance parts to cool down before touching.
WARNING - Risk of scalding!
Freshly prepared drinks are very hot.
Leave drinks to cool down if necessary. - Do not let escaping liquids or steam come into contact with your skin.
A remote start via the Home Connect app while the appliance is unattended may cause scalding to third parties.
- Do not reach under the coffee outlet during the dispensing of drinks.
- Keep other persons, in particular children, away from the appliance.
WARNING - Risk of injury!
Improper use of the appliance may endanger the user.
- To avoid injuries, only use the appliance for its intended purpose.
Trapped fingers when closing the appliance door.
Be careful of your fingers when closing the appliance door. The grinder rotates. - Never reach into the grinder.

WARNING - Danger: Magnetism!

Caution: Magnetism!

Warning for wearers of pacemakers
The appliance contains permanent magnets. They may affect electronic implants, e.g. pacemakers or insulin pumps.
- People with electronic implants must stand at least 10 cm away from the appliance and appliance door.
- Keep a minimum distance of 10cm from the water tank, milk container, pulp container, beverage outlet cover, beverage dispenser, beverage outlet, milk system holder, brewing chamber cover and brewing unit.

WARNING - Risk of harm to health!
Soiling on the appliance may be harmful to health.
- To ensure hygiene, follow the cleaning instructions for the appliance.
2 Preventing material damage
ATTENTION!
Risk of damage to the appliance. If the appliance is not started up correctly, it may be damaged.
- Use the appliance in frost-free rooms only. If the appliance has been transported or stored below 0°C , wait 3 hours at room temperature before starting it up. After plugging in, always wait approx. 5 seconds.
Improper installation may cause material damage.
- Observe the installation instructions for the appliance installed above or below.
- When installing the appliance above a warming drawer, observe a niche height of 590 mm. Unsecured units may fall over.
- Secure units to the wall using a standard bracket.
3 Environmental protection and saving energy
3.1 Disposing of packaging
The packaging materials are environmentally compatible and can be recycled.
- Sort the individual components by type and dispose of them separately.
3.2 Tips for saving energy
If you follow these instructions, your appliance will use less power.
Set the interval for automatic switchoff to the smallest value.
- If the appliance is not being used, it will switch itself off earlier. See "Basic settings", page 57.
Do not interrupt the dispensing process prematurely.
- The amount of water or milk that is heated is used optimally. Descale the appliance regularly.
- Limescale deposits increase the appliance's energy consumption.
4 Installation and connection
4.1 Scope of delivery
After unpacking all parts, check for any damage in transit and completeness of the delivery.
Note: Different accessories are enclosed depending on the appliance model. This accessory is shown in a frame with a dashed line.
-> Fig. 1
| A | Fully automatic coffee machine |
| B | Milk container |
| C | Milk tube and suction pipe |
| D | Installation instructions |
| E | Cleaning tablet1 |
| F | Descaling tablet1 |
| G | Water filter1 |
1 Depending on the appliance specifications
| H | Water hardness testing strip |
| I | User manual |
| J | Microfibre cloth |
1 Depending on the appliance specifications
4.2 Installing and connecting the appliance
The installation instructions describe various models that differ with regard to scope of supply and installation.
Note: Observe the information on safety -> Page 42 and preventing material damage -> Page 46.
Install and connect the appliance properly in accordance with the installation instructions provided in the box.
4.3 Connecting the appliance to the electricity supply
- Insert the non-heating appliance plug of the power cable into the appliance.
- Insert the mains plug of the appliance's power cable in a socket nearby.
- Check the mains plug is inserted properly.
5 Familiarising yourself with your appliance
5.1 Appliance
You can find an overview of the parts of your appliance here.
Note: Individual details and colours may differ, depending on the appliance model.
| Exterior view → Fig. 2 | |
| 1 | Shelf, removable |
| 2 | Lights |
| 3 | Control panel |
| 4 | Beverage outlet, height-adjustable |
| 5 | Appliance door |
| 6 | Beverage dispenser |
| 7 | Beverage outlet cover |
| Interior view → Fig. 3 | |
| 8 | Collecting tray |
| 9 | Rating plate |
| 10 | Water tank with lid |
| 11 | Mains switch |
| 12 | Accessory drawer |
| 13 | Bean container with lid |
| 14 | Grinding level adjustment |
| 15 | Holder for milk system, magnetic |
| 16 | Brewing chamber cover |
| 17 | Brewing unit |
| 18 | Milk container |
| 19 | Milk system |
| 20 | Milk container shelf, removable |
| 21 | Coffee dregs container |
| 22 | Drip tray |
| 23 | Drip tray cover |
5.2 Control panel
You can use the control panel to configure all functions of your appliance and to obtain information about the operating status.
| ○ | Switch the appliance on or off. |
| △ | ■ Exit the menu settings. ■ Return to the Start menu. |
| start stop | Start or stop the programme. |
| Favour-ites | Select saved beverages with personal settings. → Page 54 |
| Classic | Select standard beverages. |
| Coffee World | Select basic beverages which can be extended in conjunction with Home Connect. |
| Care & maintain-ance | Call up service programmes. |
| Settings | Open or exit the settings. |
Quick selection in beverage selection
| Quick selection directly to "Favourites" |
| Quick selection directly to "Classic" |
| Quick selection directly to "Coffee World" |
Information
| Customer service |
| Appliance is connected to Home Connect. | |
| Appliance is not connected to Home Connect. | |
| Appliance is not connected to the server. | |
| Playback function is activated in the Home Connect app. | |
| Check the milk container. | |
| Add beans. | |
| Fill with water. | |
| "Demo mode" is activated. |
Beverage settings
| ○ | Quantity |
| ○ | Strength |
| Aroma | |
| Share of milk | |
| Temperature |
Operation
| < | Go back in the menu. |
| ☆ | Add favourite. |
| ★ | Delete favourite. |
| □ | Dispense two cups. |
Quick selection
| Open quick selection. |
| Activate or deactivate childproof lock. |
| Switch WiFi on or off. |
6 Accessories
Use original accessories. These have been made especially for your appliance.
| Accessories | Retail | Customer service |
| Cleaning tablets | TCZ8001A | 00312096 |
| Dscaling tablets | TCZ8002A | 00312093 |
| Water filter | TCZ7003 | 00575491 |
| Microfibre cloth | - | 00460770 |
| Care set | TCZ8004A | 00312107 |
| Limit stop for 92° opening angle | - | 10020041 |
7 Before using for the first time
Prepare the appliance for use.
7.1 Preparing and cleaning the appliance
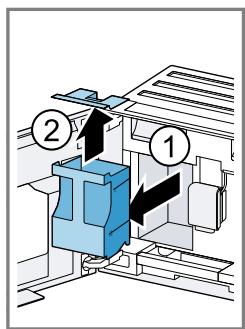
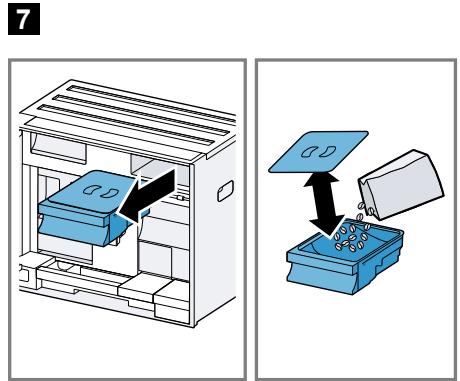
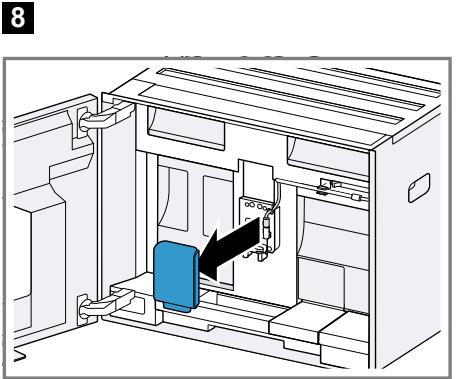
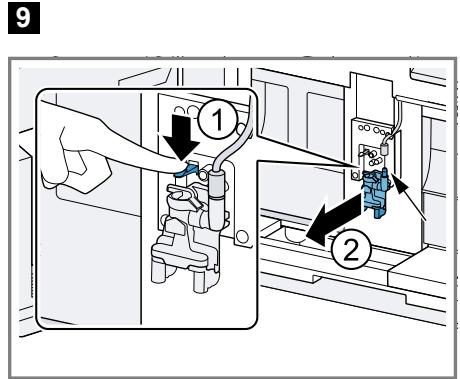
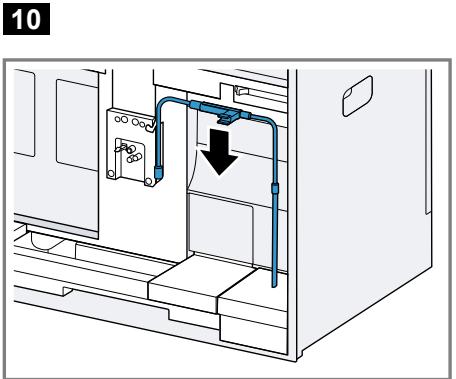
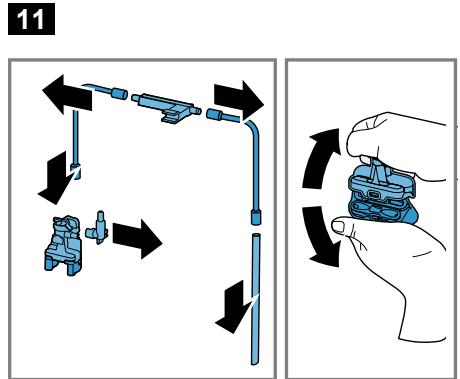
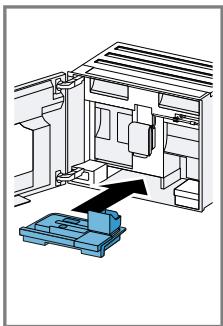
Clean the appliance and individual parts. Follow the illustrated instructions at the beginning of this manual.
ATTENTION!
Unsuitable beans can block up the grinder.
- Only use pure, roasted bean mixes that are suitable for use in fully automatic coffee or espresso machines.
- Do not use glazed coffee beans.
- Do not use caramelised coffee beans.
- Do not use coffee beans that have been treated with additives containing sugar. Do not add ground coffee.
→ Fig. 4 - 23
Note: Fill the water tank each day with fresh, cold, non-carbonated water.
Tip: To keep the coffee beans at their best, store them in a sealed container in a cool place. You can keep the coffee beans in the bean container for several days without them losing their aroma.
7.2 Checking the water hardness
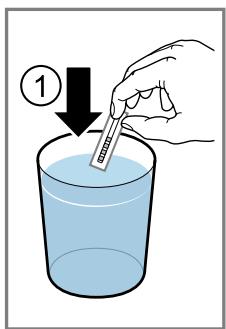
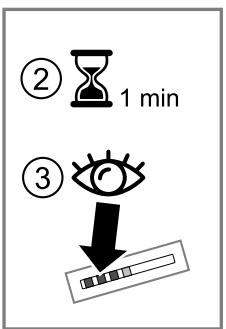
It is important to set the water hardness correctly so that your appliance indicates in good time that it needs descending. You can use the enclosed test strip to check the water hardness or ask your local water company.
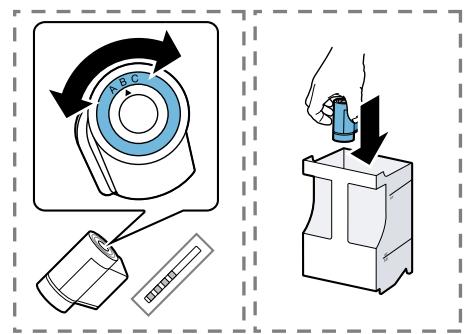
- Briefly dip the test strip in fresh tap water.
- Allow the water to drain off the test strip.
- Read the water hardness off the test strip after 1 minute.
The table shows allocation of the levels to the different degrees of water hardness:
| Level | German degrees in °dH | Total hardness in mmol/ l |
| 1 | 1-7 | < 1.3 |
| 2 | 8-14 | 1.3-2.5 |
| 3 | 15-21 | 2.5-3.8 |
| 4¹ | 22-30 | > 3.8 |
Factory setting
Note: If a water softening system is installed in your house, you can select "Water softening system".
Tip: You can change the settings at any time.
-> "Basic settings", Page 57
7.3 Water filter
You can use a water filter to minimise limescale deposits and reduce impurities in the water.
Inserting the water filter
ATTENTION!
Possible damage to the appliance due to limescale build-up.
- Change the water filter in good time.
- Change the water filter after 2 months at the latest. Observe the display messages.
- Select "Care & maintenance".
- Select "INTENZA filter" and follow the instructions on the display.
Changing or removing the water filter
You can also operate your appliance without a water filter.
- Select "Care & maintenance".
- Select "INTENZA filter".
- Select "Replace" or "Remove" and follow the instructions on the display.
Tips
- You should also change your water filter for reasons of hygiene.
- With a water filter you need to descale your appliance less frequently. If you use a water filter, your coffee will be more flavoursome.
If your appliance has not been used for a long time, for example if you were on holiday, you should rinse the water filter before use by dispensing a cup of hot water. The water filter can be purchased from retailers or customer service. (See "Accessories", page 48)
7.4 Performing initial start-up
After connecting the appliance to the power supply, configure the settings for initial start-up. Initial start-up only appears when switching on for the first time.
- Open the appliance door.
- Set the mains switch to I. (See Fig. 24)
- Close the appliance door.
- Press the power button to switch the appliance on and wait until the appliance has rinsed.
- Follow the instructions on the display.
- The display will guide you through the programme.
Tip: To call up brief information, press i.
Notes
If you want to set up Home Connect now, follow the instructions in the Home Connect app. → "Setting up Home Connect", Page 55 - If "Demo mode" is selected, only the display screens will work. You cannot dispense a beverage or run a programme.
7.5 General information
Please bear this information in mind so that you can get the best out of your appliance.
Notes
The appliance has been programmed at the factory with standard settings for optimum operation. - The integrated fan switches on each time a beverage is dispensed and switches off again after around 5-7 minutes. - The grinder has been factory-set for optimum operation. If coffee is only dispensed drop by drop or is too thin and with too little crema, you can adjust the grinding level. → "Setting the grinding level", Page 53 If you do not perform any actions on the appliance for a certain period, it will switch off automatically. You can change the duration in the basic settings. → Page 57 You can change the duration in the basic settings. The first beverage will not yet have its full aroma if:
- You are using the appliance for the first time.
- You have run a service programme.
- You have not used the appliance for a long time.
Do not drink the beverage.
8 Basic operation
8.1 Switching the appliance on or off
Notes
- Do not press the power switch while the appliance is operating. Before switching off the power switch, switch the appliance off with ① . This is the only way for the appliance to rinse automatically. Press
When the appliance switches on, the display shows the logo. When the appliance is switched on or off, it will rinse itself automatically. When switched off, the appliance will emit steam into the drip tray for cleaning. The appliance will not rinse itself if the appliance is still warm when switched on or if no beverage was dispensed before it was switched off.
8.2 Dispensing beverages
Find out how to prepare a drink of your choice.
WARNING
Risk of scalding!
Freshly prepared drinks are very hot.
- Leave drinks to cool down if necessary.
- Do not let escaping liquids or steam come into contact with your skin.
Notes
- With a number of settings your coffee is prepared in several steps. Wait until the process is fully completed. If you are dispensing a beverage with milk, always connect a container filled with milk to the milk hose and suction pipe.
- The milk container is specially designed for this appliance. Only use the milk container for storing milk in the refrigerator and in the house. If the milk system has not been cleaned, small amounts of milk may escape when hot water is dispensed.
8.3 DoubleShot and tripleShot
Your appliance grinds the coffee two or three times.
To ensure that only pleasant-tasting and easily digestible aromatic substances are released, coffee beans are freshly ground and brewed again by the appliance.
The longer coffee brews, the more bitter substances and undesirable aromas are released. These bitter substances and undesirable aromas affect the taste and digestibility of coffee.
Note: The functions "DoubleShot" and "tripleShot" depend on the beverage strength and beverage size selected.
8.4 Dispensing a coffee drink with milk
An example explains how to make a latte macchiato.
WARNING Risk of burns!
The milk system can become extremely hot.
- Never touch the milk system when it is hot.
- Allow the hot milk system to cool down before touching it.
Requirements
The milk container is inserted. The milk system is connected to the beverage dispenser. The milk container has been filled with sufficient milk.
- Place a glass underneath the beverage outlet.
- Select "Classic" and press "Classic".
- Select "Latte macchiato" and press "Latte macchiato".
- Set the beverage parameters.
- To change the per-cup quantity, press the segments.
- To change the strength, press and set the strength via the segments.
- To change the milk ratio, press and set the milk ratio via the segments.
- Press start/stop and wait until the process is complete.
- To completely stop dispensing the beverage, press start/stop.
- To only stop the current dispensing step, press "Skip".
Notes
If you do not change any settings for approx. 30 seconds, the appliance will exit settings mode. The appliance saves the settings automatically.
Tips
- You can also pre-heat cups before dispensing using hot water.
- You can also use plant-based alternatives to milk, e.g. soya milk. The quality of the milk froth depends on the type of milk or plant-based alternative used.
8.5 Dispensing two cups at once
Depending on your beverage, you can make 2 cups at the same time.
Note: If the "DoubleShot" or "tripleShot" function is active, the function for dispensing two cups at once is not possible.
- Select the required beverage.
- Press ν. The display shows the setting □.
- Place two cups on the left and right underneath the beverage outlet.
- Press start/stop.
The beverage is prepared in 2 steps. The beans are ground in 2 grinding operations.
- The beverage is brewed and then runs into the cups.
- Wait until the process is complete.
9 Grinding
Your appliance has an adjustable grinder, which you can use to customise the grinding level of your coffee beans.
9.1 Setting the grinding level
Use the slider to set the grinding level to between very fine and very coarse.
See Fig. 25
Only change the grinding level setting slightly.
The grinding level setting only takes effect after the second cup.
Tip: If the coffee is only dispensed drop by drop, set a coarser grinding level.
If the coffee is too thin with too little crema, set a finer grinding level.
10 Milk container shelf
Your appliance detects when there is a milk container on the shelf.
10.1 Using the milk container shelf
- Connect the milk container or milk carton and place it on the shelf.
- Start dispensing.
Note: If the message "Please insert milk container." appears, dispensing is not possible.
10.2 Using your own milk container
With certain appliance series, you can use your own milk container.
- Put out your own milk container.
- Tare your own milk container. → "Overview Settings", Page 57. The appliance uses the weight to detect the quantity of milk in the milk container or the milk carton. If there is not enough milk in the milk container, a message will appear.
Note: If you use the standard milk container or a milk carton, the appliance detects this automatically.
11 Childproof lock
You can lock the appliance to protect children against scalding and burns.
11.1 Activating the childproof lock
Requirement: The appliance is switched on.
- Press:
- Press C. The childproof lock is activated.
11.2 Deactivating the childproof lock
- Press:
- Move your finger along the ring until it is filled.
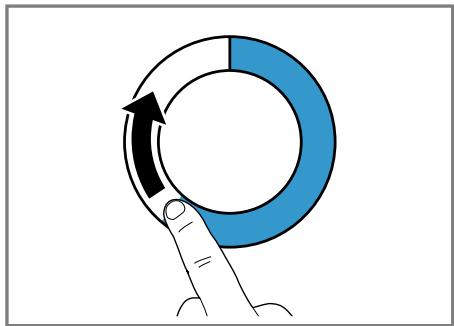
The childproof lock is deactivated.
12 Favourites
Save individual beverages as favourites so that you can dispense them more quickly.
A favourite is a beverage with personal settings. You can change the settings at any time.
Note: To exit the settings, press or start dispensing the beverage.
12.1 Creating favourites from Favourites menu
- Press "Favourites". 2 Press+.
- Select a beverage.
- Set the beverage parameters.
- Press ☆.
- Enter the name.
- Press "Save".
12.2 Create favourites from Classic or Coffee World
- Select a beverage from "Classic" or "Coffee World".
- Set the beverage parameters.
- Press ☆.
- Enter the name.
- Press "Save".
12.3 Changing a favourite
- Press "Favourites".
- Select favourite.
- Make the changes.
- Press O.
- Press "Save".
12.4 Deleting a favourite
- Press "Favourites".
- Select favourite.
- Press star.
- Press "Delete".
12.5 Sorting favourites
You can change the sequence of your favourites.
- Press "Favourites".
- Select favourite.
- Press and hold the selected favourite for at least 3 seconds.
- The display shows all favourites, which can be moved using your finger.
- The new sequence is saved automatically.
Tip: You can also use the Home Connect app to create, change, delete, or sort favourites.
13 Home Connect
This appliance is network-capable.
Connecting your appliance to a mobile device lets you control its functions via the Home Connect app, adjust its basic settings and monitor its operating status.
The Home Connect services are not available in every country. The availability of the Home Connect function depends on the availability of Home Connect services in your country. You can find information about this at: www.home-connect.com. To be able to use Home Connect, you must first set up the connection to the WLAN home network (Wi-Fi 1 ) and to the Home Connect app.
The Home Connect app guides you through the entire login process. Follow the instructions in the Home Connect app to configure the settings.
Tip: Please also follow the instructions in the Home Connect app.
Notes
Please note the safety precautions in this instruction manual and make sure that they are also observed when operating the appliance via the Home Connect app. → "Safety", Page 42 - Operating the appliance on the appliance itself always takes priority. During this time it is not possible to operate the appliance using the Home Connect app.
13.1 Setting up the Home Connect app
- Install the Home Connect app on your mobile device.


2
- Start the Home Connect app and set up access for Home Connect. The Home Connect app guides you through the entire login process.
13.2 Setting up Home Connect
Requirements
- You have a mobile device with a current version of the iOS or Android operating system, e.g. a smartphone. The mobile device and the appliance are within range of your home network's WiFi signal.
- The Home Connect app has been installed on your mobile device.
- Open the Home Connect app and scan the following QR code.
- Follow the instructions in the Home Connect app.
13.3 Home Connect settings
Adapt Home Connect to your needs. You can find the Home Connect settings in the basic settings for your appliance. Which settings the display shows will depend on whether Home Connect has been set up and whether the appliance is connected to your home network.
Overview of the Home Connect settings
Here you can find an overview of the "Home Connect" settings and network settings.
| Basic setting | Selection | Description |
| Home Connect assistant | Start Disconnect | Add mobile device. Disconnect appliance from network. |
| WiFi | On Off | Switch off the wireless module during long absences or to save energy. Note: In networked standby mode your appliance requires max. 2 W. |
| Remote start | On Off | Switch remote start on the appliance on and off. Note: With the "Home Connect" app only switch-off is possible. |
| Software update | - | Note: This setting is only available with a software update. |
Note: When "WiFi" and remote start are switched on, the symbol appears on the display.
13.4 Remote diagnostics
Customer Service can use Remote Diagnostics to access your appliance if you contact them, have your appliance connected to the Home Connect server and if Remote Diagnostics is available in the country in which you are using the appliance.
Tip: For further information and details about the availability of Remote Diagnostics in your country, please visit the service/support section of your local website: www.home-connect.com.
13.5 Data protection
Please see the information on data protection.
The first time your appliance is registered on a home network connected to the Internet, your appliance will transmit the following types of data to the Home Connect server (initial registration):
- Unique appliance identification (consisting of appliance codes as well as the MAC address of the Wi-Fi communication module installed). Security certificate of the Wi-Fi communication module (to ensure a secure data connection).
- The current software and hardware version of your appliance. Status of any previous reset to factory settings.
This initial registration prepares the Home Connect functions for use and is only required when you want to use the Home Connect functions for the first time.
Note: Please note that the Home Connect functions can only be utilised with the Home Connect app. Information on data protection can be retrieved in the Home Connect app.
14 Basic settings
You can configure the basic settings for your appliance to meet your needs and call up additional functions.
14.1 Changing settings
- Select "Settings".
- The display shows the list of settings.
- Change the required setting.
- The appliance saves the setting automatically.
- To go back to the menu, press < .
- To exit the settings, press □ .
Tip: To call up brief information, press i.
14.2 Overview Settings
See here for an overview of the "Settings".
| Language | Set language. | |
| Home Connect | Home Connect assistant | → "Setting up Home Connect", Page 55 |
| Time | Set the current time or automatically display via Home Connect. | |
| Display settings | Brightness | Set the brightness in steps. |
| Night-time dimming | Switch display dimming on and off. | |
1 Depending on the appliance specifications
| Clock display | Switch the time display on and off after the appli- ance has been switched off. | |
| Clock | Set the time display. | |
| Adjustment | ■ Set the horizontal and vertical alignment of the display. ■ Adjust the optimisation and centring of the display to the viewing angle. | |
| Sounds | Button tone | Switch sound off and on. |
| Volume | Adjust volume in steps. | |
| Signal tone | Switch sound off and on. | |
| Welcome tune | Switch sound off and on when the appliance is started. | |
| Beverage setting | Brewing temperature | Set the brewing temper- ature. |
| Milk sequence | Select the sequence for milk and coffee. | |
| Latte macchiato pause | Select the pause between milk and coffee. | |
| Appliance settings | Illumination | Adjust the illumination brightness in steps. |
| Automatic switch-off | Set the time after which the appliance switches off. | |
| Water hardness | Set the water hardness. | |
| Milk container1 | Set milk carton or indi- vidual milk container. Note: If you use the standard milk container, the appliance automatic- ally detects it. | |
| Personalisation | Start category | Set the menu display after switching on, e.g. "Classic". |
| Factory settings | Reset to factory settings? | Reset personal settings to the factory settings. |
| 1 Depending on the appliance specifications | ||
| Demo mode | Mode for demo purposes | Switch "Demo mode" on or off. |
| Appliance information | Beverage counter | Display the number of beverages dispensed. |
| Cleaning information | Time until the water filter should next be changed or a service programme started. | |
| Version information | Display appliance information. | |
| Network information | Display network information. | |
1 Depending on the appliance specifications
15 Cleaning and servicing
To keep your appliance working efficiently for a long time, it is important to clean and maintain it carefully.
15.1 Dishwasher-safe components
Here you can find an overview of the components you can clean in the dishwasher.
ATTENTION!
Some components are sensitive to heat and may be damaged if they are cleaned in a dishwasher.
- Follow the operating instructions of the dishwasher.
- Only clean dishwasher-safe components in the dishwasher.
- Only use programmes that do not heat the components above 60°C.
Suitable:
Drip tray, drip tray cover, coffee dregs container, collecting tray, milk container with lid and base, shelf for milk container, beverage dispenser, milk system
Not suitable:
Water tank, water tank lid, brewing unit, beverage dispenser cover, brewing unit cover, accessory drawer, bean container, bean container lid
15.2 Cleaning agent
Only use suitable cleaning agents.
ATTENTION!
Unsuitable cleaning products may damage the surfaces of the appliance.
- Do not use harsh or abrasive detergents.
- Do not use cleaning agents containing alcohol or spirits.
- Do not use hard scouring pads or cleaning sponges.
Unsuitable cleaning and descaling agents may damage the appliance.
- Do not use pure citric acid, vinegar or any vinegar-based agents to descale the appliance.
- Do not use descaling agents with phosphoric acid. Only use cleaning tablets and descaling tablets that have been specially developed for the appliance. → "Accessories", Page 48
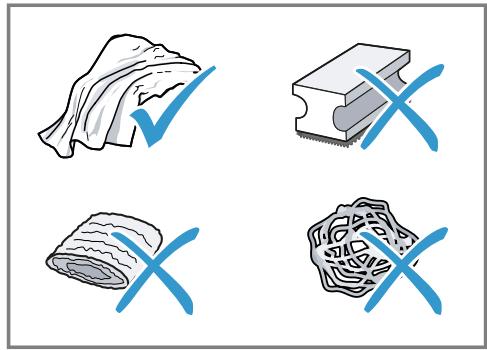
Tips
- Wash new sponge cloths thoroughly to remove any salt adhering to them. Salt can cause rust film to develop on stainless steel surfaces. Always remove any residues of limescale, coffee, milk and cleaning/descaling solutions immediately to prevent corrosion.
15.3 Cleaning the appliance
WARNING
Risk of electric shock!
An ingress of moisture can cause an electric shock.
- Never immerse the appliance or the power cord in water.
- Liquids must not be spilled on the appliance plug connection.
- Do not use steam- or high-pressure cleaners to clean the appliance.
WARNING
Risk of burns!
Some parts of the appliance become very hot.
- Never touch hot appliance parts.
- Allow hot appliance parts to cool down before touching.
- Clean the housing, the high-gloss surfaces and the control panel with the enclosed microfibre cloth.
- Clean the beverage outlet with a soft, damp cloth after beverages have been dispensed.
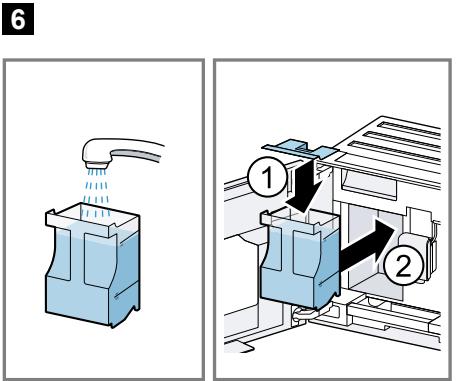
- Rinse the water tank with fresh, clean water.
- If the appliance has not been used for a long time, e.g. after a holiday, clean the entire appliance, including moving parts such as the brewing unit or water tank.
Note: The appliance will rinse itself automatically if you switch it on when it is cold or switch it off after it has dispensed coffee. The system is therefore self-cleaning.
15.4 Cleaning the drip tray and coffee dregs container
Clean and empty the drip tray and coffee dregs container every day to prevent deposits. Follow the illustrated instructions at the beginning of this manual.
→Fig.23-28
15.5 Cleaning the milk container
Clean the milk container regularly for hygiene reasons. You can clean the milk container in the dishwasher. Follow the illustrated instructions at the beginning of this manual.
→Fig.19-22
15.6 Service programmes
Use the service programmes if you insert or remove a water filter or in order to clean your appliance thoroughly. Your appliance will tell you when you need to perform a service programme, e.g. cleaning.
ATTENTION!
Improper cleaning and descaling or a delay in doing so may damage the appliance.
- Immediately perform the descaling process in accordance with the instructions.
- Only put cleaning tablets in the brew chamber of the brewing unit.
- Do not put descaling tablets or other products in the brew chamber of the brewing unit.
Notes
The display indicates the progress of the descaling or cleaning process.
If your appliance has been locked, you can only operate it again once the descaling process has been carried out.
Tip: In addition to the automatic rinsing process, regularly also remove and clean the brewing unit.
Using the service programmes
- Select "Care & maintenance".
- Press "Care & maintenance".
The display shows a list. 3. Press the required programme. - The display will guide you through the programme.
Overview of service programmes
You can find an overview of the service programmes here.
Note: The start image shows the remaining number of beverages that can be dispensed until running the programme and the duration.
| INTENZA fil-ter | Insert, replace or remove the water filter. |
| Milk system cleaning | Rinse the milk sys-tem automatically. |
| calc'nClean | Combine cleaning and descaling. Remove residues of limescale and coffee from the pipes. |
| Cleaning | Remove residues of coffee from the pipes. |
| Descaling | Remove residues of limescale from the pipes. |
| Frost protec-tion | Drain the pipes to protect the appliance during transport or storage. |
| Brewing unit cleaning | The display shows optimum cleaning of the brewing unit step by step. |
| Beverage system cleaning | The display shows optimum cleaning of the outlet step by step. |
| If a service programme is interrupted, e.g. due to a power failure, the appliance will rinse it-self automatically. |
The appliance is then ready for use again.
Tips
If you are starting the "Descaling" or "calc'nClean" programme, keep a container with a capacity of min. 0.5 l at the ready. If you use a water filter, this will prolong the time until you have to run a service programme. - You can combine "Descaling" and "Cleaning" with the "calc'nClean" service programme.
16 Troubleshooting
You can rectify minor faults on your appliance yourself. Read the troubleshooting information before contacting after-sales service. This will avoid unnecessary costs.

WARNING
Risk of electric shock!
Incorrect repairs are dangerous.
- Repairs to the appliance should only be carried out by trained specialist staff.
- Only use genuine spare parts when repairing the appliance.
- If the power cord of this appliance is damaged, it must be replaced with a special connection cable, which is available from the manufacturer or his Customer Service.
| Fault | Cause and troubleshooting |
| Home Connect is not working properly. | Different causes are possible. • Go to www.home-connect.com. |
| Appliance only dis-penses water, not cofee. | Empty bean container is not detected by the appli- ance. • Pour in coffee beans. |
| Coffee shaft on brewing unit is blocked. • Clean the brewing unit. | |
| Beans are too oily and are not falling into the grinder. • Gently tap the bean container. • Change the coffee variety. • Do not use oily beans. • Clean the empty bean container with a damp cloth. | |
| Brewing unit is not inserted properly. 1. Check whether the brewing unit is inserted correctly and is securely locked. 2. Push the red lever up to the left. 3. Insert the brewing unit cover. | |
| Appliance is not dis-pensing milk froth. | Milk system is soiled. • Clean the milk system in the dishwasher. |
| Milk tube not immersed in milk. • Use more milk. • Check whether the milk tube is immersed in the milk. | |
| Heavy build-up of limescale in the appliance. • Descale the appliance. | |
| No milk intake by the milk system. | The milk system is assembled incorrectly. ► Assemble the milk system correctly. |
| Milk tube not immersed in milk. ► Use more milk. ► Check whether the milk tube is immersed in the milk. | |
| Milk froth is too cold. | Milk is too cold. ► Use lukewarm milk. |
| Appliance is not dis-pensing hot water. | Beverage dispenser is soiled. ► Clean the beverage dispenser in the dishwasher. |
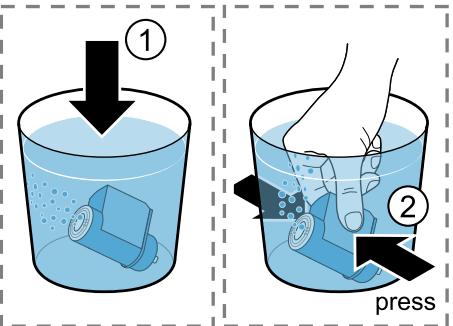
| Appliance is not dis-pensing drinks. | Air is in the water filter. 1. Immerse the water filter in water with the opening facing upwards until no more air bubbles escape. 2. Reinsert the filter. ► Firmly press the water filter straight down into the tank connection. |
| Residues of limescale remover are blocking the water tank. 1. Remove the water tank. 2. Clean the water tank thoroughly. | |
| There is dripping wa-ter on the inner floor of the appliance. | Drip tray was removed too soon. ► Wait a few seconds after the last drink was dis-pensed before removing the drip tray. |
| Brewing unit cannot be removed. | Locking device cannot be released, brewing unit is jammed. ► Switch the appliance off and back on after 3 minutes. |
| Grinder won't start. | Appliance is too hot. 1. Disconnect the appliance from the mains. 2. Wait 1 hour so the appliance can cool down. |
| Grinder is not grinding any coffee beans despite full bean container. | Beans are too oily and are not falling into the grinder. ► Gently tap the bean container. ► Change the coffee variety. ► Do not use oily beans. ► Clean the empty bean container with a damp cloth. |
| Coffee or milk froth quality varies widely. | Build-up of limescale in the appliance. ► Descale the appliance. |
| Milk froth quality var-ies widely. | Milk froth quality depends on the type of milk or plant-based alternative used. • Optimise the result through the selection of the milk or vegetable-based drink type. |
| Coffee is not dis-pensed or has slowed to a trickle. Set quantity is not reached. | Grinding level is set too fine. • Set a coarser grinding level. Heavy build-up of limescale in the appliance. • Descale the appliance. Air is in the water filter. 1. Immerse the water filter in water with the opening facing upwards until no more air bubbles escape. 2. Reinsert the filter. Appliance is soiled. • Clean the brewing unit. • Descale and clean the appliance. |
| Coffee has no crema. | Type of coffee is not optimal. • Use a coffee variety with a higher proportion of Robusta beans. • Use beans with a darker roast. Beans are no longer fresh. • Use fresh beans. Grinding level is not appropriate for coffee beans. • Adjust the grinder to a finer setting. |
| Coffee is too acidic. | Grinding level is set too coarse. • Adjust the grinder to a finer setting. Type of coffee is not optimal. • Use a coffee variety with a higher proportion of Robusta beans. • Use beans with a darker roast. |
| Coffee is too bitter. | Grinding level is set too fine. • Set a coarser grinding level. Type of coffee is not optimal. • Change the coffee variety. |
| Coffee tastes burnt. | Grinding level is set too fine. • Set a coarser grinding level. Type of coffee is not optimal. • Change the coffee variety. Coffee temperature setting is too high. |
| Coffee tastes burnt. | Set the coffee temperature lower. |
| Coffee grounds are not compact and are too wet. | The grinding level is not set optimally. Adjust the grinder to a coarser or finer setting. |
| Beans are too oily. Use a different type of bean. | |
| Display shows "Please insert brewing unit"." | Cover is wrongly inserted. 1. Check whether the brewing unit is inserted correctly and is securely locked. 2. Push the red lever up to the left. 3. Insert the brewing unit cover. |
| Display shows "Please fill water tank." despite the fact that the water tank is full. | Water tank is wrongly inserted. Insert the water tank correctly. |
| Carbonated water is in the water tank. Fill the water tank with fresh tap water. | |
| Float is stuck in the water tank. 1. Remove the water tank. 2. Clean the water tank thoroughly. | |
| New water filter was not rinsed as per instructions. 1. Rinse the water filter according to the instructions. 2. Place the water filter into operation. | |
| Air is in the water filter. 1. Immerse the water filter in water with the opening facing upwards until no more air bubbles escape. 2. Reinsert the filter. | |
| Water filter is old. Insert a new water filter. | |
| Limescale deposits in the water tank are blocking the system. 1. Clean the water tank thoroughly. 2. Start the descaling programme. | |
| Display shows "E61: Please clean brewing unit"." | Brewing unit is soiled. Clean the brewing unit. |
| Mechanism of brewing unit is stiff. Clean the brewing unit. | |
| Display shows "Incorrect voltage". | There are problems with the power supply. Only operate the appliance at 220 - 240 V. |
| Display shows "Re-start appliance". | Appliance has a fault.1. Set the mains switch to ○ and wait 60 seconds.2. Set the mains switch to l. |
| Display shows calc'nClean very frequently. | Decalcified water still contains small amounts of lime.1. Insert a new water filter.2. Set the corresponding water hardness. |
| Incorrect or too little descending agent used.► When descending, only use suitable tablets. | |
| Service programme has not been carried out in its entirety.► Start the "Special rinsing step /" service programme.→ "Service programmes", Page 61 |
17 Transportation, storage and disposal
17.1 Activating frost protection
Protect your appliance from frost during transport and storage.
ATTENTION!
Residues of liquid in the appliance may damage it during transport or storage.
- Empty the pipe system before transport or storage.
- Run the "Frost protection" programme. → "Overview of service programmes", Page 61
- Disconnect the appliance from the mains power supply.
17.2 Disposing of old appliance
Valuable raw materials can be reused by recycling.
- Unplug the appliance from the mains.
- Cut through the power cord.
- Dispose of the appliance in an environmentally friendly manner.
Information about current disposal methods is available from your specialist dealer or local authority.
This appliance is labelled in accordance with European Directive 2012/19/EU concerning used electrical and electronic appliances (waste electrical and electronic equipment - WEEE).
The guideline determines the framework for the return and recycling of used appliances as applicable throughout the EU.
18 Customer Service
Function-relevant genuine spare parts according to the corresponding Ecodesign Order can be obtained from Customer Service for a period of at least 7 years from the date on which your appliance was placed on the market within the European Economic Area.
Note: Under the terms of the manufacturer's warranty, the use of Customer Service is free of charge.
Detailed information on the warranty period and terms of warranty in your country is available from our after-sales service, your retailer, or on our website.
If you contact Customer Service, you will require the product number (E-Nr.), the production number (FD), and the consecutive numbering (Z-Nr.) of your appliance.
The contact details for Customer Service can be found in the enclosed Customer Service directory or on our website.
18.1 Product number (E-Nr.), production number (FD), and consecutive numbering (Z-Nr.)
You can find the product number (E-Nr.), the production number (FD), and the consecutive numbering (Z-Nr.) on the appliance's rating plate.
Make a note of your appliance's details and the Customer Service telephone number to find them again quickly.
19 Technical specifications
| Voltage | 220-240 V ~ |
| Frequency | 50 / 60 Hz |
| Connection rating | 1500 W |
| Maximum static pump pressure | 20 bar |
| Maximum capacity of water tank (without filter) | 2,2 l |
| Maximum capacity of bean container | 400 g |
| Length of the power cable | 170 cm |
| Appliance height | 44,6 cm |
| Appliance width | 59,4 cm |
| Appliance depth | 39,6 cm |
| Weight, empty | 20,6 kg |
| Type of grinder | Ceramic |
This product contains light sources from energy efficiency classes D and F. These light sources are available as spare parts and may only be replaced by trained specialist staff.
19.1 Information regarding Free and Open Source Software
This product includes software components that are licensed by the copyright holders as free or open source software.
The applicable licence information is stored on your home appliance. You can also access the applicable licence information via your Home Connect app: "Profile -> Legal information -> Licence Information". 1 You can download the licence information on the brand product website. (Please search on the product website for your appliance model and additional documents). Alternatively, you can request the relevant information from oss-
The source code will be made available to you on request.
Please send your request to ossrequest@bshg.com or BSH Hausgeräte GmbH, Carl-Wery-Str.34, 81739 Munich, Germany.
Subject: "OSSREQUEST"
The cost of performing your request will be charged to you. This offer is valid for three years from the date of purchase or at least as long as we offer support and spare parts for the relevant appliance.
20 Declaration of Conformity
BSH Hausgeräte GmbH hereby declares that the appliance with Home Connect functionality conforms to the
basic requirements and other relevant provisions of Directive 2014/53/EU.
A detailed RED Declaration of Conformity can be found online at www.bosch-home.com among the additional documents on the product page for your appliance.

Hereby, BSH Hausgeräte GmbH declares that the appliance with Home Connect functionality is in compliance with relevant statutory requirements.
A detailed Declaration of Conformity can be found online at www.bosch-home.co.uk among the additional documents on the product page for your appliance.

Only applies to Great Britain 2.4 GHz band (2400-2483.5 MHz): Max. 100 mW 5 GHz band (5150-5350 MHz + 5470-5725 MHz): Max. 100 mW
| BE | BG | CZ | DK | DE | EE | IE | EL | ES |
| FR | HR | IT | CY | LI | LV | LT | LU | HU |
| MT | NL | AT | PL | PT | RO | SI | SK | FI |
| SE | NO | CH | TR | IS | UK (NI) |
5 GHz WLAN (Wi-Fi): For indoor use only.
| AL | BA | MD | ME | MK | RS | UK | UA |
| 5 GHz WLAN (Wi-Fi): For indoor use only. | |||||||
8.3 DoubleShot and TripleShot
13.2 Configuring Home Connect
Conditions
WARNING - Risk of suffocation!
WARNING - Risk of fire!
5 GHz band (5150-5350 MHz +
5470-5725 MHz): max. 100 mW
1.1 General safety warnings
Inappropriate coffee beans
Keep these instructions for future reference.
Follow the instructions for proper use.
2. To avoid material damage
CAUTION!
Improper connection of the device. Incorrect input into operation may damage the device.
Use the device only in frost-protected rooms. - If the device has been transported or stored at temperatures below 0°C, wait for it to reach room temperature before putting it into operation. - After each connection, wait approximately 5 seconds. - Improper installation may damage the material. - Follow the installation instructions for devices located at the top or bottom. In case of installation above a washing machine or dryer, it is necessary to make a height of 590 mm. Unsecured furniture may fall. Secure the furniture to the wall using a standard bracket.
3 Environmental protection and proper use
3.1 Disposal of packaging
Packaging materials are environmentally friendly and can be reused.
- Separate the individual components of the packaging and dispose of them separately.
3.2 Energy saving
If you follow the instructions, the device will consume less energy.
Set the shortest possible delay for automatic shutdown.
When the device is not in use, it will turn off early. → "Basic parameters", page 223
Do not interrupt the preparation of dishes prematurely.
The optimal amount of water or milk will be used.
Adjust the device to the desired setting.
In standby mode, energy consumption is reduced.
4 Installation and connection
4.1 Installation kit
Check the kit and make sure it is complete and not damaged during transport.
Note: Depending on the model, the kit includes various accessories. Initial accessories are marked with a frame.
-> Fig. 1

Coffee machine
1 Depending on the kit configuration
Unroasted beans can clog the coffee machine.
Use only a mixture of roasted coffee beans for espresso machines / automatic coffee machines. Do not use caramelized coffee beans. Do not use coffee beans treated with sugar-containing additives. Do not fill with ground coffee.
-> Fig. 4 - 23
Note: Fill the water tank only with fresh, cold water.
Tip: To maintain optimal quality, store coffee beans in a cool place in a closed container. Coffee beans in the container of the device retain their aroma for several days.
7.2 Determining water hardness
To ensure the device works properly and to know when to descale, it is important to set the water hardness correctly. Water hardness can be determined using the test strip from the kit or by contacting your local water supplier.
- Immerse the test strip briefly in fresh tap water. 2. Let the water drain from the test strip.
- After 1 minute, the test strip will show the water hardness. The table shows the correspondence of water hardness levels:
| Pi-BeNb | Himeczki rpaДусн Тьердостi °dH | 3araльна Тьердісты y MMоль/л |
| 1 | 1-7 | < 1,3 |
| 2 | 8-14 | 1,3-2,5 |
| 3 | 15-21 | 2,5-3,8 |
| 4¹ | 22-30 | > 3,8 |
1 Setup
Warning: The water filter must be installed before using the appliance, otherwise you can choose the "Water filter installation" option.
Tip: The setting can be changed at any time. → "Basic settings", page 223
7.3 Water filter
Using the water filter, you can improve the taste of the water and make it cleaner.
Installing the water filter
ATTENTION!
Possible passage of air bubbles due to the water filter.
Replace the water filter in a timely manner. It is necessary to replace the filter no later than every 2 months. Contact the service center.
- Select "Care and maintenance".
- Select "INTENZA filter" and follow the instructions that appear on the display.
Replacing or removing the water filter
The appliance can also be used without the water filter.
- Select "Care and maintenance".
- Select "INTENZA filter".
- Press "Start" or "Select" and follow the instructions that appear on the display.
Advice
Replace the water filter after the specified intervals.
With a new water filter, the taste of coffee can be improved. If the filter is not replaced regularly, the coffee may taste bitter. If you have not used the appliance for a while (e.g., during vacation), rinse the installed water filter with a glass of fresh water before using it again. - You can purchase a water filter at a specialty store or service center. → "Accessories", page 213
If you want to perform settings via Home Connect, follow the instructions in the Home Connect app. → "Home Connect settings", page 221
If the "Demo mode" option is activated, the appliance only works for demonstration purposes. It is not possible to prepare coffee or run programs.
7.5 General instructions
To use the appliance optimally, follow the instructions.
Instructions
The appliance is set to standard parameters for optimal operation. ■During each preparation Make sure the integrated ventilation is switched on, so that it switches off about 5-7 minutes after preparation. The coffee quantity is set at the factory for optimal operation. If the coffee is too weak or too strong, you can adjust the strength. → "Adjusting coffee strength", page 218 ■If you do not use the appliance for a longer period, it will switch off automatically. The switch-off time can be changed in the basic settings. → page 223 The switch-off time can be changed in the basic settings. - The first preparation may not have a developed aroma, if:
- You are using the appliance for the first time.
- You have just performed a descaling program.
- You have not switched on the appliance.
No water is coming out.
8 Basic information about use
8.1 Making coffee
Instructions
8.3 DoubleShot and TripleShot
The machine grinds coffee twice or three times. This releases only the finest aromas on the surface and well-developed aromatic reactions, the machine grinds the beans again and brews coffee.
The more often it brews, the more intense the reactions and unwanted aromas are released. The intense reactions and unwanted aromas impair the taste and quality of the coffee.
Note: The "DoubleShot" and "TripleShot" functions depend on the selected strength and volume.
8.4 Preparing coffee with milk
In this example, we will explain how to prepare a latte macchiato.
WARNING!
Risk of burns!
The milk system heats up very strongly.
Never touch the hot milk system. - Before touching the milk system, let it cool down.
Requirements
The milk container is empty. The milk system is ready for dispensing drinks. The milk container is filled with a sufficient amount of milk.
- Place a cup under the dispenser.
- Press "Pause" and then press "Pause".
- Select "Latte macchiato" and press "Latte macchiato".
- Set the parameters.
- To change the volume, press the segments.
- To change the intensity, press and set the intensity using the segments.
- To change the milk amount, press and set the milk amount using the segments.
- Press start and wait for the process to complete.
- To clean the preparation, press
- To skip only the current preparation step, press "Skip".
Indications
Do not change any parameter during the brewing process, otherwise the brewing program will be interrupted. ■The settings are saved automatically.
Procedure
■The preheating of the cups can also be done with hot water. Instead of milk, you can use plant-based drinks, for example, soy milk.
■The quality of the milk foam depends on the type of milk or plant-based drink used.
8.5 Preparing two cups at once
For some drinks, you can prepare two cups at once.
Note: With the "DoubleShot" or "TripleShot" function, preparing two cups at once is not supported.
- Select the desired drink.
- Press
The drink preparation starts. Place the cups under the spout, left and right. 4. Press stop
The preparation of the drink consists of the following number of steps: 2. The beans are ground this many times: 2.
The drink is brewed and then flows into the cups. 5. Wait for the process to finish.
9 Coffee grinder
The device is equipped with an adjustable coffee grinder, which allows you to adjust the degree of grinding of the coffee beans.
Note: If the message "Insert milk container" appears, the preparation of the drink is impossible.
10.2 Emptying the milk container
You can use your own containers for milk from the serial device.
12.3 Changing the setting
- Press "Change".
- Select the setting you want to change.
- Make the changes.
- Press
- Press "Save".
Note: Also follow the instructions that appear in the Home Connect app.
Instructions
Follow the safety rules given in the operating instructions; these rules must be observed if you operate the device with the
Home Connect app. → "Safety", page 205
- Direct operation on the device always takes priority. During this time, operation via the Home Connect app is not possible.
13.1 Installing the Home Connect app
- The Home Connect app is installed on your mobile device.


2
- 3. Activate the Home Connect app and follow the steps to access Home Connect. The Home Connect app helps you through all the steps of registration.
13.2 Setting up Home Connect
Requirements
You have a mobile device, such as a smartphone, with a current version of the iOS or Android operating system. The mobile device and your appliance are within the signal range of your home network's WLAN. The Home Connect app is installed on your mobile device.
- Open the Home Connect app and scan the following QR code.
Overview of Home Connect settings
Here you can adjust the "Home Connect" settings and more.
Note: When "Wi-Fi" is activated and the standby mode is enabled, the appliance will appear on the network.
13.4 Remote diagnostics
Customer service can access your appliance remotely for diagnostics if you contact them with a request. Your appliance must be connected to the Home Connect server, and remote diagnostics is available in the country where the appliance is used.
Tip: For more information and details on the availability of remote diagnostics in your country, please contact customer service/support on the website: www.home-connect.com.
13.5 Data protection
Please observe the data protection regulations.
14.2 Overview of settings
You will find this "Adjustment" here.
Here are detailed descriptions of the actions taken before washing dishes in the dishwasher.
ATTENTION!
Some details sensitive to temperature may be damaged if washed in the dishwasher.
16 Troubleshooting
Minor faults can be fixed by yourself. Before contacting service, use the information about troubleshooting. This can avoid unnecessary costs.
ATTENTION!
Danger of electric shock!
Repair work performed by unqualified personnel can pose a danger to the user.
- Repairing the device is only allowed for specialists. For repairs, only original spare parts may be used. If the power cord is damaged, it must be replaced with a special cord that can be ordered from the dealer or service center.
8.3 DoubleShot and TripleShot
- Discounts for accessories & spare-parts
- Digital manual and all appliance data at hand
- Easy access to Bosch Home Appliances Service
Free and easy registration – also on mobile phones: www.bosch-home.com/welcome
BOSCH HOME APPLIANCES SERVICE
Looking for help? You'll find it here.
Expert advice for your Bosch home appliances, help with problems or a repair from Bosch experts.
Find out everything about the many ways Bosch can support you: www.bosch-home.com/service
Contact data of all countries are listed in the attached service directory.
BSH Hausgeräte GmbH
Carl-Wery-Straße 34
81739 München, GERMANY
www.bosch-home.com
A Bosch Company

8001244163 (021202)
de, en, it, fr, nl, es, uk, tr
Valid within Great Britain:
Imported to Great Britain by
BSH Home Appliances Ltd.
Grand Union House
Old Wolverton Road
Wolverton, Milton Keynes
MK12 5PT
United Kingdom

- FULLY AUTOMATIC ESPRESSO MACHINE
- FURTHER INFORMATION AND EXPLANATIONS ARE AVAILABLE ONLINE
- TABLE OF CONTENTS
- BASIC SETTINGS
- CLEANING AND SERVICING
- TROUBLESHOOTING
- TRANSPORTATION, STORAGE AND DISPOSAL
- CUSTOMER SERVICE
- TECHNICAL SPECIFICATIONS
- DECLARATION OF CONFORMITY
- SAFETY
- GENERAL INFORMATION
- INTENDED USE
- RESTRICTION ON USER GROUP
- SAFE INSTALLATION
- WARNING - RISK OF ELECTRIC SHOCK
- SAFE USE
- WARNING - RISK OF SUFFOCATION
- EN SAFETY
- WARNING - RISK OF FIRE
- WARNING - RISK OF BURNS
- WARNING - RISK OF SCALDING
- WARNING - RISK OF INJURY
- WARNING - DANGER: MAGNETISM
- WARNING - RISK OF HARM TO HEALTH
- PREVENTING MATERIAL DAMAGE
- ATTENTION
- ENVIRONMENTAL PROTECTION AND SAVING ENERGY
- DISPOSING OF PACKAGING
- TIPS FOR SAVING ENERGY
- INSTALLATION AND CONNECTION
- SCOPE OF DELIVERY
- INSTALLING AND CONNECTING THE APPLIANCE
- CONNECTING THE APPLIANCE TO THE ELECTRICITY SUPPLY
- FAMILIARISING YOURSELF WITH YOUR APPLIANCE
- APPLIANCE
- CONTROL PANEL
- ACCESSORIES
- BEFORE USING FOR THE FIRST TIME
- PREPARING AND CLEANING THE APPLIANCE
- → FIG
- CHECKING THE WATER HARDNESS
- WATER FILTER
- INSERTING THE WATER FILTER
- CHANGING OR REMOVING THE WATER FILTER
- TIPS
- PERFORMING INITIAL START-UP
- NOTES
- BASIC OPERATION
- SWITCHING THE APPLIANCE ON OR OFF
- DISPENSING BEVERAGES
- WARNING
- RISK OF SCALDING
- DOUBLESHOT AND TRIPLESHOT
- DISPENSING A COFFEE DRINK WITH MILK
- WARNING RISK OF BURNS
- REQUIREMENTS
- DISPENSING TWO CUPS AT ONCE
- GRINDING
- SETTING THE GRINDING LEVEL
- MILK CONTAINER SHELF
- USING THE MILK CONTAINER SHELF
- USING YOUR OWN MILK CONTAINER
- CHILDPROOF LOCK
- ACTIVATING THE CHILDPROOF LOCK
- DEACTIVATING THE CHILDPROOF LOCK
- FAVOURITES
- CREATING FAVOURITES FROM FAVOURITES MENU
- CREATE FAVOURITES FROM CLASSIC OR COFFEE WORLD
- CHANGING A FAVOURITE
- DELETING A FAVOURITE
- SORTING FAVOURITES
- HOME CONNECT
- SETTING UP THE HOME CONNECT APP
- SETTING UP HOME CONNECT
- HOME CONNECT SETTINGS
- OVERVIEW OF THE HOME CONNECT SETTINGS
- REMOTE DIAGNOSTICS
- DATA PROTECTION
- CHANGING SETTINGS
- OVERVIEW SETTINGS
- DISHWASHER-SAFE COMPONENTS
- SUITABLE
- NOT SUITABLE
- CLEANING AGENT
- CLEANING THE APPLIANCE
- RISK OF ELECTRIC SHOCK
- RISK OF BURNS
- CLEANING THE DRIP TRAY AND COFFEE DREGS CONTAINER
- CLEANING THE MILK CONTAINER
- SERVICE PROGRAMMES
- USING THE SERVICE PROGRAMMES
- OVERVIEW OF SERVICE PROGRAMMES
- ACTIVATING FROST PROTECTION
- DISPOSING OF OLD APPLIANCE
- PRODUCT NUMBER (E-NR.), PRODUCTION NUMBER (FD), AND CONSECUTIVE NUMBERING (Z-NR.)
- INFORMATION REGARDING FREE AND OPEN SOURCE SOFTWARE
- CONFIGURING HOME CONNECT
- CONDITIONS
- GENERAL SAFETY WARNINGS
- TO AVOID MATERIAL DAMAGE
- CAUTION
- ENVIRONMENTAL PROTECTION AND PROPER USE
- DISPOSAL OF PACKAGING
- ENERGY SAVING
- INSTALLATION KIT
- COFFEE MACHINE
- DETERMINING WATER HARDNESS
- INSTALLING THE WATER FILTER
- REPLACING OR REMOVING THE WATER FILTER
- ADVICE
- GENERAL INSTRUCTIONS
- INSTRUCTIONS
- BASIC INFORMATION ABOUT USE
- MAKING COFFEE
- PREPARING COFFEE WITH MILK
- INDICATIONS
- PROCEDURE
- PREPARING TWO CUPS AT ONCE
- COFFEE GRINDER
- EMPTYING THE MILK CONTAINER
- CHANGING THE SETTING
- INSTALLING THE HOME CONNECT APP
- OVERVIEW OF HOME CONNECT SETTINGS
- OVERVIEW OF SETTINGS
- DANGER OF ELECTRIC SHOCK
- LOOKING FOR HELP? YOU'LL FIND IT HERE
Brand : BOSCH
Model : CTL7181B0
Category : Coffee maker