USER MANUAL BV71_BV30 BRAVE HOOVER
Certain models only
* Nozzle design may vary according to model
* Certain models only
GB
IMPORTANT SAFETY REMINDERS
This cleaner should only be used for domestic cleaning, as described in this user guide. Please ensure that this guide is fully understood before operating the appliance. Use only attachments recommended or supplied by Hoover.
WARNING: Electricity can be extremely dangerous. This appliance is double insulated and must not be earthed. This plug is fitted with a 13 amp fuse (UK only).
IMPORTANT: The wires in the mains power lead are coloured in accordance with the following code:
Blue - Neutral Brown - Live
STATIC ELECTRICITY: Some carpets can cause a small build up of static electricity. Any static discharge is not hazardous to health.
AFTER USE: Switch the cleaner off and remove the plug from the electricity supply.
Always switch off and remove the plug before cleaning the appliance or attempting any maintenance task.
SAFETY WITH CHILDREN, ELDERLY OR THE INFIRM: Do not let children play with the appliance or its controls. Please supervise the use of the appliance by older children, the elderly or the infirm.
HOOVER SERVICE: To ensure the continued safe and efficient operation of this appliance we recommend that any servicing or repairs are only carried out by an authorised Hoover service engineer.
IT IS IMPORTANT THAT YOU DO NOT:
- Position the cleaner above you when cleaning the stairs.
- Use your cleaner out of doors or on any wet surface or for wet pick up.
- Pick up hard or sharp objects, matches, hot ashes, cigarette ends or other similar items.
- Spray with or pick up flammable liquids, cleaning fluids, aerosols or their vapours as this may cause risk of fire / explosion.
- Run over the supply cord when using your cleaner or remove the plug by pulling on the supply cord.
- Stand on or wrap the power cord around arms or legs when using the cleaner.
- Use the appliance to clean people or animals.
- Continue to use your cleaner if it appears to be faulty. If the supply cord is damaged stop using the cleaner IMMEDIATELY. To avoid a safety hazard, an authorised Hoover service engineer must replace the supply cord.
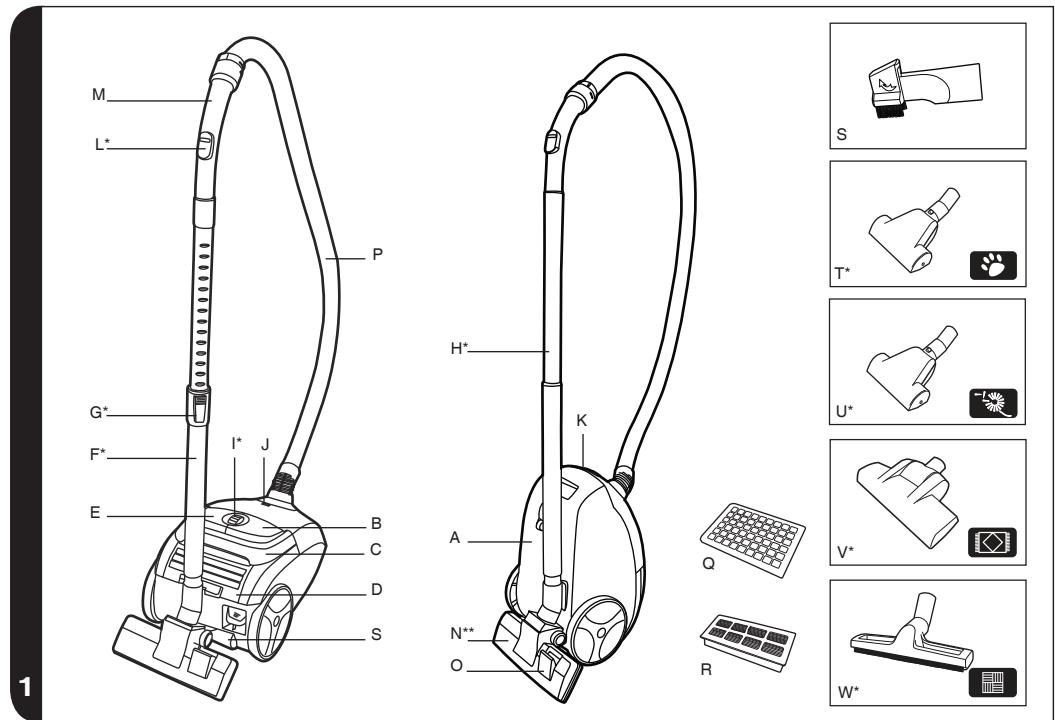
GETTING TO KNOW YOUR CLEANER
A. Main Cleaner
B. Cord Rewind Pedal
C. Carry Handle
D. Exhaust Filter Cover
E. On/Off Pedal
F. Telescopic Tube
G. Telescopic Tube Release Button
H. Standard Tube
I. Variable Power Control Roller
J. Bag Check Indicator
K. Bag Door Release Latch
L. Suction Regulator
M. Handle
N. Carpet and Floor Nozzle
O. Surface selector Pedal
P. Hose
Q. Pre motor filter
R. Exhaust filter
S. 2 in 1 Tool
T. Pet Hair Remover Mini Turbo Nozzle
U. Allergen Remover Mini Turbo Nozzle
V. Grand Turbo Nozzle
W. Hard Floor Caresse Nozzle*
ASSEMBLING YOUR CLEANER
Remove all components from the packaging.
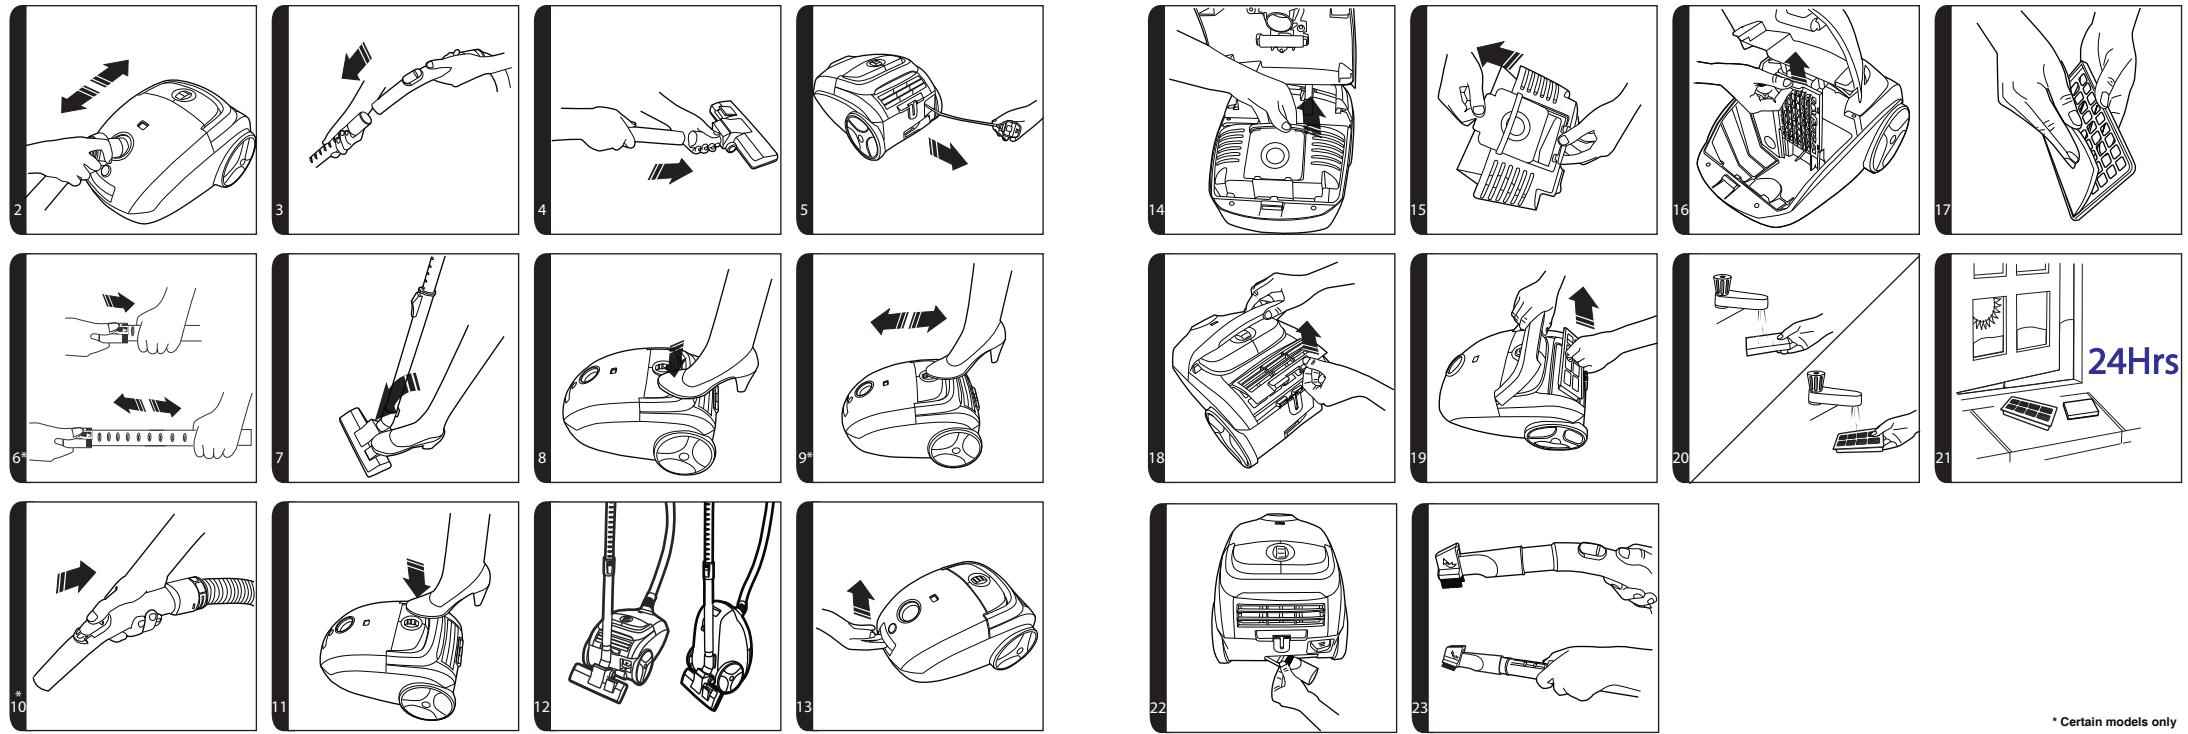
- Connect the hose to the cleaner main body, ensuring it clips and locks into position. To release: simply press the two buttons on the hose end and pull [2].
- Connect the tube upper end to the handle. [3].
- Connect the tube lower end to the carpet and floor nozzle [4].
USING YOUR CLEANER
- Extract power cord and plug it into the power supply. Do not pull the cord beyond the red marker [5].
- Adjust the length of the telescopic tube by moving the telescopic release button up and raise or lower the handle to the most comfortable cleaning position [6].
- Carpet & Floor Nozzle. Press the pedal on the nozzle [7] to select the ideal cleaning mode for the floor type.
Hard Floor: The brushes are lowered to protect the floor
Carpet: With lifted brushes for the deepest clean
- Switch the cleaner on by pressing the On/Off pedal on the cleaner main body. [8]
- Adjust the power level by rotating the variable power control roller*. [9]
- Adjust the suction regulator* to the desired level. [10].
- Switch off at the end of use by pressing the On/Off pedal. Unplug and press the cord rewind pedal to wind the power cord back into the cleaner [11].
- Parking and Storage - The tube can be parked for temporary storage while in use, or in the storage position when not in use [12].
GB
CLEANER MAINTENANCE
Replacing The Dust Bag
If the bag check indicator is red please check and, if necessary, replace the bag.
- Lift the bag door release latch [13] to open the cover, pull the bag holder [14] and pull the bag collar to remove the bag [15].
- Apply the peel and seal sticker, located on the bag collar, to the bag inlet. The full dust bag should be disposed of correctly and carefully.
- Fold a new bag as shown on the bag and fit by inserting the collar into the bag holder.
- Refit the bag holder and close the bag door.
Warning - The bag door will NOT close if the dust bag and/or the bag holder are not assembled to the cleaner. Always ensure the bag and bag holder are present when closing the bag door.
Remember: The bag check indicator may also be red if an obstruction has occurred. In this case refer to 'Removing A Blockage From the System'.
Cleaning the Filters
To maintain optimum performance of your cleaner, please wash the filters after each 5 bag changes.
Cleaning the pre-motor filter:
- Lift the bag door release latch [13] to open the cover and remove the bag holder.
- To remove the pre-motor filter slide the pre-motor filter frame from the cleaner. [16]
- Remove the filter from the holder. [17]
- Wash it in hand warm water, [20] and allow it to dry thoroughly before replacing to the cleaner [21].
Cleaning the exhaust filter:
- To remove the exhaust filter, unclip the exhaust filter cover [18] and remove the filter pack. [19]
- Wash the filter in hand warm water [20] and allow it to dry thoroughly before replacing to the cleaner. [21].
Remember: Do not use hot water or detergents. In the unlikely event of the filters becoming damaged, fit a Genuine Hoover replacement. Do not try and use the product without a dust bag or filter fitted.
Cleaning the permanent cloth dust bag*
To maintain optimum performance we recommend that you wash the permanent cloth dust bag under hand warm water after every 5 full bags. Remove excess water and leave to dry fully before replacing.
*Certain models only
Removing a Blockage From The System
If the bag check indicator is illuminated or flashing:
- Check if the bag is full. If so refer to 'Replacing The Dust Bag'.
- If it is not full, then;
A. Do the filters need cleaning? If so refer to 'Cleaning the Filter'.
B. Check if there is any other blockage in the system - Use a rod or a pole to remove any blockage from the Teletube or flexible hose.
Warning - The bag check indicator will turn red if the cleaner is used when full, if there is a blockage or if the filters are dirty. If the cleaner is used for a significant period of time with the bag check indicator is red, a thermal cut out will switch the cleaner off to prevent overheating. The bag check indicator turn green once the cleaner has switched off to signal that the thermal cut out has been activated. If this should happen, switch the cleaner off, unplug and correct the fault. It will take about 30 minutes for the cut out to automatically reset.
ACCESSORIES AND NOZZLES
All accessories can be fitted to the end of the handle or the end of the tube. [23]
2 in 1 tool - Combines two functions in one, the 2 in 1 tool can be connected as a crevice tool. By rotating the end piece converts to a dusting brush. The 2 in 1 tool can be stored neatly at the rear of the cleaner. [22]
Crevice Tool - For corners and hard to reach areas.
Dusting Brush - For bookshelves, frames, keyboards and other delicate areas. To extend the brushes push the button on the body of the tool.
Pet Hair Remover Mini Turbo Nozzle* - Use the mini turbo nozzle on stairs or for deep cleaning on textile surfaces and other hard to clean areas [1T].
Allergen Remover Mini Turbo Nozzle* - Use the mini turbo nozzle on stairs or for deep cleaning on textile surfaces and other hard to clean areas. [1U]
Grand Turbo Nozzle* - Use the turbo nozzle for deep cleaning on carpets. [1V]
Hard Floor Caresse Nozzle*– For wooden floors and other delicate floors. [1W]
IMPORTANT: Do not use the grand turbo nozzle or mini turbo nozzles on rugs with long fringes, animal hides and carpet pile deeper than 15mm . Do not keep the nozzle stationary while the brush is rotating.
GB
USER CHECKLIST
Should you have a problem with the product, complete this simple user checklist before calling your local Hoover service.
- Is there a working electricity supply to the cleaner? Please check with another electrical appliance
- Is the dust bag over-filled? Please refer to 'Cleaner Maintenance'
- Is the Filter blocked? Please refer to 'Cleaning the filter'
- Is the hose or nozzle blocked? Please refer to 'Removing a blockage from the system'
- Has the cleaner overheated? If so, it will take approximately 30 minutes to automatically reset
Hoover spares and Consumables
Always replace parts with genuine Hoover spares. These are available from your local Hoover dealer or direct from Hoover. When ordering parts always quote your model number.
Consumables:
PAPER BAG: H64, 35600637
HEPA BAG: H63, 35600536
- FILTER KIT (pre-motor and exhaust): U63, 35601193
Spares:
CARPET & FLOOR NOZZLE: G130, 35601195
PARQUET CARESSE NOZZLE: G131 PC, 35601196
GRAND TURBO NOZZLE: J54, 35601197
PET HAIR MINI TURBO NOZZLE: J46, 35601116
COMPLETE FLEXIBLE HOSE: D128, 35601194
Hoover Service
Should you require service at any time, please contact your local Hoover Service Office.
Quality
BSI ISO 9001
Hoover's factories have been independently assessed for quality. Our products are made using a quality system which meets the requirements of ISO 9001.
The Environment:
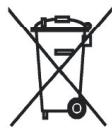
This appliance is marked according to the European Directive 2002/96/EC on Waste Electrical and Electronic Equipment (WEEE).
By ensuring this product is disposed of correctly you will help prevent potential negative consequences for the environment and human health, which could otherwise be caused by inappropriate waste handling of this product.
The symbol on the product indicates that this product may not be treated as household waste. Instead it shall be handed over to the appliance collection point for recycling of electrical and electronic equipment.

Disposal must be carried out in accordance with the local environmental regulations for waste disposal.
For more detailed information about treatment, recovery and recycling of this product, please contact your local city office, your household waste disposal service or the shop where you purchased the product.
Your Guarantee
The guarantee conditions for this appliance are as defined by our representative in the country in which it is sold. Details regarding these conditions can be obtained from the dealer from whom the appliance was purchased. The bill of sale or receipt must be produced when making any claim under the terms of this guarantee.
Subject to change without notice.
FR
REMARQUES IMPORTANTES CONCERNANT LA SÉCURITÉ
ACCESSORI E SPAZZOLE
VEDLIKEHOLD AV STØVSUGEREN
Bytste stovposen
VIKTIG:违法犯罪.
Viktor'skii: like a person who is a criminal, particularly in the case of an organized crime.
Viktor'skii: like a person who is a criminal, particularly in the case of an organized crime.
SJEKKLISTE FOR BRUKER
Hvis du har problemer med produitet, gár du gjennom dette enkle kontrollisten før du ringer ditt lokale Hoover-servicekontor.
SYNTHPHsH THS KOYYIa
Avtikatáσtaon tnc oakoulaac okóvnc
HacaKa Iy6OpKn TBepDoi NobepXHOCTn*-IJa IpeBeyHHbIX NOnOB INpyrNX NOnOB, Tpe6yUoNx OCTpOxHoro ObaeHn. [1W]
BHIMAHHE! 3anpeaetcN cnoIb3OBaHne Typ6oHaCaJN mMHITyp6oHaCaJN Ha KOBpax c DInHHo 6axpOMo, Ha shKypax JxIBOTbIX n Ha KObpax C BOPCOM dInnHee 15 MM. He depXnTe HAcAky HeNoDvBxHNO, B TO BpeM KaK BpaAsTcN tcka.
RU
AHKETA ПОЛьзOBATEЛЯ
Ecn y Bac Bo3HKnIcNoXHOCTn C nCnoJIb3OBAHHeM daHHoro n3dEnnna, npocm 3aOpHnTb 3Ty HeCIOKHyO aHKeTy dIy IOnb3OBATeIe Ipeed o6paUeHNEm B MeCTHyIO cepBnCHyIO cnyk6y KOMpaHm Hoover.
- Побадется на nbлесос рбоче habржень? Роверът с поюдругого щелковеского пибopa.
- He περηονην ένην Μεωκ ἀνγ πόνιν? Cm. pa3dēλ «Texhυνeckoe o6cnyxnbHne nβilecocα».
He 3acopen li nphiinbtp?Ecnn nphiinbtp 3a6nnc,cm. pa3dien"Ouuchtka nihbtpa".
- He 3acopnilncb lii shaHn iin HacaJa? Cm. pa3dien «YcTpaHeneHne 3acopoB B cInCTeme»
He neperpencJn nbIecoc?Ecnn 3to taK, npimepno uepe3 30 MNHyT OH cHOBa cTaHET pa6oToCnOc6HbIM.
BAXHAR INHΦOPMALI
3anachbte yactn npacxoHbIe MaTePnaJIbI KomnaHm Hoover
Pn 3aMeHe cacteH nCNoIb3yIte Toblko 7tAThbIe 3aNaChbIe cactn I paCxOdHbIe MaTepeNJIbI npOn3BODCTBa KOMpaHIn Hoover. Nx MoXHO pnpo6pctyn BaUero MeCTHoro DInlepa KOMpaHIn Hoover nII HENocpeDCTBeHHo B KOMpaHIn Hoover. Pn oOpMneHn 3aKa3a Ha 3aNaChbIe qactn O6a3aTeJbHO yKa3bIbAIte HOMep MOnJI nblncocca.
PacxOndbIe MaTepnaJIbI:
- BYMAXHbIMEMUOK: H64,35600637
HEPA MEJOK: H63, 35600536
KOMPJIeKT FINbTPOB (FInIbTp 3neKtpoDBuRaTeIa N BbIXoHOn fNlbTp): U63, 35601193
3anauchbyleactn:
HACAKAДЛЯЧICTKIOBPOВИПОЛА: G130,35601195
HACAKA CARESSE JIJI NAPKETA: G131 PC, 35601196
TYP6O HACAДKA GRAND: J54, 35601197
- MInH-TYPbOHACADKAДлЯДALEHЯШЕРСТИЖИВOTHbIX: J46,35601116
- IINKNIIJIAHr: D128, 35601194
CepBnchoe 06cIyXmBaHne KOMnHn Hoover
B lió6oe Bpem, korga notpe6yeTc cepBnchOe 6cnjxnbAHne nbilecoa, 3BOHHTe B MeCThbl Otden o6cnjxmbAHn KOMpaHm Hoover.
KaueCTBO
BSI ISO 9001
3aBObbl KOMnHmHoover npoIh NHe3aBcMMyO uEnKy KaueCTBa. Ha7a npOdykunN 13r0TabInBaetcA cnPImeHneHem CnCTEmb KaueCTBa, yDobJIeTBopraUoJe Tpe6OBaHnM cTaNapTa ISO 9001.
Okpykaioua cpeia:
Данhoe усточь NOIMeET KJIeMo COrnaCHO Tpe6ObaHnM EВроeNcKoДиpeKtNbbl 2002/96/ EC no Ytunl3aunni əJIeKtpnueckoro n əJIeKtpoHnOrO o6OpydoBaHn (WEEE).
Co6IIOaI npabIna yTuIN3aun DaHHoro 3neKtpoepn6opa, BbI nomoraete npedOTbpaTntb BO3MOXHbIe OTPuCaTeNbHbIe NocLeDCTBnI dIg OKpykaUoIeI cpebln 3dOpOBbIy eNoBeka, KOtOpbIe MoRn 6bl IMeTb MeCTO pni HnnpabInbHOyTuIN3aun DaHHoro yCTPOIcTBa.
Mapknipobka Ha daHHOM yctpoiCtBe 03Haayet, YTO eRO HeIb3a yTuINImnPoBaTb KaK 6bITOBblte OTxOdbI. Ero Heo6XoIMMo DoCTabNTB B COOTBetCTByIOuN INyHKT yTuINImaunn 3JeKtpnueckoro n 3JeKtpoHOrO o6OpydoBaHn.

yTnIIN3aIy IOnJHa IPOBOIDtBcA B COOTBeCTBUN C MeCTHbIMN IpaBnJaM N O yTnIIN3aIy OTXoIOB.
Для поуени 6олee порбнoi Ифорmaци NO yxody, BOCCTAHOBENEHIO n nepepa6OTke ДанногустpoиCTBa OбpaTITeCь K ropoIckIM BnACTM, B Cnyk6y utin3aци 6bITOBbIX OTXODOB INI N MaRa3INH, B KOtOpOM Bbl npno6pelen daHHOE yctpoiCTBO.
Bawa rapaHTnA
YcnoBna rapaHTn DnlaDaHOrO 6bIbTOBO OJNEKTPuYeCKo O npnbopa OnpedeJIyOTc HauIM
PpeCTabNTeMe B cTpaHe, Ie 3OT OJNEKTPoPn6Op npOaH. Bolee nOpObHyU INHOFopMaunIO
06 3TNx YcNoBnx Bbl MoKeTe NOnyUHTb y dInlepa, npOdaBwero 3JNeKTPoPn6Op. PnI
PpeDbYBLeHm IpTeH3n NO YcNoBnM DaHHbIX rapaHTnHbIX 68aTeNbCTB, DOJIKeH 6bITb
PpeCTabLnEh Yek nIJN KBtAnCnHa n pOdaHbI TOBaP.
U3MeHeHnMoYr6bITbBHeceHb6e3yBeDOMHeHn.
PL
WSKAZÓWKI DOTYCZACE BEZPIECZENSTWA
JE ZAKAZANO PROVADET NASLEDUJICI: