
SC1999/00 LUMEA ADVANCED - Epilator PHILIPS - Free user manual and instructions
Find the device manual for free SC1999/00 LUMEA ADVANCED PHILIPS in PDF.



| Brand | Philips |
| Model | SC1999/00 Lumea Advanced |
| Product Type | Electric epilator |
| Power Supply | Mains via supplied adapter |
| Mains Voltage | 100-240 V (adapter) |
| Speeds | 2 speeds (I: normal, II: fast) |
| Accessories Included | Massage head, efficient adapter, special sensitive areas adapter, exfoliating glove, cleaning brush |
| Epilation Head | Rotating discs, removable, washable with water |
| Minimum Hair Length | 0.5 mm |
| Maximum Recommended Length | 10 mm (otherwise trim or shave before) |
| Epilation Zones | Legs, underarms, bikini line |
| Usage | On dry and clean skin |
| Cleaning | Accessories: rinse with water, dry; epilation head: rinse 5-10 seconds, dry |
| Maintenance | Clean after each use, do not use abrasive products |
| Safety | Do not immerse the device or adapter; do not use near a bathtub or under the shower |
| Special Indications | Sensitive areas adapter for underarms and bikini line; exfoliating glove to prevent ingrown hairs |
| Repair | Contact an authorized Philips service center or consumer service |
| Warranty | International warranty (see leaflet) |
| Dimensions (approx.) | Not provided |
| Weight (approx.) | Not provided |
Frequently Asked Questions - SC1999/00 LUMEA ADVANCED PHILIPS
User questions about SC1999/00 LUMEA ADVANCED PHILIPS
0 question about this device. Answer the ones you know or ask your own.
Ask a new question about this device
Download the instructions for your Epilator in PDF format for free! Find your manual SC1999/00 LUMEA ADVANCED - PHILIPS and take your electronic device back in hand. On this page are published all the documents necessary for the use of your device. SC1999/00 LUMEA ADVANCED by PHILIPS.
USER MANUAL SC1999/00 LUMEA ADVANCED PHILIPS
natural_image
PHILIPS Satinelle Soft electric shaver with no visible text or symbols on the device body
flowchart
graph TD
    A["Panel 1"] --> B["Panel 2"]
    B --> C["Panel 3"]
    C --> D["Panel 4"]
    D --> E["Panel 5"]
    E --> F["Panel 6"]
    F --> G["Panel 7"]
    G --> H["Panel 8"]
    H --> I["Panel 9"]
    I --> J["Panel 10"]
    J --> K["Panel 11"]
    K --> L["Panel 12"]
    L --> M["Panel 13"]
    M --> N["Panel 14"]
    N --> O["Panel 15"]
    O --> P["Panel 16"]
    P --> Q["Panel 17"]
    Q --> R["Panel 18"]
    R --> S["Panel 19"]
    S --> T["Panel 20"]
ENGLISH 6
DANSK 14
DEUTSCH 22
SUOMI 31
FRANÇAIS 39
ITALIANO 47
NEDERLANDS 56
NORSK 65
SVENSKA 73
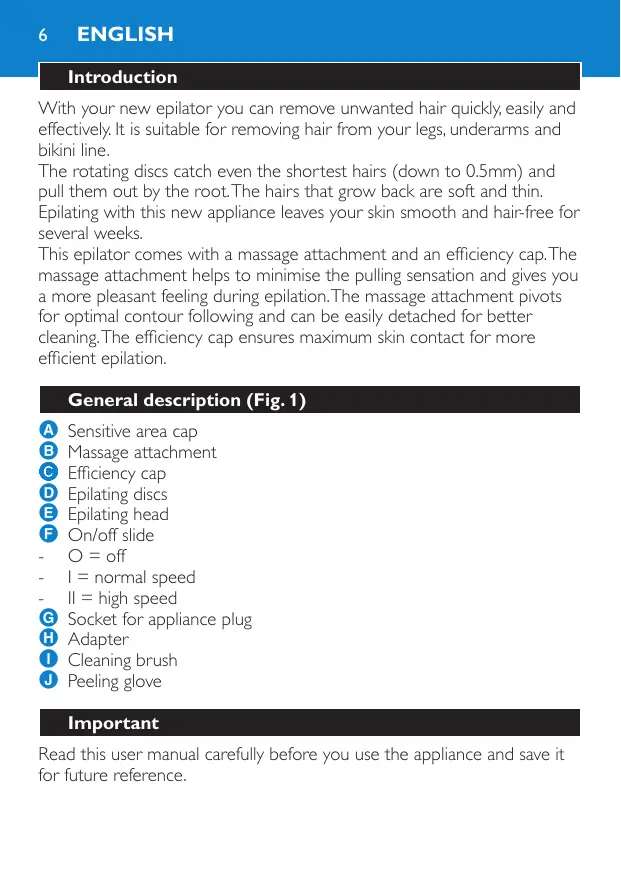
Introduction
With your new epilator you can remove unwanted hair quickly, easily and effectively. It is suitable for removing hair from your legs, underarms and bikini line.
The rotating discs catch even the shortest hairs (down to 0.5mm) and pull them out by the root. The hairs that grow back are soft and thin. Epilating with this new appliance leaves your skin smooth and hair-free for several weeks.
This epilator comes with a massage attachment and an efficiency cap. The massage attachment helps to minimise the pulling sensation and gives you a more pleasant feeling during epilation. The massage attachment pivots for optimal contour following and can be easily detached for better cleaning. The efficiency cap ensures maximum skin contact for more efficient epilation.
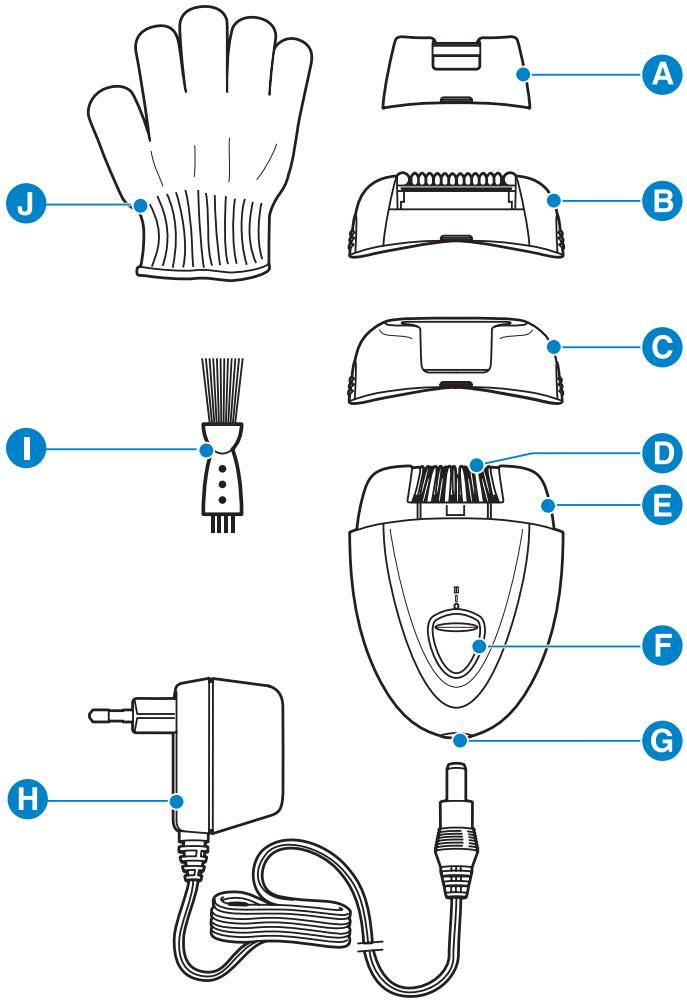
General description (Fig. 1)
A Sensitive area cap
B Massage attachment
Efficiency cap
D Epilating discs
E Epilating head
F On/off slide
- = off
- I = normal speed
- ll = high speed
G Socket for appliance plug
H Adapter
Cleaning brush
J Peeling glove
Important
Read this user manual carefully before you use the appliance and save it for future reference.
Danger
- Keep the appliance and the adapter dry.
- Do not use the appliance near or over a washbasin or bath filled with water.
- Do not use the appliance in the bath or in the shower.
- If you use the appliance in the bathroom, do not use an extension cord.
Warning
- Check if the mains voltage indicated on the appliance corresponds to the local mains voltage before you connect the appliance.
- Only use the appliance in combination with the adapter supplied.
- Do not use the appliance if the adapter or the appliance itself is damaged.
- If the adapter is damaged, always have it replaced with one of the original type in order to avoid a hazard.
- The adapter contains a transformer. Do not cut off the adapter to replace it with another plug, as this causes a hazardous situation.
- This appliance is not intended for use by persons (including children) with reduced physical, sensory or mental capabilities, or lack of experience and knowledge, unless they have been given supervision or instruction concerning use of the appliance by a person responsible for their safety.
- Children should be supervised to ensure that they do not play with the appliance.
Caution
- Only epilate the underarms and bikini line with the sensitive area cap attached.
- To prevent damage and injuries, keep the running appliance away from scalp hair, eyebrows, eyelashes, clothes, threads, cords, brushes etc.
-
Do not use the appliance on irritated skin or skin with varicose veins, rashes, spots, moles (with hairs) or wounds without consulting your doctor first. People with a reduced immune response or people who suffer from diabetes mellitus, haemophilia or immunodeficiency should also consult their doctor first.
-
Your skin may become a little red and irritated the first few times you use the epilator. This phenomenon is absolutely normal and quickly disappears. As you use the appliance more often, your skin gets used to epilation, skin irritation decreases and regrowth becomes thinner and softer. If the irritation has not disappeared within three days, we advise you to consult a doctor.
- Do not use the peeling glove immediately before or after epilation.
General
- Regular massages with the peeling glove may help to prevent ingrowing hairs.
- Regular cleaning and proper maintenance ensure optimal results and a long life for the appliance.
Electromagnetic fields (EMF)
This Philips appliance complies with all standards regarding electromagnetic fields (EMF). If handled properly and according to the instructions in this user manual, the appliance is safe to use based on scientific evidence available today.
Using the appliance
- Do not use the appliance near or over a washbasin or bath filled with water (Fig. 2).
- Do not use the appliance in the bath or in the shower (Fig. 3).
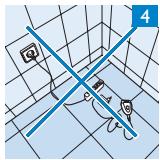
- If you use the appliance in the bathroom, do not use an extension cord (Fig. 4).
General information about epilation
- When you use the appliance for the first time, we advise you to try it out on an area with only light hair growth. This helps you get accustomed to the epilation process.
- Make sure your skin is clean, entirely dry and free from grease. Do not use any cream before you start to epilate.
- Epilation is easier just after a bath or shower. Make sure your skin is completely dry when you start to epilate.
-
We advise you to epilate before you go to bed at night, as this allows any skin irritation that may develop to diminish overnight.
-
For optimal epilation results, the hairs should not be longer than 10mm. Use one of the following methods if the hairs are longer than 10mm:
1 Shorten the hairs to a maximum length of 10mm with a trimmer. Afterwards you can immediately start with epilation.
2 Shave the hairs completely. Then you can start to epilate after a few days (minimum hair length 0.5mm necessary). - As the hairs are removed by the root, epilation may cause some skin discomfort the first few times you use the epilator. This effect gradually diminishes when you use the appliance more often. Regrowth tends to be softer both in appearance and to the touch.
Connecting the appliance
1 Insert the appliance plug into the appliance (Fig. 5).
2 Insert the adapter into the wall socket.
Epilating the legs
If you are new to epilation, we advise you to start epilating with the pivoting massage attachment. This attachment relaxes the skin and eases the sensation of epilation.
If you are used to epilation, use the efficiency cap. The efficiency cap ensures maximum skin contact and allows you to epilate your legs more quickly and efficiently.
Only use the efficiency cap on your legs.
1 Put the desired attachment on the epilating head (Fig. 6).
2 Select the desired speed to switch on the appliance.
- Select speed I for areas with little hair growth, for hard-to-reach areas and for areas where bones are located directly beneath the skin, such as knees and ankles.
- Select speed II for larger areas with stronger hair growth.
3 Stretch the skin with your free hand to make the hairs stand upright.
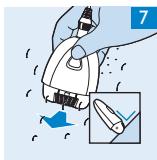
4 Place the epilator perpendicularly onto the skin with the on/off slide pointing in the direction in which you are going to move the appliance (Fig. 7).
5 Move the appliance slowly over the skin, against the direction of hair growth.
Press the appliance lightly onto the skin.
Epilating the underarms and bikini line
Your epilator comes with a sensitive area cap that reduces the number of active epilating discs. This makes the appliance ideal for epilating the more delicate areas of the body, such as the underarms and bikini line.
Note: You get the best results when the hairs are not too long (max.1cm).
1 Put the massage attachment on the epilating head. (Fig. 8)
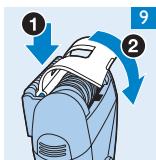
2 Hook the curved strip of the sensitive area cap behind the ridge just in front of the massage beads (1). Then press the front of the cap downwards (2) ('click') (Fig. 9).
3 Switch on the appliance.
We advise you to select speed II.
4 Stretch the skin with your free hand.
5 Place the appliance perpendicularly onto your skin, with the on/off slide pointing in the direction in which you are going to move the appliance (Fig. 7).
6 Move the appliance slowly over the skin, against the direction of the hair growth.
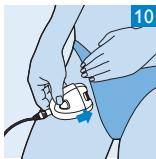
- Epilate your bikini line as shown in the figure (Fig. 10).
- Epilate your underarms as shown in the figure (Fig. 11).
Using the peeling glove
Use the peeling glove in the shower. Regular massages with the peeling glove may help to prevent ingrown hairs.
Do not use the peeling glove immediately before or after epilation.
Cleaning and maintenance
Never use scouring pads, abrasive cleaning agents or aggressive liquids such as petrol or acetone to clean the appliance.
- Never rinse the appliance or the adapter under the tap (Fig. 12).
- Keep the appliance and the adapter dry (Fig. 13).
Cleaning the attachments
1 Switch off the appliance.
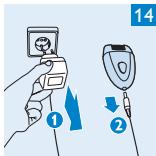
2 Remove the adapter from the wall socket (1) and pull the appliance plug out of the appliance (2) (Fig. 14).
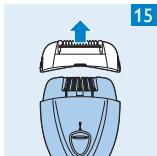
3 Remove the attachment (efficiency cap or massage attachment) from the epilating head (Fig. 15).
4 Remove loose hairs with the cleaning brush.
5 Rinse the attachment under the tap while turning it.
6 Dry the attachment before you use or store it.
Cleaning the epilating head
1 Switch off the appliance.
2 Remove the adapter from the wall socket (1) and pull the appliance plug out of the appliance (2) (Fig. 14).
3 Push the epilating head in the direction of the arrow (1) and remove it from the appliance (2) (Fig. 16).
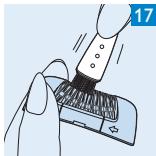
4 Remove loose hairs with the cleaning brush (Fig. 17).
5 Rinse the epilating head under the tap for 5-10 seconds while turning it (Fig. 18).
6 Shake the epilating head firmly and dry it thoroughly with a tea towel (Fig. 19).
Note: Make sure the epilating head is completely dry before you place it back onto the appliance.
Environment
- Do not throw away the appliance with the normal household waste at the end of its life, but hand it in at an official collection point for recycling. By doing this, you help to preserve the environment (Fig. 20).
Guarantee & service
If you need information or if you have a problem, please visit the Philips website at www.philips.com or contact the Philips Customer Care Centre in your country (you find its phone number in the worldwide guarantee leaflet). If there is no Customer Care Centre in your country, go to your local Philips dealer or contact the Service Department of Philips Domestic Appliances and Personal Care BV.
Troubleshooting
If the appliance does not work or does not work properly, first check the list below. If the problem is not mentioned in this list, the appliance probably has a defect. In that case we advise you to take the appliance to your dealer or to an authorised Philips service centre.
| Problem | Cause | Solution |
| Poor epilating results. | You move the epilator in the wrong direction. | Move the appliance against the direction of hair growth, with the on/off slide pointing in the direction in which you move the appliance. |
| You place the epilating head on the skin at the wrong angle. | Make sure that you place the appliance perpendicularly onto the skin (see chapter ‘Using the appliance’). | |
| You used a (depilatory) cream prior to epilation. | Make sure your skin is clean, entirely dry and free from grease. Do not use any cream before you start epilating. | |
| Make sure that the hairs to be removed have a length of at least 3mm to guarantee proper hair removal. | ||
| The sensitive area cap is on the epilating head when you epilate your legs. | Do not use the sensitive area cap when you epilate your legs, as the cap reduces the number of active epilating discs. NB: Never use the epilator without the precision cap when you epilate your underarms or bikini line. | |
| The appliance does not work. | The socket to which the appliance is connected is not live. | Make sure the socket is live. If you have connected the epilator to the socket in a bathroom cabinet, you may need to switch on the bathroom light to activate the socket. |
Introduktion
natural_image
Illustration of a medical or surgical procedure with two intersecting blue lines and a central device (no text or symbols)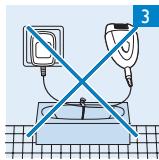
natural_image
Grid diagram with intersecting blue lines and icons, no readable text or symbols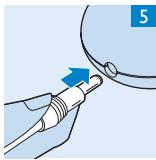
natural_image
Illustration of a hand holding a medical or laboratory device with a blue arrow pointing to a component (no text or symbols present)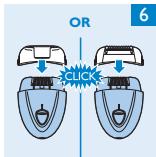
natural_image
Illustration of a hand using a tool to clean or store floor, with an inset showing a close-up of the foot (no text or symbols present)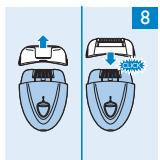
natural_image
Illustration of hands performing a medical procedure on a device (no text or symbols visible)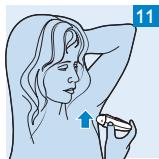
natural_image
Illustration of a person holding a small object, with a numbered label '11' and an upward arrow indicating motion (no text or symbols on the diagram itself)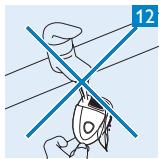
natural_image
Illustration of a person holding a cup with crossed blue lines, no text or symbols present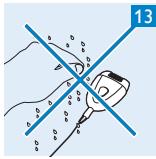
natural_image
Illustration of a hairdryer with a blue handle and white top, no text or symbols present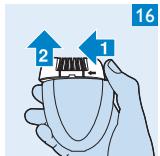
natural_image
Illustration of a hand using a pipette to clean or store teeth (no text or symbols visible)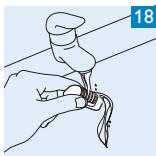
natural_image
Illustration of a hand holding a small object with a blue number 18 in the corner (no text or symbols on the object itself)
natural_image
Illustration of a hand holding a tool with blue arrows indicating movement or force direction (no text or symbols)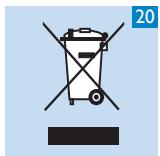


- Introduction
- General description (Fig. 1)
- Important
- Danger
- Warning
- Caution
- General
- Electromagnetic fields (EMF)
- Using the appliance
- General information about epilation
- Connecting the appliance
- Epilating the legs
- Epilating the underarms and bikini line
- Using the peeling glove
- Cleaning and maintenance
- Cleaning the attachments
- Cleaning the epilating head
- Environment
- Guarantee & service
- Troubleshooting
- Introduktion
Brand : PHILIPS
Model : SC1999/00 LUMEA ADVANCED
Category : Epilator