
SatinPerfect HP6578 - Epilator PHILIPS - Free user manual and instructions
Find the device manual for free SatinPerfect HP6578 PHILIPS in PDF.


| Product Type | Epilator |
| Brand | Philips |
| Model | SatinPerfect HP6578 |
| Number of Tweezers | 20 |
| Usage Mode | Cordless and corded |
| Power Source | Rechargeable battery (Li-Ion) |
| Charging Time | 1 hour |
| Running Time | Approx. 30 minutes |
| Speed Settings | 2 speed levels |
| Wet & Dry Use | 100% waterproof, suitable for wet & dry |
| Built-in Light | Yes, integrated LED light |
| Included Accessories | Massage cap, precision cap, charging adapter, cleaning brush |
| Dimensions | Approx. 16 x 9 x 5 cm |
| Weight | Approx. 200 g |
| Color | White/pink or purple (varies) |
| Warranty | 2 years |
| Cleaning | Rinse under running water; clean with brush |
| Motor Type | Rotary motor |
Frequently Asked Questions - SatinPerfect HP6578 PHILIPS
User questions about SatinPerfect HP6578 PHILIPS
0 question about this device. Answer the ones you know or ask your own.
Ask a new question about this device
Download the instructions for your Epilator in PDF format for free! Find your manual SatinPerfect HP6578 - PHILIPS and take your electronic device back in hand. On this page are published all the documents necessary for the use of your device. SatinPerfect HP6578 by PHILIPS.
USER MANUAL SatinPerfect HP6578 PHILIPS
natural_image
White Philips SatinPerfect electric shaver with visible circuitry and decorative pattern (no text or symbols on body)
natural_image
Diagram showing a hand holding a tool intersecting a device, with no visible text or symbols
natural_image
Diagram showing two electric vehicle charging stations with a diagonal line crossing over them (no text or symbols present)
natural_image
Diagram of a tool with a string and clamped parts, no text or symbols present

natural_image
Diagram of a handheld device with a close-up view of its internal components (no text or symbols)
natural_image
Illustration of a handheld electric shaver with a close-up of its base (no text or symbols visible)



natural_image
Illustration of a hand holding a small electronic device with an inset showing a close-up of the device's tip (no text or symbols present)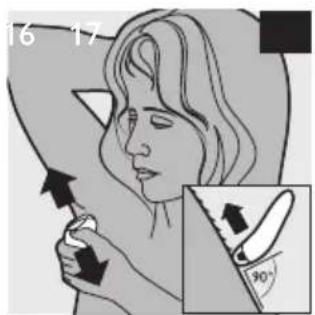


natural_image
Illustration of a hand holding a pen with a black arrow pointing downward (no text or symbols)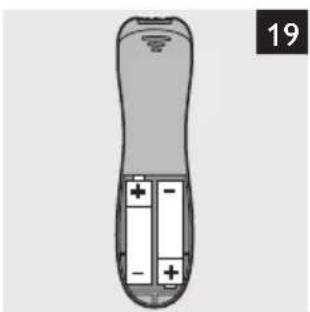
natural_image
Top-down diagram of a remote control with two battery cells and one labeled '19' (no text or symbols on the device itself)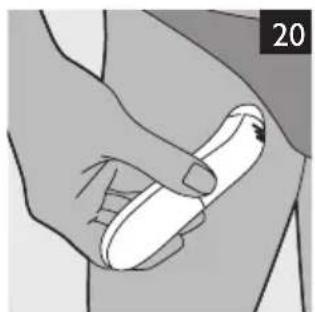
natural_image
Illustration of a hand holding a small object, possibly a tool or device, with no visible text or symbols.
natural_image
Illustration of a hand holding a pen, no text or symbols present
natural_image
Diagram of open and closed panels with arrows indicating direction (no text or symbols)
ENGLISH 6
FRANÇAIS 18

Introduction
Congratulations on your purchase and welcome to Philips! To fully benefit from the support that Philips offers, register your product at www.philips.com/welcome.
This Philips SatinPerfect epilator is produced in Europe according to the highest engineering standards and has been designed around the needs of today's women. Worldwide many women are involved in our development and production processes. They give us feedback on our concepts and products to give you the best quality possible.
Your new SatinPerfect epilator gives you the best performance in the removal of unwanted body hair, providing you with perfect and long-lasting smoothness in a pleasant way.
Your new SatinPerfect epilator has a premium design and ingenious features. The epilating head covers a maximum area of the skin and its tweezers are made of ceramic material, which ensures a proper grip on even the finest hairs for easy hair removal. Hairs are removed by the root and grow back thinner and less visible.
The SatinPerfect is ergonomically shaped. It is subtly curved to ensure that the epilator follows every contour of your body. Its speed control maintains the ideal epilation speed for perfect results, no matter how hard or soft you push. The Opti-light helps you to target and remove even the trickiest hairs so that you do not miss a hair.
The active hairlifter on the front of the active hairlifter with active massage gently vibrates and lifts flat-lying hairs so that they can be easily removed. The active massaging roller on the back of the active hairlifter with active massage vibrates to give the skin a pleasant sensation that soothes the effect of epilation.
The optimal performance cap that pivots to follow your body contours for optimal skin contact gives you optimal performance in hair removal and perfect, long-lasting smooth legs.
The skin stretcher of the optimal performance cap stretches the skin gently so that even the shortest hairs can be removed.
Enjoy perfect long-lasting smooth skin with the cordless precision epilator - even in sensitive or hard-to-reach areas.
General description (Fig. 1)
A Epilator
B Charging light
C Speed setting indications
D On/off button
- Press once for speed II
- Press twice for speed l
E Opti-light
F Epilating head
G Release button
H Basic epilation cap
Sensitive area shaving head
J Trimming comb
K Optimal performance cap
L Skin stretcher
M Active hairlifter with active massage
N Active massaging roller
Active hairlifter
P Cleaning brush
Q Adapter
R Precision epilator
1 On/off slide
2 Non-rechargeable batteries
3 Lid of battery compartment
S Smart Tweezers
1 Light of Smart Tweezers
2 On/off button for light
3 Battery and light compartment
4 Storage case of Smart Tweezers
5 Button batteries
T Luxury pouch (not shown)
Important
Read this user manual carefully before you use the appliances and save it for future reference.
Danger
- Keep the appliances and the adapter dry.
- Do not use the appliances near or over a washbasin or bath filled with water (Fig. 2).
- Do not use the appliances in the bath or in the shower (Fig. 3).
- If you use the epilator in the bathroom, do not use an extension cord (Fig. 4).
Warning
- Only charge the epilator with the adapter supplied.
- Do not use an appliance, attachments or the adapter if it is damaged or broken to avoid injuries.
- If the adapter is damaged, always have it replaced with one of the original type in order to avoid a hazard.
- The adapter contains a transformer. Do not cut off the adapter to replace it with another plug, as this causes a hazardous situation.
- Check if the voltage indicated on the adapter corresponds to the local mains voltage before you connect the appliance.
- These appliances are not intended for use by persons (including children) with reduced physical, sensory or mental capabilities, or lack of experience and knowledge, unless they have been given supervision or instruction concerning use of the appliances by a person responsible for their safety.
- Children should be supervised to ensure that they do not play with the appliances.
Caution
- The epilator is only intended for removing women's body hair on areas below the neck by epilating (legs) and shaving (underarms and bikini area). The precision epilator is intended for removing women's body hair in the bikini and underarm area, on hard-to-reach areas such as knee and ankle, and for removing hairs on the upper lip and the chin. Do not use the appliances for any other purpose.
- For hygienic reasons, the appliances should only be used by one person.
- To prevent damage and injuries, keep running appliances (with or without attachment) away from scalp hair, eyebrows, eyelashes, clothes, threads, cords, brushes etc.
- Do not use the appliances on irritated skin or skin with varicose veins, rashes, spots, moles (with hairs) or wounds without consulting your doctor first.
- People with a reduced immune response or people who suffer from diabetes mellitus, haemophilia or immunodeficiency should also consult their doctor first.
- Your skin may become a little red and irritated the first few times you use the appliances. This phenomenon is absolutely normal and quickly disappears. As you use the appliances more often, your skin gets used to epilation, skin irritation decreases and regrowth becomes thinner and softer. If the irritation has not disappeared within three days, we advise you to consult a doctor.
- Epilation in sensitive areas may cause bleeding points which disappear quickly.
- Do not look directly into the Opti-light to avoid being dazzled by the light.
- Do not use the epilating head of the epilator without attachment.
- Do not expose the appliances to temperatures lower than 5°C or higher than 35°C.
- Only use the precision epilator on non-rechargeable AA 1.5V alkaline batteries.
ENGLISH8
- Only use the Smart Tweezers on alkaline button batteries type L763H or AG3 (dia. 7.8 x 3.4mm).
Electromagnetic fields (EMF)
These Philips appliances comply with all standards regarding electromagnetic fields (EMF). If handled properly and according to the instructions in this user manual, the appliances are safe to use based on scientific evidence available today.
Charging
Charging the epilator
Charging the epilator takes approximately 1 hour. When the epilator is fully charged, it has a cordless operating time of up to 40 minutes.
1 Switch off the appliance before you charge it.
2 Insert the appliance plug into the inlet socket and put the adapter in the wall socket (Fig. 5).
The charging light pulsates white to indicate that the epilator is charging (Fig. 6).
When the battery is fully charged, the charging light lights up white continuously for 20 minutes and then goes out (Fig. 7).
Battery-low indication
1 When the batteries are almost empty, the charging light starts to flash red.
When the charging light starts to flash red, the batteries still contain enough energy for a few minutes of operation.
2 When the batteries are completely empty, the charging light lights up red continuously.
To charge the epilator, follow steps 1 and 2 in section 'Charging the epilator' above. You can also run the appliance directly from the mains by inserting the appliance plug in the socket of the appliance and the adapter in a wall socket.
Epilation tips
Before you start epilating
Note: Always clean the epilating head before first use.
- When you use the appliances for the first time, we advise you to try them out on an area with only light hair growth to get accustomed to the epilation process.
- We advise you to epilate before going to bed at night, as skin irritation usually disappears overnight.
- Epilation is easier just after taking a bath or shower. Make sure your skin is completely dry when you start epilating.
- Make sure your skin is clean, entirely dry and free from grease. Do not use any cream before you start epilating.
- Epilation is easier and more comfortable when the hair has the optimum length of 3–4 mm. If the hairs are longer, we recommend that you either shave first and epilate the shorter regrowing hairs after 1 or 2 weeks or that you use the sensitive area shaving head with the trimming comb to pretrim hairs to this ideal length.
- As your hair grows in different cycles, it is best to epilate a few days in a row when you start epilating. This will help you to remain stubble-free longer because your hairs will start regrowing in the same cycle and pace.
- The epilator is delivered with the basic epilation cap attached. If you want to use it with the optimal performance cap or the active hairlifter with active massage, detach the basic epilation cap by pulling it off the appliance and attach the optimal performance cap or the active hairlifter with active massage (see chapter 'Using the epilator', section 'Epilating the legs with the epilator').
During epilation
- The epilator can be used cordlessly on rechargeable batteries, but it can also be used with the adapter on mains power.
- While epilating, stretch your skin with your free hand. This lifts up the hairs and helps to minimise the pulling sensation.
- For optimal performance, place the epilating head on the skin at an angle of 90irc with the on/off button pointing in the direction in which you are going to move the appliance. Guide the appliance across the skin against the direction of hair growth in a slow, continuous movement without exerting any pressure.
- On some areas, hair may grow in different directions. In this case, it may be helpful to move the appliance in different directions to achieve optimal results.
- If you sweat during epilation, dab your skin dry with a soft cloth.
- When you use the optimal performance cap, make sure that both rollers of the skin stretcher always stay in contact with the skin to ensure an optimal result.
- When you use the active hairlifter with active massage, make sure the active massaging roller and the active hairlifter always stay in contact with the skin. The massaging roller stimulates and relaxes the skin for a gentler epilation.
After epilation
- To relax the skin, we advise you to apply a moisturising cream immediately after epilation or a few hours after epilation, depending on what is better for your skin.
- Use a soft deodorant without alcohol or a special deodorising cream for epilated skin after epilating the underarms.
- Regular use of an exfoliating sponge or cream (e.g. during showering) 24 hours after epilation helps to prevent ingrowing hair, as the gentle scrubbing action removes the upper skin layer and fine hair can get through to the skin surface.
Using the epilator
Epilating the legs with the epilator
- If you already have some experience with epilation, you can simply use the epilating head with the basic epilation cap.
- If you are not used to epilation, we advise you to start epilating with the optimal performance cap. This cap ensures optimal skin contact and its pivoting head stretches the skin and prepares the hairs for epilation.
- If your hairs lie flat on your skin, we advise you to use the active hairlifter with active massage. The active hairlifter with active massage not only lifts up the hairs but its active massaging roller also minimises the pulling sensation of epilation.
Note: Remove the basic epilation cap before you attach the optimal performance cap or the active hairlifter with active massage.
1 Grab both sides of the basic epilation cap and pull it off the appliance (Fig. 8).
2 Put the desired attachment on the epilating head (Fig. 9).
Note: The procedure for placing the attachments onto the appliance is the same for all attachments.
3 Press the on/off button once to switch on the epilator.
The epilator starts running at speed II, which is the most efficient speed for epilation. The bottom speed setting indication II lights up (Fig. 10).
If you want to use speed I, press the on/off button a second time. The top speed setting indication I lights up (Fig. 11).
Tip: Speed I is suitable for areas with little hair growth, for hard-to-reach areas and for areas where bones are located directly beneath the skin, such as knees and ankles.
ENGLISH10
When you press the on/off button a third time, the epilator switches off.
4 Stretch the skin with your free hand to make the hairs stand upright.
5 Place the epilating head at an angle of 90irc onto the skin with the on/off button pointing in the direction in which you are going to move the appliance (Fig. 12).
6 Move the appliance slowly over the skin against the direction of hair growth.
- When you use the optimal performance cap, make sure that both rollers of the skin stretcher always stay in contact with the skin to ensure an optimal result.
- When you use the active hairlifter with active massage, make sure the active massaging roller and the active hairlifter always stay in contact with the skin. The massaging roller stimulates and relaxes the skin for a gentler epilation.
Shaving the underarms and bikini line
Use the sensitive area shaving head to shave sensitive areas such as the underarms and the bikini line.
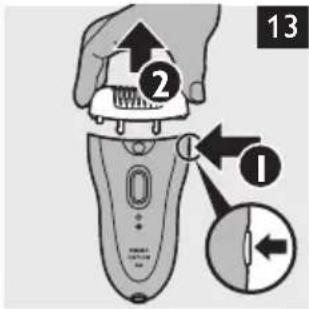
1 Press the release button (1) and remove the epilating head from the epilator (2) (Fig. 13).
Note: The sensitive area shaving head can be removed in the same way.
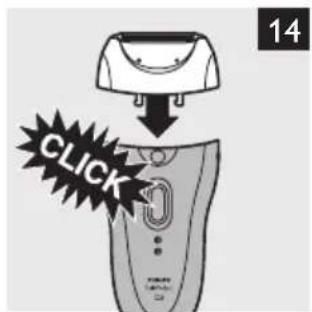
2 Put the sensitive area shaving head on the appliance and press it until it snaps home ('click'). (Fig. 14)
3 Switch on the appliance.
Note: Use speed II when you shave with the sensitive area shaving head.
4 Stretch the skin with your free hand. When shaving the underarms, raise your arm to stretch the skin.
5 Place the sensitive area shaving head at an angle of 90irc onto your skin with the on/off button pointing in the direction in which you are going to move the appliance.
6 Move the appliance slowly against the direction of hair growth.
Note: Make sure that the shaving unit with integrated trimmer is always fully in contact with the skin.
- Shave your bikini line as shown in the figure (Fig. 15).
- Shave your underarms as shown in the figure. Move the appliance in different directions. (Fig. 16)
7 When you have finished shaving, switch off the appliance and clean the sensitive area shaving head (see chapter ‘Cleaning and maintenance’).
8 Put the trimming comb on the sensitive area shaving head when you store the appliance.
Trimming with the trimming comb
Use the sensitive area shaving head with the trimming comb attached to trim your bikini line to a length of 3mm.
You can also use the trimming comb to pretrim long hairs (longer than 10mm) on the underarms or bikini line as a preparation for using the precision epilator.
1 Press the release button (1) and remove the epilating head from the epilator (2) (Fig. 13).
2 Put the sensitive area shaving head on the appliance and press it until it snaps home ('click') (Fig. 14).
3 Put the trimming comb on the sensitive area shaving head (Fig. 17).
4 Follow steps 3 to 6 in section 'Shaving the underarms and bikini line'.
Note: Make sure the surface of the trimming comb always stays fully in contact with the skin to ensure an even trimming result.
5 When you have finished trimming, switch off the appliance and clean the sensitive area shaving head and the trimming comb (see chapter ‘Cleaning and maintenance’).
6 Leave the trimming comb on the sensitive area shaving head when you store the appliance.
Corded use
To run the epilator from the mains, switch off the appliance and connect it to the mains.
Overheat protection
The epilator has an integrated overheat protection, which prevents overheating of the appliance.
Note: To avoid overheating of the epilator, do not press the appliance too hard onto your skin. The epilator works best when you move it over your skin without exerting any pressure.
1 If the overheat protection is activated, the appliance switches off automatically, the speed setting indications and the charging light flash red.
2 Let the appliance cool down.
The lights stop flashing after 30 seconds.
3 When the appliance has cooled down, you can switch it on again. If the lights start to flash red again, the appliance has not yet cooled down completely.
Overload protection
If you press the epilating head too hard onto your skin or when the rotating tweezers of the epilating head get blocked (e.g. by clothes etc.), the appliance stops and the speed setting indications start to flash red for 5 seconds.
1 Check if the rotating tweezers of the epilating head are blocked by turning the tweezers with your thumb until you can remove whatever is blocking the rotating tweezers.
2 Switch on the appliance again.
Do not press the appliance too hard onto the skin.
Using the precision epilator
Inserting the batteries
1 Remove the lid of the battery compartment by sliding it down until it comes off the appliance (Fig. 18).
2 Insert two AA 1.5V alkaline batteries into the battery compartment (Fig. 19).
Note: Make sure the + and - poles of the batteries point in the direction indicated in the battery compartment.
Note: New batteries offer an operating time of up to 40 minutes.
3 Slide the lid of the battery compartment back onto the appliance.
Do not let metal objects come into contact with the battery terminals and do not short-circuit the batteries.
Epilating with the precision epilator
Use the precision epilator to epilate the underarms, the bikini line, the upper lip, the chin and hard-to-reach areas.
ENGLISH12
1 Thoroughly clean the area to be epilated. Remove any residues of deodorant, makeup, cream etc. Then dab the skin dry.
2 Switch on the appliance.
3 Stretch the skin with your free hand. When epilating the underarms, raise your arm to stretch the skin.
4 Place the epilating head at an angle of 90irc onto the skin with the on/off slide pointing in the direction in which you are going to move the appliance.
5 Move the appliance slowly over the skin, against the direction of the hair growth.
- Epilate your bikini line as shown in the figure (Fig. 20).
- Epilate your underarms as shown in the figure. Move the appliance in different directions to catch all hairs (Fig. 21).
- Epilate your upper lip as shown in the figure (Fig. 22).
Do not use this appliance to epilate eyebrows or eyelashes.
Do not use this appliance to remove hairs that grow out of moles.
Using the Smart Tweezers
Your epilator comes with tweezers with integrated light for the easy removal of facial hair such as your eyebrows. The tweezers are protected by a case with integrated mirror which allows you to depilate wherever and whenever you want. The Smart Tweezers are supplied ready for use with 3 button batteries in the battery compartment.
Using the tweezers
1 Clean your eyebrows with skin tonic or alcohol to prevent eyebrow hair from slipping away between the tweezer arms.
2 Use a warm face cloth to soften the skin before tweezing. This makes hair removal easier.
3 Brush your eyebrows in the direction of hair growth.
4 Use an eye pencil to mark the desired shape of your eyebrows. Remove any hairs outside the marked shape.
5 Switch on the light by pressing the on/off button once.
6 Always pull out the hair in the direction of hair growth.
Note: Pull out the hairs one by one.
Do not use the Smart Tweezers to remove hairs that grow out of moles.
Do not point the light of the Smart Tweezers directly at your or somebody else's eyes.
Replacing the batteries
1 Open the battery and light compartment by turning the bottom anticlockwise with a coin (Fig. 23).
2 Remove the old button batteries (Fig. 24).
Keep the button batteries out of the reach of children and pets. Button batteries present a potential choking hazard.
3 Insert the new button batteries with the negative side pointing forward into the battery and light compartment.
Note: The Smart Tweezers work on three alkaline button batteries type L736H or AG3 (dia. 7.8 x 3.4mm).
4 Screw the bottom back on the battery and light compartment by turning it clockwise with a coin (Fig. 25).
Cleaning and maintenance
Note: Make sure the appliances are switched off and unplugged before you start to clean them.
Never use scouring pads, abrasive cleaning agents or aggressive liquids such as petrol or acetone to clean the appliance.
- Clean the appliances after each use to ensure better performance.
- Never rinse the appliances or the adapter under the tap (Fig. 26).
- Keep the appliances and the adapter dry (Fig. 27).
Cleaning the attachments
1 Remove the attachment from the epilating head (Fig. 8).
2 Remove loose hairs from the attachments with the cleaning brush (Fig. 28).
3 Rinse the attachments with lukewarm water while turning them (Fig. 29).
4 Dry the attachments before you use or store them.
Cleaning the epilating head of the epilator
1 Press the release knob (1) and remove the epilating head from the appliance (2) (Fig. 13).
2 Remove loose hairs with the cleaning brush (Fig. 30).
3 Rinse the epilating head under the tap for 5-10 seconds while turning the tweezers with your thumb (Fig. 31).
Note: Never try to detach the epilating tweezers from the epilating head.
4 Shake the epilating head firmly (Fig. 32).
5 Dry the epilating head thoroughly with a tea towel.
Note: Make sure the epilating head is completely dry before you place it back onto the appliance.
6 To reattach the epilating head, place it on the appliance and press it onto the appliance until it snaps home ('click') (Fig. 33).
Cleaning the sensitive area shaving head and the trimming comb
1 Remove the trimming comb, if attached, by pulling it off the sensitive area shaving head (Fig. 34).
2 Remove the sensitive area shaving head by pressing the release button (Fig. 35).
3 Remove the shaving unit from the sensitive area shaving head (Fig. 36).
4 Rinse the shaving unit, the sensitive area shaving head and the trimming comb under a lukewarm tap for 5 to 10 seconds while turning them a little (Fig. 37).
5 Shake the shaving unit, the sensitive area shaving head and the trimming comb firmly (Fig. 38).
6 Dry the sensitive area shaving head and the trimming comb thoroughly with a tea towel and let the shaving unit dry.
Note: Do not exert any pressure on the shaving unit to avoid damage.
ENGLISH14
7 Reattach the shaving unit to the sensitive area shaving head. Place the sensitive area shaving head on the appliance and press it onto the appliance until it snaps home ('click').
Note: Make sure the shaving unit is dry before you attach it to the sensitive area shaving head and the sensitive area shaving head is completely dry before you place it back onto the appliance.
8 Put the trimming comb on the sensitive area shaving head.
Tip: Rub a drop of sewing machine oil onto the shaving unit twice a year to extend the lifetime of the cutting element.
Cleaning the precision epilator
Never immerse the precision epilator in water or any other liquid, nor rinse it under the tap (Fig. 39).
1 Clean the precision epilator regularly by removing loose hairs with the cleaning brush. Do not switch the appliance on while brushing (Fig. 40).
2 Clean the appliance with a dry cloth.
Storage
- Put the trimming comb on the sensitive area shaving head to prevent damage.
- Put the Smart Tweezers in their storage case after use.
- Store the appliances and the accessories in the storage pouch.
Travel lock
The epilator has an integrated travel lock which prevents the appliance from accidentally being switched on during travel.
1 To activate the travel lock, press and hold the on/off button for 3 seconds until the speed setting indications flash white 2 times (Fig. 41).
The epilator starts running and stops immediately when the travel lock becomes active.
2 To deactivate the travel lock, press and hold the on/off button for 3 seconds until the speed setting indications flash white 2 times (Fig. 42).
Note: You can also insert the appliance plug into the inlet socket and the adapter into a wall socket to deactivate the travel lock.
The travel lock is now deactivated and you can switch on the epilator again by pressing the on/off button.
Replacement
All parts of the appliance can be replaced. If you need to replace one or more parts, go to your Philips dealer or an authorised Philips service centre.
Sensitive area shaving head
If you use the sensitive area shaving head two or more times a week, we advise you to replace the shaving unit after one or two years or when it is damaged.
Environment
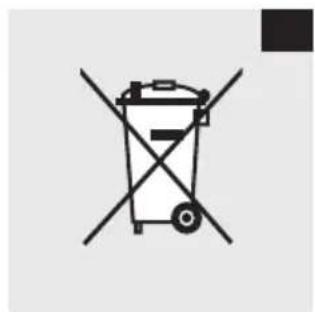
- Do not throw away the appliances with the normal household waste at the end of their life, but hand them in at an official collection point for recycling. By doing this, you help to preserve the environment (Fig. 43).
Epilator
- The built-in rechargeable batteries of the epilator contain substances that may pollute the environment. Always remove the batteries before you discard and hand in the epilator at an official collection point. Dispose of the batteries at an official collection point for batteries. If you have trouble removing the batteries, you can also take the appliance to a Philips service centre. The staff of this centre will remove the batteries for you and will dispose of them in an environmentally safe way (Fig. 44).
Removing the rechargeable batteries
1 Remove the adapter from the wall socket and let the appliance run until it stops.
2 Repeat this step until you can no longer switch on the epilator.
3 Remove the epilating head.
4 Remove the side panels of the epilator with a screwdriver (Fig. 45).
5 Insert a screwdriver into the groove next to the socket for the appliance plug in the bottom of the appliance. Turn the screwdriver to separate the two housing halves (Fig. 46).
6 Remove the battery holder with the batteries from the appliance. Remove the batteries from the battery holder with a screwdriver (Fig. 47).
7 Cut the wires with a pair of household scissors and dispose of the batteries properly (Fig. 48).
Do not allow metal objects to contact the rechargeable battery terminals or short-circuit the batteries.
Do not try to reassemble the appliance in order to connect it to the mains. This is dangerous.
Precision epilator and Smart Tweezers
Non-rechargeable batteries contain substances that may pollute the environment. Do not throw away non-rechargeable batteries with the normal household waste, but dispose of them at an official collection point for batteries. Always remove the non-rechargeable batteries before you discard and hand in the appliance at an official collection point (precision epilator) or dispose of it with the normal household waste (Smart Tweezers).
Guarantee and service
If you need service or information or if you have a problem, please visit the Philips website at www.philips.com or contact the Philips Consumer Care Centre in your country (you find its phone number in the worldwide guarantee leaflet). If there is no Consumer Care Centre in your country, go to your local Philips dealer.
Troubleshooting
This chapter summarises the most common problems you could encounter with the appliances. If you are unable to solve the problem with the information below, contact the Consumer Care Centre in your country.
Problem Cause Solution
Poor epilating results
You move the epilator in the wrong direction.
Move the appliance against the direction of hair growth, with the on/off button pointing in the direction in which you move the epilator.
| Problem | Cause | Solution |
| You place the epilating head on the skin at the wrong angle. | ||
| You have used a cream or depilatory cream prior to epilation. | ||
| The hairs are too short. | ||
| The epilator does not work. | The socket to which the appliance is connected does not work. | |
| The overheat protection has been activated. | ||
| The rechargeable batteries are empty. | ||
| The travel lock is active. | ||
| Problem Cause Solution | ||
| The overload protection is activated because something got caught between the rotating tweezers or because you pressed the appliance too hard onto your skin. | When the overload protection has been activated, the speed setting indications flash red. Turn the tweezers with your thumb until you can easily remove the item that is blocking the rotating tweezers. Then switch on the appliance again. Do not press the appliance too hard onto your skin. | |
| The precision epilator does not work. | The batteries are empty or have been inserted incorrectly. | Replace the batteries or insert them correctly (see ‘Inserting the batteries’ in chapter ‘Using the precision epilator’). |
Introduction
Protection anti-surcharge
The image is too blurry to recognize any text content.
The image is too blurry to recognize any text content.
The image is too blurry to recognize any text content.
کنید.
The image is too blurry to recognize any text content.
The image is too blurry to recognize any text content.
The image is too blurry to recognize any text content.
The image is too blurry to recognize any text content.
The image is too blurry to recognize any text content.
natural_image
Illustration of a hand applying a toothbrush to a person's mouth (no text or symbols)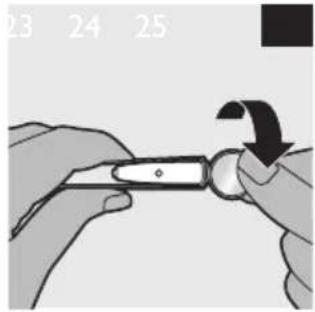
natural_image
Illustration of hands holding a tool with a curved arrow indicating rotation (no text or symbols)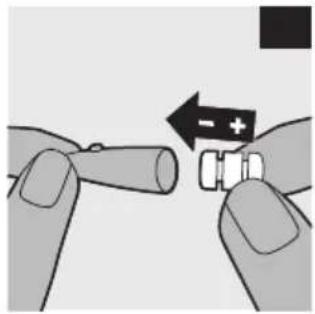
natural_image
Illustration of hands holding a battery with a switch, showing polarity change (no text or symbols)
natural_image
Illustration of hands holding a pen or tool with a circular object, no text or symbols present


natural_image
Illustration of two hands using a tool to apply or prepare a product (no text or symbols visible)
natural_image
Illustration of a hand holding a thin, elongated object with a circular mark, possibly a tool or device (no text or symbols visible)
natural_image
Illustration of hands using a tool to apply a brush to a surface (no text or symbols visible)

natural_image
Illustration of a hand holding a spring with arrows indicating force or movement (no text or symbols)

natural_image
Illustration of a hand holding a brush, showing the brush tip and blade structure (no text or symbols)

natural_image
Diagram of a device with an upward arrow and numbered labels 86 and 37, showing internal components (no text or symbols on the diagram itself)
natural_image
Illustration of two hands using a tool to lift or lift a piece of liquid into a container (no text or symbols present)

natural_image
Medical illustration showing a surgical procedure with a cross mark and numbered marker (39), no text or symbols present.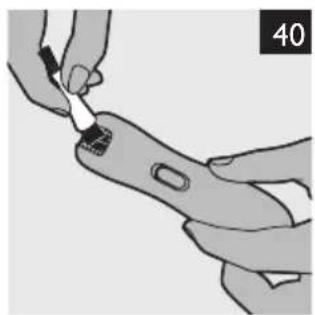
natural_image
Illustration of hands using a tool to apply a small object on a flat surface (no text or symbols visible)


natural_image
Symbol of a trash bin crossed with a diagonal line, representing waste or disposal (no text or numbers present)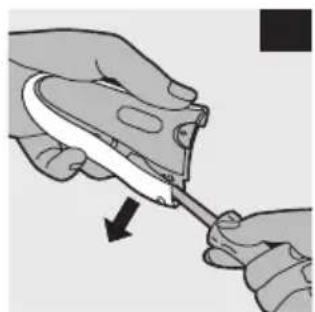
natural_image
Illustration of hands using a tool to apply a component, showing a downward arrow (no text or symbols present)
natural_image
Illustration of two hands using a tool to apply a cable or wire (no text or symbols present)
natural_image
Illustration of a hand holding a tool with an arrow indicating direction (no text or symbols)
natural_image
Illustration of a pair of scissors cutting a mechanical component (no text or symbols visible)


- Introduction
- General description (Fig. 1)
- S Smart Tweezers
- T Luxury pouch (not shown)
- Important
- Danger
- Warning
- Caution
- ENGLISH8
- Electromagnetic fields (EMF)
- Charging
- Charging the epilator
- Battery-low indication
- Epilation tips
- Before you start epilating
- Note: Always clean the epilating head before first use.
- During epilation
- After epilation
- Using the epilator
- Epilating the legs with the epilator
- ENGLISH10
- Shaving the underarms and bikini line
- Trimming with the trimming comb
- Corded use
- Overheat protection
- Overload protection
- Using the precision epilator
- Inserting the batteries
- Epilating with the precision epilator
- ENGLISH12
- Using the Smart Tweezers
- Using the tweezers
- Replacing the batteries
- Cleaning and maintenance
- Cleaning the attachments
- Cleaning the epilating head of the epilator
- Cleaning the sensitive area shaving head and the trimming comb
- ENGLISH14
- Cleaning the precision epilator
- Storage
- Travel lock
- Replacement
- Sensitive area shaving head
- Environment
- Epilator
- Removing the rechargeable batteries
- Precision epilator and Smart Tweezers
- Guarantee and service
- Troubleshooting
- Problem Cause Solution
- Protection anti-surcharge
Brand : PHILIPS
Model : SatinPerfect HP6578
Category : Epilator