
DJA100 - Voice recorder LEXIBOOK - Free user manual and instructions
Find the device manual for free DJA100 LEXIBOOK in PDF.
| Product type | Digital sports camera with voice recording |
| Brand | Lexibook |
| Model | DJA100 |
| Dimensions (W x D x H) | 82 x 47.2 x 27.1 mm |
| Weight | Approximately 75 g |
| Screen | LCD TFT 1.5 inches |
| Sensor | CMOS 2.0 Megapixels |
| Video resolution | 1920x1080 (30 fps), 1280x720 (60 fps / 30 fps) |
| Photo resolution | 2560x1920, 2048x1536, 1600x1200, 1280x960, 640x480 |
| File formats | Image: JPG, Video: MOV |
| Storage | micro SD card up to 32 GB (not included) |
| Battery | Built-in lithium-ion, 1150 mAh, rechargeable via USB |
| Connectivity | USB, Wi-Fi, HDMI (cable not included) |
| Main functions | Video recording, photo, webcam, Wi-Fi with Move Cam app, waterproof case 10 m, helmet and bike mounts |
| Power supply | Recharge via USB cable (included) to computer or mains adapter |
| Maintenance and cleaning | Wipe with a slightly damp cloth; avoid detergents |
| Safety | Do not disassemble; do not expose to fire or water; charge max 45°C |
| Spare parts and repairability | Not specified; contact the retailer or after-sales service |
| General information | 2-year warranty; made in China; designed in Europe |
Frequently Asked Questions - DJA100 LEXIBOOK
User questions about DJA100 LEXIBOOK
0 question about this device. Answer the ones you know or ask your own.
Ask a new question about this device
Download the instructions for your Voice recorder in PDF format for free! Find your manual DJA100 - LEXIBOOK and take your electronic device back in hand. On this page are published all the documents necessary for the use of your device. DJA100 by LEXIBOOK.
USER MANUAL DJA100 LEXIBOOK
natural_image
Exterior view of a compact digital camera module with visible lens and photo frame (no text or symbols)MODE D'EMPLOI INSTRUCTION MANUAL
LEXIBOOK®
www.lexibook.com
DJA100

Image 1
text_image
Labeled diagram of a device with numbered parts for identification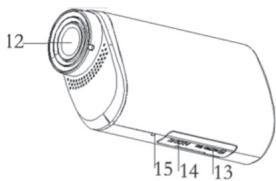
text_image
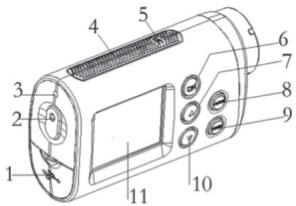
12 15 14 13
Image 2
text_image
Technical diagram of a digital camera with labeled buttons and display screenImage 3

natural_image
Technical line drawing of a mechanical component with mounting base and cylindrical body (no text or symbols)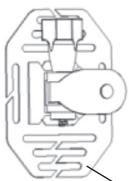
natural_image
Pure mechanical component diagram without any text, numbers, or symbols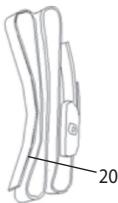
natural_image
Line drawing of a mechanical component with a labeled dimension (20), no text or symbols present.19
text_image
21 23 24 22PRÉSENTATION DE VOTRE CAMÉRA
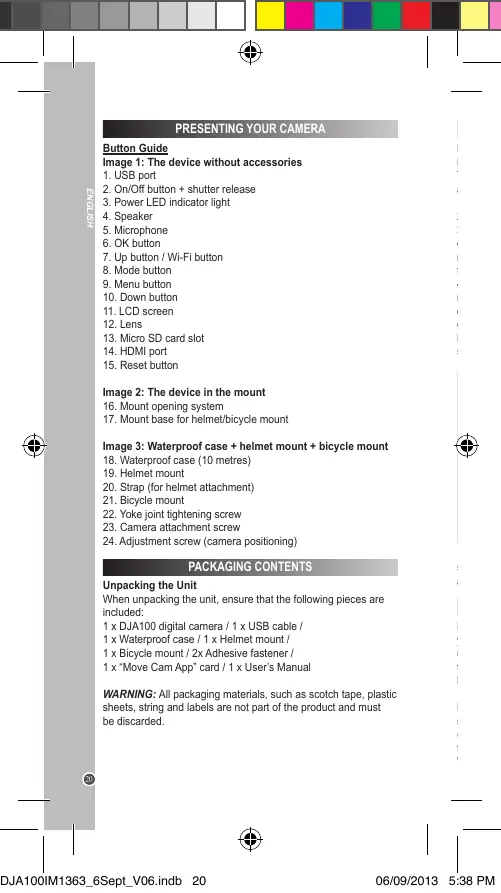
Guide des touches
Image 1 : Appareil sans accessoires
Connection via cable USB
text_image
Technical diagram of a mechanical assembly with numbered components and directional arrows indicating assembly or process flow.Image 1: The device without accessories
- USB port
- Power LED indicator light
- Speaker
- Microphone
- OK button
- Up button / Wi-Fi button
- Mode button
- Menu button
- Down button
- LCD screen
- Lens
- Micro SD card slot
- HDMI port
-
Reset button
-
On/Off button + shutter release
Image 2: The device in the mount
-
Mount opening system
-
Mount base for helmet/bicycle mount
Image 3: Waterproof case + helmet mount + bicycle mount
- Waterproof case (10 metres)
- Helmet mount
- Strap (for helmet attachment)
- Bicycle mount
- Yoke joint tightening screw
- Camera attachment screw
- Adjustment screw (camera positioning)
PACKAGING CONTENTS
Unpacking the Unit
When unpacking the unit, ensure that the following pieces are included:
1 x DJA100 digital camera / 1 x USB cable /
1 x Waterproof case / 1 x Helmet mount /
1 x Bicycle mount / 2x Adhesive fastener /
1 x "Move Cam App" card / 1 x User's Manual
WARNING: All packaging materials, such as scotch tape, plastic sheets, string and labels are not part of the product and must be discarded.


20
RECHARGING THE BATTERIES
Remark: Prior to using this camera for the first time, remove the LCD screen's protective film.
To recharge the internal lithium battery (1150 mAh), proceed as follows:
- Verify that the camera has been turned off.
- Open the rubber cover shielding the USB port.
- Plug the USB cable in the camera (5-pin) and in your computer (4-pin). The power LED indicator light (3) lights up red while batteries are recharging and shuts off once they are fully recharged.
- It is normal for the camera to become warm during recharging, but unplug/turn off the device in cases of overheating. Do not use the device while it recharges, nor use cables other than those provided.
Remark: When the "low batteries" icon is displayed on the screen, recharge them.
The lithium battery is intended for use only with this product. Do not disassemble the battery. Do not dispose of the battery in fire or water. To avoid risk of fire, burns, or damage to your battery, do not allow a metal object to touch the battery contacts. Handle a damaged or leaking battery with extreme care. If it contacts the eye, flush the eye with water for 15 minutes and seek medical attention. Do not charge the lithium battery pack if the ambient temperature exceeds 45^ (113^) . When discarding a battery pack, contact your local waste disposal provider regarding local restrictions on the disposal or recycling of batteries. Only use the supplied USB cable for charging.
WARNING: Malfunction or loss of memory may be caused by strong frequency interference or electrostatic discharge. Should any abnormal function occur, reset the unit and turn it on again.
TURNING THE CAMERA ON AND OFF
Hold down the On/Off button (2) to turn on the camera. When you turn on the camera, the power LED indicator light (3) lights up. The device and its screen turn on to confirm that it is ready to be used.
Long press the On/Off button (2) again to turn off the camera.
Remark: In order to conserve battery life, the camera goes on standby after a few minutes of inactivity. Press the On/Off button (2) to turn the camera back on. You can modify the "auto-off" time under the "Automatic Shut-Off" option (see the chapter "CONFIGURING THE DEVICE").
INSERTING A MEMORY CARD
In order to record videos and photos, you must insert a Micro SD card (sold separately) in your camera in order to be able to record the corresponding files.
Inserting a Memory Card:
- Turn off the camera.
- Open the rubber cover shielding the Micro SD slot.
- Carefully insert a Micro SD card in the Micro SD slot, and then push it in until you hear a click.
- To remove the card, lightly push inwards to release it from the slot.
Remarks: Always turn off the camera prior to inserting or removing a Micro SD card. We recommend that you purchase a good quality Micro SD card (minimum class 4) and with sufficient capacity for the storage of your videos and photos.
Formatting a Memory Card:
If the memory card is new, non formatted or has been formatted by another device, format it so that its file system is compatible with your camera.
- Insert the card in the Micro SD card slot.
- Press the On/Off button (2) to turn on the camera.
- Press the Menu button (9), and then press the Mode button (8) to access the general settings section.
- Using the Down button (10), go to "Format" (or Format) and press the OK button (6).
- Select "Yes" or "No" (Yes or No) using the Down button (10) and then press the OK button (6) to select.
Remarks: Do not remove the card while it is being formatted, as this could damage it. Even if the card has already been formatted, we recommend that you reformat it to guarantee that it functions properly.
Attention: Formatting erases all photos and videos recorded on the card. Save important files on your computer prior to formatting a memory card.
CONFIGURING THE LANGUAGE
You can change the language of the device's menus, with 7 being available: French, English, Spanish, Portuguese, Italian, German and Dutch.
- Press the Menu button (9) to access the configuration menu. Then press Mode (8) to access the configuration menu specific to the device's general configurations.
-
Using the Up (7) and Down (10) buttons, navigate through the menu and then press OK (6) once "Language" is highlighted.
-
Using the Up (7) and Down (10) buttons, navigate through the menu and then press OK (6) when the language of your choice is highlighted.
CHANGING MODE
This camera includes three modes:
| P | Photo Mode – Taking Photos |
| Video Mode – Filming Videos | |
| Playback Mode – Viewing Videos and Photos |
To change the mode, press the Mode button (8). The icon in the upper left-hand part of your screen will change in order to correspond to one of the 3 modes above.
FILMING VIDEOS (Video Mode)
Recording a Video
- Long press the On/Off button (2) to turn on the camera. If you do not directly access the Video mode, press the Mode button (8) to access the Video mode. The Video icon 📁 is displayed in the upper left-hand corner of the screen.
- Press the Shutter release (2, the same button as On/Off) to start recording. The recording time is displayed in the upper right-hand corner of the screen.
- In order to ensure maximum battery life, you can press the Down button (10) while filming in order to turn off the screen. Recording continues (the power supply indicator light (3) blinks).
- Press the Shutter release (2) again to stop filming and automatically recording the video.
Remarks: The device automatically stops filming when the memory card is full. The length of the video may vary according to the amount of memory available on the Micro SD card.
Configuring the Video Mode
- In Video mode, press the Menu button (9) to access the configuration menu.
- Using the Up (7) and Down (10) buttons, navigate through the menu and then press OK (6) to configure one of the following fields:
The following options are available: 1080P (30 fps), 720P (60fps), 720P (30 fps).
The higher the resolution, the larger the image size. FPS signifies the number of images per second and indicates the video's level of fluidity. The higher the video resolution and FPS rate, the more space required for its storage.
Movie Size


Image Quality
The following options are available: Normal, Fine, Super Fine.
The higher the image quality, the more space required for its storage.
Measurement
The following options are available: Centre, Multi, Spot.
This option is used to select which part of the image will determine the luminosity.
White Balance
The following options are available: Auto, Daylight, Cloudy,
Tungsten, Fluor H.
This option is used to adapt the filming to the external conditions.
Effect
The following options are available: Normal, B&W, Sepia, Negative, Red, Green, Blue.
This option is used to add effects to your recording.
Seamless
The following options are available: OFF, 1 min, 3min, 5 min.
This option is used to define the time after the start of recording when the camera shuts itself off.
Date Stamp
Add the date to your videos: Off, On.
TAKING PHOTOS (Photo Mode)
Taking Photos
- Long press the On/Off button (2) to turn on the camera. Press the Mode button as many times as necessary in order to access photography mode. The Photo icon P is displayed in the upper left-hand corner of the screen.
- Centre your image using the LCD screen (11) and then press the shutter release (2, same button as On/Off).
- In order to ensure maximum battery life, you can press the Down button (10) while filming in order to turn off the screen. Simply pressing the shutter release (2) will take a photo.
- The photo taken is then briefly displayed on the screen and recorded on the SD card.
Configuring the Photo Mode
- In Photo mode, press the Menu button (9) to access the configuration menu.
- Using the Up (7) and Down (10) buttons, navigate through the menu and then press OK (6) to configure one of the following fields:
Image Size
The following options are available: 2560x1920 (5MP),
2048x1536 (3M), 1600x1200 (2MP), 1280x960 (1MP), 640x480 (VGA).
The larger the image format, the more space required to store it.
Image Quality
The following options are available: Normal, Fine, Super Fine. The higher the image quality, the more space required to store the video.
Measurement
The following options are available: Centre, Multi, Spot. This option is used to select which part of the image will determine the luminosity.
White Balance
The following options are available: Auto, Daylight, Cloudy, Tungsten, Fluor H.
This option is used to adapt the filming to the external conditions.
ISO
The following options are available: Auto, 50, 100, 200, 400, 800.
This option is used to determine the level of light sensitivity.
Exposure
The range of exposure settings can be adjusted from -2.0 to +2,0.
Used to manually adjust the exposure to compensate for unusual lighting conditions, for example, indoor lighting, dark backgrounds or a very luminous background.
Effect
The following options are available: Normal, B&W, Sepia, Negative, Red, Green, Blue.
This option is used to add effects to your pictures.
Drive Mode
The following options are available: Off, 2s, 10s.
Used to define the delay between pressing the shutter release (2) and image capture.
Burst Mode
The following options are available: Off, 3, 5, 10.
Used to define whether a press of the shutter release (2) takes 1 shot (Off) or several (3, 5 or 10).
Date Stamp
Add the date to your photos: Off, On.
VIEW & MANAGE VIDEOS & PHOTOS (Playback Mode)
Ensure that an SD card containing your photos and videos taken (JPG and MOV formats) is properly inserted in the device.
View Videos and Photos
- Long press the On/Off button (2) to turn on the camera. Press the Mode button as many times as necessary in order to access the playback mode. The Playback icon ▶ is displayed in the upper left-hand corner of the screen.


- Press the Up (7) and Down (10) buttons to navigate through the videos and photos.
- When viewing photos, press the OK button (6) to launch a slide show. Next press the Menu button (9) to exit.
- When you view videos, press the OK button (6) to play them. Next press the Menu button (9) to exit.
Deleting Photos or Videos
- In Playback mode, press the Menu button (9) to access the configuration menu.
- Using the Up (7) and Down (10) buttons, navigate through the menu and then press OK (6) once "Delete" is highlighted.
- Select Single or All according to your preference and then press OK (6) to confirm.
Configuring the Slide Show
- In Playback mode, press the Menu button (9) to access the configuration menu.
- Using the Up (7) and Down (10) buttons, navigate through the menu and then press OK (6) once "Slide show" is highlighted.
- You can configure the interval between each image (1 to 10 sec), the transition (1, 2, 3, 4, 5, mix) and whether or not the slide show repeats (Yes, No).
Configuring the Effects
- In Playback mode, press the Menu button (9) to access the configuration menu.
- Using the Up (7) and Down (10) buttons, navigate through the menu and then press OK (6) once "Photo effect" is highlighted.
- You can configure the effect applied to the images: Normal, B&W, Sepia, Negative, Red, Green, Blue.
Resizing the Images
- In Playback mode, press the Menu button (9) to access the configuration menu.
- Using the Up (7) and Down (10) buttons, navigate through the menu and then press OK (6) once "Resizing" is highlighted.
- You can configure the new format to be applied: 3M, 2M, 1M, VGA.
Adding Sound to a File
- In Playback mode, press the Menu button (9) to access the configuration menu.
- Using the Up (7) and Down (10) buttons, navigate through the menu and then press OK (6) once "Voice Memo" is highlighted.
- You can configure the sound to be applied: Add, Delete
WEBCAM MODE
- In Photo, Video or Playback mode, press the Menu button (9) to access the configuration menu. Then press Mode (8) to access the configuration menu specific to the device's general configurations.
- Using the Up (7) and Down (10) buttons, navigate through the menu and then press OK (6) once "USB" is highlighted.
- Using the Up (7) and Down (10) buttons, navigate through the menu and then press OK (6) once "UVCH264" or "UVCMJPG" is highlighted.
- Connect your device to a computer via the USB cable provided. You must then simply click the icon 📋 in "My Computer" on your computer's desktop to use it as a webcam.
CONFIGURING THE DEVICE
- In Photo, Video or Playback mode, press the Menu button (9) to access the configuration menu. Then press Mode (8) to access the configuration menu specific to the device's general configurations.
- Using the Up (7) and Down (10) buttons, navigate through the menu and then press OK (6) to configure one of the following fields:
Sounds
The following options are available: Shutter release (on/off), Start, Beep, Volume.
Used to activate/deactivate the times when the device plays sounds.
Power Save
The following options are available: OFF, 1min, 3 min, 5 min. Used to define the period of non-use after which the device shuts off to conserve battery life.
Date & Time
Used to configure the current date and time to then stamp them on the photos and videos (see previous sections to activate this option). Press the Up (7) and Down (10) buttons to modify the numbers and press the Mode button (9) to shift between years, dates and times.
Language
You can change the language of the device's menus, with 7 being available: French, English, Spanish, Portuguese, Italian, German and Dutch.
USB
Prior to connecting your device via the USB cable provided, you can select from the various functions offered:
MSDC: to connect your device to your computer and view your photos from the device.
Pictbridge: to connect to a printer featuring this logo and print your files.


UVCH264/UVCMJPG: to connect your device to your computer and use it as a webcam. You must then simply click the icon in "My Computer".
Formatting
Used to erase the entire contents of the SD card, including the protected files. It is advised to transfer all your files onto your computer prior to formatting, the latter operation being irreversible.
Reset All
To return to the device's original settings.
USING WI-FI / REMOTE CONTROL
You can control your camera from an iOS/Android smartphone or tablet, and in this way, play your films, scroll through and load your images or control your viewing settings without having to physically touch the camera. This function requires downloading the “Lexibook Move Cam” application on your smartphone or tablet iOS (Apple) or Android.
Installing the "Lexibook Move Cam" Application
There are 3 ways to acquire the “Lexibook Move Cam” application:
- Depending on your iOS/Android peripheral, download your "Lexibook Move Cam" application from Google Play, Apple's App store or the Lexibook Market.
- The application is also available on the installation CD provided in the box. You must simply then transfer it from a computer onto your iOS/Android peripheral if it does not have a CD player.
- You can also download it from Lexibook's internet sites:
- From the address "http://www.lexibook.com/lexibook-market-app.html". Select the "Lexibook Move Cam" application to download it.
- On the www.mylexibooktablet.com site, click “Download Store” from the main menu and then go to “Apps for Tablets EN” > “Lexibook Tablet Apps”. Select the “Lexibook Move Cam” application to download it.
Once the application is loaded onto your iOS/Android peripheral, launch the installation.
Controlling the Device Remotely
- Ensure that you have installed the "Lexibook Move Cam" application onto your iOS (Apple) or Android smartphone or tablet.
-
Turn on your camera, ensure that you are not filming and press the Up button (7) to activate Wi-Fi.
-
Also activate Wi-Fi on your iOS/Android peripheral. Next, look for the "LEXIBOOKWIFI_000001" connection (the final numbers are different for each device). The password is "1234567890".
- Next, launch the application and it will detect your camera.
You may start to film or transfer files remotely!
LOADING FILES ONTO A COMPUTER
You may proceed in two ways to connect your camera to your computer:
a. Plug the USB cable provided into the camera and the computer (see details below).
b. Remove the Micro SD card from the camera, and then insert it in a card reader and connect the card reader to your computer.
Connection via USB Cable
- Plug the USB cable in the camera (5-pin) and in your computer (4-pin). Next, turn on your camera.
- Once the connection is made, open the "My Computer" folder on your computer's desktop. An additional removable disk will appear. Click its icon to see its contents and go to the "DCIM" file that lists your photos and videos.
- Copy the files that you wish on your computer.
DOWNLOADING YOUR PHOTOS AND YOUR VIDEOS
Using "MAGIX Photo Manager 10":
- Connect the supplied USB cable to the camera and the computer's USB port.
- Turn on the camera. "Mass storage" appears on the screen when connection to the computer has been successfully completed.
- Double click on the shortcut "MAGIX Photo Manager 10". The pictures taken with the camera automatically appear on the home screen.
- Press "Import" button on the main menu (up left).
- You can copy and paste the pictures into any directory you choose.
Publishing your photos on social networking sites:
- Using "Magix Photo Manager 10", select the photo that you wish to publish on Facebook or Flickr.
- The selected image appears in an orange frame.
- In the menu bar, click the "Online" tab and select "Upload media to other web services" and then either "Upload media to Flickr" or "Upload media to Facebook".
- The "Upload" window will be displayed on screen. Fill in the various fields (file name, description, key words, etc.).
- Click "Upload" to confirm.


- Depending on your upload destination, you will either open the Facebook or the Flickr home page.
- Next follow in the instructions displayed on the screen to finish uploading.
CONNECTING THE CAMERA TO AN HDTV TELEVISION
You can view your files on a television using an HDMI cable (sold separately).
- Plug the camera to the television using an HDMI cable (sold separately).
- Turn on the HDTV television and set it to HDMI mode.
- Turn on the camera. The camera's screen will turn opaque and you will be able to navigate within your device from your television.
BICYCLE MOUNT (Assembly)
text_image
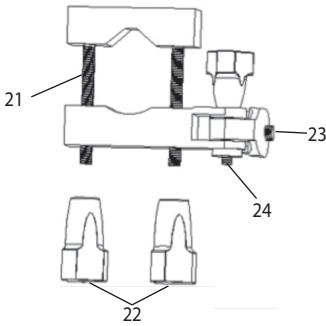
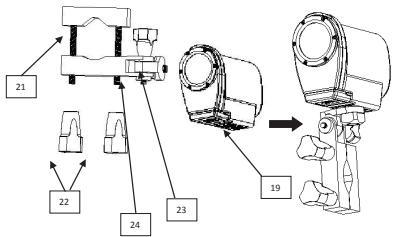
21 22 24 23 19- Unscrew the screw (22) from the yoke joint.
- Position the yoke joint (21) and its rubber pad around the bicycle handlebars and tighten the screw (22) until it is firmly attached. Ensure that this part is firmly screwed in again in order to ensure effective fastening.
- To use the waterproof case, insert the camera in the waterproof case (19), and then re-close it using its latch, ensuring that the latch is fully re-closed.
- Position the waterproof case on the bicycle mount's (23) attachment screw and screw in the case until it is firmly attached.
- To adjust the camera's position, loosen the screw (24) and move the camera up or down, and then screw the screw in again once the camera has been adjusted to the desired position.
Ensure that this part is firmly screwed in again in order to ensure effective fastening.
Note: the waterproof case must be properly closed again and it is only waterproof to a depth of 10 metres.


HELMET MOUNT (Assembly)
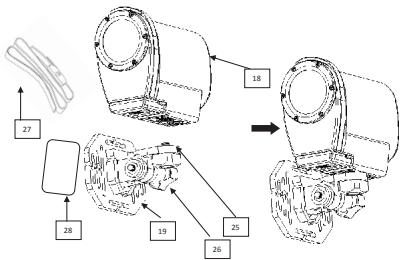
text_image
Technical diagram of a mechanical assembly with numbered components and directional arrows indicating assembly steps.Helmet Mount with Strap
- Insert your camera in the waterproof case (18) or in the non-waterproof mount also provided.
- Fasten the camera in its case to the helmet mount (19) in the place where the attachment screw (25) is located. Firmly screw it in to ensure effective fastening.
- You can adjust the camera's angle by unscrewing and then carefully fitting the removable part where the camera (26) is located. Ensure that this part is firmly screwed in again in order to ensure effective fastening.
- Connect the strap (27) to the two ends of the helmet mount.
- Position the strap around the helmet or any other stand of your choice, and then tighten its ends until it is firmly attached.
Strapless Helmet Mount
- Follow the first 3 steps described above. You may also follow all 5 steps above if you wish to attach the camera both with its strap and with its adhesive fastener (recommended).
- Next glue one side of the adhesive fastener (25) to the back of the helmet mount (19) while you glue the other side to your helmet or any other stand that you wish to use.
Remark: We recommend that you not only use the adhesive fastener to attach the camera when engaging in extreme sports. Combine the adhesive fastener with the strap provided, or purchase a more durable adhesive fastener for such activities.
Note: The waterproof case must be properly closed again and it is only waterproof to a depth of 10 metres.

32
CONFORMITY DECLARATION
We, Lexibook® S.A.
Declare under our sole responsibility that the following product:
Kind of product: Move Cam
Type designation: DJA100
Is in compliance with the following standards:
We hereby declare that the above mentioned product is in compliance with the R&TTE Directive (1999/5/EC) of the European Commission.

text_image
Jia QiuC € 1622
Yiu Wai Man
Product Development Manager
09/08/2013 (Hong Kong)

MAINTENANCE
Only use a soft, slightly damp cloth to clean the unit. Do not use detergent. Do not expose the unit to direct sunlight or any other heat source. Do not immerse the unit in water. Do not dismantle or drop the unit. Do not try to twist or bend the unit.
WARRANTY
This product is covered by our 2-years warranty.
To make use of the warranty or the after-sales service, please contact your retailer and supply proof of purchase. Our warranty covers material or installation-related defects attributable to the manufacturer, with the exception of wear caused by failure to respect the instructions for use or any unauthorised work on the equipment (such as dismantling, exposure to heat or damp, etc). It is recommended to keep the packaging for any further reference.
In a bid to keep improving our services, we could implement modification on the colours and the details of the product shown on the packaging.
NOTE: Please keep this instruction manual, it contains important information.
Reference: DJA100
Designed in Europe – Made in China
© 2013 Lexibook®
United Kingdom & Ireland
For any further information, please call our Helpline: 0808
1003015
www.lexibook.com

This product is not a toy.
Environmental Protection:
Unwanted electrical appliances can be recycled and should not be discarded along with regular household waste! Please actively support the conservation of resources and help protect the environment by returning this appliance to a collection centre (if available).

text_image
Technical diagram of a mechanical assembly with numbered components and directional arrows indicating assembly steps.09/08/2013 (Hong Kong)
C € 1622
MANTENIMIENTO
Redimensionar as imagens
text_image
Technical diagram of a mechanical assembly with numbered components and directional arrows indicating assembly steps.text_image
Technical diagram showing exploded view of mechanical components with numbered parts and directional arrows indicating assembly or assembly steps.09/08/2013 (Hong Kong)
C € 1622
MANUTENZIONE
text_image
Technical diagram of a mechanical assembly with numbered components and directional arrows indicating assembly steps.text_image
Technical diagram of a mechanical assembly with numbered components and directional arrows indicating assembly or process flow.Helmbeugel met riem
Type benaming: DJA100
09/08/2013 (Hong Kong)
C € 1622
ONDERHOUD
IM code: DJA100IM1363

