USER MANUAL FXP896SX CANDY
Safety Instructions. 04 1. General warnings.. 05 1.1 Declaration of compliance. 05 1.2 Safety hints 05 1.3 Recommendations 05 1.4 Installation 05 1.5 Electrical connection 05 2. Accessories.. 06 2.1 Oven equipment 06 2.2 Rotisserie.. 06 2.3 U-SEE 06 2.4 Removing and cleaning wire racks.. 06 3. Cleaning the oven 06 4.Description of the display. 08 4.1 Before using the oven for the first time 08 4.2 Using the end of cooking timer 09 4.3 Setting The Correct Time 10 4.4 Use Of Touch Control Clock Programmer 10 4.5 How to use the oven 10 4.6 Cooking tips 10 5. Service centre 10
Table of Contents
PL
WARNING: The appliance and its accessible parts become hot during use. Care should be taken to avoid touching heating elements.
- Children under 8 years of age must be kept away from the appliance unless they are continuously supervised.
- This appliance can be used by children aged from 8 years and above and persons with reduced physical, sensory or mental capabilities or lack of experience and knowledge if they have been given supervision or instruction concerning use of the appliance in a safe way and understand the hazards involved.
- Children must not play with the appliance.
- Cleaning and user maintenance shall not be made by children without supervision.
- During use the appliance becomes hot. Care should be taken to avoid touching heating elements inside the oven.
WARNING: Accessible parts may become hot during use. Young children must be kept away.
- Do not use harsh abrasive cleaners or sharp metal scrapers to clean the oven door glass since they can scratch the surface, which may result in shattering of the glass.
- The oven must be switched off before removing the guard, after cleaning, the guard must be replaced in accordance with the instructions.
- Only use the temperature probe recommended for this oven.
- Do not use a steam cleaner for cleaning operations.
- WARNING: Avoid possibility of electric shock - ensure the appliance is switched off before replacing the lamp.
- The means for disconnection must be incorporated in the fixed wiring in accordance with the wiring rules.
- The instructions state the type of cord to be used, taking into account the temperature of the rear surface of the appliance.
- If the supply cord is damaged, it must be replaced by a special cord or assembly available from the manufacturer or its service agent.
- CAUTION: In order to avoid a hazard due to inadvertent resetting of the thermal cutout, this appliance must not be supplied through an external switching device, such as a timer, or connected to a circuit that is regularly switched on and off by the utility.
- CAUTION: Accessible parts may be hot when the grill is in use. Young children must be kept away.
- Excess spillage must be removed before cleaning.
- During self-cleaning pyrolytic operation the surfaces may get hotter than usual and children MUST be kept away.
1. GENERAL WARNINGS
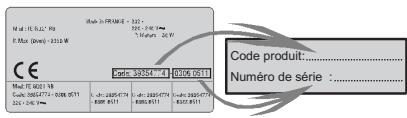
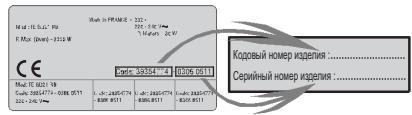
Read the instructions carefully to make the most of your oven. We recommend you keep the instructions for installation and use for later reference, and before installing the oven, note its serial number in case you need to get help from the after-sales service.
When you have unpacked the oven, make sure that it has not been damaged in any way. If you have any doubts at all, do not use it. Contact a professionally qualified person. Keep packing materials such as plastic bags, polystyrene, or nails out of the reach of children because they are dangerous to children.
The company shall not be liable if the instructions provided in this document are not complied with.
! NOTE: Functions, properties and accessories of ovens which are mentioned in this manual can change depending on oven models.
1.1 DECLARATION OF COMPLIANCE
This equipment, in the parts intended to come into contact with food, complies with the regulations laid down in EEC directives 89/109.
By placing the CE mark on this product, we are confirming compliance to all relevant European safety, health and environmental requirements which are applicable in legislation for this product.
1.2 SAFETY HINTS
- The oven must be used only for the purpose for which it was designed. It must only be used for cooking food. Any other use, e.g. as a form of heating, is an improper use of the oven and is therefore dangerous.
- The manufacturers cannot be held responsible for any damage caused by improper, incorrect or unreasonable use. When using any electrical appliance you must follow a few basic rules.
- Do not pull on the power cable to remove the plug from the socket.
- Do not touch the oven with wet or damp hands or feet.
- Do not use the oven unless you are wearing something on your feet.
- It is not generally a good idea to use adapters, multiple sockets for several plugs or cable extensions.
- If the oven breaks down or develops a fault switch it off at the mains and do not touch it.
- If the cable is damaged it must be replaced promptly.
When replacing the cable, follow these instructions.
Remove the power cable and replace it with one of the H05VV-F type. The cable must be able to bear the electrical current required by the oven. Cable replacement must be carried out by properly qualified technicians.
The earthing cable (yellow-green) must be 10 mm longer than the power cable.
Use only an approved service centre for repairs and ensure that only original parts are used. If the above instructions are not adhered to the manufacturers cannot guarantee the safety of the oven. - The oven you have just acquired has the described technical characteristics and you must not make any modifications to it. - Do not store flammable products in the oven; they can catch fire if the oven comes on accidentally. - Do not press on and do not let children sit on the oven door. - Use kitchen oven gloves, when putting into or removing a dish from the oven.
1.3 RECOMMENDATIONS
- After each use of the oven, a minimum of cleaning will help keep the oven perfectly clean.
- Do not line the oven walls with aluminium foil or single-use protection available from stores. Aluminium foil or any other protection, in direct contact with the hot enamel, risks melting and deteriorating the enamel of the insides.
- In order to prevent excessive dirtying of your oven and the resulting strong smokey smells, we recommend not using the oven at very high temperature. It is better to extend the cooking time and lower the temperature a little. Identification plate
In addition to the
accessories supplied with the oven, we advise you only use dishes and baking moulds resistant
to very high temperatures.
1.4 INSTALLATION
The manufacturers have no obligation to carry this out. If the assistance of the manufacturer is required to rectify faults arising from incorrect installation, this assistance is not covered by the guarantee. The installation instructions for professionally qualified personnel must be followed. Incorrect installation may cause harm or injury to people, animals or belongings. The manufacturer cannot be held responsible for such harm or injury.
The kitchen unit in which the oven is to be fitted must be made of material resistant to temperatures of at least 70°C.
The oven can be located high in a column or under a worktop. Before fixing, you must ensure good ventilation in the oven space to allow proper circulation of the fresh air required for cooling and protecting the internal parts. Make the openings specified on last page according to the type of fitting.
1.5 ELECTRICAL CONNECTION
THE ELECTRICAL CONNECTION SHOULD BE CARRIED OUT BY AN APPROVED CONTRACTOR OR TECHNICIAN WITH SIMILAR QUALIFICATIONS.
The installation receiving the appliance must comply with the standard in force in the installation country.
The manufacturer does not accept any responsibility if this provision is not complied with.
Connection to the network must be by earthed socket outlet, or by means of a multipole circuit-breaker, in compliance with the installation country.
The installation must be protected by suitable fuses, and have wires with a large enough cross-section to supply the oven normally.
CONNECTION:
The oven is fitted with a power lead for connecting exclusively to a voltage of 220-240 V AC across the phases or across phase and neutral.
Connection must be carried out having first checked:
-the supply voltage indicated on the meter,
The lead protection wire (green/yellow) connected to the earth terminal of the oven must be connected to the earth terminal of the installation.
Caution:
- Have the earth continuity of the installation checked by an electrician before making the connection.
- The manufacturer will not be liable for any incident, or the possible consequences that may arise from the use of the oven not earthed, or connected to an earth with defective continuity.
NB: Do not forget that the oven may require after-sales service.
Also, locate the socket outlet so that the oven can be connected once it is removed from its space.
Power supply cable: If the power supply cable has to be changed, please have this done by the after-sales service or by someone with similar qualifications.
2. ACCESSORIES (According to model)
2.1 OVEN EQUIPMENT
It is necessary to do an initial cleaning of the equipment before the first use of each of them. Wash them with a sponge. Rinse and dry off.
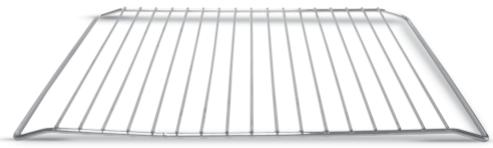
The shelf can take moulds and dishes.
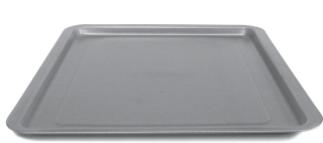
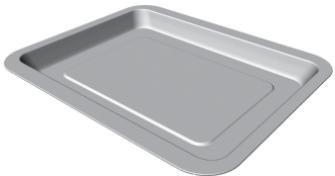
The drip tray catches the juices from grilled foods.
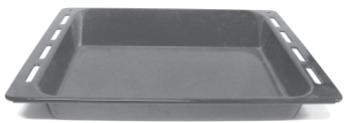
Never use the drip tray as a roasting tray as fat deposits can be quickly spread throughout the oven, which produces excess smoke.
Never place the drip tray directly on the oven bottom.
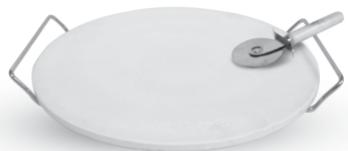
The pizza stone for a crisper pizza equipped according to the model with its stand and the pizza roller.
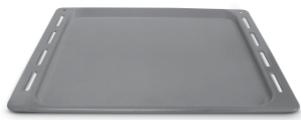
The pastry tray must be placed on the shelf. It is for cooking small pastries like choux, biscuits, meringues, etc...
Never place the pastry tray directly on the oven bottom.
2.2 ROTISSERIE
No pre-heating is required for rotisserie cooking.
Cooking with the door closed.
The energy consumption is 90-95% less than traditional system.
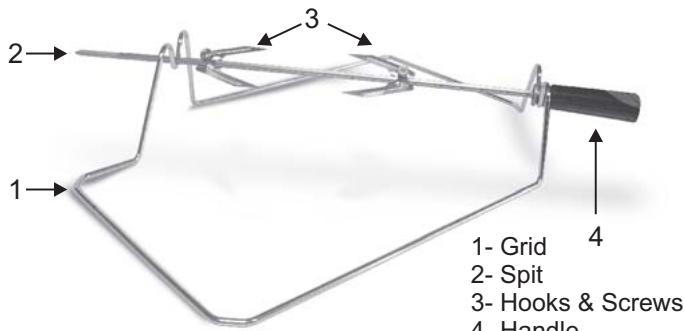
HOW TO USE TURNSPIT
- Unscrew the hooks
- Put the spit into the meat
- Fix the meat with the hooks
- Tighten the screws
- Insert the spit into the motor hole
- The handle
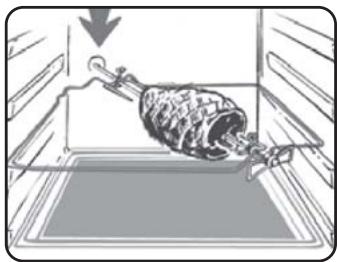
When the oven is in use, any unused accessories should be removed from the oven.
2.3 USE
It is an illumination system that replaces the traditional light bulb. 14 LED lights are integrated within the door. These produce white, high-quality illumination that allows you to view the inside of the oven with clarity, without any shadows on all the shelves.
Advantages:
This system, besides providing excellent illumination inside the oven, lasts longer than the traditional light bulb, is easier to maintain, and most of all saves energy.
Optimum view - Long life illumination - Very low energy consumption, -95% in comparison with traditional illumination. High-quality appliance with white light LED of the 1M Class according to IEC 60825-1:1993 + A1:1997 + A2:2001 (equivalent to EN 60825-1:1994 +A1: 2002 + A2: 2001); the maximum light power emitted λ459nm < 150uW.
Not to be observed directly with optical instruments.
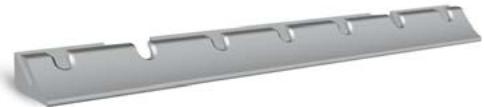
2.4 REMOVING AND CLEANING WIRE RACKS
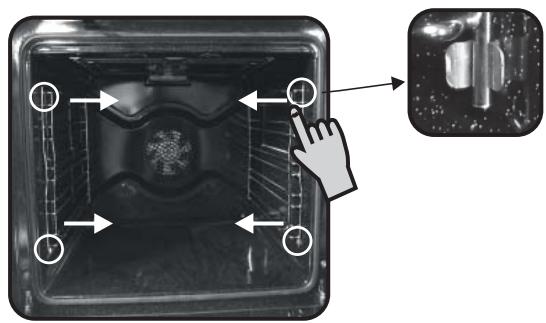
1- Remove the wire racks by pulling them in the direction of the arrows (see below). 2- To clean the wire racks, either put them in the dishwasher or use a wet sponge, ensuring that they are dried afterwards. 3- After the cleaning process, install the wire racks in reverse order.
3. CLEANING THE OVEN
- Wait for the oven to cool down before doing any cleaning by hand.
- Never clean your oven with abrasive cleaners, wire wool or sharp objects, or the enamel may be damaged beyond repair.
- Only use soapy water or bleach (ammonia) cleaners.
- Never line the oven sides with aluminium foil.
GLASS PARTS
We recommend you wipe clean the glass door with absorbent kitchen paper every time you use the oven. If the spattering is heavy, then you can clean with a well squeezed sponge and detergent, and rinse. Do not use harsh abrasive cleaners or sharp metal scrapers to clean the oven door glass since they can scratch the surface, which may result in shattering of the glass.
OVEN DOOR SEAL
If this gets dirty, clean the oven seal with a slightly damp sponge.
ACCESSORIES
Clean them with a sponge soaked in soapy water. Rinse with clean water and dry off. Avoid abrasive cleaners.
DRIP TRAY
After grilling, remove the drip tray from the oven. Take care to pour the warm grease into a container. Wash and rinse the drip tray in hot water with a sponge soaked in washing up liquid.
If residues remain attached, soak them off in water and detergent.
It can also go in a dishwasher or be cleaned with a commercial oven cleaner.
Never place a soiled drip tray in the oven.
SELF-CLEANING OVEN WITH CATALYTIC
Special self-cleaning panels covered in a micro-porous coating are available as optional extras for all models. If they are fitted, the oven no longer needs to be cleaned by hand.
The fat that is splattered onto the sides of the oven during roasting is eliminated by the microporous coating which breaks the fat down by catalysis and transforms it into gas.
Excessive splattering may nevertheless block the pores and therefore hinder self-cleaning. The self-cleaning capacity may be restored by switching on the empty oven to maximum for about 10-20 minutes.
Do not use abrasive products, metal cleaning wads, sharp objects, rough cloths, or chemical products and detergents that may permanently damage the catalytic lining.
It is a good idea to use deep roasting trays to roast fatty foods such as joints of meat etc. and to put a tray underneath the grill to catch surplus fat. If the walls of the oven are so thickly coated in grease that the catalytic lining is no longer effective remove surplus grease with a soft cloth or sponge soaked in hot water.
The lining must be porous for self-cleaning to be effective.
N.B.: All catalytic linings currently on the market have a working life of about 300 hours. They should therefore be replaced after about 300 hours.
OVEN LIGHTING
Disconnect the power supply from the oven before cleaning or replacing the lamp.
The bulb and its cover are made of material resistant to high temperatures.
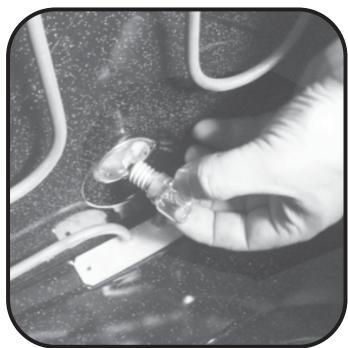
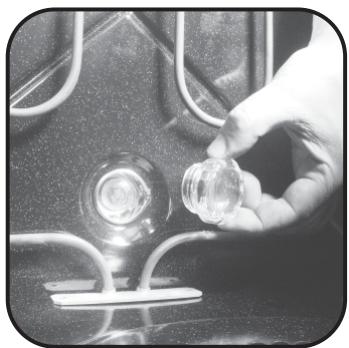
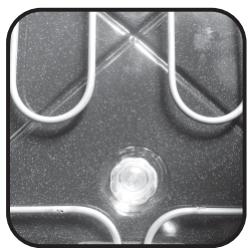
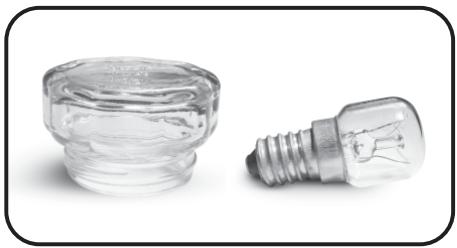
Bulb characteristics:
230 V AC - 25W-E 14 base Temperature 300°C to change a defective bulb, just:
- Unscrew the glass cover,
- Unscrew the bulb,
- Replace it with the same type: see characteristics above,
- After replacing the defective bulb, screw back the protective glass cover.
CLEANING THE DOOR GLASS
The internal door glass of this oven can be removed and cleaned. To clean the internal glass, follow these instructions:
- Open the oven door. (Picture 1)
Picture 2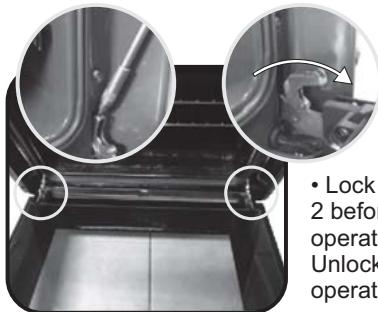
Picture 1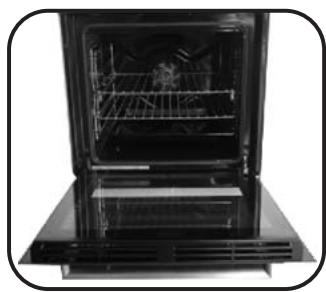
- Lock the hinges as shown in Picture 2 before starting the cleaning operation.
Unlock the hinges when the cleaning operation is finished. (Picture 2)
- Remove the screws as shown in Picture 3.
Picture 3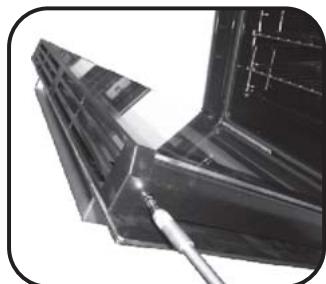
Picture 4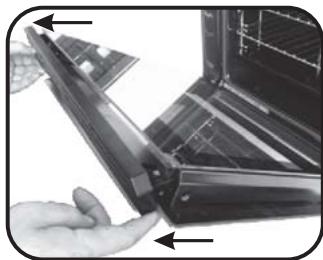
- Remove the top metallic cover by pulling it upwards. (Picture 4)
- Remove the glass by gently pulling it out of the door frame. (Picture 5)
Picture 5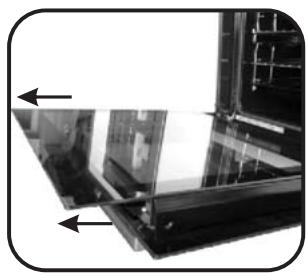
Picture 6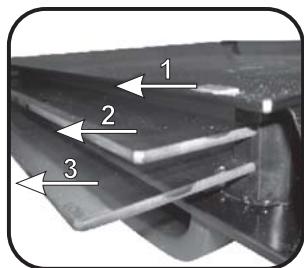
*For Pyrolytic ovens, please remove also the 2nd and 3rd glasses. (Picture 6)
After cleaning the glass, reassemble the parts in the reverse order of removal. On all glasses, the LOW-E sign must be properly readable and must be positioned on the left corner of the door, close to the left side hinge. In this way, the printed surface of the 1st glass will remain INSIDE the door.
Picture 7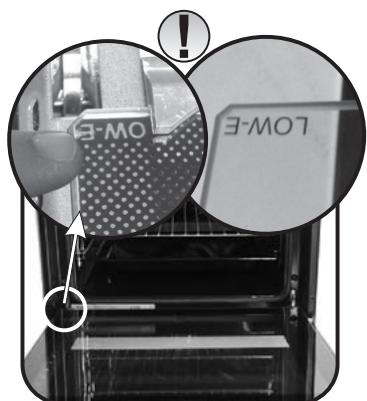
4. DESCRIPTION OF THE DISPLAY


4.1 BEFORE USING THE OVEN FOR THE FIRST TIME
PRELIMINARY CLEANING
Clean the oven before using for the first time: Wipe over external surfaces with a damp soft cloth. Wash all accessories and wipe inside the oven with a solution of hot water and washing up liquid. Set the empty oven to the maximum temperature and leave on for about 1 hour; this will remove any lingering smells of newness. Ensure that the room is well ventilated while this is being done.
THINGS TO REMEMBER
Confirmation of operation on timer
Modification must be confirmed by pressing the button.
Stopping the oven:
This may be necessary if you have input an incorrect instruction. To stop the oven, turn back the function selector knob to the Stop Position.
Child safety device:
To lock the oven controls, select the child safety device. Refer to the section entitled "Programming - The child safety device".
The cooling fan:
This protects the control panel and electronics from heat damage. It begins and then stops automatically even when the oven is switched off.
Oven lighting:
By turning to the light symbol, you can switch on the oven light when it is not in use.
When the oven is in use, the light stays on during all of the oven functions and when the door is opened.
4.2 USING THE END OF COOKING TIMER
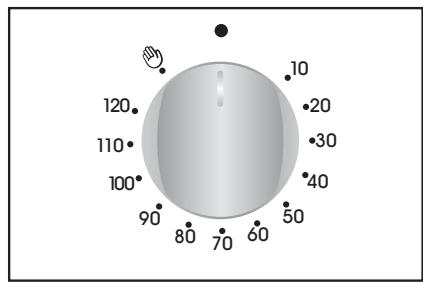
This control enables you to set the desired cooking time (max. 120 min.). The oven will automatically switch off at the end of the set time.
The timer will count down from the set time, return to the 0 position, and switch off automatically.
For normal use of the oven, set the timer to the position.
To set the oven, ensure the timer is not on the 0 position.
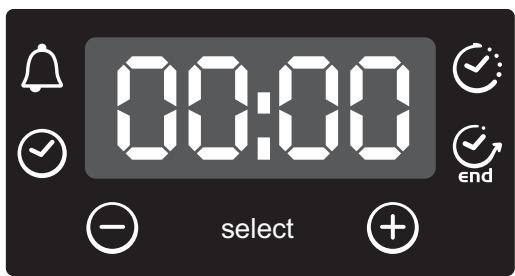
WARNING: The first operation to carry out after the oven has been installed or following an interruption of power supply (this is recognizable by the display pulsating and showing 12:00) is setting the correct time. This is achieved as follows.
- Push the central button 4 times.
- Set time with "-" and "+" buttons.
- Release all buttons.
ATTENTION: The oven will only operate providing the clock is set.
4.4 USE OF TOUCH CONTROL CLOCK PROGRAMMER
| FUNCTION | HOW TO ACTIVATE IT | HOW TO SWITCH ITOFF | WHAT IT DOES | WHAT IT IS FOR |
| KEY LOCK | ·Child Lock function is activated by touching Set (+) for a minimum of 5 seconds. From this moment on all other function are locked and the display will flash STOP and preset time intermittently. | ·Child Lock function is deactivated by touching touchpad Set (+) again for a minimum of 5 seconds. From this moment on all functions are selectable again. | | |
| MINUTE MINDER | ·Push the central button 1 times
·Press the buttons "-" "+" to set the required time
·Release all the buttons | ·When the set time as elapsed an audible alarm is activated (this alarm will stop on its own, however it can be stopped immediately by pressing the button) SELECT. | ·Sounds an alarm at the end of the set time.
·During the process, the display shows the remaining time. | ·Allows to use the oven as alarm clock (could be activated either with operating the oven or with out operating the oven) |
| COOKING TIME | ·Push the central button 2 times
·Press the buttons "-" or "+" to set the lenght of cooking required
·Release all buttons
·Set the cooking function with the oven function selector | ·When the time is elapsed the oven will switch off automatically.
Should you wish to stop cooking earlier either turn the function selector to 0, or set time to 0:00 (SELECT and "-" "+" buttons) | ·It allows to preset the cooking time required for the recipe chosen.
·To check how long is left to run press the SELECT button 2 Times.
·To alter/change the preset time press SELECT and "-" "+" buttons. | ·Push any button to stop the signal. Push the central button to return to the clock function |
| END OF COOKING END | ·Push the central button 3 times
·Press the buttons "-" "+" to set the time at which you wish the oven to switch off
·Release the buttons
·Set the cooking function with the oven function selector | ·At the time set, the oven will switch off. To switch off manually, turn the oven function selector to position O. | ·Enables you to set the end of cooking time
·To check the preset time push the central button 3 times
·To modify the preset time press buttons SELECT + "-" "+" | ·This function is typically used with "cooking time" function.
For example if the dish has to be cooked for 45 minutes and needs to be ready by 12:30, simply select the required function, set the cooking time to 45 minutes and the end of cooking time to 12:30.
·At the end of the cooking set time, the oven will switch off automatically and an audible alarm will ring.
·Cooking will start automatically at 11:45 (12:30 minus 45 mins) and will continue until the pre-set end-of-cooking-time, when the oven will switch itself off automatically.
WARNING.
If the END of cooking is selected without setting the length of cooking time, the oven will start cooking immediately and it will stop at the END of cooking time set. |
4.5 HOW TO USE THE OVEN
COOKING MODE
All cooking should be carried out with the door closed.
BOTTOM + FAN - The combination of the bottom heating element and fan is ideal for fruit flans, tarts, quiches and pastries. It prevents food from becoming too dry and encourages bread dough to rise. Place the shelf in the bottom position in the oven.
BOTTOM - Using the lower element. Ideal for cooking all pastry based dishes. Use this for flans, quiches, tarts, pâté and any cooking that needs more heat from below.
- BOTTOM + TOP - Both top and bottom heating elements are in use. This method is ideal for all traditional roasting and baking. When cooking red meat, roast beef, leg of lamb, game, bread or foil wrapped foods.
BOTTOM + TOP + FAN - Both top and bottom heating elements are used in conjunction with the fan, which circulates hot air throughout the oven. We recommend this method for poultry, pastries, fish and vegetables. By using this method better heat penetration is achieved and cooking and preheating times are also reduced. The fan cooking option allows you to cook different foods together at different positions in the oven all at the same time, providing even heat distribution but without the risk of mingling tastes and smells. When cooking different foods at the same time allow a further 10 minutes.
CIRCULAR HEATING ELEMENT + FAN - Air that has been used and is blown by the fan onto the different levels. It is ideal for cooking nutrient types of food at the same time (e.g. meat and fish) without losing tastes and smell. It cooks very gently and is ideal for sponges, pasta, pastries, etc.
GRILL - Using the top heating element. Success is guaranteed for mixed grills, kebabs and gratin dishes. The grill should be pre-heated to a high temperature for 5 minutes. White meats should always be placed at some distance from the grill element, the cooking time is slightly longer but the meat will be more succulent. Red meat and fish fillets can be placed directly onto the shelf with the drip tray placed beneath on lower shelf position.
GRILL + FAN - The top heating element is used in conjunction with the fan which circulates the hot air around the oven. Pre heating is recommended for red meats but is not necessary for white meats. Grilling is ideal for cooking thicker food items such as pork or poultry. Food to be grilled should be placed directly at the centre of the middle shelf.
By sliding the drip tray underneath the shelf it will ensure that any juices are collected. For best results always make sure that the food is not too close to the grill element and turn the food over half way through the cooking time.
GRILL + TURNSPIT + FAN - The advantage of using the top oven element at the same time as the fan and rotisserie is that the food is evenly cooked, preventing it from becoming dry and tasteless. The rotisserie is programmed to continue rotating for approximately five minutes after cooking, making full use of the residual oven heat. No preheating is required for rotisserie cooking.
DEFROST - When the dial is set to this position, the fan circulates hot air around the frozen food so that it defrosts in a few minutes without the protein content of the food being changed or altered.
The temperature is preset at 40°C constant, no regulation is possible.
KEEP WARM - This is recommended to reheat precooked foodstuff, positioning the shelf on the second level from top, or to defrost bread, pizza, or pastry by positioning the shelf on the lower level. The temperature is preset at 60°C constant, no regulation is possible.
PIZZA - With this function, hot air is circulated in the oven to achieve a perfect result for dishes such as pizza or cake.
Soft cook
SOFT COOK - Soft cook is the function for confectionery and bread. Thanks to its reduced fan speed, this function increases the oven's internal dampness. The increased dampness creates the ideal conditions for cooking those foods that need to maintain an elastic consistency while they are cooking (e.g., cakes, bread, biscuits), avoiding surface breakages.
- Tested in accordance with the CENELEC EN 60350-1 used for definition of energy class.
4.6 COOKING TIPS
It is better not to salt meats until after cooking, as salt encourages the meat to spatter fat. This will dirty the oven and make a lot of smoke.
Joints of white meat, pork, veal, lamb, and fish can be put into the oven cold. The cooking time is longer than in a preheated oven, but it cooks through to the centre better as the heat has more time to penetrate the joint.
Correct preheating is the basis of successful red meat cookery.
GRILLS
- Before loading the grill:
Remove the meat from the refrigerator a few hours before grilling. Lay it on several layers of kitchen paper. This improves searing, making it tastier and avoids it staying cold at the centre.
Add pepper and spices to the meat before grilling, but add any salt after cooking. This way it will sear better and stay juicy. Baste all the food to be cooked with a little oil. This is best done with a wide flat basting brush. Then sprinkle with more pepper and herbs (thyme, etc.).
- During cooking:
Never pierce the food during cooking even when you turn it. This lets the juice out and it becomes dry.
BAKING
Avoid using shiny tins, they reflect the heat and can spoil your cakes. If your cakes brown too quickly, cover them with greaseproof paper or aluminium foil.
Caution: The correct way to use foil is with the shiny side in towards the cake. If not, the heat is reflected by the shiny surface and does not penetrate the food.
Avoid opening the door during the first 20 to 25 minutes of cooking:
Soufflés, brioches, sponge cakes, etc. will tend to fall. You can check if cakes are done by pricking the centre with a knife blade or metal knitting needle. If the blade comes out nice and dry, your cake is ready and you can stop cooking. If the blade comes out moist or with bits of cake attached, continue baking but slightly lower the thermostat so that it is finished off without burning.
5. SERVICE CENTRE
Before calling the Service Centre.
If the oven is not working, we recommend that:
- Check that the oven is properly plugged into the power supply.
If the cause of the fault cannot be detected:
- Disconnect the oven from the mains, do not touch the oven and call the after sales service.
Before calling the Service Centre remember to make a note of the serial number on the serial number specifications plate.
The oven is supplied with a guarantee certificate that ensures that it will be repaired free of charge by the Service Centre whilst under guarantee.
This appliance is marked according to the European directive 2012/19/EU on Waste Electrical and Electronic Equipment (WEEE). WEEE contains both polluting substances (which can cause negative consequences for the environment) and basic components (which can be reused). It is important to have WEEE subjected to specific treatments, in order to remove and dispose properly all pollutants, and recover and recycle all materials.
Individuals can play an important role in ensuring that WEEE does not become an environmental issue; it is essential to follow some basic rules:
- WEEE shall not be treated as household waste.
- WEEE shall be handed over to the relevant collection points managed by the municipality or by registered companies. In many countries, for large WEEE, home collection could be present.
- When you buy a new appliance, the old one may be returned to the retailer who has to collect it free of charge on a one-to-one basis, as long as the equipment is of equivalent type and has the same functions as the supplied equipment.
ENERGY SAVING AND RESPECTING THE ENVIRONMENT
Where possible, avoid pre-heating the oven and always try to fill it. Open the oven door as infrequently as possible, because heat from the cavity disperses every time it is opened. For a significant energy saving, switch off the oven between 5 and 10 minutes before the planned end of the cooking time, and use the residual heat that the oven continues to generate. Keep the seals clean and in order, to avoid any heat dispersal outside of the cavity. If you have an electric contract with an hourly tariff, the "delayed cooking" programme makes energy saving more simple, moving the cooking process to start at the reduced tariff time slot.
1.2 SAFETY PRECAUTIONS
Do not use adapters, multiple sockets and/or extension cords.
In case of damage to the oven due to a fall or other accident, switch off the oven, disconnect the power cable from the electrical supply and do not touch the oven.
In case of damage to the power cable, it must be replaced properly.
Disconnect the cable, replace it with a new cable of type H05RRF, H05VVF, or H05V2V2-F. The cable must have sufficient load capacity to carry the current consumed by the oven.
The cable must be replaced by a qualified specialist.
The cable (yellow-green) must be longer than the other cables.
For repairs, use the services of only the approved service center, and make sure that only genuine spare parts are used. If the above requirements are not met, the manufacturer cannot guarantee the safety of the oven.
- Do not modify the characteristics of the oven by introducing any modifications into its design. - Do not store flammable materials in the oven, as they may ignite if the oven is switched on accidentally. - Do not allow children to sit on the oven door or hang on it. - When loading food into the oven and removing it from it, use protective gloves.
1.3 RECOMMENDATIONS
- After each use of the oven, clean it. - Do not cover the internal surfaces of the oven with aluminum foil or other disposable packaging materials sold in household stores. Aluminum foil or other packaging material in contact with the hot enameled surface of the oven may melt and damage the internal enameled surface of the oven. - To avoid excessive soiling of the oven and the emission of strong smoke and odors, it is not recommended to use the oven at a very high temperature. It is better to slightly reduce the temperature and increase the cooking time.
Drip tray
Additionally supplied with the kit
It is recommended to use only the thermostat probe and the thermostat probe form supplied with the oven.
1.4 INSTALLATION
The user is responsible for the installation of the oven. The manufacturer is not obliged to install the appliance. If the manufacturer's assistance is required to eliminate malfunctions caused by incorrect installation, this work will be charged, as this work is not covered by the warranty.
The specialist performing the installation of the oven must follow the installation instructions. Incorrect installation may harm the health of people and animals, and may also lead to property damage. The manufacturer is not responsible for such damage.
The materials with which the room where the oven is installed is finished must withstand temperatures not lower than 70°C.
The oven can be installed in the upper part of a column or under a work surface.
Before fixing the oven, check that in the compartment where the oven is installed, normal air circulation is ensured; this is necessary for cooling the oven and preventing its parts from overheating. Make the openings shown on the last page of this manual, in accordance with the type of installation.
1.5 CONNECTION TO THE ELECTRICAL MAINS
Connection to the electrical mains must be carried out by a qualified technician approved by the service center.
Connection to the electrical mains must be carried out in accordance with the applicable electrical engineering rules and standards.
The manufacturer is not liable for damages arising from the fact that the installation of the electrical appliance was not carried out in accordance with the rules of electrical safety.
The oven must be connected to a socket with a grounding contact; it must be connected via a multi-pole automatic circuit breaker, in accordance with the electrical engineering rules and standards in force in the country where the appliance is installed.
When connecting the oven to the electrical mains, the necessary fuses and wires of sufficiently large cross-section must be used.
CONNECTION:
The oven is supplied with a power cable for connection to the 230 V AC mains (between two phases or between phase and neutral). Before connecting the appliance to the mains, check: the voltage in the mains, the current at which the automatic circuit breaker trips, the protective earth conductor (yellow-green) connected to the oven's earth terminal must be connected to the earth contact of the electrical mains.
WARNING:
- Before connecting the oven, check that the protective earth conductor is not broken. - The manufacturer is not liable for damages or accidents arising from the fact that the oven was not earthed, or due to a break in the protective earth circuit.
IMPORTANT NOTE: Do not forget that the oven may require subsequent servicing. The electrical socket from which the oven is powered must be located in such a place that after changing the position of the oven, it can be reconnected to the electrical socket.
Power cable: Replacement of the power cable must be carried out by the after-sales service or a qualified technician with sufficient qualification.
2. TECHNOLOGY PRO/EXP'R
2.1 ACCESSORIES OF THE OVEN
Before first use of the oven, wipe its accessories with a damp cloth. Rinse with water and dry. The tray can be used for baking cakes and for roasting meat.
- Insert the battery as shown in Figure 3.
Figure 2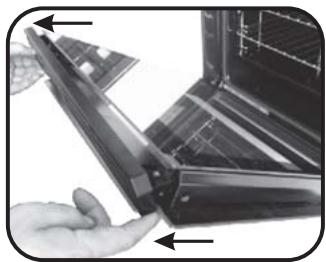
Figure 3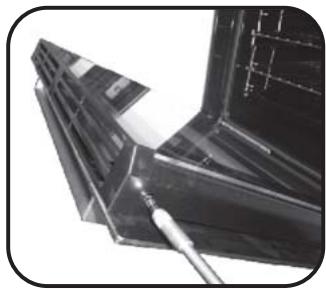
- Remove the top metal cover by pulling it upward, as shown in Figure 4.
- Remove the glass carefully by pulling it out of the door frame, as shown in Figure 5.
Figure 4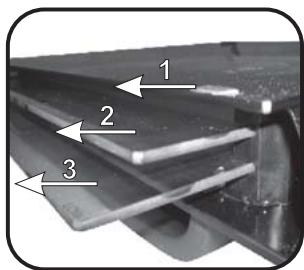
Figure 5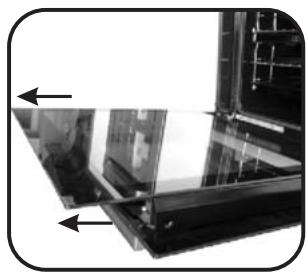
For pyrolytic cleaning, please also remove the second and third glass, as shown in Figure 6.
- After cleaning is complete, reassemble the door by performing the steps in reverse order. On all glass, the LOW-E mark should be correctly readable and should be located in the left corner of the door, near the left hinge. Thus, the printed symbol on the first glass remains on the inside of the door.
Figure 7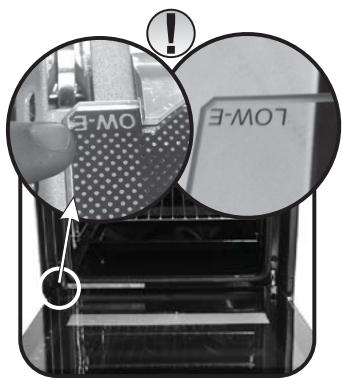
4. DESCRIPTION OF THE APPLIANCE


4.1 BEFORE FIRST USE OF THE OVEN
- CLEANING BEFORE FIRST USE
Before using the oven for the first time, proceed as follows:
Wipe the external surfaces of the oven with a damp cloth.
Remove all accessories and wipe the internal surfaces of the oven with a cloth soaked in hot water with a mild detergent.
Let the empty oven operate at maximum temperature for about one hour. This is necessary to remove odors from the oven. During this operation, the room where the oven is installed should be well ventilated.
- THINGS NOT TO FORGET
Surface operations performed with the timer
Changing parameters must be confirmed with the knob
Turning off the oven:
This operation may be necessary in case of entering an incorrect command. To turn off the oven... set the programming knob to the OFF position.
Child lock:
To lock the operation of the oven control elements, select the lock function from the menu. See the section "Programming - Child Lock".
Cooling fan:
It protects the panel and electronic devices from overheating. It turns on automatically and turns off when the oven is turned off.
Lighting in the oven:
To turn on the lighting in the oven, set the programming knob to the lighting symbol.
The oven works, the lamp will turn on when selecting any function, and will continue to burn after opening the door.
4.2 USING THE TIMER TO SET THE END TIME FOR COOKING
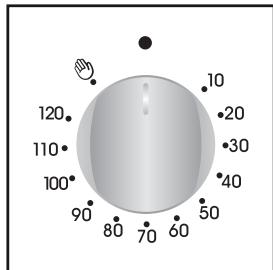
With this function, you can set the required cooking time (max. 120 min), after which the oven will turn off automatically.
The timer counts down the set time and then turns off automatically.
To use the oven in the conventional mode, set the position
To turn on the oven, make sure that the timer is not in position 0.
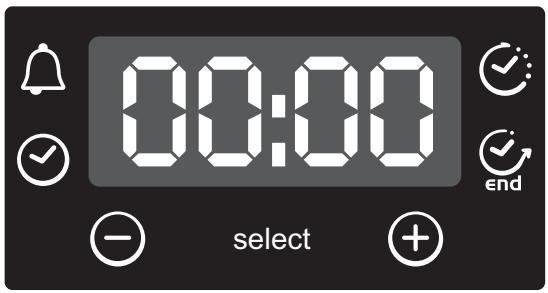
WARNING: The time setting is done before or after turning on the oven (the need for this will be indicated by the flashing display 12:33). The time setting is done in the following way:
- Press the central knob 4 times
- Set the time with the "-" and "+" buttons
- Release the buttons
BOTTOM HEAT + TOP HEAT - Used
Upper and lower heating elements. This method is particularly suitable for traditional baking. It is used for cooking black bread, pastries, pies, pizza, bread, and products wrapped in foil.
BOTTOM HEAT + TOP HEAT + FAN -
The grill, heating elements, and also the fan, which circulates air in the oven, are used. This method is recommended for cooking poultry, baked goods, fish, and vegetables. Using this method ensures deeper heat penetration, and also reduces cooking time for preheating. The method of cooking with the fan allows you to cook different types of food on different shelves of the oven at the same time. This ensures more even heat distribution and prevents one type of food from absorbing the smell of another type of food. When cooking different types of food at the same time, follow the cooking time for the food that takes the longest.
Round heating elements +
FAN - The upper and lower heating elements are used, as well as a round-shaped heating element, and air circulation is carried out in the oven. This method of cooking is with the fan.
GRILL - The upper heating element is used.
This method is ideal for cooking various types of meat, kebabs, and steaks (beef, green pork). The meat should be preheated to a high temperature for 5 minutes. Pieces of white meat should be placed at the same distance from the heating element. The cooking time increases, but the meat is more juicy. Dark meat and fish can be placed directly on the grill, under which a tray must be installed to collect liquid.
3
GRILL + FAN - The upper
heating element and fan are used, which circulates hot air in the oven. For cooking dark meat, it is recommended to preheat the oven, but for cooking white meat, preheating the oven is not required. Cooking meat is ideal for roasting large pieces of meat and poultry. The meat should be placed on the grill in the center.
For collecting juices that are released when cooking meat on the grill, a tray must be installed under the grill. For optimal results, make sure that the meat is not too close to the heating element, and check the meat when the time has elapsed, which is equal to half the cooking time.
X
GRILL + SPIT + FAN - The
method of cooking food in which the upper heating element, fan, and spit are used. The food is roasted evenly, and it does not become dry and tasteless. The time will be extended by about five minutes after the oven is turned on. This ensures the use of the remaining heat in the oven. When cooking food on the spit, preheating
the oven is not required.
%
DEFROSTING - When the regulator
In this mode, the fan circulates air around the frozen products, which ensures their defrosting within a few minutes without changing the protein content.
CONTENTS\INTRODUCTION
This mode is recommended for defrosting fish placed on a shelf installed on the second level, or for defrosting fish or meat placed on a shelf installed on the lower level.
A constant temperature of 60 °C is used; the temperature is regulated.
If the oven does not work:
- Check that it is correctly connected to the electrical network.
If you cannot determine the cause of the malfunction yourself:
- Disconnect the oven from the electrical network, do not touch it, and contact the service center.
Before calling the service center, write down the serial number of the device, indicated on its nameplate.
If the warranty period indicated in the warranty card has not expired, the repair of the device at the service center will be carried out free of charge.
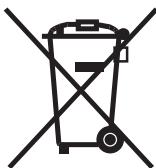

This device has marking in accordance with the European Directive 2012/19/EC on waste electrical and electronic equipment (WEEE). Waste electrical and electronic equipment contains hazardous substances (which can negatively affect the environment) and basic components (which are subject to
reuse). It is important that waste electrical and electronic equipment is subjected to special treatment with the aim of removing and neutralizing all hazardous substances, as well as regenerating and reusing all materials.
Everyone can make a significant contribution to preventing environmental problems caused by waste electrical and electronic equipment; for this, it is important to follow some basic rules:
Do not dispose of waste electrical and electronic equipment as unsorted municipal waste. - Waste electrical and electronic equipment should be handed over to collection points controlled by local authorities or registered companies. In many countries, for large quantities of waste electrical and electronic equipment, collection of waste is carried out at home. - When purchasing a new device, the old device can be returned to the retail company, which is obliged to accept it free of charge on the basis of mutual agreement, if this device is of a similar type and the returned device has the same functions as the sold one.
ENERGY SAVING AND ENVIRONMENTAL PROTECTION
If possible, avoid preheating the oven and always keep it closed. Open the oven door as rarely as possible, because each time it is opened, heat is dissipated. To significantly save electricity, turn off the oven 5-10 minutes before the planned end of cooking time, thus using the residual heat produced by the oven. Keep the gasket clean and in good condition to prevent heat from escaping beyond the cavity. If your electricity supply contract includes a time-of-use tariff, the "Delayed Start" program simplifies the process of saving electricity by allowing you to start cooking at the beginning of the off-peak tariff.
2. PRO/EXP'R TECHNOLOGY
Tel: 039.2086.1 Fax: 039.2086.403
www.candy-group.com
CANDY
2.1 OVEN EQUIPMENT
Applying more torque than needed to fix the screws can close the ventilation channels on both sides. Please be sure that these ventilation channels are 2mm open after installation to furniture.
ATTENTION!
GB Fixing in the location
Inside the oven there is a bag with four fixing screws. Fixing: When the oven door is open, holes are accessible, they are located on each side. Use the screws provided to fix the oven.
The manufacturer will not be responsible for any inaccuracy resulting from printing or transcript errors contained in this brochure. We reserve the right to carry out modifications to products as required, including the interests of consumption, without prejudice to the characteristics relating to safety or function.