
MGF20210B - Microwaves BEKO - Free user manual and instructions
Find the device manual for free MGF20210B BEKO in PDF.
User questions about MGF20210B BEKO
0 question about this device. Answer the ones you know or ask your own.
Ask a new question about this device
Download the instructions for your Microwaves in PDF format for free! Find your manual MGF20210B - BEKO and take your electronic device back in hand. On this page are published all the documents necessary for the use of your device. MGF20210B by BEKO.
USER MANUAL MGF20210B BEKO
Please read this manual first!
Dear Customer,
Thank you for purchasing a Beko product. We hope that you get the best results from your product which has been manufactured with high quality and state-of-the-art technology. Therefore, please read this entire user manual and all other accompanying documents carefully before using the product and keep it as a reference for future use. If you handover the product to someone else, give the user manual as well. Follow all warnings and information in the user manual.
Remember that this user manual is also applicable for several other models. Differences between the models are explicitly described in the manual.
Meanings of the symbols
Following symbols are used in the various section of this user manual:

Important information and useful hints about usage.

Warnings for dangerous situations concerning the safety of life and property.

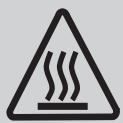
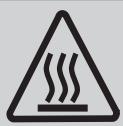
Warning for hot surfaces.

This product has been manufactured in environmental friendly modern plants without giving any harm to the nature.
1 Important safety and environmental instructions 4
1.1 General safety 4
1.2 Intended use 8
1.3 Children's safety 9
1.4 Compliance with the WEEE Directive and disposal of waste products 10
1.5 Package information 10
2 Your microwave oven 11
2.1 Overview 11
2.2 Technical data 11
2.3 Installing the turntable 12
3 Installation and connection 13
3.1 Installation and connection 13
4Operation 14
4.1 Control panel 14
4.2 Operating instructions 14
4.2.1 Clock Setting 14
4.2.2 Kitchen Timer 14
4.2.3 Microwave Cooking 15
4.2.4 Grill Cooking 15
4.2.5 Combination Cooking 16
4.2.6 Speedy Cooking 16
4.2.7 Defrost by weight 16
4.2.8 Defrost by time 16
4.2.9 Auto menu 17
4.2.10 Auto cooking menu 17
4.2.11 Multi-step cooking 18
4.2.12 Inquiring Function 18
4.2.13 Child lock. 18
4.2.14 Specification 18
5 Cleaning and maintenance 19
5.1 Cleaning 19
5.2 Storage 19
6 Troubleshooting 20
1
Important safety and environmental instructions
Important Safety Instructions Read Carefully And Keep For Future Reference
This section contains safety instructions that will help protect from risk of fire, electric shock, exposure to leak microwave energy, personal injury or property damage. Failure to follow these instructions shall void any warranty.
1.1 General safety
- The microwave oven is intended for heating food and beverages. Drying of food or clothing and heating of warming pads, slippers, sponges, damp cloth and similar may lead to risk of injury, ignition or fire.
This appliance is intended to be used in household and similar applications such as:
- Staff kitchen areas in shops, offices and other working environments;
- Farm houses
- By clients in hotels, motels and other residential type environments;
-
Bed and Breakfast type environments.
-
Do not attempt to start the oven when its door is open; otherwise you may be exposed to harmful microwave energy. Safety locks should not be disabled or tampered with.
- Do not place any object between the front side and the door of the oven. Do not allow dirt or cleaning agent remnants built-up on the closure surfaces.
- Any service works involving removal of the cover that provides protection against exposure to microwave energy must be performed by authorized persons/ service. Any other approach is dangerous.
- Your product is intended for cooking, heating and defrost food at home. It must not be used for commercial purposes. Manufacturer shall not be held liable for damages that have arisen from misuse.
- Do not use this appliance outdoors, bathrooms, humid environments or in places where the it can get wet.
- No responsibility or warranty claim shall be assumed for damages arising from misuse or improper handling of the appliance.
1
Important safety and environmental instructions
- Never attempt to dismantle the appliance. No warranty claims are accepted for damage caused by improper handling.
- Only use the original parts or parts recommended by the manufacturer.
- Do not leave this appliance unattended while it is in use.
- Always use the appliance on a stable, flat, clean dry, and non-slip surface.
- The appliance should not be operated with an external clock timer or separate remote control system.
- Before using the appliance for the first time, clean all parts. Please see the details given in the "Cleaning and Maintenance" section.
- Operate the appliance for its intended purpose only as described in this manual. Do not use abrasive chemicals or steam on this appliance. This oven is particularly intended for heating and cooking the food.
It is not intended for industrial or laboratory use.
-
Do not use your appliance to dry clothes or kitchen towels.
-
Appliance becomes very hot while it is in use. Pay attention not to touch the hot parts inside the oven.
- Your oven is not designed to dry any living being.
- Do not operate the oven empty.
- Only use utensils that are suitable for use in microwave ovens.
- Cooking utensil may get hot due to the heat transferred from the heated food to the utensil. You may need oven gloves to hold the utensil.
- Utensils shall be checked to ensure that they are suitable for use in microwave ovens.
- Do not place the oven on stoves or other heat generating appliances. Otherwise, it may be damaged and the warranty becomes void.
- Microwave oven must not be placed in a cabinet that is not in compliance with the installation instructions.
- Steam may come out while opening the covers or the foil after cooking the food.
- Use gloves while taking any kind of heated food out.
1
Important safety and environmental instructions
- The appliance and its accessible surfaces may be very hot when the appliance is in use.
- Door and outer glass may be very hot when the appliance is in use.
1.1.1 Electrical safety
- If the supply cord is damaged, it must be replaced by the manufacturer or its service agent or a similarly qualified person in order to avoid a hazard.
- Beko Microwave Ovens comply with the applicable safety standards; therefore, in case of any damage on the appliance or power cable, it should be repaired or replaced by the dealer, service center or a specialist and authorized service alike to avoid any danger. Faulty or unqualified repair work may be dangerous and cause risk to the user.
- Make sure that your mains power supply complies with the information supplied on the rating plate of the appliance.
The only way to disconnect the appliance from the power supply is to remove the power plug from the power outlet.
- Use the appliance with a grounded outlet only.
- Never use the appliance if the power cable or the appliance itself is damaged.
- Do not use this appliance with an extension cord.
- Never touch the appliance or its plug with damp or wet hands.
- Place the appliance in a way so that the plug is always accessible.
- Prevent damage to the power cable by not squeezing, bending, or rubbing it on sharp edges. Keep the power cable away from hot surfaces and naked flame.
- Make sure that there is no danger that the power cable could be accidentally pulled or that someone could trip over it when the appliance is in use.
- Unplug the appliance before each cleaning and when the appliance is not in use.
- Do not pull the power cable of the appliance to disconnect it from its power supply and never wrap its power cable around the appliance.
- Do not immerse the appliance, power cable, or power plug in water or any other liquids. Do not hold it under running water.
1
Important safety and environmental instructions
- When heating food in plastic or paper containers, keep an eye on the oven due to the possibility of ignition.
- Remove the wire strings and/or metal handles of paper or plastic bags before placing bags suitable for use in microwave oven to the oven.
- If smoke is observed, switch off or unplug the appliance and keep the door closed in order to stifle any flames.
- Do not use inside of the oven to store something. Do not leave paper items, cooking material or food inside the oven when it is not being used.
- The contents of feeding bottles and baby food jars shall be stirred or shaken and the temperature shall be checked before consumption, in order to avoid burns.
- This appliance is a Group 2 Class B ISM equipment. Group 2 contains all ISM (Industrial, Scientific and Medical) equipment in which radio-frequency energy is intentionally generated and/or used in the form of electromagnetic radiation for the treatment of material, and spark erosion equipment.
Class B equipment is suitable for use in domestic establishments and establishments directly connected to a low voltage power supply network.
- Door or outer surface of the appliance may become hot when it is in use.
1.1.2 Product safety
- Heating the beverages with microwave may cause them to boil by splashing around after they have been taken out of the oven; so be careful when you are holding the containers.
- Do not roast anything in the oven. Hot oil may damage the components and materials of the oven, and it may even cause skin burns.
- Pierce food with thick crust such as potatoes, zucchini, apples and chestnuts.
- Appliance must be placed so that the rear side is facing the wall.
- Before moving the appliance, please secure the turntable to prevent damage to it.
1 Important safety and environmental instructions
- Eggs in their shell and whole hard-boiled eggs must not be heated in microwave ovens since they may explode, even after microwave heating has ended.
- Never remove the parts at the rear and sides of the appliance, which protect the minimum distances between the cabinet walls and the appliance in order to allow for the required air circulation.
1.2 Intended use
- Failure to maintain the oven in a clean condition could lead to deterioration of the surface that could adversely affect the life of the appliance and possibly result in a hazardous situation.
- Cleaning the door seals and adjacent parts: Use hot soapy water. Clean with a dish cloth, do not scour. Do not use a metal or glass scraper for cleaning.
-
WARNING: If the door or door seals are damaged, the oven must not be operated until it has been repaired by a competent person.
-
WARNING: It is hazardous for anyone other than a competent person to carry out any service or repair operation which involves the removal of a cover which gives protection against exposure to microwave energy.
- WARNING: Liquids and other foods must not be heated in sealed containers since they are liable to explode.
- The oven should be cleaned regularly and any food deposits removed.
- There should be min 30 ~cm free space above the top surface of the oven.
- Do not use the appliance for anything other than its intended use.
- Do not use the appliance as a heat source.
- Microwave oven is intended to thaw, cook and stew food only.
- Do not over-cook foods; otherwise, you may cause a fire.
- Do not use steam assisted cleaners to clean the appliance.
1
Important safety and environmental instructions
1.3 Children's safety
- Extreme caution is advised when being used near children and persons who are restricted in their physical, sensory or mental abilities.
- This appliance can be used by the children who are at the age of 8 or over and by the people who have limited physical, sensory or mental capacity or who do not have knowledge and experience, as long as they are supervised with regard to safe use of the product or they are instructed accordingly or understand the risks of using the product. Children should not play with the appliance. Cleaning and user maintenance procedures should not be performed by children unless they are controlled by their elders.
- Danger of choking! Keep all the packaging materials away from children.
-
Only allow children to use the oven without supervision when adequate instructions have been given so that the child is able to use the microwave oven in a safe way and understands the hazards of improper use.
-
Due to excessive heat that arises in grill and combination modes, children should only be allowed to use these modes under supervision of an adult.
- Keep the product and its power cable so that they are inaccessible by children under 8 years old.
- The appliance and its accessible surfaces may be very hot when the appliance is in use. Keep children away.
- The appliance is not intended for use by persons (including children) with reduced physical, sensory or mental capabilities, or lack of experience and knowledge, unless they have been given supervised or instruction concerning use of the appliance by a responsible person for their safely.
- Young children should be supervised to ensure that they do not play with the appliance.
- WARNING: Only allow children to use the oven without supervision when adequate instructions have been given so that the child is able to use the oven in a safe way and understands the hazards of improper use.
1
Important safety and environmental instructions
1.4 Compliance with the WEEE Directive and disposal of waste products
This product does not include harmful and prohibited materials specified in the "Regulation for Supervision of the Waste Electric and Electronic Appliances" issued by the Ministry of
Environment and Urban Planning. Complies with the WEEE Directive. This product has been manufactured with high quality parts and materials which can be reused and are suitable for recycling.
Therefore, do not dispose the product with normal domestic waste at the end of its service life. Take it to a collection point for the recycling of electrical and electronic equipment. Ask the local authority in your area for these collection points. Help protect the environment and natural resources by recycling used products.
1.5 Package information

Package of the product is made of recyclable materials in accordance with our National Legislation. Do not dispose of the packaging materials
together with the domestic or other wastes. Take them to the packaging material collection points designated by the local authorities.
2.1 Overview
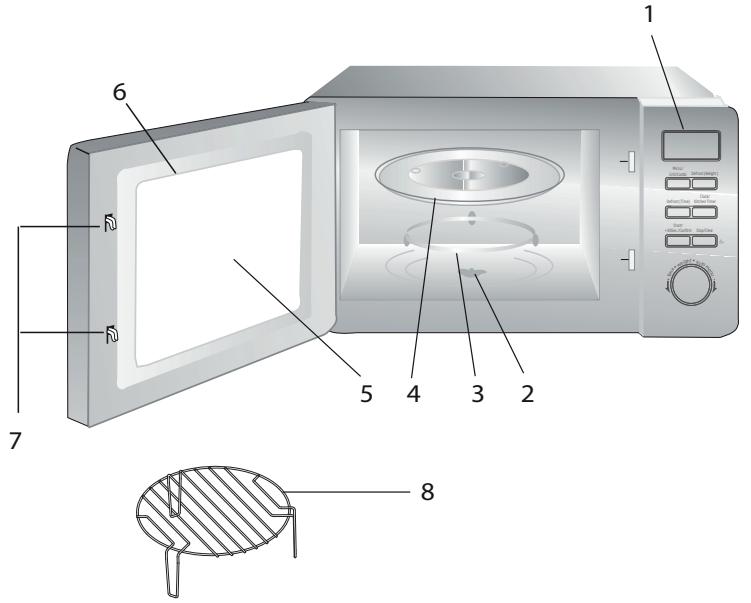
- Control panel
- Turntable shaft
- Turntable support
- Glass tray
- Oven window
- Door group
- Door safety interlock system
- Grill Rack( Only be used in grill function and be placed on the glass tray )
2.2 Technical data
| Power consumption | 230 V~50 Hz, 1270 W (Microwave) |
| Output | 800 W |
| Operating frequency | 2450 MHz |
| Ampere value | 5 A |
| External dimensions (Microwave Oven) | 258.2 mm (H) / 439.5 mm (W) / 356 mm (D) |
| Internal dimensions of the oven | 205.2 mm (H) / 303.6 mm (W) / 306 mm (D) |
| Oven Capacity | 20 Liters |
| Net weight | 11.6 kg |
| Net weight (Kit contents) | 12.7 kg |
Markings on the product or the values stated in other documents supplied with the product are values obtained under laboratory conditions as per relevant standards. These values may vary according to the usage of the appliance and ambient conditions. Power values are tested at 230V.
2.3 Installing the turntable
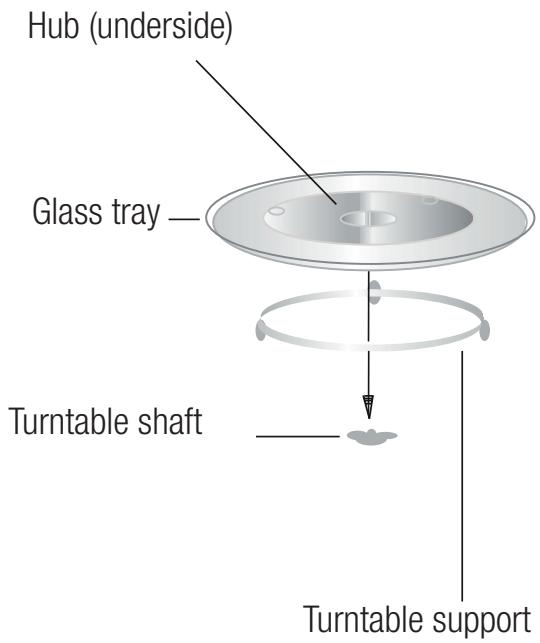
- Never place the glass tray upside down. The glass tray should never be restricted.
- Both glass tray and turntable support must always be used during cooking.
- All food and containers of food must always place on the glass tray for cooking.
- If glass tray or turntable support crack or break, contact your nearest authorized service center.
3.1 Installation and connection
- Remove all packing material and accessories. Examine the oven for any damage such as dents or broken door. Do not install if oven is damaged.
- Remove any protective film found on the microwave oven cabinet surface.
- Do not remove the light brown Mica cover that is attached to the oven cavity to protect the magnetron.
- Select a flat surface that provides sufficient space for inlet and outlet ducts.
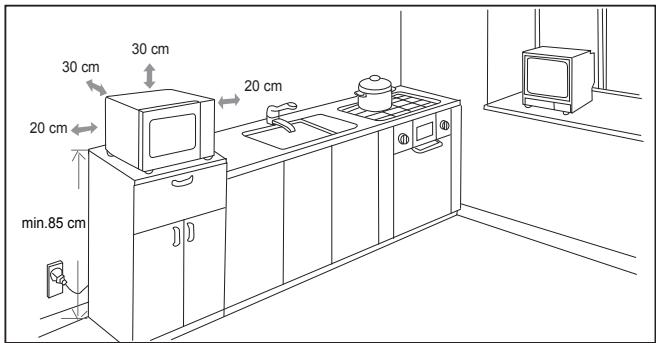
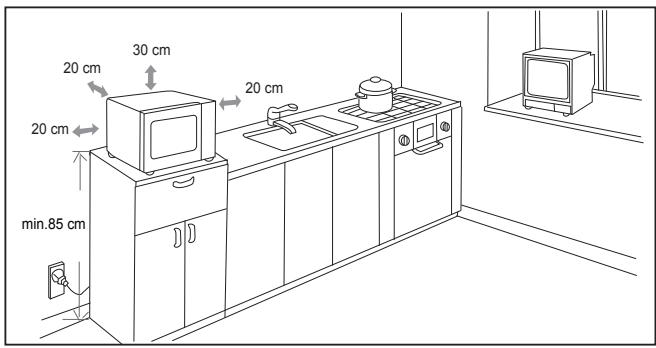
- Minimum installation height is 85 ~cm .
- The rear surface of appliance shall be placed against a wall. Leave a minimum clearance of 30~cm above the oven, a minimum clearance of 20~cm is required between the oven and any adjacent walls.
- Do not remove the legs from the bottom of the oven.
- Blocking the intake and / or outlet openings can damage the oven.
- Place the oven as far away from radios and TV as possible. Operation of microwave oven may cause interference to your radio or TV reception. 2. Plug your oven into a standard household outlet. Be sure the voltage and the frequency is the same as the voltage and the frequency on the rating label.

WARNING: Do not install oven over a range cooktop or other heat-producing appliance. If installed near or over a heat source, the oven could be damaged and the warranty would be void.
The accessible surface may be hot during operation.
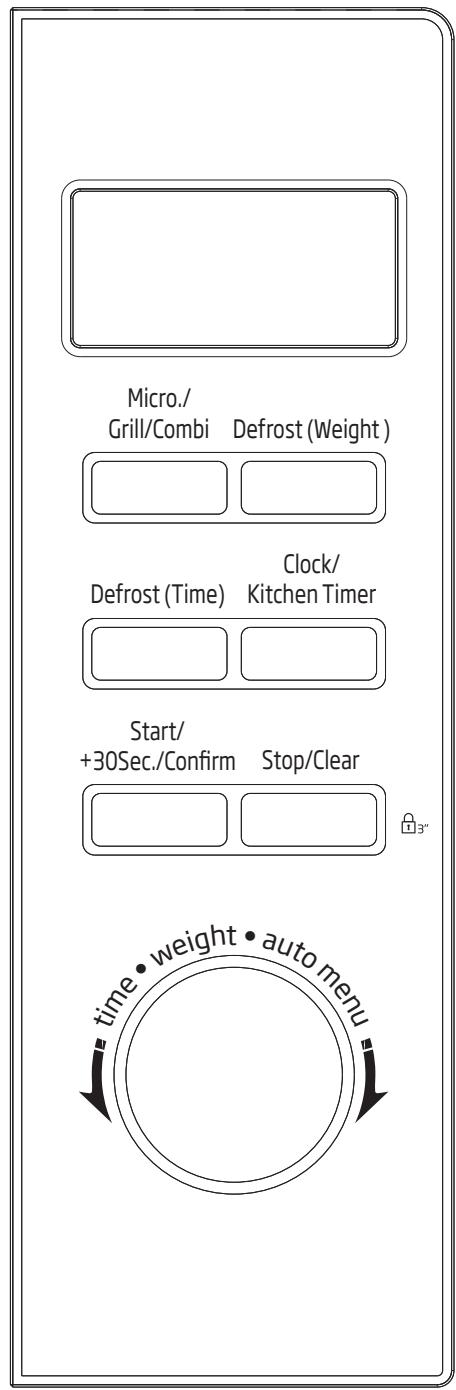
4.1 Control panel

4.2 Operating instructions
This microwave oven uses modern electronic control to adjust cooking parameters to meet your needs better for cooking.
4.2.1 Clock Setting
When the microwave oven is electrified, the oven will display "0:00", buzzer will ring once.
- Press "Clock/Kitchen Timer" once, the hour figures will flash.
- Turn to adjust the hour figures, the input time should be with i n 0--23.
- Press "Clock/Kitchen Timer" the minute figures will flash.
- Turn to adjust the minute figures, the input time should be with in 0--59.
- Press "Clock/Kitchen Timer" to finish clock setting.": " will flash.

If the clock is not set, it would not function when powered.

During the process of clock setting, if you press "Stop/Clear" or no operation in one minute, the oven will exit the setting.
4.2.2 Kitchen Timer
- Press "Clock/Kitchen Timer" twice, the screen will display "00:00".
- Turn to enter the correct timer.(The maximum cooking time is 95 minutes,)
- Press "Start/+30Sec./Confirm" to confirm setting.
- When the kitchen time is reached, clock indicator will go out. The buzzer will ring 5 times. If the clock has been set (24-hour system), screen will display the current time.

The kitchen Time is different from 24-hour system. Kitchen Timer is a timer.
4.2.3 Microwave Cooking
- Press the "Micro./Grill/Combi." key once, and "P100" display.
- Press "Micro./Grill/Combi." for times or turn tto select the microwave power "P100", "P80", "P50", "P30", "P10" will display in order.
- Press "Start/+30Sec./Confirm" to confirm.
- Turn to adjust the cooking time. (The time setting should be 0:05- 95:00.)
- Press "Start/+30Sec./Confirm" to start cooking.

The step quantities for the adjustment time of the coding switch are as follow
| Setting the duration | Increment amount |
| 0-1 minute | 5 seconds |
| 1-5 minutes | 10 seconds |
| 5-10 minutes | 30 seconds |
| 10-30 minutes | 1 minute |
| 30-95 minutes | 5 minutes |
Microwave Power Chart
| Press | Once | Twice | Thrice | 4 times | 5 times |
| Microwave Power | 100% | 80% | 50% | 30% | 10% |
4.2.4 Grill Cooking
- Press the "Micro./Grill/Combi." key once, and "P100" display.
4 Operation
- Press "Micro./Grill/Combi." for times or turn " to select the grill power .
- Press "Start/+30Sec./Confirm" to confirm when the screen display "G".
- Turn " " to adjust the grill time. (The time setting should be 0:05- 95:00.)
- Press "Start/+30Sec./Confirm" to start cooking.

If half the grill time passes, the oven sounds twice, and this is normal. In order to have a better effect of grilling food, you should turn the food over, close the door, and then press "Start/+30Sec./Confirm" to continue cooking. If no operation, it will continue working.
4.2.5 Combination Cooking
- Press the "Micro./Grill/Combi." key once, and "P100" display.
- Press "Micro./Grill/Combi." for times or turn " " to select the combination power "C-1(55%microwave+45%grill)" and "C-2(36%microwave+64%grill)" will display in order.
- Press "Start/+30Sec./Confirm" to confirm.
- Turn " " to adjust the cooking time. (The time setting should be 0:05- 95:00.)
- Press "Start/+30Sec./Confirm" to start cooking.
4.2.6 Speedy Cooking
- In waiting state, press "Start/+30Sec./ Confirm" key to cook with 100 % power level for 30 seconds. Each press on the same key can increase 30 seconds. The maximum cooking time is 95 minutes.
- During the microwave cooking and time defrost process, press "Start/+30Sec./Confirm" to increase the cooking time.
- In waiting states, turn " " left to choose the cooking time directly. After choosing the time, press "Start/+30Sec./Confirm" to start cooking. The microwave power is 100% .

Under the states of auto menu and weight defrost, cooking time cannot be increased by pressing "Start/+30Sec./Confirm"
4.2.7 Defrost by weight
- Press "Weight Defrost" once, the screen will display "dEF1".
- Turn to select the food weight. The range of weight is 100-2000g.
- Press "Start/+30Sec./Confirm" key to start defrosting.
4.2.8 Defrost by time
- Press "Time Defrost" once, the screen will display "dEF2".
- Turn to select the cooking time.
- Press "Start/+30Sec./Confirm" key to start defrosting.
4 Operation
4.2.9 Auto menu
- In waiting states, turn " " right to choose the menu from "A-1" to "A-8";
-
Press "Start/+30Sec./Confirm" to confirm the menu you choose;
-
Turn to choose the food weight;
- Press "Start/+30Sec./Confirm" to start cooking;
- After cooking finish, the buzzer sounds five times.
4.2.10 Auto cooking menu
| Menu | Weight | Display |
| A-1 Auto reheat | 200 g | 200 |
| 400 g | 400 | |
| 600 g | 600 | |
| A-2 Vegetable | 200 g | 200 |
| 300 g | 300 | |
| 400 g | 400 | |
| A-3 Fish | 250 g | 250 |
| 350 g | 350 | |
| 450 g | 450 | |
| A-4 Meat | 250 g | 250 |
| 350 g | 350 | |
| 450 g | 450 | |
| A-5 Pasta | 50 g (with 450 ml cold water) | 50 |
| 100 g (with 800 ml cold water) | 100 | |
| A-6 Potato | 200 g | 200 |
| 400 g | 400 | |
| 600 g | 600 | |
| A-7 Pizza | 200 g | 200 |
| 400 g | 400 | |
| A-8 Soup | 200 ml | 200 |
| 400 ml | 400 |
4 Operation
4.2.11 Multi-step cooking
Two stages can be maximumly set. If one stages is defrosting, it should be put in the first stage automatically. The buzzer will ring once after each stage and the next stage will begin.

Auto menu cannot be set as one of the multi-stage.

Example: If you want to defrost the food for 5 minutes, then to cook with 80% microwave power for 7 minutes. The steps are as following:
- Press "Time Defrost" once, the screen will display "dEF2".
- Turn to adjust the defrost time of 5 minutes;
- Press "Micro./Grill/Combi." once;
- Turn to choose 80 % microwave power till “P80” display;
- Press "Start/+30Sec./Confirm" to confirm;
- Turn to adjust the cooking time of 7 minutes;
- Press "Start/+30Sec./Confirm" to start cooking.
4.2.12 Inquiring Function
- In cooking states of microwave, grill and combination, press "Micro./Grill/Combi.", the current power will be displayed for 3 seconds.
- During cooking state, press "Clock/Kitchen Timer" to check the current time. It will be displayed for 3 seconds.
4.2.13 Child lock
- Lock: In waiting state, press "Stop/Clear" for 3 seconds, there will be a long "beep" denoting entering the children-lock state.
- Lock quitting: In locked state, press "Stop/ Clear" for 3 seconds, there will be a long "beep" denoting that the lock is released.
4.2.14 Specification
- The buzzer will sound once when turning the knob at the beginning;
- "Start/+30Sec./Confirm" must be pressed to continue cooking if the door is opened during cooking;
- Once the cooking programme has been set, "Start/+30Sec./Confirm" is not pressed in 1 minute. The current time will be displayed. The setting will be cancelled.
- The buzzer sounds once by efficient press, inefficient press will be no response.
- The buzzer will sound five times to remind you when cooking is finished.
5 Cleaning and maintenance
5.1 Cleaning

WARNING: Never use gasoline, solvent, abrasive cleaning agents, metal objects or hard brushes to clean the appliance.

WARNING: Never immerse the appliance or its power cable in water or in any other liquid.
- Turn the appliance off and disconnect it from wall socket.
- Wait for the appliance to completely cool down.
- Keep the inside of the oven clean. Wipe with a damp cloth when splashed food or spilled liquids stick on the walls of the oven. A mild detergent may be used if the oven gets very dirty. Avoid using sprays and other harsh cleaning agents as they may cause stains, marks, and opaqueness on the door surface.
- Outer surfaces of the oven must be cleaned with a damp cloth. Do not allow water ingress from ventilation openings to prevent damage to the operating parts in the oven.
- Wipe both sides of the door and the glass, door gaskets and parts near the gaskets frequently with a damp cloth in order to remove the overflowing and splashing stains. Do not use abrasive cleaning agents.
- Do not allow control panel to get wet. Clean with a soft damp cloth. Leave the door of the oven open to prevent inadvertent operation while cleaning the control panel.
- If steam accumulates inside or around the oven door, wipe with a soft cloth. This may occur when the microwave oven is operated under high humidity conditions. It is normal.
-
In some cases, you may need to remove the glass tray for cleaning. Wash the tray in warm soapy water or in a dishwasher.
-
The roller ring and oven floor should be cleaned regularly to avoid excessive noise. It would be sufficient to wipe the lower surface of the oven with a mild detergent. Roller ring may be washed in warm soapy water or in a dishwasher. When you remove the roller ring from oven internal floor for cleaning, ensure that you install it in the correct position while replacing it.
- In order to remove bad odors in your oven, put a glass of water and juice and peel of a lemon to a deep bowl suitable for use in microwave and operate the oven for 5 minutes in microwave mode. Wipe thoroughly and dry with a soft cloth.
- Please contact the authorized service when the oven lamp needs to be replaced.
- The oven should be cleaned regularly and any food deposits should be removed. If the oven is not kept clean, this may cause surface defects that would affect the lifecycle of the appliance negatively and that would possibly cause risks.
- Please do not dispose this appliance with household waste; old ovens shall be disposed to special waste centers provided by the municipalities.
- When the microwave oven is used in grill function, a small amount of smoke and odor may occur which will disappear after a certain time of usage.
5.2 Storage
- If you do not intend to use the appliance for a long time, please store it carefully.
- Please make sure that the appliance is unplugged, cooled down and totally dry.
- Store the appliance in a cool and dry place.
- Keep the appliance out of the reach of children.
6 Troubleshooting
| Normal | |
| Microwave oven interferes with TV reception | Radio and TV reception may be interfered when microwave oven is operating. It is similar to the interference caused by small electrical appliances, like mixer, vacuum cleaner, and electric fan. It is normal. |
| Oven light is dimmed | In low power microwave cooking, oven light may be dimmed. It is normal. |
| Steam accumulating on door, hot air coming out of vents | During cooking, steam may arise from the food. Most of this steam will get out from vents. But some may accumulate on a cool place like oven door. It is normal. |
| Oven started accidentally with no food in it. | It is not allowed to run the appliance without any food inside. It is very dangerous. |
| Problem | Possible Reason | Solution |
| Oven cannot be started. | 1) Power cable is not plugged in properly. | Unplug. Then plug again after 10 seconds. |
| 2) Fuse is blown or circuit breaker is activated. | Replace fuse or reset circuit breaker (repaired by professional personnel of our company). | |
| 3) Trouble with outlet. | Test the outlet with other electrical appliances. | |
| Oven does not heat. | 4) Door is not closed properly. | Close the door properly. |
| Glass turntable makes noise when microwave oven operates | 5) Turntable and bottom of the oven is dirty. | Refer to “Cleaning and Maintenance” section to clean dirty parts. |
4.2 Pokyny k obssluze
3.1 MoHTaЖи CBbP3BaHe
OTCTpaHete ueJna ONAKObUeH MaTePnAIn npHaIeXHoCTn. IpeJIeJaTe fypHaTa 3a IOBpeiN OT BcKaKbVB XapaKTep KaTo BdIb6BaHn IIN CUYPeHa Bpata. He MOHTnpaIte, aKO fypHaTae NOBpeDeHa.
OTCTpaHeTe npEДna3HOTO FOJIO NO NOBbpxHOCTTa Ha TЯЛOTO Ha MINKPOBbJIHOBaTa φурн.
He oTcTaHЯBaIe CBeTJIo KaΦyBnI KaNak Mica, KoITo e npKauEn Hau KuyxHaTa 3a 3aunTa Ha MaHrHeTpOHa.
- Избере теловповьхнocт, осиурваца дoctаъчно посстразнсво 3а BXODЯцпт Em 3XODЯцNTe Tpb6n.
- МнималhaТа Инстацнонь Висунь e 85 cm.
3aɪnHaTá NOBbpxHocT Ha ypeɪa He TpЯ6Ba Da ce Do6JInxKaBa Do CTeHa. OCTaBeTe pa3cTOrHne OT MInHMym 30 cm NaI ΦypHaTa; MInHMaJIHOTo pa3cTOrHne MeJxDy ΦypHaTa N CbCeɪHaTa CTeHa, aKO IMa TaKaBa, TpЯ6Ba Da 6bJe 20 cm.
He oTcTpaHraBaiTe KpaKaTa PoI d cyPhaTa. - Бл_OKиранeto на BXODHNTe И/ИЛN ИЗХОДНITE OТВОРИ моче за NOВpeДи Фурнata.
- Пocтавete Фурна Та Вьзможно Най-далоче ot paДио anapatи и TeileВиЗори. Pa6otata Ha MИКрOBьЛНоваТа Фурна МОже ДА ппчни CMУшени на paДио И ТeileВиЗиОннITE ппемни. 2. Вклочete BaшаТа Фурна В CTандартEH DOMAKINHСК KOHTaKT.
YBepTe Ce, Ye NaPpeXeHneTo N YecToTaTa Ha Toka Ca CbIte KaTO Te3n Ha 6pHuHaTa Ta6eJa.

IPEyPExEHE: He nHcTaJInpaIte cypHaTb 06XBaTa Ha KOtIOHn IIN dpyrN i3TOUHnHa ToPInHa. Ako e nHcTaJInpaHa B 6JIN3OcT Do IIN HaN i3TOUHnK Ha ToPInHa, cypHaTa MoKe Da ce IOBpeiN rapaHcYraTa Ue 6bJe HeBaJIndHa.
IocTbHnHaTa NOBbpxHOCT MoKe da ce HaRopeuN IO BpeMe Ha pa6oTa.
4.1 KoHTpOJIeH paHeJ
4.2 Иструкции за pабotinga
Ta3n MmKpoBbJHOBa cypHa n3noJ3Ba MoJepHo eJIeKTPoHNO ynpaBJIeHne 3a peryJIpaHe Ha naPamEtprte 3a rotBeHe, TaKa Ye da OTROBOprT P0-Do6pe Ha BaIHTe HxJdN 3a rotBeHe.
Hnkora He noTaTЯrTe ypeDa n Ka6eMa My BbB BoJa IJI npyra TeuHOcT.
1.ИЗклочete урEDAи ИЗВаде Te Ucenca Na OTOKHTaKTa.
2.ИЗчakай Te Do ПьлноTO OXлжданe Ha ypeda.
3.Подьржай Te BbTpewHocTTa Ha Фурнata chsta.N36bpweTe c BlaJxHa KbPna,aKo NMa N3npbckaHa XpaHa IJIpa3JyJaCe TeUHocT, 3aJIeNHaJaNoCTeHnTe HaФурнata.MoJke da ce N3noJ3Ba Jek npenapat 3a nouchTbaHe, aKOФурнata e MHOrO МрсHa.N36raBaiTe CnpeIOBE nДpyrN CINHN NOuCtBaUm npenapatN,Tb' KaTo Te MoJce Da npuHnT OcBeTЯBaHe,MapKnipOBKnI Da HApUaT pOzpaHOCTTa Ha NOBpbXHocTTa Ha BpTaTata.
4. BbHsHnTe NOBbpxHocTn Ha cypHaTa Tp6Ba Da 6bDaT NouchTBaHn C BlaJXHa KbpNa. He N03BOJyBaIte HABJI3aHeTo Ha BOJa OT BeHTNJaCIOHnTe OTBOpN, 3a Ja IpeIoTbPaTnTe IOBpeJa Ha YacTnTe Ha cyphHaTa.
5.Избьрсваite чecTo I DBeTe CTpaHn Ha BpataTaNCTbKJIoTO, rapHNTypHTe Ha BpataTaNчacntte Do Hea C OrJIeD OTcPaHЯBaHeTo Ha 3aNotYBaHeto N npbckn. He n3noJ3BaIte a6pa3INBHN NOUcTBAuN INpenapaTn.
- He Доруckeй Te habokряпTo Ha KOHTPOHnHa NaHeI. Почист BaIte C MeKa BlaJxHa Kbpna. OctaВeTe BpataTHa HcypHaTa OTBopeHa, 3a Да пpeДOTbpaTITe HeOuaKBaHo BKJIuOuBaHepo Bpeme Ha YIcTeHе Ha KOHTPOHnHa NaHeI.
7.AKO OKOJIO N BbB BpaTaTa Ha cyphHaTa Ce akymyInpa npapa, n36bpweTe C MeKa Kbpna. ToBa moKe Da cJyuN, KOrato MmKpOBblHO-BaTa cyprHa e pa60Tnla npn MHOro BlaXnYcNoBn. ToBa e HopMaJIHo. - B nяkon cnyuan, moxe da Tpr6Ba da OTCTpaHnTe CTbKJHeHaTa NocTaBkA 3a nouchTbaHe. N3MnIte NocTaBkata C ToJIa caNyHeHa BOda INB MmJInHa MaShHa.
- PoIkaT ha noIbT Ha cypHaT a TpI6Ba da 6bDat noUcTBaHn peRyIrpHo, 3a da ce n36eHne npEkaJIeH shum. Bn 6nIo DoCTaTbUHO da n36bpIseTe DOJHaTa NOBbpxHocT Ha cypHaTc MeK npenapat. PoIkaT a MoXe Da 6bDe n3MIta c ToIIa canYHeHa BOda IIN B MmJIna MaunHa. Korato oTcTpaHITe 3a NouchTbaHe poIkata OT nOda Ha cypHaTa ce yBepTe, ye cTe J MOHTnpaII N o6paTHo BCBoTBeTHOTO pNOJKeHne.
- C orIeJ OTCpaHЯBaHeTo Ha IIOU MInu3-MN BbB BaShaTaФурHa, NocTaBeTe YaUa 3a BOJa N OBeJIeTe JIMOH B IbJIbOc KcД, NODXoJrS 3a MInKpOBbJIHOBaФурHa NpycheTeФурHaTа 3a 5 MInHyTn B MInKpOBbJIHOB peJxM. CJIeJ TOBa N36bPseTe Do6pe N NOcCyUWeTe C MeKa KbPna.
- MoЯ, CBbpxKeTe ce c OToPn3IpaH cepBn3eH ueHTbp, KOraTO JAmPaTa Ha φуpHaTa Tpr6Ba Da 6bDe CMeHeHa.
12.Фурнata Tpr6Ba Да 6bde поиctBaHa pe- rγларно И дбдат OTCTpaHЯВИ BCЯКВи OCTaHKn OT xpaHa.Ако Фурнata He ce ПОДьржа Упста,TOBa може Да пчини Deфektи NO nobpXHOCTHTe, KOnTo Да NOBЛягТ HeratINBHo Ha ekCПLOaTaцIOHnIЯЖИBOT Ha урEDA И e Bb3MOxHOb TOBa ДadoBoDE Do риCKOBe.