
PACW12CO - Air-conditioner WHIRLPOOL - Free user manual and instructions
Find the device manual for free PACW12CO WHIRLPOOL in PDF.
| Product type | Monobloc portable air conditioner |
| Brand | WHIRLPOOL |
| Model | PACW12CO |
| Operating modes | Cooling, Dehumidification, Fan only, Heating (depending on model) |
| Remote control | Yes, with AAA batteries (2 x 1.5 V) |
| Display | Digital display on unit and remote control |
| Refrigerant | R134a (GWP 2087.5) |
| Power supply | 220-240 V / 50 Hz |
| Recommended fuse | 20 A time-delay |
| Air filter | Washable, with cleaning indicator (light after 360 h of operation) |
| Water tank | Manual drain, error code E5 if full |
| Exhaust hose | Flexible, adjustable length (60 to 170 cm) |
| Window kit | Sliding, with rain protection |
| 6th Sense function | Yes, automatic temperature and airflow regulation |
| Sleep function | Yes, automatic shut-off after 8 h |
| Jet function | Rapid cooling or heating |
| Around U function | Ambient temperature measurement via remote control |
| Timer | Yes, programmable from 1 to 10 h |
| Swing | Yes, vertical air flow direction |
| Weight | Not specified |
| Dimensions | Not specified |
Frequently Asked Questions - PACW12CO WHIRLPOOL
User questions about PACW12CO WHIRLPOOL
0 question about this device. Answer the ones you know or ask your own.
Ask a new question about this device
Download the instructions for your Air-conditioner in PDF format for free! Find your manual PACW12CO - WHIRLPOOL and take your electronic device back in hand. On this page are published all the documents necessary for the use of your device. PACW12CO by WHIRLPOOL.
USER MANUAL PACW12CO WHIRLPOOL
6. TASTE 6TH SENSE (6. SINN)
Please ready all instructions carefully before using this product. When using this appliances, should always follow this instruction to reduce the risk of fire, electric shock, and injury to person.
Please keep this manual. If you deliver the appliance to other users, do handover this manual together.
These instructions shall also be available on website: www.whirlpool.eu.
SAFETY PRECAUTIONS
- The Installation and service/repair must be performed by a qualified technician, in compliance with the producer's instructions and following local safety norms. Do not repair or replace any parts of the appliance unless it is specifically written in the user instructions.
- Do not pull the power supply cord to remove it from the socket. Do not twist or press the power supply cord, and make sure it is not broken.
- Do not touch the power plug, circuit breaker and emergency button when your hands are wet.
- Do not insert your fingers or foreign substances into the air inlet/outlet of indoor&outdoor unit.
- Never block the air inlet or outlet of indoor and outdoor unit.
- Physically or mentally disabled people, children and people without any experience with the product are only allowed to use
the appliance if they have had specific training on how to operate the appliance by a person responsible for their security and well-being. The appliance is not intended for use by disabled people and very young children without supervision.
- Children should be supervised to ensure that they do not play with the appliance (including remote control).
- This appliance can be used by children aged from 8 years and above and persons with reduced physical, sensory or mental capabilities or lack of experience and knowledge if they have been given supervision or instruction concerning use of the appliance in a safe way and understand the hazards involved. Children shall not play with the appliance. Cleaning and user maintenance shall not be made by children without supervision.
AIR CONDITIONER PRECAUTIONS
Please strictly follow the below instructions:
- Long and direct exposure to cool air might be harmful to health. It is advisable to set the louvers in order to avoid direct cool air and deflect it within the room.
- Upon malfunctioning first turn the appliance off by pressing the ON/OFF button on the remote control, then disconnect it from power supply.
-
Always turn off the air conditioner by remote control first. Do not use the power supply circuit breaker or pull off the plug to turn it off.
-
Do not switch the appliance on and off too often as this can damage the appliance.
- Do not place any objects on the outdoor unit.
- Disconnect the air conditioner from the power supply if it is to be left unused for a long period of time or during a thunder/lightning storm.
- This product contains Fluorinated Greenhouse Gases covered by the Kyoto Protocol, the refrigerant gas being in a hermetically sealed system. Refrigerant gas: R410a has a Global Warming Potential (GWP) 2087.5.
SAFEGUARDING THE ENVIRONMENT
- This appliance has been made of recyclable or re-usable material. Scrapping must be carried out in compliance with local waste disposal regulations. Before scrapping it, make sure to cut off the mains cord so that the appliance cannot be re-used.
- For more detailed information on handling and recycling of this product, contact your local authorities who deal with the separate collection of rubbish or the shop where you bought the appliance.
SCRAPPING OF PACKAGING
- The packaging can be 100% recycled as confirmed by the recycling symbol . The various parts of the packaging must not be dispersed in the environment, but must be scrapped in line with local authority regulations.
SCRAPPING OF APPLIANCE
- This appliance is marked according to the European Directive 2002/96/EC, Waste Electrical and Electronic Equipment (WEEE).
- By ensuring that this product is disposed of correctly, you will help to prevent potentially negative consequences for the environment and for human health.
The symbol on the product or on the documents accompanying the product indicates that this appliance should not be treated as household waste, but must be given to the appropriate local gathering place where electric and electronic appliances are stored and recycled.
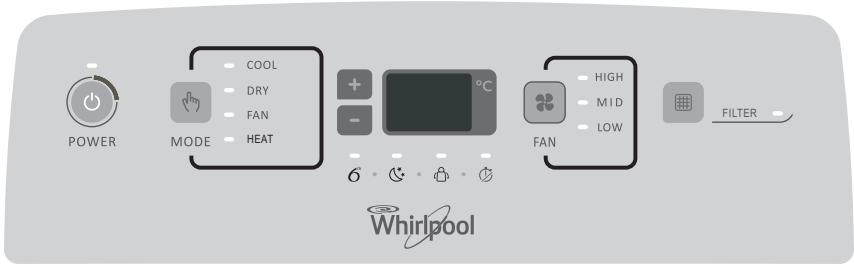
STARTING YOUR LOCAL AIR CONDITIONER

This section explains proper local air conditioner operation.
IMPORTANT:
- The air conditioner display shows the setting temperature.
- Only in standby mode the display shows the ambient temperature
- When changing modes while the air conditioner is operating, the compressor will stop for 3 to 5 minutes before restarting.
If a button is pressed during this time, the compressor will not restart for another 3 to 5 minutes.
- In Cooling or Dry mode, the compressor and condenser fan will stop when the room temperature reaches the set temperature.
NOTE: In the event of a power failure, your air conditioner will operate at the previous settings when the power is restored.
I. Select the mode. See "Mode."
2. Select the fan speed. See "Fan Speed."
3. Set the temperature. See "Temperature."
4. Press ON/OFF button to start the air conditioner.

POWER
NOTE: When the air conditioner is turned on for the first time after it is plugged in, it will run in the 6th Sense Mode control.
When the air conditioner is turned on at all other times, it will run according to the previous settings. 6th Sense Mode can be selected with the remote control only.
Only if the unit is operated in UNLIKELY VERY HUMID air, water will be collected in the container inside the unit. If the water container is full, the air conditioner will stop. The water container is full, the air conditioner will stop. The screen will display "E5" to inform you to empty the internal container.
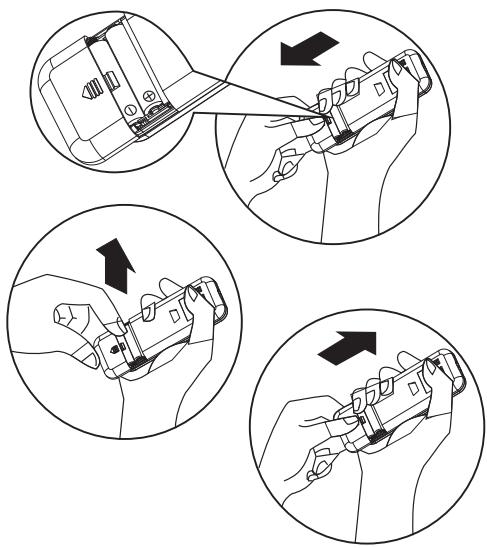
STORAGE AND TIPS FOR USING THE RC
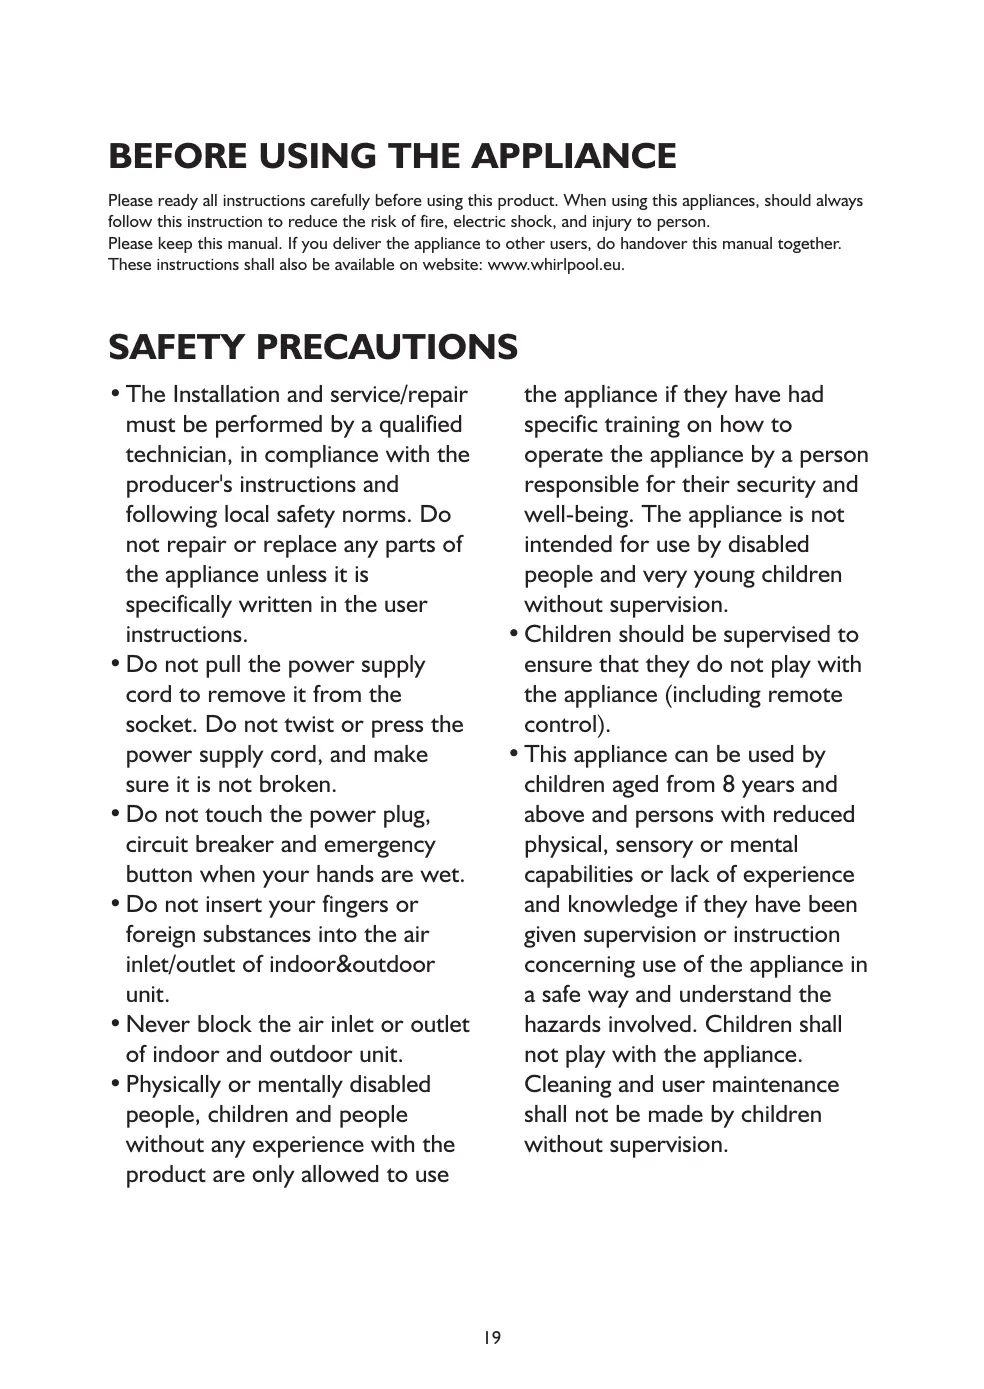
How to insert the batteries
Insert a pin and gently press down on the battery cover and push in the direction of the arrow to remove, as shown.
2 Insert 2 AAA batteries (1.5V) into the compartment. Ensure that "+" and "-" polarity is correctly positioned.
3 Close the battery cover on the remote control.
How to remove the batteries
Remove the battery cover in the direction of the arrow.
Press the positive pole of the battery softly with your fingers, then draw the batteries out of the compartment. All this should be done by adults, children are forbidden to remove the batteries from the remote control in order to avoid danger of swallow.
Disposal of the batteries
To protect natural resources and to promote material reuse, please separate batteries from other types of waste and recycle them through your local, free battery return system.
Precautions
- When replacing the batteries, do not use new batteries with old batteries, or different types of batteries as this may cause the remote control to malfunction.
- If you do not expect to use the remote control for some time, take the batteries out to prevent leakage of battery acid in the remote control.
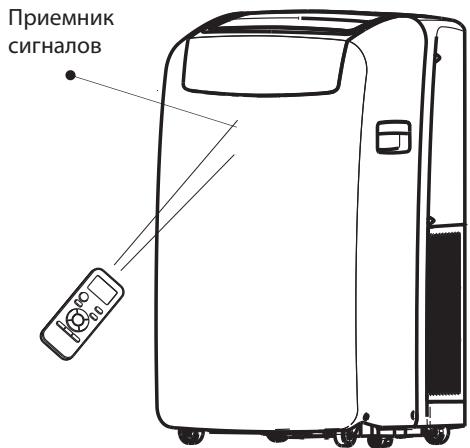
- Operate the remote control within effective range. Keep the remote control at least 1 meter from any TV set or HI-FI equipment.
- If the remote control does not work normally, take the batteries out and reinstall after 30 seconds. If it still does not work install new batteries.
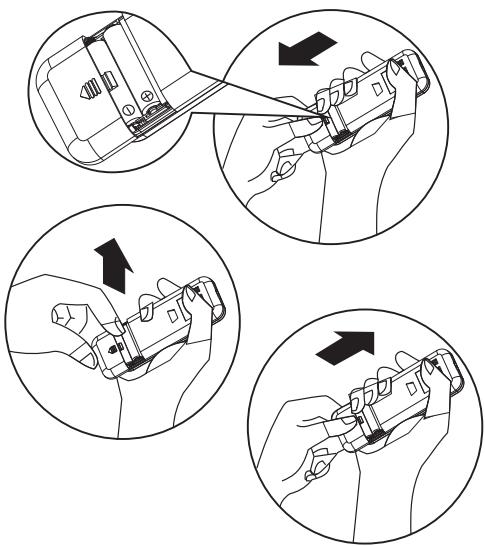
- To operate the appliance by remote control, point the remote control at the receiving device on the indoor unit, to ensure receiving sensibility.
- To send a message from remote control, the symbol will flash for 1 second. On receipt of the message, the appliance will emit a beep.
- The remote control will operate the air conditioner at a distance of up to 7m .
Each time the batteries are replaced in the remote control, the remote control is pre-set at Heat mode.
OPERATING MODE DESCRIPTION
Operating modes:
I. Press and release MODE until you see the symbol glow for the desired setting

MODE
- Choose Cooling, Dry, Fan Only or Heating.
Cooling-Cools the room. Press FAN to select High, Mid or Low. Press the Plus or Minus button to adjust the temperature.

COOL
- Dry-Dries the room. The air conditioner automatically selects the temperature. The fan runs on Low speed only.
NOTE: Dry mode should not be used to cool the room.

DRY
- Fan Only-Only the fan runs. Press FAN to select High, Mid or Low.

FAN
- Heating-Heats the room. Press FAN to select High, Mid or Low. Press the PLUS or MINUS button to adjust the temperature.
NOTE: Heating is NOT available for cooling only air conditioner.

HEAT
Fan Speed
I. Press and release FAN to choose the desired fan speed.

FAN
- Choose High, Mid or Low.
High-for maximum fan speed

HIGH
Mid-for normal fan speed

MID
- Low-for minimum fan speed

LOW
Filter Reset
- When the Filter Reset indicator light is lit, remove, clean and replace the air filter. See "Cleaning the Air Filter."
- Press and release FILTER button after replacing the air filter.

NOTE: After 360 hours of fan operating time, the Filter indicator light will turn on. It will remain on for 180 hours or until you press FILTER button. After 180 hours, it will turn off automatically.
Temperature
- Press the PLUS button to raise the temperature. Press the PLUS button once to increase the set temperature by 1^ .

- Press the down Adjust button to lower the temperature. Press the down Adjust button once to decrease the set temperature by 1^ , or press twice to decrease the set temperature by 2^ .

NOTES:
- In the Cooling and Heating mode, the temperature can be set between 18^ and 32^ .
- In Fan Only mode, the temperature cannot be set.
- In Dry mode, press the PLUS/MINUS botton the set temperature change by 2^ .
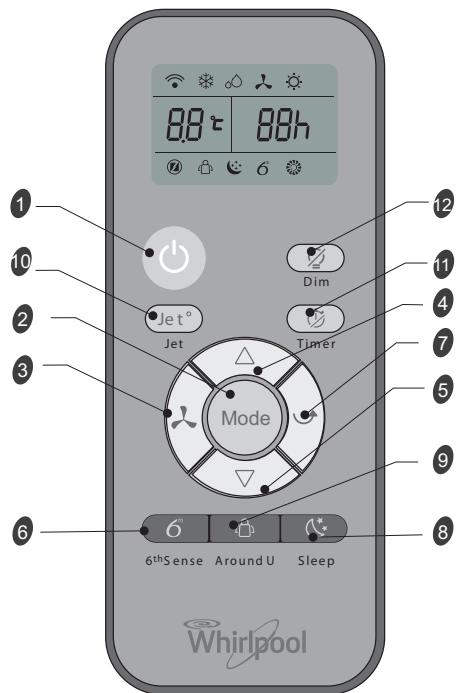
REMOTE CONTROL FUNCTIONS AND INDICATORS
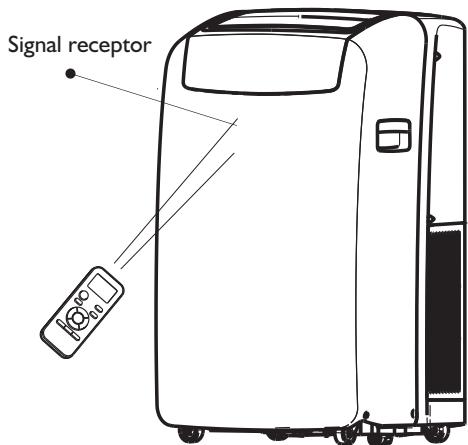
I. ON/OFF BUTTON
Starts and/or Stops the appliance by pressing this button.
2. MODE BUTTON
Used to select the operation mode.
3. FAN BUTTON
Used to select fan speed in sequence auto, high, medium or low.
4-5. TEMPERATURE BUTTON
Used to select the room temperature. Used to set time in timer mode and real time clock.
6. 6TH SENSE BUTTON
Sets or cancels 6th sense operation.
7. SWING BUTTON
Stops or starts horizontal adjustment louver swinging and sets the desired up/down airflow direction.
8. SLEEP BUTTON
Sets or cancels Sleep Mode operation.
9. AROUND U BUTTON
Used to set or cancel Around U function.
10.JET BUTTON
Used to start or stop the fast cooling or heating.
II. TIMER BUTTON
Used to set or cancel the timer on operation. Used to set or cancel the timer off operation.
12. DIM BUTTON
Used to turn on or turn off display light on indoor unit.
INDICATOR SYMBOLS ON RC DISPLAY

Cooling indicator

6th Sense indicator

Dry indicator

Sleep indicator

Fan only indicator

Around U indicator

Heating indicator

Jet indicator

Auto fan speed

Signal transmission

High fan speed

Display set timer

Medium fan speed

Display set temperature

Low fan speed
FUNCTION DESCRIPTIONS
Power On or Off
Press ON/OFF button to turn on or off the unit.

NOTE:
- Changing the mode during operation. Sometimes the unit does not response at once, wait 3 minutes
- Wait 3 minutes before restarting the appliance.
Selecting mode
I. Press and release MODE until you see the symbol glow for the desired setting.
Mode
- Choose Cooling, Dry, Fan Only or Heating.
Cooling-Cools the room. Press Fan to select Auto, High, Mid or Low. Press the up or down Adjust button to adjust the temperature.

- Dry-Dries the room. The air conditioner automatically selects the temperature. Fan runs on Low speed only.
NOTE: Dry mode should not be used to cool the room.
At "Dry" mode, the unit can decrease or rise 2^(3^ or 4^) if you still feel uncomfortable.

- Fan Only-Only the fan runs. Press FAN to select High, Mid or Low.

NOTE: Auto fan speed cannot be selected in Fan Only mode.
- Heating- Heaters the room. Press FAN to select the fan speed. Press the up or down button to select the temperature.

6th Sense mode
The air conditioner automatically selects Cooling or Dry mode, depending on room temperature and sets the target temperature.

Operation mode and temperature are determined by indoor temperature.
Electric Heat models
| Indoor temperature | Operation mode | Target temperature |
| 21°C or below | HEATING | 22°C |
| 21°C-23°C | FAN ONLY | |
| 23°C-26°C | DRY | Room temperature decrease 2°C after operating for 3 minutes |
| Over 26°C | COOLING | 26°C |
| Indoor temperature | Operation mode | Target temperature |
| 21°C or below | FAN ONLY | |
| 23°C-26°C | DRY | Room temperature decrease 2°C after operating for 3 minutes |
| Over 26°C | COOLING | 26°C |
Cooling only models
NOTE: Temperature, airflow and direction are controlled automatically in 6th Sense mode.
However, a decrease or rise of up to 2^ can be set with the remote control if you still feel uncomfortable.
- Press 6th Sense button.

6^th Sense
- In Fan Only mode, press Fan to select High, Mid or Low.
Jet mode
Jet button is used for fast cooling or heating.
NOTE: 6th Sense mode button does not operate when Jet function is selected.
- Press Jet in cooling mode. The air conditioner automatically sets the fan speed and the temperature to 18^ . Fast heating operates at auto fan speed, changing the set temperature to 32^ .

- To exit Jet mode press any button except Timer Around U and Swing button.
Fan Speed
I. Choose desired fan speed.

- Each time the "FAN" button is pressed, the fan speed is changed in sequence:

- Auto-automatically controls fan speed depending on current room temperature and temperature control setting.
NOTE: Auto fan speed cannot be selected in Fan Only mode.

High - for maximum cooling

Mid - for normal cooling

- Low - for minimum cooling

Temperature
- Press the UP adjust button to raise the temperature. Press the UP Adjust button once to increase the set temperature by 1^ , or press twice to increase the set temperature by 2^ .

- Press the DOWN adjust button to lower the temperature. Press the DOWN adjust bottom to decrease the set temperature by 1^ , or press twice to decrease the set temperature by 2^ .

NOTES:
- In the Cooling or Heating mode, the temperature can be set between 18^ and 32^ .
- In Fan Only mode, the temperature cannot be set.
- In Dry mode, press the UP/DOWN bottom the set temperature change by 2^ .
Around U function

When you press this button, the remote control transmits signal of the actual room temperature around it to the unit, and the appliance will operate according to this temperature to let you feel more comfortable.
Please keep the remote control in a location where it can transmit the signal to the unit properly. Press once to set and press again to cancel.
Sleep mode
Press Sleep button on remote control and the indicator in LCD lights up, the appliance operates in sleep mode and the fan speed is automatically set to low speed.

NOTES:
- The appliance will stop operation automatically after operating for 8 hours.
Fan speed is automatically set at low speed.. - In Cooling mode if the current room temperature is below 26^ , the temperature will automatically increase 1^ during the first hour after Sleep control is activated, then remain the same.
- In Heating mode, the setting temperature will decrease by 3^ at most for 3 hours constantly, then keeps steady.
I. Press MODE to select Cooling, Dry or Heating. NOTE: Sleep mode cannot be selected when Fan Only is selected.
2. Press the or button to set the temperature.
3. Press SLEEP. After 10 seconds, the lights on the control panel display will dim.
NOTE: The temperature and airflow direction may be adjusted during Sleep control. The fan speed is automatically set to Low speed. After 10 seconds, the lights on the control panel display will dim again.
4. To turn off Sleep control, press SLEEP, MODE, FAN, ON/OFF or wait 8 hours for Sleep control to turn off automatically.
DIM function
Press the DIM button to turn off the light and the display in the unit.

NOTES: When the light is off, receive signal will turn on the light again.
TIMER function
It's convenient to set the timer on with TIMER button before you leave so that you will come back to the comfortable room temperature you set. Press the TIMER button to set a switch-on button when the appliance is off. Press the TIMER button to set a switch-off timer during operation.

How to set TIMER
I. Set desired operating mode, temperature setting and fan speed firstly, then press the TIMER button and "01h" flashed on LCD.
2. Set desired operating mode, temperature setting and fan speed firstly, then press the TIMER button and "01h" flashed on LCD.
3. Point the remote control at the signal receptor of the unit, press the + or - button when "01h" flashes.
Choose the timer you want, then press the TIMER button.
A "beep" can be heard.
- Timer indicator on the control panel lights up.
-h" stops flashing.
4. To cancel the set timer: press the TIMER button again, a "beep" can be heard.
NOTES:
- The range can be set is 1 hour to 10 hours.
After setting a switch-on timer when the appliance is off, the Timer light on the control panel lights and - Setting a switch-off timer when the unit working, the Timer light of the control panel lights up.
Changing Air Direction
Press SWING once to change vertical airflow direction. Press again to stop airflow louver at desired airflow direction.

Normal Sounds
When your air conditioner is operating normally, you may hear sounds such as:
Air movement from the fan.
- Clicks from the thermostat cycle.
- Vibrations or noise due to poor wall or window construction.
- A high-pitched hum or pulsating noise caused by the modern high-efficiency compressor cycling on and off.
MAINTENANCE
Draining the Air Conditioner
(in accordance with the indication of Water Full under "Starting your local air conditioner".)
I. Press ON/OFF to turn off the air conditioner.
2. Unplug air conditioner or disconnect power.
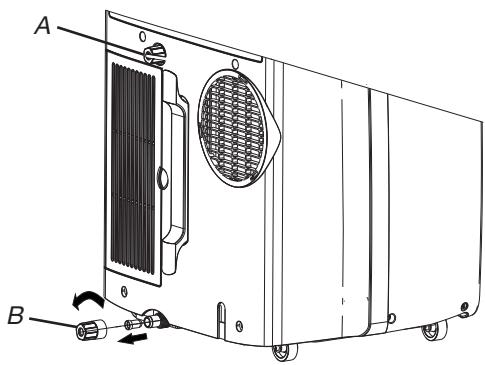
3. Move the appliance gently and stably to a draining location or outside to drain water. Do not move the unit before water is drained out completely.
4. Remove the secondary drain plug and drain water completely.
5. Remove the primary drain hose from the drain hose clip. Remove the drain hose plug from the end of the primary drain hose and drain water completely.
NOTE: If air conditioner will be stored after use, see "Storing After Use."
- Reinstall the drain hose plug and the secondary drain plug.
- Reattach the primary drain hose to the drain hose clip.
- Reposition the air conditioner.
- Plug in air conditioner or reconnect power.
- Press ON/OFF to start the air conditioner.
Cleaning the Air Filter
I. Press ON/OFF to turn off the air conditioner.
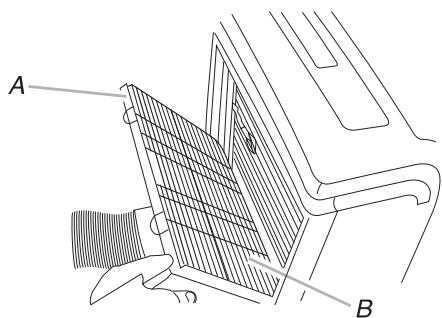
2. Open the filter panel door on the back of the air conditioner and remove it.
3. Remove the air filter from the filter panel door.
4. Use a vacuum cleaner to clean the filter. If filter is very dirty, wash filter in warm water with a mild detergent.
NOTE: Do not wash filter in the dishwasher or use any chemical cleaners.
- Air dry filter completely before replacing to ensure maximum efficiency.
- Reattach the air filter to the filter panel door.
- Reinstall filter panel door.
- Press ON/OFF to start the air conditioner.
Cleaning the Outside
I. Unplug air conditioner or disconnect from power.
2. Remove the air filter and clean separately. See "Cleaning the Air Filter."
3. Wipe outside of the air conditioner with a soft, damp cloth.
4. Plug in air conditioner or reconnect power.
5. Press ON/OFF to start the air conditioner.
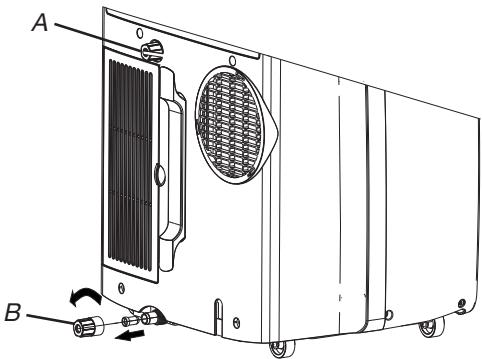
A. Secondary drain plug
B. Drain hose plug

A. Filter panel door
B. Air filter
Storing After Use
I. Drain the water (see the "Draining the Air Conditioner")
2. Run the air conditioner set to Fan Only for approximately 12 hours to dry the air conditioner.
3. Unplug air conditioner.
4. Remove flexible exhaust hose and store with air conditioner in a clean, dry area. See "Installation Instructions."
5. Remove window kit and store with air conditioner in a clean, dry area. See "Installation Instructions."
6. Remove the filter and clean. See "Cleaning the Air Filter."
7. Clean the outside of air conditioner. See "Cleaning the Outside."
8. Reinstall filter.
9. Remove the batteries and store the remote control with air conditioner in a clean, dry area.
TROUBLESHOOTING
Before calling for service, try the suggestions below to see whether you can solve your problem without outside help.
| Trouble | Analysis |
| Air conditioner does not operate | ·The power supply cord is unplugged. Plug into a grounded outlet. See "Electrical Requirements."·A household fuse has blown, or a circuit breaker has tripped. Replace the fuse, or reset the circuit breaker. See "Electrical Requirements."·The On/Off button has not been pressed. Press ON/OFF·The local power has failed. Wait for power to be restored.·Time-delay fuse or circuit breaker of the wrong capacity is being used. Replace with a time-delay fuse or circuit breaker of the correct capacity. See "Electrical Requirements." |
| Air conditioner blows fuses or trips circuit breakers | ·Too many appliances are being used on the same circuit. Unplug or relocate appliances that share the same circuit.·You are trying to restart the air conditioner too soon after turning off air conditioner. Wait at least 3 minutes after turning off air conditioner before trying to restart it.·You have changed modes. Wait at least 3 minutes after turning off air conditioner before trying to restart the appliance. |
| Air conditioner seems to run too much | ·Is there a door or window open? Keep doors and windows closed.·In cooling mode: the air conditioner is in a heavily occupied room, or heat producing appliances are in use in the room. Use exhaust vent fans while cooking or bathing and try not to use heat producing appliances during the hottest part of the day. Local air conditioners are designed as supplemental cooling to local areas within a room. A higher capacity air conditioner may be required, depending on the size of the room being cooled.·In heating mode: the air conditioner is in a very cool room. Local air conditioners are designed as supplemental heating to local areas within a room. A higher capacity air conditioner may be required, depending on the size of the room being heated up. |
| Air conditioner runs for a short time only, but room is not cool or hot | ·Set temperature is close to room temperature. Lower or Higher set temperature. See "Operating mode description". |
| Display error code | ·If the unit display error code E5, it is water full in the unit, you should drain the water, see "Draining the air conditioner". After draining, you can operate the unit.·If the unit display error code E1/E2/E3/E6/E7/EA, please contact customer service. |
| Air conditioner runs, but does not cool/hot | ·The filter is dirty or obstructed by debris. Clean the filter.·Air outlet is blocked. Clear air outlet.·The setting temperature is not compatible. In cooling mode: set temperature is too high. Lower set temperature. In heating mode: set temperature is too low. Higher set temperature. |
| Air conditioner cycles on and off too much | ·The air conditioner is not properly sized for your room. Check the cooling/heating capabilities of your local air conditioner. Local air conditioners are designed as supplemental cooling/heating to local areas within a room.·The filter is dirty or obstructed by debris. Clean the filter.·In cooling mode there is excessive heat or moisture (open container cooking, showers, etc.) in the room. Use a fan to exhaust heat or moisture from the room. Try not to use heat-producing appliances during the hottest part of the day. In heating mode the temperature of the environment is too high. Do not use your air conditioner when the temperature of the environment is too high.·The louvers are blocked. Install the air conditioner in a location where the louvers are free from curtains, blinds, furniture, etc.·The outside temperature is below 18°C. Do not try to operate your air conditioner in the cooling mode when the outside temperature is below 18°C. |
INSTALLATION REQUIREMENTS
Tools and Parts
Gather the required tools and parts before starting installation. Read and follow the instructions provided with any tools listed here.
I. Tools needed
- Phillips screwdriver
- Saw
- Cordless drill and 1/8'' bit
- Scissors
Pencil
2. Parts Supplied
The company provides only one plan to install local air conditioner. See "Install local Air Conditioner".
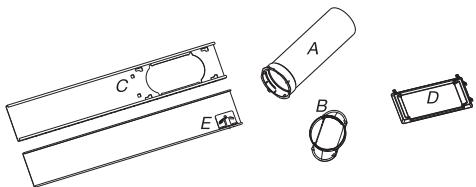
A. Flexible exhaust hose
B. Window exhaust adapter
C. Outer slider section
D. Rain Cover
E. Inner slider section
Location Requirements
NOTES:
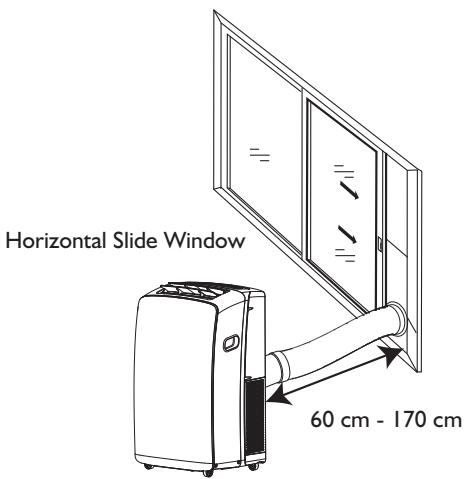
- The flexible exhaust hose allows placement of the air conditioner between 23 12 and 67 (60 cm and 170 cm) from window or door.
- Local air conditioners are designed as supplemental cooling to local areas within a room.
To ensure proper ventilation, keep the required distance from the return air outlet to the wall or other obstacles at least 2312 (60 cm). - Do not block air outlet.
- Provide easy access to grounded outlet.
Electrical Requirements
- The local air conditioner should be connected to a 220-240V / 50Hz, 20-amp fused grounded outlet.
- The use of a time-delay fuse or time-delay circuit breaker is recommended.
- All wiring must comply with local and national electrical regulations and be installed by a qualified electrician. If you have any questions, contact a qualified electrician.
Use your power supply cord:
Plug power supply cord into a grounded outlet.
NOTES:
- A damaged power supply cord must be replaced with a new power supply cord obtained from the product manufacturer and must not be repaired.
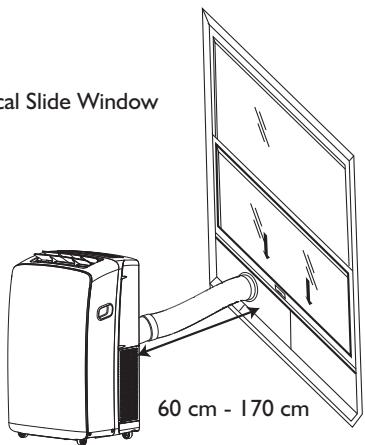
Vertical Slide Window
INSTALLATION INSTRUCTIONS
Unpack the Air Conditioner
Remove packaging materials
- Remove and dispose of/recycle packaging materials. Remove tape and glue residue from surfaces before turning on the air conditioner. Rub a small amount of liquid dish soap over the adhesive with your fingers. Wipe with warm water and dry.
- Do not use sharp instruments, rubbing alcohol, flammable fluids, or abrasive cleaners to remove tape or glue. These products can damage the surface of your air conditioner.
Install Local Air Conditioner
Install Exhaust Hose and Adapter
I. Open the window.
2. Measure the window opening.
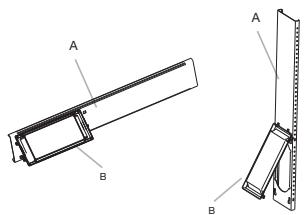
- If the window opening is too narrow for the window slider kit, remove the inner slider from the window slider kit.
A. Inner slider section
B.Outer slider section
- Using a saw, cut the inner slider section to fit the window opening.
- Slide the inner slider section into the outer slider section of the window slider kit.
- Place the window slider kit into the window, extending it to fit the width of the window. Be sure the rain cover is on the outside of the window.
NOTE: For casement window installation, the window slider kit may be installed vertically with the window slider kit opening at the bottom.

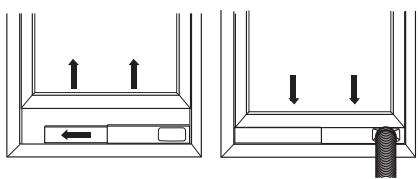
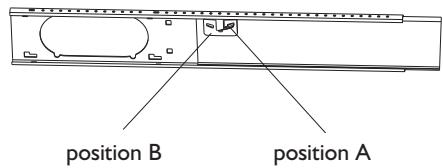
- Use a special plastic device with spring to fix the window brackets: Place the device to the position A, the pin may stretch out then lock the brackets, when place the device to position B, the pin will draw back and the brackets will be released the window slider kit.
- Close the window onto the window slider kit to secure.
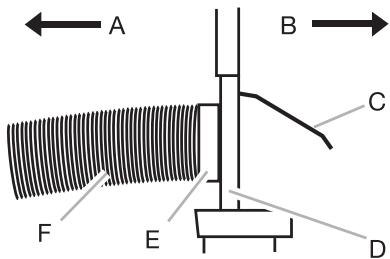
A To local air conditioner
B Outdoors
C Rain cover
D Window slider kit
E Window exhaust adapter
F Flexible exhaust hose
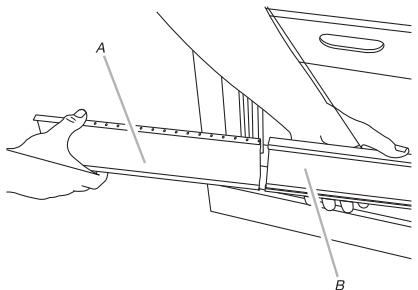
Install Exhaust Hose and Adapter
I. Roll the air conditioner to selected location. See "location Requirements".
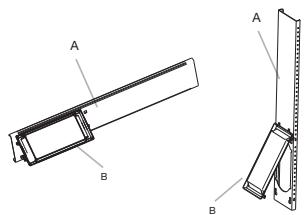
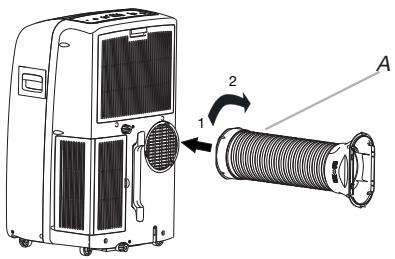
2. Attach the window exhaust adapter to the flexible exhaust hose. Turn anticlockwise until securely locked into place.

A Flexible exhaust hose
B Window exhaust adapter
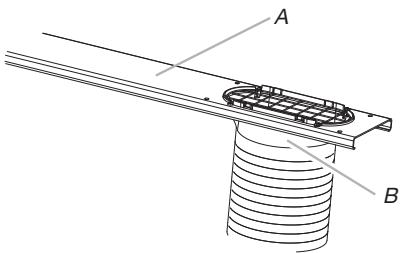
- Insert the dummy coupling into the slot on the back of the air conditioner.
- Put and rotate to lock the hose into place.

A. Flexible exhaust hose
Window Installation
I. Your window slider kit has been designed to fit most standard vertival and horizontal window applications. Roll the air conditioner to selected location. See "Location Requirements".
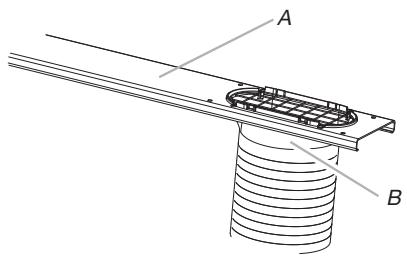
2. Insert the window exhaust adapter into the slot on the window slider kit.
A. Window slider kit
B. Window exhaust adapter
Rain Cover Installation
Attach the rain cover to the holes of the outer slider section. Then slide the rain cover until securely locked place.
Vertical Installation
Horizontal Installation
A. Out slider section
B. Rain cover
Complete Installation
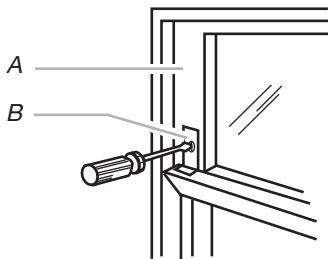
I. Place the window-lock bracket on top of the lower window and against the upper window sash.
2. Use 1 / 8^ drill bit to drill a starter hole through the hole in the bracket.
3. Attach the window-lock bracket to the window sash with wood screw(provdie 4) to secure the window in place.
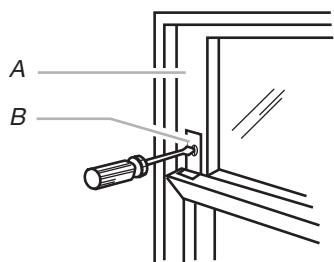
A. Upper window sash
B. Window-lock bracket
- Insert the foam seal behind the top of the lower window sash and against the glass of the upper window.
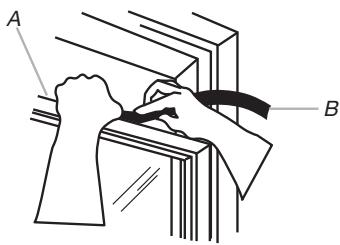
A. Top of lower window sash
B. Foam seal
AFTER SALES SERVICE
Before contacting the Customer Care Centre:
I. Try to solve the problem yourself based on the descriptions given in the "Troubleshooting".
2. Turn the appliance off and restart it to see if the fault persists.
If after carrying out the above checks, the fault persists, contact the Customer Care Centre.
Please give:
- a short description of the fault;
the exact model of the air conditioner; - the service number (this is the number found after the word Service on the rating plate), located on the back of the appliance. The service number can also be found in the warranty booklet;
- your full address;
- your telephone number.
If repair work has to be carried out, contact the Customer Care Centre (Use of original spare parts and a proper repair is guaranteed).
You will need to present the original invoice.
Failure to comply with these instructions could compromise the safety and quality of your product.

AVANT D'UTILISER L'APPAREIL
Mode 6th Sense (6eme Sens)
Exigences relatives aux raccordements electriques
AFVOER VAN DE VERPAKKING
AFVOER VAN HET APPARAAT
7. KOYMNI SWING (Taλavτωη)
iakontei n EKKIVE tNv aiwpon tnc ypiiaoc opicovtia cpuoiqcn kauouice tNv eniountn avodikn/kaOobikn kateuohvon tnc poic aepa.
8. KOYMNI SLEEP ('Yntvooc)
PntnoTe to koumuI ON/OFF
(Evpyoioiən/Aevepyoioiŋ) yia va evpyoioiOeTe n va aeepeyoioiOeTe tn ova

\SHMEIΩΣH:
- Aλλayntou tpoio λειοupyiac katá tn δiαρκεia tnc λειοupyiac.
MepiKec, φopec, η movδa δev aπokpivetai αeωc, πeπεινα πeipéveTe 3 επτa
- PatnoTe to koumi 6th Sense (6n aiognon).

6^th Sense
A Eukamtooc owlnvac Eaywynic
B Ppooapouyeac Eaywync npaohpuo
- Eioayete To ooiwa Oueuktnpa Tny undoxn OTNV niow nleupa tou klauiatiotkou.
- TonoθeTnToE kai περIoTρεγTe tov εukαμπTo σωλνa yia va tov ασφλioεTe Θη θεοι tou.
A. Eukamptoc owlvac eayyniC
TooTeTnOe npaOpO
- To kit oIioθntnpa napaθρou exi oxδiaotε i e Tétoio tpóno, wote va eivai katáλλno yia ta πepiooTepa tuniKa takaKópu Ka opióvtia oupóeva npáθupa. Metakivnote to KλiμatiOTIKO OTNV Eπileyμevn ΕeON. Deite tvn napaypao «Anaitnoic tonoθétanç.
- Eiayetye tov npoapmuoyea Eaaywync npaohpuo stnu todoxni oTo kIT oAnthnpa npaohpuo.
Mid (Mellan)- for normal kylning

Vertical installation
Horisontell installation

FORHOLDSREGLER FOR KLIMAANLEGGET
Vis timer-innstilling
BB
Vis innstilt temperatur
FUNKSJONSBESKRIVELSER
Strøm av eller pa
Horizontal installations
A. Ytre gliderdel
B. Regndeksel
Komplett installationsjon
I. Sett vindusåsbraketen oppå den nedre vindusrammen og opp mot det øverste vindusrammen.
2. Bruk 1/8" bor til a drille et feste hull gjennom hullet i braketten.
3. Fest vinduslåsbraketten til vindusrammen med treskrue (4) for a feste vinduet pä plass.
A. Øvre vindusramme
B. Vinduslasbrakett
FØR APPARATET TAGES I ANVENDELS
6 Indikator for 6th Sense
Indikator for Slumre
Indicator for Around U
Indikator for Jet
Signaltransmission
BBh Vis indstillet timer
BB Vis indstillet temperatur
FUNKTIONSBESKRIVELSER
On ell er Off
Tryk pa knappen ON/OFF for at tende aller slukke for enheden.

BEMAERK:
Opbevaring after drug
KAUKOSÄATIMEN TOIMINNOT JA KUVAKKEET
I. VIRTAPAINIKE
6. 6TH SENSE -PAINIKE
SPUŠTěNI VOLNÉ STOJÍCÍ KLIKATIZACE
POPIS PROVOZNÍCH REŽIMÜ
Provozní režímy:
4-5. TLACITKO TEPLOTA
MEPbI INPEIOCTOPOXHOCTN
- UCTaHOBKa I TexHnueCKoe 6cIyJxNBAHHe/peMOHTdoJIxHbI BblIOJIHrTbcrTexHnueCKIM CneUaJIncTOM B COOTBeTCTBmC INHCTpyKzIaMn IpOu3BOAnTeJIa IN DeIcTBYIOZMM MeCTHbIMN HopMaMn IO 6e3OJaCHOCTN 3aIpeUaETcra peMOHTnpoBaTb IIN 3aMeHЯTb DeTaJIIn Prn6Opa, 3a NCKJIoueHnEM ClyuaeB, KOHKpeTHO OROBOpHHbIX B INHCTpyKzIu N0 EKCpIyatau.
3aŋpezaetc TaHnyt 3a ceTeBOI shHyp dIy TOrO, yTO6bI BbIHyt bNkky n3 po3eTkn. He nepern6aIte n He nepexmaite ceTeBOI shHyp, cIeINTe 3a ero NaJIeXaIIM COCTOHNEM.
3aπpezaetcKacaTbCSBnKN, aBTOMaTa 3aUNTbl N KHOPIKn aBapnHOrO OCTaHOBa BlaJXhIMN pykamn.
3anpeuaeTcBCTaBnTb naIbcuI pyK nIIN NOCTOpOHnE npedMeTb B OTBepCTnI dJI 3a6Opa/BbInycka BO3dyXa BHyTpEnHero I HapxKnOro 6IoKOB.
- Hn B Koem cnyuae He nepereopaxnBaIte OTBepCTna Dnla 3a6opa/BbInycka Bo3nyxa BHyTpeHHeRo n HapyKHOro 6JOKOB.
JIIOJAMC OOrpaHnUeHHbIMN 03MOxHOCTaM,JeTAM NlIaM, He IMeOuIM ONbIta
IcNoJIb3OBAHnJaHHOro Iprn6opa,
pa3pe7aetcraIOJIb3OBAtbcra IM
TolbKO NocJe TOrO, KaK OHI
IpoUIn CneuAJIbHOe OObyuHne
IIO IcNoJIb3OBAHnIO prn6opa IOd
pyKOBODCTBOM InuCa,
OTBETCTBeHHORo 3a INX
6e3OpaChOCTb IN 3DOpOBBe.
Iprn6op He IpeHa3NaueH dJa
EKCPlnyatauN JIOdbMn C
OrpaHnueHHbIMN BO3MOxHOCTaMn
IIIN DeTbMn 6e3 PrncmOTpa.
Kak BCTabJIaTb 6aTapei
1 BCTaBbTe ⅢTnΦT n CJIeKa HaIadABHTe Ha KpbIshKy OTcKa n CdBnHbTe ee B HApPaBHeHIn, O6O3HaueHHOM CTpeKN Ko HA Kopnyce, KaK NOKa3aHO Ha pncyHke.
2 UctaHOBITE B OTCsE K 2 6aTapeu Tnna AAA (1,5 B).Ipn yctaHOBKe co6JIoJaTe o6O3HaueHHyIO NOJrPHOCtB (^ + ^ n"-").
3 3aKpoIe KpbIuKy OTCeKa 3JIeMeHToB NITaHnnybTa Iy.
Kak BbiHImatb 6atapen
Cdbnhte Kpbikky OTeJeHn6bTapeB HnpaBHeHn CTpeKN.
Clerka npnKmTe naIbZamn nIOJXmTeIbHbI nOJIoc 6aTapei,3aTeM n3BLeKeTIe 6aTapeu n3 OTdelenHna.3aMeHy 3JeMeHTOB nITaHnI DOJXhbl BbIIOJIrTa B3POcJIbe,
PnI NTOM DeTAM 3aIpeuaeTcR N3BLeKaTb6aTapeN I3 npIbTa DY BO n36exHne npOrIaTbIBaHnI.
Ytuln3aun6atapei
Дязштblпрюнbix pecypcoBи
обсpeуня NOBTOHOrO INCNoIb3OBaHnA
MaTePnaIOB Heo6XODmO OTdJIaTb 6aTapeNOT
DpyrNX TINOB OTXOIOB U yTInI3INPOBaTb INC
NOMOuBIO MeCTHOJ 6ecPnATHOH CNTeMbI
BO3BpTa 6aTapei.
Mepbippeoctopoxhoctn
- Пи заме He 6aTapeн He nCNoIb3yIne HOBbIe 6aTapeN BMeTe CO StapbIMn, a TaKxHe He nCNoIb3yIne 6aTapeu paZIuHbIX TINOB, TaK KaK 3TO MoJET nPnBecTn K NOBpeJdeHnIO pyNbTaДИCTaHcUOHHOrO ynpaBJIeHnI.
- Ecn npednojanaeTcndntelhny nepepbiv B nCnOJb3OBaHmN pJbTa Dy, peKOMeHdyETcR n3BLeY n3 Hero 6aTapeu, yTO6bl npEDoTbpaNTb BO3MOxHyU yTeKy 3NeKTPoJINa t NOBpeXdHeHne PJIbTa.
- Ynpablenhe yctpoiCtBOM npn nomoouny npbTa DY doJnxHO ocUyceCTBnTbcB NpepeIax erO padNyca deIcTBn. He pacnoIaraiTe npblT DY ha paCCToHnn MeHee 1 M oT TeNeBUNOHbIX npneMHNKOB nIi Hi-FI annnapaTybl.
-Писбояв БаразOTе pylbTaДУИЗВLEКИTe 6aTapeи Ha 30 cekyHd, a 3aTem BHOBb yCTaHOBIne Ix. EcIN pa6OToCnOC6HocTh bpylbTa He BOcSTaHOBnAcb, 3aMeHIne 6aTapei.
-ПиИСПОЛБОВАн ИльТаДу habрал Te erо на ппимhoe OKошКо на BHTpeHem
6Ioke KOHdUcNoHepa, YTObbl NOBbICNTb KaueCTBO pNMeMa KOMaHd.
- PnnperepaeyKOMaHdbcnybTaNyHaero DnCnPeeB TeueHne 1 cekyHdb6yDet MngaTb CmMBOI .PnpnoyuHn CnHnA-la-KOMaHdbi OT nybTa Ny KOHNzIOHep 6yDet n3daBaTb 3ByKOBoi CNrHaI.
- Пльт Ду обесенььает управлике Кондцноером на пасстаян до 7 M.
Kaxdbpa3 npu yctaHOBe B nybT DY HOBORO KOMPNekeTa 6atapei nylbT nepexoNTB pezIM o6OrpeBa.
ОПИСАНЕ PЕЖUMOB PABOTbl ППБОРА
Pexumbl pa60Tbl:
- HaxmTe KhoNky MODE (PEXIM) n He OTnycKaIte ee, NOKa He NOBtCn CnMBoN, COOTBeTCTByOuNn HxHOn NaCTpOJKe.

MODE
- Виберпе Cooling (Охлajдени), Dry (Осушени), Fan Only (Толъко вентлитог) пи Heating (Обогрев).
- Pexim Cooling (OxlaJdeHne) - oxlaJdaet nomeJeHn. HaxmTe KhoNky FAN (BEHTNJTROP)ДЯ BbIbopa hyXhON knOpocTu: High (BbICOKa), Mid (CpeDnay) NIn Low (Hn3ka). HaxmTe KhoNky C pIIIOcOM NIn MInHycom dJa peRyIINpOBKn TempePaTypbl.

COOL
- PexMM Dry (Ocyuene) - BbIOnHaeT Ocyuene BO3dyxa B NOMEuEHN. Bb6op TempeatypbBbIOnHaeTcB KOHNzHOpeaBTOMaTUnecKn. PnN 3tOM BeHTnJIaTOp pa60aet TOnbKO Ha Hn3Ko KNOPocTN (Low).
IcnoIb3yeTcIЯ yCTaHOBKn OTMeHb I BbIKJIIOUeHnI NO TaIMepy.
12. KHOPIKA DIM (IOIDCBETKA)
IcnoIb3yeTcA DnB KblOueHn N OTKlOueHn NOCBETKn Dcnpner Ha BHTpeHHem 6JIOke.
A BATOMaTnuecka CKoPoCTb BeHTnIaTopa
BbICOKaC KOpOCTb BeHTnIaTopa
CpeHnA cnOpocb BENTnIaTopa
Hn3ka CKoPoCTb BeHTnIaTopa
6' INHnkaTop peKIma 6th Sense (6-e yBCTBO)
IHHdNkaTOp pexIma Sleep (CoH)
HINHnKaTOp pexmAm Around U (TempepaTypa OkpykaUoSei cpebl)
UHdukatop pekma Jet (bbyctpb)
Pepedaya cunhana
BBh Iucnnei yctaHOBKn TaImepa
BB T DnCnneynyctaHOBKn TEMpepaTypbI
ОпИСАне PЕЖИМOB PABOTbl
BkIIOUeHne nn BbIKIOUeHne
HaKmTe KhONkY ON/OFF (BKJ./BbIKJ.), qTo6bl BKNHouNTb INI NBIKKHouNTb np6Op.

ПРИМЕЧАНЕ:
Cmeha pexkma BO Bpema pa60tbl np6bopa. Hnorga np6bop He pearnpyet cpa3y, noDoxjnte 3 MNHyTbI.
- Побождente 3 мнутbl, пешке чемпесацкатл рибор.
Bb6op pexima
- HaxmTe KhoNky MODE (PEXIM) n He OtnyckaIte ee, Noka He NoBtCn CnMBOJ, COOTBeTCTByUOuH NyKHOH NaCTpoiKe.

-
Виберпente Cooling (Охлajдени), Dry (Осушени), Fan Only (Толъко вентлитог) пи Heating (Обогрев).
-
Pexim Cooling (Oxnaedne) - oxlaqdaet nomeeene. Haxmte KhoNky Fan (BeHTnIaTOp) dans BbIbopa ckopoctn BpaeeHnB eHTnIaTopa: Auto (ABTomatueckn BbIbOp), High (BbICOKa), Mid (CpeDnA) nn Low (Hn3kA). Haxmte KhoNky perynilpOBKn co cTeJIKO BBEpx nII IN BHN3 dIy 3aDaHn HJXHOI TempepaTybl.

- PexMM Dry (OcyuheHne) - BbIOnHaeT ocyuHne BO3dyxa B IomeUeHn. Bb6Op TempeatypbI bIbONHReTcB KOHNIOHepe aBTOMaTUnecKn. PpN 3tOM BeHTnIaTOp pa60aet TolbKO Ha Hn3Ko KcOpocTn (Low).
PexkM 6th Sense (6-e yBCTBO)
Pexm pa60tI n TempepaTpya 3aBncrT OTeMpepaTpyb B NOMEueHn.
Moden C 3neKtpo06orpbeBaTelem
HhctpymeHTbI n dTaII
Co6epnte Heo6xOaMbIe IHCTpyMeHTbI n DeTaII, npexJe Yem HaunHaTb MOHTaJ. IpouHtaiTe INcoHIOdaIte IHCTpyKcUN KO BcEM nepeUncJIeHHbIM 3deCb IHCTpyMeHTaM.
- Heo6xOaMbIe INCTpyMeHTbl
Kpecto06pa3HaJ OTBepTka
-Пида
AkkymyIaTOPHaI dpeIb co CBePLOM 1/8 IIOMa
HOxHnUbI
KapaHdaa
- BYTOH "SWING" (3ABbPTAHE)
Cnnpa nn nyska 3aBbPtaHTo Ha kany3nte 3a XOpN3OHTaIIHO peryInpaHe N 3aJaBa KjelaHaTa Nocoka Harope/HaOny Ha Bb3DyUHHn IOTOK.
- BSYTOH“SLEEP”(CINIILPEXIM)
BkIIOUba nIIN n3KIIIOUBa cIpyra pexim.
- ByTOH "AROUND U" (OKOJO BAC)
I3no3Ba ce 3a BkIoUcbAHe IInn I3KIOUbaHe Ha fynKcunra "Around U"(Okono Bac).
- BYTOH "JET" (TYPBO)
I3nO3Ba Ce 3a BkIIOUBaHe nIN I3KJIIOUBaHe Na fYHKZIraTa 3a 6bP3O oxJaXdaHe nIN OTOpJIeHne.
- BSYTOH "TIMER" (TAIMEP)
I3no3Ba ce 3a BkIIOUBaHe IINI IN3KIOUBaHe Na fYHKuTAta "TaMep 3a BkIIOUBaHe".
I3nO3Ba Ce 3a BkIIOUBaHe IINI IN3KIIIOUBaHe Ha YHKuTAta "TaIMep 3a IN3KIIIOUBaHe".
BnCoka ckopoCT Ha BeHTInaTopa
CpeHa ckopocHa BeHTnlaTopa
Hncka ckopocT Ha BeHTnlaTopa
6 INHnKaTOp"UeCTo UyBCTBO"
IHHdNkATOp 3a cpiu pexHM
IHHdNkaTop "Around U"
④ INHДикаТор 3a Typ60 peжIM
PnpdaBaHeHa cnHnA
BBh Ioka3Ba HaCTpoiKaTa Ha TaIMepa
Bb Toka3Ba 3aJaHeHaTa TempepaTpa
ОпИСАнUE HA ФУнкцИNTE
BkIOUOVAHe mIIN 3KJIIOUVAHe
HaTnCHeTe 6yToHa ON/OFF (BKJ./I3KJI.), 3a da BkJIIOUHTe NJIЯ DA I3KJIIOUHTe KJIIMaTnka.

3A6EJIEXKA:
- Cмяна на рекима по Врeme на pa6oTa. ПонякORA уретьт He pearupa BeDHara, taka che n3чakaiTe 3 MInHytN.
-Изчakай Te 3 mHyTu,прдп да рсета rtnpaTe ypeda.
I36npaheHa pexnM
- HatackaTe n otnyckaTe MODE (PEKIM), DOKATO CBETHE CUMBOJbT Ha JKeJaHaTa Hactpoika.

2.ИЗберетe"Оxnackданe","ИЗсушаванe","СамоВентиатор"ил"Отонпенe".
- OxnaJaHe - oxnaJa nOmeJeHneTo. HATnCKaIte Fan (BeHTnlaTOp), 3a da n36peTe ABTomaTnUHa, BnCOKA, cpeHa nn HnCKa CKoPcT. HATnCKaIte 6yToHnte CbC cTpeKa HaRope nnHaOnLy, 3a da peRyInpate TemnepaTypata.

I3cuwaBaHe - 3CuwaBA B3dUxA B nomeeHneTo. KImMaTnKbT n36npa aBTOMaTuHo TempepaTypa. BeHTnlaTopbT pa6Ot caMo Ha HnCKa CKOpocT.
3A6EJIEXKKA: Pekim "I3cysbaHe" He Tp86Ba da ce n3PON3Ba 3a OXlaJxdaHe Ha NOMeueHneTO.
B pexnM "U3cyuabaHe"ypeBt moKe da haMaann nn da yBelenny TempepaTypa c 2^ (3^ nn 4^) , aKo BCE oSe He ce ueyBCTBaTe kOMΦopTHO.

- Camo BeHTnlaTOP - pa60Tu camo BeHTnlaTOPbT. HatncKaIte FAN (BEHTNlATOP), 3a da n36epe Te BncoKa, cpeHa nn HnCKa ckopocT Ha BeHTnlaTopa.

3A6EJIEXKKA: ABTOMaTnHaTa CkOPOCT Ha BeHTnIaTopa He MoKe Ja ce I3bIpa BpeKIM "Camo BeHTnIaTop".
- OToPJIeHne -OTOnJIaBa nomeUHeNIETo. HAtnCKaIte FAN (BEHTINATOP), 3a da n36epTe cKOpocTtHa BeHTInaTopa. HAtnCKaIte 6yToHnTe CbC CTpeIka HaRope nnHaDoNy, 3a da n36epTe TempepaTypata.

PexMM "6-To yBCTBO"
KlmaTKnbI 36npa aBtOMaTnHOppeXIM "OxlaJaHe"nn "N3cuBaHaE" B 3aBncmocOT Tempeatypata B cTaAtn HacTroBa ueBeTa Tempepatypa.

PekimbT Ha pa6ota N TempepaTypata ce onpejenT OT TempepaTypaT B NOMeuenTo.
EneKtpueeckMoJoEN3aOTONneHne
3A6EJIEXKKA: ByToHbT 3a peXnIM "IeCTo yBcTB0" (6th Sense) He yHKcuOnHnpa, KOrato e n36paHa yHKcnyTa "Typ6o."
- Hatnche Jet (Typ6o) B pexmHa oxlaqdahe. KImatKbT aBtOMaTuHo hAcIpoBa cKOpocTa Ha BeHTnlaTopa n TempepaTypa tHa 18^. Ppi 6bp3O OTIpHe N KImatKbT pa60n C aBTomatuHa cKOpoc Ha BeHTnlaTopa, KaTo IpomHe 3aJaDeHaTa TempepaTypa Ha 32^
Jet°
- 3a da n3ne3eTe ot Typ6o pejMma,HaTnCHete KOIto n Da e 6yToH, C n3KJIuOeHne Ha 6yToHnte Timer (TaIMep),
Around U (Okono Bac) u Swing (3aBbptaHe).
Ckopoct Ha BeHTnlaTopa
I3toBaHe Na KInMaTnKa
(pn INIINKaizna 3a nbIeN KOHTeHep 3a BODa, Bx. "IyckaHe Na IOKaJIHHa KJIMAtNK")
- HATINCHETe ON/OFF (BKJL./N3KJI.), 3a da n3KJIIOUHTe KIMMATIKA.
2.ИЗваде TEцпсени Na Климатиka OT KOHTaТа Илпп配电ьс悔етахранБаHETO.
3.Ппемсгете урда винмално И стблно Ha място заитувае Илл наьн,за заитугte Вогда. He мсгетe урда,пддвогда д ce и STOTUNla ДOKраi.
4.CBaIeTe DOnbIInHTeNHaTApIO6Ka 3a N3TOUBAHe N3TOUeTe BODaTdoKpai.
5.Cbane OCHOBnHa Mapky 3a n3TOBaHe O CKo6aTa My.
CbaIe np6kata B KpaHa OCHOBnHa Mapky 3a n3TOBaHe
n n3TOye BOdaTdoKpa.
3A6EJEXKA: Ako KInMaTnKbT ige 6bIe np6paH 3a cbXpaHene cIeI yIOTpe6a, Bx. "CbxpaHene cIeI yIOTpe6a".
6. Пocstabete OTHOBIO np6kata Ha Mapkya 3a n3TOUbaHe nДоьнIHTeHATA np6ka 3a n3TOUbaHe.
7. Okaete ochOBHnma Mapkyu 3a n3ToUbahe Ha ckO6aTa My.
8. Bbphete KImatika Ha MCTOTO MY.
9. BкИочete КIMMaTиkaВ KOHTaKta Иль ВьЗТаHOBeTe eNeEkpO3axpaHBAHeTo.
10. Hatachete ON/OFF (BKJI./M3KJI.), 3a da BKJIIOUHTe KIMMATika.
TouncTBaHe Ha Bb3dUnnHa Qmntbp
- HataHcHete ON/OFF (BKJ./N3KJI.), 3a da n3KJIIOUHTe KIMMATnka.
- Otbopete BpaTnUkata Ha nahanela Ha nItbpa, KoTo e Ha Tbp6a Ha KJIIMatika, I a CBAJete.
3.ИЗвадеТБьздушня ФиNTbp OT bpaTчКаТ ha NaHeNaHaФиNTbpa.
4.ПоунстефиNTbpaспрахocmykaчka.AкоФиNTbрт eMHORO cyx,ИЗМиITE ro CToTnla BODa C Mekпериел npenapat.
3A6ELEKKA:He MmIteФinTbpa BcBdOMnraHa MaunHa N He 3NpON3BaYTe HNKaKBN NOUChTBau XMMUKaJI.
5.ИЗсушete HanbIино Вьзduшпя Филтbp,прди на го Вьрнete Ha мястOTO му, за де сега rapанда мakсималhaТа му eфektimbHOTC.
6.3akpenete Bb3dyuHnna fnnTbp KbM bpaTuKaTa Ha naHeNa ha fnnTba.
7.BbpheteBpaTmukkataHa naHela HaΦnITbpaHa MrcTOTO M.
8. HataChete ON/OFF (BKJ./I3KJI.), 3a da BKJIouHtTe KJIIMATnKA.
TouncTBaHeOTBbH
1.ИЗваде Teцпсени Na Климатika OT KOHTaKa TИnpeкьс悔Te 3axpaHbAHETo My.
2.ИЗвадете Вьздушни ФиNTьр и Го почеспг Рдени.Вж. "Почиствано вьздушни ФиNTьр".
3.ИЗБРБЕТЕКINIMATINAOTВБСМЕKAВДАХHAКьрпа.
4. Bклioчete КлmaТиКВ KOHTaNTI NII Bb3ctaHOBeTe eNeKTPO3aXpaHbAHeTO.
A.Доьнштелна побka 3a n3toubahe
B.Пpo6kaHaMapkya3aN3ToUbaHe
A. Bpatauka Ha naheHa φnItbpa
B.B3dyeuhenΦnTbp
- HatncheT ON/OFF (BKl./I3Kl.), 3a da BKliouynte KImatnka.
Cbxpanenne cneynotpe6a
1.ИЗTOUYE BODATA(BK.“ИЗTOUBA He KaJIIMaTnKa")
2. Octabete KInmatnka da pa6oTb B pexim "Camo BeHTINATOp" 3a OKOIO 12 Yaca, 3a Da ce n3Cywn.
3.ИЗваде тценина на Климатinksо Контакт.
4.CBaIeTe rBbKaBnMa MapKyu 3a OTBeXJaHe nTo CbXpaHbAte 3aeDNo C KInMaTnKa Ha NcTO cCyX MoCTO. Bx."VHcTpKuIm 3a MoHTnpaHe."
5.CbaneTe KOMPnEKeT3a 3npo3opeu n ro CbXpaHBAIte 3aeJHO C KJIIMaTIka Ha YnCTO n CyXo McTc. Bx. "INHCTpyKUIn 3a MOHTnpaHe."
6.ИЗвадеTeФиNTьрази ro почесTe.BЖ.“ПочисванеHa Bb3dУшпЯФиNTbp".
7.ПочиртeteКлIMaTnkaOTbB.N.BxKTe"ПочИсТВанe OTbBn".
8. Bbphete qntbpa Ha mactoto MY.
9.ИЗвадеTe 6aTePIMTe n CbXpaHЯВaTeДиCTaHcIOnHHTOуправление 3aEДноСКИМATИКаHaЧИстОngуСХМЯТСТо.
OTCTPAHЯBAHE HA HEN3ПРABHOCTN
Ipeu da ce 6auneBcepu3a, u3npo6baTe npednoxehnraTno-dony - Te moxe da Bn nomorhat da peuinte npo6nema 6e3 yxka nomou.
| Heɪзправноct | Анелиэ |
| КлIMаткьт не рабoting | 3axpaHbauηrT ka6e e n3KluyenOT OKTakTa. BkIoueTe UpeBa 3a3eMeH NOKTAK. Bx. "ЗИSCBANHЯ KмЕLEKTPO3AXPAHBAHeto". Изгоря e npednaitelВ tabIoToHa doma BnIInpEkbCbaVt ha eNektrpueckata BeprA rce e n3Klouyil. Cmehete npednaitelЯ nIbKloueTe OTHOBO npEkbCbaAha Bepurata. Bx. "ЗИSCBANHЯ KmELEKTPO3AXPAHBAHeto". He e Hatichat 6byoTbON/FF (BKJL./IV3KJI). Hatichete ON/OFF (BKJL./IV3KJI). П配电chato e eNektpo3axpanBaHeto. Ичakayte Дд bZbCTAHOBY T eNEKTPo3axPahBaHeto. ИзрОБСВANHЯ npednaitelЯ nIbPekCbBaCBy c6c 3aKbSChENe NO BpeMe e c HeNoDxOJaIq КалчтET. Cmehete c npednaitelЯ nIbPekCbBaCBy c6c 3aKbSChENe NO BpeMe c NODXOJaIq КалчтET. Bx. "ЗИSCBANHЯ KmELEKTPO3AXPahBaHeto". |
| КлIMаткьт пушиныв иЗагаре на п配电дати ял п配电дати ял п配电свае на п配电свачыа н配电свачыа н配电свачыа н配电свачыа н配电свачыа н配电свачыа н配电свачыа н配电свачыа н配电свачыа н配电свачыа н配电свачыа н配电свачыа н静电ур Тьрду Мноуо | ИзрОБВATE TBbRdme MHOrO UpeДу в Edna HneEeKTPuCKe Bepira. ИЗКluyeTe OT KONTAKТЯ IIN п配电метe T hKoNуeDу B dpyra E neEeKTPuCKe Bepira. ОпИВATE сда сецтAPIATE KIIMATINA TBbRdpe ckopo сда кato сдауюн.KILOUCHI.NIЗЧAKAJTE пОпЕЗТРССССССССССССССССССССССССССССССССССССССССССССССССССССССССССССССССССССССССССССССССССССССССССССССССССССCS СмEHINI CTPE PEXIMA. ИЗЧAKAJTE NODE 3MHNYt cIeD N3KlIOUHBAHTo HO KIIMATINA,п配电Ду ra PECTAPITRATE. |
| Изглесда, ч КлIMаткьт рабoting Тьрду Мноуо | Има li OTBOPeHa Brata iIиIpOzopeuz? Дрьжte BbatITE иПрozopuzite 3aTBopeENi. В ржим Ha oxlaJdahe: KIIMATINA TBbRdye B pOMSeHNe, B KOETO MMa MHOro XOpa IIN CE N3KlOUnH YA KIIMATINA,п配电Ду NaCBy OTPOMITENI YpeДу. ИЗПОЗВАITE BEHTINATOP 3a OTBExDAH, KORATO rOttBVEI IIN CE KByNETe, И ce noCTapAITE pRe3 Nai-TOnNATA cuaTc OT DeHЯ DA He N3PON3BATE ypeDi, KOTTO N3PbYBaT BTOPIHNA. ЛokанITE KIIMATINI CA npEDnHa3NaChEuH 3a DoNbLiHNTENO OXIAJDAHne HA ONPeDEnH MeCTA B NOMeUeHNeTo. B ZABICMOCST OT pAsMepa Ha oxlaJdaHOT OMOseHNe MoMeJe Da e HeO6XODIM KlIMATIK C no-ToLAMKANAQTET. В ржим "OTOnLHNe": KIIMATIK TB e MHOro STUdeH NOMeUeHNe. ЛokaнITE KIIMATINI Ca п配电Ду NaChEuH YA OTOHДHNO OTPOMeHNe Ha onPeDEnH MeCTA B NOMeUeHNe. B 3aBVCIMOCST OT pAsMepa Ha OTOpLBAHOT OMOseHNe MoMeJe Da e HeO6XODIM KIIMATIK C no- ToLAMKANAQTET. ФИNTbPbT e МрbceH nIи E zanyuShen OT OToNduIy. ПоUpCTe foNITbpa. ИзхODNHЯ OTBOP 3a Bb3dux e B0nkpuAn. ПОчstete ИЗХODNHЯ OTBOP 3a Bb3dux. НасТPoEHATA TemPepaType Ha e NOxODAIa. B pexIM "OxlanJDAH": NaCTpoEHATA TemPepaType a п配电ALEHBO VBCOA. Habalete NaHCTpoEHATA TemPepaType. B pexIM "OTOnLHNe": NaCTpoEHATA TemPepaType a PexkanetoH NIsCA. YBileuHete NaCTpoEHATA TemPepaType.a |
| КлIMаткьт рабoting само 3a КраTKO Врeme, н Б в РОшшевOT He хладо Ил.TОПLO | ФИNTbPbT e МрbceH nIи E zanyuShen OT OToNduIy. ПоUpCTe foNITbpa. ИзхODNHЯ OTBOP 3a Bb3dux e B0nkpuAn. ПОчstete ИЗХODNHЯ OTBOP 3a Bb3dux. НасТPoEHATA TemPepaTyPe Ha e NOxODAIa. B pexIM "OxlanJDAH": NaCTpoEHATA TemPepaType a п配电ALEHBO VBCOA. Habalete NaHCTpoEHATA TemPepaType. B pexIM "OTOnLHNe": NaCTpoEHATA TemPepaType a PexkanetoH NIsCA. YBileuHete NaTCTpoEHATA TemPepaType. |
| КлIMаткьт ВКИЮУВИ ИЗКИЮΥВА TBbRdpe ЧecTo | КlIMATIKTB He c PoOxOДуЯшь рasmER 3a NOMeUeHTo. ПОверete kanaClITeta 3a oxlaJdahe/OTOnLHNe Ha BAshry NOLaHEN KIIMATINI KIOLANITE KIOMILATINI Ca npednHa3NaCheuH 3a doTobPbHnI ToHbJDAH OXLAJDAH/OTOnLHNe Ha onPeDEnH MeCTA B NOMeUeHNe. ФИNTbPbT e МрbceH nIи E zanyuShen OT OToNduIy. ПоUpCTe foNITbpa. В ржим Ha oxlaJdahe B NOMeUeHTo IMA npEkoMepHa TOnLHIna IIN BlaRa (rotBeHe B OTBOPeHnI CBDOBE, duWObE nДр.). ИЗПОЗВАITE BEHTINATOP 3a OTBExDAH He TOnLHIna IIN BlaRatA ot NOMeUeHTo. ПОверete се рпзHa nIb-TOnLTAчТот OT DeHЯ DA He n3PON3BATE ypeDi, КOTTO IN3bYbAT TOnLHIna. B pexIM "OTOnLHNe": bTVbHIna TELMepaType a PpeKALeHo BvCoka. He ИЗПОЗВАITE KIIMATINA, KORATO bTVbHIna TELMepaType a PpeKALeHo BvCoka. ЖалузITE ca 6blokiransHa mЯсто, Кддeto NizIoTo He 6blokirpaЖалузITE, наррIMER nepdeta, ilorpi, mebei n.T.H. Вьншatura TemPepaType a по 18°C. He n3PON3BAAte KIIMATINI B pexIM Ha oxlaJdaH, korato Вьншatura TemPepaType a по 18°C. |