
80 HELIUM 4G - Tablet ARCHOS - Free user manual and instructions
Find the device manual for free 80 HELIUM 4G ARCHOS in PDF.
User questions about 80 HELIUM 4G ARCHOS
0 question about this device. Answer the ones you know or ask your own.
Ask a new question about this device
Download the instructions for your Tablet in PDF format for free! Find your manual 80 HELIUM 4G - ARCHOS and take your electronic device back in hand. On this page are published all the documents necessary for the use of your device. 80 HELIUM 4G by ARCHOS.
USER MANUAL 80 HELIUM 4G ARCHOS
Description of the device 4
Through the Wizard 6
Connecting to a 3G network.. 7
Connecting to a WiFi network 9
The AndroidTM interface. 10
Getting familiar with AndroidTM 14
Troubleshooting 16
For more information, please consult the FAQs and the User manual of your product on: www.archos.com. Make sure to read them before considering any product return. Your deal may be no big deal.
Package Content
ARCHOS 80 xenon
USB cable

QSG booklet

Warranty, legal & safety booklet

Charger
2
Getting Started
Charging
Charge your device by plugging your power cable into the power connector.
The device will start charging. The Power indicator light is red while the battery is charging.
Press the ON/OFF button to turn on the device.
You can use your ARCHOS whilst it charges.
Installation Wizard
The first time you start up your ARCHOS, the installation wizard will help you set up your device. Simply follow the onscreen instructions.
TIPS:
To receive more complete service, please register your product.
With a computer: go to www.archos.com/register.
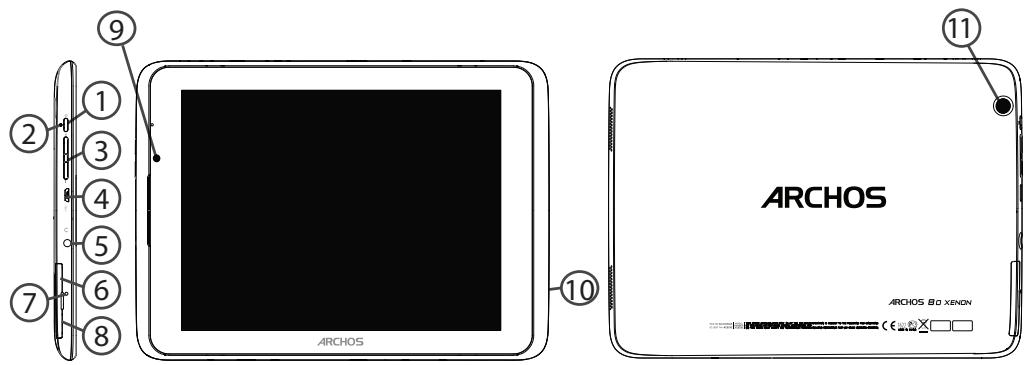
Description of the device
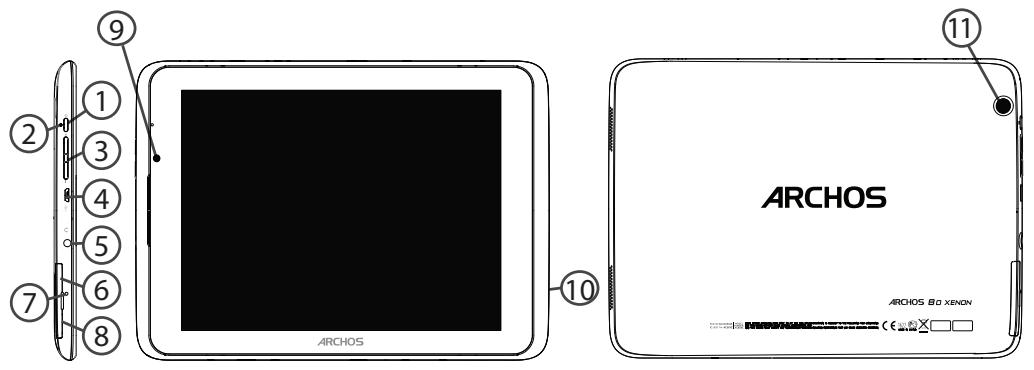
(1) ON/OFF button
(2) Charging indicator
(3) Volume buttons
(4) Micro-USB port
⑤ Headphone jack
⑥ SIM card slot
⑦ Reset button
(8) Micro-SD card slot
(9) Front camera
(10) Loudspeaker
(1) Back camera
Through the Wizard
The first time you start up your ARCHOS, the installation wizard will help you set up your device:
- Language
- Date & time
- Wifi network
- My location
- 3rd party apps
TIPS:
We recommend that you set up your device in the WiFi zone of the network that you will regularly be using.
Connecting to a 3G network
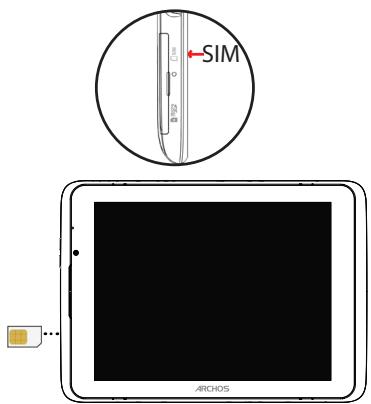
Your ARCHOS is equipped with a SIM card slot. Any standard SIM card can be inserted. There is no provider restriction. The ARCHOS will only have signal if you are in an area covered by your 3G provider's 3G or EDGE network.
Inserting your SIM card
Before inserting a SIM card, turn off the device.
- Open the cover of the SIM card slot.
- Place the SIM card and push it into place.
- Turn on the device.
A Pin number may be requested.
4. Enter the SIM card pin number and tap OK.
Your device will attempt to connect to the 3G network of your provider.
To remove the card, push it deep down and a spring will take it out.
Connecting to a 3G network
Tips:
If your device does not connect to your 3G provider's network
- Contact your 3G provider to obtain the connection parameters.
- On your device, tap Settings.
-
Select Wireless & networks > More... > Mobile networks.
-
In Network operators, select your operator.
- In Access Point Names, select the correct access point name and enter the exact connection parameters.
Connecting to a WiFi network
EN
WARNING: Make sure that you are in a WiFi zone.
You can access the WiFi settings quickly from the status bar in the bottom right corner of the screen:
- Touch the time in the status bar. The status dashboard is displayed.
- Touch the time a second time in the status dashboard. The quick settings will display.
- Touch WiFi to open the WiFi settings menu.
- If the WiFi is off, slide the WiFi switch to the ON position. Once the WiFi is on, the ARCHOS will scan for WiFi networks in range.
- Touch the name of network you want to connect to.
Private networks are shown with a lock icon and will require you to enter your password.
TIPS:
- When entering a WiFi password, we recommend that you select "Show password" so you can see the characters you are typing.
- To get the correct WiFi password (or settings) for the network, contact the WiFi network provider.
- If your WiFi is on and you are in range of a network that you previously connected to, your ARCHOS will automatically attempt to connect to it.
The Android™ Interface
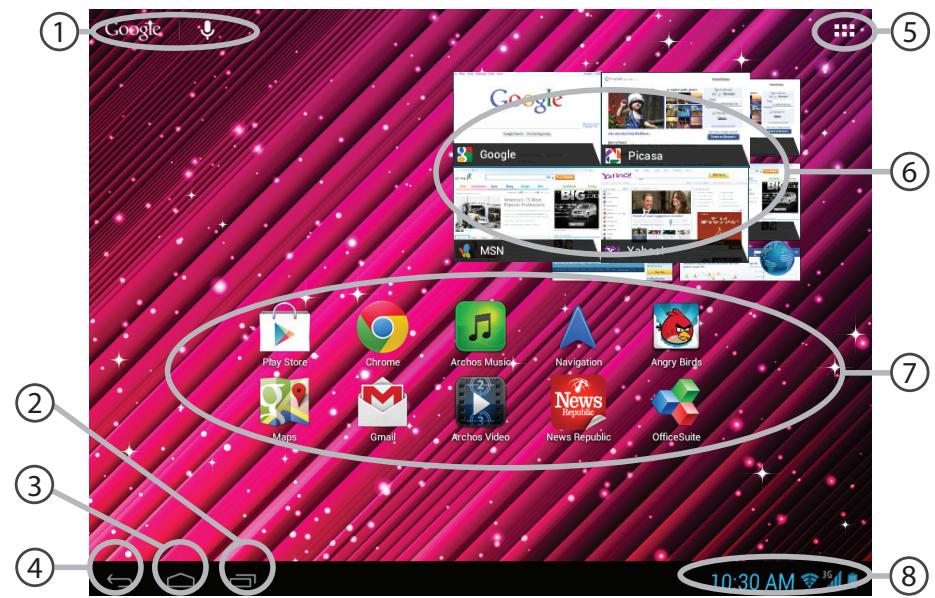
① Google™ Search
Touch for text search or search by voice
(2) Recent apps buttons
(3) Home button
(4) Back button
(5) All Apps buttonTouch this icon to show all the applications and widgets installed on your ARCHOS.
All your downloaded applications are here.
(6) Widget
Android™ apps shortcuts
The status bar >Displays notifications and quick settings
The Android™ Interface
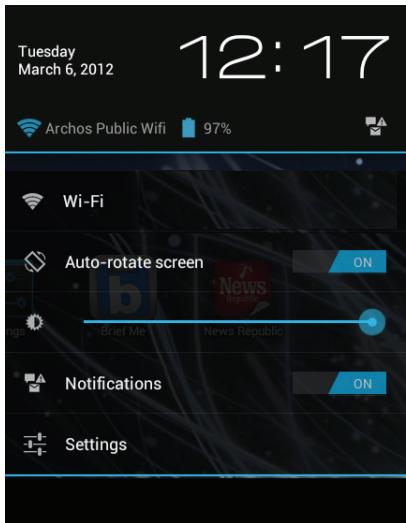
The Quick settings:
WiFi:
To turn on/off your WiFi connection.
- Auto-rotate screen:
To activate/deactivate automatic screen orientation as you turn your ARCHOS.
- Brightness:
To adjust the screen brightness.
- Notifications:
To activate/deactivate incoming notifications.
- Settings:
To access all your settings.
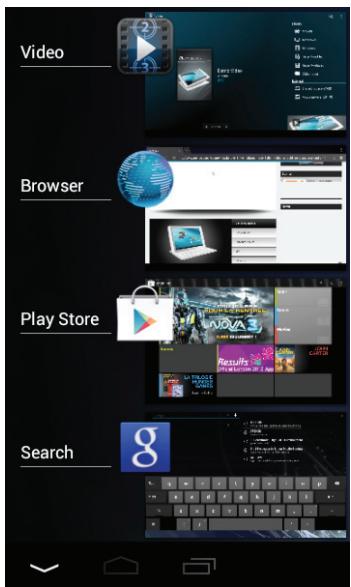
The Recent Apps:
Opens a list of thumbnail images of apps you've worked with recently.
- To open an app, touch it.
- To close an app, swipe it left or right.
Getting familiar with Android™
The extended home screen:
Navigate between different home screen panels by swiping left and right.
Moving a home screen item:
Touch and hold your finger onto it until the positioning gridlines appear, then slide it to the desired location, and release your finger.
Removing a home screen item:
Touch and hold it, slide your finger towards the top of the screen and drop it over the Remove icon.
Uninstalling an item:
From the All apps screens, touch and hold it, slide your finger towards the top of the screen and drop it over Uninstall bin.
Creating application folders:
Drop one app icon over another on a home screen and the two icons will be combined.
Widgets:
Touch the All Apps icon on your home screen. Touch Widgets at the top of the screen. From the main Widgets screen, you can move around widgets just as you do for app icons.
Changing your wallpaper:
Hold your finger on the screen at an empty location, then choose from the list.
Locking the touchscreen:
From the quick settings dashboard in the status bar, touch settings. Scroll down and touch security. Touch Screen lock. Touch the type of lock you would like to use. After you set a lock here, a lock screen is displayed whenever your screen wakes up, requesting the pattern, PIN or other specified key.
Troubleshooting
If your device is frozen:
Press the ON/OFF button for 10 seconds or use the Reset button by inserting a paper clip.
If your device doesn't turn on:
-
Charge your device.
-
Press the ON/OFF button for 10 seconds or use the Reset button by inserting a paper clip.
If the touchscreen doesn't function correctly:
From Settings, touch Touchscreen calibration.
If you want to extent the life of your battery:
Decrease the screen brightness and turn off the wireless connections if not in use.
If your device functioning is too slow:
Close all apps which are not currently used. Use ARCHOS System Monitor.
If your WiFi reception is too low:
Make sure you are not far from the WiFi hotspot.
Update the firmware of the device. http://www.archos.com/support
From Settings > Repair & Formatting, select Reset Android.
Contact your Wifi connection provider.
SIM card PIN locked
Contact your network operator to obtain the PUK code (Personal Unblocking Key).
If you want to restore your product (forgotten password? erase all your settings?):
- While holding Volume+, press the ON/OFF button.
- Hold Volume+ until the Android system recovery is displayed.
- Use the Volume buttons to scroll and the ON/OFF button to validate.
- Select "Wipe data/factory reset" and validate.
- Select "Yes -- delete all user data" and validate.
- Select "Reboot system now" and valid.
Table des matières
3G-networkverbinding. 87
WiFi-networkverbinding. 89
De Android™-Interface. 90
WiFi-networkverbinding
WiFi-networkverbinding
TIPS:
WiFi-networkverbinding
Para activar/desactivar as notifications recebidas
- Definções:
TapaHTnN INHCTpyKcN N 6e3ONaCHOCTN

3apndoe yctpoictBO
Hauano pa60tbl
3apnka
Дязардкусточь Кбеллкючite Ka6eJb 3NeKtpoNTaHЯ K pa3bemy nHTaHЯ.
UcTpOncTbO NaunHaet 3apAky.
INHdkaTOp 3apAnK KpaChbI, aAkkymyTOp 3apJaTaTc.
HaxmTe KhONkY BKJI/BblKJI IЯ BkIIOueHn ycTpoiCTBa.
Bb mojkeTe nCnoJIb3OBAt b yCTpoIcTBO B TO BpeM 3apJdKn.
Mactep yctaHOBKn
При посту востvo.
ДялэТOrO сеДунTe UNHCTpyKцЯнMa NaЗкpaHe.
ПОЛЕЗHAИ NHФОМALДА:
Bb moxeme nonyumb 6olee nonhbl o6bem ycny, 3apeucmpup08a u3deneue.
Дялэмоzo, nocpeсdmьOM komnbiomepa, nepeüdume no ccblke www.archos.com/register.
Описанце устpoиства
(1) Khoŋka BKЛ/BbIKЛ
(2) INДиКаТОр 3аряДкИ
(3) KhoPkn rpoMkoCTn
(4) Мнкpo-USB пот
⑤ Pa3bemДЯHayshnKOB
⑥ Cnot SIM-KapTbl
⑦ Bo3BpaT aannapaTHoro o6ecneueHnK
⑧ Cnot KapTbl Micro-SD
⑨ ΦpoNTaJIbHaЯ KaMepa
10Динамки
(1) kamepa
RU
Mactep NaCTpoiKn
Bo Bpemr nepBoro 3anycka ARCHOS mactep yCTaHOBKN NOMOKeT Bam HAcTpOnTb yCTpoiCTBO:
-3bIK
-ДаТаи Время
-BecepnoBODna cetb
-Mectononoloxene
-Ппложене дугхnpoиЗводтел征
COBET:
Mby pekomehdyem bblonlHmB hacmpouky ycmpoucmba e 30he Wi-Fi cemu, komopoB Bb6yde me peynpno noIb30abmbcra.
Ecn yctpojCTBO He BKIOUaTeTc:
1.3apndte yctpoonctBO.
- Haxmnte Ha KhoIky BKJI/BblKI n yapedxnbaiTe b TeueHne 10 cekyHd.
Ecnncnepbni 3KpaH cyHKunOHnpyET HnpaBnIbHo:
Bb6epnTe p03uun Settings > Repair & formatting (HactpoKn > BocstahOBJIeHne n φopMaTnpOBAHne), npKocnTecb K p03uun Touch-screen calibration (KaIIN6pOBka ceHCOPHOrO kpaHa).
EcnBbIXOTnTe npoDnTb cpoK cnYk6bl 6aTapen:
UmeHbIHTe rkoCTb 3KpaHa N BbIKJIIOHTe 6ecnpoBOHDhIE COeINHeHn, ecNI OHn He IcNOJIb3yIOTc.
Ecn yctpoCTBO yHKUOHpyeT cnKOM MeJeHHo:
3aKpOte Bce npJIOXeHn, KOToPbIe B daHHbIMOMeHT He NCIOJb3yOTcA.
Ecn npnHmAmbI cnrHaJ Wi-Fi cnuKoM cna6:
Y6eHntecb, yTo He haoDnTeCb cInskom daJeKO oT y3na doctyna Wi-Fi.
06HOBnTe BCTpOeHHyMQKpONpPpAMMy yctpojCTBa:
http://www.archos.com/support.
C6poCbTe NIOBTOPO BVeIte npaMeTpbl CoeINHeHnA.
6paTntecb K npoBaienepy cetn Wi-Fi.
3a6IokpObaH PIN-KoSIM-KapTbI
O6paTntecb K onepatopy Mo6nIbHcBra3n dIy noJyuEnH PUK-KoJa (Personal Unblocking Key — nepcoHaJIbHbI pa36NoKupuOuI KOD).
EcnxOTnTe BOCCTaHOBNTb COCTOHNue N3dennna (3a6bln npoIb? CtepeTb BCE HAcTPOIKN?:
- YdepxnBaTe KhONky yBeJIuYeHnraPOMKocTn + n HaxMnte Ha KhONky BKJI/BbIKJI.
- YdepknBaTe KhONky POMKOCTb + J0 BOCtAHOBLeHnCnCTeMbI Android oTo6paXaTcra
3.ИспόньуйTe Kноркп ретулровки Гомковгдя перемшени и Кнорку BKЛ/BыКЛ дяnpоверкn. - BbIepeNTyNHT "Wipe data/factory reset" [CTepTe bHaHbIe/3aBOdCKne yCTaHOBKn], nOITbEpDnTe.
- Bыберпе "Yes -- delete all user data" [Да, удалить польватейcke Данны] и полтвердуte.
- Bыберпe "Reboot system now" [ПурсьнгсnteMy ] И постовпe.
National restrictions
This device is intended for home and office use in all EU countries (and other countries following the EU directive 1999/5/EC) without any limitation except for the countries mentioned below:
| Country | Restriction | Reason/remark |
| Bulgaria | None | General authorization required for outdoor use and public service |
| France | Outdoor use limited to 10 mW e.i.r.p. within the band 2454-2483.5 MHz | Military Radiolocation use. Refarming of the 2.4 GHz band has been ongoing in recent years to allow current relaxed regulation. Full implementation planned 2012 |
| Italy | None | If used outside of own premises, general authorization is required. |
| Luxembourg | None | General authorization required for network and service supply (not for spectrum) |
| Norway | Implemented | This subsection does not apply for the geographical aera within a radius of 20 km from the centre of Ny-Alesund |
| Russian Federation | None | Only for indoor applications |
Note: Frequency 2454-2483.5MHZ are restricted to indoor use in France.
Consult the declaration of conformity on http://www.archos.com/products/declaration_conformity.html
Open Source Software Offer
The software bundled with this product includes software files subject to certain open source license requirements. Such open source software files are subject solely to the terms of the relevant open source software license. Such open source software is provided on an "AS IS" basis to the maximum extent permitted by applicable law.
For the open source files contained herein, please access "Open source license" section located at: Settings\About tablet\Legal information on the device for the relevant copyright and licensing terms. You may obtain a copy of Apache License, Version 2.0 at http://www.apache.org/licenses/License-2.0. You may also obtain a copy of GNU General Public License, Version 2 at the Free Software Foundation, INC, 51 Franklin Street, Fifth Floor, Boston, MA 02110-1301, USA.
Until the date that is three years after our last shipment of this product, you may obtain a copy of the source code corresponding to the binaries for any GPL-Licensed file by contacting ARCHOS customer service at
http://www.archos.com and ARCHOS will send you a link to such source code or will provide instructions to get the source on a physical medium.
This offer is valid to anyone in receipt of this information.
The SAR limit of Europe is 2.0W / kg . ARCHOS 80 xenon has also been tested against this SAR limit. The SAR rate of ARCHOS 80 xenon is 1.530W / kg . This device was tested for typical body-worn operations with the back of the handset kept 1.5cm from the body. To maintain compliance with RF exposure requirements, use accessories that maintain a 1.5cm separation distance between the user's body and the back of the handset. The use of belt clips, holsters and similar accessories should not contain metallic components in its assembly. The use of accessories that do not satisfy these requirements may not comply with RF exposure requirements, and should be avoided.
RF exposure information: The Maximum Permissible Exposure (MPE) level has been calculated based on a distance of d = 20 cm between the device and the human body. To maintain compliance with RF exposure requirement, use product that maintain a 20 cm distance between the device and human body.