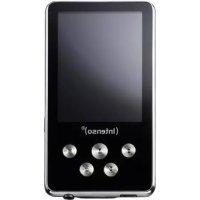
MEDIACENTER 15,6 - Media player INTENSO - Free user manual and instructions
Find the device manual for free MEDIACENTER 15,6 INTENSO in PDF.
| Product type | Digital media player (digital photo frame) |
| Brand | INTENSO |
| Model | MEDIACENTER 15,6 |
| Screen size | 15.6 inches (39.62 cm diagonal) |
| Screen resolution | 1366 x 768 pixels |
| Screen aspect ratio | 16:9 |
| Dimensions (W x H x D) | 415 x 278 x 30 mm |
| Weight | Approx. 1150 g |
| Power supply | AC power adapter 100-240V, 50/60Hz, output 9V 1.5A DC |
| Supported image formats | JPEG (up to 9000x9000 pixels) |
| Supported video formats | MPEG-1/4, M-JPEG, AVI |
| Supported audio formats | MP3, WMA |
| Storage media | Memory cards (SD, SDHC, MMC, MS, XD) and USB flash drives (USB 2.0) |
| Main functions | Photo slideshow with background music, music playback, video playback, calendar, alarm, file management |
| Remote control | Yes (with included battery) |
| Headphone jack | 3.5 mm jack |
| Operating temperature | 0°C to +40°C |
| Safety | Do not open the casing, avoid water and humidity, do not expose to heat, use only the supplied adapter |
| Maintenance and cleaning | Clean with a soft, lint-free cloth, without chemicals; use LCD screen cleaner |
| Repairability | Repair by a specialist only; no user-serviceable parts |
| Included accessories | Remote control, stand, power adapter, user manual |
| Warranty | Legal, subject to conditions (material and production defects) |
Frequently Asked Questions - MEDIACENTER 15,6 INTENSO
User questions about MEDIACENTER 15,6 INTENSO
0 question about this device. Answer the ones you know or ask your own.
Ask a new question about this device
Download the instructions for your Media player in PDF format for free! Find your manual MEDIACENTER 15,6 - INTENSO and take your electronic device back in hand. On this page are published all the documents necessary for the use of your device. MEDIACENTER 15,6 by INTENSO.
USER MANUAL MEDIACENTER 15,6 INTENSO
- Secure Digital Card (SD™)
- Secure Digital High Capacity (SDHC™)
Multimedia Card (MMC™)
Memory Stick (MS) - XD - Card

Operating instructions for Intenso Digital Photo Frame
Please comply with the following instructions to be informed about the different functions of the Intenso digital photo frame.
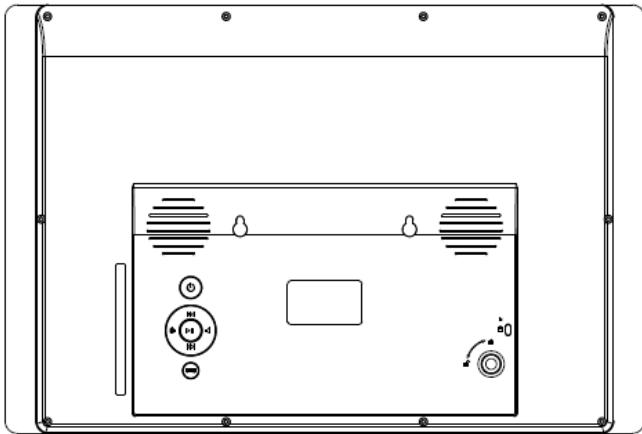
1) Assignment of keys rear of the unit
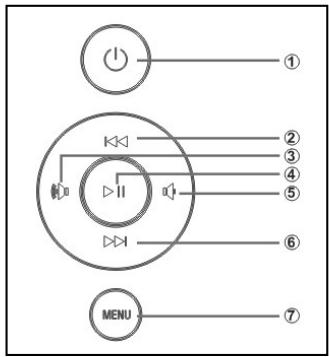
1 Power On/Off
2 Up / previous image
3 Vol +key / move right
4 Play / Pause [▶II] key
5 Vol - key / move left
6 Down / next image
7 Menu key / Back to the previous menu
2) Remote Control
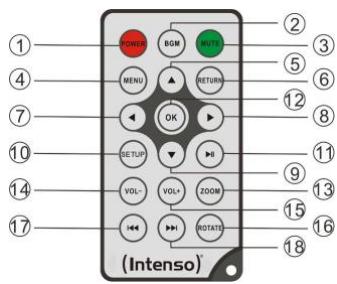
| 1 | POWER | Power On / Off |
| 2 | BGM | Start slide show with background music |
| 3 | MUTE | Muting |
| 4 | MENU | Displaying the starting screen |
| 5 | ▲ | Moves the cursor up |
| 6 | RETURN | Return to superordinate menu |
| 7 | ← | Moves the cursor left |
| 8 | ▶ | Moves the cursor right |
| 9 | ▼ | Moves the cursor down |
| 10 | SETUP | Display of all settings |
| 11 | [►II] | Play/Pause key |
| 12 | OK | Confirming the selected menu item |
| 13 | ZOOM | Enlarge the image in paused slide show |
| 14 | VOL - | Decrease volume |
| 15 | VOL + | Increase volume |
| 16 | ROTATE | Rotating 90° clockwise |
| 17 | ↔ | Previous track |
| 18 | → | Next track |
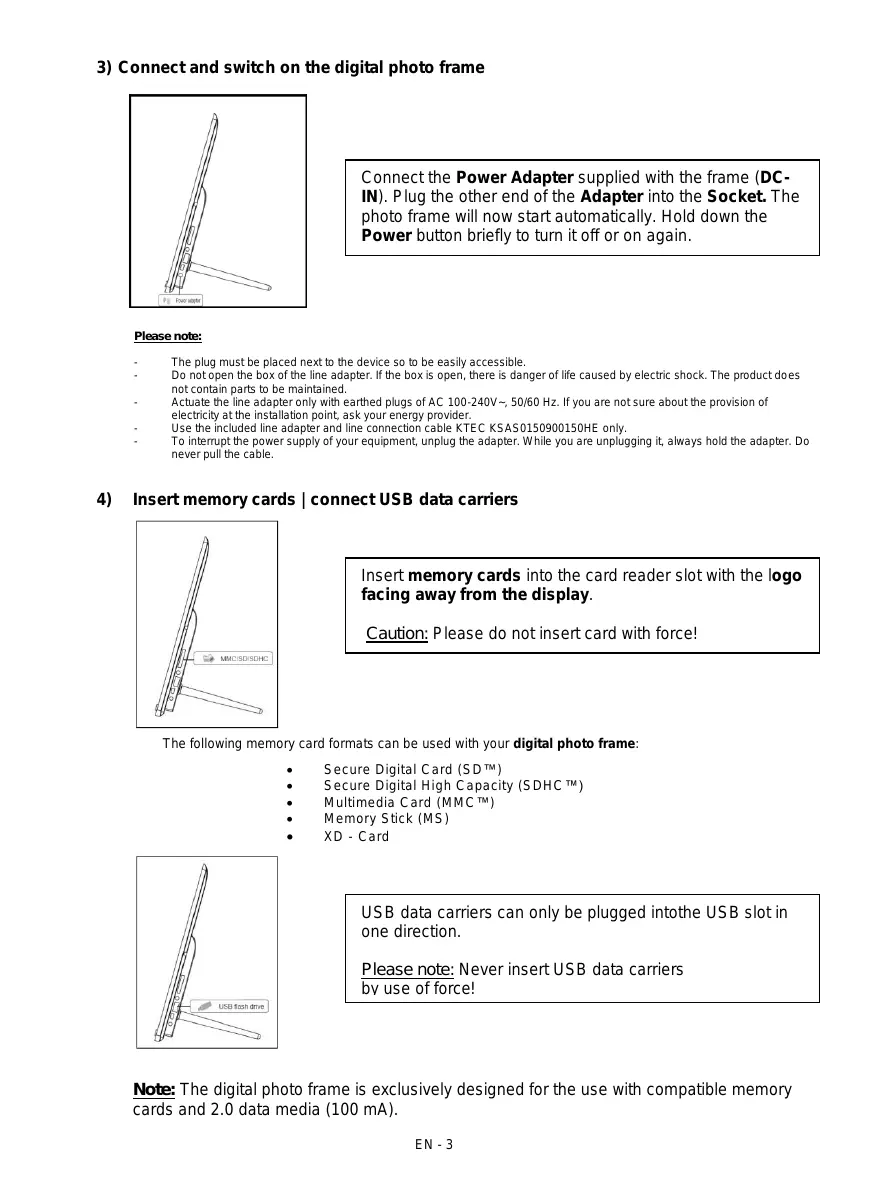
3) Connect and switch on the digital photo frame
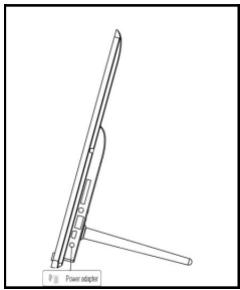
Connect the Power Adapter supplied with the frame (DCIN). Plug the other end of the Adapter into the Socket. The photo frame will now start automatically. Hold down the Power button briefly to turn it off or on again.
Please note:
- The plug must be placed next to the device so to be easily accessible.
- Do not open the box of the line adapter. If the box is open, there is danger of life caused by electric shock. The product does not contain parts to be maintained.
- Actuate the line adapter only with earthed plugs of AC 100-240V-, 50/60 Hz. If you are not sure about the provision of electricity at the installation point, ask your energy provider.
- Use the included line adapter and line connection cable KTEC KSAS0150900150HE only.
- To interrupt the power supply of your equipment, unplug the adapter. While you are unplugging it, always hold the adapter. Do never pull the cable.
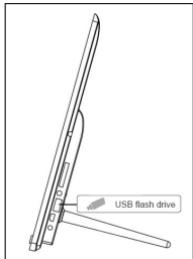
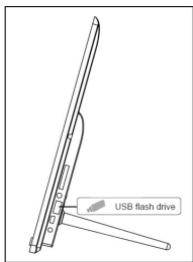
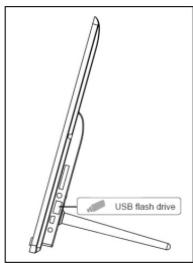
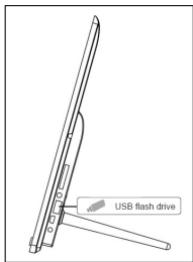
4) Insert memory cards | connect USB data carriers

Insert memory cards into the card reader slot with the logo facing away from the display.
Caution: Please do not insert card with force!
The following memory card formats can be used with your digital photo frame:
- Secure Digital Card (SD™)
- Secure Digital High Capacity (SDHC™)
Multimedia Card (MMC™)
Memory Stick (MS) - XD - Card
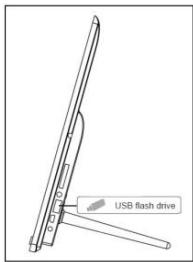
USB data carriers can only be plugged into the USB slot in one direction.
Please note: Never insert USB data carriers by use of force!
Note: The digital photo frame is exclusively designed for the use with compatible memory cards and 2.0 data media (100 mA).
5) General handling
a) Main menu
After starting up, the main menu appears.
In the main menu you can choose between multiple functions of the digital photo frame and the menu item settings. Press the cursor keys on the remote or the cursor keys and the Vol/Vol+ keys on the unit to select a menu item. Confirm your selection with the OK key on the remote or the Play/Pause key [▶II] on the unit.
b) Selection of storage media
The RETURN key on the remote or the menu key on the unit leads from the main menu to the selection of connected storage media. In this menu you can, if provided, choose between memory card and USB storage device. Confirm your selection with the OK key on the remote or the Play/Pause key on the unit. You then get back to the main menu automatically.
c) Displaying photos
If you already have inserted a storage medium with saved photos, the unit will automatically start a slide show of your photos. If no storage medium is inserted, the unit will start a slide show of pre-installed sample images (these cannot be changed). Press the menu key to get back to the main menu.
You can also start the slide show manually. To do that, navigate to the photo function in the main menu. Confirm your selection with the OK key on the remote or the Play/Pause key on the unit. The slide show will be started now. Alternatively you can press the BGM key on the remote to start a slide show from any other function directly.
In the photo settings you can specify, whether background music (if provided on the same storage medium) is played during a slide show.
Press the RETURN key on the remote or the menu key on the unit to leave the slide show and to call up the image preview menu. You can now navigate to a photo, confirm your selection with the OK key on the remote or the Play/Pause key on the unit and continue the slide show from this point directly. You can reach the respective superordinate file folder by pressing the RETURN key in the image preview menu again. This is how you navigate easily between the various folders of your storage medium.
Functions during the slide show:
- You can switch a photo forward or back by pressing the cursor keys on the remote or the cursor keys on the unit right or left.
- You can stop a slide show by pressing the Play/Pause key on the remote or on the unit. The slide show is continued if you press the key again.
- Press the double arrow keys [K, K] on the remote for selecting the next or previous track of the background music, if you have activated it.
- The volume of the background music can be set with the Vol-/Vol+ keys on the remote or the unit.
d) Calendar
Navigate to the calendar function in the main menu and confirm your selection with the OK key on the remote or the Play/Pause key on the unit.
In the calendar mode you can see the current time, a possibly set alarm, the current calendar sheet and (with inserted storage medium with supported photo files) a slide show.
You can change the month and the year for the displayed calendar sheet by pressing the cursor keys on the remote or the Up/Down and Vol-/Vol+ keys on the unit.
e) Playing music files
Navigate to the music function in the main menu and confirm your selection with the OK key on the remote or the Play/Pause key on the unit.
All supported music files (MP3 and WMA) will now be displayed. Navigate to a music file now and confirm your selection with the OK key on the remote or the Play/Pause key on the unit to play the selected file.
Functions during playback of a song:
- You can stop and continue the music by pressing the Play/Pause key on the remote or the unit.
- You can set the volume with Vol-/Vol+ keys on the remote or the unit.
- Press the cursor keys on the remote right or left to fast-forward or rewind.
- Press the double arrow keys [M, M] on the remote or the cursor keys on the unit to jump to the next or previous track.
f) Playing video files
Navigate to the video function in the main menu and confirm your selection with the OK key on the remote or the Play/Pause key on the unit.
All supported video files (MPEG-1/4, M-JPEG and AVI) will now be displayed. Navigate to a video file now and confirm your selection with the OK key on the remote or the Play/Pause key [▶] on the unit to play the selected video file.
Functions during playback of a video
- You can stop and continue the video playback by pressing the Play/Pause key on the remote or the unit.
- You can set the volume with Vol-/Vol+ keys on the remote or the unit.
- Press the cursor keys on the remote right or left to fast-forward or rewind.
- Press the double arrow keys [K, K] on the remote or the cursor keys on the unit to jump to the next or previous file.
g) File system
Navigate to the file function in the main menu and confirm your selection with the OK key on the remote or the Play/Pause key on the unit.
Now all folders and files of the selected storage medium will be displayed. Navigate to a subfolder using the cursor keys on the remote or the unit and confirm your selection with the OK key on the remote or the Play/Pause key on the unit. Now all files and folders within the selected folder will be displayed. You can go back to the superordinate folder by pressing the RETURN key on the remote or the menu key on the unit.
In order to open a file directly from the file system, navigate to the desired file and confirm your selection with the OK key on the remote or the Play/Pause key on the unit. The file will now be played.
In order to delete a file or an entire folder from the selected storage medium, navigate to the desired file and then press the right cursor key on the remote or the VOL+ key on the unit. You can now see a dialogue field, in which you have to confirm the deletion to prevent accidental deletion. Select Yes and the selected file or the selected folder will be deleted. Select No to get back to the file overview.
h) Changing the settings
Navigate to the settings function in the main menu and confirm your selection with the OK key on the remote or the Play/Pause key on the unit.
You now have the following setting options: Photo settings, calendar settings, video settings, music settings, and system settings. Navigate to the desired menu item and confirm your selection with the OK key on the remote or the Play/Pause key on the unit. Now all setting options will be displayed. You can navigate through the individual setting options with the Up/Down cursor keys on the remote or the cursor keys on the unit. You can customise the settings using the Left/Right cursor keys on the remote or the Vol+/Vol- keys on the unit.
| Setting options | Description | |
| Photo settings | Display mode | Choose between slide show and preview image. |
| Music | Activation and deactivation of background music during a slide show (if supported music files are provided on the storage media). | |
| Photo mode | Choose between original and full screen. | |
| Display duration | Setting of display duration of individual slides during the slide show. | |
| Show slide show | Choose between a one-time display of an image or endless loop. | |
| Transition effect | Select a specific transition effect or a random selection of transition effects. | |
| Slide show mode | Choose between displaying a single image, or two, three, or four images simultaneously. | |
| Playback mode | Choose between displaying the images in the order of storage on the medium or a random order. |
| Calendar settings | Date | Setting the current date. | |
| Set time format | Setting the time format: 12 (AM / PM) hours or 24 hours. | ||
| Time | Setting the current time. | ||
| Alarm status | Activate / deactivate the alarm. | ||
| Alarm time | Setting the desired alarm time. | ||
| Alarm sound volume | Set the desired volume (low, medium and high). | ||
| Alarm repetition | Set the desired alarm repetition (every day, Monday to Friday, weekends, once). | ||
| Video | Display mode | Choose between original and full screen. | |
| Playback | Select the playback mode (once, repeat all, repeat track). | ||
| Music | Playback | Once | All tracks will be played once. |
| Repeat track | Selected track will be repeated in endless loop. | ||
| Repeat all | All tracks will be repeated in endless loop. | ||
| Random | Selected track will be played in random order. | ||
| Show spectrum | Select whether the spectrum should be faded in or out during music playback. | ||
| System | Language | Select the desired language. | |
| Brightness | Select the desired display brightness. | ||
| Contrast | Select the desired display contrast. | ||
| Chroma | Select the desired display chroma. | ||
| Colouring | Change the display colouring. | ||
| Automatic activation | Activate/Deactivate automatic activation. | ||
| Activation time | Select the automatic activation time. | ||
| Automatic deactivation | Activate/Deactivate automatic deactivation. | ||
| Deactivation time | Select the automatic deactivation time. | ||
| Repetition | Set the frequency of automatic activation (every day, Monday to Friday, weekends, once). | ||
| Volume | Set the desired volume. | ||
| Factory settings | Restore to factory settings. | ||
| Version | The current version number will be displayed. | ||
| Update | Should a Firmware update be available on www.intenso.de, then you can install it in this menu item. | ||
| Auto boot mode | Select the function that will start upon unit activation (photo, music, video, and calendar). | ||
6) Product Specifications
| Display | Digital TFT LCD Display size: 15.6 inch (39,62 cm diagonal viewable image) Display modus: 16:9 Resolution: 1366 x 768 Pixel |
| Power supply | Input: 100~240V AC, 50/60Hz Output: 9V 1.5A DC |
| USB port | USB Host 2.0 (High Speed) Supports USB storage mediums |
| Memory cards supported | SD/SDHC™ (Secure Digital Card), MMC™ (Multi Media Card) |
| Headphone jack | 3.5 mm jack |
| Picture size supported | JPEG, max. resolution: 9000*9000 pixels |
| Video Formats | MPEG 1/4, MJPEG, AVI |
| Music Formats | MP3, WMA |
| Operating temperature | 0°C ~ +40°C |
| Dimensions | ~415*278*30 mm |
| Weight | ~1150 gr. |
| Accessory | Remote control (incl. battery), Foot, Power supply, multi-lingual operating instruction |
You need help?
Simply call our Technical Service Hotline at:
+49 (0) 900 150 40 30 for 0.39 €/Min. with calls from the German telephone network. Different rates may apply to calls from mobile phones.
Enjoy Intenso's digital photo frame!
Service and Maintenance
Care
- In order to prevent danger from electric current do neither remove screws nor the case of the weather station.
- Do not operate this device near water. Do not expose the device to rain and moisture. Do not put any objects which store water or other fluids near the device.
- Do not install the picture near heaters, ovens or other heat issuing devices.
- Do not open the case. Do not try to repair the device yourself but have it repaired by qualified personnel only.
- Avoid using the device on sandy areas.
- Fully insert the power supply plug into the opening of the Intenso weather station. This will prevent electrostatic charge.
- Correctly and safely connect all ports.
- Do not push onto the display. Protect the display from direct sunlight.
The picture frame only plays compatible data formats. - Images may be protected by the rights of third persons. The play back without licence may infringe copyrights.
- When in operation, do not touch the Intenso weather station with metal objects.
- Avoid operating the device on pillows, sofas or other objects which support the development of heat as there is danger of overheating of the device.
- Do not remove memory cards during read operation. This may cause system crash or data loss.
- Do not switch off the device during an ongoing slide show.
- Do not wrap up the device directly after longer use. Ensure sufficient enough cooling. Otherwise, there is danger of overheating.
- In order to ensure a better service, changes of the operating instructions may be necessary.
Maintenance of the device
The device must be switched off.
Never spray or apply a fluid directly onto the display or case.
Cleaning the displays / case / frame
Carefully wipe the case, frame and LCD display with a soft cloth free from lint and chemicals. Only use cleaning agents which are specifically designed for LCD displays.
Disposal of electrical waste
Devices marked with this symbol are subject to the EG Directive 2002/96/EG.
All electrical appliances and old appliances must be disposed off separately from the household waste and are to be returned to the state authorities designed for that purpose.
By correctly disposing of electrical old appliances environmental damage may be prevented.
(Intenso)
49377 Vechta
Germany
www.intenso.de


(Intenso) Warranty conditions

Dear Intenso customer,
Thank you for opting for a high-quality Intenso product. All Intenso products are subject to constant quality inspections and the legal warranty period applies, of course, from the date of purchase. Please be sure therefore to save the sales receipt as proof of purchase.
Warranty conditions
The warranty only covers material and production defects. Intenso GmbH is not liable for the loss of data in units sent to us. The free of charge warranty service covers the repair or replacement of defective parts. Please understand that we cannot render any warranty services, e.g. in case of:
- Misuse or improper handling, installation or use
- Damages, scratches or wear
- Modifications, manipulation or repairs by third parties
- Damages through force majeure or transport
Your Intenso GmbH
CLAIM PROCEDURE
In case of a claim, please proceed as follows:
- Only returns accompanied with all accessories and sales receipt are accepted.
- In addition, a RMA number is absolutely required for return shipments. You can request this RMA number via e-mail or through the service hotline.
- Please package the product including all accessories and the sales receipt safe for transport. Please stamp the package.
- Please affix the RMA number clearly visible on the outside of the package.
Please send to the following service address:
INTENSO GMBH
Service Center (your RMA-No.)
(0.39 €/min. from the landline in Germany. Usual costs apply.)
Email: support@intenso.de
- Secure Digital Card (SD™)
- Secure Digital High Capacity (SDHC™)
Multimedia Card (MMC™)
Memory Stick (MS) - XD - Card
- Secure Digital Card (SD™)
- Secure Digital High Capacity (SDHC™)
Multimedia Card (MMC™)
Memory Stick (MS) - XD - Card

- Secure Digital Card (SD™)
- Secure Digital High Capacity (SDHC™)
Multimedia Card (MMC™)
Memory Stick (MS) - XD - Card
- Secure Digital Card (SD™)
- Secure Digital High Capacity (SDHC™)
Multimedia Card (MMC™)
Memory Stick (MS) - XD - Card

Service Center (Seu N° ADM)
- Secure Digital Card (SD™)
- Secure Digital High Capacity (SDHC™)
Multimedia Card (MMC™)
Memory Stick (MS) - XD - Card
- Secure Digital Card (SD™)
- Secure Digital High Capacity (SDHC™)
Multimedia Card (MMC™)
Memory Stick (MS) - XD - Card
Hocntenb namrtn USB moKet BCTabJIaTbcraB rHe3do USB TOnbKO OndHom HappaBHeHH.
BHumaHue:He npimehayTe cnilny npn BCTabJeHHN HocuTeJn parny USB!
BHumaue: Lnfoobar foToopamka npedymoTpeHa Tolbko IJN NcNoIb3OBAHnC COBmecTmbim Kaptamn namrtn HocntelaMn namrtn USB 2 (100mA).
5) O6nn npraDok DeiCTBn
a) TnaBHOe MeHIO
Iocne BkIIOUeHnIOBJIaTcraJbHOe MeHIO.
B rIaBHOM MeHIO BbI MoKTe Bbl6nPaTb pa3nnHbIe FyHKcHm cHfPBOH oTOpAMKn H NaCTPOKN pNHTOB MeHIO. IJI TORA YTO6bI Bbl6PbAT kAKoJ-Ni6O pNHT MeHIO, HaxIMaIte Ha KONKo CO CTpeKNo, HaxoJaUHcECA HA NylbTe DnCTaHcUHOHORO ynpABNeHnA, INI HA KONKo CO CTpeKNo, A TaKHe NA KONKn "Vol-/"/Vol+, HaxoJaUHcECA HA YCTPOICTBE. IOnTBepdnte CBOI Bbl6Op KONKo "OK", HaxoJaUHcECA HA NylbTe DnCTaHcUHOHORO ynpABNeHnA, INI KONKo npOnrpbIbAHn/na3bl [▶II], HaxoJaUHcECA HA YCTPOICTBE.
b) Bb6op HocnteJI INHΦopMaun
KhONka "RETURN", haxoJaIaIcRaHa npIbTe DnCTaHcIOHHO ynpaBHeHra, IIN KhONka
"Menu", haxoJaIaIcRaHa ycTpoIcTBe, BbIOJNT Bac n3 rnaBHOrO MeHIO K Bbl6Opy
pnpcoEiInHeHHbIX HocITeJIe INΦOpMaII. B daHOM MeHO Bby MoXeTe Bbl6paTb KapTy
namrtn HIOncITeJIb INΦOpMaIIc C pa3BeMOM USB. POnTBePdIte CBOB Bbl6Op KHONKO
"OK", haxoJaIeScHa npIbTe DnCTaHcIOHHO ynpaBHeHra, IIN KhONKO
ponorpbIBAHn/Nay3bI, haxoJaIeScra Ha ycTpoIcTBe. Nocne 3TOrO Bby AToMaTHueckn CHOba
nonaDaete B rnaBHoe MeHIO.
c) Ioka3ΦoToRpaФn
EcIn BBy yke BCTaBnIN HOCNTeJIb NaMRTc 3aNcAHHbIMn FOOTorpaFmIM,TO yCTpOyCTBO ABTomatueckn HaunHaet INX NOKa3. EcIn HOCNTeJIb NaMRTn He BCTaBJeH,TO yCTpOyCTBO HaunHaet NOKa3 3apaHee INHctaIINPobAHbIX ObaPa3CuOB IN3o6paKeHN (ONH He MOrYt 6bITb IN3MeHebl).ДЯ TORO YTO6bl IONACTb B rIaNbHOE MeHIO, HAKMITE Ha KHOJky "Menu".
Bb MoKTe 3aynCTnTb CnAid-woy TaOKe BpyHyU. DnA 3TOrO BoYnITe B rnaBHOM MeHIO B ΦHKnZuHO FOTo. POnTBpeDnTe CBoB bIbOp KONKOl "OK", HaxoJaeJeCnHa NpIbTe DnCTaHnOHHO YnpaBHeN, INI KNKoN npOnrPbIBaHN/Hay3bl, HaxoJaeJeCn Ha UcyTObTBe. PInr 3aONyCaEcTa nAid-woy. Dn TOrO TTObI 3aynCTnTb CnAid-woy HeNocepDCTBeHHO nI IIOBOI dpyrof CyHKnU, Bb MoKTe aJIbTePHaTHNBHO TAKKe HaxaTb Ha KONky "BGM", HaxoJauyOcHc NaIyIte DaNTaHcNOHHO ynpaBHeNIA.
B hacptponkax fOToRpaФm Bby MoKTe 3aDaTb, DOnJxHa IIN BO BpeM CnaiD-woy npOnrpbBaTbcra fOHOBA My3bIka (ecn OHa NMeETcra NMeHHO Ha 3TOM HOCITeNe nHfOpMaun).
YXODIPIPOΦHIAKTNUECKN OCMOTP
yxo
- Yto6bI n36exKaTb HmnylncOB ToKa, Ha ydaJIaIe Ta H BnHTbI HN Kopnyc.
He nCnoIb3yTe daHnbl np6Op B6n3n BoDbl. He noDaBaTe np6Op BnnaHIO doxJa nnBnAnJHoCTn. He cTabe T B6n3n np6Op npedMeTb, KOTOpbl HaKaanBaOT BoDy nn DpyrNe BnDblXnDKoCTe.
He yctanabnBaIe TaHHyio oToPamky B6JIn3n OToJIeHna, neey nnn dpyrnx npnbopob, n3nyauoux tenno.
He OtkpbIbaiTe Kopnyc. He nbItaTecb peMoHTnpoBaTb npi6op camn. IpeIoCTabBe 3To npoPeccnoHaanam. - 136e9aTe HcNoIb3OBaHnHa MeCtax C neckOM.
BCTaBbTe Bnky IJr noKJIOUeHn6Ioka nHTaHnB OBTbepctne LΦ nonHOcTbIO. TOnbKO TaK MoXHo 36exKaTb 3NeKTpoCTatuYeCKOrO 3apraJa.
BbINOJIHnTe BCE NOdCOeINHeHnI npaBnIbHo nHaIeXHO.
He nadaBnBaIte Ha dncnne. 3aunuaTe dncnnei O cInbHbIX coJHehN lyuei. - ΦOTOPAMKa BOCPON3BOJNT TOJIbKO COBMECTMlbIe φOpMaTbl.
ΦotorpaΦm Moryt 6bIb 3aunuHbI npabam TpeTbx Nc. Bocnpo3BeDeHne φotorpaΦm 6e3 Nlueh3nn MoKet 6bIb HapyuHHeM ABTOPCKnx npab.
He npukacaiTebc K LΦ BO BpeMpa6bI MetaJIHueckmN npEdmTaMn.
I36eraTe IcnoIb3OBAHnHa nOduIkXa, DnBaHax IINn dpYrNx PneDMeTAX 6bIta, KOTOpBte noDpeKJBaOT pa3BNTHe TEnJa, TaK KAc cyuEcTByeT OAnchocTb NeperePBeAHn npnbopa.
He n3BneKaai Te KapTbI NaMaTn BO BpEma YTeHna KapT. 3To MoKet PnpBecTu B C6oam B CnCTeMe I nOtepe daHHbx.
He BbikJUoyaTe np6op BO BpemB BocnpOn3BeDeHn.
He ynaKobBaIe npBOp hEnocpeDCTBeHNO nOcne dInTeNbHO nCnOJIb3OBaHn. ObecneYbTe doCTaTOHoe OXIAJKeHne. B INOM cIyae cyueCTByeT onaHOCt b nepeRpeBaHn. - Дя обесенья лушero серва BOЗможны Изменения ИНСТрукции NO обслужьаню.
PpOΦnlaKtNueckn oCmOpT npn6opa
HINKoTDAHEBpI3rAITE INHEHAHOCTe KNDKOCTb PRAMO HA DUNCJIPEI INI KOPNUC.
ENCTBNA PNI NPEBBAJEHN INEKNAMALUN
B cnyae npeIbIeHnpeKnaMaun n deCTByTe TAKM 6pa30m
- Ha3ad npHnHMaETc8 ToIbKO npOdyKcNco BCEMn npHnAdJeXHoCTaMn KaccOBbIM YeKOM
- 063aTeNbHbIM ycIOBHeM IJI B03BpaueHn npOdyKuH INBnaTcH OmeP RMA. 3ToT Hmep RMA Bbl MoKeTe 3anPoCHTb no 3NeKtpoHHo nOHTe INI rOpAeIN INHM cepBnCHOrO 06cnykmbAHn.
- IoxaIyIcTa, ynaKyIte npOdyKcuIO, BKJIouAra BCE npINHAdNExHOCTn KACCobBiyek, HADexHO DЯ TpaHCnopTnpOBKn. Ha nocbIKy DoJHKHO 6bITb HAKJeeHO DOCTaTOHoe KOJIueCTBO NOYTOBbIX MapOK.
- HaheCHTe, noXaIyIcTa, YetKO HOMep RMA C BHeUHei CTopoHbI.
Otnpabte, noxanynta, no taKomy apecy:
INTENSO GMBH
Topyau liuHn cepBnCHOrO 6cnyKuBaHn:
+49(0)900-1504030
CepBnchbIeHTp(BaW N RMA)
(0,39 eBpo/MNH. B HemeLkoN CtaQHOHaHOp CEtN.
LHeHbHa CBA3b MOBnIbHbIX onepaTopoB MOryT OTNIuHaTbcra.)