YSM5 - Studio Monitor YORKVILLE - Free user manual and instructions
Find the device manual for free YSM5 YORKVILLE in PDF.
User questions about YSM5 YORKVILLE
0 question about this device. Answer the ones you know or ask your own.
Ask a new question about this device
Download the instructions for your Studio Monitor in PDF format for free! Find your manual YSM5 - YORKVILLE and take your electronic device back in hand. On this page are published all the documents necessary for the use of your device. YSM5 by YORKVILLE.
USER MANUAL YSM5 YORKVILLE
This lightning flash with arrowhead symbol, within an equilateral triangle, is intended to alert the user to the presence of uninsulated "dangerous voltage" within the product's enclosure that may be of sufficient
magnitude to constitute a risk of electric shock to persons.
The exclamation point within an equilateral triangle is intended to alert the user to the presence of important operating and maintenance (servicing) instructions in the literature accompanying the appliance.

Instructions pertaining to a risk of fire, electric shock, or injury to a person
CAUTION: TO REDUCE THE RISK OF ELECTRIC SHOCK,DO NOT REMOVE COVER (OR BACK).
NO USER SERVICEABLE PARTS INSIDE.
REFER SERVICING TO QUALIFIED SERVICE PERSONNEL.
Read Instructions: The Owner's Manual should be read and understood before operation of your unit. Please, save these instructions for future reference and heed all warnings.
Clean only with dry cloth.
Packaging: Keep the box and packaging materials, in case the unit needs to be returned for service.
Warning: To reduce the risk or fire or electric shock, do not expose this apparatus to rain or moisture. Do not use this apparatus near water!
Warning: When using electric products, basic precautions should always be followed, including the following:
Power Sources
Your unit should be connected to a power source only of the voltage specified in the owners manual or as marked on the unit. This unit has a polarized plug. Do not use with an extension cord or receptacle unless the plug can be fully inserted. Precautions should be taken so that the grounding scheme on the unit is not defeated. An apparatus with CLASS I construction shall be connected to a Mains socket outlet with a protective earthing ground. Where the MAINS plug or an appliance coupler is used as the disconnect device, the disconnect device shall remain readily operable.
Hazards
Do not place this product on an unstable cart, stand, tripod, bracket or table. The product may fall, causing serious personal injury and serious damage to the product. Use only with cart, stand, tripod, bracket, or table recommended by the manufacturer or sold with the product. Follow the manufacturer's instructions when installing the product and use mounting accessories recommended by the manufacturer. Only use attachments/accessories specified by the manufacturer
Note: Prolonged use of headphones at a high volume may cause health damage on your ears.
The apparatus should not be exposed to dripping or splashing water; no objects filled with liquids should be placed on the apparatus.
Terminals marked with the "lightning bolt" are hazardous live; the external wiring connected to these terminals require installation by an instructed person or the use of ready made leads or cords.
Ensure that proper ventilation is provided around the appliance. Do not install near any heat sources such as radiators, heat registers, stoves, or other apparatus (including amplifiers) that produce heat.
No naked flame sources, such as lighted candles, should be placed on the apparatus.
Power Cord
Do not defeat the safety purpose of the polarized or grounding-type plug. A polarized plug has two blades with one wider than the other. A grounding type plug has two blades and a third grounding prong. The wide blade or the third prong are provided for your safety. If the provided plug does not fit into your outlet, consult an electrician for replacement of the obsolete outlet. The AC supply cord should be routed so that it is unlikely that it will be damaged. Protect the power cord from being walked on or pinched particularly at plugs. If the AC supply cord is damaged DO NOT OPERATE THE UNIT. To completely disconnect this apparatus from the AC Mains, disconnect the power supply cord plug from the AC receptacle. The mains plug of the power supply cord shall remain readily operable.
Unplug this apparatus during lightning storms or when unused for long periods of time.
Service
The unit should be serviced only by qualified service personnel. Servicing is required when the apparatus has been damaged in any way, such as power-supply cord or plug is damaged, liquid has been spilled or objects have fallen into the apparatus, the apparatus has been exposed to rain or moisture, does not operate normally, or has been dropped.
SUVEZ TOUTES LES INSTRUCTIONS
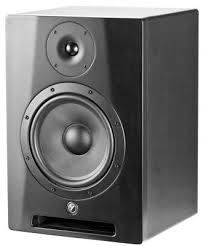
Powered Studio Monitors
Welcome to the next generation of Yorkville Sound Powered Studio Monitors. Building upon our technical knowledge and experience we have developed better sounding monitors which are easier to use in virtually any environment. The Yorkville Sound monitors are at home in professional recording studios, home studios and living rooms. We're confident that the YSM5, YSM6 or YSM8 will help you cut to the mix and create fantastic music!
The YSM5, YSM6 and YSM8 feature 1-inch black-silk diaphragm neodymium dome tweeters. These tweeters use specially designed waveguide bevelled edge housings. The waveguide bevelled edges perfectly couple the tweeter with the woofer, reducing sonic anomalies normally created by their proximity. The leading-edge fibre-composite cone woofer have also been designed to perform with sonic excellence, providing a wide dynamic range at all levels. Transparent bi-amplification is specifically optimised for each driver. This guarantees perfect performance and eliminates the phase irregularities between tweeter and woofer that are usually associated with passive crossover networks.

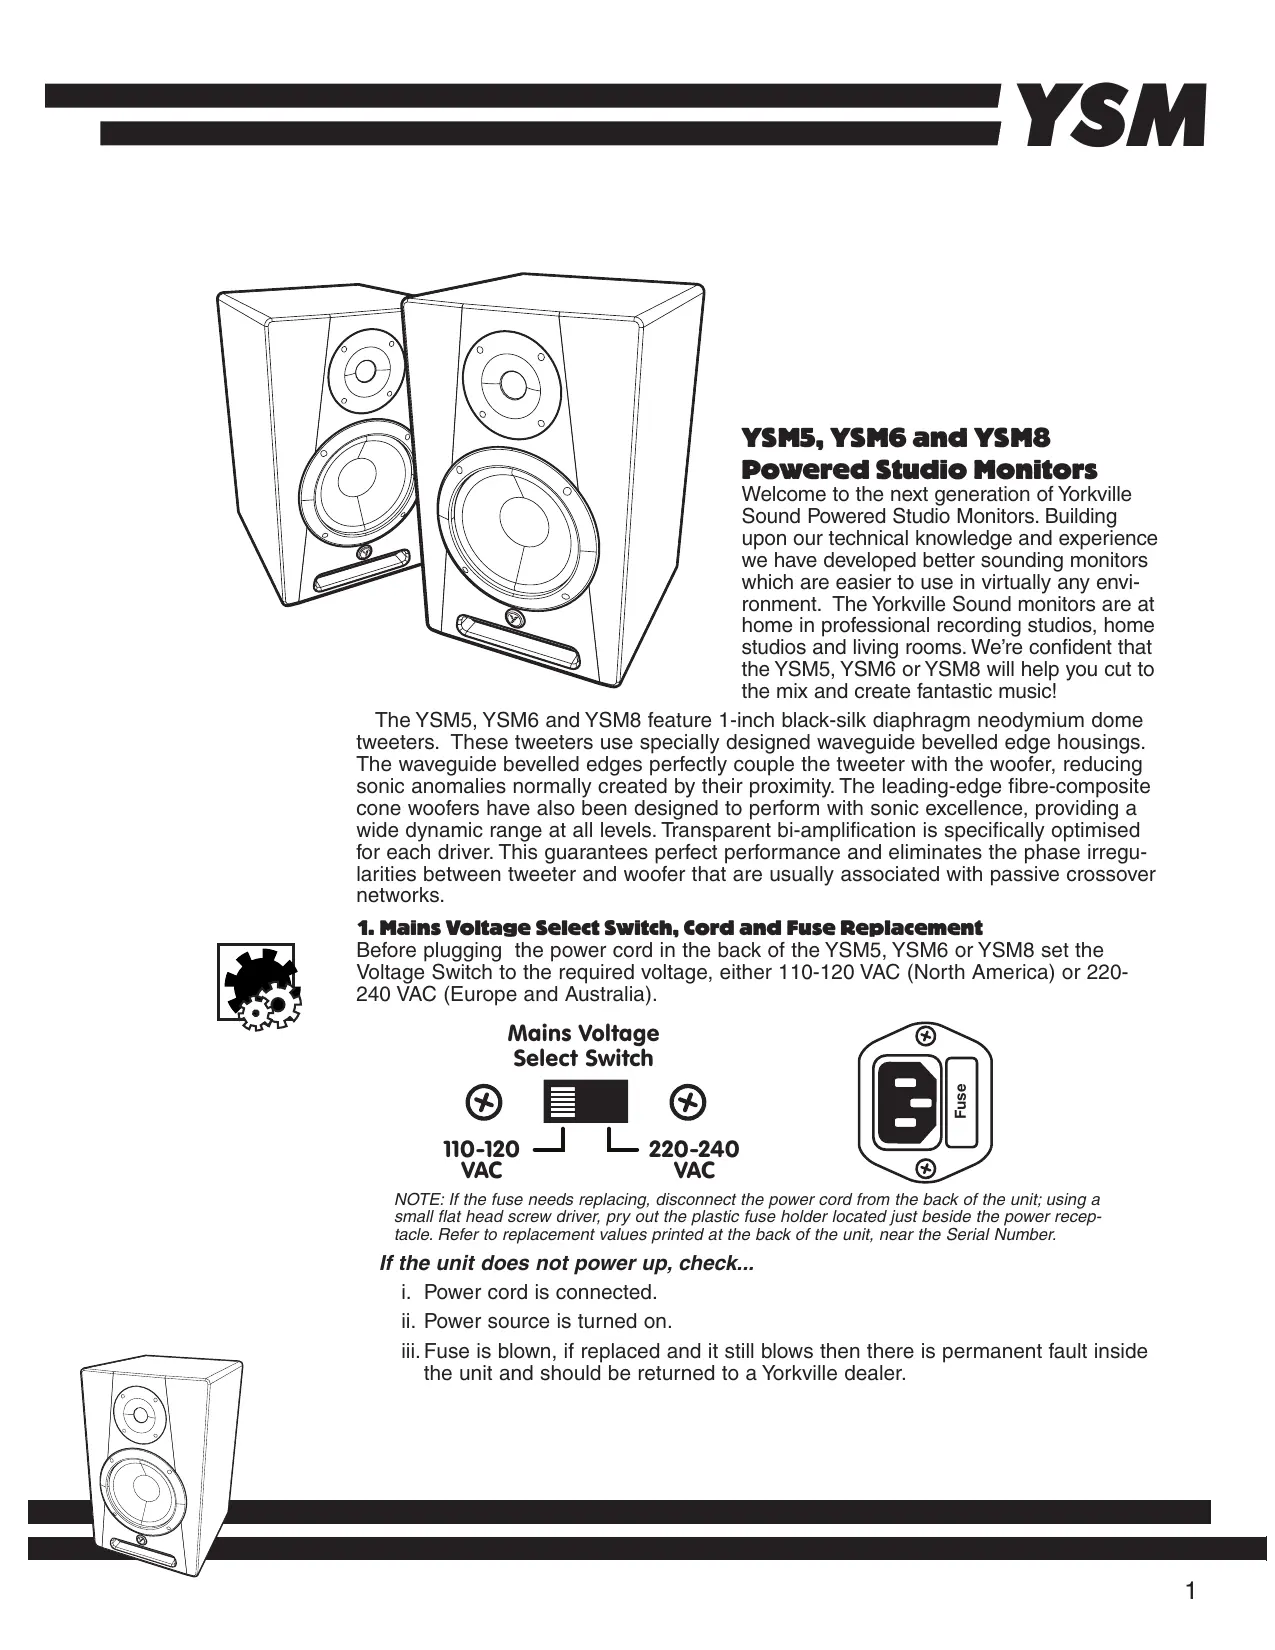
1. Mains Voltage Select Switch, Cord and Fuse Replacement
Before plugging the power cord in the back of the YSM5, YSM6 or YSM8 set the Voltage Switch to the required voltage, either 110-120 VAC (North America) or 220-240 VAC (Europe and Australia).


NOTE: If the fuse needs replacing, disconnect the power cord from the back of the unit; using a small flat head screw driver, pry out the plastic fuse holder located just beside the power receptacle. Refer to replacement values printed at the back of the unit, near the Serial Number.
If the unit does not power up, check...
i. Power cord is connected.
ii. Power source is turned on.
iii. Fuse is blown, if replaced and it still blows then there is permanent fault inside the unit and should be returned to a Yorkville dealer.

2. Input Jack
The inputs of all three monitors are balanced and can use a 1/4 -inch TRS phone jack or XLR connector. If you need to use an RCA cable to connect, use a standard RCA >1/4 -inch adapter such as the APEX AA1/6. Similarly, If you wish to use an 1/8inch (3.5MM) cable you will need the APEX AA49 adapter.
3. Input Sensitivity (YSM5, YSM6 and YSM8)
The Input Sensitivity control enables the YSM5, YSM6 and YSM8 monitors to be properly matched to various systems enabling the best calibration between the devices.

Combi INPUT
1/4-inch/XLR
BAL/UNBAL

The Input Sensitivity can be adjusted in two ways,
i. as a Volume Control. Connect a line in from the line-level source into the YSM's input located at the back of the unit,
proceed to rotate the Input Sensitivity control located at the rear of the monitor counter clockwise for minimum/off and full clockwise for maximum gain (sensitivity). Please note, always start with the volume control at minimum (off) and slowly bring up to desired level.
ii. If you are using a mixing console to feed the input of the YSM powered monitor, set the db gain control to the desired level and then proceed to the Input Sensitivity control on the YSM powered monitor and adjust to same db level as the mixer, this insures that the overall desired gain is not too much or too little.

Hi Presets

INPUT

LF Presets

HF Presets

INPUT

4. HF Presets Control Settings (YSM5, YSM6 and YSM8)
The default setting for the HF (high frequency) is 0 which is a flat response in normal near field conditions. If the room is over dampened it might be desirable to increase the HF trim to +1 , this will increase the High Frequency response, the opposite would hold for an under dampened room with a lot of reflections that can become quite challenging for the ears, try settings -1 and -2.

HF Presets


5. Low Frequency Control Settings (YSM6 and YSM8)
The default setting for the LF (low frequency) is 0. As an example, if the monitors are placed in the middle of a room and more low end response is needed, set the select switch to +1.5 A. As another example, if your monitors are placed against the back wall as shown in the diagram below, it is recommended that you set the LF setting to -1. Accordingly, if the monitors are placed in the corner of the room, set to -2.

LF Presets
+1.5 0 -1 -2

Full Space Placement (full area)

1/2 Space Placement (against the wall)

1/4 Space Placement (in corner)
6. Bi-Amplification

The common term is bi-amplification, a process which uses two power amplifiers and an electronically accurate 'active' crossover network. This type of crossover network divides the signal much more precisely than traditional passive crossover networks. All three monitors, the YSM5, YSM6 and YSM8 use bi-amplification, an amplifier dedicated for the tweeter and another for the woofer.


Full Space Placement (full area)

1/2 Space Placement (against the wall)

1/4 Space Placement (in corner)
6. Bi-Amplification

| Specifications | |||
| Model | YSM-5 | YSM-6 | YSM-8 |
| Active or Passive | Active | Active | Active |
| Program Power (Watts) | 45 | 65 | 95 |
| Biamp / Configuration | Yes-Two Way | Yes-Two Way | Yes-Two Way |
| Max SPL (dB) | 105 | 105 | 105 |
| Frequency Response (Hz +/- 3db) | 52Hz-20kHz | 50Hz-20kHz | 45Hz-20kHz |
| Crossover Frequency (Hz) | 3.0 kHz | 2.6 kHz | 2.4 kHz |
| HF Driver(s) | Neo Soft dome Ferro Fluid | Neo Soft dome Ferro Fluid | Neo Soft dome Ferro Fluid |
| HF Program Power (Watts) | 15 | 20 | 25 |
| HF Dispersion (°H x °V) | 60° | 60° | 60° |
| HF Protection | Therm, Over voltage | Therm, Over voltage | Therm, Over voltage |
| LF Driver/s | 5-inch composite | 6.5-inch composite | 8-inch composite |
| LF Program Power(Watts) | 30 | 45 | 70 |
| LF Impedance (ohms) | 4 | 4 | 4 |
| LF Protection | Therm, O.V | Therm, O.V,clip | Therm, O.V,clip |
| Sheilding | Yes | Yes | Yes |
| HF Power Amplifier (Watts) | 15 | 18 | 20 |
| HF Amplifier Type | A/B | A/B | A/B |
| HF Distortion | 0.03 | 0.08 | 0.08 |
| LF Power Amplifier (Watts) | 30 | 50 | 75 |
| LF Amplifier Type | A/B | A/B | A/B |
| LF Distortion | 0.02% | 0.02% | 0.02% |
| LF Processing | Analog | Analog | Analog |
| Cooling Scheme | convection | convection | convection |
| Power Cable | included | included | included |
| Power Switch | front/back litf | ront/back litf | ront/back lit |
| Power Consumption (typ/max) | 40/100 VA | 40/100 VA | 40/100 VA |
| Inputs - 1/4-inch Jacks | 1 | 1 | 1 |
| Inputs - XLR | 1 | 1 | 1 |
| Input Sensitivity (Vrms Sine) | 0.2 | 0.2 | 0.2 |
| Level Controls | 1 | 1 | 1 |
| EQ Controls | 1 | 2 | 2 |
| Limiter | yes | Yes | yes |
| LED Indicators | power on front | power on front | power on front |
| Other Controls / Features | base foam pad | base foam pad | base foam pad |
| Enclosure Materials | mdf | mdf | mdf |
| Baffle Material | mdf | mdf | mdf |
| Covering / Finish | Enamel | Enamel | Enamel |
| Optional Covering / Finishes | N/A | N/A | N/A |
| Dimensions (DWH xbackW, inches) | 9.5 x 7.5 x 11.5 | 10 x 9.5 x 15 | 10.8 x 10.5 x 16.5 |
| Dimensions (DWH xbackW, cm) | 24.13 x 19.05 x 29.21 | 25.4 x 24.13 x 38.1 | 27.43 x 26.67 x 41.91 |
| Weight (lb/ft3) | 15/6.9 | 21/9.5 | 28/13.7 |
Weight (Ibs/ka) | 15/6.8 | 21/0.5 | 29/12.7

YSM
Yorkville's two and ten-year unlimited warranty on this product is transferable and does not require registration with Yorkville Sound or your dealer. If this product should fail for any reason within two years of the original purchase date (ten years for the wooden enclosure), simply return it to your Yorkville dealer with original proof of purchase and it will be repaired free of charge. This includes all Yorkville products, except for the YSM Series studio monitors, Coliseum Mini Series and TX Series Loudspeakers.
Freight charges, consequential damages, weather damage, damage as a result of improper installation, damages due to exposure to extreme humidity, accident or natural disaster are excluded under the terms of this warranty. Warranty does not cover consumables such as vacuum tubes or par bulbs. See your Yorkville dealer for more details. Warranty valid only in Canada and the United States.
Garantie Illimitée
Niagara Falls, New York
14305 USA
Voice: (716) 297-2920
Fax: (716) 297-3689

Quality and Innovation Since 1963
Printed in China
Manual-Owners-ysm5_6_8-00-1v0 • March 11, 2011