
VME 9325 BTA - Car Monitor AUDIOVOX - Free user manual and instructions
Find the device manual for free VME 9325 BTA AUDIOVOX in PDF.
| Product Type | Mobile multimedia receiver / Car monitor |
| Brand | AUDIOVOX |
| Model | VME 9325 BTA |
| Screen | 7 inch TFT LCD, 800x480 pixels, 16:9, motorized |
| FM Radio | 87.5 - 107.9 MHz, 18 presets (3 bands x 6) |
| AM Radio | 530 - 1720 kHz, 12 presets (2 bands x 6) |
| Supported audio formats | CD-DA, MP3, WMA |
| Supported video formats | DVD, VCD, SVCD, AVI, MPEG1/2, XviD, DivX |
| Bluetooth | Yes (optional BTM10 module) |
| USB connectivity | USB 1.0, 500 mA, FAT32, compatible with keys and hard drives |
| Auxiliary input | Front (RCA) and rear AV, for game console, camera, GPS |
| Video output | 1 composite output for additional screens |
| Audio output | Preamplifier 100 ohms, 2 VRMS, subwoofer output |
| Equalizer | 7 preset curves (Rock, Hip Hop, Dance, etc.) + manual adjustment |
| Remote control | Infrared 44 keys |
| Power supply | 11 to 16 V DC, negative ground, 15A fuse |
| Dimensions | Standard 2 DIN (approx. 178 x 100 mm) |
| Weight | Approximately 1.5 kg |
| Included accessories | Mounting brackets, half-sleeve, remote control, wiring harnesses, instructions |
| Warranty | 2 years |
| Maintenance | Clean with a silicone cloth and neutral detergent; do not use water or alcohol |
Frequently Asked Questions - VME 9325 BTA AUDIOVOX
User questions about VME 9325 BTA AUDIOVOX
0 question about this device. Answer the ones you know or ask your own.
Ask a new question about this device
Download the instructions for your Car Monitor in PDF format for free! Find your manual VME 9325 BTA - AUDIOVOX and take your electronic device back in hand. On this page are published all the documents necessary for the use of your device. VME 9325 BTA by AUDIOVOX.
USER MANUAL VME 9325 BTA AUDIOVOX
| Setting | Options | Function |
| Clock Mode | 12Hr | Clock displays 12 hour time using AM and PM. |
| 24Hr | Clock displays 24 hour time up to 23:59. | |
| Clock | (HH:MM) | Clock appears in the top right corner of the screen and on the LCD screen during certain operations. NOTE: The AM/PM indication will change as you continue to adjust the hour past 12. |
| Tuner Region | USA | ·AM Frequency Spacing - 10kHz ·AM Frequency Band - 530kHz~1720kHz ·FM Frequency Spacing - 200kHz ·FM Frequency Band - 87.5MHz~107.9MHz |
| S.Amer1 | ·AM Frequency Spacing - 10kHz ·AM Frequency Band - 530kHz~1720kHz ·FM Frequency Spacing - 100kHz ·FM Frequency Band - 87.5MHz~108.0MHz | |
| Arabia | ·AM Frequency Spacing - 9kHz ·AM Frequency Band - 531kHz~1620kHz ·FM Frequency Spacing - 100kHz ·FM Frequency Band - 87.5MHz~108.0MHz | |
| China | ·AM Frequency Spacing - 9kHz ·AM Frequency Band - 522kHz~1620kHz ·FM Frequency Spacing - 100kHz ·FM Frequency Band - 87.5MHz~108.0MHz | |
| S. Amer2 | ·AM Frequency Spacing - 5kHz ·AM Frequency Band - 520kHz~1600kHz ·FM Frequency Spacing - 100kHz ·FM Frequency Band - 87.5MHz~108.0MHz | |
| Europe | ·AM Frequency Spacing - 9kHz ·AM Frequency Band - 522kHz~1620kHz ·FM Frequency Spacing - 50kHz ·FM Frequency Band - 87.5MHz~108.0MHz | |
| Korea | ·AM Frequency Spacing - 9kHz ·AM Frequency Band - 531kHz~1602kHz ·FM Frequency Spacing - 200kHz ·FM Frequency Band - 88.1MHz~107.9MHz | |
| Beep | On | When turned on, an audible beep tone confirms each function selection. |
| Off | No beep sounds. |
| Symbol | Meaning |
| ⑧ | Number of voice languages recorded. The num- ber inside the icon indicates the number of lan- guages on the disc (maximum of 8). |
| 32 | Number of subtitle languages available on the disc (maximum of 32). |
| 9 | Number of angles provided (maximum of 9). |
| 16:9 LB | Aspect ratios available. "LB" stands for Letter Box and "PS" stands for Pan/Scan. In the example on the left, the 16:9 video can be converted to Letter Box video. |
| ALLO | Indicates the region code where the disc can be played. • Region 1: USA, Canada, East Pacific Ocean Islands • Region 2: Japan, Western Europe, Northern Europe, Egypt, South Africa, Middle East • Region 3: Taiwan, Hong Kong, South Korea, Thailand, Indonesia, South-East Asia • Region 4: Australia, New Zealand, Middle and South America, South Pacific Ocean Islands/ Oceania • Region 5: Russia, Mongolia, India, Middle Asia, Eastern Europe, North Korea, North Africa, North-West Asia • Region 6: Mainland China • ALL: All regions |
DVD/CD AUDIO-BETRIEB
High Performance 24 Bit / 192 kHz Abtastrate, Multi-Bit Sigma-Delta Modulator Video
1 Vp-p (NTSC)
Thank you for choosing a Audiovox product. We hope you will find the instructions in this owner's manual clear and easy to follow. If you take a few minutes to look through it, you'll learn how to use all the features of your new Audiovox VME 9325 BTA Mobile Multimedia Receiver for maximum enjoyment.
Preparation 3
Optionalequipment 4
Warning 4
Installation 5
Wiring Diagram 8
Controls and Indicators 9
Remote Control 11
14
Setup Menu 15
Tuner Operation 19
DVD/VCD Video Operation 22
DVD/CD Audio Operation 27
MP3/USB/WMA/Operation 29
iPod 31
Information DivX 33
Troubleshooting 34
Care and Maintenance 36
Specifications 37
Warranty Card
PREPARATION
Congratulations on your purchase of the Audiovox VME 9325BTA Mobile Multimedia Receiver.
It's a good idea to read all of the instructions before beginning the installation. We recommend having your Audiovox VME 9325BTA installed by a reputable installation shop.
Features
DVD
- Aspect Ratio - Cinema, Normal and OFF (Standby)
- Fast Forward, Fast Reverse - 2X, 4X, 8x and 20X
- Slow Forward, Slow Reverse - 2X, 4X, 8x and 20X
- Play, Pause, Stop, Next Chapter and Previous Chapter
CD / MP3 / WMA
- CD-Text Compatible
- ID3 Tag Compatible
- Directory Search (MP3 / WMA Only)
- Direct Track Access via Remote control
- Burn Up To 1500 MP3 and WMA Files onto a DVD+R /RW
- Audible Forward / Reverse Track Search
- Random, Repeat and Intro
- Play, Pause, Stop, Next Track and Previous Track
AM-FM-RDS
USA/Europe/Latin America/Asia Frequency Spacing
30 Station Presets (18 FM, 12 AM)
- Auto Stereo/Mono
- Local/Distance
- Auto Store/Preview Scan
- RDS (Radio Data System)
Chassis
- 2.0 DIN (Import / ISO-DIN Mountable)
- 16cm / (6.2") TFT Active Matrix LCD w/ Anti-Glare Coating
-1,152,000 Sub Pixels (800Wx3(W) X 480H) - Beep Tone Confirmation (On-OFF Option)
- Heat Management System - Forced Air Cooling to keep the chip sets operating at nominal temperatures
- USB 1.0 (500 mA max.)
General
- Navigation Ready (NAV101 or NAV102)
44-Key Infrared Remote Control - One Composite Video Output for Additional Screens
- One Audio / Video Auxiliary Input for Game Console, Camcorder, Navigation, etc.
- Three-Band Tone control (Bass, Mid and Treble) w/ seven Preset EQ Curves
- Front, Rear and Subwoofer Line Output
- Subwoofer filter 80/120/160 Hz
- Programmable Volume Control
- Rear Camera Input (Normal and Mirror Image View)
- Touch Screen Calibration Mode
- 100-Ohm Preamp Line Output - All Audio Channels
2VRMS Line Output - All Channels - Rotary Encoder Audio Control
DivX® certification Home Theater Version 3.0
Optional Equipment
- NAV101/NAV102
The VME 9325 BTA is "navigation ready." Before accessing any navigation features, you must purchase and install the NAV module. All installation and operating instructions will be included with the NAV navigation module. Once the NAV is connected and operating properly, the NAV source mode will become active. While the NAV is not installed, the NAV option appears gray, indicating the function is not available.
Rear Camera
The VME 9325 BTA is "camera ready." Before accessing any camera features, you must purchase and install a rear video camera. Once the rear camera is connected and operating properly, the CAMERA source mode will become active. While the camera is not installed, the CAMERA option appears gray, indicating the function is not available.
- BTM10
Before you can connect to a Bluetooth enabled device, you must purchase and install the Audiovox BTM10.
- J-Link 4 cable
For iPod video or photo playback, you must purchase the Audiovox jLink 4 (USB and 3.5mm jack to 30-pin iPod connector) cable.
Disconnecting the Battery
To prevent a short circuit, be sure to turn off the ignition and remove the negative (-) battery cable prior to installation.
NOTE:
If the VME 9325 BTA is to be installed in a car equipped with an on-board drive or navigation computer, do not disconnect the battery cable. If the cable is disconnected, the computer memory may be lost. Under these conditions, use extra caution during installation to avoid causing a short circuit.
WARNING! Only connect the unit to a12-volt power supply with proper grounding.
WARNING! Never install this unit where operation and viewing could interfere with safe driving conditions.
WARNING! To reduce the risk of a traffic accident (except when using for rear view video camera) never use the video display function while driving the vehicle. This is a violation of federal law.
WARNING! Never disassemble or adjust the unit.
WARNING! To prevent injury from shock or fire, never expose this unit to moisture or water.
WARNING! Never use irregular discs.
WARNING! To prevent damage to the mechanism inside this unit, avoid impact to the TFT monitor.
WARNING! Using an improper fuse may cause damage to the unit and result in a fire.
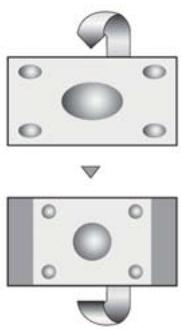
WARNING! The monitor employs an automatic motorized mechanism. To prevent damage to the core mechanism, please do not push, pull or swivel the monitor manually.
INSTALLATION
ISO DIN Installation
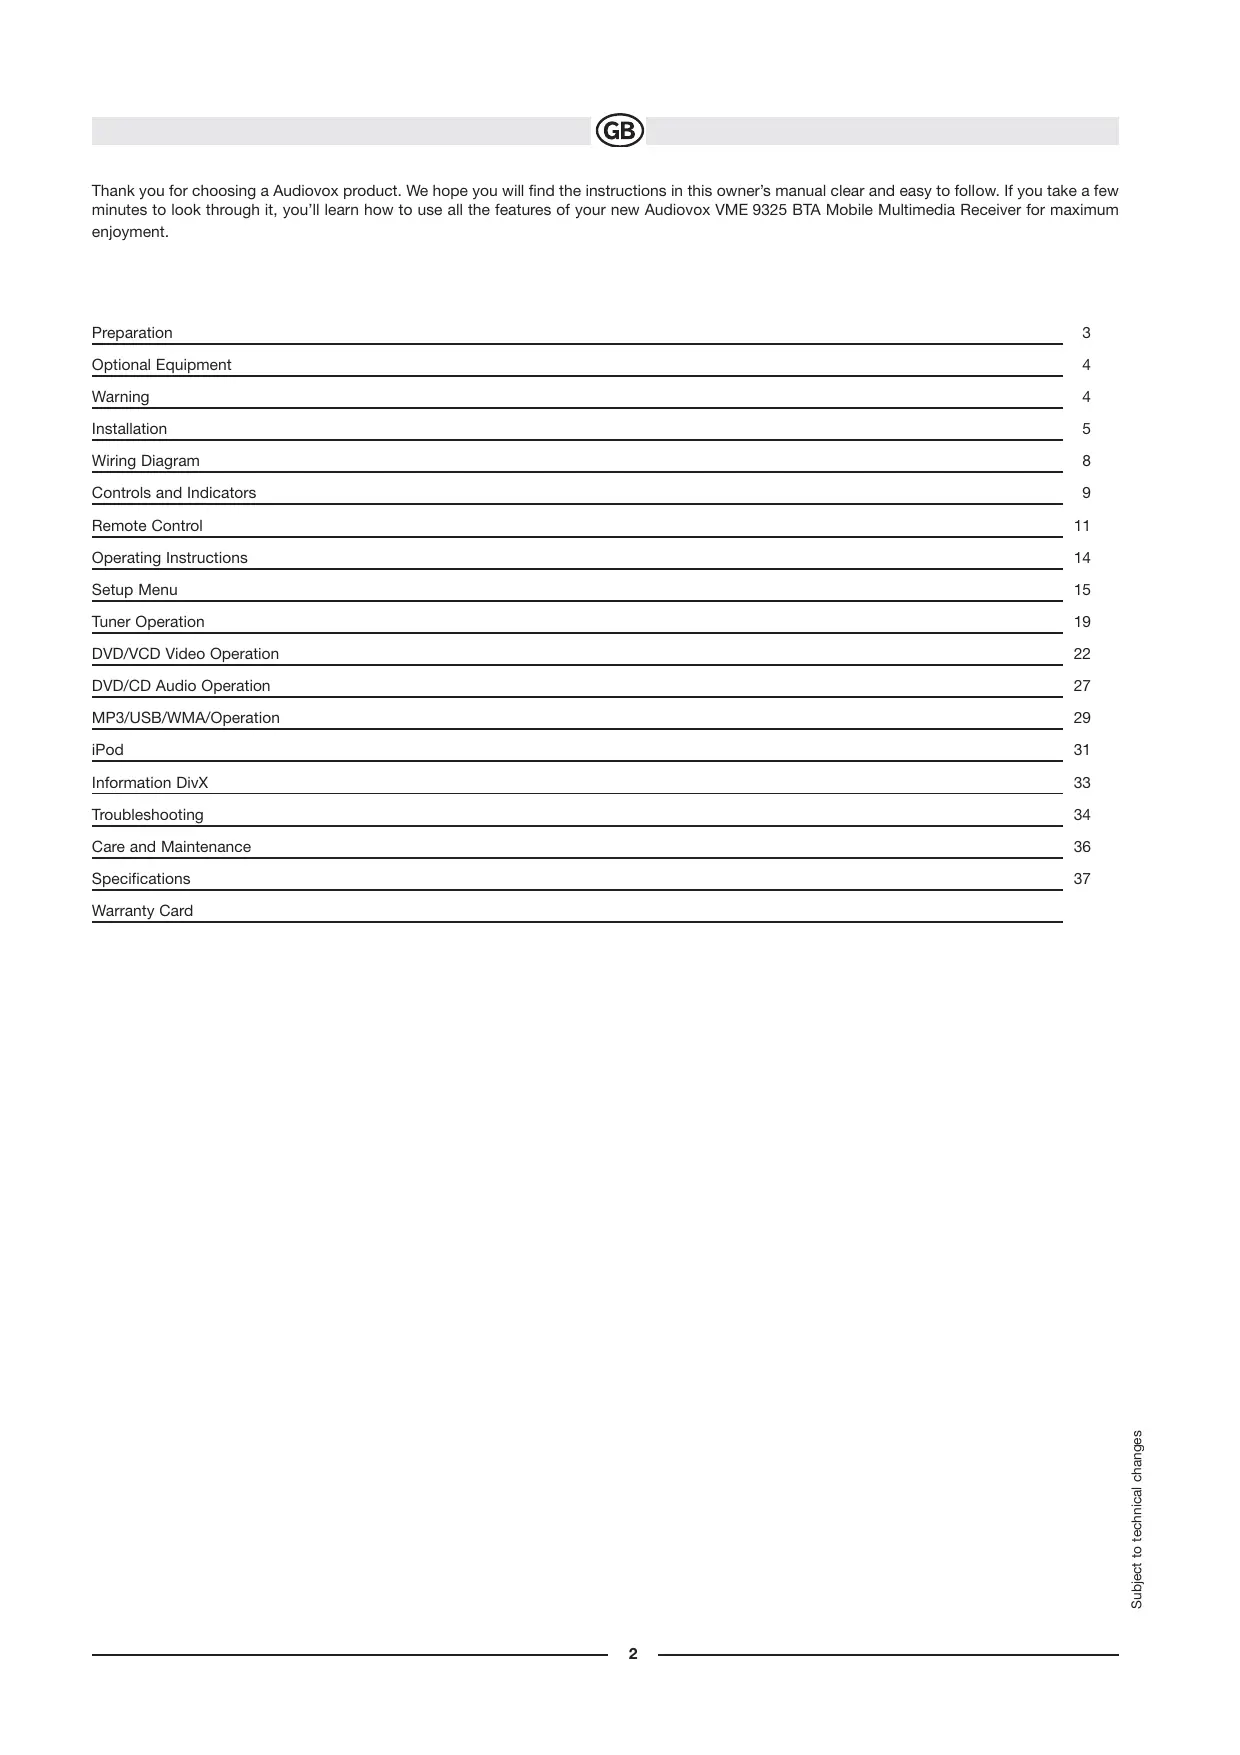
This unit is designed to fit into a 2.0 DIN dashboard opening, found in many imported cars. The unit has threaded holes in the chassis side panels which may be used with the original factory mounting brackets of some Toyota, Nissan, Mitsubishi, Isuzu, Hyundai and Honda vehicles to mount the radio to the dashboard. Please consult with your local car stereo specialty shop for assistance on this type of installation.
- Remove the existing factory radio from the dashboard or center console mounting. Save all hardware and brackets as they will be used to mount the new radio.
- Remove the four screws at the front of the radio that attach the mounting sleeve to the radio chassis (two at the top and two at the bottom). Remove the Half Sleeve.
- Remove the factory mounting brackets and hardware from the existing radio and attach them to the new radio.
CAUTION: Do not exceed M5 X 6MM screw size. Longer screws may touch and damage components inside the chassis.
-
Place the radio in front of the dashboard opening so the wiring can be brought through the dash. Follow the wiring diagram carefully and make certain all connections are secure and insulated with wire nuts or electrical tape. After completing the wiring connections, plug the ISO connectors into the mating sockets on the rear of the chassis. Turn the unit on to confirm operation (vehicle ignition switch must be "on"). If the unit does not operate, re-check all wiring until the problem is corrected.
-
Mount the new radio assembly to the dashboard o center console using the reverse procedure in step 1.
CAUTION: For proper operation of the CD player, the chassis must be mounted within 30^ of horizontal. Make sure the unit is mounted within this limitation.
NOTE: It is the end-users responsibility to install and operate this unit in a manner in accordance with local, state and federal laws. The PARKING BRAKE wire MUST BE CONNECTED as directed in the manual.
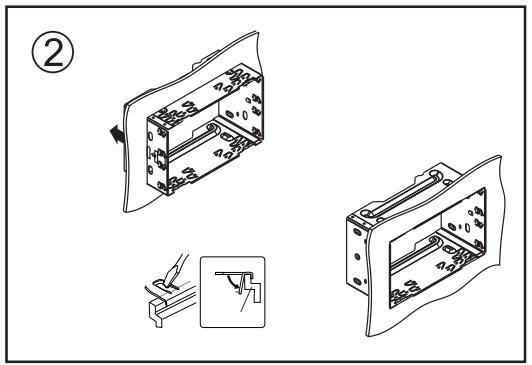
Using the Cosmetic Trim Ring
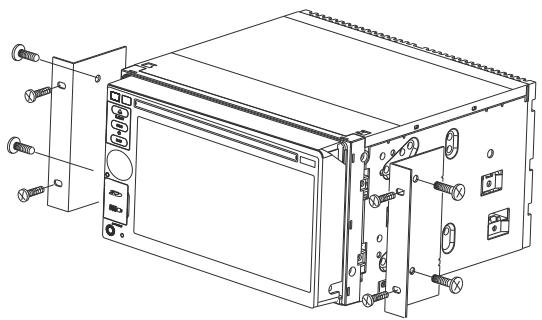
- Install the sleeve.
a. Install adapter if necessary (optional).
b. Install sleeve into adapter or dashboard (use only the supplied screws). Do not force the sleeve into the opening or cause it to bend or bow.
c. Locate the series of bend-tabs along the top, bottom and sides of the mounting sleeve. With the sleeve fully inserted into the dashboard opening, bend as many of the tabs outward as necessary so that the sleeve is firmly secured to the dashboard.
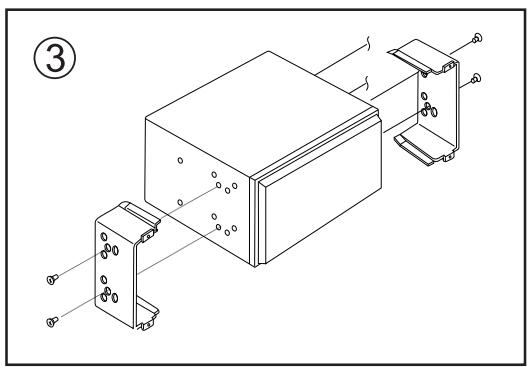
2.Use the M5 x 6 screws (provided) to install the mounting brackets to each side of the radio using the holes indicated below.
- Place the radio in front of the dashboard opening so the wiring can be brought through the mounting sleeve.
CAUTION! Be careful not to damage the car wiring.
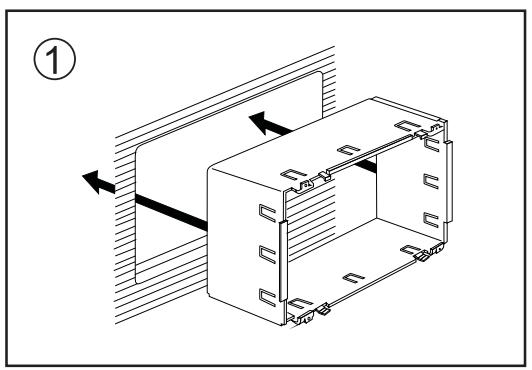
- Complete wiring as illustrated in the wiring diagram on page 8. Once the wiring is complete, reconnect the battery negative terminal. If there is no ACC available, connect the ACC lead to the power supply with a switch.
After completing the wiring connections, turn the unit on to confirm operation (ignition switch must be on). If unit does not operate, recheck all wiring until problem is corrected. Once proper operation is achieved, turn off the ignition switch and proceed with final mounting of the chassis.
- Connect wiring adapter to existing wiring harness.
- Connect antenna lead.
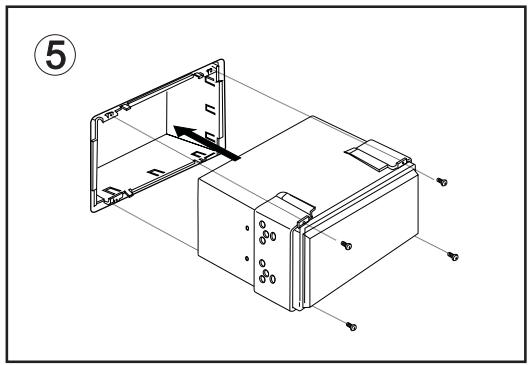
- Carefully slide the radio into the sleeve, making sure it is right-side-up, until it is fully seated and the spring clips lock it into place.
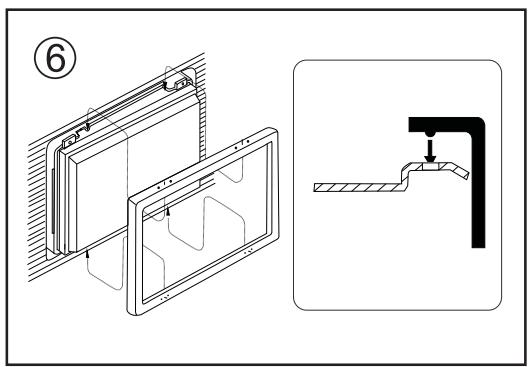
Using the Cosmetic Trim Ring
Two cosmetic trim rings are packaged with the VME 9325BTA for installation flexibility. The VME 9325BTA will fit into most import dashes with little or no modification to the dash board/cavity. Some US domestic vehicle dashes will accept a Double-DIN chassis, but there is usually a small gap between the radio and dash piece after installation is complete. In this case, use the appropriate trim ring to conceal any gaps that may be present. The 4 tabs on the trim ring will snap into four holes on top and bottom of the mounting sleeve. (Picture 6 / Page 6)
Replacing the Fuse
The fuse is located next to the wiring harness. When replacing the fuse, use a new 15A replacement fuse. Using a fuse with an improper rating could damage the unit and cause a fire.
What's in the Box
- Left and Right Double DIN Mounting Brackets
- Double DIN Sleeve
- Remote Control with Battery
- Two Custom Cosmetic Trim Rings
- Screen Cleaning Cloth
- M5x6 and M3x4 Screws to Mount Radio to Brackets
- Speaker Output Harness
- Power Input Harness
- Navigation system input harness
- Camera input harness
Tools and Supplies
You will need these tools and supplies to install your VME 9325BTA
- Torx type, flat-head and Philips screwdrivers
- Wire cutters and strippers
- Tools to remove existing radio (screwdriver, socket wrench set or other tools)
- Electrical tape
- Crimping tool
- Volt meter/test light
Crimp connections
18 gauge wire for power connections
16-18 gauge speaker wire
Wiring Diagram
IMPORTANT: Incorrect wiring connections can damage the unit. Follow the wiring instructions carefully, or 4 have the installation handled by an experienced technician.
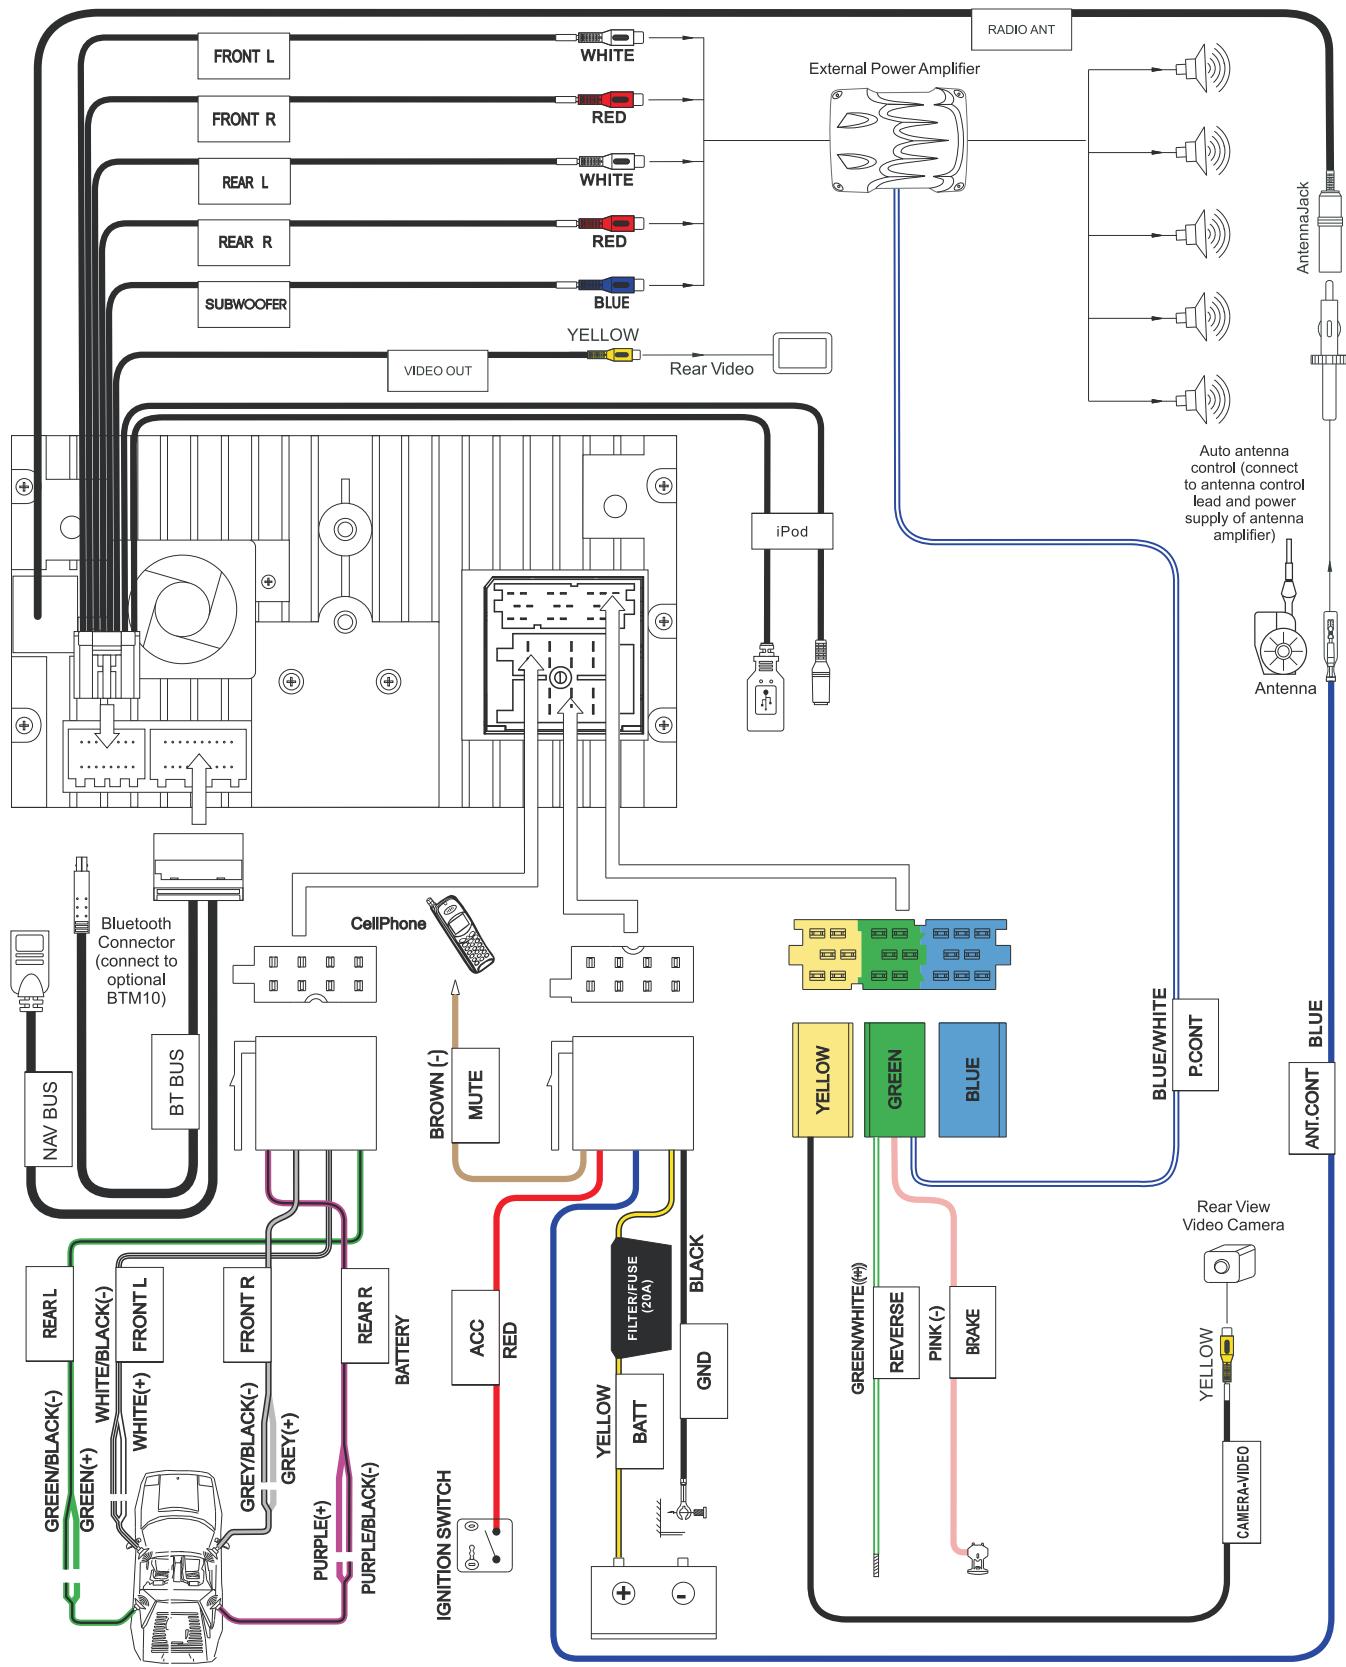
Subject to technical changes
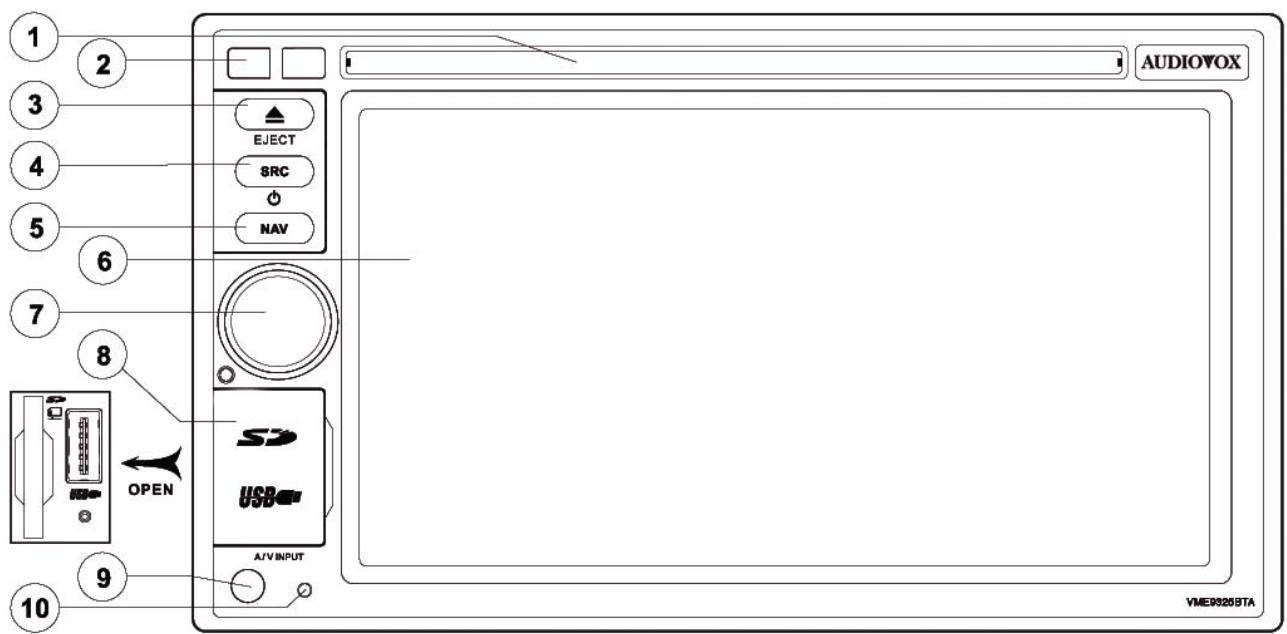
CONTROLS AND INDICATORS
Button Operation
-
Disc Slot
-
IR Remote Control Receiver
-
EJECT
Press to eject a disc. Press and hold to reset core mechanism position.
- SRC
Press to turn the unit on. Press and hold to turn the unit off. When on, press once to select playing mode.
- NAV
Press to display the navigation user interface.
-
TFT Display
-
AUDIO
Rotate to adjust the volume. Press and release to enter and/ or confirm audio settings. Press and hold to activate the Local (LOC) setting.
- USB/SD Interface Connector
NOTE:
The USB port will recognize most USB flash memory devices and portable hard drives (hard drives must be formatted to FAT32, NTFS is not supported).
If an iPod is connected to the USB1 port, "iPod" appears instead of the text "USB1". Concerning the control of the iPod see page 30.

1.Lift the protective cover to reveal the connectors.
2.Insert the USB device or SD card into the appropriate connector.
The unit will read the audio/video files automatically.
To remove the USB device or SD card, press the SRC button (4) to switch to another mode and then remove the device from the connector.
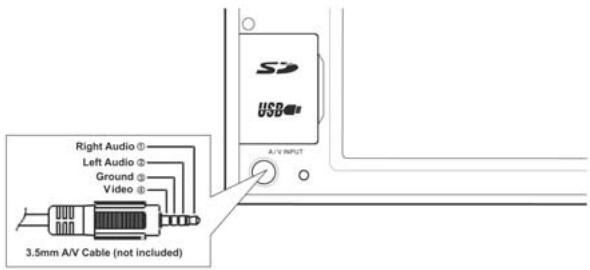
- Front AV-input
External peripheral devices, including a game console, camcorder, navigation unit, iPod, Zune, etc. can be connected to this unit via RCA output using an A/V Media Adapter Cable (not included). Connect the external device to the A/V Media Adapter Cable and then plug the cable into the A/V INPUT connector (9) on the front of the radio. You cannot directly control external devices connected to the A/V INPUT.
-
iPod/iPhone
-
RESET
Press to reset system settings to factory default (except the password and parental lock setting).
Subject to technical changes
Subject to technical changes
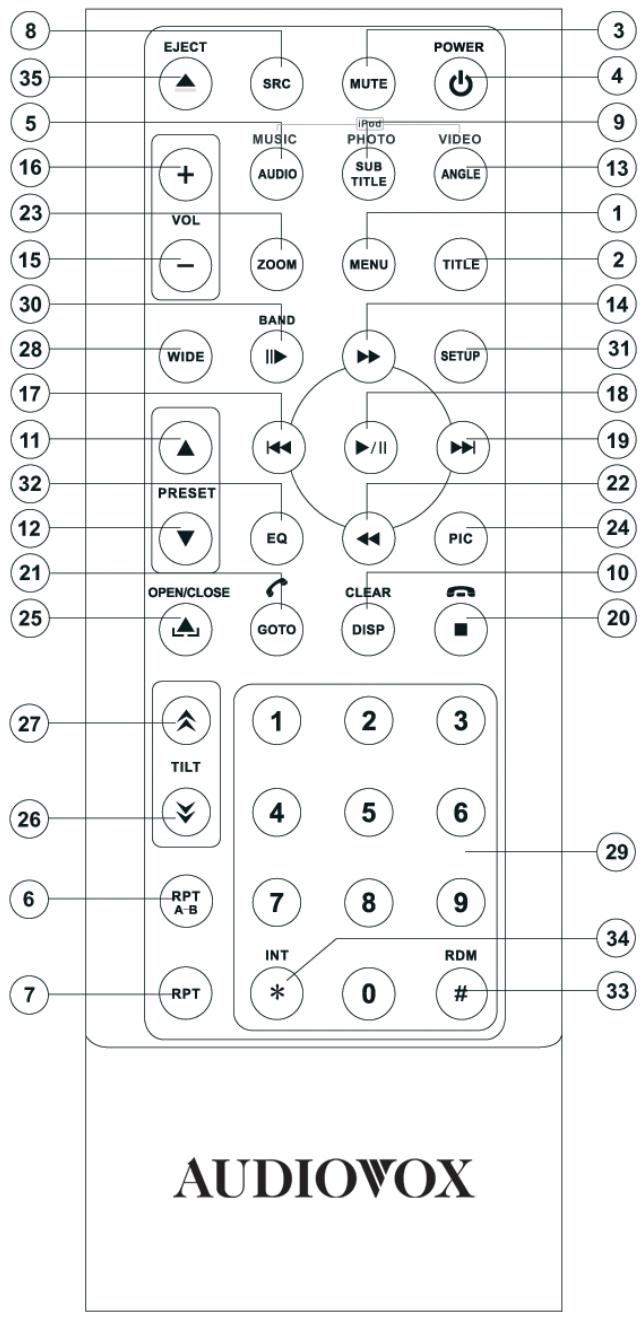
Remote Control Functions
| Name | Ref. Nr. | DVD | VCD | TUNER | CD/MP3 | USB | iPod |
| MENU | 1 | Open Route Menu Disc | Turns on/off PBC when playing VCD | ||||
| TITLE | 2 | Open Title Menu Disc | Plays first ten seconds of each chapter / title | ||||
| MUTE | 3 | Mute audio signal | Mute audio signal | Mute audio signal | Mute audio signal | Mute audio signal | Mute audio signal |
| POWER 0 | 4 | Power the unit ON/OFF | Power the unit ON/OFF | Power the unit ON/OFF | Power the unit ON/OFF | Power the unit ON/OFF | Power the unit ON/OFF |
| AUDIO | 5 | Change Audio language of disc playback | Selects MUSIC mode | ||||
| RPT A-B | 6 | Repeat from time frame A to B | Repeat from time frame A to B | ||||
| RPT | 7 | Repeats playback of current chapter | Repeats playback of current chapter | Repeats playback of current track | Repeats playback of current track | Repeats playback of current track | |
| SRC | 8 | Selects Source | Selects Source | Selects Source | Selects Source | Selects Source | Selects Source |
| SUBTITLE | 9 | Select subtitle language | Selects PHOTO mode | ||||
| DISP | 10 | Displays playing information. | Displays playing information. | Displays playing information. | Displays playing information. | Displays playing information. | Displays playing information. |
| Delete entry or move backwards to correct error in Direct Access mode | Delete entry or move backwards to correct error in Direct Access mode | Delete entry or move backwards to correct error in Direct Access mode | Delete entry or move backwards to correct error in Direct Access mode | Delete entry or move backwards to correct error in Direct Access mode | Delete entry or move backwards to correct error in Direct Access mode | ||
| PRESET ↑ | 11 | Enlarge picture at DVD/DivX or Picture | Enlarge picture | Navigates the preset station list | Navigates list | ||
| PRESET ↓ | 12 | Reduce picture at DVD/DivX or Picture | Reduce picture | Navigates the preset station list | Navigates list | ||
| ANGLE | 13 | Plays back disc in different angle for a scene | Plays back Picture CD with different angle of picture displayed | Selects VIDEO mode | |||
| >> | 14 | Fast forwards the disc content | Fast forwards the disc content | Fast forwards the disc content | Fast forwards the disc content | Accesses iPod Menu | |
| VOL - | 15 | Decrease volume | Decrease volume | Decrease volume | Decrease volume | Decrease volume | Decrease volume |
| VOL + | 16 | Increase volume | Increase volume | Increase volume | Increase volume | Increase volume | Increase volume |
| I<< | 17 | Selects the previous chapter for playback | Selects the previous chapter for playback | Searches an available radio station by decreasing tuning frequency | Selects the previous track for playback | Selects the previous track for playback | |
| >II | 18 | Pauses playback/start play-back | Pauses playback/start play-back | Pauses playback/start play-back | Pauses playback/start play-back | ||
| >>I | 19 | Selects the next chapter for playback | Selects the next chapter for playback | Searches an available radio station by increasing tuning frequency | Selects the next track for playback | Selects the next track for playback | Selects the next track for playback |
| ■ | 20 | Stop playback | Stop playback | Stop playback | Stop playback | ||
| GOTO | 21 | Activate direct access mode | Activate direct access mode | Activate direct access mode | Activate direct access mode | ||
| << | 22 | Fast rewind | Fast rewind | Fast rewind | |||
| ZOOM | 23 | Zoom IN / OUT | Zoom IN / OUT | ||||
| PIC | 24 | Brightness and Contrast adjustment | Brightness and Contrast adjustment | Brightness and Contrast adjustment | Brightness and Contrast adjustment | Brightness and Contrast adjustment | |
| OPEN / CLOSE | 25 | No function | No function | No function | No function | No function | No function |
| TILT ↓ | 26 | No function | No function | No function | No function | No function | No function |
| TILT ↑ | 27 | No function | No function | No function | No function | No function | No function |
| WIDE | 28 | Picture: CINEMA, NORMAL or Stand By | Picture: CINEMA, NORMAL or Stand By | Picture: CINEMA, NORMAL or Stand By | Picture: CINEMA, NORMAL or Stand By | Picture: CINEMA, NORMAL or Stand By | |
| 1,2,3,4,5,6,7,8,9,0 (Number Pad) | 29 | Jump directly to chosen chapter | 1-6 selects preset for current band | Directly accesses track | Directly accesses track | ||
| II> BAND | 30 | Press repeatedly for slow motion forward/backward | Press repeatedly for slow motion forward/backward | Selects FM/AM band | |||
| SETUP | 31 | Display SETUP menu | Display SETUP menu | Display SETUP menu | Display SETUP menu | Display SETUP menu | Display SETUP menu |
| EQ | 32 | Open EQ menu | Open EQ menu | Open EQ menu | Open EQ menu | Open EQ menu | Open EQ menu |
| # RDM | 33 | Playback all chapter in random order | Playback all tracks in random order | Playback all tracks in random order | Playback all tracks in random order | ||
| * INT | 34 | Plays the first ten seconds of each track | |||||
| EJECT | 35 | Eject disc | Eject disc | Eject disc | Eject disc | Eject disc | Eject disc |
Aspect RatioPress the WIDE button (28) on the remote control or WIDE/NAV button (2) on the monitor to adjust the aspect ratio as follows:
STANDBY
FULL
The entire screen is extended horizontally to the aspect ratio of
16 to 9. The extension ratio is the same at any point.
NORMAL
The conventional display image has a 4 to 3 ratio of horizontal to vertical, leaving a blank area on the right and left sides of the display.
Screen becomes black. Touch screen to resume.
Parameter Adjustment Procedure
| Playing Source | Video Output Modes |
| Radio | RGB-Modus |
| Disc | RGB-Modus |
| USB 1 | CVBS-Modus |
| USB 2 | CVBS-Modus |
| SD | CVBS-Modus |
| BT | CVBS-Modus |
| NAV | CVBS-Modus |
| AUX | CVBS-Modus |
| CAMERA | CVBS-Modus |
- Enter Picture Quality Setting Mode:
Press the PIC button (24) on the remote control or the PIC button on the monitor.
- Select Item to Set:
Press the PIC button on the control panel to select
"BRIGHT" or "CONTRAST".
- Set Parameters:
Press the +/- buttons (15, 16) on the remote or turn the rotary encoder (7) on the control panel.
- Exit Picture Quality Setting Mode:
Press the PIC button (24) on the remote control or the PIC button on the monitor
- CVBS - Composite Video Baseband Signal
Parking Brake Inhibit
- When the "PRK SW" cable is connected to the brake switch, the display on the TFT monitor will display video only when the vehicle is applied.
- Parking brake function is overridden when the video source is set to CAMERA.
- When the parking brake inhibits active, the front monitor displays "Parking Is On", preventing the driver from watching content while driving. Rear video screens are not affected.
Mute
Press the MUTE button on remote control (3) to mute the volume from the unit. Press the MUTE button again to restore the volume. "MUTE" is displayed on the LCD. Adjusting the volume or using any of the audio setup features cancels the mute function. External peripheral devices can be connected to this unit via RCA output or MediaLink. Select "AUX" mode to access and control connected auxiliary devices.
OPERATING INSTRUCTIONS
Power On / Off
Press the /SRC button (4) on the unit (or the / POWER button (4) on the remote control) to turn the unit on. The buttons on the front of the unit light up and the current mode status appears in the LCD (7).
Press and hold the button to power off the unit. The monitor is drawn back into the main compartment.
Audible Beep Confirmation
An audible beep tone confirms each function selection. The Beep tone can be disabled through the Setup menu.
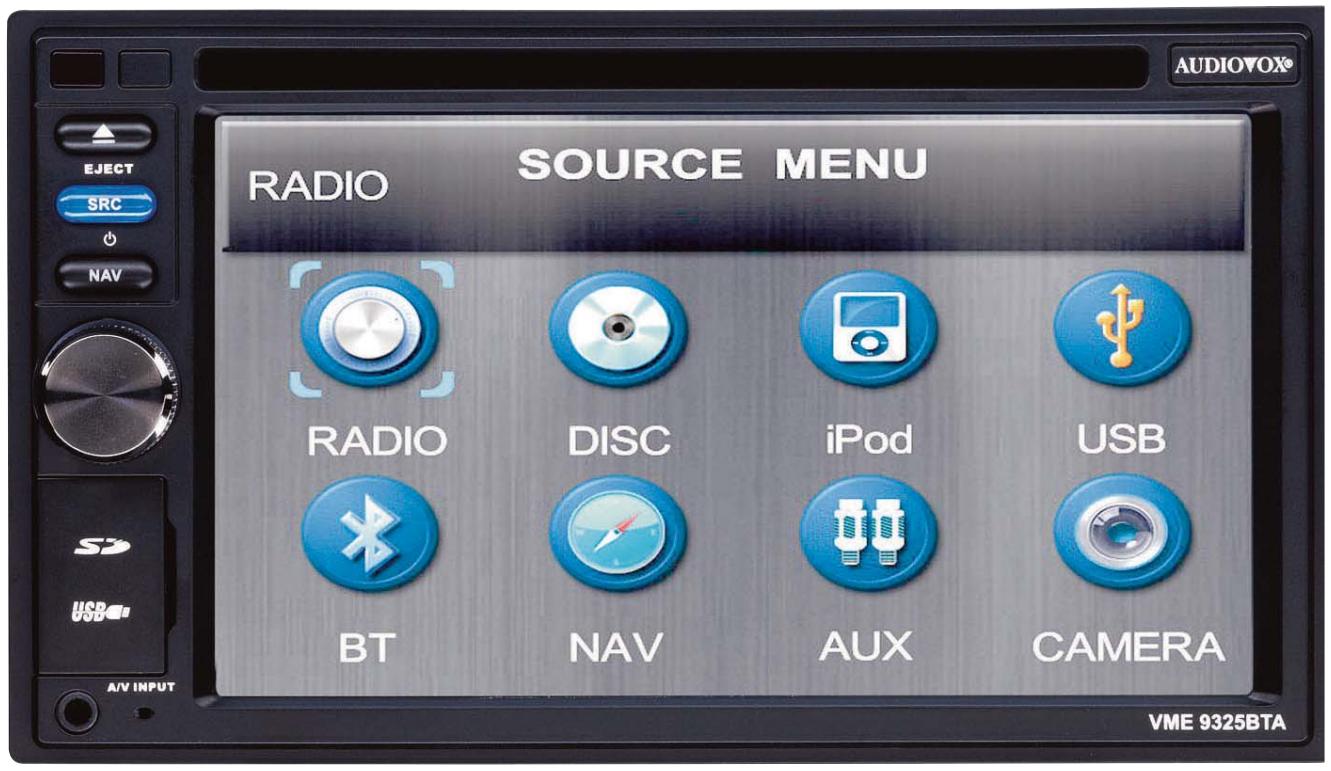
Playing Source Selection
Press the SRC button (4) on the front panel or the SRC button (8) on the remote to change between available playing sources in the following order: AM/FM/RDS, DISC, USB1, USB2, SD, AUX, CAMERA (Navigation can be selected if connected). The playing mode is displayed on the TFT and LCD screens.
Volume Adjustment
To increase or decrease the volume level, turn the rotary encoder (7) on the front panel or press the VOL+/ VOL buttons (15, 16) on the remote control. When the volume level reaches "0" or "40", a beep sounds, indicating that the adjustment limit has been reached. The volume ranges from "0" to "40". The LCD or TFT screen displays the volume level for 3 seconds.
Programmable Turn-On Volume
This feature allows the user to select a turn-on volume setting regardless of the volume setting prior to turning the unit off. To program a specific turn-on volume level, turn the rotary encoder (7) to adjust the volume to the desired turn-on volume. Push and hold the rotary encoder button while the yellow speaker icon and level indication is displayed on the screen. The unit will beep two times to confirm your turn-on volume setting.
Audio Control Menu
The Audio Control feature allows you to easily adjust your audio system to meet the acoustical characteristics of your vehicle, which vary depending on the type of vehicle and its measurements. Proper setting of the Fader and Balance boosts the effects of the cabin equalizer. Press the AUDIO button (5) on the front panel once to display the audio menu. To adjust an audio feature:
| Function | Adjustment option | |
| EQ | User | Adjustment of Bass/Mid/Treble separately available |
| Rock | By push at the “EQ”-field you can choose between the pre adjusted EQ’s | |
| Hip Hop | ||
| Dance | ||
| Latin | ||
| Rave Urban Acoustic | ||
| FAD-BAL | By push at the gridfield you can adjust the Fader/Balance accordingly. | |
System Reset
To correct a system halt or other illegal operation, use the tip of a pen to press the reset button (10) located on the front bottom-right corner of the unit. After a system reset, the unit restores all factory default settings.
NOTE: If the unit is reset while a DVD is playing, the DVD resumes play once the reset is complete.

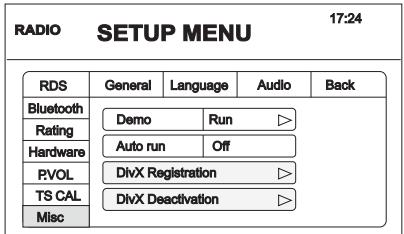
SETUP MENU
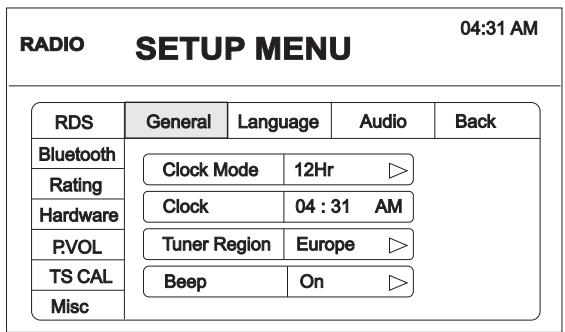
To access system settings, press the SETUP button (31) on the remote control or touch the button on the screen to enter the "SETUP" menu. The "GENERAL" sub-menu appears highlighted in blue
Accessing Menu Items
Touch the sub-menu name, press the << , >> , << , or >> direction buttons (22, 14, 17, 19) on the remote control to select a sub-menu (Language, Audio, RDS, etc.).
Adjusting a Feature
- Use the touchscreen or press the or V buttons (14, 22) on the remote control to select the feature to be adjusted.
- Enter the option field for the feature you want to adjust by using the touchscreen or pressing the > / || button (18) on the remote. A submenu appears in a second row with the selected option highlighted in blue.
- Select a new value by using the touchscreen or pressing the >> or << buttons (14, 22) on the remote control.
- Use the touchscreen or press the > / button (18) on the remote control to confirm setup.
| Setting | Options | Function |
| Clock Mode | 12Hr | Clock displays 12 hour time using AM and PM. |
| 24Hr | Clock displays 24 hour time up to 23:59. | |
| Clock | (HH:MM) | Clock appears in the top right corner of the screen and on the LCD screen during certain operations. NOTE: The AM/PM indication will change as you continue to adjust the hour past 12. |
| Tuner Region | USA | ·AM Frequency Spacing - 10kHz ·AM Frequency Band - 530kHz~1720kHz ·FM Frequency Spacing - 200kHz ·FM Frequency Band - 87.5MHz~107.9MHz |
| S.Amer1 | ·AM Frequency Spacing - 10kHz ·AM Frequency Band - 530kHz~1720kHz ·FM Frequency Spacing - 100kHz ·FM Frequency Band - 87.5MHz~108.0MHz | |
| Arabia | ·AM Frequency Spacing - 9kHz ·AM Frequency Band - 531kHz~1620kHz ·FM Frequency Spacing - 100kHz ·FM Frequency Band - 87.5MHz~108.0MHz | |
| China | ·AM Frequency Spacing - 9kHz ·AM Frequency Band - 522kHz~1620kHz ·FM Frequency Spacing - 100kHz ·FM Frequency Band - 87.5MHz~108.0MHz | |
| S. Amer2 | ·AM Frequency Spacing - 5kHz ·AM Frequency Band - 520kHz~1600kHz ·FM Frequency Spacing - 100kHz ·FM Frequency Band - 87.5MHz~108.0MHz | |
| Europe | ·AM Frequency Spacing - 9kHz ·AM Frequency Band - 522kHz~1620kHz ·FM Frequency Spacing - 50kHz ·FM Frequency Band - 87.5MHz~108.0MHz | |
| Korea | ·AM Frequency Spacing - 9kHz ·AM Frequency Band - 531kHz~1602kHz ·FM Frequency Spacing - 200kHz ·FM Frequency Band - 88.1MHz~107.9MHz | |
| Beep | On | When turned on, an audible beep tone confirms each function selection. |
| Off | No beep sounds. |
Language Sub-menu Features
If a DVD supports more than 1 Subtitle or Audio language, all the languages are available for selection during playback. If the selected language is not supported by the DVD, then the default language is used.
| Setting | Options | Function |
| Language | English Deutsch Français | On Screen Display appears in English. On Screen Display appears in German. On Screen Display appears in French. |
| Audio | English Deutsch Français | DVD Audio is heard in English when the option is available. DVD Audio is heard in German when the option is available. DVD Audio is heard in French when the option is available. |
| Subtitle | English Deutsch Français Off | DVD subtitles automatically appear in English when available. DVD subtitles automatically appear in German when available. DVD subtitles automatically appear in French when available. DVD subtitles do not appear automatically. |
| DVD Menu | English Deutsch Français | DVD menu (if applicable) is displayed in English. DVD menu (if applicable) is displayed in German. DVD menu (if applicable) is displayed in French. |
Audio Sub-menu Features
| Setting | Options | Function |
| Subwoofer | ONOFF | Turn the subwoofer on/off. |
| Loudness | ONOFF | Function |
| Sub.W-Filter | Sub Fittler 80 /120 / 160 Hz |
| Setting | Options | Function |
| RDS | ONOFF | Unit will display Radio Data System information when available. |
| CT | ONOFF | Clock timesupported by RDS |
| Manual Clocktime adjustment | ||
| TA/Vol | Volumen increasement for traffic announcements. |
Rating Sub-menu Features
The DVD system has a built-in parental lock feature to prevent unauthorized persons from viewing restricted disc content. By default, the rating system is unlocked. Once setup, the parental lock is released only by entering the correct password. Once the password is entered, rating is available for setup.
The default password is 0000.
| Setting | Options | Function |
| Password | Enter a 4-digit password to activate the “Rating” feature. | |
| Rating | 1. Kid Safe | Select the appropriate rating level for the intended audience. You may override higher ratings by using your password. |
| 2. G | ||
| 3. PG | ||
| 4. PG-13 | ||
| 5. PG-R | ||
| 6. R | ||
| 7. NC-17 | ||
| 8. Adult | ||
| Load Factory | Reset | Select “Reset” to restore the |
To reset the password, access the "RATING" menu and enter the current password. Once the correct password is entered, you can access the "Password" field and enter a new one.
NOTE: Record the password and keep it in a safe place for future reference. The rating for each disc is marked on the disc, disc packing, or documentation. If the rating is not available on the disc, the parental lock feature is unavailable. Some discs restrict only portions of the disc and the appropriate content will play. For details, please refer to the disc description.
Hardware Sub-menu Features
If the rear-view video camera is connected, the unit is on, and the TFT monitor is retracted inside the unit, the TFT monitor automatically moves into the viewing position and Camera mode is selected upon shifting into REVERSE gear. When shifting into DRIVE gear, the TFT monitor is retracted back inside unit.
| Setting | Options | Function |
| Camera In | Normal | |
| Mirror | ||
| On | The TFT panel automatically opens when the unit is turned on. | |
| Off | You must press the OPEN button (1) to open the TFT panel. | |
| Manual | When the ignition is turned OFF, the TFT panel DOES NOT retract if it was previously out. |
If the monitor is in display mode, the monitor automatically switches to CAMERA mode upon reverse driving. When the reverse driving stops, the monitor returns to its original input mode.
P.VOL Sub-menu Features
| Setting | Options | Function |
| Source | DISC | Choose a sourcefor which you would like to increase the relative volume (LEVEL). |
| RADIO | ||
| AUX 1 | ||
| AUX 2 | Use the +/- buttons to increase relative volume for specified source up to 6 deci-bels. | |
| NAV | ||
| USB |
TS Cal (Screen Calibration)
To access the "Screen Calibration" function from the SETUP menu, select the "TS CAL" option.
After entering calibration mode, a crosshair appears in a corner quadrant of the screen. To begin calibration, press and hold the crosshair for one second until it moves to the next quadrant. Continue for each quadrant until the calibration is completed.
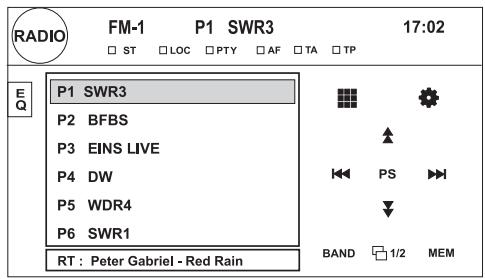
TUNER OPERATION Tuner TFT Display
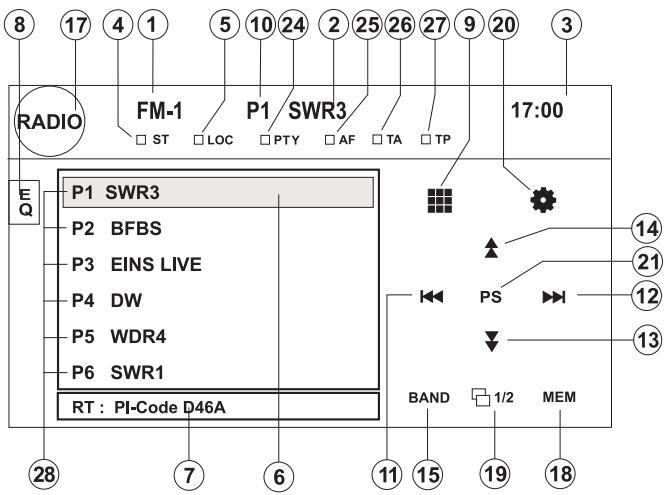
- Current radio band indicator
- Radio frequency indicator
- Clock
- Stereo broadcasting indicator
- Strong Local signal broadcasting indicator
- Preset radio stations: Touch to recall preset stations
- RDS Information: PS (Program Service), PTY (Program Type), RT (Radio Text)
- Touch for quick access to Equalizer level settings
- Touch to access the direct entry screen
- Current preset station indicator
- |<< : Touch to seek backward
-
: Touch to seek forward
- Touch to tune backward one step
- Touch to tune forward one step
- BAND: Touch to change between AM/FM bands
- AS: Touch to automatically store stations
- Touch to view the SOURCE MENU and select a new playback source
- MEM: View screen used to enter current channel into preset memory
- 1/2 or 2/2: Touch this page button to view a second page of on-screen buttons
- : Touch to view the SETUP menu
- PS (Preview Scan): Touch to scan all stations available, stopping for 5 seconds at each and continuing until a station is selected
- LOC: Touch to tune to strong local stations
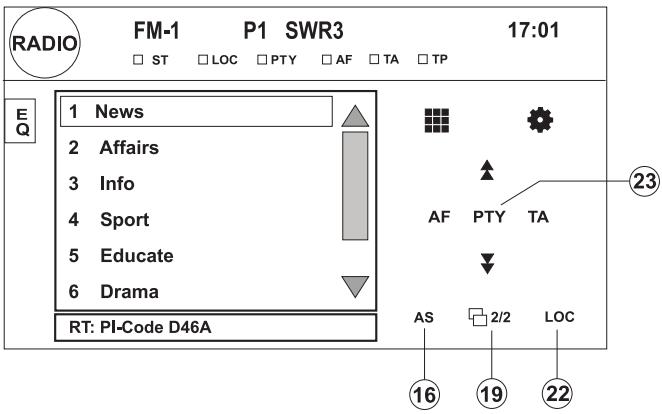
- PTY: When PTY is pressed, the Program Type categories are listed, allowing listeners to find similar programming by genre. When a PTY category is selected from the touch screen menu, the radio will start scanning for the selected category.
- Indicates the PTY function is activated
- Indicates the RDS function is activated
- TA: (Traffic Announcement) indicator
- TP: (Traffic Program) indicator
- Broadcaster information stored at the preset
Switch to Radio Tuner source
- Touch the top left corner of the screen (the RADIO circle) to view the SOURCE MENU. Touch "Radio".
- Press the SRC button (4) on the front panel or remote control (8) to switch to the AM/FM or RADIO source.
Select FM/AM Band
Touch the BAND button (15) on the screen, or press the BAND button on the unit (4) or remote control (20) to change between the following bands: FM1, FM2, FM3, AM1, and AM2
NOTE: The BAND button on the unit only works when the TFT is closed.
Seek Tuning
To seek the next higher station:
- Touch the >>| button on screen.
- Press the >> button (19) on remote control.
To seek the next lower station:
- Touch the |<<| button on screen.
- Press the |<< button (17) on the remote control.
Manual Tuning
To increase or decrease the tuning frequency one step:
- Touch the or buttons on screen.
- Press the >> or << buttons (14, 22) on the remote control.
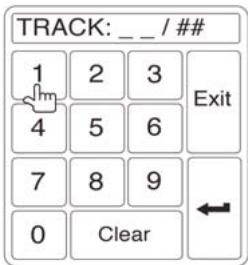
Direct Tuning
To enter a radio station directly, touch the button.
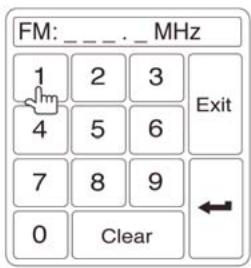
Enter the desired radio station using the on-screen numberpad. Press the enter button (arrow) to tune to the selected station. To exit the screen without changing the station, touch Exit. To clear your entry and start over, touch Clear.
Using Preset Stations
Six numbered preset buttons store and recall stations for each band. All six stored stations (P1-P6) for the current band appear on the screen.
Storing a Station
- Select a band (if needed), then select a station.
- Touch the on-screen MEM button (18) to open the preset screen.
- Touch the preset number in which you would like to store the current station (or press EXIT to cancel and close the menu). The preset number and station appears highlighted.

Recalling and Storing broadcaster using the presets and the Automatic Storing ( AS) Function:
Recalling a Station
- Select a band (if needed)
- Touch an on-screen button (P1- P6) to select the corresponding stored station.
Manual Storing of a Station
- Please manual tune to the desired broadcaster (Frequency)
- Push the MEM on-screen button and then select the desired preset (P1- P6)
- The broadcaster will be stored at the selected one
- Instead of the frequency the Program Service ID (i.e. BBC) will be stored
Automatic Storing (AS) of the strongest Stations
- Push the Automatic Storing (AS) on-screen button for 2 seconds
- The VME start scanning the available broadcasters (which take a while)
- Once scanning is finished the 6 strongest ones will be stored at P1- P6
- During Automatic Storing (AS) only the frequencies will be stored at P1- P6 to decrease the scanning/ storing time
- If you now manually select P1- P6, then the PS information will be finally stored for the selected preset (i.e. P2: BBC)
Radio Text message bar
- The Radio Text (RT) information is a part of the RDS signal which is supplied by the broadcaster. This information will be shown at the lower bar (i.e. ABCD)
- Not all broadcaster support this additional information or all the time
Preview Scan (PS)
To scan the AM or FM band for a preview of available stations in your particular area, touch the 1/2 button to access the second screen of menu options touch the PS button (21). Touch again to stop preview scan.
Local Radio Station Seeking (LOC)
When the Local function is on, only radio stations with a strong local radio signal are played. To activate the Local function in AM/FM tuner mode, touch the 1/2 button to access the second screen of menu options, and then touch the onscreen LOC button. Touch the LOC button again to turn Local off. When the Local function is active, the LOC indicator at the top of the screen is illuminated.
NOTE: When properly installed, DVD video cannot be displayed on the main TFT screen unless the parking brake is applied. If you attempt to play a DVD while the vehicle is moving, the TFT screen displays "PARKING" with a blue background. Rear video screens, if applicable, will operate normally.
Insert/Eject Disc
Upon inserting a DVD disc, DVD mode is entered and disc play begins.
NOTE: If Parental Lock (Rating) is activated and the disc inserted is not authorized, the 4-digit code must be entered and/or the disc must be authorized (see “General Sub-menu Features” on page 24).
You cannot insert a disc if there is already a disc in the unit or if the power is off.
NOTE: DVD-R and DVD-RW will not play unless the recording session is finalized and the DVD is closed.
Ejecting a Disc
Press the button (11) on the unit or remote control (35) to eject the disc. The unit automatically reverts to Tuner mode.
You may eject a disc with the unit powered off. The unit will remain off after the disc is ejected.
Reset the Loading Mechanism
If the disc loads abnormally or an abnormal core mechanism operation occurs, press and hold the button (11) on the unit or remote control (35) to reset the loading mechanism. Normal operation resumes.
Accessing DVD Mode
To switch to DVD mode when a disc is already inserted, press the SRC button (4) on the front panel or remote control (8) until "DISC" appears at the bottom of the screen.
ControllingPlayback
To access the on-screen controls, touch the screen. Touch the 1/2 button to view a second page of controls.
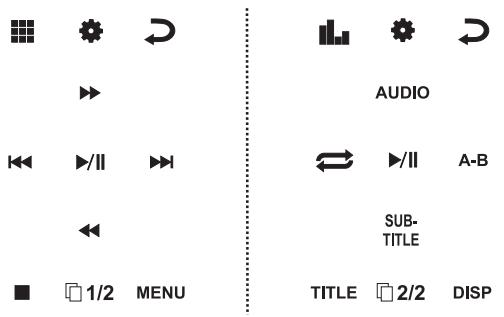
Stopping Playback
Touch the stop button (■) on the screen or press the / BAND button (20) on the remote control to stop DVD play.
Pausing Playback
Touch the pause button (||) on the screen (or press the > / || button on the remote control) to suspend disc playback. Press the > button on the screen to resume disc playback.
Slow Motion Playback
Press the << button (22) on the remote control or the << button on the screen to play the current title in slow motion. Keep pressing and releasing the button to increase the rate from "2X" to "4X", "8X", and "20X". Press > / (18) on the remote control or touch the onscreen play button (> ) to resume normal play.
Fast Forward Playback
Press the >> button (14) on the remote control or the >> button on the screen to fast forward. Keep pressing and releasing the button to increase the rate from "2X" to "4X", "8X", and "20X".
Press > / (18) on the remote control or touch the onscreen play button (> ) to resume normal play.
Repeat Playback
Press the REPT button (7) on the remote control or the button on screen to alter repeat mode according to the following:
DVD: Repeat Chapter, Repeat Title, Repeat Off
VCD (PBC Off): Repeat Single, Repeat Off
NOTE: For VCD play, the repeat function is not available if PBC is on.
Sectional Repeat Function (A-B)
Use the A-B function to define a specific area of a disc to repeat.
- Press the RPT A-B button (6) on the remote control (or the A-B button on screen) to set the start point (A) of the repeated section.
- Press the RPT A-B button again once you reach the desired end point (B) of the repeated section. The selected portion of the DVD will now repeat continuously.
- Press the RPT A-B button again to cancel the A-B section setting and stop repeat play.
NOTE: When a VCD is playing with PBC turned "On", activating random playback automatically turns PBC off.
Random Playback
With a DVD, VCD, or CD playing, press the RDM button (33) on the remote control to activate random playback and play all chapters/tracks in random order. "On" appears on the screen. Press the >>| button (19) on the remote control to play the next random track. Press the RDM button again to turn random play off.
NOTE: When a VCD is playing with PBC turned "On", activating random playback automatically turns PBC off.
Accessing the DVD Menu
Press the MENU button (1) on the remote control to recall the main DVD menu.
Press the TITLE button (2) on the remote control or on screen to select a different title for playback.
Press the > / button (18) on the remote control to confirm your selection and begin playback. You can also select a title using the touch screen.
Moving Through Chapters
Press the >>| button (19) on the remote control or the >>| button on screen to advance to the next chapter on the DVD. Press the | button (17) on the remote control or the | button on screen to move to the previous chapter.
Goto Search
During DVD or VCD playback, perform the following steps to use the GOTO feature to access a specific location on a disc:
- Press the GOTO button (21) on remote control to enter "GO TO" mode.
-
Press the >> or << buttons (14, 22) on the remote control to select a category (highlighted in blue).
-
For DVD mode, you can choose Time or Title/ Chapter search.
-
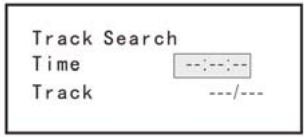
For VCD mode, press the GOTO button to choose between Track Search, Disc Search and Exit.
VCD Track Search
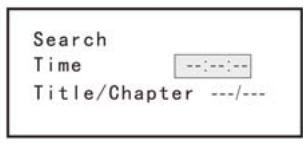
DVD Search
Time - Go to specific time in current title
Title/Chapter - Go to specific time in a chapter
Time - Go to specific time in the current track
Track - Go to specific track
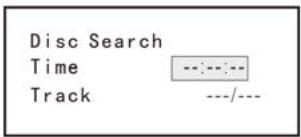
VCD Disc Search
Time - Go to specific time on disc
Track - Go to specific track
Direct Chapter / Track Selection
Remote Control Direct Entry
During DVD, VCD and CD playback, you can use the numeric keypad on the remote control (29) to access a track directly.
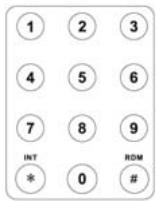
- Enter a time into the field using the numeric keypad (29) on the remote control.
- Press the > / button (18) on the remote control to go to the specified location on the disc.
- Press the GOTO button again to exit.
Touch Screen Direct Entry
To select a chapter/track directly, touch the button on screen control to display the direct entry menu.
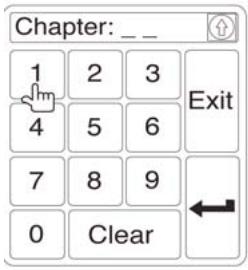
Enter the desired chapter/track using the on-screen number pad. Press the enter button (arrow) to tune to the selected station. To exit the screen without changing the station, touch Exit. To clear your entry and start over, touch Clear.
Viewing an Alternate Picture Angle (DVD Only)
Some DVDs contain scenes that have been shot simultaneously from different angles. For discs recorded with multiple angles, press the ANGLE button (13) on the remote control to toggle available angles of the on-screen image.
Zooming
Press the ZOOM button (23) on the remote control to enlarge and pan through the video image using the following options: “Q1”, “Q2”, “Q3”, and “OFF”.
Multi-Language Discs (DVD Only)
Changing Audio Language
If you are watching a disc recorded in multiple languages, press the AUDIO button (5) on the
remote control to choose a language.
Changing Subtitle Language
If you are watching a disc recorded in multiple languages with subtitles, press the SUBTITLE button (9) on the remote control to choose the language in which you would like the subtitles to appear.
NOTE: During VCD playback, press the AUDIO button (5) on the remote control to choose between Left Channel, Right Channel, and Stereo.
PBC (Play Back Control - VCD Only)
For VCDs with play back functionality, play back control (PBC) provides additional controls for VCD playback.
Press the MENU button (1) on the remote control to toggle the PBC function "On"/"Off". Once PBC is on, playback starts from track one of the play list.
NOTE: When PBC is activated, fast forward, slow playback, and previous/next track are available. Repeat and direct track selection are not availa-ble.
Playback Information
During DVD and VCD playback, press the DISP button on the control panel (14) or remote control (10) to display playback information on the screen, including the media playing and current playback time.
DVDPlayback Information
The following information is displayed at the top of the screen during DVD playback:
- Title: 05/08 - "05/08" indicates the fifth of 8 titles on the DVD is currently playing.
- C:2/16 - "2 / 16" indicates that the second of 16 titles on the DVD is currently playing.
00:41:28 - "00:41:28" indicates the playback time of the current title. - 2/6 Eng - The language display information indicates the second language out of 6 (English) is currently being used.
VCD Playback Information
The following information is displayed at the top of the screen during VCD playback:
VCD2.0 - Format of current disc.
- T: 6/18 - "6/18" indicates the sixth of 18 tracks on the VCD is currently playing.
00:02:18 - "00:02:18" indicates the playback time of the current track.
General Disc Information
Table 5:Disc Properties
| Symb ol | 12cm Disc Properties | Max Play Time |
| DVD VIDEO | Single side single layer (DVD-5) Single side double layer (DVD-9) Double side single layer (DVD-10) Double side double layer (DVD-18) | (MPEG 2 Method) 133 minutes 242 minutes 266 minutes 484 minutes |
| CONTRACT DISC CONTERVAL VCD | Single side single layer (VCD) | (MPEG 1 Method) 74 minutes |
| CONTRACT DISC CONTERVAL TEXT | Single side single layer | 74 minutes |
Table 6:Disc Symbols
| Symbol | Meaning | |
| ⑧ | Number of voice languages recorded. The num- ber inside the icon indicates the number of lan- guages on the disc (maximum of 8). | |
| 32 | Number of subtitle languages available on the disc (maximum of 32). | |
| 9 | Number of angles provided (maximum of 9). | |
| 16:9 LB | Aspect ratios available. "LB" stands for Letter Box and "PS" stands for Pan/Scan. In the example on the left, the 16:9 video can be converted to Letter Box video. | |
| Indicates the region code where the disc can be played. • Region 1: USA, Canada, East Pacific Ocean Islands • Region 2: Japan, Western Europe, Northern Europe, Egypt, South Africa, Middle East • Region 3: Taiwan, Hong Kong, South Korea, Thailand, Indonesia, South-East Asia • Region 4: Australia, New Zealand, Middle and South America, South Pacific Ocean Islands/ Oceania • Region 5: Russia, Mongolia, India, Middle Asia, Eastern Europe, North Korea, North Africa, North-West Asia • Region 6: Mainland China • ALL: All regions | ||
| Regional Coding:Both the DVD-Player and discs are coded by region. These region codes must match in order for the disc to play. If the codes do not match, the disc won't play. This unit's code is 2. DVD's with other region codes cannot be played in this unit. | ||
Instructions for TFT control and Insert/Eject are the same for DVD and CD operation. Please see the DVD/Disc Video Operation section for information about these topics. The VME 9325 BTA will play music or other audio files from the following disc media:
CD-DA
CD-R/RW
DVD
DVD+R/RW
DVD-R/RW
Upon inserting a disc with the TFT screen open, the disc and track title (if available), along with the track number and playing time appear on the screen.
CD Player User Interface
The on-screen indicators and touch key areas for CD playback are outlined below.
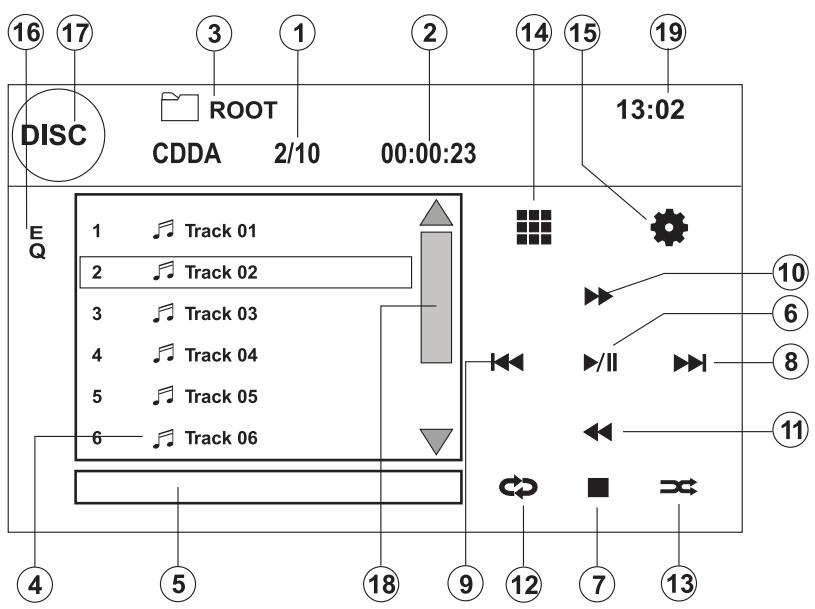
- Current track and total number of tracks on disc
- Elapsed playing time
- Current time
- Track titles
- Disc title
- II Touch to play/pause disc playback
- Touch to stop disc playback
-
|: Touch to move to next track
- |<< : Touch to move to previous track
-
: Touch to fast forward current track
- <<: Touch to rewind current track
- Touch to activate/deactivate Repeat play mode
- Touch to open sub page
- Touch to access the direct entry screen
- Touch to view the SETUP menu
- Touch for quick access to Equalizer level settings
- Touch to view the SOURCE MENU and select a new playback source
- Touch and slide to show next track or page
- Clock time
ControllingPlayback
Stopping Playback
Touch the button on screen or press the /BAND button (20) on the remote control to stop disc play.
To resume playback, touch the button on screen or press the > / || button on the remote control (18).
Pausing Playback
Touch the button on screen to suspend or resume disc playback.
Moving Through Tracks
Press the >>| button (19) on the remote control or on screen to advance to the next track on the disc. Press the | button (17) on the remote control or on screen to move to the previous track.
Repeat Playback
Touch the button on screen, press the RPT button on the remote control (7) to alter repeat mode according to the following:
DVD: Repeat Chapter, Repeat Title, Repeat Off
- CD-DA: Repeat One, Repeat All, Repeat Off
- CD-R/RW: Repeat One, Repeat All, Repeat Off
DVD-R/RW: Repeat One, Repeat All, Repeat Off
Track Scan Select (CD-DA discs only)
During disc play, press the SCN button on the remote control (34) to play the first 10 seconds of each track. When a desired track is reached, press the SCN button again to cancel the function and play the selected track.
Random Play Select
While disc play is stopped, press the RDM button on the remote control (33) to play the tracks on the disc in a random, shuffled order. Touch the RDM button again to cancel Random Play mode.
NOTE: CD-R and CD-RW will not play unless the recording session is finalized.
Fast Forward/Fast Rewind
Touch the button on screen >> to fast forward and the button << to fast rewind. Keep pressing and releasing the button to increase the rate from "2X" to "4X", "6X", "8X" and "20X"
Direct Track Entry
To select a track directly, touch the button on screen to display the direct entry menu.
Enter the desired track number using the on-screen number pad, and then press the Enter button. To exit the screen without making a selection, touch Exit. To clear your entry and start over, touch Clear.
MP3/USB/WMA-Operation
Instructions for TFT control and Insert/Eject are the same for DVD and MP3 operation. Please see the DVD/Disc Video Operation section for information about these topics.
MP3/WMA Media and File Requirements
This player allows you to play back MP3 and WMA files recorded onto CD-R/RWs, DVD+R/RWs, and DVD-R/RWs. For CD-RW discs, please make sure it is formatted using the full method and not the quick method to prevent illegal disc operation. Up to 1500 songs/files can be burned onto a disc for a MEGA DVD music mix. Do not exceed this number of songs/files or disc readability problems may occur.
MP3 Format Compatibility
The file naming formats listed below are compatible with this unit:
- ISO 9660 - file name: 12 characters, file extension: 3 characters
- ISO 9660 - file name: 31 characters, file extension: 3 characters
Joliet-64characters
If the file or folder name does not conform to ISO 9660 file system standards, it may not be displayed or played back correctly. Use the following settings when compressing audio data for your MP3 disc:
- Transfer Bit Rate: 128kbps
- Sampling Frequency: 48kHz
When recording MP3 up to the maximum disc capacity, disable additional writing. For recording on an empty disc up to maximum disc capacity, use the "Disc at once" setting.
MP3 Playing Order
When selected for play, files and folders (Folder Search, File Search or Folder Select) are accessed in the order they were written by the CD writer. As a result, the order in which they are expected to be played may not match the order in which they are actually played. You may be able to set the order in which MP3/WMA files are to be played by writing them onto a medium such as a CD-R with their file names beginning with play sequence numbers such as "01" to "99". For example, a medium with the following folder/file hierarchy is subject to Folder Search, File Search or Folder Select, as shown below.
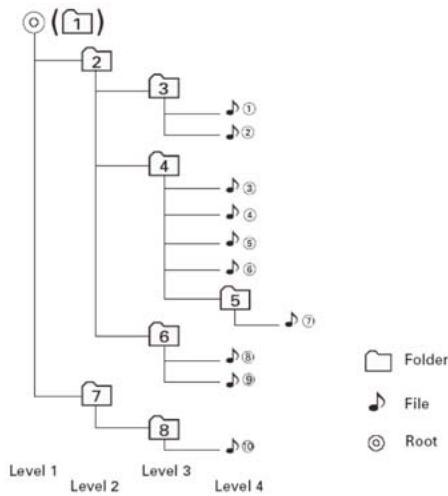
The VME 9325 BTA player will only recognize three folder levels and does not display folders containing only other folders. In the example above, the unit will display folders 3, 4, 6, and 8, but not 2 and 7 since they do not contain any tracks directly. Folder 5 is not recognized at all since it is at the fourth level.
MP3 User Interface
The on-screen indicators and touch key areas for MP3 playback are outlined below
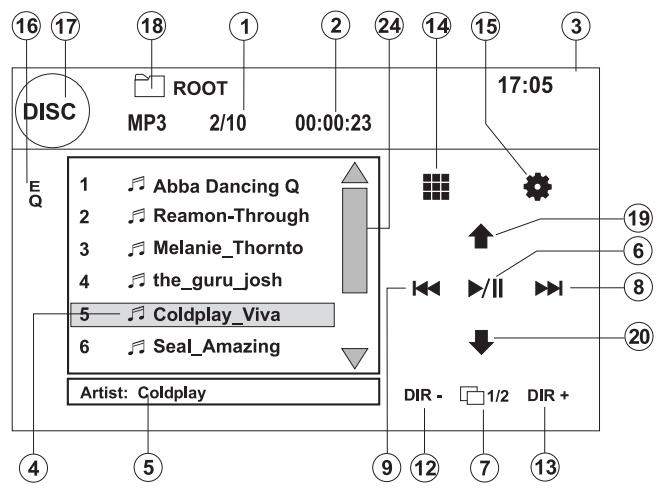
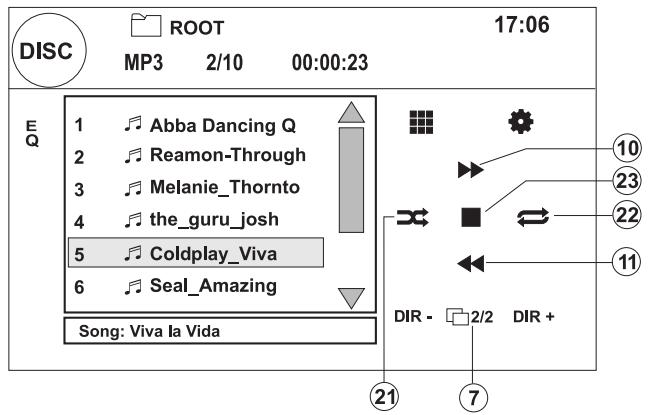
- Current track and total number of tracks on root of disc
- Elapsed playing time, track length
- Current time
- Track titles
- ID3 information
- II: Touch to play/pause disc playback
- DIR-: to previous directory
-
: Touch to move to next track
- |<< : Touch to move to previous track
-
: Touch to navigate playlist
- <<: Touch to navigate playlist
- DIR -: Touch to view the previous folder
- DIR+: Touch to view the next folder
- Touch to access the direct entry screen
- Touch to view the SETUP menu
- Touch for quick access to Equalizer level settings
- Touch to view the SOURCE MENU and select a new playback source
- Folder name
- Page Up
- Page Down
- Touch to activate / deactivate Random Playback
- Touch to activate / deactivate Repeat Playback
- Touch to stop disc playback
- Touch and slide to show next track or page
Controlling Playback
Playing MP3/WMA Files
After inserting a MP3/WMA disc, files will play in the sequence of the "Root" directory.
NOTE: When burning MP3 / WMA files onto a DVD disc, use the 2X or 4X burning option, if available. This slower burning speed will help eliminate buffer errors and increase disc reading reliability. Also, use folders when burning large numbers of songs / files to a disc for easy music navigation. Select the "Disc at Once" option and close your disc.
Stopping Playback
Touch the button on screen or press the / BAND button (20) on the remote control to stop disc playback.
To resume playback, touch the button on screen or press the > / || button (18) on the remote control.
Pausing Playback
Touch the button on screen or press the > / || button (18) on the remote control to suspend or resume disc playback.
Moving Through Tracks
Press the >>| button (19) on the remote control or on screen or to advance to the next track on the disc. Press the | button (17) on the remote control or on screen to move to the previous track.
Bluetooth operation
Detailed information how to use your BT connection you will find in the owners manual of your BTM 10.
iPod operation
NOTE: Be sure your iPod has the latest Apple firmware installed to avoid connectivity issues.
Accessing iPod Mode
This unit is Made for iPod. You can control your iPod via touch screen to access Playlist, Artist, Album, Songs, etc. Supported models include, but are not limited to, the following:
- iPod Classic
- iPod Touch 2G / 3G
- iPod Nano 3G / 4G / 5G
iPhone 3G / 3GS
Note: Viewing photos is not available when using the iPod Classic.
The unit will automatically switch to iPod mode when an iPod or iPhone is plugged into the front or rear USB connector.
NOTE: For basic iPod connectivity, you can use the white 30-pin to USB iPod cable that came with your Apple device. For iPod video or photo playback, you must purchase the jLink-USB cable.
To return to the iPod menu from any other source menu, press the SRC button (4) on the front panel or remote control (8) until the iPod menu appears on the screen. The on-screen indicators and touch key areas for iPod playback are outlined below.
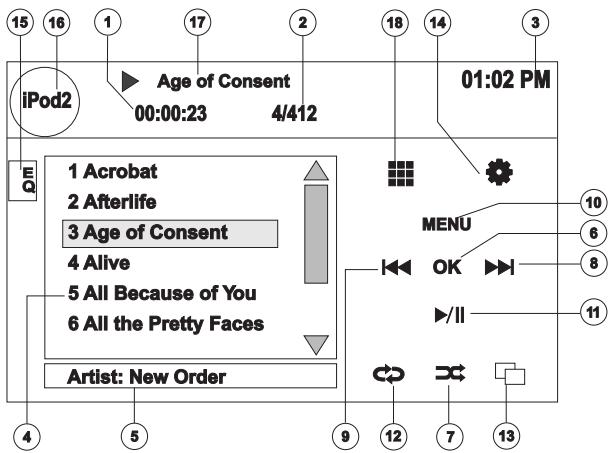
- Elapsed playing time for current file
- File number and total number of files on the disc
- Current time
- File titles
- ID3 information (Artist/Album)
- OK: Touch to "Enter"
- Touch to play all files in random order
-
l: Touch to move to next file
- I: Touch to move to previous file
- MENU: Touch to view the iPod main menu
11.: Touch to play/pause disc playback - Touch for Repeat File > Repeat Folder
- Touch to view the album art screen
- : Touch to view the SETUP menu
- Touch for quick access to Equalizer level settings
- View SOURCE MENU and select a new source
- Current file title
18.:Touch to access the direct entry screen
Controlling your iPod
Touch the MENU button or press the following remote control buttons to access the main iPod menu.
| Menu | Remote Control |
| Music | AUDIO |
| Photos | SUBTITLE |
| Videos | ANGLE |
Use the touchscreen or the directional keys on the remote control to navigate the iPod menus.
Note: Use the controls of the iPod to select and to see photos.
FilePlayback
To access files, touch the MENU button on screen until you return to the main
iPod menu and then select "MUSIC," "VIDEO" or "PHOTO" or press the
remote control button indicated in the table above.
- Touch the > / II button on screen to play/pause.
- Touch >>I on screen or press the >>I button (19) on the remote control to move to the next item on the menu.
- Touch l << on screen or press the l << button (17) on the remote control to move to the previous item on the menu.
- Use the touch screen or press the >/II button (18) on the remote control to select the highlighted menu option.
- Press the >> button (14) on the remote control or touch the MENU button on screen, to return to the previous menu.
During music playback, the following screen is displayed:
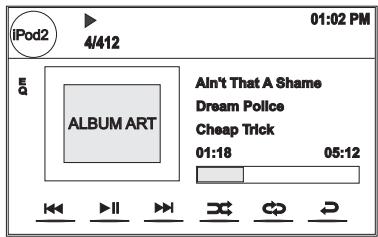
To return to the iPod music menu from the album art screen, press
- To return to the Video or Photo menu while viewing video or photo, touch the screen.
Fast Forward/Fast Reverse
Press and hold the 1<< or>>l buttons on screen or on the remote control (17, 19) for 1 second and continue to hold for fast forward or fast reverse. Release to resume normal play.
Search Playlist/Artist/Album/Song
To search through Playlists, Artists, Albums and Songs, press the MENU button (1) on the remote control while in one of the following directories: Playlist, Artist, Album or Song. The selected directory will be accessed with the number of pages and files in that directory displayed at the top of the page. To access the page or file, enter the page or file number directly from theremote control keypad. Press the I<< or >>I button (17, 19) on the remote control to select the desired song or file.
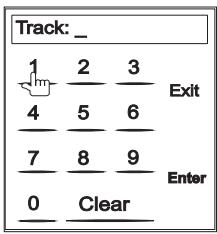
Direct Track Entry
To select a track directly, touch the button on screen control to display the direct entry menu. Enter the desired track using the on-screen number pad. Press Enter to tune to the selected station. Toexit the screen without changing the station, touch Exit. To clear your entry and start over, touch Clear.
NOTE: To transmit the video from your iPod to the VME 9325BTA screen, you must set the following options through the iPod video settings menu: TV Out = On, TV Signal = NTSC, and Widescreen = On.
NOTE: After disconnecting your iPod, the VME 9325BTA will always return to the last mode accessed when the iPod is plugged back into the unit.
Information regarding DivX®

This device is certified in accordance with DivX® Home Theater Version 3.0.
DivX® is a digital video format which has been developed by DivX, Inc. to provide a high-quality viewing experience on various platforms, for example, on mobile phones and DVD players. DivX®, DivX Certified® and associated logos are registered trademarks of DivX, Inc. and are used under licence.
Please note the online information www.divx.com/vod .
This device is able to play DivX® video files that have been recorded on CD-R/RW, DVD-R/RW and DVD+R/RW discs and USB sticks.
This device plays all versions of DivX® video (incl. DivX®7), with standard playback of DivX® media files. Unauthorized DivX® files may not play properly. File extensions such as .avi or .divx must be used properly.
You can obtain further information on DivX® video files and software tools at.
TROUBLESHOOTING
| Problem | Cause | Corrective Action |
| GENERAL | ||
| Unit will not power on | Radio Fuse blown | Install new fuse with correct rating |
| Car battery fuse blown | Install new fuse with correct rating | |
| Illegal operation | Press the RESET button located in the bottom right corner of the front panel | |
| Remote control does not function | Battery depleted | Replace battery with new one |
| Battery installed incorrectly | Remove battery and install correctly | |
| No/low audio output | Improper audio output connection | Check wiring and correct |
| Volume set too low | Increase volume level | |
| Improper "MUTE" connection | Review wiring diagram and check "MUTE" connection | |
| Speakers damaged | Replace speakers | |
| Heavily biased volume balance | Adjust the channel balance to the center position | |
| Speaker wiring is in contact with metal part of car | Insulate all speaker wiring connections | |
| Poor sound quality or distortion | Pirated disc is in use | Use original copy |
| Speaker power rating not compatible with unit | Connect proper speakers | |
| Speaker is shorted | Check speaker contact | |
| Tel-Mute malfunction | "MUTE" wire is grounded | Check that the "MUTE" connection is not grounded and that it's properly insulated |
| Unit resets itself when engine is off | Incorrect connection between ACC and positive battery wire | Check wiring and correct |
| TFT MONITOR | ||
| Monitor does not open automatically | TFT Auto Open is turned off | Turn TFT Auto Open on |
| No image | Incorrect connection to parking brake wire | Check wiring and correct |
| PRK SW is activated, parking brake is not engaged | Stop vehicle in safe place and apply parking brake | |
| Flashing image or interference appears on screen | DVD is not compatible with current TV system settings | Change setup to accommodate disc |
| Improper video signal connections | Check wiring and correct | |
| Prolonged image or improper height/width ratio display | Improper aspect ratio setup | Use correct aspect ratio setting |
| Monitor stops at incorrect position | Moving path is blocked | Press OPEN key to restart monitor movement |
| TUNER | ||
| Weak station searching | Auto antenna is not fully extended | Connect the auto antenna control cable properly |
| Auto antenna not properly connected | Connect the auto antenna control cable properly | |
| LOCAL function is activated | Turn LOCAL function Disc does not play back | |
| Disc is warped or scratched | Use disc in good condition | |
| Disc is dirty or wet | Clean disc with soft cloth | |
| Laser pickup is dirty | Clean laser pickup with cleaning disc | |
| Incompatible disc is used | Use compatible disc | |
| Disc rating exceeds Parental Lock rating limit | Change Parental Lock settings to lower restriction | |
| Disc region code is not compatible with unit | Use disc with proper region code | |
| Disc is inserted upside down | Insert disc with label side up | |
| Image blurred, distorted, or dark | Disc is illegally copied | Use original disc |
| PCB cannot be used during | VCD playback | PCB is not available on the disc |
| No repeat or searching | while playing VCD | PCB is on Turn PCB off |
| MP3 | ||
| Interruption occurred during playback | Disc is dirty or scratched | Clean disc or replace |
| File is damaged/bad recording | Recreate disc with good files | |
| Incorrect playback message displayed | Message is longer than LCD can display | |
| Message Displayed | Cause | Corrective Action |
| Loading | Disc is being read | |
| No Disc | Disc is dirty | Clean disc with soft cloth |
| Disc is upside down | Insert disc with label side up | |
| Disc not present in loading compartment | Insert disc | |
| Bad Disc | Disc is dirty | Clean disc with soft cloth |
| Disc is upside down | Insert disc with label side up | |
| Unknown disc | Disc format is not compatible with this unit | |
| Region Error | DVD is not compatible with region code of unit | |
| Error | Illegal mechanism operation | Press EJECT key for 5 seconds to reset loading mechanism |
Care and Maintenance
- Use only a clean silicone cloth and neutral detergent to clean the front panel or monitor. A rough cloth and nonneutral detergent (such as alcohol) may result in scratching or discoloration.
- Do not get water or cleaning fluids on the unit.
- If the temperature inside the player gets too hot, a protective circuit automatically stops play of the disc. If this occurs, allow the unit to cool before operating the player again.
- Never insert anything other than a 5" (12 cm) compact disc into the player as the mechanism can be damaged by foreign objects.
- Do not attempt to use a 3" (8 cm) CD-Single disc in this unit, either with or without an adaptor, as damage to the player and/or disc may occur. Such damage is not covered by the Warranty on this product.
- The CD player may not operate properly in extreme hot or cold. If such conditions occur, allow the interior of the vehicle to reach a normal temperature before using player.
- When the vehicle warms up during cold weather or under damp conditions, condensation may appear on the LCD panel. Should this occur, the screen will not operate properly until the moisture has evaporated.
- We suggest you use a cleaning disc in this unit more frequently than in the unit in your home due to the environmental conditions of the vehicle.
SPECIFICATIONS
DVD/CD Player
Compatible Disc Media:
Compatible Media Formats:
Signal to Noise Ratio:
Dynamic Range:
Frequency Response:
Channel Separation:
D/A Converter:
Video
Output:
Input:
FM Tuner
Tuning Range:
Mono Sensitivity (-30dB):
Quieting Sensitivity (-50dB):
Alternate Channel Selectivity:
Signal to Noise Ratio @ 1 kHz:
Image Rejection:
Stereo Separation @ 1 kHz:
Frequency Response:
AM Tuner
Tuning Range:
Sensitivity (-20dB):
Signal to Noise Ratio @ 1 kHz:
Image Rejection:
Frequency Response:
Monitor
Screen Size:
Screen Type:
Response Time:
DIN chassis dimensions:
Resolution:
General
Auxiliary Input impedance:
Power Supply:
Power Antenna (Blue):
USB 1.0
DVD + R / RW (Single and Dual Layer) and CD-R / RW
CD-DA, MP3, WMA, VCD, SVCD, AVI, MPEG1 / 2, XviD, DivX® and Kodak picture CD (JPEG).
95dBAA
95dB
20Hz to 20 kHz, -3dB
60dB @ 1 kHz
High performance 24-bit / 192 kHz sample rate,
Multi-Bit Sigma-Delta Modulator
1Vp-p (NTSC)
1Vp-p (PAL, NTSC /autodetection))
87.5MHz - 107.9MHz
9dBf
15dBf
70dB
58dB
80dB
30dB
30Hz - 15 kHz, -3dB
530 kHz - 1720 kHz
15uV
50dB
60dB
50Hz - 2 kHz, -3dB
16,2cm / (6,2") (Measured diagonally), 16:9 Widescreen
6.06" (154.1mm) W X 3.42" (87mm) H
High Definition TFT Liquid Crystal Display (LCD) active matrix
30mSec rise time, 50mSec fall time
7" X 7" X 2" (178mm x 178mm x 100mm)
1,152,00 sub pixels, 1440 (W) X 234 (H)
10k
11 to 16VDC, negative ground
500 mA max, current limited protection
500 mA max. current
Made for

Pod
iPh
"Made for iPod" and "Made for iPhone" mean that an electronic accessory has been designed to connect specifically to iPod or iPhone respectively, and has been certified by the developer to meet Apple performance standards. Apple is not responsible for the operation of this device or its compliance with safety and regulatory standards.
iPhone, iPod, iPod classic, iPod nano and iPod touch are trademarks of Apple Inc., registered in the U.S. and other countries.
VME 9325 BTA
AUDIOVOX®
Congratulations! You have made a wise selection in becoming the owner of a Audiovox Mobile Video equipment. Due to high
quality Audiovox products have earned an excellent reputation through the western world. And this high quality standard enables us to grant a 2-years warranty for Audiovox Mobile Video products.
The equipments are checked and tested continuously during the entire production process. In case you have problems with your Audiovox Mobile Video equipment, kindly observe the following:
- The 2-years guarantee period commences with the purchase of the component and is applicable only to the original owner.
- During the guarantee period we will rectify any defects due to faulty material or workmanship by replacing or repairing the defective part at our discretion. Further claims, and in particular those for price reduction, cancellation of sale, compensation for damages or subsequent damages, are excluded. The guarantee period is not altered by the fact that we have carried out guarantee work.
- Unauthorized tampering with the equipment will invalidate this guarantee.
- Consult your authorized dealer first, if guarantee service is needed. Should it prove necessary to return the component to the factory, please insure that the component is packed in original factory packing in good condition the quality control card has been filled out and enclosed with the component, your enclose your receipt as proof of purchase.
- Excluded from the guarantee are: • Illuminates • Wear parts • Shipping damages, either readily apparent or concealed (claims for such damages must be lodged immediately with forwarding agent, the railway express office or post office). • Scratches in cases, metal components, front panels, etc. (You must notify your dealer directly of such defects within three days of purchase.) • Defects caused by incorrect installation or connection, by operation errors (see operating instructions), by overloading or by external force. • Equipments which have been repaired incorrectly or modified or where the case has been opened by persons other than us. • Consequential damages to other equipments. • Reimbursement of cools, without our prior consent, when repairing damages by third parties • batteries and battery packs.
F
Name and address of the dealer/stamp
Käufer/Customer
Name/Name
StraBe/Street
PLZ, Ort/City
Land/Country
Kaufdatum/buying date
No warranty without receipt!
